Craving a juicy and flavorful meal? Herbed Lemon Grilled Chicken is your answer. This bright dish bursts with fresh flavors and is easy to make. I’ll guide you through simple steps, teach you about key ingredients, and share helpful tips. Whether you’re a novice or a grill pro, you’ll impress your friends and family. Let’s fire up the grill and create something delicious!
Ingredients
List of Ingredients for Herbed Lemon Grilled Chicken
To make this tasty dish, you will need:
– 4 boneless, skinless chicken breasts
– 1/4 cup olive oil
– 2 lemons (juice and zest)
– 4 cloves garlic, minced
– 1 tablespoon dried oregano
– 1 tablespoon fresh thyme leaves (or 1 teaspoon dried)
– 1 tablespoon fresh rosemary, finely chopped (or 1 teaspoon dried)
– Salt and pepper to taste
– Fresh parsley for garnish (optional)
Ingredient Substitutions
If you don’t have certain items, you can swap them out. Use chicken thighs if you prefer. You can also use any cooking oil instead of olive oil. If fresh herbs are not available, just use dried herbs. Keep in mind, dried herbs are more potent, so use less. For lemon, you can use lime juice for a different taste.
Importance of Fresh Herbs vs. Dried
Using fresh herbs makes a big difference. They add bright flavor and aroma to the chicken. Fresh herbs can make your dish feel special. Dried herbs are useful, too. They last longer and are easy to store. Just remember to adjust the amount since dried herbs are stronger. Fresh herbs give your meal a vibrant touch, while dried herbs add depth.
Step-by-Step Instructions
Preparing the Marinade
To start, grab a large mixing bowl. Add 1/4 cup of olive oil. Squeeze in the juice from 2 lemons. Don’t forget to zest those lemons too! Next, chop 4 cloves of garlic and add them in. Sprinkle in 1 tablespoon of dried oregano, 1 tablespoon of fresh thyme leaves, and 1 tablespoon of fresh rosemary. You can also use dried herbs if needed. Season with salt and pepper to taste. Whisk everything together until it blends well. This marinade is where the magic begins!
Marinating the Chicken
Now, take your 4 boneless, skinless chicken breasts. Place them in a resealable plastic bag or a dish. Pour the marinade over the chicken, making sure they get a nice coat. Seal the bag or cover the dish tightly. Refrigerate the chicken for at least 1 hour. For the best flavor, let it marinate overnight. The longer the chicken soaks, the more flavor it absorbs.
Grilling the Chicken Breast
Before you grill, preheat the grill to medium-high heat, around 375°F (190°C). Lightly oil the grill grates to stop the chicken from sticking. Take the chicken out of the marinade and shake off any extra. Discard the leftover marinade. Place the chicken breasts on the grill. Cook them for about 6-7 minutes on each side. Use a meat thermometer to check if they reach 165°F (75°C). This ensures they are safe to eat. Avoid flipping them too much; let them sear to get those nice grill marks.
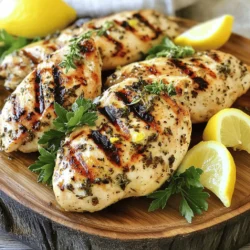
Resting and Serving the Chicken
Once cooked, take the chicken off the grill and let it rest for about 5 minutes. This keeps the juices inside, making it tender and juicy. You can garnish the chicken with fresh parsley if you like. Slice and serve it on a large platter with lemon wedges and some fresh herbs for color. Pair it with grilled veggies or a garden salad for a lovely meal. For the full recipe, check out the detailed instructions!
Tips & Tricks
Achieving Perfect Grill Marks
To get those beautiful grill marks, start with a hot grill. Preheat it to medium-high heat. Place the chicken on the grill and do not move it for the first few minutes. This helps the chicken sear and creates those nice lines. After about 6-7 minutes, use tongs to flip the chicken. You will see lovely grill marks on each side.
Recommended Cooking Temperature
The best cooking temperature for juicy chicken is 165°F (75°C). To check this, use a meat thermometer. Insert it into the thickest part of the chicken. If it reads 165°F, your chicken is safe to eat. This ensures the chicken is cooked but not dry. Trust me, juicy chicken is always better!
How to Prevent Chicken from Sticking to the Grill
To stop the chicken from sticking, oil the grill grates before cooking. Use a paper towel dipped in oil and rub it on the grates. You can also lightly coat the chicken with olive oil before placing it on the grill. This extra step helps keep your chicken intact and makes for easier flipping.

Variations
Mediterranean Twist
You can give this dish a fun Mediterranean twist. Add some feta cheese and olives for a salty kick. You can also toss in sun-dried tomatoes for a sweet touch. These flavors blend well with the lemon and herbs. Try serving it with a side of couscous or a Greek salad for a full meal.
Herb and Spice Alternatives
If you want to switch things up, use different herbs and spices. Instead of thyme, try basil or dill. For a bolder taste, add smoked paprika or cumin. You can even use a pinch of chili flakes for some heat. This allows you to personalize the chicken to your taste.
Side Dish Pairings
Pair your herbed lemon grilled chicken with tasty sides. Grilled vegetables like zucchini and bell peppers work great. You could also serve it with quinoa or rice for a filling meal. A fresh garden salad with a light vinaigrette adds a refreshing crunch. These sides enhance the juicy, flavorful chicken and make a complete dish. For more ideas, check out the Full Recipe.
Storage Info
Storing Leftover Grilled Chicken
After you finish your meal, let the chicken cool down. Place any leftovers in an airtight container. It keeps well in the fridge for up to three days. Make sure it is sealed tightly. This helps keep it fresh and safe to eat. If you want to enjoy it later, consider freezing it.
Reheating Tips for Best Flavor
To reheat grilled chicken, use the oven or stovetop. These methods help keep the chicken juicy. Preheat your oven to 350°F (175°C). Place the chicken on a baking sheet, cover it with foil, and heat for about 15-20 minutes. On the stovetop, warm it in a pan over low heat. Add a splash of water or broth for moisture. This keeps it from drying out.
Freezing and Thawing Guidelines
Freezing grilled chicken is a great option for meal prep. Wrap each piece in plastic wrap, and then place them in a freezer bag. Be sure to remove as much air as possible. This helps prevent freezer burn. The chicken can stay frozen for up to three months. When you’re ready to eat, thaw it in the fridge overnight. This keeps the texture nice and tasty. For quicker thawing, you can use the microwave, but watch it closely to avoid cooking it.
You can find the full recipe for Herbed Lemon Grilled Chicken to enjoy this delicious dish even more!
FAQs
How long should I marinate the chicken?
I suggest marinating the chicken for at least one hour. If you have time, marinate it overnight. This gives the chicken more flavor. The longer it sits, the better it tastes. Just don’t forget to keep it in the fridge.
Can I use chicken thighs instead of breasts?
Absolutely! Chicken thighs work great for this recipe. They stay juicy and tender while cooking. Thighs also have a richer flavor. Just adjust the cooking time, as thighs may take longer to cook than breasts.
What is the best way to check chicken doneness?
The best way is to use a meat thermometer. Insert it into the thickest part of the chicken. It should read 165°F (75°C) to be safe to eat. If you don’t have a thermometer, cut into the chicken. The juices should run clear, not pink.
How do I make the chicken spicy?
To add heat, mix in red pepper flakes or cayenne pepper in the marinade. Start with a small amount and taste as you go. You can also add chopped jalapeños for a fresh kick. If you like it spicy, don’t hold back! Check out the Full Recipe for more ideas.
In this blog post, we covered how to make herbed lemon grilled chicken. We explored key ingredients, marinade steps, and grilling techniques. You learned tips for perfect grill marks and recommended cooking temperatures. We also touched on variations and storage tips for your leftovers.
Remember, fresh herbs enhance flavor more than dried ones. Experiment with different spices and sides to make the dish your own. Enjoy your grilling!