Get ready to elevate your snack game with my easy cheeseburger sliders! This simple recipe packs all the classic flavors of a juicy cheeseburger into bite-sized delights. Whether you’re hosting a party or craving a quick meal, these sliders are fun to make and sure to please everyone. I’ll share tips on choosing the best beef, fun additions, and how to prevent common mistakes. Let’s get cooking!
Ingredients
Main Ingredients for Easy Cheeseburger Sliders
To make these tasty sliders, you need just a few key items. Here’s what you’ll use:
– 1 pound ground beef (80/20 blend)
– 1 teaspoon garlic powder
– 1 teaspoon onion powder
– ½ teaspoon salt
– ¼ teaspoon black pepper
– 6 slider buns
– 6 slices of cheddar cheese
These ingredients create juicy, flavorful sliders. The 80/20 beef gives you a great mix of flavor and moisture. Garlic and onion powders add depth without being too strong.
Optional Garnishes and Add-ons
You can make your sliders even better with some fun add-ons. Here are some ideas:
– Lettuce leaves
– Tomato slices
– Pickles
– Ketchup and mustard
Adding these garnishes makes each bite fresh and crunchy. You can mix and match to suit your taste. A slice of tomato adds sweetness, while pickles bring a tangy crunch.
Tips for Choosing the Best Ground Beef
When picking ground beef, look for the right blend. The 80/20 mix is best for sliders. Here are some tips:
– Choose fresh beef with a bright red color.
– Check the expiration date.
– Buy from a trusted butcher or store.
Fresh beef ensures the best taste and texture. Avoid leaner blends, as they may dry out during cooking. Always aim for quality to get juicy, delicious sliders.
Step-by-Step Instructions
Preparing the Meat Mixture
To start, gather your ingredients. You need ground beef, garlic powder, onion powder, salt, and black pepper. In a large mixing bowl, combine 1 pound of ground beef with 1 teaspoon of garlic powder and 1 teaspoon of onion powder. Add in ½ teaspoon of salt and ¼ teaspoon of black pepper. Mix gently. Avoid overworking the meat. This keeps the sliders tender.
Next, divide the meat into 6 equal parts. Shape them into small patties. Make each patty slightly larger than the slider buns. They will shrink a bit while cooking.
Cooking the Sliders
Now, it’s time to cook! Preheat your grill or stovetop skillet over medium-high heat. Once hot, place the patties on the grill. Cook the first side for about 3 to 4 minutes. Then, flip each patty over. After flipping, place a slice of cheddar cheese on top of each patty. Cook for another 2 to 3 minutes. You want the cheese to melt and the patties to reach 160°F inside.
While the patties cook, lightly toast the slider buns. You can use the grill or a toaster. This adds a nice crunch to your sliders.
Assembling the Sliders
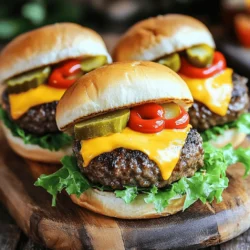
Once everything is cooked, it’s time to build your sliders. Start with the bottom half of each toasted bun. Place a cheesy patty on top. Add lettuce leaves, tomato slices, and pickles for freshness.
Finally, spread ketchup and mustard on the top half of the bun. Place it on the assembled slider. Repeat this process for each slider. Enjoy your delicious cheeseburger sliders!
For the full recipe, check out Mini Marvelous Cheeseburger Sliders.
Tips & Tricks
Common Mistakes to Avoid
When making cheeseburger sliders, avoid overmixing the ground beef. If you mix too much, the meat can become tough. Keep it simple; gently combine the spices with the beef. Another mistake is not shaping the patties correctly. Make them slightly larger than the buns. They shrink while cooking, and you want them to fit perfectly. Don’t forget to let them rest after cooking. This helps keep the juices inside.
Cooking Methods: Grill vs. Skillet
You can cook your sliders on a grill or in a skillet. Each method has its perks. Grilling gives a nice smoky flavor and beautiful grill marks. If you use a skillet, you get a nice sear and can easily control the heat. For a skillet, use medium-high heat. This heat helps to brown the outside while keeping the inside juicy. Choose the method that works best for you. Both ways make tasty sliders.
Best Practices for Melting Cheese
To melt cheese perfectly, add it to the patties just after flipping them. Cover the pan or grill with a lid. This traps the heat and helps the cheese melt faster. Choose a cheese like cheddar for a classic taste. If you want something different, try pepper jack for a spicy kick. Let the cheese become gooey before serving. This adds a great texture to your sliders. For the full recipe, check the earlier section.

Variations
Alternative Meats for Sliders
You can swap ground beef for other meats. Ground turkey is a leaner choice. It keeps the sliders moist with added spices. Ground chicken also works well and has a mild taste. You could even try ground lamb for a richer flavor. Choose the meat you like best for your sliders.
Vegetarian and Vegan Options
If you want a veggie version, use black beans. Mash them and mix in spices. You can also use lentils or chickpeas for a hearty texture. There are store-bought veggie patties too, made from beans or grains. For vegan sliders, skip the cheese and use avocado or a vegan spread.
Flavoring Ideas: Spices and Toppings
Get creative with spices in your meat mix. Try adding paprika or cayenne for heat. You can also mix in herbs like parsley or thyme for freshness. For toppings, think beyond lettuce and tomato. Add crispy onions, jalapeños, or even coleslaw for crunch. Don’t forget to explore different sauces like BBQ or spicy mayo for extra flavor.
For more details, check the Full Recipe for Easy Cheeseburger Sliders.
Storage Info
How to Store Leftover Sliders
To keep your leftover sliders fresh, place them in an airtight container. Make sure to let them cool down first. Cover each slider with plastic wrap if you want to keep them in the fridge. They will stay good for up to three days. For longer storage, consider freezing them.
Reheating Tips for Best Results
When you want to reheat your sliders, use an oven for the best taste. Preheat the oven to 350°F. Place the sliders on a baking tray, cover them with foil, and heat for about 10-15 minutes. This keeps the bread soft and the cheese melted. If you’re in a rush, use a microwave. Just heat them for 30 seconds to 1 minute, but they might get a bit soggy.
Freezing Sliders: Dos and Don’ts
Freezing sliders is easy, but do it right. Wrap each slider in foil or plastic wrap, then place them in a freezer bag. They can last for up to three months. Don’t freeze them with toppings like lettuce or tomato. These don’t freeze well and can get mushy when thawed. When you’re ready to eat, just thaw them overnight in the fridge and reheat as mentioned above. Enjoy your Easy Cheeseburger Sliders anytime!
FAQs
Can I use different types of cheese for the sliders?
Yes, you can use many kinds of cheese. Cheddar is popular because it melts well. You might try Swiss, pepper jack, or American cheese. Each type gives a unique taste. Experiment to find your favorite!
How do I make sliders gluten-free?
To make sliders gluten-free, choose gluten-free slider buns. Many stores sell these now. You can also use lettuce leaves as a wrap. This way, you skip the bread but still enjoy the burger.
What side dishes pair well with cheeseburger sliders?
Cheeseburger sliders go great with many sides! Here are some ideas:
– French fries
– Sweet potato fries
– Onion rings
– Coleslaw
– Salad
These sides add crunch and flavor to your meal.
How do I make the sliders spicier?
To spice up the sliders, add diced jalapeños to the meat mix. You can also use spicy cheese, like pepper jack. Another option is to top the sliders with hot sauce. Each choice brings heat and excitement to your meal!
Feel free to check the Full Recipe for detailed steps and tips!
You learned how to make easy cheeseburger sliders today. We discussed key ingredients and optional add-ons. You also saw how to prepare and cook sliders step-by-step. I shared tips for avoiding common mistakes. Plus, you discovered different meat options and vegetarian choices.
Always remember to store leftovers properly and reheat them for best taste. Enjoy your sliders with tasty sides or your favorite sauces. Get ready to impress friends and family with these fun bites. Happy cooking!