Dive into dessert bliss with my No Bake Biscoff Cheesecake recipe! This creamy delight combines rich cheesecake flavors with the unique taste of Biscoff cookies. I’ll guide you through simple steps and quality ingredients to create a show-stopping treat for any occasion. Whether you’re a baking pro or a kitchen novice, this cheesecake will impress. Ready to indulge? Let’s whip up this unforgettable dessert together!
Ingredients
List of Ingredients for No Bake Biscoff Cheesecake
– 200g Biscoff cookies, crushed
– 80g unsalted butter, melted
– 400g cream cheese, softened
– 100g powdered sugar
– 200ml heavy whipping cream
– 150g Biscoff spread (cookie butter)
– 1 teaspoon vanilla extract
– A pinch of salt
– Additional Biscoff cookies, for topping
Measurement Units
Using correct measurement units is key for this recipe. I recommend using grams and milliliters. This will help you get the perfect texture and taste. For example, 200 grams of cookies gives you the right crunch. If you use cups, it may not turn out the same.
Importance of Quality Ingredients
Quality ingredients matter a lot for flavor. Using fresh cream cheese makes the cheesecake creamy. The Biscoff spread enhances the taste with rich, buttery notes. I suggest using unsalted butter for the crust. This way, you control the salt in your dessert. Always choose good quality Biscoff cookies. They bring the unique taste we crave. When you use top-notch ingredients, you create a cheesecake everyone will love. For the full recipe, check out the link.
Step-by-Step Instructions
How to Prepare the Crust
To start, gather your ingredients. You need 200g of crushed Biscoff cookies and 80g of melted unsalted butter. In a mixing bowl, mix the crushed cookies with the melted butter. Stir until they blend well. Next, press this mixture firmly into the bottom of a 9-inch springform pan. This creates your crust. Make sure it’s smooth and even. After that, place the pan in the fridge while you work on the filling.
Making the Cheesecake Filling
Now, let’s make the filling. In a large bowl, take 400g of softened cream cheese. Add 100g of powdered sugar to it. Using an electric mixer, beat them together until they are creamy and smooth. Then, mix in 150g of Biscoff spread, 1 teaspoon of vanilla extract, and a pinch of salt. Blend these ingredients until fully combined. In another bowl, whip 200ml of heavy cream until stiff peaks form. Gently fold the whipped cream into the cream cheese mixture. Be careful not to deflate the whipped cream.
Assembling and Chilling the Cheesecake
Now it’s time to assemble! Pour the cheesecake filling over the prepared cookie crust in the springform pan. Use a spatula to smooth the top. Cover the cheesecake with plastic wrap and put it in the fridge. Chill it for at least 4 hours, but overnight is best for a perfect set.
Tips for Serving
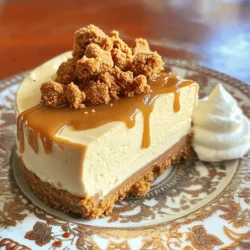
When you are ready to serve, carefully remove the cheesecake from the springform pan. For a lovely touch, top it with additional Biscoff cookies. You can slice the cheesecake and serve it on a nice plate. Add a dollop of whipped cream and drizzle some extra Biscoff spread on each slice for a special look. Enjoy your delicious creation! For the full recipe, refer back to the beginning.
Tips & Tricks
Common Mistakes to Avoid
Making a no bake cheesecake is easy, but some slip-ups can happen. Here are key mistakes to avoid:
– Overmixing the Cream Cheese: If you beat the cream cheese too much, it can become too airy. Aim for a smooth blend without extra fluff.
– Not Chilling Long Enough: Let the cheesecake chill at least four hours. If you rush this step, it won’t set properly.
– Using Warm Ingredients: Always use room temperature cream cheese and butter. Cold ingredients mix poorly and can lead to lumps in your cheesecake.
How to Achieve the Perfect Texture
To get that creamy, smooth texture, follow these tips:
– Beat the Cream Cheese First: Start with the cream cheese alone. This helps break it down before adding other ingredients.
– Fold in Whipped Cream Gently: When adding whipped cream, use a spatula. Carefully fold it in to keep the mixture light and fluffy.
– Use Quality Ingredients: The better your ingredients, the better your cheesecake will taste. Choose fresh cream cheese and high-quality Biscoff spread.
Presentation Tips for Your Cheesecake
A beautiful cheesecake makes it more tempting. Here’s how to present it well:
– Use a Sharp Knife: For clean slices, dip your knife in hot water before cutting. Wipe it between slices to keep it neat.
– Decorate with Biscoff Cookies: Add whole or crushed cookies on top for a lovely look. This adds texture and highlights the Biscoff flavor.
– Garnish with Whipped Cream: A dollop of whipped cream on each slice adds a nice touch. Drizzle extra Biscoff spread over it for extra flair.
For full instructions and ingredient details, check the Full Recipe.

Variations
Adding Flavor Variations (Chocolate, Caramel, etc.)
You can easily change up the flavor of your No Bake Biscoff Cheesecake. One fun option is to add chocolate. Just mix in melted chocolate into the cream cheese filling. Dark or milk chocolate works great. You can also swirl in some caramel sauce for a sweet touch. This adds a nice layer of flavor and makes it extra special.
Gluten-Free Options
For a gluten-free version, use gluten-free cookies. There are many brands of gluten-free cookies that taste great. Just make sure to check the label. You can also use almond flour mixed with butter for the crust. This keeps the same yummy taste while being gluten-free.
Alternative Toppings and Garnishes
Toppings can make your cheesecake even more fun. Besides Biscoff cookies, try using fresh fruit like berries. They add a nice pop of color and flavor. You can also drizzle chocolate or caramel sauce on top. For a crunchy touch, add chopped nuts or crushed pretzels. Get creative with your toppings and make each cheesecake unique!
For the full recipe, check out the details provided above.
Storage Info
Best Practices for Storing Leftovers
To keep your No Bake Biscoff Cheesecake fresh, store it in the fridge. Use an airtight container. This helps prevent drying out and keeps it tasty. If you have leftovers, cut them into slices first. This makes it easy to grab a piece later.
Freezing Tips for No Bake Biscoff Cheesecake
You can freeze your cheesecake, but it’s best to do this before serving. Wrap the cheesecake tightly in plastic wrap. Then, place it in a freezer-safe container or bag. This helps prevent freezer burn. When you’re ready to eat, thaw it in the fridge overnight.
How Long Does It Last?
In the fridge, your cheesecake can last for about 5 days. If you freeze it, it can last for up to 2 months. Just remember to check for any changes in texture or taste before enjoying leftovers. For the full recipe, make sure to follow the steps carefully for the best results!
FAQs
Can I Use Other Cookie Brands?
Yes, you can use other cookie brands. Look for cookies with a similar texture and flavor. Oreos or graham crackers can work well. Just crush them and mix with melted butter, like the Biscoff cookies.
How Do I Know When the Cheesecake is Set?
You know the cheesecake is set when it feels firm to the touch. It should not jiggle when you shake it. Chill it for at least 4 hours, but overnight is best for the best texture.
Is This Recipe Suitable for Vegetarians?
Yes, this recipe is suitable for vegetarians. It contains no meat or animal by-products besides dairy. Just check the cookie brand and the cream cheese to ensure they are vegetarian-friendly.
Can I Make It Ahead of Time?
Absolutely! Making the cheesecake a day ahead is a great idea. This allows the flavors to develop. Just keep it covered in the fridge until you are ready to serve. You can find the Full Recipe to guide you through this delightful process.
This blog post shared how to make a tasty No Bake Biscoff Cheesecake. We covered key ingredients, detailed steps, and helpful tips to avoid common mistakes. You learned how to add fun flavors and make gluten-free options. Storing and serving your cheesecake was also discussed. Remember to use quality ingredients for the best taste. Enjoy creating this easy, delicious dessert, and impress your friends!