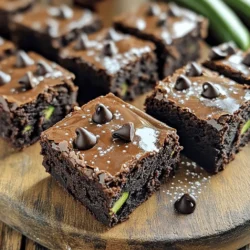
When you crave something sweet, these Dark Chocolate Zucchini Brownies hit the spot! Rich and chewy, they combine the goodness of zucchini with rich dark chocolate for a delicious treat. I’ll guide you through every step of the process, from gathering ingredients to clever storage tips. Whether you’re a novice baker or a seasoned pro, you’ll love how easy and satisfying these brownies are to make. Let’s dive in!
Ingredients
List of Ingredients
To make dark chocolate zucchini brownies, gather these simple ingredients:
– 1 cup grated zucchini (about 1 medium zucchini, excess moisture squeezed out)
– 1/2 cup coconut oil, melted
– 1/2 cup brown sugar
– 1/4 cup maple syrup
– 2 large eggs
– 1 teaspoon vanilla extract
– 1/2 cup all-purpose flour
– 1/2 cup unsweetened cocoa powder
– 1/2 teaspoon baking soda
– 1/2 teaspoon baking powder
– 1/4 teaspoon salt
– 1/2 cup dark chocolate chips (plus extra for topping)
Measuring Tips for Accurate Baking
Measuring is key in baking. Here are some tips:
– Use dry measuring cups for flour and cocoa powder. Fill to the top and level off.
– Use a liquid measuring cup for coconut oil and syrup.
– Grate the zucchini and squeeze it to remove excess moisture. This helps prevent soggy brownies.
Substitutions and Alternatives
You can swap some ingredients if needed:
– Coconut oil: Use unsalted butter or vegetable oil instead.
– Brown sugar: Use white sugar or coconut sugar for a different flavor.
– All-purpose flour: Substitute with whole wheat flour or gluten-free flour blend.
– Zucchini: You can replace zucchini with grated carrots or applesauce for moisture.
These choices can still yield delicious dark chocolate zucchini brownies. Check out the Full Recipe for more guidance!
Step-by-Step Instructions
Preparation Steps Overview
Making Dark Chocolate Zucchini Brownies is fun and easy. First, you need to gather your ingredients. You will need grated zucchini, coconut oil, brown sugar, maple syrup, eggs, vanilla extract, flour, cocoa powder, baking soda, baking powder, salt, and dark chocolate chips.
Start by preheating your oven to 350°F (175°C). This helps the brownies bake evenly. Grease an 8×8 inch baking dish or line it with parchment paper. This step keeps the brownies from sticking and makes cleanup easy.
Next, mix the melted coconut oil, brown sugar, and maple syrup in a bowl. Whisk until everything is smooth. Then, add the eggs and vanilla extract. Whisk again until the mixture is well combined.
In another bowl, mix the dry ingredients: flour, cocoa powder, baking soda, baking powder, and salt. Stir until everything is even. Now, combine the wet and dry mixtures. Add the dry mix to the wet mix gradually, stirring gently. Avoid overmixing to keep the brownies chewy.
Finally, fold in the grated zucchini and dark chocolate chips. This is where the magic happens! Pour the batter into your prepared dish and spread it evenly. If you like, sprinkle a few extra dark chocolate chips on top.
Baking Guidelines
Now it’s time to bake! Place your dish in the preheated oven and set a timer for 25 to 30 minutes. Keep an eye on it. The edges should look set, but the center might still look moist.
To check for doneness, insert a toothpick in the middle. If it comes out with a few moist crumbs, your brownies are ready. If it comes out wet, let them bake for a few more minutes.
Tips for Checking Doneness
Checking doneness is key to perfect brownies. Here are some tips:
– Look for the edges: They should pull away from the sides of the pan.
– Check the center: It should be slightly soft but not wet.
– Use a toothpick: This is the best test. Remember, some gooey bits are okay!
Once baked, let the brownies cool for about 10 minutes in the pan. Then, transfer them to a wire rack to cool completely. Enjoy your rich and chewy Dark Chocolate Zucchini Brownies! For the full recipe, check out the earlier section.
Tips & Tricks
Baking Time Adjustments for Different Ovens
Ovens can vary. Some bake hotter than others. Always check your brownies a bit early. If the recipe says 25-30 minutes, start at 25 minutes.
Use a toothpick to test. Insert it in the center. If it comes out with moist crumbs, they are done. If it comes out wet, bake for a few more minutes. This helps prevent overbaking.
How to Achieve the Perfect Texture
For rich and chewy brownies, avoid overmixing. Mix just until you see no dry flour. This keeps your brownies soft and moist.
Using freshly grated zucchini is key. It adds moisture without a strong taste. Squeeze out excess water before adding it to the mix. This helps balance the wet and dry ingredients.
Storing Leftovers for Freshness
Store your brownies in an airtight container. This keeps them fresh for up to five days. If you want to keep them longer, freeze them.
Wrap each brownie in plastic wrap, then place in a freezer bag. They can last up to three months in the freezer. To eat, thaw them in the fridge overnight.
For the full recipe, follow the steps above to enjoy these delicious treats!

Variations
Adding Nuts or Fruits
You can make your brownies even better by adding nuts or fruits. Chopped walnuts or pecans add a nice crunch. You can mix in about half a cup of nuts right before you bake them. If you love fruit, try adding chocolate chips or dried cherries. These will add sweetness and flavor. Just remember to keep the total mix under two cups. This keeps the batter balanced and moist.
Gluten-Free Options
If you want gluten-free brownies, it’s easy to switch the flour. Use almond flour or oat flour instead of all-purpose flour. You can also try a gluten-free blend. Make sure the blend has xanthan gum. This helps the brownies hold together. The texture may change a bit, but they will still be delicious. Just remember to check the baking time, as it may vary.
Vegan Substitutions
To make these brownies vegan, you can swap the eggs. Use flax eggs or applesauce. For each egg, mix one tablespoon of flaxseed meal with three tablespoons of water. Let it sit for five minutes to thicken. You can also use plant-based yogurt for moisture. Replace the coconut oil with coconut cream or a vegan butter. These changes will keep your brownies rich and chewy. For the Full Recipe, follow the original steps but with your vegan tweaks.
Storage Info
Best Practices for Storing Brownies
To keep your dark chocolate zucchini brownies fresh, store them in an airtight container. This helps maintain moisture and taste. Place parchment paper between layers if stacking. Avoid direct sunlight, as heat can dry them out. For best flavor, enjoy them within a week.
Freezing Instructions
You can freeze brownies for later enjoyment. First, let them cool completely. Then, cut them into squares. Wrap each square in plastic wrap. Place the wrapped brownies in a freezer bag or container. They can last up to three months in the freezer.
Thawing and Reheating Tips
To thaw frozen brownies, take them out and leave them at room temperature for about two hours. For a warm treat, reheat in the microwave for about 10-15 seconds. This brings back the gooey, chewy texture. Enjoy your brownies warm and fresh!
For the full recipe, check the section above.
FAQs
How do I know when the brownies are done?
You can check the brownies by using a toothpick. Stick it in the center. If it comes out with a few moist crumbs, they are done. If it’s sticky, bake a few more minutes. Keep an eye on the time. The baking time is usually 25-30 minutes. Ovens may vary, so adjust as needed.
Can I use a different type of chocolate?
Yes, you can use milk chocolate or semi-sweet chocolate. Just remember, this will change the flavor. Dark chocolate makes these brownies richer and less sweet. You can also try chocolate chunks for a fun texture. Just make sure it melts well into the batter.
What can I substitute for zucchini?
If you don’t have zucchini, you can use applesauce or mashed bananas. Both add moisture and sweetness. If you use applesauce, reduce the sugar slightly. Mashed bananas will add a nice flavor. Just make sure to keep the same amount of liquid in the batter. For the full recipe, check out the Dark Chocolate Zucchini Brownies section.
In this blog post, I covered key ingredients, precise measuring tips, and useful substitutions. I outlined easy steps for baking brownies and shared tips for checking doneness. I also provided adjustments for baking times, texture tips, and storage advice. You can explore tasty variations and options like gluten-free and vegan substitutes.
Remember, accurate measurements and careful baking are key for the best results. With these tips, you’ll create delicious brownies every time. Enjoy your baking!