Welcome to your new favorite recipe: Air Fryer Coconut Shrimp Sweet Chili Delight! I’ll show you how to make crunchy shrimp coated in coconut and panko, paired with a spicy sweet sauce. This dish brings together simple ingredients and easy steps, perfect for any meal or snack. Whether you’re hosting friends or treating yourself, this recipe is a must-try! Ready to impress your taste buds? Let’s dive in!
Why I Love This Recipe
- Easy Preparation: This recipe is straightforward and requires minimal prep time, making it perfect for busy weeknights or last-minute gatherings.
- Crispy Texture: The combination of panko breadcrumbs and shredded coconut creates a delightful crunch that contrasts beautifully with the tender shrimp.
- Flavorful Dipping Sauce: Sweet chili sauce adds a deliciously sweet and spicy kick, elevating the shrimp to a whole new level of flavor.
- Versatile Serving Options: These coconut shrimp are great as an appetizer, snack, or main dish, and they pair wonderfully with a variety of sides.
Ingredients
Main Ingredients
- 1 pound large shrimp, peeled and deveined
- 1 cup unsweetened shredded coconut
- 1 cup panko breadcrumbs
Large shrimp are the star of this dish. They give a nice, juicy bite. You want to use fresh, large shrimp, but frozen works too. Just thaw them before cooking. Unsweetened shredded coconut adds a tropical crunch. It coats the shrimp beautifully. Panko breadcrumbs add extra crisp. They make the outside light and airy.
Seasoning & Coating
- ½ cup all-purpose flour
- 2 large eggs
- 1 teaspoon garlic powder
- 1 teaspoon salt
- ½ teaspoon black pepper
- ½ teaspoon paprika
The flour helps the coating stick. It creates a base layer. Eggs act as glue for the coconut and panko. Garlic powder brings depth to the flavor. Salt, black pepper, and paprika add a nice kick. This mix makes every bite taste amazing.
Dipping Sauce and Garnish
- ½ cup sweet chili sauce
- Fresh lime wedges
- Chopped cilantro (optional)
Sweet chili sauce is perfect for dipping. It adds sweetness and heat. Lime wedges brighten the dish. A squeeze of lime lifts the flavors. Chopped cilantro gives a fresh touch. You can skip it if you don’t like cilantro.

Step-by-Step Instructions
Preparing the Shrimp
First, rinse the shrimp under cold water. This step is vital to remove any salt and unwanted bits. After rinsing, pat dry with paper towels. You want the shrimp dry so the breading sticks well. Next, set up your breading station. You will need three bowls.
1. In the first bowl, mix together the flour, garlic powder, salt, black pepper, and paprika.
2. The second bowl should have two beaten eggs.
3. In the last bowl, combine the shredded coconut and panko breadcrumbs.
Breading Process
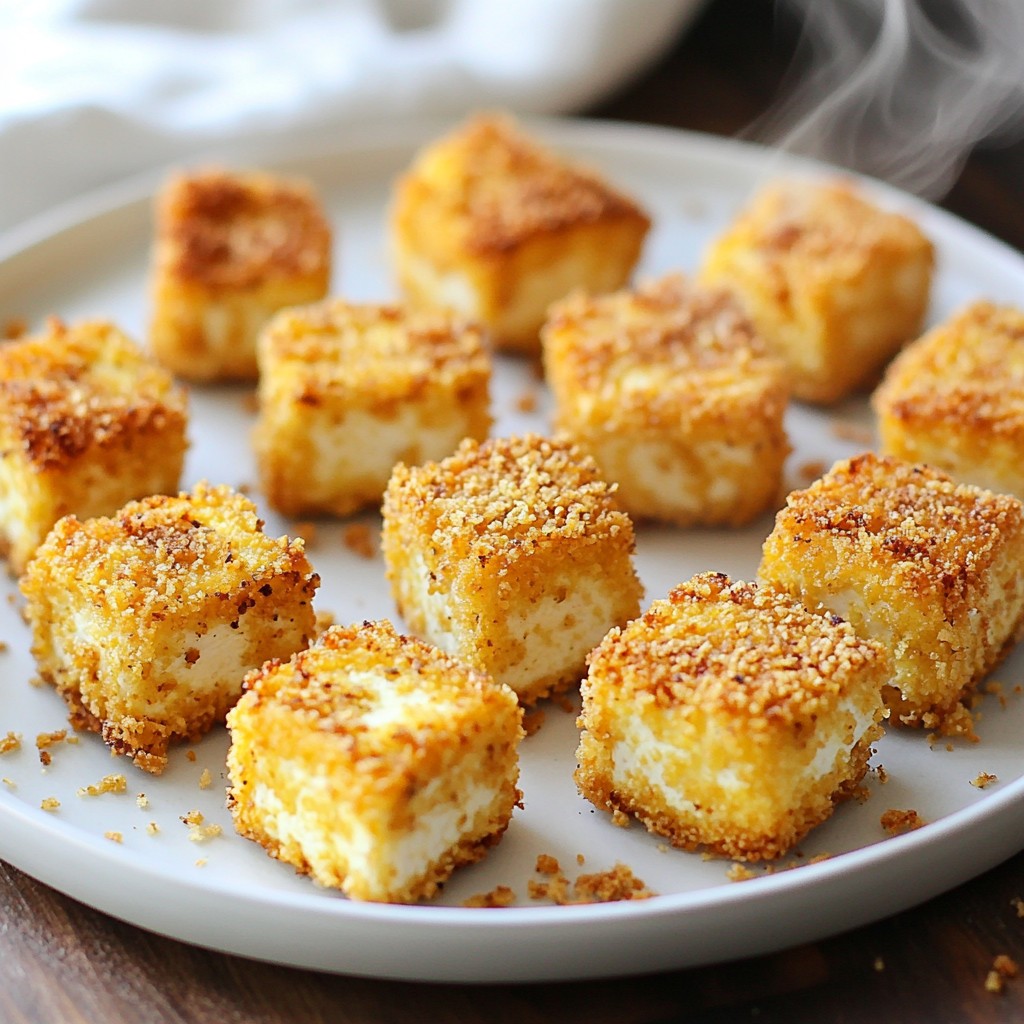
Now, it’s time to bread the shrimp. Start by coating each shrimp in the flour mixture. Make sure you shake off any extra flour. Next, dip the shrimp into the egg wash. Let any excess egg drip off. Finally, coat each shrimp with the coconut-panko mixture. Press gently to help the coating stick. This process gives the shrimp a crunchy texture.
Air Frying the Shrimp
Before cooking, preheat your air fryer to 375°F (190°C). This step takes about 5 minutes. While the air fryer heats up, arrange the breaded shrimp in the basket. Place them in a single layer without overlapping. If your air fryer is small, you may need to cook the shrimp in batches. Lightly spray the shrimp with cooking oil. This spray helps them become crispier.
Cook the shrimp for 8-10 minutes. Flip them halfway through to ensure even cooking. They should turn golden brown and be fully cooked. Once done, remove the shrimp from the air fryer. Enjoy them right away with sweet chili sauce for dipping!
Pro Tips
- Tip Title: Use Fresh Shrimp: For the best flavor and texture, opt for fresh shrimp instead of frozen. If using frozen, make sure to thaw them completely and pat them dry.
- Tip Title: Customize Your Coating: Feel free to add spices or herbs to the coconut-panko mixture for additional flavor. Consider using cayenne pepper for heat or dried herbs for a fresh twist.
- Tip Title: Avoid Overcrowding: When air frying, make sure the shrimp are in a single layer without overlapping. This ensures even cooking and crispiness.
- Tip Title: Serve Immediately: Coconut shrimp are best enjoyed fresh out of the air fryer. Serve them right away for the crispiest texture, paired with lime wedges and sweet chili sauce.
Tips & Tricks
Ensuring Crispiness
To make your coconut shrimp extra crispy, lightly spray them with cooking oil. This small step gives the shrimp a beautiful golden color and crunch. Also, arrange the shrimp in a single layer in the air fryer basket. This space allows hot air to circulate and cook the shrimp evenly.
Perfecting the Breading
Press the coating onto each shrimp. This helps the breading stick better. Make sure you avoid overlapping the shrimp while cooking. If you crowd the basket, the shrimp will steam instead of crisp.
Serving Suggestions
For a tasty finish, serve your shrimp with sweet chili sauce for dipping. Fresh lime wedges add a bright touch. You can also sprinkle chopped cilantro on top for extra flavor. Pair your coconut shrimp with a cold drink, like iced tea or a light beer. This combo makes for a delightful meal.
Variations
Different Coatings
You can switch up the coating for your coconut shrimp. Try using different breadcrumb types, like regular breadcrumbs or crushed cornflakes. Each will give a unique crunch. You can also add spices to the coating mix. Try cayenne for heat or onion powder for extra flavor. Mixing in dried herbs like oregano or thyme can also add a tasty twist.
Alternative Sauces
You might want to make your own sweet chili sauce. It’s simple! Just mix ½ cup of sugar, ¼ cup of vinegar, 1 tablespoon of chili flakes, and ¼ cup of water in a pot. Cook until the sugar dissolves. Cool before serving. You can also try other dipping sauces. A tangy mango salsa or creamy garlic aioli works great too.
Ingredient Substitutions
If you want a shrimp substitute, use chicken breast or tofu. Both offer a great texture when breaded. For gluten-free options, swap the all-purpose flour with rice flour. Use gluten-free panko for the coating. You can still enjoy the crispy goodness without the gluten!
Storage Info
Storing Leftovers
To keep your cooked shrimp fresh, store it in a sealed container. I like to use glass or plastic containers with tight lids. This helps keep the shrimp moist and prevents them from absorbing other odors. Make sure to cool the shrimp to room temperature before sealing. You can store them in the fridge for up to three days.
Reheating Instructions
When reheating your shrimp, the air fryer is your best friend. Set it to 350°F (175°C). Place the shrimp in a single layer in the basket. Heat for about 5 minutes. This method helps keep the shrimp crispy. If you don’t have an air fryer, you can use a skillet on medium heat. Just be careful not to overcook them, or they'll become tough.
Freezing Options
You can freeze both uncooked and cooked shrimp. For uncooked shrimp, place them in a zip-top bag and remove as much air as possible. Store it in the freezer for up to three months. For cooked shrimp, let them cool completely first. Then, pack them in a freezer-safe container or bag. They will keep for about two months.
To thaw shrimp properly, put them in the fridge overnight. If you need them faster, you can submerge the bag in cold water for about 30 minutes. Avoid using hot water, as it can cook the shrimp.
FAQs
How do I know when the shrimp is done?
You can tell when shrimp is done by looking for a few signs. First, the shrimp should turn a nice pink color. They will also curl into a C shape. The flesh should feel firm, not mushy. Cooked shrimp also lose their translucent look. If you see these signs, your shrimp is ready to enjoy!
Can I use frozen shrimp for this recipe?
Yes, you can use frozen shrimp! Just make sure to thaw them first. To thaw shrimp, place them in the fridge overnight. If you're short on time, put them in a bowl of cold water for about 15-20 minutes. Change the water every few minutes to speed up the process. After thawing, pat them dry with paper towels before cooking.
What can I serve with coconut shrimp?
Coconut shrimp pairs well with many sides. Here are some popular options:
- Rice or quinoa for a filling meal
- Slaw for a crunchy texture
- Fresh salad for a light side
- Sweet chili sauce for extra dipping fun
- Lime wedges to add a zesty kick
Feel free to mix and match! Enjoying your coconut shrimp with these sides will make your meal even better.
You've learned the essentials of making coconut shrimp, from the key ingredients to cooking tips. The correct use of seasonings and the right frying technique are crucial for a perfect crunch. Experiment with different coatings and sauces to suit your taste. Remember, the joy of cooking lies in trying new things. So, dive in and enjoy every bite of this tasty dish. With the proper storage and reheating methods, your shrimp can stay delicious for days. Happy cooking!