Skip to content
DisclaimerTerms Of UseGDPR PolicyCookie Policy

My Saved Recipe

  • Home
  • Drinks
  • Appetizers
  • Dinner
  • Dessert
  • About
  • Contact
  • Privacy Policy
DisclaimerTerms Of UseGDPR PolicyCookie Policy

Savannah

- Apples: Choose 2 large apples like Granny Smith or Honeycrisp. Granny Smith gives a nice tartness. Honeycrisp offers great sweetness and crunch. Both work well for frying. - Flour and Seasonings: Use 1 cup of all-purpose flour. Add 1 teaspoon baking powder for lightness. Include 1/2 teaspoon cinnamon and 1/4 teaspoon nutmeg for warmth. Finish with 1/4 teaspoon salt to enhance flavor. - Additional Components: For the batter, you need 1 cup of cold sparkling water. It keeps the batter light and crispy. Use 1 cup of breadcrumbs, preferably panko, for extra crunch. Finally, get vegetable oil for frying. You might want powdered sugar for dusting, but this is optional. These ingredients come together to create a sweet and crispy treat. Enjoy the process of making these delightful apple rings! First, wash the apples under cold water. Make sure to dry them well. Use an apple corer or a sharp knife to remove the core. Slice the apples into rings about 1/4 inch thick. The slices should be even for cooking. In a mixing bowl, combine the following dry ingredients: - 1 cup all-purpose flour - 1 teaspoon baking powder - 1/2 teaspoon cinnamon - 1/4 teaspoon nutmeg - 1/4 teaspoon salt Whisk these together until they blend well. Next, slowly add 1 cup of cold sparkling water. Whisk until the batter is smooth. It should be thick enough to coat the apple rings. Prepare a shallow dish with 1 cup of breadcrumbs. Panko breadcrumbs work best for extra crunch. Heat about 2 inches of vegetable oil in a deep pan over medium-high heat. Use a deep-fry thermometer to keep the oil at 350°F (175°C). Dip each apple ring into the batter. Make sure it is fully coated. Then, transfer it to the breadcrumbs. Press the breadcrumbs onto the batter to coat the ring well. Once the oil is hot, carefully place a few apple rings in the oil. Do not overcrowd the pan; this helps them cook evenly. Fry for 2-3 minutes on each side until they turn golden brown and crispy. When done, use a slotted spoon to remove the fried apple rings. Set them on a plate lined with paper towels to drain any extra oil. If you want, sprinkle powdered sugar on top of the warm apple rings before serving. To make your apple rings super crispy, use cold sparkling water. The bubbles help create a light batter. This makes each ring puff up nicely. Panko breadcrumbs work best for extra crunch. They are larger and give a better texture than regular breadcrumbs. Avoid putting too many apple rings in the pan at once. This keeps the oil hot and helps them fry evenly. It’s best to fry just a few at a time. Aim for a golden brown color, which takes about 2-3 minutes per side. For a fun presentation, stack the crispy rings on a platter. You can drizzle caramel sauce over them. They also pair well with cinnamon ice cream for a sweet treat. Enjoy your crispy fried apple rings! {{image_2}} You can make crispy fried apple rings even more exciting with some fun flavors. One way is to add spices to your batter. Nutmeg and allspice are great choices. They give a warm, cozy taste. Just a pinch can change everything! You can also infuse your batter with extracts. Vanilla extract adds a lovely sweetness. You might even try almond extract for a nutty twist. Experimenting with these additions keeps the recipe fresh and lively. Dipping sauces can take your apple rings to the next level. Caramel sauce is a classic choice. It pairs well with the sweet apples. You can even warm it up for a gooey treat. Cinnamon sugar is another delicious option. Just mix sugar and cinnamon together. Sprinkle it on the warm apple rings right after frying. This adds a sweet, crunchy layer that everyone will love. To keep your crispy fried apple rings tasty, store them in the fridge. Place them in an airtight container. They will stay fresh for about 2 days. If you want to reheat them, use the oven. Preheat it to 350°F (175°C). Place the apple rings on a baking sheet. Bake for about 10 minutes. This method helps keep them crispy. If you want to save some for later, freezing is a great option. First, let the apple rings cool completely. Then, place them in a single layer on a baking sheet. Freeze them for about 1 hour. Once frozen, move them into a freezer-safe bag. This method stops them from sticking together. When you are ready to eat, take out what you need. Thaw the apple rings in the fridge for a few hours before reheating. This helps ensure they heat evenly. To make crispy fried apple rings, start by washing and drying two large apples. Core the apples and slice them into rings about 1/4 inch thick. In a bowl, mix 1 cup of flour, 1 teaspoon of baking powder, 1/2 teaspoon of cinnamon, 1/4 teaspoon of nutmeg, and 1/4 teaspoon of salt. Gradually stir in 1 cup of cold sparkling water until smooth. Dip each apple ring into the batter, then coat it with breadcrumbs. Fry in hot oil until golden brown. Yes! You can fry other fruits, too. Pears, bananas, and peaches work well. These fruits have a soft texture that absorbs the batter nicely. Just remember to slice them thick enough to keep them from falling apart in the oil. Each fruit will add its own flavor twist! For the best coating, dip each apple ring fully in the batter. Make sure the batter sticks well. Then, transfer it to the breadcrumbs. Press gently on the breadcrumbs to help them stick. This method ensures a crispy texture after frying. You can also double-coat by repeating the process for extra crunch. Leftover apple rings can be stored in the fridge for 1-2 days. Keep them in an airtight container to stay fresh. If you want to enjoy them later, reheating them in an oven can help restore their crispiness. Avoid microwaving, as it can make them soggy. Crispy fried apple rings are simple and fun to make. We discussed key ingredients, from apple selection to necessary spices and batter. I shared step-by-step instructions for preparing, battering, and frying. You learned tips for crispiness and serving ideas, plus variations for flavor and sauces. Remember, using cold sparkling water and avoiding crowded pans ensures great results. Whether you serve them fresh or store leftovers, these apple rings can be a delightful treat. Enjoy experimenting with different flavors and find your favorites!

Crispy Fried Apple Rings Delightful Snack Idea

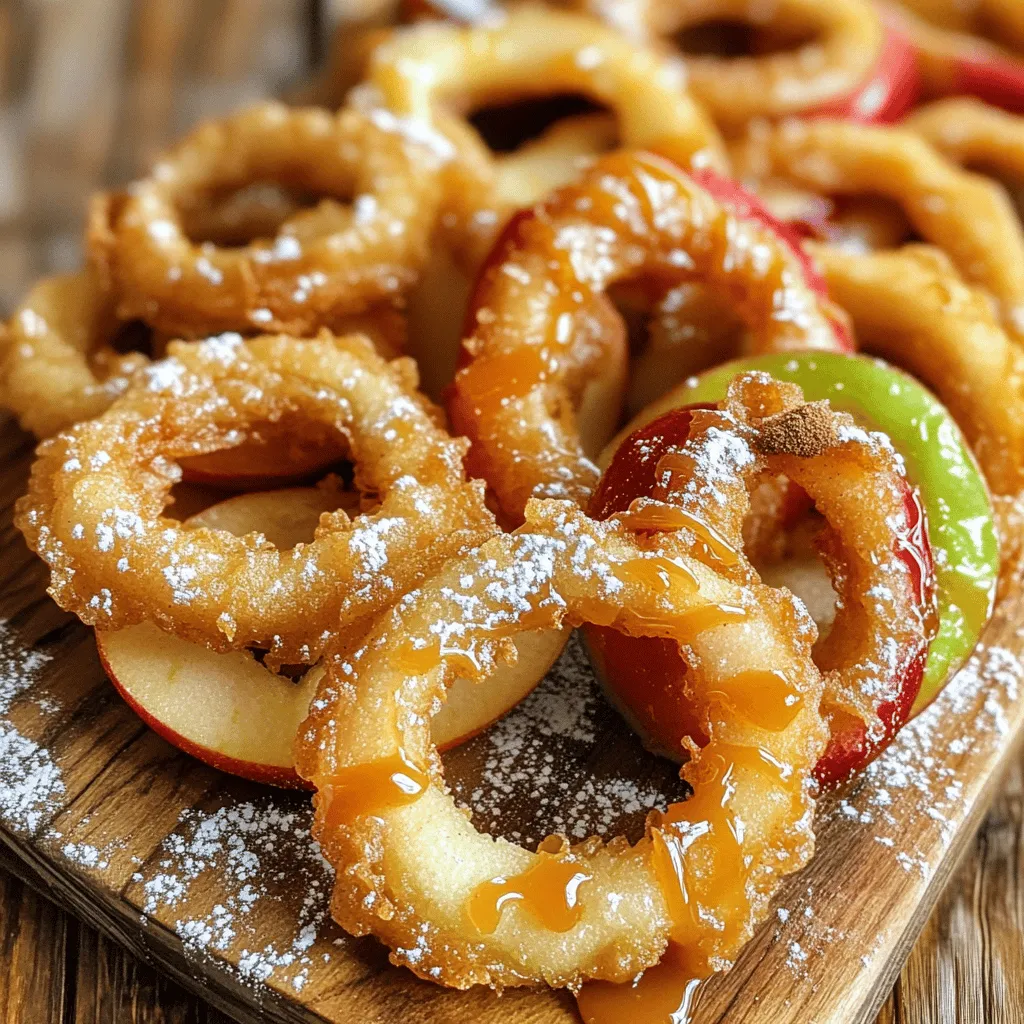
Are you ready to treat yourself to a delightful snack? Crispy Fried Apple Rings are the perfect mix of sweet

Here is what you need to make Crème Brûlée Cookies: - 1 cup unsalted butter, softened - 1 cup granulated sugar - 1/2 cup brown sugar, packed - 2 large eggs - 1 teaspoon vanilla extract - 2 1/2 cups all-purpose flour - 1 teaspoon baking powder - 1/2 teaspoon salt - 1 tablespoon heavy cream - 1 cup granulated sugar (for topping) - 1 tablespoon cornstarch If you use metric measurements, here are the conversions: - 1 cup unsalted butter = 227 grams - 1 cup granulated sugar = 200 grams - 1/2 cup brown sugar = 110 grams - 2 large eggs = about 100 grams - 1 teaspoon vanilla extract = 5 milliliters - 2 1/2 cups all-purpose flour = 312 grams - 1 teaspoon baking powder = 5 grams - 1/2 teaspoon salt = 3 grams - 1 tablespoon heavy cream = 15 milliliters - 1 cup granulated sugar (for topping) = 200 grams - 1 tablespoon cornstarch = 8 grams You can swap some ingredients if needed: - Use margarine instead of butter if you want. - Brown sugar can be replaced with white sugar plus a bit of molasses. - For a dairy-free option, try using coconut cream. - If you are gluten-free, use a gluten-free flour mix. These options help you customize your cookies while keeping them tasty. Enjoy your baking! Start by preheating your oven to 350°F (175°C). Line two baking sheets with parchment paper. In a large bowl, mix 1 cup of softened butter, 1 cup of granulated sugar, and 1/2 cup of brown sugar. Beat these together until the mix is light and fluffy. Add 2 large eggs, one at a time, mixing well after each. Stir in 1 teaspoon of vanilla extract. In another bowl, whisk 2 1/2 cups of all-purpose flour, 1 teaspoon of baking powder, 1/2 teaspoon of salt, and 1 tablespoon of cornstarch. Slowly mix this dry blend into the wet ingredients until just combined. Use a cookie scoop to drop rounded balls of dough onto the baking sheets, leaving space for spreading. Bake the cookies in your preheated oven for about 10 to 12 minutes. Look for golden edges but slightly underbaked centers. Once done, remove the cookies and let them cool on the baking sheets for 5 minutes. While your cookies cool, prepare the topping. In a small bowl, mix 1 tablespoon of heavy cream with 1 cup of granulated sugar. This should create a thick paste. After the cookies have cooled slightly, spread a thin layer of this mixture over each cookie. To finish, use a kitchen torch to caramelize the sugar until it forms a crispy, golden crust. If you don’t have a torch, broil the cookies in the oven for a minute or two. Watch closely to avoid burning. Finally, let the cookies cool for another 10 minutes until the topping hardens. To get the best cookie texture, start with soft butter. It should feel like a pillow. Cream the butter and sugars well until light and fluffy. This adds air. Then, mix in the eggs one at a time. This helps the cookies rise. Finally, be careful not to over-mix when adding the dry ingredients. Stir until just combined. This keeps your cookies soft and chewy. Caramelizing the sugar is key to that yummy topping. You can use a kitchen torch for the best results. Hold it about 2 inches above the cookie. Move it slowly in circles to ensure even melting. If you don’t have a torch, broil the cookies in the oven. Watch them closely to avoid burning. The sugar should turn a golden brown for that crunchy layer. To store your cookies, let them cool completely. Then, place them in an airtight container. They stay fresh for up to a week. If you want to enjoy them warm, use the oven. Preheat it to 350°F (175°C). Heat the cookies for about 5 minutes. This makes them soft again without melting the topping. {{image_2}} You can make these cookies even more fun by adding flavors. Try mixing in some lemon zest for a bright twist. It pairs well with the creamy topping. Almond extract is another great option. Just swap it for vanilla extract. You can also add mini chocolate chips for a sweet surprise. They give a nice contrast to the crispy topping. Feel free to experiment with spices too. A pinch of cinnamon or nutmeg can add warmth. If you need a gluten-free version, use a gluten-free flour blend. Many blends work well in cookies. Just make sure it has xanthan gum. This helps give the cookies structure. Follow the same steps in the recipe. You'll still get that soft center and crispy topping. Always check labels for cross-contamination if that’s a concern for you. For a vegan version, swap out the butter for a plant-based spread. Use flax eggs instead of regular eggs. Mix 1 tablespoon of ground flaxseed with 3 tablespoons of water. Let it sit for a few minutes to thicken. Use coconut cream in place of heavy cream for the topping. These changes keep the cookie delicious and creamy, while still being plant-based. When you want to enjoy Crème Brûlée Cookies without baking, you have options. You can find delicious pre-made Crème Brûlée Cookies from several brands. - Tate’s Bake Shop: Known for crispy cookies with a rich flavor. - Entenmann’s: Offers a soft and sweet version. - Lofthouse: Features a frosted cookie style that many love. These brands are usually available at major grocery stores. Many local bakeries make their own Crème Brûlée Cookies. - Check your favorite bakery for unique flavors. - Ask if they use real vanilla and fresh cream for the best taste. - Local bakeries often add their own twists, making each one special. Supporting local businesses also means enjoying fresh cookies. You can also buy Crème Brûlée Cookies online. - Amazon: A great place for various brands. - Goldbelly: Offers cookies from famous bakeries across the country. - Etsy: Some home bakers sell their unique cookie creations here. Ordering online can bring special cookies right to your door. Crème Brûlée Cookies combine two great desserts. They have the soft texture of cookies and the rich flavors of crème brûlée. The crispy caramel topping adds a fun crunch that surprises your taste buds. This blend makes them special and enjoyable for all. Yes, you can make the dough early. Wrap it in plastic wrap and refrigerate it. This keeps the dough fresh for up to three days. You can also freeze the dough for about three months. Just thaw it in the fridge before baking. To avoid burning the topping, keep a close watch while you caramelize. If using a kitchen torch, move it in small circles. If broiling, check every 30 seconds. This way, you can catch it before it gets too dark. A golden color is what you want. Yes, you can freeze these cookies. Allow them to cool completely first. Then, place them in an airtight container or a freezer bag. They can last up to three months in the freezer. Just thaw them at room temperature when you are ready to enjoy. Crème Brûlée Cookies stay fresh for about five days at room temperature. Keep them in an airtight container to maintain their softness. If you want them to last longer, freeze them for later use. Crème brûlée cookies blend rich flavors and textures into a tasty treat. We covered essential ingredients, step-by-step baking, and useful tips for success. You learned how to make variations that suit your diet or taste. Don't forget to explore buying options for ready-made cookies if you're short on time. Enjoy crafting these cookies and sharing them with loved ones. With practice, you'll master this delightful dessert. Your kitchen will smell amazing, and your cookies will impress everyone! Happy baking!

Crème Brûlée Cookies Delightful and Easy Recipe

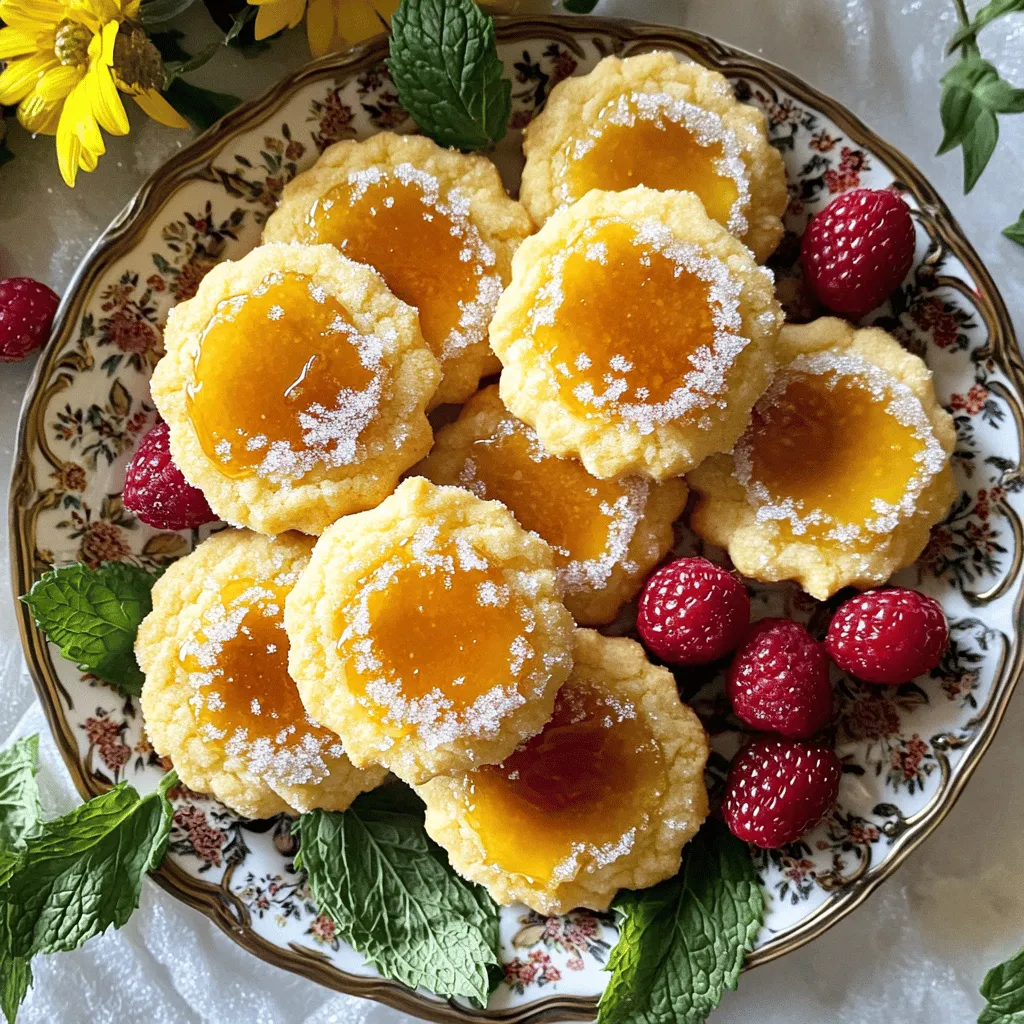
Are you ready to indulge in a sweet treat that combines the classic crème brûlée with a delicious cookie? In

To make crispy fried apple rings, you need: - 2 large apples (Granny Smith or Honeycrisp), cored and sliced into ½-inch rings - 1 cup all-purpose flour - 1 teaspoon baking powder - ½ teaspoon cinnamon - ¼ teaspoon nutmeg - 1 tablespoon sugar - 1 cup cold sparkling water - ½ cup breadcrumbs (panko for extra crunch) - Oil for frying - Powdered sugar for dusting (optional) - Caramel sauce for dipping (optional) These ingredients come together to create a sweet and crunchy treat. The flour and baking powder give the batter a light texture. Cinnamon and nutmeg add warmth and flavor, making these rings hard to resist. When choosing apples, select varieties that balance sweetness and tartness. My favorites are: - Granny Smith: Tart and crisp, great for frying. - Honeycrisp: Sweet and juicy, holds up well in heat. Both options keep their shape and add a nice flavor to your snack. To kick your apple rings up a notch, try these optional ingredients: - Vanilla extract: A splash can enhance the sweetness. - Coconut flakes: Adds a tropical twist to your apple rings. - Chopped nuts: Almonds or pecans can add crunch and flavor. Feel free to mix and match according to your taste. These additions can make your crispy fried apple rings even more special! To start, you need two large apples. I like using Granny Smith or Honeycrisp. These apples are tart and sweet, making them perfect for frying. First, core the apples and slice them into rings. Aim for slices that are about ½-inch thick. This thickness helps them cook evenly. After slicing, pat the rings dry with a kitchen towel. Removing extra moisture is key for crispiness. Next, grab a large bowl. In this bowl, whisk together the flour, baking powder, cinnamon, nutmeg, and sugar. Make sure they mix well. Then, slowly add in one cup of cold sparkling water. Stir gently until you get a smooth batter. It’s okay if there are a few lumps; don’t overmix! Set aside a shallow dish for the breadcrumbs. Now it’s time to fry! Heat about 1-2 inches of oil in a skillet over medium-high heat until it reaches 350°F (175°C). Dip each apple ring into the batter, letting the excess drip off. Then, coat the ring in breadcrumbs. Carefully place the coated apple rings into the hot oil. Fry only a few at a time to avoid overcrowding. Cook for about 2-3 minutes on each side until they turn golden brown and crispy. Once they are done, use a slotted spoon to remove the rings. Place them on a plate lined with paper towels to drain excess oil. If you like, dust them with powdered sugar. Serve them warm with caramel sauce for dipping. Enjoy this tasty snack! To get that perfect crunch, start with cold sparkling water. The bubbles in the water add air, making the batter light. Use panko breadcrumbs for extra crunch. They hold up better than regular breadcrumbs. Fry in oil heated to 350°F (175°C). This temp cooks the rings fast and keeps them crispy. Do not overcrowd the pan. Fry just a few rings at a time. This ensures they cook evenly. One common mistake is using warm batter. Always keep your batter cold for crispiness. Avoid using too much flour when coating the rings. A light coat keeps them crunchy. If the oil is not hot enough, the apple rings will soak up oil. This makes them soggy instead of crispy. Lastly, do not skip drying the apple rings. Moisture can ruin the crispiness. Crispy fried apple rings are great on their own, but you can add fun toppings. Dust them with powdered sugar for a sweet touch. Pair them with caramel sauce for dipping. You can also serve them with vanilla ice cream. This makes for a great dessert. Try adding a sprinkle of sea salt for a sweet-salty mix. Enjoy these warm for the best taste! {{image_2}} You can switch up the coating for your apple rings. Instead of plain breadcrumbs, try using crushed cornflakes. This adds a nice crunch. For a twist, use seasoned breadcrumbs. They give a savory touch. You can also coat the rings in coconut flakes for a tropical vibe. Just make sure to dip the apple rings in the batter first. Adding different flavors can make your apple rings pop! Consider mixing vanilla extract into the batter. This gives a sweet aroma. You can also add a pinch of ginger for an extra kick. If you like a bit of heat, try adding cayenne pepper. It contrasts well with the sweetness of the apples. Want a healthier version? You can bake the apple rings instead of frying them. Preheat your oven to 400°F (200°C). Coat the apple rings in the batter and place them on a baking sheet. Use parchment paper to prevent sticking. Bake for about 15-20 minutes. Flip halfway through for even cooking. You still get a tasty treat with less oil! To keep your leftover apple rings fresh, place them in an airtight container. Make sure to let them cool completely before sealing. If you skip this step, moisture will build up and make them soggy. Store the container in the fridge for up to three days. When you're ready to enjoy your apple rings again, reheating is key. Preheat your oven to 350°F (175°C). Spread the apple rings on a baking sheet in a single layer. Bake them for about 10 minutes or until they feel warm and crispy. Avoid using the microwave, as it can make them mushy. If you want to save apple rings for later, you can freeze them. First, let the cooked rings cool completely. Lay them out in a single layer on a baking sheet. Freeze them for about an hour. Once frozen, transfer the rings to a freezer bag. Remove as much air as possible before sealing. They will last for about two months in the freezer. To make crispy fried apple rings, start with two large apples. I like Granny Smith or Honeycrisp for their tartness. Core and slice the apples into ½-inch rings. Pat them dry with a kitchen towel to remove moisture. In a large bowl, whisk together one cup of all-purpose flour, one teaspoon of baking powder, half a teaspoon of cinnamon, a quarter teaspoon of nutmeg, and one tablespoon of sugar. Gradually add one cup of cold sparkling water to the dry mix. Stir gently until you get a smooth batter. Next, dip each apple ring into the batter, letting the excess drip off. Coat them gently in breadcrumbs. Heat oil in a skillet to 350°F (175°C). Fry each apple ring for about 2-3 minutes per side, until golden brown and crispy. Use a slotted spoon to remove them and place on paper towels to drain excess oil. Dust with powdered sugar and serve warm with caramel sauce. Yes, you can use other fruits for frying! Try bananas, peaches, or pears. Each fruit adds a unique taste and texture. Just make sure they are firm enough to hold their shape while frying. Slice them into rings or wedges similar to apples. Follow the same batter and frying process. Experimenting with different fruits can lead to delicious surprises! To keep apple rings from browning, soak them in a mixture of water and lemon juice. Use one tablespoon of lemon juice for every cup of water. This will help keep them fresh and bright while you prepare the recipe. Another tip is to pat the apple rings dry after soaking. This way, they won’t affect the batter. Enjoy your crispy fried apple rings without worrying about browning! We covered how to make tasty fried apple rings. You learned about the right apples and other ingredients to use. I shared easy steps to prepare, mix, and fry the rings. You now know tips for crispiness and common mistakes to avoid. There are many ways to add flavor and store your leftovers. Keep experimenting with new coatings and spices. Enjoy your apple rings fresh and crispy. Happy cooking!

Crispy Fried Apple Rings Irresistible and Easy Snack

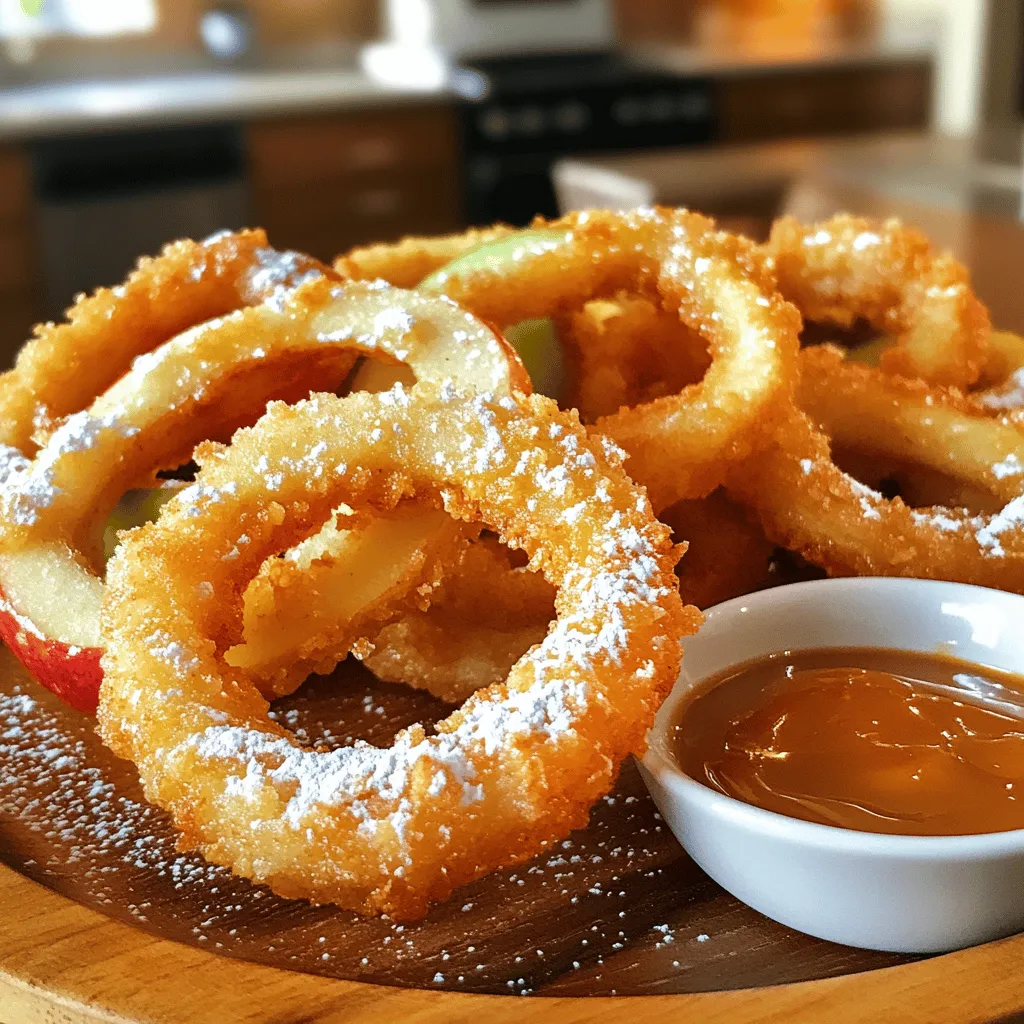
If you’re craving a delightful snack that’s crispy, sweet, and easy to make, you’re in the right place! I’m excited

- 1 cup unsalted butter, softened - 1 cup granulated sugar - 1/2 cup brown sugar, packed - 2 large eggs - 1 teaspoon vanilla extract - 2 cups all-purpose flour - 1 teaspoon baking soda - 1/2 teaspoon salt - 1/2 cup heavy cream - 1/4 cup granulated sugar (for topping) Using fresh, high-quality ingredients makes a big difference. I always choose unsalted butter for better control over salt levels. Granulated sugar and brown sugar should be fresh and free from lumps. I prefer large eggs for their size. Vanilla extract must be pure for the best flavor. Fresh all-purpose flour should be sifted to avoid lumps. Heavy cream should have a high-fat content for a rich taste. If you're dairy-free, use coconut oil or a dairy-free butter. For egg allergies, flax eggs are a good option. Instead of all-purpose flour, you can use a gluten-free blend. If you dislike vanilla, almond extract adds a nice twist. Always check labels for allergens when substituting ingredients. Start by preheating your oven to 350°F (175°C). Line two baking sheets with parchment paper. In a large bowl, cream together 1 cup of softened unsalted butter, 1 cup of granulated sugar, and 1/2 cup of brown sugar. Mix this until it gets light and fluffy. This should take about 2-3 minutes. Next, add in 2 large eggs one by one. Make sure to mix well after each egg. Stir in 1 teaspoon of vanilla extract. In another bowl, whisk together 2 cups of all-purpose flour, 1 teaspoon of baking soda, and 1/2 teaspoon of salt. Slowly add this dry mix to your wet ingredients. Mix until just combined. Now pour in 1/2 cup of heavy cream. Gently fold it into your dough until it looks smooth and glossy. Using a tablespoon or a cookie scoop, drop rounded balls of dough onto the prepared baking sheets. Leave about 2 inches between each ball. Bake these in the preheated oven for 10-12 minutes. You want the edges to be lightly golden, but the centers should still be soft. After baking, remove the cookies from the oven and let them cool on the sheets for about 5 minutes. Then, transfer them to a wire rack to cool completely. Once your cookies are cool, sprinkle a thin layer of granulated sugar on top of each cookie. Use about 1/4 teaspoon per cookie. Now, take a kitchen torch and caramelize the sugar. Move the flame in a circular motion over the sugar until it melts and forms a golden crust. Be careful not to burn it! After caramelizing, let the sugar cool and harden before you serve these delightful treats. To get the best texture for your Crème Brûlée Cookies, focus on the dough. Start with softened butter for easy mixing. Cream the butter and sugars well until light and fluffy. This step adds air and makes the cookies soft. Don’t overmix the dough once you add the flour. Gently fold in the heavy cream to keep that nice, chewy bite. Bake just until the edges are golden. The centers should remain soft for that perfect melt-in-your-mouth feel. If you have leftover cookies, store them in an airtight container. This keeps them fresh and soft. You can place a slice of bread in the container. The bread helps keep the cookies moist. If you want to store them longer, freeze the cookies. Just make sure they are fully cooled first. Wrap each cookie in plastic wrap and place them in a freezer bag. They can last up to three months in the freezer. One common mistake is not measuring ingredients correctly. Use measuring cups and spoons for accuracy. Another mistake is baking at the wrong temperature. Always preheat your oven to 350°F (175°C). Watch the cookies closely while they bake. If you let them bake too long, they may turn hard. Lastly, when caramelizing the sugar, keep the torch moving. This helps avoid burning the sugar and gives you a nice, even crust. {{image_2}} You can easily change the basic recipe to fit your taste. Try adding chocolate chips for a rich twist. Dark, milk, or white chocolate all work well. You can mix in chopped nuts like pecans or walnuts for crunch. Toast them first to enhance their flavor. Want a fruity touch? Add dried fruit, like cranberries or cherries. They add a fun burst of flavor and color. If you need a gluten-free option, swap the all-purpose flour. Use a gluten-free flour blend that works well for baking. Make sure it has xanthan gum for better texture. Your cookies will still be soft and delicious. Keep an eye on baking time, as gluten-free cookies may need slight adjustments. Mini cookies are a fun way to serve these treats. Use a small cookie scoop to form smaller balls of dough. Bake them for around 8-10 minutes. They will be perfect bite-sized delights! You can then top them with sugar and caramelize as usual. This makes them great for parties or sharing with friends. To keep your Crème Brûlée Cookies fresh, store them in an airtight container. This helps maintain their soft texture and rich flavor. Place parchment paper between layers to avoid sticking. Store them at room temperature for up to five days. If you want them to last longer, consider freezing. Freezing these cookies is simple. First, let them cool completely. Then, place them in a single layer on a baking sheet. Freeze for about two hours until firm. After that, transfer the cookies to a freezer bag. Remove as much air as possible before sealing. They can stay frozen for up to three months. To reheat your cookies, preheat the oven to 350°F (175°C). Place the cookies on a baking sheet. Heat for about five minutes, just until warm. If you want to refresh the sugar crust, use a kitchen torch quickly. This gives them that fresh-out-of-the-oven taste! Yes, you can make these cookies ahead of time. Prepare the dough and chill it in the fridge. You can store it for up to three days. When ready, scoop and bake the cookies fresh. This keeps them soft and tasty. These cookies blend classic crème brûlée flavors into a cookie form. The creamy texture comes from heavy cream mixed in the dough. The sugar topping adds a crunchy, caramelized layer. This combination creates a delightful contrast in each bite. To avoid burning the sugar, use a kitchen torch carefully. Keep the flame moving in a circular motion. This helps the sugar melt evenly. Aim for a golden color, not dark brown. If it burns, the taste turns bitter, so watch closely! You learned about the key ingredients for crème brûlée cookies. Quality matters, and there are easy substitutions for allergies. Our step-by-step guide showed you how to prep, bake, and caramelize the top for that perfect crunch. I shared tips to ensure the best texture and storage methods to keep your cookies fresh. Remember to explore variations like adding chocolate or going gluten-free. Now, you’re ready to enjoy these tasty treats. Make them your own and impress your friends with your baking skills!

Crème Brûlée Cookies Delightful and Decadent Treat

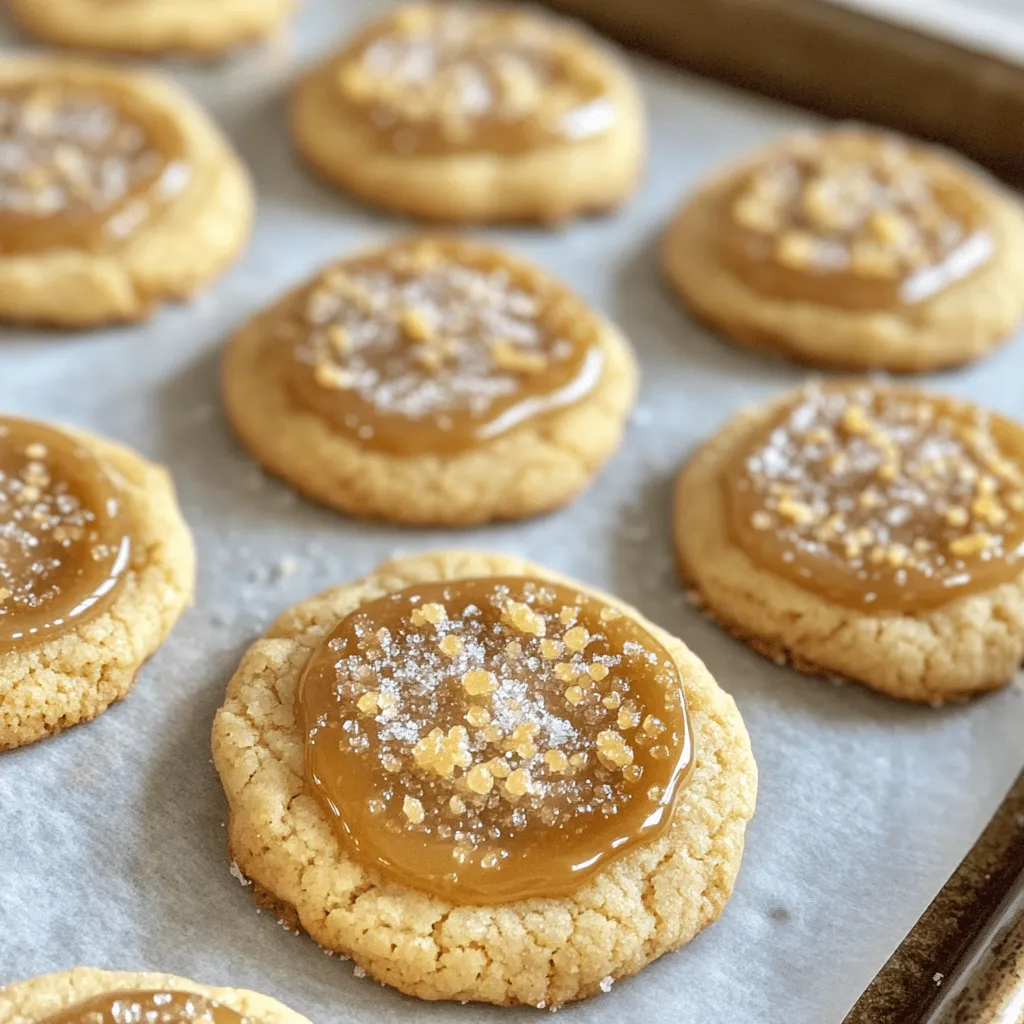
Get ready to indulge in a unique dessert experience! Crème Brûlée Cookies combine rich flavors and a fun twist on

To make this super moist pumpkin loaf, you need some key ingredients. Here’s what you will gather: - 1 ½ cups all-purpose flour - 1 teaspoon baking powder - 1 teaspoon baking soda - ½ teaspoon salt - 1 teaspoon ground cinnamon - ½ teaspoon ground nutmeg - ½ teaspoon ground ginger - ½ cup unsweetened applesauce - 1 cup pure pumpkin puree - ¾ cup granulated sugar - ½ cup brown sugar, packed - 2 large eggs - ½ cup vegetable oil - 1 teaspoon vanilla extract These ingredients work together to create a loaf that is moist and full of flavor. The pumpkin puree adds moisture and texture. The spices give it that warm, cozy taste. Feel free to make this pumpkin loaf your own by adding some extras. Here are a couple of tasty options: - ½ cup chopped walnuts or pecans - ½ cup chocolate chips Adding nuts gives a nice crunch. Chocolate chips add sweetness and richness. You can mix and match based on your taste. You can easily swap some ingredients for others based on what you have. Here are some ideas: - Flour: Use whole wheat flour for more fiber. - Sugars: Coconut sugar or honey can work, but adjust amounts. - Applesauce: You can use yogurt for a creamier texture. - Oil: Substitute with melted coconut oil or melted butter. These swaps can change the flavor and texture a bit. Experiment to find what you like best! Start by preheating your oven to 350°F (175°C). This step is key for even baking. Next, prepare your loaf pan. You can grease it or line it with parchment paper. Lining makes it easier to take the loaf out later. In a bowl, whisk together the dry ingredients. Combine 1 ½ cups of all-purpose flour, 1 teaspoon of baking powder, 1 teaspoon of baking soda, and ½ teaspoon of salt. Then, add 1 teaspoon of ground cinnamon, ½ teaspoon of ground nutmeg, and ½ teaspoon of ground ginger. Mix well until everything is combined. Set this bowl aside. In a large bowl, mix the wet ingredients. Start with ½ cup of unsweetened applesauce and 1 cup of pure pumpkin puree. Add ¾ cup of granulated sugar and ½ cup of packed brown sugar. Crack in 2 large eggs, and pour in ½ cup of vegetable oil and 1 teaspoon of vanilla extract. Stir these until they blend into a smooth mixture. Now, fold the dry ingredients into the wet mix. Use a spatula to gently combine them. Don’t overmix; a few lumps are okay. If you want, add ½ cup of chopped walnuts or pecans, and ½ cup of chocolate chips. Gently fold these in until they spread evenly through the batter. Pour the batter into your prepared loaf pan. Smooth the top with a spatula. Place the pan in the oven and bake for 55-65 minutes. Check if it’s done by inserting a toothpick into the center. If it comes out clean, your loaf is ready! If it browns too fast, cover it with foil for the last 10-15 minutes. Once baked, let it cool in the pan for 10 minutes. After that, move it to a wire rack to cool completely. Enjoy your Super Moist Pumpkin Loaf! You can find the Full Recipe for more details. To make your pumpkin loaf super moist, use pure pumpkin puree. Canned pumpkin works well and helps keep the loaf soft. Mixing in unsweetened applesauce adds extra moisture too. You can also add a bit of vegetable oil for richness. Be careful not to overmix your batter. Overmixing can lead to a dry loaf. Just mix until the dry ingredients are combined with the wet ones. Baking can be tricky. Here are some common problems to watch for: - Incorrect oven temperature: Always check your oven with a thermometer. An oven that's too hot can burn the loaf. - Underbaking: If you pull it out too soon, the inside may be gooey. Use a toothpick to check for doneness. - Overbaking: This can dry out your loaf. Keep an eye on the time, especially in the last few minutes. - Not greasing the pan: Make sure your pan is greased or lined. This helps with easy removal after baking. Serving your pumpkin loaf is fun! Here are some tasty ideas: - Slice the loaf and serve it warm. Add a pat of butter on each slice. - Top with cream cheese spread for a rich taste. - Dust the top with powdered sugar for a pretty finish. - Pair it with a warm drink like coffee or tea. This makes a great snack or breakfast treat. Explore these options to enjoy your super moist pumpkin loaf even more! For the full recipe, check the earlier section. {{image_2}} You can make this pumpkin loaf a bit healthier. Swap half the sugar for honey or maple syrup. Use whole wheat flour instead of all-purpose flour. You can also replace the oil with mashed banana or yogurt. These changes keep your loaf tasty while cutting calories. Want to kick up the flavor? Add a teaspoon of vanilla bean paste. It gives a rich taste. Try mixing in a tablespoon of orange zest for a citrus twist. You can also add a pinch of cloves for warmth. For those who love spice, a dash of cayenne pepper can create a surprising kick. Change your pumpkin loaf with seasonal ingredients. In fall, add dried cranberries or chopped apples. In winter, mix in chopped pecans for crunch. For a summer treat, try adding blueberries or fresh peaches. Each season brings new flavors to explore! For the complete recipe, check out the Full Recipe section above. To keep your pumpkin loaf moist, wrap it well. Use plastic wrap or aluminum foil. Store it at room temperature for up to three days. If you want it to last longer, consider refrigerating it. In the fridge, it can stay fresh for up to a week. Just remember to let it come to room temp before serving. Freezing is a great option if you want to save some for later. First, let the loaf cool completely. Then, slice it into pieces. Wrap each slice in plastic wrap, then place them in a freezer bag. Label the bag with the date. Your loaf can last up to three months in the freezer. When you’re ready to enjoy, simply thaw it overnight in the fridge. Reheating your pumpkin loaf is simple. If you want it warm, preheat your oven to 350°F (175°C). Place the slices on a baking sheet and heat for about 10-15 minutes. For a quick option, use the microwave. Heat one slice for about 15-20 seconds. Add a little butter or cream cheese for extra flavor. Enjoy every bite of your super moist pumpkin loaf! For the full recipe, refer to the cooking instructions above. Yes, you can make this pumpkin loaf vegan. To replace the eggs, use flaxseed meal. Mix one tablespoon of flaxseed meal with three tablespoons of water. Let it sit for a few minutes until it thickens. You can also swap the vegetable oil for a plant-based oil like coconut oil. For the applesauce, make sure it's unsweetened. This keeps the loaf moist and tasty. The pumpkin loaf stays fresh for about four days. Store it in an airtight container at room temperature. If you want it to last longer, you can refrigerate it for up to a week. Just make sure to seal it well to avoid drying out. You can also freeze it if you want to save some for later. Absolutely! Fresh pumpkin works great in this recipe. First, you'll need to roast the pumpkin until it's soft. Then, scoop out the flesh and mash it. Aim for about one cup of mashed pumpkin. This adds a nice fresh taste to your loaf. Just remember to let it cool before mixing it into your batter. You can enjoy this pumpkin loaf plain or with toppings. Spread some butter or cream cheese for extra flavor. It also pairs well with coffee or tea. For a fun twist, serve slices with a scoop of vanilla ice cream. You can even add a drizzle of caramel sauce on top for a sweet treat. To check if your pumpkin loaf is done, use the toothpick test. Insert a toothpick into the center of the loaf. If it comes out clean, it’s ready. If it has batter on it, bake for a few more minutes. Keep an eye on the top; it should be golden brown. If it browns too fast, cover it with foil. For the full recipe, check the instructions above! You learned about key ingredients for super moist pumpkin loaf, helpful baking tips, and fun variations. We covered storage methods and answered common questions too. Remember, the right mix of ingredients and proper technique ensures a tasty loaf. Try different flavors and swap out items to suit your taste. Enjoy baking your pumpkin loaf, and share it with friends and family. It’s a perfect treat for any season. Happy baking!

Super Moist Pumpkin Loaf Irresistibly Delicious Treat

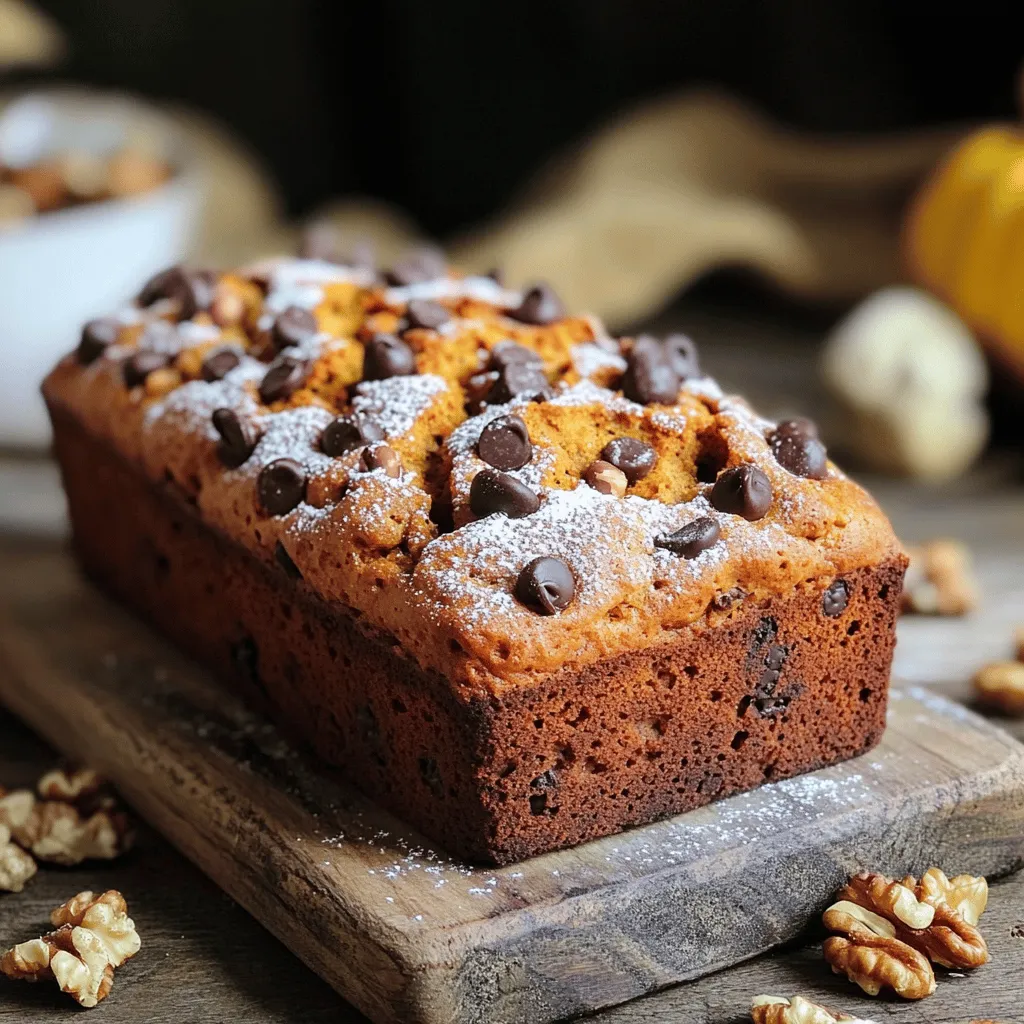
Welcome to my kitchen! If you’re craving a treat that’s both moist and full of flavor, look no further. This

To make my easy pumpkin bread, gather these essential ingredients: - 1 ½ cups all-purpose flour - 1 teaspoon baking powder - 1 teaspoon baking soda - ½ teaspoon salt - 1 teaspoon ground cinnamon - ½ teaspoon ground nutmeg - ¼ teaspoon ground ginger - ½ cup vegetable oil - 1 cup granulated sugar - 2 large eggs - 1 cup canned pumpkin puree - 1 teaspoon vanilla extract These ingredients combine perfectly to create a warm, spiced loaf that feels like a hug in bread form. The pumpkin puree adds moisture and flavor, making each bite rich and satisfying. You can jazz up your pumpkin bread with some fun add-ins. Consider these options: - ½ cup chopped walnuts or pecans - ½ cup chocolate chips - ½ cup dried cranberries These add-ins can bring extra flavor and texture. Nuts give a nice crunch, while chocolate chips add sweetness. Dried cranberries can offer a fruity surprise. If you don’t have an ingredient on hand, here are some easy swaps: - Use whole wheat flour for a healthier option. - Swap vegetable oil with melted coconut oil for a different flavor. - Replace granulated sugar with brown sugar for added depth. These substitutions keep the bread delicious, while still making it your own. Don’t be afraid to experiment! Check out the Full Recipe for all the details on how to make this delightful treat. Start by preheating your oven to 350°F (175°C). This heat makes sure your bread cooks evenly. While the oven warms up, take a 9x5-inch loaf pan. You can grease it with butter or spray. If you want an easy cleanup, line it with parchment paper. This keeps your bread from sticking. Next, grab a medium bowl. In this bowl, whisk together these dry items: - 1 ½ cups all-purpose flour - 1 teaspoon baking powder - 1 teaspoon baking soda - ½ teaspoon salt - 1 teaspoon ground cinnamon - ½ teaspoon ground nutmeg - ¼ teaspoon ground ginger Mix them well. This step ensures your spices and leavening agents are evenly spread. Now it's time for the wet mix. In a large bowl, add: - ½ cup vegetable oil - 1 cup granulated sugar Whisk these until smooth. Then, add 2 large eggs, one by one. Beat well after each egg. Next, stir in: - 1 cup canned pumpkin puree - 1 teaspoon vanilla extract Mix until these ingredients are fully combined. Now, take your dry mix and fold it into the wet mix. Be gentle. Overmixing can make your bread tough. If you like nuts, fold in ½ cup of chopped walnuts or pecans. Pour your batter into the prepared loaf pan. Smooth the top with a spatula. Place the pan in the oven for 60-70 minutes. To check if it's done, insert a toothpick into the center. If it comes out clean, your bread is ready. Once baked, let it cool in the pan for 10 minutes. Then, transfer it to a wire rack to cool completely. Enjoy your pumpkin bread! To keep your pumpkin bread soft, mix gently. Overmixing makes the bread tough and dry. After adding the dry mix to the wet, stir just until you see no flour. Clumps are okay. Remember, it's not a race, so take your time. The key to moist pumpkin bread is the pumpkin puree. It adds flavor and keeps the bread soft. Use canned pumpkin puree for ease and consistency. If you want to add moisture, consider using applesauce. It works well without changing the taste much. Let the bread cool in the pan for about 10 minutes. Then, transfer it to a wire rack. This helps it cool evenly. When slicing, use a serrated knife for clean cuts. Warm slices are perfect with a little butter or cream cheese. Enjoy your delicious pumpkin bread! {{image_2}} You can boost the flavor of your pumpkin bread by adding more spices. Try adding a pinch of cloves for warmth. Or, mix in some allspice for a unique taste. You can even add a bit of cardamom for a fragrant twist. These spices work well with pumpkin, making the bread even tastier. If you want a healthier version, swap all-purpose flour for whole wheat flour. This change gives you more fiber and nutrients. For sugar, you can use honey or maple syrup. This switch keeps the sweet flavor but reduces refined sugars. These options make your pumpkin bread a bit better for you. Adding mix-ins can take your pumpkin bread to another level. Chocolate chips give a sweet and rich flavor. Dried cranberries add a tart bite that contrasts with the sweetness. You can also add nuts for crunch. Walnuts or pecans work great in this recipe. Get creative with your mix-ins, and enjoy trying new combinations. To keep your pumpkin bread fresh, wrap it in plastic wrap. You can also use aluminum foil or store it in an airtight container. This helps keep moisture in and prevents it from drying out. Store it at room temperature for best results. If you live in a humid area, consider refrigerating it. When stored properly, your pumpkin bread lasts about 3 to 4 days at room temperature. If you put it in the fridge, it can last up to a week. However, refrigeration can change the texture, making it a bit firmer. For the best taste, eat it fresh within the first few days. Freezing is a great way to keep your pumpkin bread longer. First, let it cool completely. Then, wrap it tightly in plastic wrap and place it in a freezer bag. Remove as much air as you can. Pumpkin bread can last up to 3 months in the freezer. When you're ready to enjoy it, just thaw it in the fridge or at room temperature. For quick enjoyment, you can even slice and toast the frozen bread! You can test if your pumpkin bread is done by using a toothpick. Insert the toothpick into the center of the bread. If it comes out clean, your bread is ready. If it has batter on it, bake for a few more minutes. The top should look golden and feel firm to the touch. Yes, you can use fresh pumpkin. Start by roasting a pumpkin until soft. Then, scoop out the flesh and blend it until smooth. Make sure to measure it as you would canned pumpkin. The flavor will be richer and fresher, giving your bread a unique touch. Pumpkin bread pairs well with many tasty options. Here are some ideas: - Cream cheese spread - Butter - Honey or maple syrup - Chopped nuts on top - A hot drink like coffee or tea These will enhance the flavors and make each bite even more enjoyable. To make your pumpkin bread more moist, you can try a few tricks: - Add a little more oil or butter. - Use brown sugar instead of white sugar. - Include a small amount of yogurt or sour cream. - Ensure you do not overbake the bread. These tips can help keep your pumpkin bread soft and delicious. Try them out next time you bake! To make easy pumpkin bread, you need simple ingredients. Here’s what you'll need: - 1 ½ cups all-purpose flour - 1 teaspoon baking powder - 1 teaspoon baking soda - ½ teaspoon salt - 1 teaspoon ground cinnamon - ½ teaspoon ground nutmeg - ¼ teaspoon ground ginger - ½ cup vegetable oil - 1 cup granulated sugar - 2 large eggs - 1 cup canned pumpkin puree - 1 teaspoon vanilla extract - ½ cup chopped walnuts or pecans (optional) Follow these steps to bake your pumpkin bread. 1. First, preheat your oven to 350°F (175°C). Grease a 9x5-inch loaf pan or line it with parchment paper. 2. In a medium bowl, whisk together flour, baking powder, baking soda, salt, cinnamon, nutmeg, and ginger until mixed. 3. In a large bowl, combine vegetable oil and sugar. Whisk until smooth. 4. Add the eggs to the sugar mix, one at a time. Beat well after each egg. Then stir in pumpkin puree and vanilla until fully mixed. 5. Gradually fold the dry mix into the wet mix. Don't overmix. If using nuts, gently stir them in. 6. Pour the batter into your loaf pan. Smooth the top with a spatula. 7. Bake for 60-70 minutes, or until a toothpick inserted in the center comes out clean. 8. After baking, remove from the oven. Cool in the pan for 10 minutes. Then transfer to a wire rack to cool fully. Each slice of pumpkin bread is a tasty treat. It offers warmth and comfort. Here are some ideas for serving: - Slice the bread and serve warm. A sprinkle of powdered sugar adds a nice touch. - Spread cream cheese on top for extra flavor. - Wrap the loaf in colorful parchment paper. Tie it with twine for a lovely gift. This recipe brings joy to your kitchen with its rich flavors and delightful aroma. Enjoy! You can make easy pumpkin bread with just a few key ingredients and simple steps. We explored different mixes, tips for great texture, and how to store your bread. Remember, you have options for flavors and healthy swaps. Baking can be fun and rewarding. Whether you stick to the basics or try new things, enjoy every moment. Your homemade pumpkin bread will taste great, and you'll impress your friends and family. Let your creativity shine as you bake!

Easy Pumpkin Bread Quick and Simple Recipe Idea

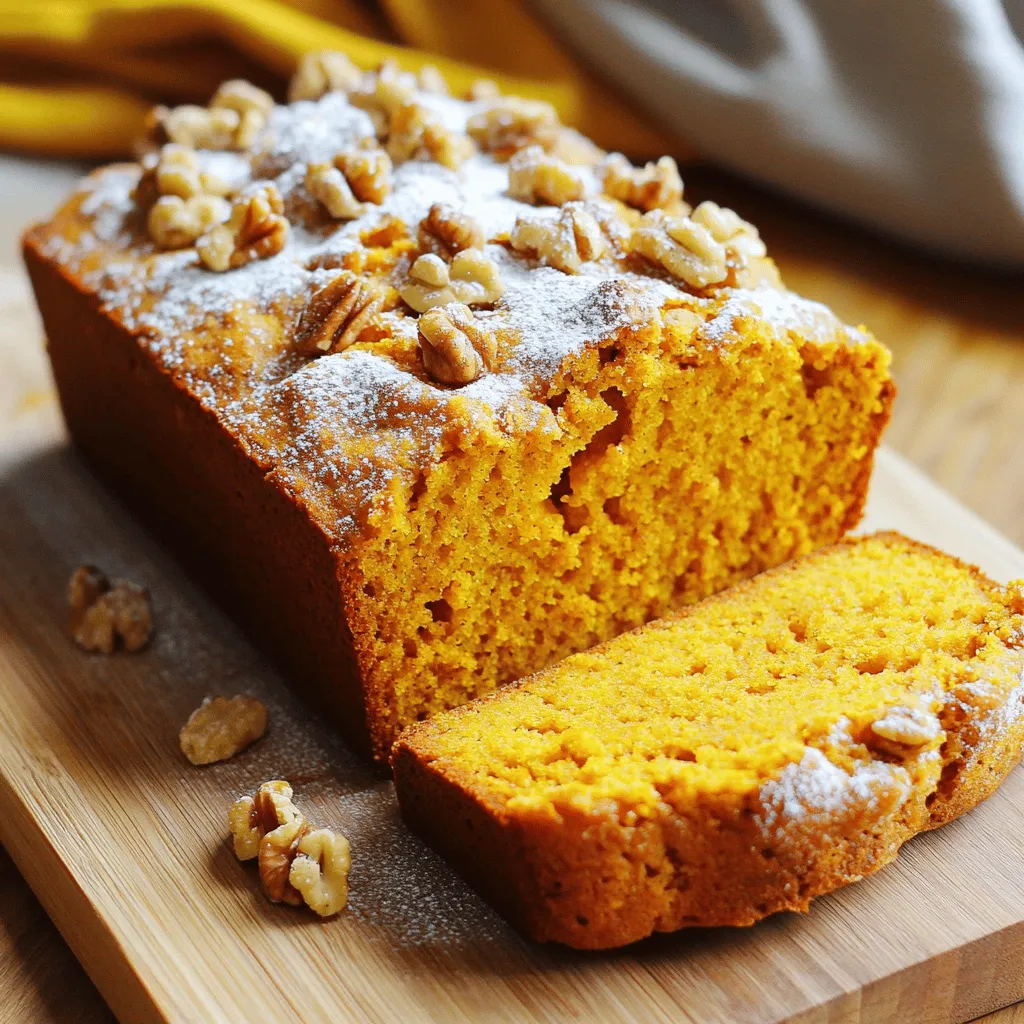
Are you ready to bake the best pumpkin bread? This easy recipe will delight your taste buds and fill your

To make these tasty rolls, you need a few key items: - 2 ripe bananas, mashed - 1/4 cup granulated sugar - 1/4 cup brown sugar, packed - 1/2 cup unsalted butter, melted - 1 large egg - 1 teaspoon vanilla extract - 2 cups all-purpose flour - 1 tablespoon baking powder - 1/2 teaspoon baking soda - 1/2 teaspoon salt - 1 tablespoon ground cinnamon - 1 cup chopped nuts (walnuts or pecans) (optional) These ingredients blend well to create a soft, sweet dough that holds the flavors of banana and cinnamon. For the filling that makes these rolls special, gather: - 1/2 cup brown sugar, packed - 1 tablespoon ground cinnamon - 1/4 cup unsalted butter, softened This mix adds a warm, sweet swirl to each bite, enhancing the banana flavor. To top your rolls with a sweet glaze, you'll need: - 1 cup powdered sugar - 2 tablespoons milk - 1/2 teaspoon vanilla extract The glaze brings a smooth finish that ties all the flavors together. For the full recipe, check out the instructions in the main section. To start, preheat your oven to 375°F (190°C) and grease a 9x13-inch baking dish. In a large bowl, mix together 2 ripe bananas, 1/4 cup granulated sugar, 1/4 cup brown sugar, and 1/2 cup melted butter. Add 1 large egg and 1 teaspoon vanilla extract. Stir until smooth. In another bowl, whisk together 2 cups all-purpose flour, 1 tablespoon baking powder, 1/2 teaspoon baking soda, and 1/2 teaspoon salt. Gradually mix the dry ingredients into the banana mixture until just combined. If you like, fold in 1 cup of chopped nuts. Now, roll out the dough on a floured surface into a rectangle, about 1/4 inch thick. For the filling, mix 1/2 cup brown sugar and 1 tablespoon cinnamon in a small bowl. Spread 1/4 cup softened butter evenly over the dough, then sprinkle the cinnamon-sugar mixture on top. Starting from one long edge, roll the dough tightly into a log. Slice the log into 12 equal pieces and place them in the greased baking dish, leaving space between each roll. Bake the rolls in the preheated oven for 25-30 minutes or until they turn golden brown. While the rolls bake, make the glaze by whisking together 1 cup powdered sugar, 2 tablespoons milk, and 1/2 teaspoon vanilla extract until smooth. Once the rolls are out of the oven, let them cool for a few minutes. Drizzle the glaze over the warm rolls for a sweet finish. For the full recipe, check out the complete instructions above. Enjoy your delicious treat! Baking banana bread cinnamon rolls can be easy with a few tips. First, always use ripe bananas. They add more flavor and moisture. Second, don’t overmix the dough. Mix just until combined. This keeps the rolls soft and fluffy. Finally, let the rolls rise for a bit before baking. This step helps them grow tall and light. To get a moist banana bread base, use enough mashed bananas. Two ripe bananas work well for this recipe. They not only add moisture but also flavor. Adding melted butter also helps. Use unsalted butter for the best taste. Make sure you mix the wet ingredients well before adding the dry ones. This helps blend all the flavors nicely. When serving banana bread cinnamon rolls, warmth is key. Serve them straight from the oven for the best taste. You can drizzle the glaze on top for a sweet finish. For a nice touch, add chopped nuts or a sprinkle of cinnamon. Use a pretty plate to make the rolls look even more inviting. This adds a special touch to your treat. For more ideas, check out the Full Recipe for variations and fun toppings. {{image_2}} You can make your banana bread cinnamon rolls even more fun with some tasty add-ins. Many people love using chopped nuts like walnuts or pecans. They add a nice crunch and pair well with the soft bread. You can also mix in chocolate chips for a sweet touch. Dark or milk chocolate works great here. If you want a fruity twist, add dried fruit like raisins or cranberries. Just remember to adjust the sugar if you add sweet dried fruit. For a healthier version, consider using whole wheat flour instead of all-purpose flour. This swap gives your rolls more fiber and nutrients. You can also cut back on the sugar. Try using half the amount or substituting with natural sweeteners like honey or maple syrup. These options still taste great and will keep your rolls light and fluffy. If you want a vegan treat, it's easy to make your banana bread cinnamon rolls without eggs and dairy. You can use flaxseed meal mixed with water as an egg substitute. Just mix one tablespoon of flaxseed meal with three tablespoons of water and let it sit for a few minutes. For the butter, use coconut oil or a vegan butter spread. Make sure to use plant-based milk in the glaze too. These simple swaps let everyone enjoy this sweet delight! You can find the full recipe above. To keep your leftover cinnamon rolls fresh, place them in an airtight container. You can also wrap them tightly in plastic wrap. This method helps keep them soft and moist. Store them at room temperature for up to three days. If you want to keep them longer, consider freezing them. If you plan to save the rolls for later, freezing is a great option. First, let the rolls cool completely after baking. Then, wrap each roll in plastic wrap. After that, place them in a freezer bag or container. Make sure to squeeze out as much air as possible. They will stay fresh in the freezer for up to three months. To enjoy your cinnamon rolls again, you can reheat them easily. If they are frozen, let them thaw in the fridge overnight. Then, place them on a baking sheet. Preheat your oven to 350°F (175°C) and warm them for about 10-15 minutes. You can also microwave them for about 15-20 seconds. Serve warm with a drizzle of glaze from the Full Recipe for the best taste. You can tell when the rolls are done by their color. They should turn golden brown. You can also use a toothpick. Insert it into the center of a roll. If it comes out clean, the rolls are ready. If it has dough on it, bake them a bit longer. The rolls should feel firm but soft. Let them cool slightly before adding the glaze. Yes, you can use banana puree instead of ripe bananas. One medium banana equals about 1/3 cup of puree. Keep in mind that the texture may change a little. The flavor remains sweet and delicious. Puree gives a smoother batter, which some may prefer. Just make sure the puree is not too watery, or it may affect the dough. The best way to frost cinnamon rolls is while they are warm. This allows the glaze to melt into the rolls. Start with a drizzle from the center and work your way out. You can use a spoon or a small whisk for control. If you want, sprinkle some nuts or cinnamon on top for extra flavor. For a fun twist, try adding a pinch of sea salt to the glaze for balance. For the complete recipe, check out the Full Recipe. In this post, we covered how to make tasty banana bread cinnamon rolls. We discussed the main ingredients and sharing tips for perfect rolls. The variations allow you to customize the taste and healthiness. Storing and reheating tips ensure your rolls stay fresh. Final thoughts: You can create amazing treats that everyone will love. Enjoy baking and experimenting!

Banana Bread Cinnamon Rolls Delightful and Simple Treat

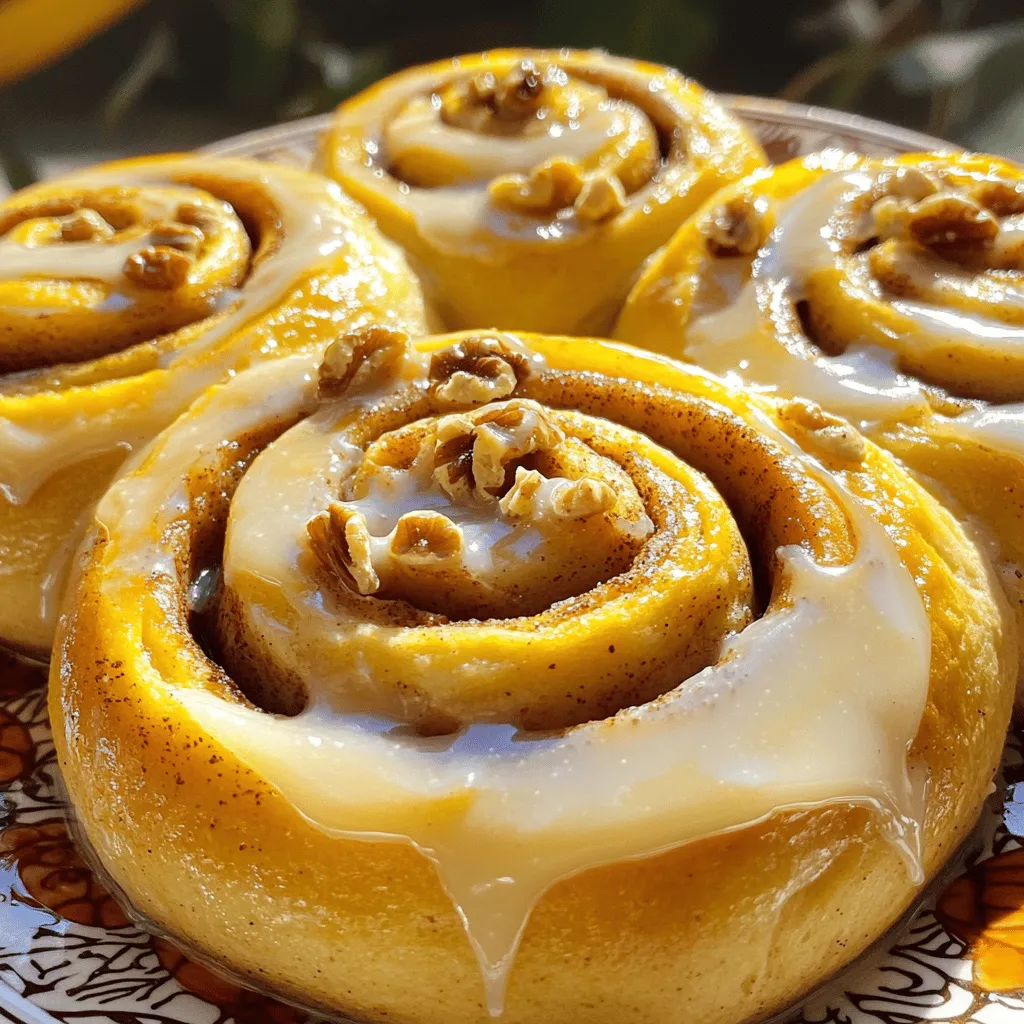
Are you ready to elevate your snack game? These Banana Bread Cinnamon Rolls are not just easy to make—they are

- 2 cups cooked chicken, shredded - 1 cup mushrooms, sliced (cremini or button) - 1 medium onion, diced - 2 cloves garlic, minced - 3 cups chicken broth - 1 cup heavy cream - 2 tablespoons olive oil - 1 tablespoon butter - 1 teaspoon dried thyme - Salt and pepper to taste - Fresh parsley, chopped for garnish Every ingredient plays a key role in making this creamy chicken mushroom soup tasty. The cooked chicken gives it heartiness. You can use leftover chicken or rotisserie chicken for easy prep. Mushrooms add a rich flavor and nice texture. I love using cremini or button mushrooms for this recipe. Onions and garlic boost the overall taste. They add depth and warmth. Chicken broth forms the base of the soup, making it comforting and savory. Heavy cream is what makes this soup creamy and rich. Using olive oil and butter helps sauté the veggies and adds flavor. Thyme brings a wonderful aroma and taste. Finally, season with salt and pepper to your liking. Fresh parsley adds a pop of color and freshness. For the full recipe, check out the details provided above. - Heat olive oil and butter in a large pot. - Sauté onion until translucent. To start, I heat two tablespoons of olive oil and one tablespoon of butter in a big pot. I place the pot over medium heat. Once the butter melts, I add one medium diced onion. I sauté it until it turns translucent, which usually takes about five minutes. This step builds a great base for flavor. - Add garlic and mushrooms, cooking until softened. - Stir in thyme, salt, and pepper. Next, I add two cloves of minced garlic and one cup of sliced mushrooms to the pot. I let them cook for about five minutes until the mushrooms soften and get a nice brown color. Then, I sprinkle in one teaspoon of dried thyme, salt, and pepper to taste. This brings a warm, herbal note to the soup. - Pour in chicken broth and bring to a boil. - Add shredded chicken and simmer. - Incorporate heavy cream and adjust seasoning. - Serve and garnish with parsley. After that, I pour in three cups of chicken broth. I bring the mixture to a gentle boil. Once boiling, I reduce the heat to low and stir in two cups of shredded cooked chicken. I let it simmer for about ten minutes to let the flavors blend. Now comes the creamy part! I slowly add one cup of heavy cream while stirring. This makes the soup rich and smooth. I taste it and adjust the seasoning as needed. Finally, I ladle the soup into bowls and garnish with fresh chopped parsley. For the full recipe, check out the details above. Enjoy this creamy delight! To boost flavor, use homemade chicken broth. It makes the soup richer and tastier. You can also add spices like paprika or nutmeg. These spices give a warm touch to the soup. For a creamier soup, blend a portion of it. This gives a smooth feel while keeping some chunks. Also, try a mix of mushrooms, like cremini and button. Different mushrooms add unique textures and flavors that make every bite exciting. Pair your creamy chicken mushroom soup with crusty bread. It’s perfect for dipping and adds a nice crunch. You can also enjoy it with a fresh salad for a light meal. This soup works well as an appetizer or a main dish, making it very versatile. Explore more with the Full Recipe for detailed steps. {{image_2}} You can make this creamy chicken mushroom soup fit your needs. If you want a dairy-free option, use coconut milk or almond milk. This keeps the soup creamy without dairy. For gluten-free adjustments, check your broth and seasoning. Many brands offer gluten-free products. You don’t have to stick with chicken! Try turkey or tofu instead. This adds a fun twist and makes it vegetarian. You can also mix in different veggies. Spinach or carrots work well and boost nutrition. Make it exciting by changing how you serve the soup. You could add noodles to turn it into a pasta dish. This makes it even heartier. Another fun idea is to serve it in a bread bowl. It’s interactive and delicious! For the full recipe, check out the detailed instructions. To store leftovers, let the soup cool to room temperature. Then, pour it into an airtight container. This keeps the soup fresh. Make sure to seal it well. You can store it in the fridge for up to three days. If you want to enjoy it later, freezing is a great option. If you plan to freeze the soup, first let it cool. Then, transfer it to freezer-safe containers. Leave some space at the top since soup expands when frozen. This soup can last for up to three months in the freezer. To reheat, thaw it in the fridge overnight. Then, heat it on the stove over low heat. Stir often to keep the texture smooth and creamy. For easy meal prep, you can assemble the soup ahead of time. Chop your ingredients and store them in separate containers. Keep the broth and cream separate until cooking. This keeps everything fresh. When you are ready to cook, just combine everything in a pot. It makes dinner quick and simple. This method helps you enjoy a warm meal any night of the week. For the full recipe, refer to the beginning section. How long does creamy chicken mushroom soup last in the fridge? This soup lasts about 3 to 4 days in the fridge. Store it in an airtight container. Make sure it cools down first before sealing. Can I use frozen chicken for this recipe? Yes, you can use frozen chicken. Just ensure you cook it all the way through. If using frozen, add more time to cook it properly. Is it necessary to sauté the onions and mushrooms before adding broth? Yes, sautéing the onions and mushrooms adds flavor. This step helps to release their natural sweetness. It makes the soup taste richer and more complex. Can I use other types of meat for this soup? Absolutely! You can use turkey or even shredded beef. Just adjust the cooking time as needed. Each meat will give a different taste to the soup. How many calories are in creamy chicken mushroom soup? One serving has about 350 calories. This can vary based on specific ingredients. Always check the labels for exact numbers. What are the health benefits of mushrooms in this recipe? Mushrooms are low in calories and packed with nutrients. They provide vitamins like B and D. Plus, they are a good source of antioxidants, which help keep you healthy. This article covered making a delicious creamy chicken mushroom soup from scratch. We explored key ingredients, step-by-step directions, and tips for adding flavor and texture. You can modify the recipe to suit dietary needs and even switch up ingredients. Proper storage can keep leftovers fresh, making this a perfect meal prep option. Enjoying this soup can warm any chilly day or impress at dinner. With simple steps, you can create a comforting dish that you’ll want to share again and again. Dive in and savor every bite!

Creamy Chicken Mushroom Soup Simple and Delicious Recipe

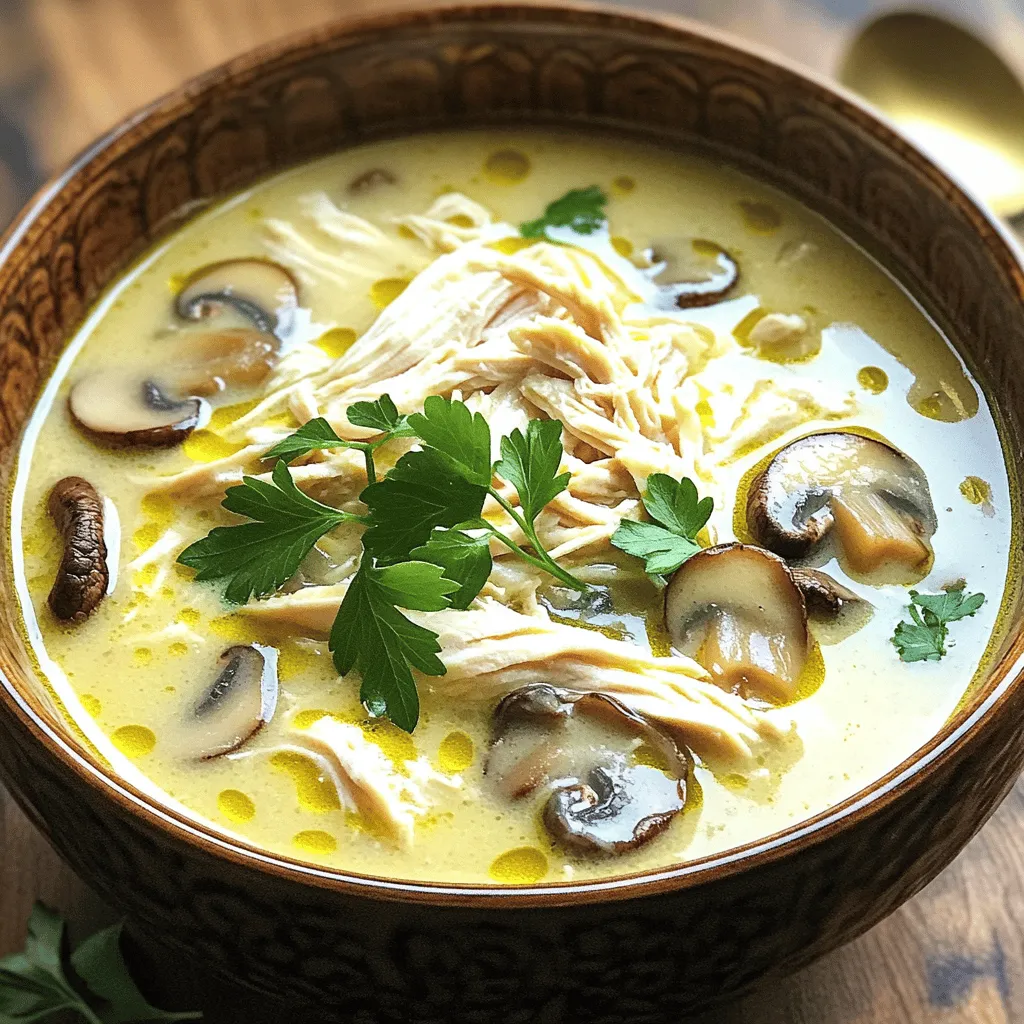
Creamy Chicken Mushroom Soup is a cozy dish that’s simple to make. With just a few ingredients, you can create

To make delicious blueberry cream cheese bars, you need some key ingredients. Here’s what you will need: - 1 cup all-purpose flour - ½ cup unsalted butter, softened - ½ cup granulated sugar - 1 teaspoon vanilla extract - ½ teaspoon baking powder - ¼ teaspoon salt - 8 oz cream cheese, softened - 1/3 cup powdered sugar - 1 egg - 1 cup fresh blueberries - Zest of 1 lemon Each ingredient plays a role. The flour gives structure, while butter adds richness. Sugar sweetens your bars, and cream cheese brings creaminess. Fresh blueberries add a burst of flavor, and lemon zest brightens it all up. You can add a few optional ingredients for extra fun. Consider these: - 1 teaspoon cinnamon for warmth - 1 tablespoon honey for extra sweetness - A pinch of nutmeg for depth These flavors can elevate your bars. Cinnamon and nutmeg add warmth, while honey offers a different kind of sweetness. Feel free to mix and match based on your taste! To make the process smooth, gather these tools: - 9x9-inch baking pan - Mixing bowls - Electric mixer or whisk - Rubber spatula - Measuring cups and spoons Having the right tools makes cooking easier. A good mixer helps create a smooth filling, while a spatula ensures you get every bit from the bowl. This setup will help you craft tasty blueberry cream cheese bars with ease! For the full recipe, check out the detailed instructions. Start by gathering all your ingredients. You need flour, butter, sugar, vanilla, baking powder, salt, cream cheese, powdered sugar, an egg, blueberries, and lemon zest. Make sure everything is at room temperature. This helps with mixing and gets a smooth texture. In a medium bowl, mix the softened butter and granulated sugar. Beat them together until it looks light and fluffy. Then, add in the vanilla, baking powder, and salt. Stir to combine. Next, slowly add the flour. Mix until just combined. Don't overmix, or the crust may become tough. In another bowl, beat the softened cream cheese and powdered sugar. Mix until the cream cheese is smooth and creamy. Then, add the egg and lemon zest. Mix again until everything is well blended. This filling adds a rich taste to your bars. Once the crust is baked, take it out of the oven. Pour the cream cheese mixture over the hot crust. Spread it evenly with a spatula. Now, bake the dish again for 25 to 30 minutes. The center should be set and just slightly jiggly. Let the bars cool in the pan at room temperature. Then, refrigerate them for at least 2 hours. This helps the flavors meld and makes cutting easier. Once chilled, cut into squares. Now, you’re ready to enjoy these tasty treats! For the full recipe, check the earlier section. To make a great crust, start with soft butter. It blends better with sugar. Mix them until light and fluffy. This adds air and makes the crust nice and crisp. Use all-purpose flour for the right texture. Make sure to press the crust firmly in the pan. This helps it hold its shape while baking. Bake it until it’s just lightly golden. If you bake it too long, it gets hard. Keep an eye on it during baking. For a smooth filling, use softened cream cheese. It blends easily with powdered sugar. Mix them well until there are no lumps. Add the egg and lemon zest slowly. This gives the filling a fresh taste. When folding in the blueberries, be gentle. You want to keep them whole for texture. This step also adds a burst of flavor in every bite. Avoid overmixing once you add the blueberries. This keeps the filling creamy and light. These bars are great chilled or at room temperature. Serve them fresh from the fridge for a cool treat. You can also drizzle a bit of honey on top. This adds a nice touch of sweetness. For a fun twist, add some whipped cream. It pairs well with the tangy filling. If you want to impress guests, garnish with mint leaves. This adds color and freshness. For a casual gathering, cut them into bite-sized pieces. This makes sharing easier and more fun. You can find the full recipe below to make your own! {{image_2}} You can change the flavor of Blueberry Cream Cheese Bars easily. For a Lemon Blueberry twist, add more lemon zest to the cream cheese mix. This gives a fresh and zesty taste. If you prefer strawberries, swap the blueberries for fresh strawberries. Just chop the berries into small pieces. This adds a sweet and fruity flavor with a lovely color. To make these bars gluten-free, use a gluten-free flour blend instead of all-purpose flour. Many blends work well in baking. Make sure to check the package for a one-to-one ratio. This way, you can still enjoy the same great taste without gluten. You can also make a vegan version. Replace the cream cheese with a vegan cream cheese alternative. Use a flax egg instead of a regular egg. To make a flax egg, mix 1 tablespoon of ground flaxseed with 2.5 tablespoons of water. Let it sit for five minutes until it thickens. This keeps your bars creamy and rich while being plant-based. Check out the Full Recipe for more details on making these tasty treats. To keep your blueberry cream cheese bars fresh, store them in an airtight container. Place a piece of parchment paper between layers to avoid sticking. This helps maintain their texture. You can keep them in the fridge for up to five days. Always check for any signs of spoilage before eating. To freeze blueberry cream cheese bars, wrap them well in plastic wrap. Then, place the wrapped bars in a freezer bag or a container. This protects them from freezer burn. They can last for up to three months. When you’re ready to enjoy, simply thaw them in the fridge overnight. After storing, I recommend serving the bars chilled. They taste best when cold. If they have sat at room temperature, pop them back in the fridge for 20 minutes. This helps the flavors come alive again. Remember, you can also dust them with powdered sugar before serving for a nice touch. For the full recipe, check out the previous section. Yes, you can use frozen blueberries. They work well in this recipe. Just remember to thaw and drain them first. This avoids excess moisture in your bars. These bars last about five days in the fridge. Store them in an airtight container. This keeps them fresh and tasty. Absolutely, you can make these bars a day or two ahead. Just cool and chill them in the fridge. This allows the flavors to blend nicely. Serve these bars chilled or at room temperature. They pair well with whipped cream or a scoop of vanilla ice cream. For a fun twist, dust them with powdered sugar before serving. For the full recipe, check here. In this post, we explored making blueberry cream cheese bars. You learned about essential and optional ingredients, tools, and a step-by-step baking guide. We shared tips for a perfect crust and filling, plus fun variations like vegan or gluten-free options. Remember, baking these bars can be fun. Experiment with flavors and enjoy your tasty treats! Store them well to keep them fresh, and serve with joy. Happy baking!

Blueberry Cream Cheese Bars Simple and Tasty Treat

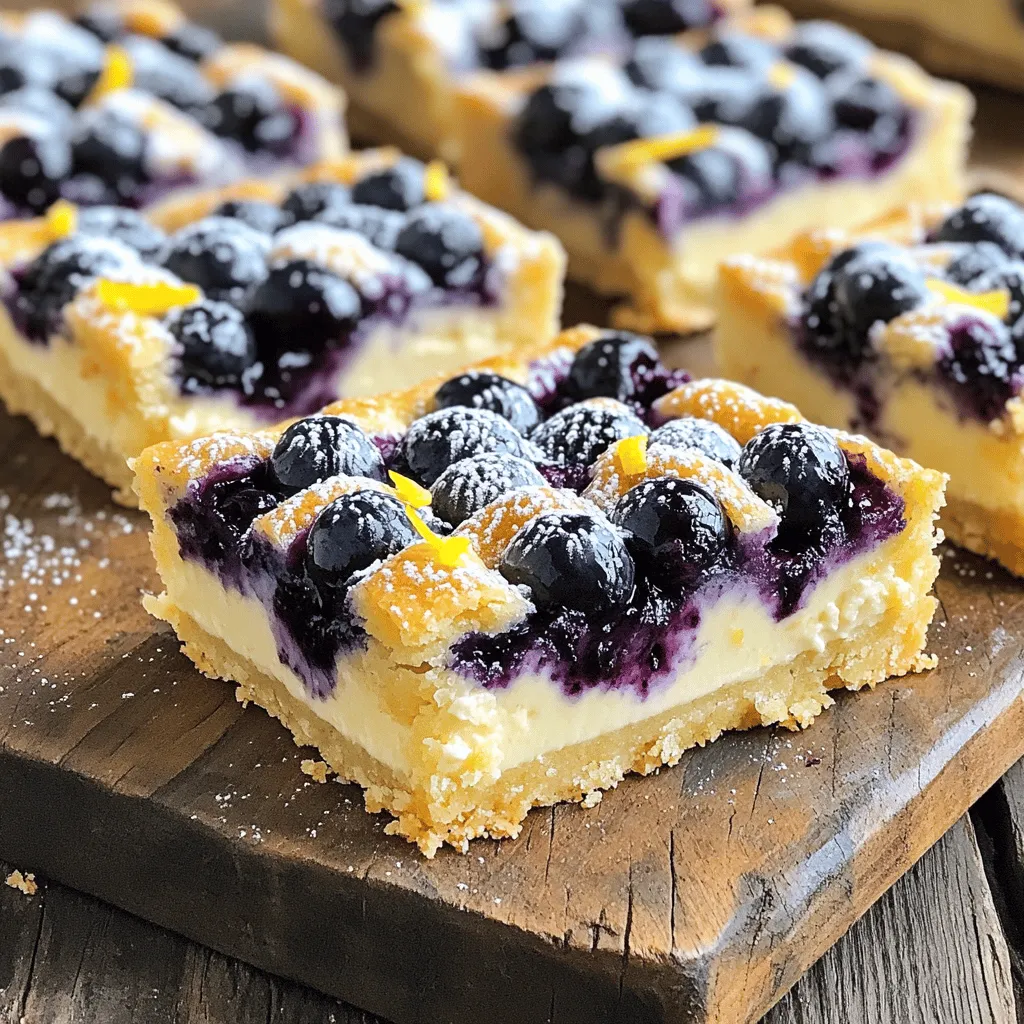
Are you ready to whip up a sweet treat that’s both easy and delicious? Blueberry Cream Cheese Bars offer a

- 2 large apples, peeled, cored, and diced - 1/2 cup brown sugar - 1 teaspoon ground cinnamon - 1/4 teaspoon nutmeg - 1 tablespoon lemon juice - 1 tablespoon cornstarch - 1 package of pre-made pie crusts - 1 egg, beaten - 1 tablespoon granulated sugar For the best flavor in your mini apple pies, I suggest using Granny Smith or Honeycrisp apples. These types balance sweetness and tartness well. If you want to make your own pie crust, you can use flour, butter, and water. This gives a fresh taste. Also, feel free to swap brown sugar with maple syrup or honey for a different sweetness. You will need a muffin tin to shape the pies. Mixing bowls are great for combining ingredients. A baking sheet will catch any drips while baking. 1. Preheat the oven and prepare the filling Start by preheating your oven to 375°F (190°C). This step is key for a crispy crust. In a medium bowl, mix together 2 large apples, 1/2 cup brown sugar, 1 teaspoon ground cinnamon, 1/4 teaspoon nutmeg, 1 tablespoon lemon juice, and 1 tablespoon cornstarch. Toss everything until the apples are well coated. Let the mixture sit so the flavors blend. 2. Prepare the muffin tin and pie crusts Lightly grease a muffin tin with non-stick spray or butter. This will help prevent sticking when you bake. Roll out your pre-made pie crusts on a floured surface. Use a round cutter, about 4 inches wide, to cut out 12 circles from the dough. 3. Create the pie shells Place each dough circle into a muffin tin cup. Press it gently against the sides and bottom. This will form a small pie shell that holds your filling. 1. Fill the shells with apple mixture Spoon the apple filling into each mini pie shell. Fill them just to the top, but don’t overfill. You want to allow room for bubbling as they bake. 2. Add decorative tops Use the leftover dough to cut out smaller circles. You can also make fun shapes, like stars, to place on top. This adds a nice touch to your pies. If you prefer, you can leave them open-faced for a rustic look. 3. Bake until golden brown Brush the tops with a beaten egg for a golden finish. Sprinkle granulated sugar on top for added sweetness and crunch. Bake in your preheated oven for 20-25 minutes. Look for a golden brown crust and bubbling filling. 1. Cooling time and techniques Once baked, let the mini apple pies cool in the muffin tin for about 10 minutes. This makes them easier to remove. After that, carefully lift them out and place them on a wire rack to cool completely. 2. Presentation tips Serve these tasty treats warm. They pair wonderfully with a scoop of vanilla ice cream or a drizzle of caramel sauce. For an elegant touch, add a sprig of mint on top. This makes your mini apple pies not just delicious, but beautiful too. For the full recipe, check out the details provided earlier. Enjoy your baking! To make your muffin tin mini apple pies perfect, focus on the crust. To avoid soggy crusts, use fresh pie crusts and bake them at the right temperature. Pre-baking the crust slightly can help too. This step helps firm it up. For even baking, rotate your muffin tin halfway through baking. This ensures all pies get equal heat. Check the pies at the 20-minute mark. You want them golden brown and bubbling. Using pre-made pie crusts is a great way to save time. They help you skip the dough-making step. You can find them in any grocery store. Just roll them out and cut them into circles for your mini pies. Batch prepping is another smart move. You can prepare the apple filling ahead of time. Store it in the fridge for up to three days. This makes your baking day quick and easy. One mistake to watch for is overfilling the pies. If you fill them too high, the filling will ooze out. This can cause a mess in your oven. Aim to fill them just to the top for best results. Not cooling the pies properly before serving is also a common error. Let them cool for about 10 minutes in the tin. This makes them easier to remove and helps the filling set. Enjoy these tips to make your Muffin Tin Mini Apple Pies delicious! For the full recipe, check out the provided link. {{image_2}} You can switch up the flavor of your mini apple pies in fun ways. One great option is to make caramel apple mini pies. To do this, simply add a few tablespoons of caramel sauce to your apple filling. This adds a sweet and rich taste. Another fun twist is a cinnamon roll-inspired version. Use cinnamon roll dough instead of pie crust. Place it in the muffin tin and fill it with your apple mixture. The result is a warm, gooey treat that feels like a dessert and breakfast all in one. If you need gluten-free options, use a gluten-free pie crust. Many brands offer good choices. This way, everyone can enjoy your mini pies without worry. For vegans, you can substitute the butter in the crust with coconut oil. Use maple syrup or agave instead of brown sugar in the filling. These changes keep the flavor while making it plant-based. Serve your mini pies warm for the best taste. Pair them with a scoop of vanilla ice cream for a classic touch. The cold ice cream mixes well with the warm pie, creating a great experience. You can also drizzle the pies with caramel sauce for extra sweetness. For a creative look, arrange them on a platter and garnish with mint leaves. This adds a fresh touch that makes the dessert even more appealing. To keep your mini apple pies fresh, store them in an airtight container. Place a piece of parchment paper between layers to avoid sticking. The pies will stay good in the fridge for about 3 to 4 days. If you want to save some for later, freezing is easy. First, let the pies cool completely. Then, wrap each pie in plastic wrap and place them in a freezer bag. They can last up to 2 months in the freezer. To reheat, simply bake them at 350°F (175°C) for about 15-20 minutes. This will keep the crust nice and crispy. If you have leftover pie crusts or apple filling, you can make other tasty treats. Use extra pie crusts to make cookies or tarts. For leftover apple filling, try adding it to oatmeal or yogurt for a sweet twist. You can also make an apple crisp by layering the filling with oats and butter. These ideas let you enjoy every bit of your ingredients! To balance sweetness in the filling, choose tart apples. Granny Smith is a great choice. You can also reduce the brown sugar by a few tablespoons. Adding lemon juice brightens the flavor and cuts the sweetness. A pinch of salt can also help balance the flavors. Yes, you can use frozen apples. Thaw them first and drain excess liquid. Frozen apples might be softer than fresh ones. They work well if you want to save time. Just adjust the sugar if your frozen apples are sweetened. To reheat mini apple pies, use an oven. Preheat it to 350°F (175°C). Place the pies on a baking sheet. Heat them for about 10 minutes. This keeps the crust crispy and warms the filling. Microwave can make the crust soggy, so avoid that. These mini apple pies take about 20-25 minutes to bake. Watch for the crust to turn golden brown. The filling should bubble slightly. If you see this, your pies are done. Always check them a few minutes early to avoid overbaking. You can create delicious mini apple pies with simple ingredients and easy steps. We covered everything from ingredients to common mistakes. Remember to choose the right apple types for great flavor. Pay attention to cooling and presentation for the best results. With practice, you will impress friends and family. Enjoy making these tasty treats, and don’t forget to get creative with your variations and serving ideas! Happy baking!

Muffin Tin Mini Apple Pies Tasty and Simple Treat

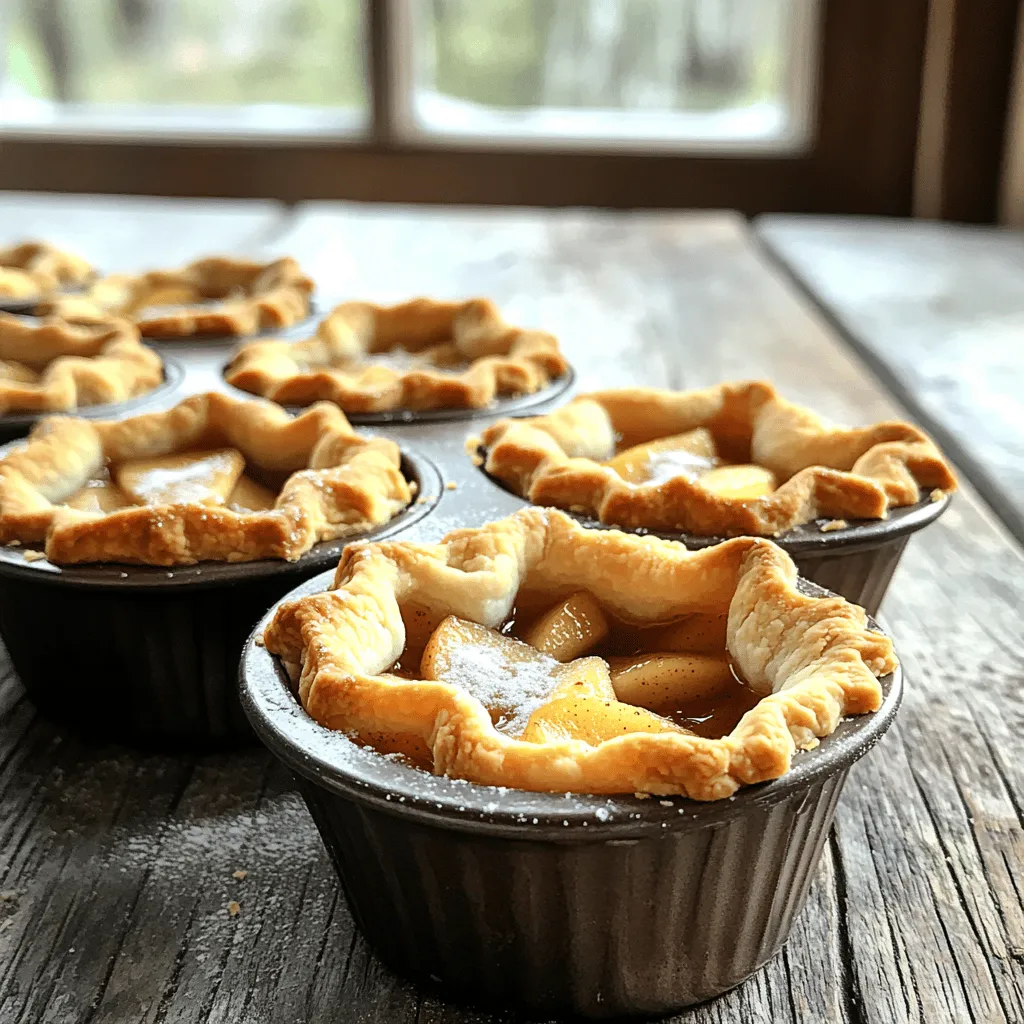
Craving a tasty treat that’s simple to make? Look no further! My Muffin Tin Mini Apple Pies pack all the

Older posts
Page1 Page2 … Page78 Next →

dsad

© 2025 My Saved Recipe • Built with GeneratePress

Our Policies

  • Copyright Policy
  • Cookie Policy
  • GDPR Policy
  • Privacy Policy
  • Disclaimer
  • Terms Of Use

More Information

  • Home
  • About
  • Contact
  • Appetizers
  • Dessert
  • Dinner
  • Drinks
©2025, My Saved Recipe About Back To Top