Skip to content
DisclaimerTerms Of UseGDPR PolicyCookie Policy

My Saved Recipe

  • Home
  • Drinks
  • Appetizers
  • Dinner
  • Dessert
  • About
  • Contact
  • Privacy Policy
DisclaimerTerms Of UseGDPR PolicyCookie Policy

Savannah

To make the Roasted Beet and Goat Cheese Butter Board, you will need: - 2 medium beets, scrubbed and trimmed - 4 tablespoons olive oil, divided - Salt and pepper to taste - 1 cup creamy goat cheese, softened - 1/2 cup unsalted butter, softened - 1 tablespoon honey - 1 teaspoon fresh thyme leaves, plus more for garnish - 1/2 cup toasted walnuts, roughly chopped - Fresh arugula, for serving - Artisan bread or crackers for dipping If you need alternatives, here are some easy swaps: - Replace goat cheese with cream cheese or feta for a different taste. - Use coconut oil in place of unsalted butter for a dairy-free option. - For sweetness, maple syrup can work instead of honey. - If you don't have walnuts, try pecans or almonds for crunch. - Fresh herbs like rosemary or parsley can replace thyme for a new flavor. To make this tasty board, gather the following tools: - A roasting pan or baking sheet - Aluminum foil for wrapping the beets - Mixing bowl for the goat cheese butter - Spoon for spreading and creating texture - A serving platter or wooden board to arrange everything This list ensures you have all you need to create this delightful dish. If you're ready to dive into the full recipe, check out the [Full Recipe]. Enjoy the colorful and tasty flavors that come together beautifully! Start by gathering your ingredients. You will need beets, goat cheese, butter, honey, thyme, walnuts, arugula, and bread or crackers. Make sure everything is fresh and ready to go. Preheat your oven to 400°F (200°C). This step is crucial for roasting the beets perfectly. Wrap each beet in aluminum foil. Drizzle one tablespoon of olive oil on each beet. Season them with salt and pepper. Seal the foil tightly to keep the steam in. Place the wrapped beets on a baking sheet. Roast them for about 45-60 minutes. Check them with a fork; they should be fork-tender. When done, let them cool a bit. Unwrap the foil, peel the skins, and slice the beets thinly. The colors will be vibrant and beautiful. In a mixing bowl, combine the softened goat cheese and butter. Add honey and thyme leaves to the bowl. Mix everything well until it’s nice and creamy. This will be your goat cheese butter. Spread this mixture on your serving platter or board. Use the back of a spoon to create some indents for a nice texture. Now, arrange your sliced beets on top of the goat cheese butter. Sprinkle the toasted walnuts over the beets. If you like a touch of sweetness, drizzle a little extra honey on top. Garnish with more thyme leaves. Serve it with fresh arugula and your choice of artisan bread or crackers for dipping. Enjoy your Roasted Beet and Goat Cheese Butter Board Delight! For the full recipe, check out the details above. Store any leftovers in an airtight container. Keep it in the fridge. The beet and goat cheese butter can last up to three days. Ensure to separate the bread or crackers to keep them crisp. If you want to enjoy it later, you can freeze the butter spread. Just thaw it in the fridge overnight before using. When choosing beets, look for smooth skin and firm texture. Avoid beets with soft spots or blemishes. Smaller beets tend to be sweeter and more tender. To prepare, wash them well under cold water. Trim off the tops and roots. You can roast them whole or cut them into wedges. Roasting brings out their natural sweetness and enhances their flavor. For a stunning display, use a wooden board as your base. Spread the goat cheese butter in a thick layer. Arrange the beet slices on top in a circular pattern. Sprinkle chopped walnuts for a nice crunch. Add fresh thyme leaves for color. Serve with artisan bread or crunchy crackers around the board. This makes it easy for guests to dip and enjoy. If you want, add a small dish of honey for an extra touch. For more ideas, check the Full Recipe. {{image_2}} You can swap goat cheese for cream cheese or feta. Cream cheese makes the dish smooth and rich. Feta adds a tangy kick that pairs well with beets. Both options work great and change the flavor. In spring, try adding fresh herbs like dill or chives. In summer, add fresh berries for a pop of color and flavor. In fall, roasted squash can add warmth to the board. Using seasonal ingredients keeps it fresh and fun. Consider adding sliced radishes for crunch and color. You can also sprinkle pomegranate seeds for a sweet burst. Toasted seeds or nuts add texture. For a spicy touch, drizzle with chili oil. These toppings make the board even more exciting. Explore the full recipe to discover more ways to customize your roasted beet and goat cheese butter board. This butter board shines with great pairings. I love serving it with crusty artisan bread. Crackers make a nice crunchy contrast too. Fresh arugula adds a peppery bite. You might also try it with sliced apples or pears. Their sweetness balances the tangy goat cheese. For drinks, a light white wine works perfectly. A crisp Sauvignon Blanc or a fruity Riesling complements the flavors. If you prefer non-alcoholic options, try sparkling water with a slice of lemon. This will refresh your palate while you enjoy the board. Leftovers are a treat! Spread the goat cheese butter on toasted bagels for breakfast. Mix leftover beets into a salad for lunch. You can also blend them into a dip for veggies. Don’t forget to use it as a spread for sandwiches. It adds a gourmet touch to any meal. For the full recipe, check out Roasted Beet and Goat Cheese Butter Board. Roasted beets can last about 5 to 7 days in the fridge. Keep them in an airtight container. This keeps them fresh and tasty. If you have leftovers, enjoy them in salads or sandwiches. Yes, you can mix it up with other cheeses! Cream cheese or ricotta works well too. Each cheese brings its own flavor. Goat cheese gives a tangy taste, while cream cheese is milder. Try different combos to find your favorite. You can add many tasty things to your butter board. Try fresh herbs, sliced radishes, or roasted garlic. Nuts like almonds or pistachios add a nice crunch. You can even use fruits like figs or berries for a sweet touch. Get creative and make it your own! For the full recipe, check the earlier section. Roasting beets and making goat cheese butter is simple and fun. We covered the ingredients and their substitutes, plus equipment needed. The step-by-step guide ensured anyone can follow along. I shared tips for storage, selection, and presentation. You now know variations to try and great pairings for serving. Enjoy your tasty butter board and feel free to make it your own!

Roasted Beet and Goat Cheese Butter Board Delight

Ready to impress your guests? The Roasted Beet and Goat Cheese Butter Board is your new must-try dish! This vibrant

To create this tasty dish, you need a few simple ingredients. Here’s what you will need: - 1 cup rolled oats - 1 cup unsweetened almond milk (or milk of choice) - 1/2 cup canned pumpkin puree - 2 tablespoons brown sugar (adjust to taste) - 1 teaspoon vanilla extract - 1 teaspoon pumpkin pie spice - 1/2 teaspoon cinnamon - 1/4 teaspoon salt Each ingredient plays a vital role. The rolled oats serve as the base, while the pumpkin puree brings a rich flavor. Brown sugar adds sweetness and depth. The spices create that cozy, warm taste we love in fall. While the main ingredients shine, you can enhance your oats with a few extras: - 1 tablespoon chia seeds (optional, for added texture) - 1/4 cup chopped pecans or walnuts (for topping) - Whipped cream or coconut whipped topping (for serving) Chia seeds help thicken the oats and add nutrition. Chopped nuts give a nice crunch, and whipped cream adds a creamy layer on top. Having the right tools makes cooking easier. Here are some helpful items for this recipe: - Large mixing bowl - Whisk or spoon for stirring - Mason jars or airtight containers for storage - Measuring cups and spoons These tools help mix, store, and serve your delicious oats. Each item is easy to find and makes the process smooth. Enjoy making your Brown Sugar Pumpkin Pie Overnight Oats! For the complete recipe, check out the Full Recipe section. To start, gather all your ingredients. You will need rolled oats, almond milk, pumpkin puree, brown sugar, vanilla, pumpkin pie spice, cinnamon, and salt. In a large mixing bowl, combine these ingredients. Mix them well until everything is smooth and blended. If you like a thicker texture, add the chia seeds now. They help the oats soak up the liquid. Stir again to ensure the chia seeds are evenly mixed in. Next, take your mixture and divide it into two or three mason jars or airtight containers. This makes it easy to grab in the morning. Seal the containers tightly to keep the oats fresh. Place them in the fridge overnight. This allows the oats to soak up all the flavors. In the morning, take out your oats. Give them a good stir. If they seem too thick, add a splash of almond milk to loosen them up. For a tasty finish, top your oats with chopped pecans or walnuts. A dollop of whipped cream or coconut whipped topping adds a special touch. For a fun presentation, serve in clear glasses. A drizzle of extra pumpkin puree or a sprinkle of cinnamon makes it look even more appealing. You can find the Full Recipe for Brown Sugar Pumpkin Pie Overnight Oats in the earlier section. Enjoy! To get the right texture for your oats, start with rolled oats. They absorb liquid well and stay chewy. Mix the oats with your liquid of choice. I prefer almond milk for a nutty flavor. If your oats are too thick in the morning, add a splash of milk. Stir well to keep things creamy. Also, consider adding chia seeds. They help thicken the mixture as it sits. A tablespoon of chia seeds makes a big difference! For added flavor, use fresh spices. Ground cinnamon and nutmeg brighten the dish. Make sure to add a good amount of pumpkin pie spice. This blend gives that warm, cozy taste. If you love sweetness, adjust the brown sugar. You can always add more if needed. A drizzle of maple syrup in the morning adds a nice touch too. Don’t forget to top your oats with chopped nuts. They add crunch and extra flavor. You can swap out some ingredients if needed. For a dairy-free option, stick with almond milk, soy milk, or oat milk. If you want a lower sugar option, use unsweetened applesauce instead of brown sugar. You can also use other sweeteners like honey or agave. If you’re not a fan of pumpkin, try using mashed banana or even applesauce. Both give a nice flavor and keep the oats moist. For a unique twist, add cocoa powder for a chocolatey vibe! {{image_2}} You can easily make this recipe vegan. Just swap regular milk for almond milk or oat milk. Both are great options. Use maple syrup instead of brown sugar for sweetness. This change keeps it tasty and plant-based. For gluten-free oats, choose certified gluten-free rolled oats. This way, you avoid any hidden gluten. These simple swaps let everyone enjoy the dish. Want to mix things up? Try adding different spices. Nutmeg or ginger can add warmth. You can also stir in a few chocolate chips for a sweet twist. If you love fruit, add diced apples or sliced bananas. These fruits pair well with pumpkin. You can also try adding a spoonful of peanut butter for creaminess. Each of these ideas gives a fun new taste to your oats. As seasons change, so can your oats! In the summer, swap pumpkin for fresh peaches or berries. A touch of lemon zest brightens the flavor. In the winter, add more spices like clove or cardamom for warmth. You could even use eggnog in place of milk for a festive treat. Each season brings new flavors and ideas. Enjoy experimenting with your overnight oats! Check out the Full Recipe for more inspiration. To keep your Brown Sugar Pumpkin Pie Overnight Oats fresh, store them in airtight containers. Mason jars work well for this. Make sure the lids are tight to prevent air from getting in. This helps keep the oats moist and flavorful. You can prepare them the night before and store them in the fridge. They stay fresh for up to five days. You can also freeze your overnight oats for later. Divide the mixture into freezer-safe containers or bags. Make sure to leave some space for expansion. When you are ready to eat, thaw them in the fridge overnight. You can heat them in the microwave if you like warm oats. Just add a splash of almond milk to keep them creamy. The shelf life of these oats is about five days in the fridge. If you freeze them, they can last up to three months. When reheating, stir in a little almond milk to restore creaminess. Heat in short bursts in the microwave, stirring in between. This method keeps the oats from getting too hot and drying out. Yes, you can use any milk you like. Almond milk works well, but feel free to try oat, soy, or even regular cow's milk. Each milk gives a different taste. If you want a creamier texture, whole milk is a good choice. You can also use lactose-free milk if you need it. Overnight oats last about three to five days in the fridge. Just make sure to keep them in a sealed container. This way, the oats stay fresh and safe to eat. The flavors will blend more over time, making them even better. Absolutely! You can adjust the brown sugar to fit your taste. If you want less sugar, try using a bit of honey or maple syrup. You can also add more pumpkin pie spice for flavor without extra sugar. Just remember to taste as you go for the best results. For a complete guide on making these delicious oats, check out the Full Recipe. This blog post covered how to make delicious brown sugar pumpkin pie overnight oats. We explored the main and optional ingredients and discussed helpful tools. You learned step-by-step instructions for preparing, storing, and serving these oats. I shared tips to get the right consistency and flavor. We also looked at variations, including vegan options and seasonal twists. Remember, these oats are simple and tasty! Enjoy experimenting with your favorite flavors.

Brown Sugar Pumpkin Pie Overnight Oats Delight

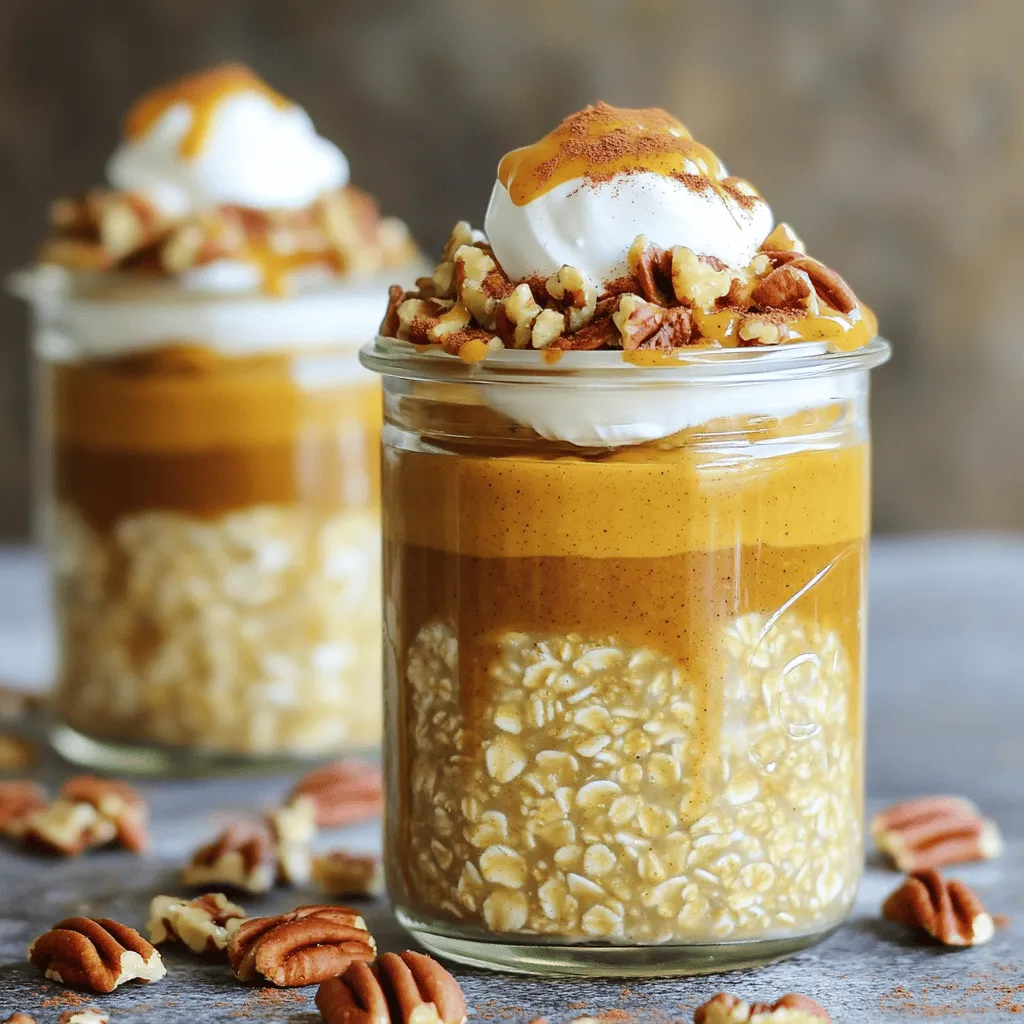
Looking for a tasty breakfast that’s easy and fun? You’ll love my Brown Sugar Pumpkin Pie Overnight Oats Delight! This

- Sushi rice and chicken base - 2 cups cooked sushi rice - 1 lb grilled chicken breast, shredded Sushi rice is key for great rolls. It should be sticky and slightly warm. You can use short-grain rice, which works best. Shredded chicken gives the rolls flavor and protein. - Identifying the right buffalo sauce - 1/2 cup buffalo sauce (adjust to taste) Choose a buffalo sauce that fits your spice level. Some sauces are mild, while others are hot. Taste before you use it to find your favorite. - Additional ingredients for texture and flavor - 1/2 cup cream cheese, softened - 1/4 cup green onions, sliced - 1/2 cup shredded carrots - 1 large cucumber, cut into thin strips - 4 sheets nori (seaweed) - Sesame seeds for garnish - Soy sauce for serving Cream cheese adds creaminess. Green onions bring a fresh taste. Shredded carrots add crunch, while cucumber gives a nice bite. Nori wraps everything together. Don’t forget soy sauce for dipping! For the full recipe, check the instructions carefully to make these tasty sushi rolls. First, cook 2 cups of sushi rice according to the package. Use water for the right texture. Once cooked, let it cool for about 10 minutes. This cooling step is key. It keeps the rice sticky but not too hot to handle. The perfect sushi rice feels firm yet tender. It should not be mushy or dry. While the rice cools, shred 1 pound of grilled chicken breast. In a bowl, mix the chicken with 1/2 cup of buffalo sauce. You can adjust the sauce for more or less heat. If you like spice, add more buffalo sauce. If you prefer mild, use less. This mix gives a great kick to your sushi. Now, grab a bamboo sushi mat. Place a sheet of nori, shiny side down, on the mat. With wet hands, spread about 1 cup of sushi rice over the nori. Leave a 1-inch border at the top. In the center, add the buffalo chicken mix, 1/2 cup cream cheese, sliced green onions, shredded carrots, and cucumber strips. Start rolling from the bottom edge. Roll it tightly, but not too tight. Wet the nori edge with water to seal the roll. Use a sharp knife to slice the roll into 6-8 pieces. Wipe the knife with a damp cloth between cuts. This helps keep the edges clean. For a fun tailgate look, arrange the sushi rolls on a platter and sprinkle sesame seeds on top. Serve with soy sauce on the side for dipping. Enjoy this fun and flavorful dish! To make tight sushi rolls, use a bamboo mat. This helps control the shape. Start by spreading the rice evenly on the nori. Leave a small edge at the top to seal the roll. Wet your hands to prevent the rice from sticking. When rolling, apply gentle pressure. Avoid squeezing too hard, as this can break the roll. A common mistake is overstuffing. Too much filling makes it hard to roll properly. To fix this, use less filling and keep your layers thin. Buffalo chicken sushi rolls pair well with fresh veggies. Serve with carrot sticks or cucumber slices for crunch. You can also add a side of ranch or blue cheese dressing for dipping. For a nice touch, layer the rolls on a platter. Sprinkle sesame seeds on top to make them look fancy. Use small bowls for soy sauce, so guests can easily dip their rolls. If you need to serve more people, just double the recipe. Make sure you have enough rice and chicken. You can prep the chicken and rice ahead of time. Keep the sushi rolls fresh by covering them with a damp cloth. This keeps the nori from drying out. If you plan to make the rolls in advance, store them in the fridge, but enjoy them within a day for the best taste. {{image_2}} You can easily adapt this recipe for different diets. For a gluten-free option, use gluten-free soy sauce. This keeps the taste while making it safe for those with gluten issues. You can also swap out the cream cheese for a dairy-free option. Use a vegan cream cheese or avocado to keep it creamy and rich. For a vegetarian version, replace the chicken with marinated tofu or tempeh. Add extra veggies like bell peppers or snap peas for crunch. The beauty of sushi rolls lies in their versatility. You can switch up the sauces to suit your taste. Try using ranch dressing for a creamy twist. If you want more heat, add sriracha or a spicy mayo. You can also mix in different ingredients. For a fresh taste, add mango or pineapple chunks. These fruits balance the spice of the buffalo sauce. Remember, you can customize these rolls to fit any flavor profile you enjoy. Tailgate Buffalo Chicken Sushi Rolls are all about your personal touch! If you want to dive deeper into the details, check the Full Recipe for more ideas. To keep your sushi rolls fresh, wrap them tightly in plastic wrap. This helps to prevent air from drying them out. Store the wrapped rolls in an airtight container in the fridge. Sushi can last for about two days in the refrigerator. When you want to enjoy your leftover sushi, avoid using a microwave. The microwave can make the rice mushy. Instead, place the rolls in a pan on low heat. Cover the pan with a lid to keep moisture in. This method keeps the rolls fresh and tasty. For best results, eat the sushi cold rather than reheating. Cold sushi offers a nice crunch and keeps the flavors bright. Yes, you can make sushi rolls ahead of time. I recommend rolling them a few hours before your event. This helps them stay fresh. Store the rolls in the fridge. Use plastic wrap to keep them moist. Just remember, sushi tastes best when it’s fresh. If you cannot find sushi rice, use short-grain rice as a substitute. It has a similar texture and stickiness. Quinoa is another great option. It adds a nutty flavor and is gluten-free. You can also try brown rice for a healthier twist. Just keep in mind that cooking times may vary. For a fun presentation, cut the rolls into bite-sized pieces. Arrange them on a colorful platter. Add small bowls of soy sauce for dipping. You can also garnish with sesame seeds and sliced green onions. This makes them look even more appealing and tasty! Nori is generally safe for most people. However, some may have allergies to seaweed. If you have a gluten-free diet, check the brand of nori. Some brands may add glutenous ingredients. Always read the label to ensure it's safe for your diet. In this post, we explored how to make tasty buffalo chicken sushi rolls. You learned about key ingredients, like sushi rice and buffalo sauce. I shared step-by-step instructions for preparing, assembling, and serving your rolls. Plus, I covered tips to perfect your sushi and variations for different diets. With these insights, you can impress guests at your next gathering. Enjoy creating and sharing your own delicious sushi rolls!

Tailgate Buffalo Chicken Sushi Rolls Fun and Flavorful Dish

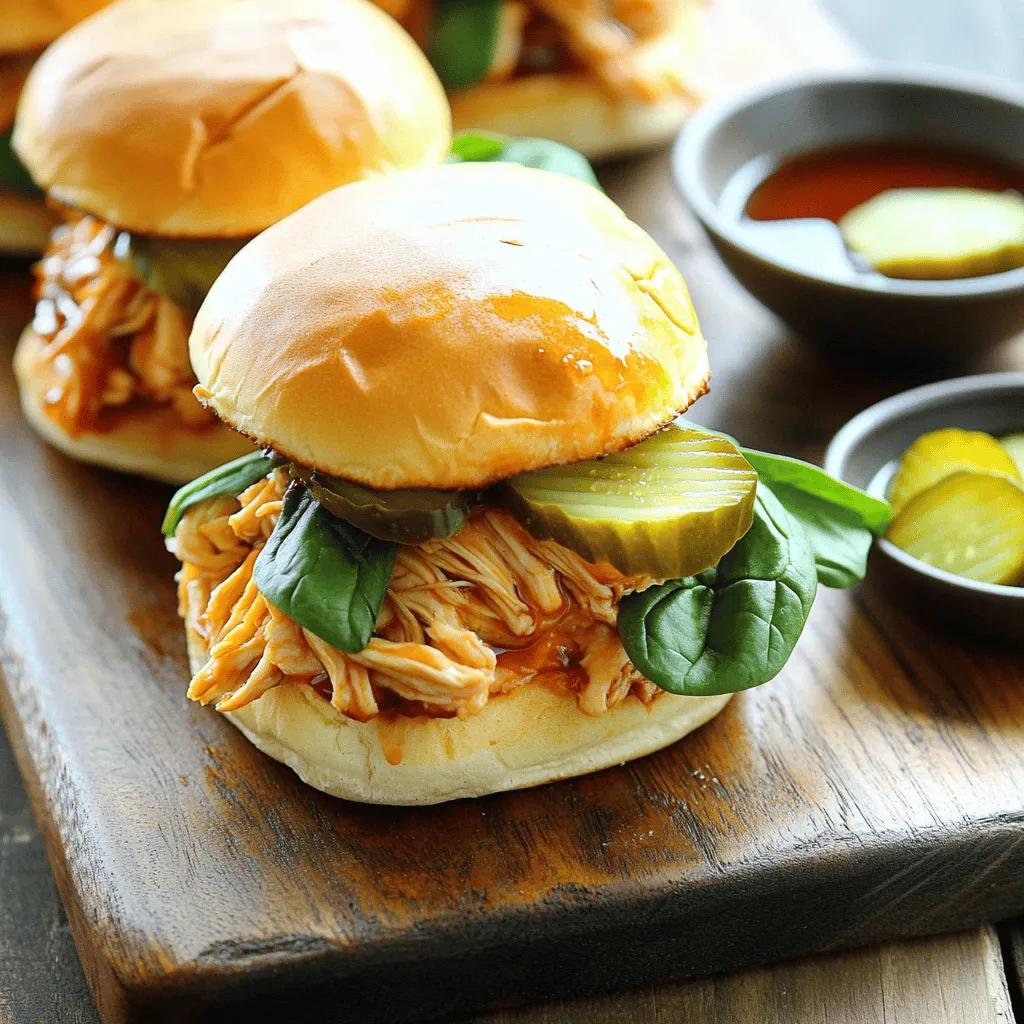
Get ready to elevate your tailgate game with these Tailgate Buffalo Chicken Sushi Rolls! This fun and flavorful dish combines

- 2 medium sweet potatoes, spiralized - 2 large eggs - 1/2 cup grated Parmesan cheese (or nutritional yeast for a vegan option) - 1/2 cup peas (fresh or frozen) - 2 cloves garlic, minced - 1 tablespoon olive oil - Salt and pepper to taste - Fresh parsley, chopped (for garnish) - Red chili flakes (optional, for heat) The sweet potatoes form the base of this dish, giving it a bright color and a natural sweetness. Spiralizing them makes for a fun and unique pasta alternative. The eggs and cheese create a creamy sauce that clings to the sweet potato noodles. Peas add a pop of color and nutrition. Garlic gives it a savory kick, while olive oil helps cook everything to perfection. Seasonings like salt, pepper, and optional chili flakes enhance the flavor. Fresh parsley adds a touch of brightness and looks great on the plate. For the full recipe, check out the detailed instructions later in the article. Enjoy cooking this delightful dish! - Start with two medium sweet potatoes. Use a spiralizer or mandoline to create long, curly noodles. - Once spiralized, place the sweet potato noodles in a large bowl. Sprinkle them with a pinch of salt. This step helps draw out moisture. - Let them sit for about ten minutes. This will release excess water and improve texture. - In a separate bowl, whisk together two large eggs and half a cup of grated Parmesan cheese. If you want a vegan option, substitute with nutritional yeast. - Add a pinch of salt and pepper to the egg mixture. This will enhance the flavor of your sauce. - Heat one tablespoon of olive oil in a large skillet over medium heat. - Add two cloves of minced garlic. Sauté for one to two minutes until fragrant. Be careful not to brown the garlic. - Drain any excess moisture from the sweet potato noodles. Add them to the skillet and sauté for about five to seven minutes. You want them to soften while keeping a slight crunch. - Stir in half a cup of peas, fresh or frozen. Cook for an additional two minutes until they are heated through. - Remove the skillet from heat and let it cool slightly. This step is key to prevent the eggs from scrambling. - Gradually add the egg and cheese mixture to the sweet potatoes, stirring quickly. The heat from the noodles will create a creamy sauce. - Taste and adjust seasoning. You can add more salt, pepper, or even red chili flakes for a kick. - Serve immediately, garnished with fresh parsley and extra cheese if desired. For a full recipe, explore the details provided above. To make a creamy sauce without scrambling the eggs, you need to work quickly. Remove the skillet from the heat before adding the egg mixture. Stir fast to blend the eggs into the warm sweet potatoes. This heat will cook the eggs gently, creating a silky sauce. The right heat level for sautéing sweet potatoes is medium. If it’s too high, the sweet potatoes can burn. You want them to soften and stay al dente. Stir often to keep them cooking evenly. If you want to change up the cheese, try using nutritional yeast for a vegan option. It adds a cheesy flavor without dairy. For protein, you can add cooked chicken, bacon, or even tofu for a plant-based choice. You can also use different veggies to boost nutrition. Zucchini noodles or spinach can add more color and taste. Each will bring its own flavor to the dish while keeping it healthy. Pair your sweet potato carbonara with a crisp salad for a complete meal. A light vinaigrette works great to balance the creamy sauce. When storing leftovers, let the dish cool before placing it in an airtight container. It keeps best in the fridge for about 2-3 days. For reheating, warm it on low heat to keep the sauce creamy. {{image_2}} For a vegan twist, you can replace eggs and cheese. Use silken tofu or cashew cream for creaminess. Nutritional yeast gives a cheesy flavor without dairy. You can also add more vegetables. Try spinach, bell peppers, or mushrooms for extra texture and nutrients. If you want protein, add cooked bacon or sausage. They give the dish a rich flavor. For a plant-based option, choose chickpeas or lentils. These add protein and make the meal hearty. You can also use tempeh or seitan for a meaty bite. To boost flavor, use fresh herbs like basil or thyme. They add a nice aroma and taste. You can also try different spices like smoked paprika for a smoky kick. Explore sauces beyond carbonara. A light pesto can add a fresh twist. You can even drizzle with lemon juice for brightness. For the full details, check out the Full Recipe. To store leftovers, let the carbonara cool first. Then, place it in an airtight container. Keep it in the fridge for up to three days. When reheating, use a skillet over low heat. This keeps the sauce creamy. Stir often to heat evenly. You can also add a splash of water or broth to help the sauce stay smooth. Yes, you can freeze sweet potato carbonara! To do this, let it cool completely. Then, transfer it to a freezer-safe container. It can last up to three months in the freezer. When you’re ready for a meal, thaw it in the fridge overnight. Reheat it in a skillet, adding a little water to keep it creamy. This method makes it easy to enjoy a tasty meal anytime. For more details, check the Full Recipe for extra tips! To spiralize sweet potatoes, you need a spiralizer. This tool cuts the potatoes into long, thin strands. You can also use a mandoline. First, wash the sweet potatoes. Cut off the ends, then secure them in the spiralizer. Turn the handle to create noodles. After spiralizing, place the noodles in a bowl and sprinkle with salt. Let them sit for about 10 minutes. This step helps remove excess water, making the dish better. Yes, you can use many other vegetables. Zucchini is a popular choice and works great. Carrots add a nice crunch and color. Butternut squash also makes a tasty noodle. You can mix different veggies for a fun twist. Just remember to adjust cooking times based on the veggie you choose. You can tell sweet potatoes are done by their texture. They should be soft yet slightly firm. A fork should easily pierce them but not mushy. If they look bright in color, that’s a good sign. Keep an eye on them while cooking to avoid overcooking. If your sauce is too thick, don’t worry. You can add a splash of water or broth to thin it out. Stir well to mix. Another option is to add a little olive oil. This keeps the flavor rich and creamy. Always taste as you go to ensure it stays delicious. For the full recipe, check the earlier section. This blog post shared a simple and tasty recipe for sweet potato carbonara. You learned about the main ingredients, like sweet potatoes and eggs, and how to prepare them. We covered helpful tips for perfecting the dish and offered variations to suit your taste. Finally, we discussed storage methods for leftovers. Enjoy experimenting with this dish! You can always adjust ingredients to make it your own. Happy cooking!

Spiralized Sweet Potato Carbonara Creamy and Delicious

Are you ready to elevate your dinner game? My Spiralized Sweet Potato Carbonara is not just creamy and delicious; it’s

- 1 cup pickle brine - 1 cup tomato juice - 1 tablespoon Worcestershire sauce - 1 teaspoon hot sauce - 1 tablespoon lemon juice - 1/2 teaspoon celery salt - 1/2 teaspoon ground black pepper - 1/4 cup ripe cherry tomatoes, halved - 1/4 cup diced cucumber - Fresh dill sprigs for garnish The key to a great Pickle Brine Bloody Mary Popsicle starts with the right ingredients. You need a mix of savory and tangy flavors. The pickle brine brings a sharp taste that works well with the smooth tomato juice. Worcestershire sauce adds depth to the flavor. Hot sauce can kick up the heat, so adjust it to your liking. Fresh lemon juice gives a bright note, while celery salt and black pepper add a nice touch of seasoning. Cherry tomatoes and cucumber give these pops a fun crunch. They also make them look pretty! Finally, fresh dill sprigs on top not only add flavor but also a burst of color. - Additional spices to customize flavor - Alternative vegetable add-ins - Ideas for garnishing You can spice things up even more! Try adding garlic powder, paprika, or even a pinch of cayenne. If you want to switch it up, consider using other veggies. Bell peppers or radishes can add a fresh twist. For garnishing, think beyond dill! You can use sliced olives or pickled jalapeños for a kick. The options are endless, making your popsicles unique every time. Check out the Full Recipe to explore all these ideas! Start by mixing the pickle brine and tomato juice in a bowl. This blend is the heart of your popsicle. Next, add Worcestershire sauce and hot sauce. This step adds depth and a kick to the flavor. Taste your mixture. If you want it spicier, add more hot sauce. If you prefer it tangy, add lemon juice. Adjust the seasoning to match your taste. Now, it’s time to fill the molds. Take your halved cherry tomatoes and diced cucumber. Place them in the popsicle molds. They add a nice crunch and color. Carefully pour the brine mixture into the molds. Leave a little space on top for the mixture to expand. Insert popsicle sticks into the molds. Make sure they are centered. Cover the molds with lids or plastic wrap to keep the flavors fresh. Freeze the popsicles for at least six hours. They need time to become solid. To release the popsicles, run warm water over the outside of the molds. This trick helps them come out easily. Once free, garnish each popsicle with a fresh dill sprig. It adds a pop of color and flavor. Enjoy your Pickle Brine Bloody Mary Popsicles as a refreshing summer treat! For the full recipe, check the earlier section. To make your pickle brine Bloody Mary popsicles shine, start with the right balance. Add lemon juice to brighten the taste. If you like it spicy, adjust the hot sauce to your liking. Don't be shy to experiment! Try adding a splash of lime juice or a dash of smoked paprika for a unique twist. Mix your ingredients well. This step is key to a smooth texture. If you don’t mix thoroughly, ice crystals can form. These can ruin the popsicle's creamy feel. Aim for a uniform mixture before pouring it into the molds. For popsicle molds, choose silicone ones. They make it easy to pop out the finished treats. Use a sturdy mixing bowl and a whisk for blending. A measuring cup is also essential for getting the right amounts. These tools will help you create the best popsicles possible. For the full recipe, check out the earlier section. {{image_2}} You can switch out the pickle brine for other brines. Try using olive brine for a tangy twist. If you want a sweeter note, pickle brine made from bread-and-butter pickles works well. You can also use different juice bases for a unique flavor. For instance, swap tomato juice for beet juice. This gives a vibrant color and earthy taste. Introducing other garnishes or mix-ins can elevate your popsicles. Consider adding sliced olives or jalapeños for extra flair. Incorporating spirits like vodka or gin adds a fun kick. Simply mix in a shot of your favorite spirit before pouring the mixture into molds. For a boozy adult popsicle version, use a ratio of one part alcohol to four parts mixture. This keeps the popsicles from freezing too hard. Always taste first to adjust the alcohol level as you like. You can create holiday-themed bloody mary popsicles for special occasions. For Halloween, add spooky garnish like black olives or edible glitter. For summer-inspired variations, focus on fresh ingredients. Use ripe summer tomatoes or herbs like basil and mint. These ingredients burst with flavor and freshness, making your popsicles perfect for hot days. To freeze your Pickle Brine Bloody Mary Popsicles, follow these steps: - First, make sure the mixture is well-blended. - Use clean molds to prevent any off-flavors. - Leave a small space at the top of the molds. This helps the popsicles expand as they freeze. - Cover molds with lids or plastic wrap. This keeps freezer odors out. To avoid freezer burn, try these tips: - Seal molds tightly. - Freeze popsicles in the coldest part of your freezer. - Avoid opening the freezer door too often. You can store these popsicles in the freezer for up to three months. After that, they may lose flavor. Look for these signs to know if they are bad: - Ice crystals on the popsicles signal freezer burn. - A change in color or texture means it's time to toss them. - If they smell off, it’s best to discard them. To keep your molds clean and ready for use: - Wash them with warm, soapy water after each use. - Rinse well to remove any soap residue. - Let them dry completely before storing. When storing molds, keep them in a dry place. Stack them to save space. Consider using a container to keep them together. This makes it easy to find them next time you want to make popsicles. Yes, you can easily make these popsicles non-alcoholic. Just leave out any alcohol. The pickle brine and tomato juice create a tangy flavor that shines. You will still enjoy a refreshing treat. These popsicles need at least six hours to freeze. For best results, freeze them overnight. This ensures they become solid and easy to eat. If you don't have popsicle molds, you can use small cups or ice cube trays. Just insert sticks into the center after filling. Cover them with plastic wrap to keep the sticks in place while they freeze. Absolutely! You can use any pickle brine you like. Dill pickles, sweet pickles, or even spicy pickles work well. Each type will change the taste slightly, so feel free to experiment. To make a larger batch, simply double or triple the ingredients. Use a larger container for mixing. Just make sure to leave enough space in the molds for the mixture to expand as it freezes. For the full recipe, check the main article. You can now make delicious Pickle Brine Bloody Mary Popsicles with ease. We covered ingredients like pickle brine, tomato juice, and spices. The step-by-step guide ensures you blend and freeze properly. Don't hesitate to try different flavors and tweaks to match your taste. Experimenting with variations can lead to delightful surprises. These popsicles are fun for any occasion, impressing friends and family alike. Enjoy your refreshing creation, and remember, making popsicles is all about having fun in the kitchen!

Pickle Brine Bloody Mary Popsicles Refreshing Summer Treat

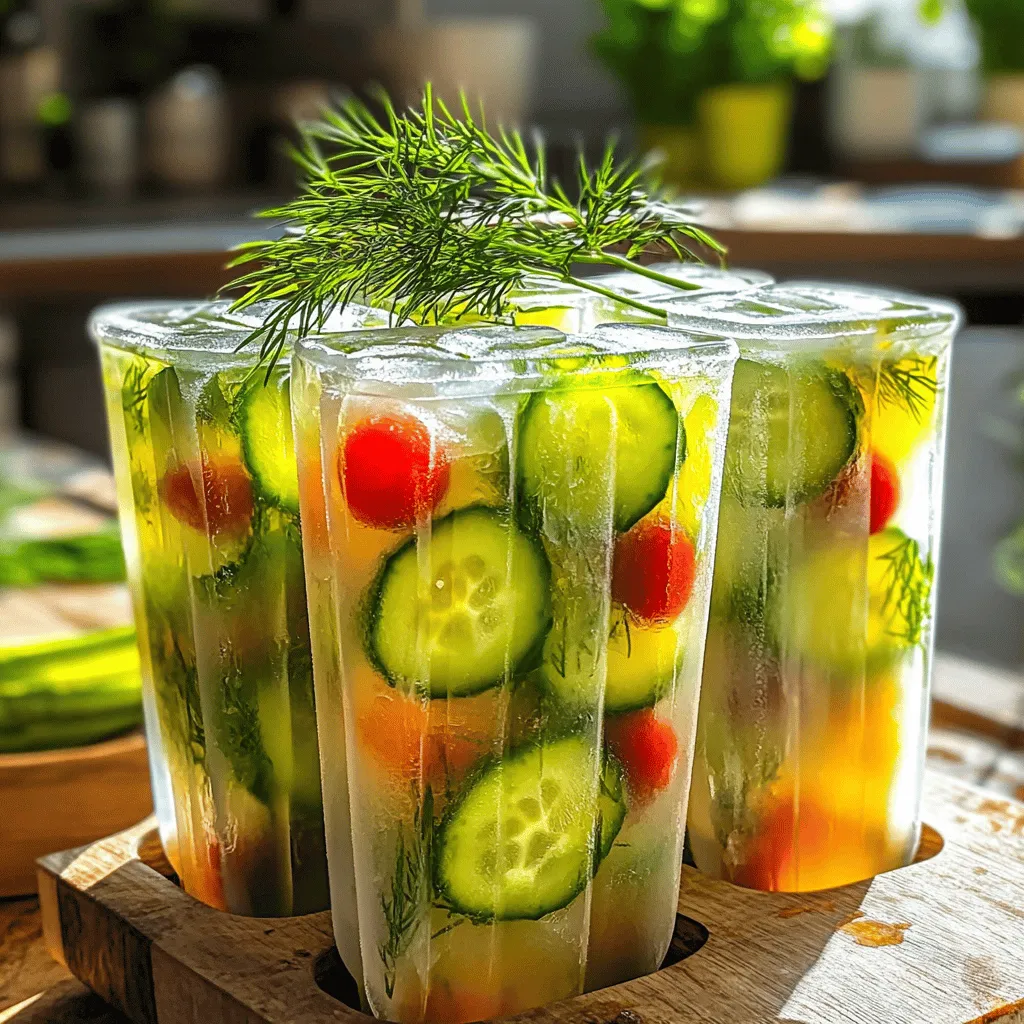
Get ready to cool down this summer with an exciting twist on a classic drink! Pickle Brine Bloody Mary Popsicles

- 1 lb (450g) boneless, skinless chicken thighs - 1 cup cherry cola (non-diet) - 1/4 cup soy sauce - 1/4 cup ketchup - 1 tablespoon apple cider vinegar - 1 teaspoon garlic powder - 1 teaspoon onion powder - 1 tablespoon olive oil - Salt and pepper to taste - 6-8 slider buns - Fresh baby spinach or arugula for topping - Sliced pickles for garnish When making Cherry Cola Chicken Sliders, the right ingredients make all the difference. I love using boneless, skinless chicken thighs. They stay juicy and tender. The cherry cola adds a sweet twist that makes the chicken pop. Soy sauce brings depth, while ketchup adds a nice tang. Apple cider vinegar rounds it all out with a hint of acidity. I season the mix with garlic and onion powder. These simple spices boost the flavor. You can’t forget olive oil; it helps the chicken cook well on the grill. Salt and pepper are key, so don’t skip these! For the sliders, choose soft buns that hold up the filling. Fresh spinach or arugula adds color and crunch. Finally, sliced pickles give a sharp touch that balances the sweetness. - Medium bowl - Resealable plastic bag - Grill or stovetop grill pan - Saucepan Having the right tools makes cooking easier. A medium bowl is perfect for mixing the marinade. A resealable plastic bag is great for marinating the chicken. It keeps the flavors close to the meat. I love using a grill or stovetop grill pan for the smoky taste. Lastly, a saucepan helps to thicken the marinade for later. - Calories per serving - Protein, fat, and carbohydrate breakdown Knowing the nutritional info helps you plan meals. Cherry Cola Chicken Sliders pack flavor without too many calories. Each serving provides a good amount of protein, making it satisfying. You can enjoy these sliders without feeling guilty. - First, grab a medium bowl. - Whisk together these marinade ingredients: cherry cola, soy sauce, ketchup, apple cider vinegar, garlic powder, onion powder, salt, and pepper. - Mix until everything blends well. - Place the chicken thighs in a large resealable plastic bag. - Pour the marinade over the chicken. - Seal the bag tight. - Let it marinate in the fridge for at least 1 hour. Longer marinating gives more flavor. - Preheat your grill or grill pan over medium-high heat. - Brush the grill grates with olive oil. This helps keep the chicken from sticking. - Remove the chicken from the marinade, saving the marinade for later. - Place the chicken on the hot grill. - Cook it for about 5-7 minutes on each side. - Check the chicken's internal temperature. It should reach 165°F (75°C). - Get your slider buns ready. - Place a generous amount of the cherry cola chicken on the bottom half of each bun. - Top with fresh baby spinach or arugula. - Add sliced pickles for a nice crunch. - Cover it with the top bun. - Arrange the sliders on a wooden board for a great presentation. This process makes for great sliders. You can find the full recipe if you want to dive deeper into the details! To keep your chicken juicy, marinate it well. The cherry cola adds sweetness and moisture. Always let the chicken sit in the marinade for at least an hour. If you can, try to marinate it overnight. This gives the flavors more time to soak in. To tell if your chicken is cooked, use a meat thermometer. It should read 165°F (75°C) at the thickest part. If you don’t have one, cut the chicken open. It should be white inside, with no pink. Cherry Cola Chicken Sliders pair well with many sides. Try serving them with crispy sweet potato fries. They add a nice crunch. You can also serve a fresh salad for a light touch. Coleslaw works great, too, adding some creaminess. For drinks, I recommend sweet tea or a light lager. Both drinks balance the sweetness of the sliders. You can also serve a cherry cola for extra fun! To present your sliders creatively, use a wooden board. Stack the sliders high and add some fresh herbs around them. This makes for a great photo, too! Garnish with sliced pickles on the side. You can also add fresh spinach or arugula on top of the sliders. These greens add color and a bit of crunch. Serve extra sauce in a small bowl for dipping. This makes for a fun and tasty meal! {{image_2}} You can swap chicken thighs for chicken breasts if you prefer. Chicken breasts are leaner but still tender. For a plant-based option, tofu works great. Just press the tofu to remove extra water, then marinate it like chicken. If you need gluten-free buns, look for rice-based or almond flour slider buns. Many stores offer tasty gluten-free options now. To give your sliders more flavor, try adding spices. Paprika or cayenne pepper can add heat. You can also mix in smoked paprika for a smoky taste. If you want to try different sauces, barbecue sauce pairs well. You could also use a spicy sriracha sauce if you like heat. For a simple method, use a slow cooker. Just place your marinated chicken in the cooker. Set it on low for about 6 hours or high for 3 hours. Shred it when done, and serve on buns. If you want oven-baked sliders, preheat your oven to 375°F (190°C). After cooking the chicken, place the sliders on a baking sheet. Bake until the buns are golden, about 10 minutes. This gives a nice crisp to the sliders. For the full recipe, click here. Cherry Cola Chicken Sliders are great for leftovers. You can store them in the fridge for up to three days. Make sure to keep them in an airtight container. This helps keep the flavors fresh. When you’re ready to eat, simply reheat them in the microwave or on a skillet. Heat them until warm, but don’t overcook. This keeps the chicken juicy. You can freeze cooked chicken and sliders too. Wrap each slider tightly in plastic wrap, then place them in a freezer bag. They can last up to three months in the freezer. For defrosting, move them to the fridge overnight. If you need them quickly, use the microwave's defrost setting. Just be careful not to cook them during defrosting. Prepping ingredients in advance makes cooking easier. You can marinate the chicken a day before. This lets the flavors soak in. Chop the toppings, like spinach and pickles, and store them in the fridge. Batch cooking is also a smart idea. Cook a larger amount of chicken, shred it, and save it for future meals. This way, you have a tasty option ready to go! You can pair these sliders with great side dishes. Here are some tasty ideas: - Coleslaw: A crunchy, creamy side that complements the sweet chicken. - Potato Wedges: Crispy on the outside and soft inside. They add great texture. - Corn on the Cob: Sweet corn brings a fresh flavor to the meal. - Sweet Potato Fries: They have a sweet taste that matches the sliders well. - Garden Salad: A light salad with greens keeps things fresh and balanced. These sides make your meal more fun and colorful. Try mixing and matching! Yes, you can prep this recipe ahead of time. Here are some tips to help: - Marinate the Chicken: Prepare the marinade and soak the chicken the night before. This adds more flavor. - Cook and Store: You can grill the chicken in advance. Store it in the fridge for up to three days. - Assemble Later: Wait to put the sliders together until you are ready to serve. This keeps the buns fresh and soft. Meal prepping can save time and stress. Enjoy your time in the kitchen! Keeping the chicken juicy is key for great sliders. Here’s how: - Use Chicken Thighs: Thighs have more fat than breasts, making them juicy. - Marinate Well: Letting the chicken soak in the marinade adds moisture. - Don’t Overcook: Grill the chicken until it reaches 165°F (75°C). Overcooking makes it dry. - Rest the Chicken: Letting the chicken sit for a few minutes after grilling helps the juices stay inside. By following these tips, you’ll have tasty, juicy sliders every time! For the full recipe, check out the earlier section. In this post, I shared how to create tasty Cherry Cola Chicken Sliders. We discussed the easy steps, essential ingredients, and kitchen tools you need. I also covered tips for cooking, serving, and how to store leftovers. Now, you have the skills to impress with these delicious sliders. Enjoy the process and have fun experimenting with flavors. Your next meal can be both tasty and fun!

Cherry Cola Chicken Sliders Flavorful and Easy Recipe

Craving something bold and unique for your next meal? Cherry Cola Chicken Sliders are your answer! These tasty bites pack

For this salsa, you need fresh corn kernels. Use about 2 cups, which comes from 3 to 4 ears of corn. Fresh corn gives a sweet taste and great texture. You can also use canned corn, but fresh is best. Cherries add a burst of flavor. You will want 1 cup of pitted and chopped cherries. They balance the sweetness of the corn. Next, use one small red onion, finely chopped, for a nice crunch. Add one jalapeño, deseeded and minced, for some heat. To bring it all together, you need some seasoning. Use 2 tablespoons of olive oil for cooking. Honey adds just a tablespoon to sweeten the mix. For acidity, include 2 tablespoons of lime juice. Finally, chop 1/4 cup of fresh cilantro. This herb adds freshness. Don’t forget to add salt and pepper to taste. You can find the full recipe and more tips in the [Full Recipe]. Start by husking the corn. Remove all the silk and green leaves. Use a sharp knife to cut the kernels from the cob. Aim for about 2 cups of fresh corn. This will give you a sweet taste. Fresh corn is key for this salsa. In a large skillet, heat the olive oil over medium heat. Once hot, add the corn kernels. Sauté the corn for about 8-10 minutes. Stir occasionally until the corn is golden and caramelized. Then, add the finely chopped red onion. Sauté for another 2-3 minutes until the onion is soft and clear. Next, stir in the minced jalapeño. Cook for one more minute to blend the flavors. Remove the skillet from heat and transfer the corn mix to a bowl. Let it cool for a few minutes. Once the corn mixture is cool, it's time to mix! Add the chopped cherries, honey, lime juice, and fresh cilantro to the bowl. Season with salt and pepper to taste. Gently stir all the ingredients together. Let the salsa sit for at least 15 minutes. This helps the flavors mix well. For the full recipe, refer to the section above. To make great caramelized corn, start with fresh corn. Remove the kernels from the cob for the best taste. Heat olive oil in a skillet over medium heat. Add the corn and let it cook without stirring for a few minutes. This helps it brown. After that, stir it every few minutes. Cook until the corn is golden, about 8-10 minutes. This gives your salsa a sweet, rich flavor. I love serving this salsa in a bright bowl. It looks great on the table. You can also add lime wedges and extra cilantro on top. This makes it even more colorful. This salsa pairs well with grilled chicken or fish. You can also use it as a dip with tortilla chips. Guests enjoy the mix of sweet and spicy flavors. Feel free to get creative! You can add diced bell peppers for crunch. A sprinkle of feta cheese adds a nice salty bite. If you want more heat, add more jalapeño or some red pepper flakes. Fresh mint can also bring a unique twist to the salsa. Each add-in gives a new flavor to enjoy. For the full recipe, check out the earlier section. {{image_2}} You can swap out ingredients based on what you have. For corn, use frozen corn if fresh isn’t available. It will still taste great. Instead of cherries, try diced peaches or mango. They add a fun twist. If you don’t like cilantro, parsley works well too. You can also use green onions for a milder flavor. If you want heat, leave some seeds in the jalapeño. For a milder salsa, use a small amount of bell pepper instead. You can also add a pinch of cayenne pepper for a kick. If you prefer no spice, skip the jalapeño entirely. The sweetness of the cherries will shine through. This salsa is great as a topping. Use it on grilled chicken or fish. It also pairs well with tacos or burritos. Serve it as a dip with tortilla chips for a fun snack. Try it on a salad for added flavor. You can even mix it into cold pasta for a fresh side dish. Explore these ideas to make the most of your Caramelized Corn and Cherry Salsa. For the full recipe, check out the section above. To keep your caramelized corn and cherry salsa fresh, store it in an airtight container. Glass containers work well. Make sure to let the salsa cool to room temperature before sealing it. This prevents moisture from building up inside the container. It’s best to refrigerate the salsa right after you make it. When stored properly in the fridge, your salsa can last up to three days. If you want to keep it longer, you can freeze it. However, I recommend only freezing the corn mixture without the cherries. The cherries may become mushy after thawing. To freeze, place the corn mixture in a freezer-safe bag. It should stay fresh for up to three months. If you freeze the corn mixture, let it thaw overnight in the fridge. To reheat, warm it in a skillet over medium heat. Stir it gently until heated through. Add the fresh cherries, lime juice, and cilantro after reheating. This keeps the flavors bright and fresh. Enjoy your salsa with grilled chicken or as a dip for chips! Caramelized corn and cherry salsa is a sweet and savory mix. It combines golden corn and juicy cherries. The dish also has red onion and spicy jalapeño. Honey and lime juice add a bright flavor. This salsa is perfect for summer or any gathering. It pairs well with grilled meats or chips. You can find the full recipe above to make your own. Yes, you can use frozen corn. Just thaw and drain the corn before cooking. It may not caramelize as well as fresh corn. However, it still tastes great in the salsa. Make sure to cook it long enough to warm through. You can keep the salsa in the fridge for about three days. Store it in an airtight container. The flavors will blend and deepen over time. Just give it a gentle stir before serving. If you see any signs of spoilage, toss it out. In this article, we explored how to make a tasty caramelized corn and cherry salsa. You learned about the key ingredients like fresh corn and sweet cherries. We detailed step-by-step instructions for cooking, combining, and serving. Tips for perfect caramelization and storage practices were shared. Each variation lets you customize the salsa to your taste. Enjoy making this dish. It's easy, fun, and packed with flavor! You'll impress your family and friends.

Caramelized Corn and Cherry Salsa Flavorful Delight

Are you ready for a fresh twist on salsa? Today, I’ll show you how to make a vibrant Caramelized Corn

To make Dill Pickle Potato Salad, gather these key items: - 2 pounds baby potatoes, halved - 1 cup dill pickles, diced - 1/2 cup red onion, finely chopped - 1/2 cup celery, diced - 1 cup mayonnaise - 2 tablespoons Dijon mustard - 1 tablespoon apple cider vinegar - 2 tablespoons fresh dill, chopped (or 1 tablespoon dried dill) - Salt and pepper to taste You can make this salad your own by adding: - 1 hard-boiled egg, chopped - Fresh herbs like parsley or chives - A sprinkle of smoked paprika - Chopped bell peppers for extra crunch If you want to switch things up, here are some ideas: - Use Greek yogurt instead of mayonnaise for a lighter option. - Substitute cucumbers for dill pickles if you prefer a milder flavor. - For a tangy kick, try using spicy mustard instead of Dijon. - If you don’t have fresh dill, dried dill works fine, but use less. This recipe allows plenty of room for your personal touch. Enjoy exploring different flavors! For the full recipe, check out the detailed instructions and tips. First, wash the baby potatoes. Cut them in half. Place them in a pot. Add water and a pinch of salt. Turn on the heat and bring the water to a boil. Once boiling, cook the potatoes for 10 to 12 minutes. Check them with a fork; they should be tender but not mushy. Drain the potatoes and let them cool down. In a large mixing bowl, add the cooled potatoes. Next, chop the dill pickles, red onion, and celery. Toss these into the bowl with the potatoes. The colors and textures will look great together. Gently mix all these ingredients with a spatula. Be careful not to break the potatoes. In a small bowl, combine mayonnaise, Dijon mustard, and apple cider vinegar. Whisk them together until smooth. Add chopped dill, salt, and pepper to taste. This dressing is what gives the salad its creamy and tangy flavor. Pour the dressing over the potato mix. Toss gently until everything is coated. If you want, you can fold in a chopped hard-boiled egg for extra richness. Taste the salad and adjust the seasoning if needed. Finally, refrigerate the salad for at least one hour. This helps the flavors blend nicely. You can find the full recipe [Full Recipe]. To cook potatoes well, use small baby potatoes. They cook evenly and taste great. Start by placing them in cold, salted water. Bring the water to a boil. Cook for about 10 to 12 minutes. Check with a fork; they should be soft but not mushy. Drain them and let them cool fully before mixing into the salad. This helps keep their shape. You can make this salad a day in advance. It tastes even better after sitting in the fridge. Just prepare everything and store it in a sealed container. Let the flavors blend overnight. When ready to serve, give it a quick stir and adjust any seasoning. If you want a fresh twist, add a bit more dill or pickles before serving. Seasoning is key to a tasty potato salad. Start with salt and pepper to bring out the flavors. You can also add a splash more apple cider vinegar for zing. Fresh dill works wonders, but dried dill is good too. If you want a kick, try adding some crushed red pepper flakes. Taste as you go to find your perfect mix. For a creamy touch, don’t forget the mayonnaise and Dijon mustard in the dressing. For the complete recipe, check out the [Full Recipe]. {{image_2}} You can make a vegan version of this dish. Swap out the mayonnaise for vegan mayo. It keeps the creamy texture while being plant-based. You can also use silken tofu blended smooth as a great substitute. This option adds protein and keeps it rich. Add your favorite fresh herbs for a burst of flavor. Chopped parsley or chives work well here. If you want to cut carbs, try using cauliflower instead of potatoes. Steam cauliflower florets until tender but firm. This swap keeps the salad light and fresh. You can still toss in the same pickles, onions, and dressing. It gives you that classic taste without the carbs. This version is perfect for anyone watching their carb intake. Boost the nutrition by adding proteins like chicken or chickpeas. Cut cooked chicken into small pieces or add canned chickpeas. Both options make the salad more filling. You can also mix in other veggies like bell peppers or radishes. They add crunch and color, making the dish even more appealing. Feel free to experiment with flavors you enjoy. For the full recipe, check out the main dish instructions. To store leftover potato salad, place it in an airtight container. Make sure to seal it well. This helps keep the flavors fresh. You can keep it in the fridge for about 3 to 5 days. If you notice any signs of spoilage, it’s best to throw it away. To maintain freshness, avoid letting the salad sit out too long. Serve it chilled and cover it if you plan to leave it out for a while. Using fresh ingredients when you make the salad also helps. If you have extra dill pickles, add them right before serving. This keeps the crunch intact. Reheating potato salad is not always necessary. However, if you prefer it warm, do so gently. Use the microwave in short bursts. Stir it between heating sessions. Be cautious, as the mayonnaise can separate when heated too much. If possible, enjoy it cold for the best flavor. For the full recipe, refer to the recipe section above. If you want a mayo swap, try Greek yogurt. It adds creaminess and tang. You can also use sour cream or avocado for a rich taste. Each option changes the flavor, so choose what you like best. Dill Pickle Potato Salad can last about 3 to 5 days in the fridge. Make sure to store it in a sealed container. Always check for any off smells or changes in texture before enjoying it again. Yes, you can make this salad a day ahead. It tastes even better after sitting in the fridge. Just mix it well and let the flavors blend overnight. Remember to keep it covered for freshness. Freezing potato salad is not recommended. The texture of the potatoes can change when thawed. If you want to save some, consider making smaller batches to enjoy fresh. For best results, eat it within a few days after making it. For a full recipe, check out the detailed instructions and tips! In this blog post, I covered how to make a delicious potato salad. We explored essential and optional ingredients, plus substitutions for your needs. You learned step-by-step instructions for prepping potatoes, mixing the salad, and making a tasty dressing. I shared tips for cooking and storing your salad, ensuring it stays fresh. Finally, I introduced fun variations, from vegan to low-carb options. Remember, potato salad is flexible. Customize it to match your taste and enjoy every bite!

Dill Pickle Potato Salad Easy and Flavorful Recipe

Looking for a fresh twist on a classic dish? My Dill Pickle Potato Salad is easy and packed with flavor.

- 1 baguette, sliced into ½ inch pieces - 1 cup fresh cherries, pitted and halved - 1 tablespoon balsamic vinegar - 1 tablespoon honey - 8 ounces burrata cheese - 2 tablespoons olive oil - Salt and pepper to taste - Fresh basil leaves for garnish - Balsamic glaze for drizzling - Additional toppings (e.g., chopped nuts or microgreens) Gather these ingredients for your Cherry Balsamic Burrata Crostini. This dish is simple yet full of flavor. The baguette forms a nice base with a crunchy texture. Fresh cherries add sweetness and color. Balsamic vinegar and honey balance the dish with tang and sweetness. Burrata cheese gives a creamy richness that ties it all together. If you want to elevate your crostini, consider adding a balsamic glaze. This adds a nice shine and extra flavor. You can also get creative with toppings. Chopped nuts or microgreens can add a nice crunch or freshness. These options let you personalize your crostini experience. For the full recipe, refer to the recipe section. Enjoy making this delightful treat! - Preheat the oven to 400°F (200°C). - Brush baguette slices with olive oil. Start by preparing your baguette. Preheating the oven is key for a crispy crostini. While it heats, slice your baguette into ½ inch pieces. A sharp knife works best for this task. Next, lay the slices on a baking sheet. Brush both sides lightly with olive oil. This step adds flavor and helps achieve that perfect golden color. - Bake in the oven for 8-10 minutes until golden brown. Once your oven is ready, slide the baguette slices inside. Bake them for 8-10 minutes. Keep an eye on them. You want them golden brown and crispy but not burnt. The aroma will fill your kitchen, making your mouth water. - Combine all cherry topping ingredients in a bowl and marinate. Now, let’s make the cherry topping. In a small bowl, mix the halved cherries, balsamic vinegar, honey, salt, and pepper. Toss gently to coat the cherries. Let them marinate for 5-10 minutes. This helps the cherry flavors blend. The vinegar and honey create a sweet and tangy flavor that pairs perfectly with burrata. - Place burrata on crostini and add the cherry mixture. - Garnish with fresh basil leaves. It's time to build your crostini! Take a warm baguette slice and place a scoop of burrata on top. The creamy cheese melts slightly, making it even more delicious. Next, add a spoonful of your cherry mixture on top. Let those juicy cherries spill over the cheese. For the finishing touch, tear fresh basil leaves and sprinkle them over everything. The green basil adds a lovely pop of color and flavor. Enjoy each bite of this Cherry Balsamic Burrata Crostini. It’s a great treat for gatherings or a lovely snack for yourself. For the full recipe, check the ingredients and steps above! - How to achieve perfect crispiness on crostini: For a crunchy crostini, use a fresh baguette. Slice it into ½ inch pieces. Brush both sides with olive oil. Bake at 400°F (200°C) for 8-10 minutes. Keep an eye on them. You want them golden brown, not burnt. Let them cool slightly after baking. - Best way to handle burrata cheese: Burrata is delicate. Use a sharp knife to cut it. You want to keep its creamy center intact. Let it sit at room temperature for 30 minutes before serving. This warms it up and makes it creamy. - Suggestions for adding spices or herbs: Fresh herbs like thyme or rosemary pair well with this dish. You can sprinkle some finely chopped herbs over the cherries. A pinch of red pepper flakes adds a nice kick too. - Ideas for pairing flavors with cherries and burrata: Add a drizzle of honey for extra sweetness. A touch of black pepper on the burrata enhances its creaminess. You can also pair with nuts like walnuts for a crunchy contrast. For a twist, try adding a splash of orange juice to the cherry mixture. Feel free to get creative! Explore flavors that excite your palate. For more detailed instructions, check out the Full Recipe. {{image_2}} You can switch up the cheese! If you can't find burrata, try goat cheese. Goat cheese has a tangy flavor that pairs well with cherries. You can also use cream cheese for a richer taste. For fruits, cherries are not the only option. You can use strawberries for sweetness. Peaches add a nice twist too. Raspberries bring a tart zing to the dish. Choose fruits based on your taste or what's in season. Want more flavor? Add prosciutto on top. Its saltiness contrasts well with sweet cherries. You can also layer on some arugula for a peppery taste. For a crunchy touch, sprinkle nuts or seeds. Chopped walnuts or toasted sunflower seeds work great. These add texture and extra nutrition. You can mix and match these ideas to create your own unique crostini. Each bite can be a fun surprise! Check the Full Recipe for the basic steps. To keep your crostini fresh, store the toppings and crostini separately. Place the crostini in an airtight container at room temperature. They will stay crispy for up to a day. For the cherry topping, use a sealed container in the fridge. This will keep it fresh for about three days. Make sure to keep the burrata cheese in its original packaging in the refrigerator. It will stay good for about five days. When you're ready to enjoy your crostini again, preheat your oven to 350°F (175°C). Place the crostini on a baking sheet and heat them for about 5 minutes. This helps them regain their crispness without losing their flavor. Avoid using a microwave, as it makes them soft. After reheating, top them with the cherry mixture and burrata. Enjoy the fresh burst of flavors! For the full recipe, check out the Cherry Balsamic Burrata Crostini details above! What can I use instead of burrata cheese? If you can't find burrata, use fresh mozzarella or goat cheese. Both offer creamy textures. They pair well with cherries and balsamic. I often swap them when I need a quick fix. How long can I store leftovers? You can store leftovers in the fridge for up to two days. Keep crostini and toppings separate. This keeps the crostini crispy. The cherry topping can last longer, about three days. What drinks pair well with Cherry Balsamic Burrata Crostini? A chilled white wine works great. Try a Sauvignon Blanc or a sparkling wine. Both enhance the dish’s flavors. For non-alcoholic options, serve sparkling water with lime. Can this dish be made ahead of time? Yes, you can prepare the cherry topping a day in advance. Just store it in the fridge. Assemble the crostini right before serving. This keeps the bread crispy and fresh. Best places to find fresh cherries and burrata cheese Local farmers' markets often have fresh cherries. Look for ripe, firm ones. Burrata cheese is best found at specialty cheese shops or gourmet grocery stores. Some larger supermarkets stock it too. Recommendations for high-quality balsamic vinegar Look for balsamic vinegar labeled "Tradizionale" or "Aged." These types offer richer flavors. Brands like Modena and Aceto Balsamico di Modena are good picks. They add depth to your dish. For the full recipe, check out the detailed instructions. This blog post outlined a fresh and tasty recipe for Cherry Balsamic Burrata Crostini. We discussed all the key ingredients, from baguette slices to fresh cherries and burrata cheese. I shared step-by-step instructions to make each part come together perfectly. You learned tips for crispy crostini and fun variations to explore. In conclusion, this dish is simple to make and full of flavor. Try it for your next gathering or snack. It's sure to impress!

Cherry Balsamic Burrata Crostini Tasty Easy Treat

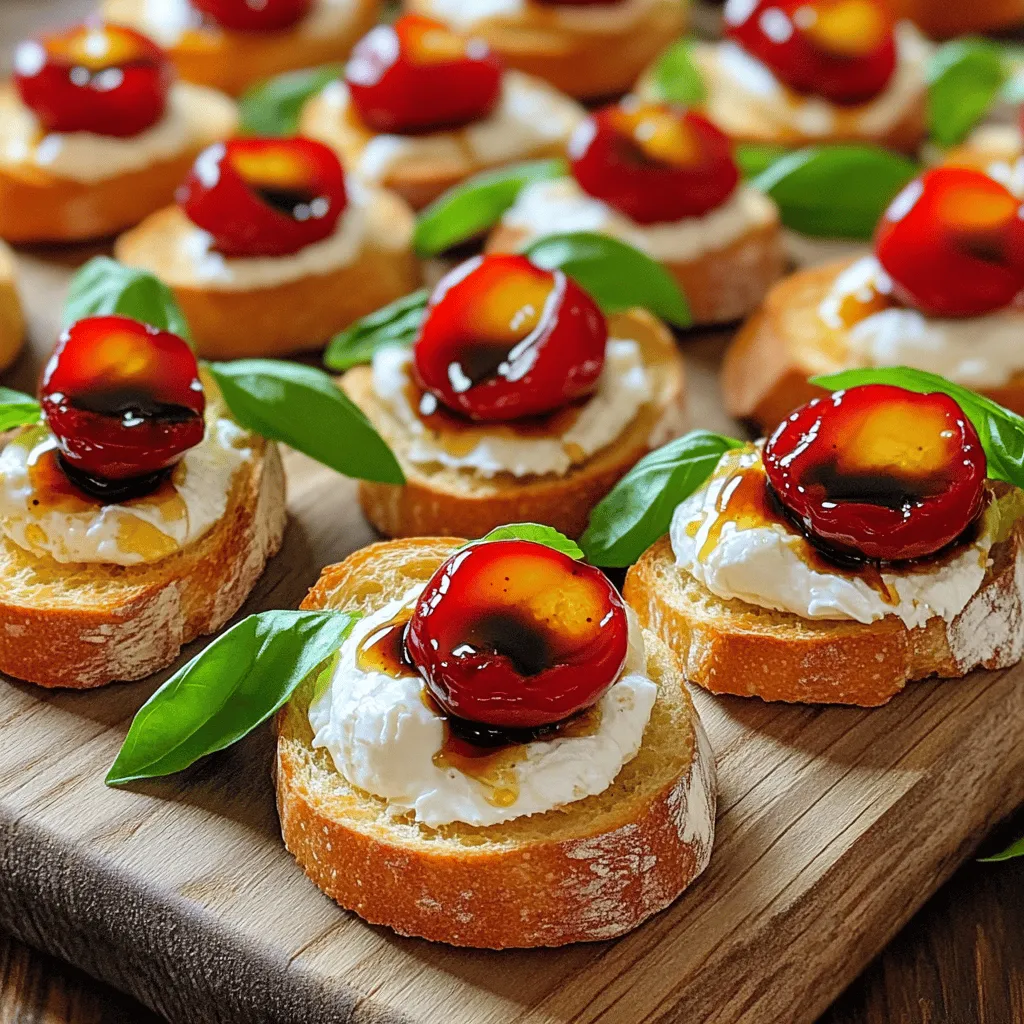
Looking to impress your guests or treat yourself? Try my Cherry Balsamic Burrata Crostini! This tasty and easy treat combines

To make delicious mango pickle tacos, gather these fresh and vibrant ingredients: - 2 cups corn tortillas - 1 ripe mango, diced - 1/2 cup mango pickle (store-bought or homemade) - 1/2 cup black beans, rinsed and drained - 1 avocado, sliced - 1/4 cup red onion, finely chopped - 1 jalapeño, sliced (optional for heat) - 1/4 cup fresh cilantro, chopped - 1 tablespoon lime juice - Salt to taste These ingredients blend together to create a flavorful dish. The ripe mango adds sweetness, while the mango pickle gives a tangy kick. You can use fresh or store-bought mango pickle depending on your time and preference. The black beans provide protein and make the meal more filling. Fresh cilantro and lime juice brighten the flavors, making every bite refreshing. Enjoy preparing these tasty mango pickle tacos! For the full recipe, check out the complete instructions above. - First, dice the ripe mango into small pieces. - If your mango pickle has large chunks, chop it into smaller bits. - In a bowl, mix the black beans with the diced mango. - Add lime juice and a pinch of salt to the mix. - Heat corn tortillas in a skillet over medium heat. - Warm each side for about thirty seconds. - Check that the tortillas are pliable and soft. - Take a warm tortilla and place it on a plate. - Spoon some of the black bean and mango mixture into the center. - Top with sliced avocado, red onion, and jalapeño slices if you like heat. - Drizzle mango pickle over your tacos for a tangy kick. - Garnish with fresh cilantro to add color and flavor. Follow these steps from the full recipe to make your tacos shine! To make the best mango pickle tacos, choose ripe mangoes. Look for smooth skin and a sweet scent. The color should be vibrant and slightly soft to the touch. If you can't find ripe mangoes, you can use canned mango slices or even other fruits like peaches. They add a nice twist. Adjust the spice level to your taste. If you like it hot, add more jalapeños. You can also mix in chili powder for extra heat. Fresh herbs like cilantro or mint bring out the flavors too. They add a bright touch that makes the tacos pop. Warming tortillas is easy. Use a non-stick skillet on medium heat. Heat each tortilla for about 30 seconds on both sides. This makes them soft and easy to fold. For tortillas, corn is the best choice. They have a great flavor and texture. Flour tortillas can work too, but corn gives you that authentic taste. {{image_2}} For a vegetarian or vegan twist, you can swap black beans with chickpeas or lentils. Both options give good protein and texture. You can even try roasted sweet potatoes for a sweet and hearty touch. For toppings, load up on fresh veggies. Try shredded lettuce, diced tomatoes, or radishes. You can also add a dollop of vegan sour cream or cashew cream for a creamy finish. Want to mix it up? Add diced pineapple or mango salsa for a sweet twist. You can even use pickled red onions for a tangy kick. They add a nice crunch, too! For sauce, drizzle on some tahini or a spicy aioli. A squeeze of fresh lime juice can also brighten the flavors. Don't hesitate to experiment with different sauces to find your favorite. Using seasonal ingredients can make your tacos even better. In summer, add fresh corn or zucchini. In fall, roasted butternut squash can give a warm, cozy flavor. Tailor your toppings based on what's fresh. If avocados are in season, use them generously. If not, try some crunchy cabbage or fresh herbs like mint or basil for added flavor. For the full recipe, check the section above. To keep your tortillas fresh, store them in a zip-top bag. This will help them stay soft. You can also wrap them in a clean kitchen towel. For leftover mangoes, place them in an airtight container. If you have extra toppings, use small containers to keep them separate. - Zip-top bags for tortillas - Airtight containers for mango and toppings - Small glass jars for chopped onions and cilantro To reheat tortillas, warm them in a skillet. Heat them for about 15 seconds on each side. This method keeps them soft and tasty. If you have taco fillings, you can microwave them. Place them in a bowl and cover it with a damp paper towel. Heat in 30-second bursts until warm. - Use a non-stick skillet for even heating - Avoid overheating to keep them soft - Use the microwave for quick reheating - Stir halfway through for even heat You can store prepared tacos in the fridge for about 2 days. Make sure to cover them well. If you want to freeze taco fillings, place them in a freezer-safe container. This keeps them fresh for up to 3 months. - 2 days in the fridge - Use freezer-safe containers for fillings - Label with the date for easy use The best mango for tacos is ripe. Ripe mangoes are sweet and soft. They have a rich, juicy taste. Look for mangoes that yield slightly when you press them gently. Their skin should be vibrant and slightly wrinkled. Unripe mangoes are firm and tart. They can be crunchy but lack the sweet flavor you want. Choose ripe mangoes for the best taste in your tacos. Making homemade mango pickle is easy. Here’s a simple recipe to get you started: - Ingredients: - 2 cups raw mango, diced - 1/4 cup salt - 1 tablespoon mustard seeds - 1 teaspoon turmeric - 1 tablespoon chili powder - 1/4 cup vinegar Instructions: 1. Combine diced mango and salt in a bowl. 2. Let it sit for a few hours to draw out moisture. 3. Mix mustard seeds, turmeric, and chili powder. 4. Add vinegar and stir until combined. 5. Pour over the mango and mix well. 6. Store in a jar for at least a week before using. This pickle adds zing to your tacos. Yes, you can use other types of pickles! Try dill pickles for a sharp taste. Bread-and-butter pickles add sweetness. You can even use spicy pickles for heat. Each type brings a unique flavor to your tacos. Feel free to mix in different pickles for fun twists. Just remember, the goal is to have a tasty and tangy kick. Experiment with what you love! This blog post covered tasty mango tacos, from ingredients to variations. You learned how to prepare fresh mangoes and warm tortillas for ultimate flavor. Don't forget to use ripe mangoes for the best taste and adjust spice levels to suit your style. These tacos are easy to customize, so explore different toppings or pickles. Enjoy experimenting and creating your perfect taco meal. Tasty food brings joy, so gather your loved ones and share the fun!

Mango Pickle Tacos Flavorful and Fresh Delight

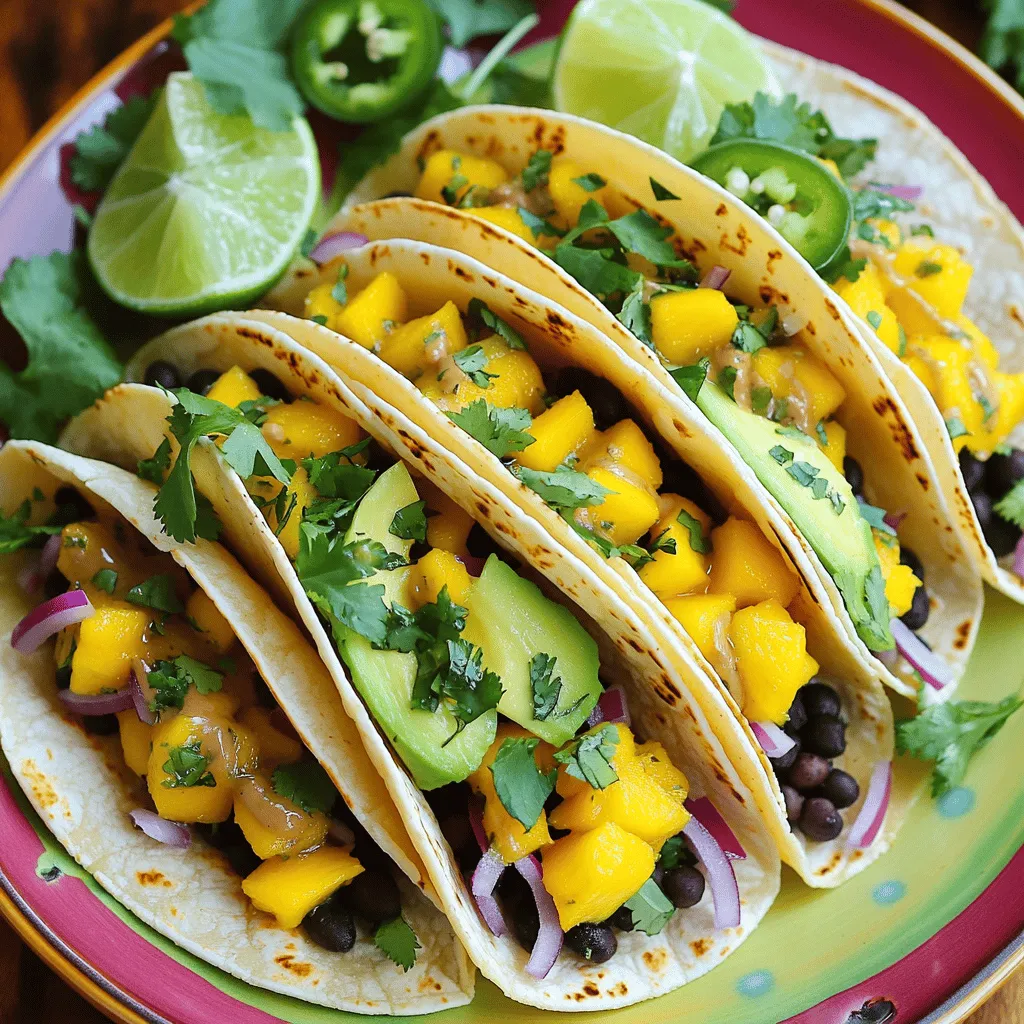
Get ready to awaken your taste buds with Mango Pickle Tacos! This tasty dish blends sweet mango, spicy pickle, and

Older posts
Newer posts
← Previous Page1 … Page13 Page14 Page15 … Page80 Next →

dsad

© 2025 My Saved Recipe • Built with GeneratePress

Our Policies

  • Copyright Policy
  • Cookie Policy
  • GDPR Policy
  • Privacy Policy
  • Disclaimer
  • Terms Of Use

More Information

  • Home
  • About
  • Contact
  • Appetizers
  • Dessert
  • Dinner
  • Drinks
©2025, My Saved Recipe About Back To Top