Skip to content
DisclaimerTerms Of UseGDPR PolicyCookie Policy

My Saved Recipe

  • Home
  • Drinks
  • Appetizers
  • Dinner
  • Dessert
  • About
  • Contact
  • Privacy Policy
DisclaimerTerms Of UseGDPR PolicyCookie Policy

Savannah

- 1 ½ cups all-purpose flour - 1 cup granulated sugar - ½ cup unsalted butter, softened - 2 large eggs - 1 tsp vanilla extract - ½ cup milk - 1 ½ tsp baking powder - ¼ tsp salt - Food coloring paste (various colors) - 2 cups powdered sugar - 1 cup unsalted butter (for buttercream) - 2-3 tbsp heavy cream or milk (for buttercream) To make these delightful watercolor buttercream cupcakes, you need fresh, quality ingredients. The cupcakes are fluffy and sweet, while the buttercream adds a beautiful touch. For the cupcakes, all-purpose flour gives structure. Granulated sugar adds sweetness, while softened butter adds moistness. Eggs help bind the mix, and vanilla extract gives a warm flavor. Milk keeps the cupcakes tender, while baking powder ensures they rise. Salt balances the sweetness. For the buttercream, food coloring paste allows you to create vibrant colors. Powdered sugar gives the frosting its sweetness and smooth texture. Unsalted butter adds richness and creaminess. Heavy cream or milk helps to achieve the right consistency for easy spreading. You can find the full recipe to guide you through the steps. Enjoy crafting these lovely treats! - Preheat your oven to 350°F (175°C). - Line a muffin tin with cupcake liners. - Cream together butter and sugar until light and fluffy. - Beat in the eggs one at a time and stir in vanilla extract. - Combine dry ingredients and gradually mix with the wet ingredients. - Fill cupcake liners and bake for 18-20 minutes. Baking these cupcakes is simple and fun. Start by preheating your oven. This step ensures even baking. While it heats up, line your muffin tin with colorful cupcake liners. This adds a vibrant touch to your treats. Next, make the batter. In a big bowl, cream the softened butter and granulated sugar together. You want it to be light and fluffy. This step is key for a soft cupcake. Then, add your large eggs one at a time. Mix well after each addition. Finally, add in the vanilla extract for great flavor. In a separate bowl, mix the dry ingredients. This includes flour, baking powder, and salt. Whisk them together to avoid lumps. Add this dry mix to the butter mixture slowly. Alternate it with the milk. This helps keep the batter smooth. Once your batter is ready, fill each cupcake liner about two-thirds full. This allows room for the cupcakes to rise without overflowing. Bake them in the preheated oven for 18-20 minutes. Check for doneness by inserting a toothpick. If it comes out clean, your cupcakes are perfect! This process is not just about following steps. It’s about creating something delightful. For the full experience, check out the Full Recipe. Happy baking! To make fluffy cupcakes, start with room temperature ingredients. This helps them mix better. When you cream the butter and sugar, aim for a light and fluffy texture. Be careful not to over-mix the batter. Over-mixing can make your cupcakes dense. Getting the right buttercream consistency is key. Your butter should be soft but not melted. Mix the powdered sugar in slowly. If too thick, add heavy cream or milk a little at a time. For coloring, divide your buttercream into bowls. Use a toothpick to add food coloring paste for better control. Mix each bowl gently to create different shades. To create beautiful watercolor effects, start with a base layer of buttercream. Use a spatula to smooth it out. When adding colors, apply them in small dollops. Blend the colors lightly to create smooth transitions. For decoration, fill a piping bag with different shades. Use a round tip and apply the frosting in a circular motion. This technique helps achieve the gorgeous watercolor look. Explore more techniques in the Full Recipe for Watercolor Buttercream Cupcakes. {{image_2}} You can add unique flavors to your cupcakes. Try different extracts like almond or lemon. A few drops can change the whole cupcake. You can also add zest from citrus fruits. This simple step boosts freshness and taste. Think of it as a flavor upgrade! Color is key to making your cupcakes pop. For spring, use pastel colors like soft pink or light blue. These shades feel light and cheerful. In fall, switch to warm tones like amber or deep red. You can even use natural food coloring. Beet juice or matcha are great choices. They add color without chemicals! Buttercream can be much more than plain vanilla. You might love chocolate buttercream or mint buttercream. You can mix flavors too, like chocolate and orange. This combo gives a fun twist! Be creative and have fun with it. Each frosting can bring a new treat to your cupcake! For the complete recipe, check the Full Recipe link. Store your cupcakes properly to keep them fresh. If they are frosted, place them in a single layer in an airtight container. A clamshell container works well for this. If they are unfrosted, stack them with parchment paper between layers. This prevents sticking. Keep the cupcakes at room temperature for up to three days. If it's hot or humid, refrigerate them. The cold air will keep them fresh. You can freeze cupcakes for later. First, let them cool completely. Then, wrap each cupcake in plastic wrap. Next, place them in a freezer bag. This keeps out air and moisture. To thaw, move them to the fridge overnight. For a fun touch, re-decorate them after thawing. Use fresh buttercream or a drizzle of chocolate for added flair. Cupcakes have a good shelf life when stored right. They last about three days at room temperature. In the fridge, they can last up to a week. If you freeze them, they stay fresh for about three months. The buttercream will keep for about two weeks in the fridge. Always check for changes in texture or smell before enjoying! To get the best watercolor effect, start with good food coloring paste. Mix colors well before applying them to the cupcakes. Use a toothpick to pick up a small amount of color. This gives you control over how much you use. Apply different shades lightly on the cupcake. Blend colors with a spatula for a smooth look. Keep your colors close together, but not mixed. This will give a lovely watercolor effect. Yes, you can make buttercream ahead of time. Store it in an airtight container. Place it in the fridge for about a week. If you need it for longer, freeze it. Just make sure to let it thaw in the fridge before using. When ready to use, beat it again to restore its creamy texture. This way, you can save time and have fresh buttercream ready when you need it. If your cupcakes overflow, don’t worry; it happens! First, check if you filled the liners too much. Aim to fill them about two-thirds full. If they still overflow, you can trim the tops after baking. Use a serrated knife to even them out. Another tip is to place a baking sheet under the muffin tin. This catches any spills and keeps your oven clean. Remember, practice makes perfect, so keep trying! You now have everything you need to create tasty cupcakes and buttercream. Start by gathering the listed ingredients and follow the step-by-step guide. Remember to use room temperature ingredients and avoid over-mixing for fluffy cupcakes. Try flavor variations and color themes to make your treats unique. Store them well and enjoy your creations for days. Baking can be fun and rewarding, so don’t hesitate to experiment. Happy baking!

Watercolor Buttercream Cupcakes Delightful Recipe Guide

Are you ready to bring some color to your baking? In this guide, I’ll show you how to make stunning

- 8 oz pasta (spaghetti or your choice) - 2 cups cherry tomatoes, halved - 1 cup corn kernels (fresh or frozen) - 3 tablespoons olive oil - 3 cloves garlic, minced - 1 teaspoon red pepper flakes (adjust to taste) - Salt and pepper to taste - 1/2 cup fresh basil, chopped - 1/4 cup grated Parmesan cheese (optional) - Zest and juice of 1 lemon To make charred corn tomato pasta, let's gather our ingredients. Start with 8 oz of your favorite pasta, like spaghetti. You will need 2 cups of cherry tomatoes. Halve them for easy cooking. Next, get 1 cup of corn kernels. Fresh corn is great, but frozen works too. For flavor, we will use 3 tablespoons of olive oil. You will also need 3 cloves of garlic, minced for a tasty kick. Red pepper flakes add heat, so grab 1 teaspoon. Adjust this to your taste. Don't forget salt and pepper to bring out all the flavors. For a fresh touch, use 1/2 cup of chopped basil. If you like cheese, 1/4 cup of grated Parmesan is optional. Finally, zest and juice 1 lemon to brighten the dish. Now you have everything ready for a flavorful and simple meal. Check out the Full Recipe for detailed steps on how to make this delicious pasta dish! First, boil a large pot of salted water. Once the water is boiling, add 8 oz of pasta. Cook it according to package instructions until it is al dente. This usually takes about 8-10 minutes. After cooking, reserve 1/2 cup of the pasta water, then drain the rest. While the pasta cooks, heat 1 tablespoon of olive oil in a large skillet over medium-high heat. Add 1 cup of corn kernels to the skillet. Cook the corn for about 5-7 minutes, stirring occasionally. You want to see a nice char on the corn. Once it’s charred, remove it from the skillet and set it aside. In the same skillet, add another tablespoon of olive oil if needed. Lower the heat to medium. Now, add 3 cloves of minced garlic and 1 teaspoon of red pepper flakes. Cook them for about 30 seconds, or until you smell that great aroma. Next, stir in 2 cups of halved cherry tomatoes. Season with salt and pepper to taste. Cook the tomatoes for about 5-6 minutes. They should start to soften and burst, creating a light sauce. Now, it’s time to mix everything together. Add the charred corn back into the skillet. Then, pour in the drained pasta. Gradually add the reserved pasta water while stirring. This helps create a creamy texture. If needed, add more water until you get the right consistency. To finish the dish, stir in the juice and zest of 1 lemon. Add 1/2 cup of chopped fresh basil. Toss everything together to coat the pasta well. Taste the pasta and adjust the seasoning if needed. For the full recipe, check out the details above. Enjoy your charred corn tomato pasta! For charred corn tomato pasta, choose pasta that holds sauce well. I recommend spaghetti, fusilli, or penne. These shapes catch the sauce and bits of corn nicely. You can use whole wheat or gluten-free pasta, too. It all depends on your taste and dietary needs. Using fresh ingredients makes a big difference. Fresh cherry tomatoes burst with flavor and sweetness. Choose ripe ones for the best taste. Fresh corn adds a sweet crunch that frozen corn can’t match. Look for local produce when you can; it’s often the best choice. To get that ideal char, heat your skillet before adding corn. Use medium-high heat and keep the corn moving. Don’t stir too often; let it sit for a minute to form a nice brown color. This gives it a smoky flavor that pairs well with the tomatoes. You can also char corn on the grill for an extra layer of taste. {{image_2}} To make this dish vegan, simply switch out the Parmesan cheese. Use nutritional yeast instead. It gives a cheesy flavor without dairy. Just sprinkle it on top as you serve. You can add about 1/4 cup to start. Taste and add more if you like. This option keeps the dish plant-based and tasty. If you want more protein, grilled chicken or shrimp works great. Cook the protein separately and add it when you mix the pasta. For chicken, use about 1 cup, chopped into pieces. For shrimp, 1 pound is perfect. This boosts the dish's heartiness and makes it more filling. Are you gluten-free? No problem! You can use gluten-free pasta options. Many brands offer delicious choices like brown rice or chickpea pasta. Just cook it like regular pasta. This way, everyone can enjoy the charred corn tomato pasta without worry. To keep your charred corn tomato pasta fresh, store it in an airtight container. Make sure to cool it down to room temperature before sealing. This helps prevent moisture build-up. Place the container in the fridge. It will stay good for about three to four days. To reheat, you can use a skillet on low heat. Add a splash of olive oil or water to keep the pasta moist. Stir gently until heated through. This method helps preserve the flavors and texture. You can also use the microwave. Heat in short bursts of 30 seconds, stirring in between. If you want to freeze charred corn tomato pasta, let it cool completely. Then, place it in a freezer-safe bag or container. Remove as much air as possible to prevent freezer burn. It can last for up to three months. To thaw, move it to the fridge overnight before reheating. You can cook the pasta and char the corn ahead of time. Store them in separate containers. When you are ready to eat, just heat them up. Add the tomatoes, garlic, and other flavors fresh. This keeps the pasta great. Yes, frozen corn works well in this dish. It saves time and still tastes good. Just add it to the skillet straight from the freezer. You may need to cook it a minute longer to get it nice and warm. If you want a cheese swap, try using nutritional yeast for a vegan option. You can also use a different cheese like Pecorino or even goat cheese for a tangy flavor. Each choice adds its own twist to the dish. Charred Corn Tomato Pasta stays fresh for about 3-4 days in the fridge. Just store it in an airtight container. When you reheat it, add a splash of water or oil to keep it moist. Absolutely! Add any veggies you like. Zucchini, bell peppers, or spinach work great. Just chop them small so they cook fast. This adds more color and flavor to your meal. Check out the Full Recipe for more ideas! This blog post laid out a simple recipe for Charred Corn Tomato Pasta. You learned about the key ingredients and followed easy steps for cooking. I shared tips to elevate the flavor and options for customization like adding protein or making it vegan. Remember, fresh ingredients yield the best taste. Enjoy experimenting with this dish to find what you like best. Happy cooking!

Charred Corn Tomato Pasta Flavorful and Simple Meal

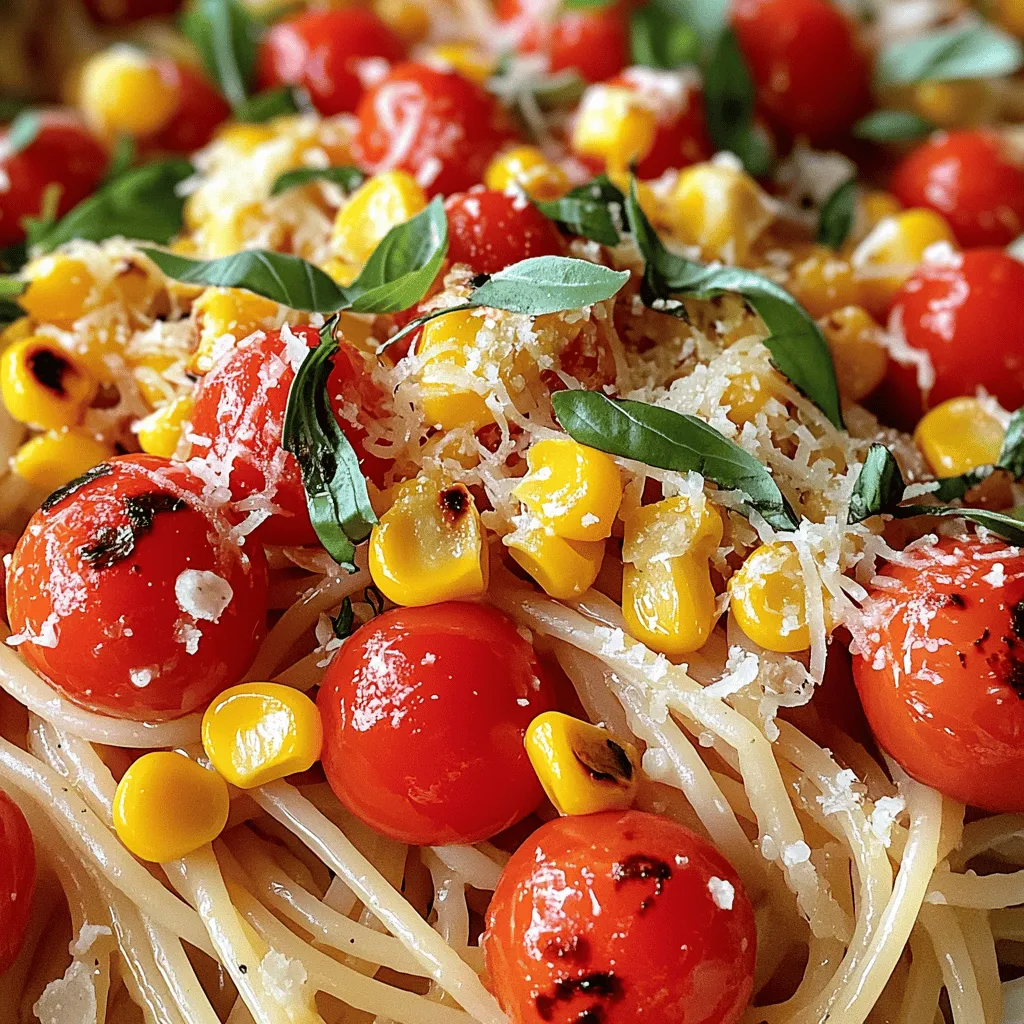
Looking for a quick and tasty meal? Charred Corn Tomato Pasta is the answer! This dish combines sweet corn, ripe

To make the viral TikTok salmon rice bowl, gather these items: - 2 salmon fillets (about 6 oz each) - 1 cup sushi rice - 1 1/4 cups water - 2 tablespoons soy sauce (or tamari for gluten-free) - 1 tablespoon sesame oil - 1 teaspoon honey - 1 avocado, sliced - 1 small cucumber, thinly sliced - 2 green onions, chopped - 1 tablespoon sesame seeds - Nori sheets, cut into strips (optional) - Pickled ginger for garnish (optional) The key parts of this dish are the salmon and sushi rice. Here’s why they matter: - Salmon: Fresh, high-quality salmon gives rich flavor and texture. It cooks quickly and pairs well with the rice. Look for bright color and firm flesh when buying. - Sushi rice: This rice is sticky and perfect for holding together. It gives the bowl a nice base. Rinse it well before cooking to remove excess starch. You can add extra flavors and textures with these optional items: - Nori sheets: These seaweed strips add a nice crunch and ocean flavor. They also look great in the bowl. - Pickled ginger: This adds a tangy flavor that cuts through the richness of the salmon. It’s a fun addition for those who love a little zing. Feel free to mix and match these ingredients to make your bowl unique! For the full recipe, check out the details above. To make the sushi rice, start by rinsing the rice. Use cold water until it runs clear. This step removes excess starch and helps the rice cook well. In a medium saucepan, add the rinsed rice and 1 1/4 cups of water. Bring it to a boil over high heat. Once it boils, lower the heat. Cover the pan with a lid and let it simmer for 15 minutes. After that, remove it from heat but keep it covered for another 10 minutes. Finally, fluff the rice with a fork to make it nice and airy. While the rice cooks, it’s time to cook the salmon. Heat 1 tablespoon of sesame oil in a skillet over medium-high heat. Season each salmon fillet with salt and pepper on both sides. Place the salmon skin-side down in the pan. Cook for about 4-5 minutes. Then flip the fillets and cook for another 3-4 minutes. The salmon should be golden and cooked all the way through. This method gives you a nice crust and keeps it juicy inside. Now, you can assemble your salmon rice bowl. Start with the fluffy sushi rice as the base in a serving bowl. Place the cooked salmon on top. Next, add sliced avocado and thin cucumber slices. Drizzle the soy sauce mixture over everything. For garnish, sprinkle sesame seeds and chopped green onions on top. If you like, you can add nori strips and pickled ginger for extra flavor. Enjoy your beautiful, tasty meal right away! Check the Full Recipe for more details. When choosing salmon, look for bright color and firm texture. Fresh salmon has a shiny, moist surface. Avoid salmon with dull skin or brown spots. If you can, buy wild-caught salmon. It usually tastes better and is healthier. Always check for a fresh smell. If it smells fishy, skip it. To get fluffy sushi rice, rinse it well. This removes excess starch. Use cold water until it runs clear. This step is key for good texture. After rinsing, let it soak for 30 minutes. This helps the rice cook evenly. Use a 1:1.25 rice-to-water ratio. Always cover the pot while cooking to trap steam. To make your bowl pop, add fresh herbs. Chopped cilantro or basil adds a nice twist. For a crunch, sprinkle on toasted sesame seeds. Thinly sliced radishes also add color and texture. Use nori strips for a fun touch. A drizzle of spicy mayo can elevate the flavor. Don't forget to serve with pickled ginger for freshness. Try these tips from the Full Recipe to impress your friends and family! {{image_2}} You can switch out salmon for other proteins. Chicken or shrimp works well. Just make sure you adjust the cooking time. For chicken, cook until it reaches 165°F. For shrimp, cook until they turn pink. These options add variety without losing flavor. If you prefer a plant-based option, tofu or tempeh is great. Use firm tofu for the best texture. Cut it into cubes and pan-fry until golden. You can also use chickpeas for protein. Toss them in a bit of soy sauce for flavor. These options keep the dish satisfying and healthy. You can change the flavor with sauces. Try spicy mayo for a kick. Just mix mayonnaise with sriracha. Another tasty option is teriyaki sauce. It adds a sweet and savory touch. You can also experiment with hoisin or peanut sauce. These variations make every bowl a new adventure. For more ideas, check the Full Recipe for inspiration. You can store leftover salmon rice bowl in an airtight container. Place your leftovers in the fridge. They will stay fresh for up to two days. Be sure to separate the salmon and rice if you plan to store them for a longer time. This keeps each component tasting great. When you are ready to eat your leftover salmon rice bowl, reheating it right is key. Use the microwave for quick heating. Place the bowl in the microwave and heat for 1-2 minutes. Stir halfway through to warm it evenly. If you prefer, you can reheat it in a skillet. Add a splash of water for moisture and cover with a lid. Heat over low until it warms through. If you want to save your salmon rice bowl for later, freezing is a great option. Place the bowl in a freezer-safe container. Make sure to seal it tightly to avoid freezer burn. You can freeze it for up to three months. When you are ready to eat, thaw it in the fridge overnight before reheating. Note that the texture might change slightly after freezing, but it will still taste yummy. For the full recipe, check out the main article. The best rice for a salmon rice bowl is sushi rice. Sushi rice is sticky and holds together well. This makes it easy to eat with chopsticks. It also absorbs flavors from the sauce. You want short-grain rice for the best texture. Yes, you can prep some parts of this meal ahead. Cook the rice and salmon in advance. Just store them in separate containers. When ready to eat, reheat the rice and salmon before serving. Keep the toppings like avocado and cucumber fresh. Add these just before you eat for the best taste. To check if salmon is cooked, look for its color. It should change from bright pink to a more opaque shade. Use a fork to flake the fish. If it flakes easily and is no longer raw in the center, it is done. The internal temperature should reach 145°F. If you want to follow the full recipe, check the cooking time closely. You learned how to make a delicious salmon rice bowl. We covered every step, from ingredients to cooking methods. Remember to choose the freshest salmon and cook your rice well. Add fun toppings to make it your own. Don’t forget storage tips for leftovers. Cooking at home can be fun and tasty. Explore flavor variations and adapt the recipe to suit your taste. Enjoy creating a dish that impresses and satisfies!

Viral TikTok Salmon Rice Bowl Easy and Flavorful Recipe

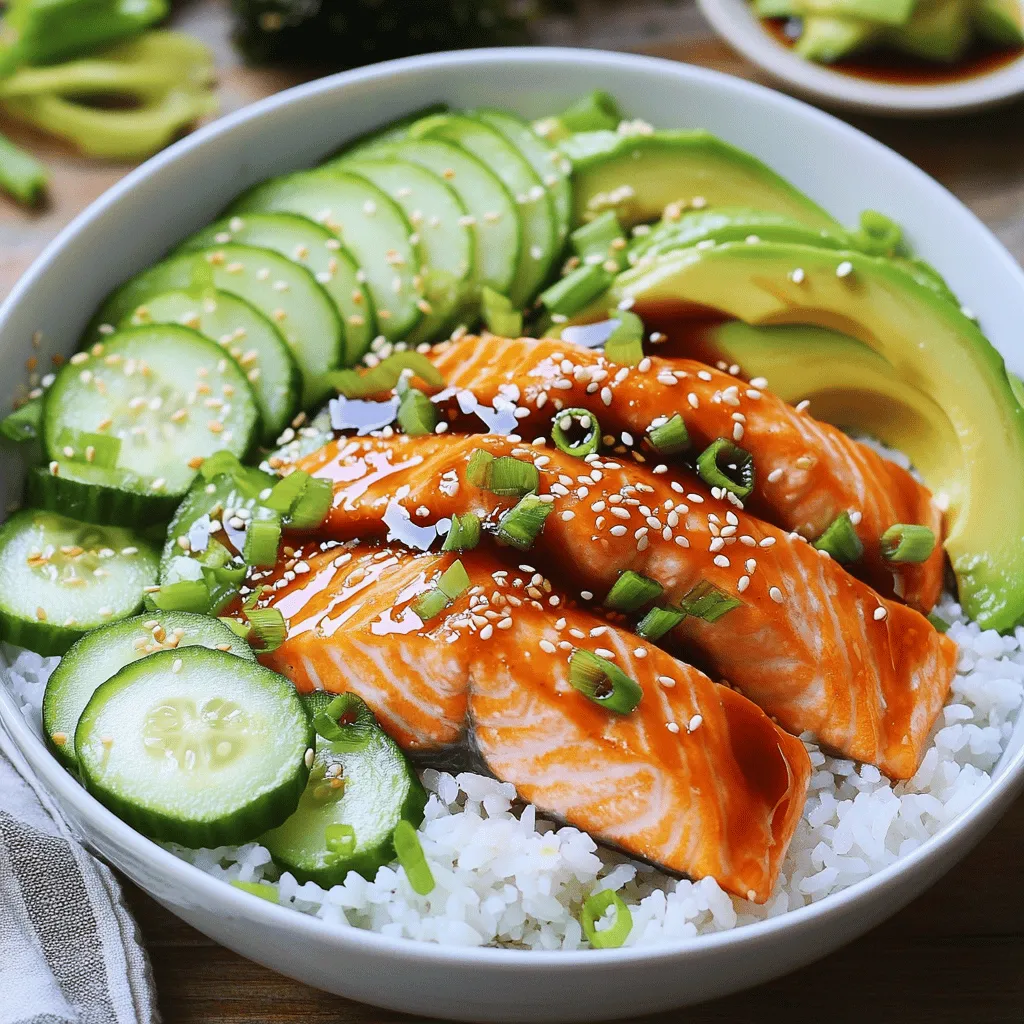
Are you ready to try the dish that’s taken TikTok by storm? The Viral TikTok Salmon Rice Bowl is not

- Chicken and Vegetables - 1 pound chicken breast, sliced into strips - 1 red bell pepper, sliced - 1 yellow bell pepper, sliced - 1 green bell pepper, sliced - 1 large onion, sliced - Spices and Seasonings - 3 tablespoons olive oil - 2 teaspoons chili powder - 1 teaspoon cumin - 1 teaspoon paprika - 1 teaspoon garlic powder - 1/2 teaspoon onion powder - 1/2 teaspoon salt - 1/4 teaspoon black pepper - Serving Essentials - Fresh cilantro, chopped (for garnish) - Tortillas, for serving - Lime wedges, for serving Gather all these ingredients before you start cooking. Chicken and colorful veggies bring flavor and nutrition. The spices add warmth and depth. Fresh cilantro, tortillas, and lime make the dish shine. Each ingredient plays a role in making your fajitas tasty. Follow the steps in the Full Recipe to create a delicious meal that everyone will love. Prepping the Chicken and Vegetables Start by washing your hands. Then, slice the chicken breast into thin strips. Next, wash and slice the red, yellow, and green bell peppers, and the onion. Make sure all pieces are about the same size. This helps them cook evenly. Place the sliced chicken and veggies into a large bowl. Mixing the Seasoning Blend In another small bowl, combine olive oil, chili powder, cumin, paprika, garlic powder, onion powder, salt, and black pepper. Use a whisk to mix all the spices together. Pour this blend over the chicken and veggies. Toss everything well until all pieces are coated. This step packs in flavor. Arranging on the Sheet Pan Preheat your oven to 400°F (200°C). Line a large sheet pan with parchment paper or aluminum foil. This makes for easy cleanup later. Spread the chicken and vegetable mixture evenly on the pan. Make sure they are not crowded. This allows them to roast properly. Baking Time and Method Place the sheet pan in the preheated oven. Bake for 20 to 25 minutes. Halfway through, toss the mixture to ensure even cooking. The chicken should be fully cooked and the vegetables tender. Keep an eye on them as they bake. Garnishing and Serving Suggestions When the fajitas are done, take them out of the oven. Let them cool slightly. Sprinkle fresh cilantro on top for a pop of color and flavor. Serve with warm tortillas and lime wedges on the side. These add a zesty touch to each bite. Enjoy your Easy Sheet Pan Fajitas with Flavorful Twist! For more details, check the Full Recipe. Ensuring Even Cooking To make sure your fajitas cook evenly, spread the chicken and veggies in one layer. This helps hot air reach all parts of the pan. Toss them halfway through cooking to let them brown well. If you crowd the pan, some pieces may not cook right. Timing for Crunchy Vegetables For crunchy veggies, keep an eye on the cooking time. Start checking after 15 minutes. You want them to be tender but still have a bite. If you like softer veggies, let them bake a few minutes longer until they reach your desired texture. Adding Extra Spices Want a flavor boost? Try adding more spices! A pinch of cayenne pepper can give heat. For a smoky touch, add smoked paprika. Feel free to adjust the spices to suit your taste buds. Experiment until you find your perfect mix! Marinating the Chicken Marinating your chicken adds depth. Mix olive oil, lime juice, and spices in a bowl. Let the chicken soak for at least 30 minutes. This gives it more flavor and makes it juicy. If you’re short on time, even 10 minutes works wonders. Check out the Full Recipe for more details! {{image_2}} You can easily switch the protein in your fajitas. For beef, use flank steak or sirloin. Slice it thin and marinate it in the same spices. This method keeps the beef tender and flavorful. For shrimp, choose large, peeled shrimp. Toss them in the spice mix and bake for about 10-15 minutes. The shrimp will cook quickly and soak up all the delicious flavors. If you prefer a meatless option, try using black beans or chickpeas. They add protein and a nice texture to your fajitas. Feel free to mix in other vegetables. You can use different types of peppers. Orange or poblano peppers will add a sweet twist. Besides onions, you can add red onions for a sharper taste. If you like more crunch, try adding zucchini, sliced thin. Zucchini roasts well and adds moisture. Mushrooms are another great option. They bring an earthy flavor and a meaty texture. By adding these veggies, your fajitas will be colorful and full of nutrients. You can follow the Full Recipe to see how to combine these ingredients perfectly. Refrigeration Guidelines After enjoying your sheet pan fajitas, store any leftovers in an airtight container. Keep the fajitas in the fridge for up to 3 days. Make sure to let them cool down first. This way, they won't steam and get soggy. If you want to keep the tortillas separate, that works too. Freezing Instructions To freeze, pack the fajitas in a freezer-safe container. You can also use heavy-duty freezer bags. Make sure to remove as much air as possible. Frozen fajitas last about 2 months. When you're ready to eat, thaw them overnight in the fridge before reheating. Best Methods for Reheating For the best taste, reheat your fajitas in the oven. Preheat it to 350°F (175°C). Spread the fajitas on a baking sheet and heat for about 10-15 minutes. This keeps them crispy and tasty. You can also use a skillet on medium heat. Just stir occasionally until heated through. If you're in a rush, the microwave works too. Heat in short bursts, stirring in between. Just be careful not to overdo it, or they can get tough. Remember, these easy sheet pan fajitas are quick to make and even easier to store! Want the detailed steps? Check out the Full Recipe. Can I use frozen chicken for this recipe? Yes, you can use frozen chicken. Just make sure to thaw it first. It is best to thaw in the fridge overnight. This way, your chicken cooks evenly. If you cook it from frozen, it may not cook well. You want juicy, tender chicken in your fajitas. How do I make it spicier? To add more heat, increase the chili powder. You can also use cayenne pepper for a kick. Sliced jalapeños in the mix work great too. Another option is to serve with a spicy salsa. This will give each bite a zesty boost. What side dishes pair well with fajitas? Fajitas go well with many sides. Rice, like cilantro lime rice, is a popular choice. Black beans or refried beans are tasty too. You might also enjoy a fresh salad or corn on the side. For a fun twist, serve with chips and guacamole. For the complete recipe, check out the Full Recipe section. This blog post covered how to make easy sheet pan fajitas. We talked about the key ingredients, from chicken to spices. Next, I gave you step-by-step instructions, including how to prepare and bake everything perfectly. I shared useful tips to enhance flavors and offered variations for proteins and veggies. Finally, I provided storage info and answered common questions. Enjoy making your fajitas! They are fun to prepare and taste great. With these tips, you'll create a dish that everyone loves. Happy cooking!

Easy Sheet Pan Fajitas with Flavorful Twist

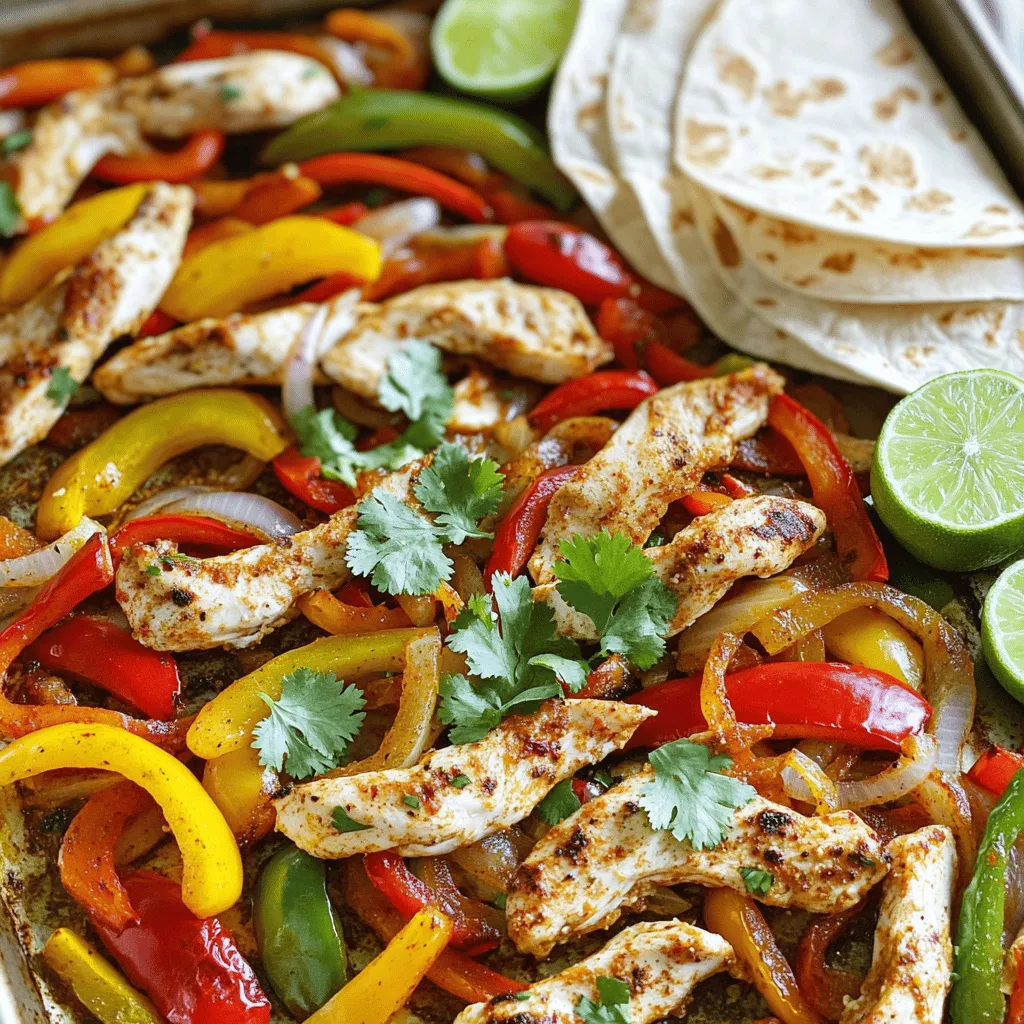
Craving a quick and tasty dinner? Look no further! My Easy Sheet Pan Fajitas with a Flavorful Twist will make

To make One-Pot Chicken Alfredo, you need a few simple ingredients. Here’s what you will need: - 2 tablespoons olive oil - 2 boneless, skinless chicken breasts, cubed - Salt and pepper to taste - 3 cloves garlic, minced - 1 cup chicken broth - 1 cup heavy cream - 8 ounces fettuccine pasta - 1 cup grated Parmesan cheese - 1 teaspoon Italian seasoning - 1 cup frozen peas (optional) - Fresh parsley, chopped (for garnish) These ingredients come together to create a dish that is creamy and comforting. Olive oil adds flavor and helps cook the chicken. The chicken breasts give the dish protein and heartiness. Seasoning with salt and pepper makes everything taste great. Garlic adds a nice aroma and depth of flavor. Chicken broth and heavy cream form the rich sauce. Fettuccine pasta is perfect for soaking up the sauce. Parmesan cheese adds a savory kick, while Italian seasoning gives a touch of herbiness. Frozen peas add a pop of color and nutrition. Finally, fresh parsley makes your dish look beautiful and fresh. For the full recipe, check out the [Full Recipe]. First, heat 2 tablespoons of olive oil in a large pot over medium heat. This oil helps cook the chicken and adds flavor. Next, season 2 cubed boneless chicken breasts with salt and pepper. When the oil is hot, add the chicken to the pot. Cook it for about 6 to 7 minutes. You want it browned and fully cooked. Once done, take the chicken out and set it aside on a plate. In the same pot, add 3 minced garlic cloves. Sauté them for about 1 minute until they smell good. Be careful not to burn the garlic; it can turn bitter. Then, pour in 1 cup of chicken broth and 1 cup of heavy cream. Stir it well and bring it to a gentle simmer. This step is key for a rich sauce. Next, add 8 ounces of fettuccine pasta. Press it down into the liquid, so it cooks evenly. Stir it every few minutes to keep it from sticking. Cook according to the package instructions, usually about 10 to 12 minutes. You want it to be al dente, with a nice chew. Once the pasta is cooked, reduce the heat. Stir in 1 cup of grated Parmesan cheese and 1 teaspoon of Italian seasoning. Mix until the cheese melts and the sauce becomes creamy. If you like, add 1 cup of frozen peas and let them cook for about 2 minutes. This adds color and extra nutrients. Now, return the cooked chicken to the pot and mix it all together. Adjust the taste with more salt and pepper if needed. Let the dish sit for a couple of minutes to thicken. This step makes your One-Pot Chicken Alfredo perfect. For the full recipe, check out the details above. To make One-Pot Chicken Alfredo, you must ensure the chicken is fully cooked. Cook cubed chicken for 6-7 minutes until it turns golden brown. This step makes sure it is safe to eat. Always check that the internal temperature reaches 165°F (75°C). Stirring the pasta is also important. It helps keep the noodles from sticking together. Stir the pasta every few minutes as it cooks. This way, it absorbs all the creamy goodness from the sauce. You can add more seasoning options to boost flavor. A pinch of red pepper flakes adds warmth. You can also try adding herbs like basil or oregano. These small changes can make a big difference. Using freshly grated Parmesan makes the dish taste better. Pre-grated cheese can lack flavor and creaminess. Grating it fresh allows the cheese to melt evenly into the sauce. Garnishing can elevate the look of your dish. Sprinkle fresh parsley on top for a pop of color. You can add more grated Parmesan for extra flavor. Serve the Alfredo in shallow bowls for a nice touch. This presentation makes it easier to enjoy all the creamy sauce. A beautiful plate can make your meal feel special. {{image_2}} You can change the cream for light cream or even milk. This keeps it lighter but still tasty. For pasta, try using penne or rotini instead of fettuccine. Each type gives a new twist to your One-Pot Chicken Alfredo. Want to switch up the protein? Shrimp or salmon work great in this dish. Just cook them until tender. If you prefer a vegetarian option, use tofu or mushrooms. They absorb the flavors well and add a nice texture. To add some heat, sprinkle in red pepper flakes. It gives the dish a nice kick. For herbs, basil or spinach can bring fresh flavors. Just toss them in at the end for a burst of color and taste. After cooking, let your One-Pot Chicken Alfredo cool down. This helps keep it safe to eat later. Place it in the fridge in less than two hours. Use airtight containers. Glass or plastic containers work well. This keeps the dish fresh and prevents odors from mixing. For reheating, the best method is the stovetop. Place the Alfredo in a pot over low heat. Stir often to ensure even heating. You can also use a microwave. Heat in short bursts, stirring between each. To keep the creaminess, add a splash of milk or cream while reheating. You can freeze One-Pot Chicken Alfredo if you want to save it for later. Let it cool completely before freezing. Use freezer-safe bags or containers. Remove as much air as possible to avoid freezer burn. When ready to eat, thaw it overnight in the fridge. Reheat it on the stovetop. Add a little cream to restore its creamy texture. Yes, you can use other cheeses in this recipe. Try mozzarella for a milder taste. Cheddar adds a nice twist, too. If you want something sharper, go for Pecorino Romano. Each cheese brings a unique flavor. Mixing cheeses can create a rich taste. Just remember to keep the total amount similar to the Parmesan in the full recipe. Absolutely! This dish is great for kids. If your child is picky, reduce the garlic. You can also skip the peas if they don’t like them. For a milder sauce, add less cheese. You can also serve it plain and let kids add their own toppings. Making it fun can make it more appealing to them. You can keep leftovers in the fridge for up to three days. Make sure to let it cool before storing. Use an airtight container to keep it fresh. When reheating, do it slowly on low heat. This will help keep the sauce creamy. If it seems too thick, add a splash of broth or cream to loosen it up. This blog post shared a simple recipe for One-Pot Chicken Alfredo, outlining ingredients, steps, and tips. You learned how to cook tender chicken, create a creamy sauce, and present it beautifully. Remember, you can customize the recipe with your favorite proteins or flavors. Enjoy cooking and don’t be afraid to experiment. Homemade meals can be fun and tasty! Keep this guide handy as you make your own delicious pasta dish.

One-Pot Chicken Alfredo Creamy Comfort Dish

Are you craving a warm, creamy dish that’s easy to make? Look no further than my One-Pot Chicken Alfredo! This

To make this tasty dish, you need some key ingredients. Here they are: - 2 cups cooked rice (white or brown) - 2 cups fresh broccoli florets (or frozen) - 1 cup cheddar cheese, shredded - ½ cup cream cheese, softened - 1 cup vegetable broth - 1 cup milk (can substitute with almond or oat milk) - 1 teaspoon garlic powder - 1 teaspoon onion powder - ½ teaspoon black pepper - 1 tablespoon olive oil - 1 cup breadcrumbs (panko for extra crunch) - Optional: ¼ cup Parmesan cheese, grated These ingredients work together to create a creamy, cheesy, and satisfying casserole. The rice acts as a soft base while the broccoli adds a nice crunch and color. The cheeses melt beautifully, making each bite a delight. If you have dietary needs, you can still enjoy this dish. Here are some swaps: - Use quinoa instead of rice for a gluten-free option. - Substitute cream cheese with cashew cream for a vegan option. - Use dairy-free cheese to keep it plant-based. - Swap vegetable broth with chicken broth for added flavor. These alternatives allow you to customize the casserole to fit your diet while still enjoying its deliciousness. Want to add more flavor or texture? Consider these optional toppings: - ¼ cup grated Parmesan cheese for a savory kick. - Fresh herbs like parsley or chives for a fresh taste. - Cooked chicken or turkey for added protein. - Sliced jalapeños for a spicy touch. Feel free to mix and match these options. They enhance the dish and make it your own. For the full recipe, be sure to check out the complete instructions. Start by gathering your ingredients. You will need cooked rice, fresh broccoli, cheddar cheese, cream cheese, vegetable broth, and milk. Don't forget garlic powder, onion powder, black pepper, olive oil, and breadcrumbs. Preheat your oven to 350°F (175°C). Grease a 9x13-inch baking dish with olive oil. This helps prevent sticking and makes cleanup easy. Next, heat olive oil in a large pan over medium heat. Add broccoli florets and sauté them for 3 to 5 minutes. You want them bright green and a bit tender. This step brings out their flavor and keeps them vibrant. While the broccoli cooks, mix the rice, sautéed broccoli, cheddar cheese, and cream cheese in a bowl. Pour in vegetable broth and milk, then add garlic powder, onion powder, and black pepper. Stir well until everything is combined. Once your mixture is ready, pour it into the greased baking dish. Spread it out evenly to ensure even cooking. In a separate bowl, mix breadcrumbs with grated Parmesan cheese if you choose to add it. This gives a nice crunch and extra flavor. Sprinkle the breadcrumb mixture over the casserole. Cover the dish with aluminum foil to keep moisture in, then bake for 25 minutes. This helps the flavors meld together. After 25 minutes, remove the foil and bake for another 15 minutes. You want the breadcrumbs golden brown and crispy. This creates a delightful texture contrast with the creamy filling. For this casserole, the total cooking time is 40 minutes. Bake at 350°F (175°C) for best results. Make sure to let the casserole cool for a few minutes before serving. This allows the layers to set and makes it easier to cut. Serve warm for the best cheesy experience. You can find the full recipe for more details on cooking times and tips. To make your casserole creamy, use both cream cheese and cheddar cheese. Cream cheese adds a rich texture. Cheddar brings a lovely flavor. Combine these with the milk and broth for the best results. Mixing well ensures a smooth blend. If you want it even creamier, try adding a splash of sour cream. This will enhance the taste and texture. One common mistake is not cooking the rice fully. If rice is undercooked, it can affect the dish. Be sure to follow the cooking time on the rice package. Another mistake is not sautéing the broccoli long enough. Sautéing helps keep its bright color and flavor. Lastly, avoid overbaking. This can dry out the casserole. Keep an eye on the time to get that perfect golden top. To boost flavor, consider adding more spices. A pinch of smoked paprika can add a nice kick. You might also try some cayenne for heat. If you enjoy herbs, fresh thyme or parsley can brighten up the dish. Adding a splash of lemon juice before serving can also enhance the flavors. Feel free to experiment with your favorite seasonings to make this casserole your own. For the full recipe, check out the details above. {{image_2}} You can switch up the cheese in this dish. Try using mozzarella for a gooey texture. Gouda adds a nice smokiness, while pepper jack gives a spicy kick. Mixing different cheeses can create a unique flavor. Just remember to keep the total amount of cheese similar to the recipe. For a vegetarian twist, use vegetable broth and stick to the dairy cheeses. If you want a vegan option, replace cream cheese and milk with plant-based versions. Use cashew cream or a vegan cream cheese. Nutritional yeast can also add a cheesy flavor. These swaps keep the dish rich and tasty. Want to make it heartier? You can add proteins like chicken, turkey, or beans. Cooked chicken mixes well and adds flavor. For a veggie boost, toss in bell peppers, peas, or spinach. Just make sure to adjust cooking time so everything cooks evenly. Each addition will make this cheesy broccoli rice casserole your own. Check out the Full Recipe for more ideas! To keep your cheesy broccoli rice casserole fresh, place it in an airtight container. You can store it in the fridge for up to three days. Make sure the casserole cools before sealing the container. This helps prevent moisture buildup and keeps it tasty. When you're ready to enjoy leftovers, reheat them in the oven for the best taste. Preheat your oven to 350°F (175°C). Place the casserole in an oven-safe dish. Cover it with foil to keep moisture in. Heat for about 20 minutes or until warm. You can also use the microwave. Just heat it in short bursts of one minute, stirring in between. If you want to save your casserole for later, freezing works great. To freeze, let the dish cool completely. Then, wrap it tightly in plastic wrap and aluminum foil. This protects it from freezer burn. You can freeze it for up to three months. When you're ready to eat, thaw it in the fridge overnight before reheating. For the full recipe, check out the Cheesy Broccoli Rice Casserole preparation steps. You can make this dish gluten-free by using gluten-free breadcrumbs. There are many great options at stores. Instead of regular cream cheese, look for a gluten-free brand. Use rice and broth that are labeled gluten-free. This way, you can enjoy this tasty casserole without worry. Yes, you can use different types of rice. Brown rice adds a nutty flavor and a chewy texture. If you prefer white rice, that works too! You can even try jasmine or basmati rice for a unique taste. Just make sure to cook the rice before adding it to the casserole. This casserole goes great with many side dishes. A fresh salad adds crunch and color. Roasted vegetables also complement the creamy casserole well. You could serve it with garlic bread for a hearty meal. For a lighter option, try steamed green beans or a side of fruit. In this post, we explored how to make Cheesy Broccoli Rice Casserole. We covered essential ingredients, dietary alternatives, and fun toppings. You learned step-by-step instructions for preparation and baking, plus tips to avoid common mistakes. Variations allowed for different cheeses and protein choices. Finally, we provided storage tips to keep leftovers fresh. Enjoy creating this dish your way and savoring every bite!

Cheesy Broccoli Rice Casserole Comfort Food Delight

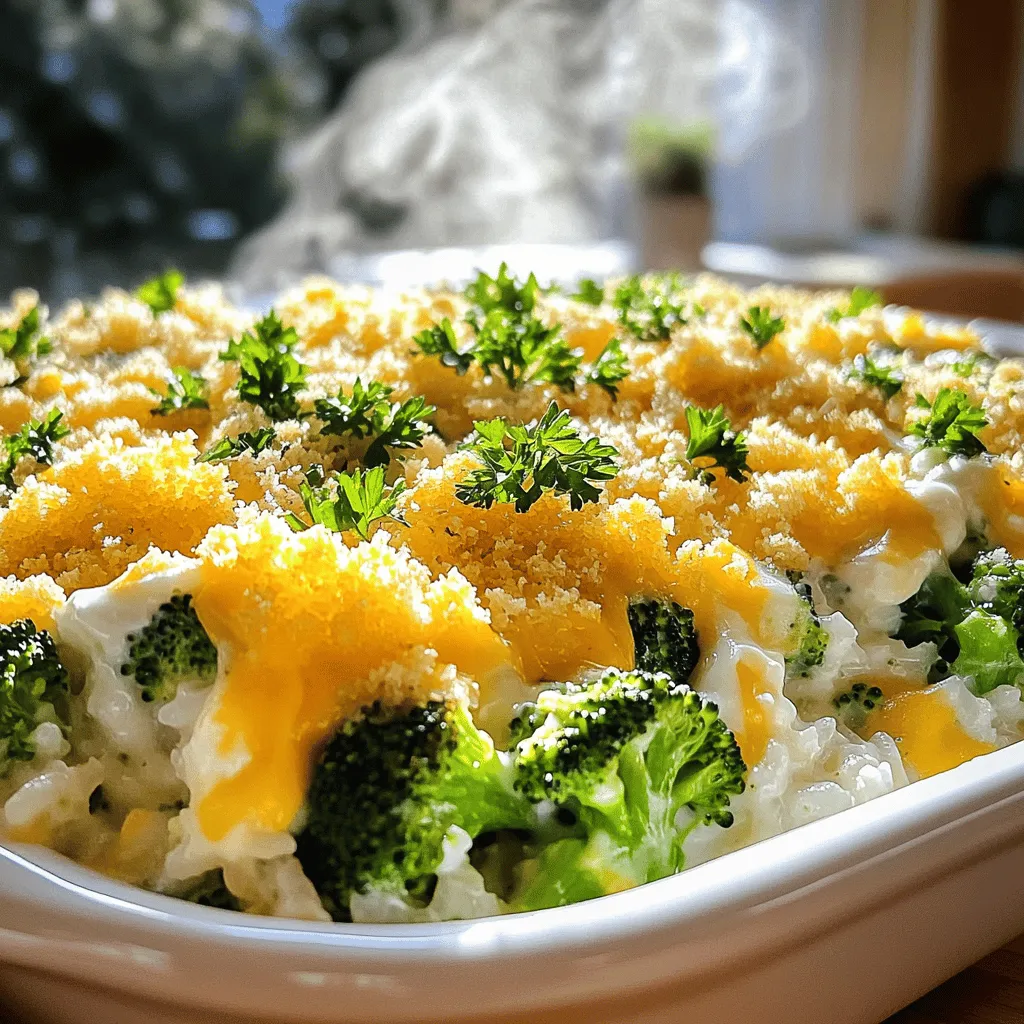
Are you craving a cozy dish that’s packed with flavor? Look no further! My Cheesy Broccoli Rice Casserole is the

- 4 salmon fillets - 1/4 cup honey - 3 tablespoons soy sauce - 3 cloves garlic - Fresh ginger - Olive oil and sesame oil - Vegetables (snap peas, red bell pepper) - Lemon and herbs (cilantro or parsley) - Other vegetables - Extra seasonings The main ingredients in this dish are simple yet powerful. Salmon is the star, and its rich flavor shines through the honey and soy sauce. The honey adds sweetness, while soy sauce brings depth. Garlic adds a nice punch, making the dish savory. You can enhance the flavor with fresh ginger. It adds a warm, spicy note that pairs well with salmon. Use olive oil and sesame oil for cooking; they add richness and a nutty flavor. For veggies, snap peas and red bell peppers work great. They add color and crunch. You can mix in other vegetables too, like broccoli or carrots, if you like. Lemon slices and fresh herbs, such as cilantro or parsley, brighten the dish. They add freshness and a pop of color, making your meal look beautiful. Feel free to add extra spices or herbs. A pinch of chili flakes or some fresh thyme can change the flavor profile. The Full Recipe gives you all the details you need to make this easy and tasty meal. 1. Preheat your oven to 400°F (200°C). This step helps cook the salmon evenly. 2. In a small bowl, whisk together honey, soy sauce, minced garlic, and grated ginger until smooth. Set this sauce aside. It adds a great flavor to the salmon. 1. In a large oven-safe skillet, heat olive oil and sesame oil over medium-high heat. This mix gives a nice depth to the dish. 2. Once the oil is hot, add the salmon fillets skin-side down. Season them with salt and pepper. Cook the salmon for about 3-4 minutes. You want the skin crispy. 3. Carefully flip the fillets over. Pour the honey garlic mixture over the salmon and place lemon slices on top. The lemon adds brightness to the dish. 1. Add snap peas and red bell pepper around the salmon in the same skillet. This adds color and crunch. 2. Transfer the skillet to the preheated oven. Bake for 10-12 minutes. The salmon should flake easily with a fork when done. 3. Remove from oven and let it sit for a couple of minutes. This cooling time helps the flavors meld together. 4. Garnish with fresh cilantro or parsley before serving. Enjoy your beautiful One-Pan Honey Garlic Salmon! For details on the ingredients, check the Full Recipe. To ensure crispy skin on your salmon, start with a hot pan. Heat olive oil and sesame oil until they shimmer. Place the salmon skin-side down and let it cook without moving it for about 3-4 minutes. This method helps the skin get nice and crispy. The ideal internal temperature for salmon is 145°F (63°C). Use a meat thermometer to check. When the salmon flakes easily with a fork, it’s ready to eat. For side dishes, snap peas or red bell pepper work great. You can also serve this salmon with rice or quinoa for a filling meal. When plating, arrange the salmon fillets neatly. Add the veggies around the fish. A sprinkle of fresh cilantro or parsley on top adds a pop of color and flavor. One common mistake is overcooking the salmon. Keep an eye on the time and check the temperature. Overcooked salmon can become dry and tough. Another mistake is using the wrong pan. Choose an oven-safe skillet. If your pan isn't oven-safe, transfer the salmon to a baking dish before putting it in the oven. This keeps your cooking smooth and easy. For the Full Recipe, check out the main sections. {{image_2}} You can make this dish with chicken or tofu instead of salmon. Chicken thighs work well. Just adjust the cooking time. Tofu is a great option for vegans. Use firm tofu, and press it to remove extra water. This way, it absorbs the flavors better. Both options offer a tasty twist on the original. Other fish options include tilapia or cod. These fish have mild flavors and cook quickly. Just follow the same cooking method in the recipe. Adding spices or herbs can change the taste. Consider adding red pepper flakes for heat. Fresh herbs like basil or dill can add freshness. You can also try a dash of smoked paprika for a unique touch. If you want to adjust sweetness, use maple syrup instead of honey. Maple syrup gives a different flavor but is still delicious. Just keep the same amount as the honey in the recipe. To make this dish gluten-free, use tamari instead of soy sauce. Tamari is a great substitute that keeps the flavors intact. This change makes it safe for those with gluten allergies. For low-carb or keto diets, skip the honey altogether. You can use a sugar substitute like erythritol. This keeps the dish tasty without the added carbs. Adjust to your taste, and enjoy a healthier version! To keep your One-Pan Honey Garlic Salmon fresh, store it right. Let the salmon cool down before placing it in the fridge. Use an airtight container to avoid air exposure. It stays good for up to three days. For best taste, consume it within two days. You can freeze this dish if you want to save it for later. First, let the salmon cool completely. Wrap each fillet tightly in plastic wrap. Then, place them in a freezer-safe bag or container. Seal it well to prevent freezer burn. This way, it can last up to three months in the freezer. When you're ready to eat, thaw it overnight in the fridge. Reheating salmon can be tricky, but I have some good methods. The oven works best. Preheat it to 350°F (175°C). Place the salmon on a baking sheet and cover it with foil. Heat for about 10 minutes. You can also reheat it in the microwave. Use a microwave-safe plate and cover it with a damp paper towel. Heat in short bursts until warm. Avoid overcooking, as it may dry out the fish. To make One-Pan Honey Garlic Salmon, follow these steps: 1. Preheat your oven to 400°F (200°C). 2. In a bowl, mix honey, soy sauce, minced garlic, and grated ginger. 3. Heat olive oil and sesame oil in an oven-safe skillet. 4. Add salmon fillets skin-side down and season with salt and pepper. 5. Cook for 3-4 minutes until the skin is crispy, then flip. 6. Pour the honey garlic sauce over the salmon and add lemon slices. 7. Add snap peas and red bell pepper around the salmon. 8. Transfer the skillet to the oven and bake for 10-12 minutes. 9. Remove from the oven and let it cool for a few minutes. 10. Garnish with fresh cilantro or parsley before serving. This simple method brings out great flavors in a short time. You can find the Full Recipe for more details. Yes, you can use frozen salmon. However, you need to thaw it first. Here are two methods: - Refrigerator method: Place the frozen salmon in the fridge overnight. - Cold water method: Seal the salmon in a bag and submerge it in cold water for 30-60 minutes. Make sure the salmon is fully thawed before cooking. Cooking frozen salmon directly may lead to uneven cooking. If you need a substitute for honey, try these sweeteners: - Maple syrup: This gives a similar sweet flavor. - Agave nectar: It’s sweeter than honey but works well. - Brown sugar: Mix it with water to create a syrup. Each sweetener will change the taste slightly, so choose based on your preference. You can store leftovers for up to 3 days in the fridge. Keep them in an airtight container. If you want to keep them longer, you can freeze the salmon. It can last up to 3 months in the freezer. Just remember to reheat it gently to avoid drying it out. This blog showed how to make One-Pan Honey Garlic Salmon with ease. You learned about the key ingredients, step-by-step cooking instructions, and handy tips. We also explored flavor variations, dietary adjustments, and storage advice. Now, you can prepare a delicious meal that is both simple and satisfying. Trust these methods and enjoy your cooking journey with confidence.

One-Pan Honey Garlic Salmon Quick and Tasty Recipe

Are you ready to make a delicious meal in just one pan? This One-Pan Honey Garlic Salmon recipe is quick,

- 4 boneless, skinless chicken breasts - Zest and juice of 2 lemons - 3 cloves garlic, minced - 1 tablespoon fresh rosemary, chopped - 1 tablespoon fresh thyme, chopped - 1 tablespoon fresh parsley, chopped - Olive oil, salt, and pepper - Mixing bowl - Grill - Resealable plastic bag or shallow dish To make lemon herb grilled chicken, you need fresh ingredients. Start with chicken breasts. They are lean and cook well on the grill. The zest and juice of lemons add bright flavor. Garlic gives a nice kick. When choosing herbs, use fresh ones for the best taste. Rosemary, thyme, and parsley work well together. Olive oil helps the chicken stay moist. Salt and pepper are key for flavor. For tools, gather a mixing bowl to mix your marinade. A grill is essential for cooking. Use a resealable plastic bag or shallow dish to marinate the chicken. This recipe is simple yet full of flavor. You can find the full recipe for lemon herb grilled chicken at the end of this article. To start, gather your ingredients. You need lemon zest, lemon juice, minced garlic, and fresh herbs. I like to use rosemary, thyme, and parsley. 1. In a large mixing bowl, combine the lemon zest, lemon juice, minced garlic, and herbs. 2. Whisk in olive oil, salt, and pepper. This will create a flavorful marinade. Now, let's marinate the chicken. 1. Place the chicken breasts in a resealable plastic bag or shallow dish. 2. Pour the marinade over the chicken. Make sure each piece is well covered. 3. Seal the bag or cover the dish. Refrigerate for at least one hour. For best results, marinate overnight. Grilling the chicken is the best part. 1. Preheat your grill to medium-high heat. If using charcoal, wait until the coals glow red. 2. Remove the chicken from the marinade. Let any excess drip off and discard the rest. 3. Grill the chicken for 6-7 minutes on each side. Check that it reaches an internal temperature of 165°F (75°C). Look for nice grill marks. 4. Once cooked, take the chicken off the grill and let it rest for 5 minutes. This keeps it juicy. Now you are ready to enjoy your Lemon Herb Grilled Chicken! For the full recipe, check the earlier section. To make your lemon herb grilled chicken burst with flavor, marinate it well. A good marinade helps the chicken absorb all the tasty herbs and lemon. Use a resealable bag or a shallow dish to coat the chicken evenly. For best results, let it sit for at least one hour. If you have time, overnight is even better. This longer marinating time helps the flavors soak in deeply. When grilling, aim for those perfect grill marks. Start with a clean grill and preheat it to medium-high heat. Place the chicken on the grill and resist the urge to move it too soon. Let it cook for about 6-7 minutes on one side before flipping. Use a meat thermometer to check for doneness. The chicken should reach 165°F (75°C). This way, you avoid overcooking, keeping it juicy and tender. Lemon herb grilled chicken pairs well with many sides. Try serving it with a fresh salad, grilled veggies, or rice. These sides complement the bright flavors perfectly. For garnish, add fresh herbs or lemon wedges on the plate. This adds a nice touch and makes your dish look even more appealing. If you want to impress, drizzle some extra olive oil on top before serving. This simple step enhances the dish's flavor and beauty. {{image_2}} You can switch up the herbs in this recipe. Try using fresh basil or cilantro for a new taste. Each herb adds its own flair. You can also mix in spices like paprika or cumin for a spicy twist. These changes keep your meals exciting and full of flavor. If you have dietary needs, you can swap ingredients in the marinade. For a dairy-free option, use coconut milk instead of olive oil. You can also try yogurt or buttermilk as a base. These ingredients help make the chicken tender and juicy while adding a creamy texture. No grill? No problem! You can bake the chicken in an oven. Preheat your oven to 375°F (190°C). Place the marinated chicken on a baking sheet. Bake for 25-30 minutes or until the chicken is cooked through. For stovetop grilling, heat a grill pan over medium heat. Cook the chicken for about 6-7 minutes on each side. Both methods yield tasty results. For the full recipe, check out the detailed instructions above. To keep your lemon herb grilled chicken fresh, follow these tips: - Refrigerating Leftovers: Let the chicken cool down first. Place it in an airtight container. This keeps out air and moisture. Store it in the fridge for up to four days. - Freezing Lemon Herb Grilled Chicken: For longer storage, wrap each piece in plastic wrap. Then, place the wrapped chicken in a freezer bag. Remove as much air as you can before sealing. It can last for up to three months in the freezer. When it's time to enjoy leftovers, use these methods: - Best Methods: A stovetop skillet or oven works best. Avoid the microwave if you can. Microwaving can dry out the chicken. - Time and Temperature Guidelines: Heat the chicken in a skillet over medium heat for about 5 minutes per side. If using an oven, heat it at 350°F (175°C) for 10-15 minutes, until warm. Understanding how long your chicken lasts is key: - Refrigerated Duration: Cooked chicken stays good for up to four days in the fridge. - Frozen Duration: If frozen, it can last for about three months without losing flavor. - Signs of Spoilage: Check for a strange smell, slimy texture, or discoloration. If you notice any of these, throw the chicken away. For the full recipe, refer back to the main sections of this article. Enjoy your cooking! You should marinate chicken for at least 1 hour. If you have time, go for 8 hours or overnight. This lets the chicken soak up all the tasty flavors from the marinade. The best internal temperature for chicken is 165°F (75°C). Use a meat thermometer to check this. Cooking chicken to this temperature keeps it safe to eat. Yes, you can use chicken thighs. They are juicier and have more flavor. Cook them for about 7-8 minutes per side. Make sure they also reach 165°F (75°C). Lemon herb grilled chicken pairs well with many sides. Try it with: - Steamed vegetables - Rice or quinoa - A fresh salad - Grilled corn on the cob Yes, you can prep this recipe ahead of time. Marinate the chicken and keep it in the fridge. You can grill it later when you are ready to eat. This recipe is naturally gluten-free. Just make sure any added sauces or marinades are gluten-free. Check labels to be sure. Enjoy your meal without worry! Lemon herb grilled chicken is simple and tasty. You learned to make a flavorful marinade and how to grill chicken perfectly. Remember to marinate long enough and check the internal temperature. Explore variations to keep meals exciting, and consider storage tips for leftovers. This dish pairs well with many sides, making it versatile. Enjoy the fresh flavors in your meals, and feel free to experiment with herbs and cooking methods. With practice, you’ll achieve great results every time. Happy cooking!

Lemon Herb Grilled Chicken Delightfully Simple Recipe

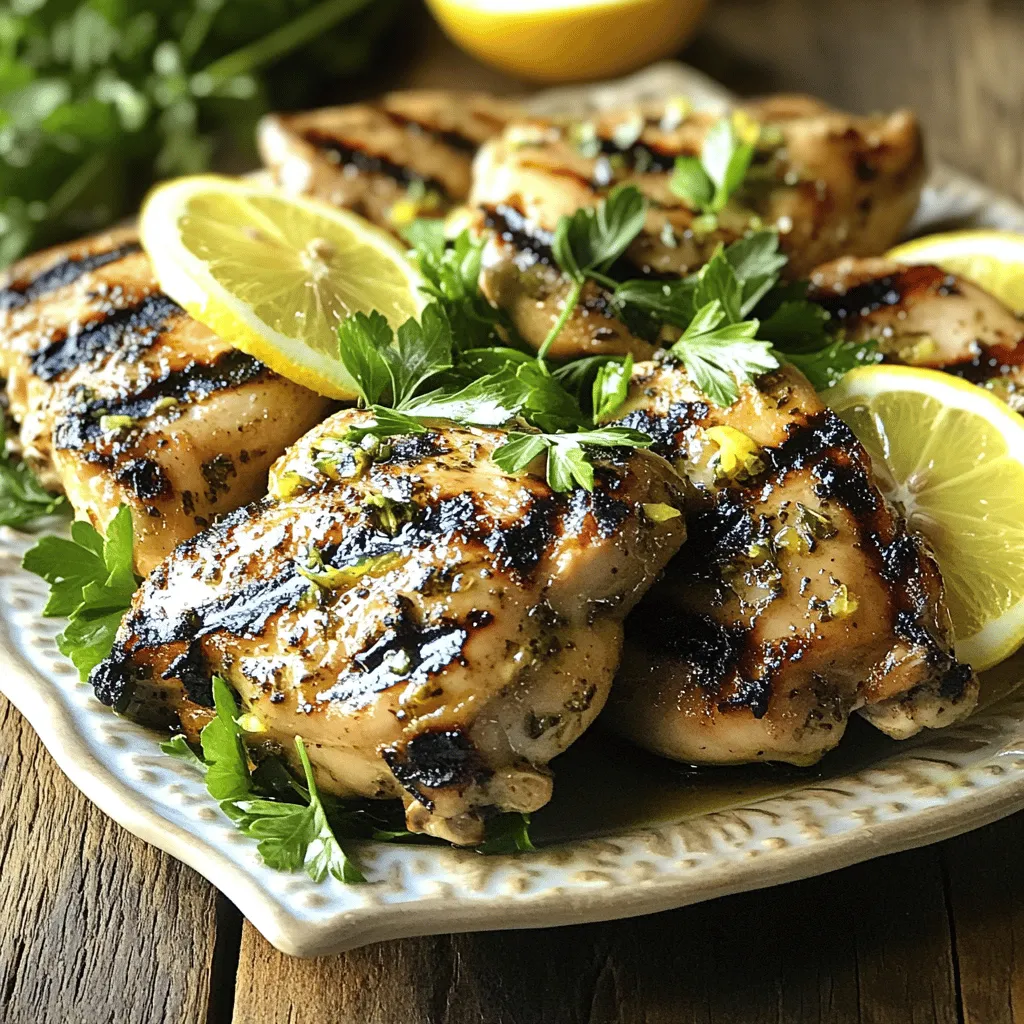
If you’re looking for a quick and tasty meal, I have the perfect recipe for you: Lemon Herb Grilled Chicken!

To make garlic butter shrimp pasta, you need some key ingredients. These items will create a rich and savory delight. Here’s what you need for this dish: - 8 oz spaghetti or linguine - 1 lb large shrimp, peeled and deveined - 4 cloves garlic, minced - 1/2 cup unsalted butter - 1/4 teaspoon red pepper flakes (optional) - 1/2 cup chicken broth - 1 tablespoon lemon juice - 1/4 cup fresh parsley, chopped - Salt and pepper to taste - Grated Parmesan cheese for serving Each ingredient plays a role in the flavor and texture of the dish. The shrimp brings a sweet taste, while garlic adds depth. Butter makes the sauce rich and smooth. Lemon juice adds brightness, balancing the flavors. Fresh parsley gives a pop of color and freshness. If you want to make adjustments, the red pepper flakes can spice things up. You can also replace the shrimp with chicken or scallops if you prefer. For a more plant-based option, try adding vegetables like spinach or bell peppers. Remember, using fresh ingredients will always enhance your dish. For the full recipe, you can follow the steps to create this wonderful meal. Enjoy cooking! - Total Cooking Time: 25 minutes - Prep Time: 10 minutes - Servings: 4 Start by boiling a large pot of salted water. Add 8 oz of spaghetti or linguine. Cook it until al dente, following the package instructions. Once done, drain it but save about 1/2 cup of that pasta water. You’ll use it later for the sauce. In a large skillet over medium heat, melt 1/2 cup of unsalted butter. Add 4 minced garlic cloves and, if you like a bit of heat, 1/4 teaspoon of red pepper flakes. Sauté for about 1 minute until the garlic smells great. Then, add 1 lb of large, peeled, and deveined shrimp. Season these with salt and pepper. Cook them for 2-3 minutes on each side until they turn pink and opaque. Once cooked, take them out and set them aside. In the same skillet, pour in 1/2 cup of chicken broth and 1 tablespoon of lemon juice. Bring this mix to a simmer. Cook for 2-3 minutes, making sure to scrape any brown bits off the bottom of the pan. This adds flavor! Now, add the cooked pasta back into the skillet with the garlic butter sauce. Toss it well to coat all the noodles. If it seems too dry, add a bit of that reserved pasta water until it looks just right. Return the shrimp to the skillet and mix everything together gently. Finally, stir in 1/4 cup of chopped fresh parsley. To serve, plate the pasta and shrimp mixture in deep bowls. Top with grated Parmesan cheese and a little extra parsley. A lemon wedge on the side adds a nice touch! Enjoy your rich and savory garlic butter shrimp pasta. For the complete recipe, check the Full Recipe. Identifying Quality Shrimp When buying shrimp, look for a firm texture. Their shells should be shiny and moist. Fresh shrimp should smell like the ocean, not fishy. Avoid any shrimp with black spots or a strong odor. Seasonal Considerations Shrimp is best when in season. Look for local seafood markets for fresh catches. In the U.S., peak shrimp season is from May to August. Buying in season means better taste and quality. Achieving the Perfect Al Dente Texture To get al dente pasta, cook it for about one minute less than the package states. Stir the pasta often to keep it from sticking. Taste the pasta a minute or two before the time is up. It should be tender but still have a slight bite. Working with Different Pasta Types Spaghetti and linguine work well in this dish, but you can try others. Fettuccine or penne can also hold the sauce well. Just keep an eye on cooking times, as they may differ. Additional Seasoning Suggestions For a zesty kick, add lemon zest or more red pepper flakes. A pinch of smoked paprika can deepen the flavor. Fresh herbs like basil or thyme also pair well with shrimp. Pairings and Complementary Ingredients Serve your garlic butter shrimp pasta with a side salad or garlic bread. A crisp white wine, like Pinot Grigio, balances the rich butter. You can also add steamed asparagus or broccoli for extra veggies. For the complete cooking process, check the Full Recipe for Garlic Butter Shrimp Pasta. {{image_2}} You can switch out shrimp for chicken or scallops. Chicken makes a nice twist. It cooks well in garlic butter too. Use chicken breast, cut into bite-sized pieces. Cook it until golden brown. Then, add garlic just like in the shrimp recipe. Scallops are also a great choice. They’re sweet and tender. Sear them in the garlic butter for 2-3 minutes. This adds a rich flavor to your dish. If you want a vegetarian option, try using mushrooms or tofu. Both soak up flavor nicely. Sauté them in garlic and butter. Then, add them right to your pasta. You can make this dish even better by adding veggies. Spinach, cherry tomatoes, or bell peppers work well. Add them to the pan after the garlic. Cook until they're soft but still bright. They give color and nutrition to your meal. You might also explore other herbs and spices. Fresh basil or oregano can add depth. A sprinkle of paprika can give a smoky taste. Don’t be afraid to experiment with flavors you love. If you're gluten-free, use gluten-free pasta. Many brands offer options that cook well and taste great. Look for ones made from rice or chickpeas. They can replace regular pasta without a hitch. For a dairy-free version, skip the butter and cheese. Use olive oil instead. Nutritional yeast is a good substitute for cheese. It adds a cheesy flavor without the dairy. These variations let you enjoy garlic butter shrimp pasta in new ways, fitting your diet and taste. Explore these options to make it your own! Store your garlic butter shrimp pasta in an airtight container. This helps keep it fresh. If you have more than one serving, divide it into smaller portions. This way, you can enjoy it later without losing quality. Use glass or plastic containers with tight lids. These are great for keeping the pasta safe. Make sure the pasta cools down before sealing the container. This prevents moisture build-up, which can make the pasta soggy. To reheat your pasta, you have a few options. The microwave is quick and easy. Just put the pasta in a bowl and cover it. Heat in short bursts, stirring in between. Stovetop reheating is another option. Place the pasta in a skillet with a splash of chicken broth. Heat it over low heat, stirring gently. This method helps preserve the texture and flavor. - Microwave: Quick and convenient. Use a covered bowl. - Stovetop: Add broth to keep it moist. Heat gently. To keep the pasta tasty, avoid overheating. Heat until warm, not hot. Adding a little extra butter or broth can bring back that rich flavor. You can freeze garlic butter shrimp pasta to enjoy later. Place it in a freezer-safe container. Make sure to leave some space for expansion. - Cool the pasta completely. - Portion it into freezer-safe bags or containers. - Label with the date for easy tracking. To thaw, move the pasta from the freezer to the fridge a day before. This allows it to thaw slowly. If you’re in a hurry, you can use the microwave. Just set it to defrost, checking often to avoid cooking it. Enjoy your garlic butter shrimp pasta, even days later! For the complete recipe, check [Full Recipe]. Garlic butter shrimp pasta lasts about 3 to 4 days in the fridge. Store it in an airtight container to keep it fresh. Always check for any off odors before eating. Yes, you can make garlic butter shrimp pasta ahead of time. Just cook the pasta and shrimp, then store them separately. Reheat them together before serving for the best taste. You can substitute shrimp with chicken, scallops, or even tofu. Each option brings a unique flavor to the dish. Adjust cooking times based on the protein you choose. To add spice, use more red pepper flakes or add fresh chopped chili. You can also mix in some hot sauce for a different kick. Adjust the heat to your taste. Spaghetti and linguine work best for this dish. They hold the sauce well and complement the shrimp nicely. You can also try fettuccine for a thicker noodle. For the full recipe, check the Garlic Butter Shrimp Pasta section above. This blog post covered a simple and delicious garlic butter shrimp pasta recipe. You learned the key ingredients, preparation steps, and cooking tips. I shared ways to enhance flavor and offered alternatives for different diets. Remember, using fresh shrimp makes a big difference. Enjoying your meal is the goal, so feel free to get creative. Explore different variations to keep this dish exciting. Your kitchen is a place for fun, so try new things without fear. Cooking should be enjoyable, and I hope this recipe inspires you to share it with others.

Garlic Butter Shrimp Pasta Rich and Savory Delight

Welcome to a mouthwatering journey where garlic, butter, and shrimp come together! In this post, I’ll share my favorite recipe

- 3 ripe peaches, sliced - 1 cup heavy whipping cream - 1/2 cup powdered sugar - 1 teaspoon vanilla extract - 1 1/2 cups graham cracker crumbs - 1 cup cream cheese, softened - 1 tablespoon lemon juice - 2 tablespoons honey - Fresh mint leaves for garnish No-Bake Peach Icebox Cake is fun to make. You start with fresh peaches. They give the cake a juicy, sweet flavor. The heavy whipping cream adds a light and fluffy texture. Powdered sugar adds sweet notes that balance the tartness of peaches. Next, you need graham cracker crumbs. They form the cake's base and add a crunchy bite. Cream cheese gives the cake a creamy richness. Mixing in vanilla extract boosts the flavor profile even more. Lemon juice adds a refreshing twist. It brightens all the flavors and lifts the dish. Honey adds more natural sweetness and a hint of floral notes. Finally, fresh mint leaves make a lovely garnish. They add color and a burst of freshness. For the full recipe, you can check the details above. This treat is perfect for warm days. It's simple, refreshing, and all about using good ingredients. First, you need to whip the heavy cream. Use a large mixing bowl and an electric mixer. Whip until soft peaks form. This step is key for a light texture. Next, gradually add the powdered sugar and vanilla extract. Continue to whip until stiff peaks form. This cream will be a big part of your cake's charm. In another bowl, mix the softened cream cheese, lemon juice, and honey until smooth. This mixture adds a rich, creamy layer. It’s best to use a spatula to get it nice and creamy. Now, gently fold this cream cheese mix into the whipped cream. Be careful not to deflate the whipped cream. This folding keeps the mixture airy. Grab a rectangular baking dish for this part. Start by spreading a thin layer of the cream mixture at the bottom. This helps keep the graham crackers from sticking. Then, place a layer of graham cracker crumbs over the cream. After that, add a layer of sliced peaches on top. Repeat this process, alternating layers of cream, crackers, and peaches. Finish with a final layer of cream on top. This layering creates a beautiful look. Cover your dish with plastic wrap. Refrigerate for at least 4 hours, or overnight if you can wait. This chilling time is vital. It lets the graham crackers soak and the flavors mix. When you are ready to serve, cut into squares. You can garnish with fresh mint leaves for a nice touch. This adds color and a fresh scent to the cake. Enjoy your No-Bake Peach Icebox Cake with friends and family. For the full recipe, check the details above. When picking peaches, look for ripe ones. They should feel soft but not mushy. Ripe peaches smell sweet and have a light color. Avoid overripe peaches as they can spoil your cake. If peaches are out of season, use canned or frozen peaches. Just drain the syrup and pat them dry before using. To whip the cream well, start with cold heavy cream. Use a chilled bowl and beaters for best results. Whip until soft peaks form, then add powdered sugar. Fold in the cream cheese mixture slowly. This keeps the cream light and fluffy. Be gentle when folding to avoid losing air. This cake pairs great with ice cream or extra whipped topping. A scoop of vanilla ice cream adds a nice touch. For a party, slice the cake into squares and arrange them on a platter. Garnish with fresh mint leaves for color and flavor. It makes the dessert look fancy and fresh. {{image_2}} You can make this peach icebox cake even more fun by adding different fruits. Try using berries like strawberries or blueberries for a burst of color and taste. Mango slices also work great for a tropical twist. You can also switch up the cream cheese. Use flavored cream cheese, like strawberry or honey, to give your cake a unique flair. If you want a lighter version, use low-fat cream for the whipped part. You can also reduce sugar by using sugar substitutes like stevia or monk fruit. These swaps can help make the dessert healthier while still tasting sweet and delicious. For a gluten-free cake, replace graham cracker crumbs with almond flour or gluten-free cookies. You can also use gluten-free vanilla wafers to keep the layers intact. When layering, be gentle, as gluten-free options may not hold up as well. These tips will help you create a tasty gluten-free peach icebox cake. For the full recipe, check out the [Full Recipe]. To keep your peach icebox cake fresh, store it in the fridge. Use an airtight container to prevent moisture loss and keep flavors intact. If you don't have a container, cover the dish with plastic wrap. This helps seal in the taste and texture. Make sure it touches the top of the cake to avoid drying out. Can you freeze the cake? Yes, you can freeze your peach icebox cake. However, it’s best to freeze it before serving. Wrap it well in plastic wrap and then in aluminum foil. This extra layer helps prevent freezer burn. For thawing after freezing, place the cake in the fridge overnight. This method keeps it cool and tasty. Avoid thawing at room temperature, as it may change the texture. How long does it last in the fridge? Your cake will last about 3 to 5 days in the fridge. Keep an eye on it. Signs the cake has gone bad include a sour smell or an off taste. If you see any mold, throw it away. Eating spoiled food can make you sick. Enjoy your delicious treat while it’s fresh! For the full recipe, check out the earlier section. An icebox cake is a no-bake dessert. It layers cookies or crackers with cream and fruit. This cake gets its name from the time when people used iceboxes to chill food. It’s simple to make and perfect for hot days. Yes, you can make this cake a day before serving. It tastes even better after chilling overnight. This gives the flavors time to blend well. Just cover it tightly in the fridge. Check if the cake is firm and chilled. The graham crackers should be soft but not mushy. You can slice it easily into squares. If it looks set and cool, it’s ready to enjoy. Yes, you can make a vegan icebox cake. Use coconut cream instead of heavy cream. Replace cream cheese with a vegan cream cheese. You can also use maple syrup in place of honey. These swaps keep the cake tasty and dairy-free. For the full recipe, check the instructions above. This blog post covered how to make a delicious peach icebox cake. We talked about the main ingredients, like ripe peaches and cream, and how to layer them. You learned tips to achieve the perfect texture and how to store your cake. Whether you want healthier options or flavor variations, there’s something for everyone. Get ready to impress your friends or family with this easy yet tasty dessert. With the right peaches and a few simple steps, your cake will be a hit at any gathering. Enjoy your baking!

No-Bake Peach Icebox Cake Simple and Refreshing Treat

If you’re seeking a sweet, cool treat that’s simple to make, it’s time to try my No-Bake Peach Icebox Cake.

Older posts
Newer posts
← Previous Page1 … Page15 Page16 Page17 … Page80 Next →

dsad

© 2025 My Saved Recipe • Built with GeneratePress

Our Policies

  • Copyright Policy
  • Cookie Policy
  • GDPR Policy
  • Privacy Policy
  • Disclaimer
  • Terms Of Use

More Information

  • Home
  • About
  • Contact
  • Appetizers
  • Dessert
  • Dinner
  • Drinks
©2025, My Saved Recipe About Back To Top