
Peach Cobbler Cheesecake Delightful Flavor Awaits
Are you ready to indulge in a dessert that combines the best of two worlds? This Peach Cobbler Cheesecake brings
Are you ready to indulge in a dessert that combines the best of two worlds? This Peach Cobbler Cheesecake brings

Welcome to the world of cheesy zucchini fritters! If you’re looking for a fun, tasty dish that’s crispy on the
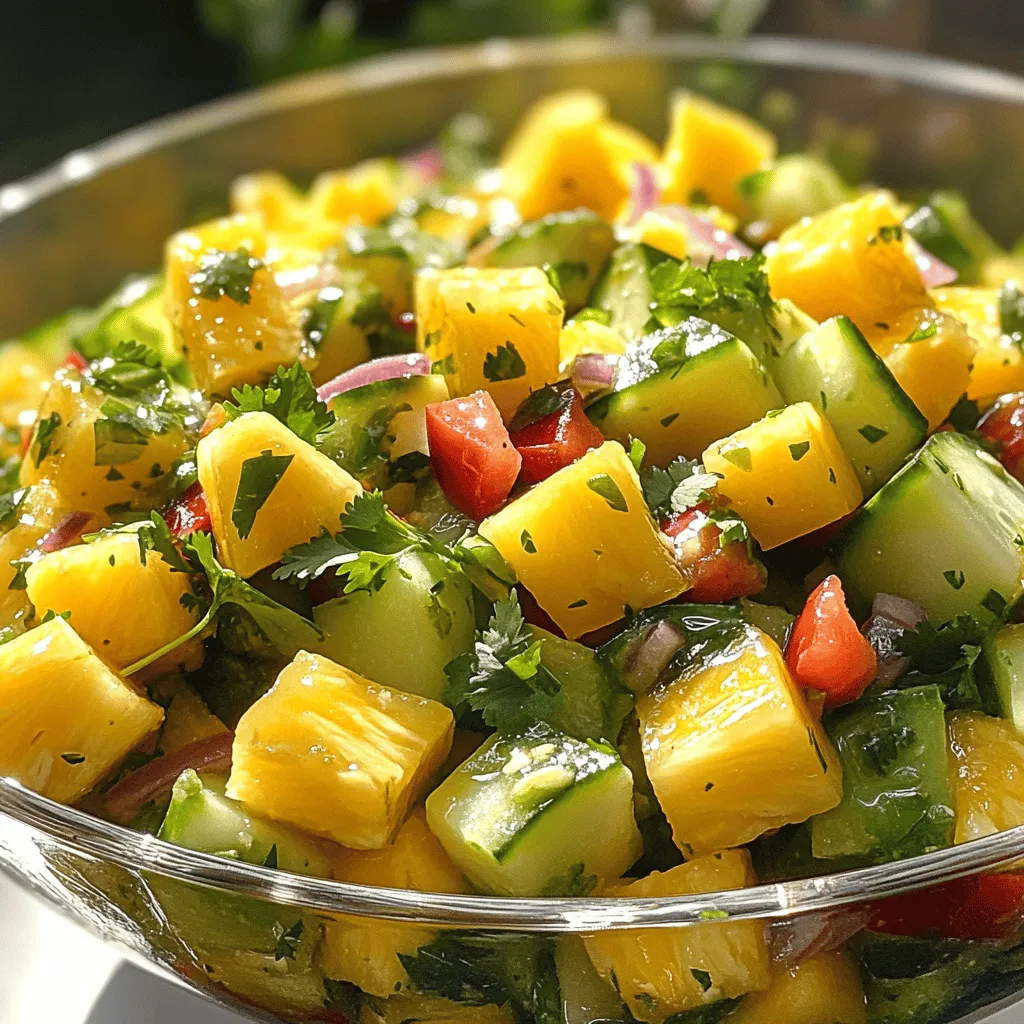
Looking for a refreshing dish that’s simple and vibrant? This Pineapple Cucumber Salad is the answer! Bursting with fresh flavors
![- Zucchini and Fresh Produce - 4 medium zucchinis, thinly sliced - 1 cup cherry tomatoes, halved Zucchini is the star of this dish. I love how its mild flavor shines through. Fresh cherry tomatoes add a touch of sweetness. They balance the dish perfectly. - Dairy Ingredients - 1 cup ricotta cheese - 1 cup shredded mozzarella cheese - 1/2 cup grated Parmesan cheese The ricotta gives a creamy texture. It melts beautifully with the mozzarella and adds richness. Parmesan brings a sharp and salty kick, making the flavors pop. - Herbs and Seasonings - 3 cloves garlic, minced - 1 tablespoon fresh basil, chopped - 1 tablespoon fresh thyme, chopped - 1 tablespoon olive oil - Salt and pepper to taste - 1/2 teaspoon red pepper flakes (optional) - 1 cup breadcrumbs (for topping) Garlic adds a wonderful aroma as it cooks. Fresh herbs like basil and thyme elevate the dish with vibrant flavor. Olive oil helps everything cook nicely. You can use red pepper flakes for a little heat if you like. The breadcrumbs on top give a satisfying crunch. This mix of ingredients makes the herb zucchini casserole both tasty and fun to eat. For the full recipe, check out the detailed instructions. Start by washing the zucchinis. Use a sharp knife to slice them thinly. This helps them cook evenly. Next, take your garlic cloves and mince them finely. This step adds great flavor to the dish. Heat a large skillet over medium heat and add olive oil. Once hot, add the minced garlic. Sauté it for about one minute until it smells nice. Then, add the sliced zucchini to the skillet. Cook for about five to seven minutes until they soften. Season with salt and pepper to taste, and add red pepper flakes if you like a bit of heat. In a big mixing bowl, combine the ricotta cheese and half of the mozzarella. Add half of the Parmesan cheese next. Then, chop fresh basil and thyme, and mix them in. Stir everything until it is smooth and creamy. This mixture will act as a tasty layer in your casserole. Grab a greased baking dish and layer half of the cooked zucchini at the bottom. Spread half of the ricotta mixture over the zucchini. Then, add half of the halved cherry tomatoes on top. Repeat these layers with the remaining zucchini, ricotta mixture, and cherry tomatoes. Finally, sprinkle the rest of the mozzarella and Parmesan on top. This will create a beautiful and cheesy finish. Now, cover the baking dish with aluminum foil. This helps everything cook through without browning too quickly. Place it in the preheated oven at 375°F (190°C) and bake for 25 minutes. This initial baking allows the flavors to meld nicely. After 25 minutes, carefully remove the foil. This lets the top get nice and golden. Bake for an extra 15 to 20 minutes until the cheese is bubbly and the top is golden brown. Once done, take it out and let it cool for about five to ten minutes before serving. This waiting time helps set the casserole. For the complete recipe, see the [Full Recipe]. Choosing the Right Zucchini Pick medium zucchinis for the best taste. Look for firm zucchinis with smooth skin. Avoid ones with soft spots or blemishes. Fresh zucchinis hold their shape and flavor well in the casserole. Adjusting Seasoning Levels Taste as you go! Start with salt and pepper, then add more if needed. You can also play with herbs. If you like more flavor, add extra basil or thyme. For spice lovers, the red pepper flakes will give it a nice kick. Making Ahead of Time You can prepare the casserole a day before. Layer all the ingredients, cover it, and place it in the fridge. Just bake it when you are ready to eat. This way, the flavors blend nicely, and it saves you time. Pairing Ideas for the Casserole Herb zucchini casserole goes well with a light salad. A simple green salad with lemon dressing works great. You can also serve it with crusty bread to soak up the flavors. If you want a protein, grilled chicken or fish pairs nicely. Presentation Tips: Garnishing Make your casserole look pretty by adding fresh herbs on top. Sprinkle some chopped basil or parsley before serving. This adds color and a fresh taste. A drizzle of olive oil can also enhance the look and flavor. Check the Full Recipe for detailed steps and tips to create this delicious dish! {{image_2}} Adding Proteins: Chicken or Tofu You can boost your casserole with protein. Adding cooked chicken or tofu makes it heartier. For chicken, use shredded rotisserie or diced grilled chicken. If you like tofu, press it first to remove water. Then, cube and sauté it with garlic before mixing it in. This swap not only adds flavor but also makes your meal more filling. Experimenting with Different Cheeses Cheese can change the taste a lot! Feel free to swap out the cheeses in the recipe. Try feta for a tangy kick or goat cheese for creaminess. You can also mix in some cheddar for a sharp flavor. Each cheese brings its own unique twist, so get creative and see what you love best! Gluten-Free Options If you need a gluten-free dish, switch out the breadcrumbs. Use gluten-free breadcrumbs or crushed gluten-free crackers. This keeps the texture nice and crisp. You can also skip the topping if you want a lighter version. The casserole will still taste great without it! Vegan Alternatives For a vegan option, replace dairy ingredients with plant-based choices. Use vegan ricotta or cashew cheese instead of regular ricotta. Choose almond or soy milk for a creamy base. You can also try nutritional yeast for a cheesy flavor without the dairy. With these swaps, everyone can enjoy this tasty dish! For more details on making this dish, check out the full recipe. To keep your herb zucchini casserole fresh, store it in the fridge. Use an airtight container. This helps prevent it from drying out. It stays good for about three to five days. If you want to save it for later, you can freeze the casserole. Cut it into pieces and wrap each piece well. Use plastic wrap and then foil to keep out air. You can freeze it for up to three months. When you are ready to eat it, let it thaw in the fridge overnight. When it’s time to enjoy your leftover casserole, you have a few good options. The oven is the best way to reheat it. Preheat the oven to 350°F (175°C). Place the casserole in an oven-safe dish. Cover it with foil to prevent it from drying out. Heat for about 20-25 minutes, or until hot. You can also use the microwave for a quicker option. Place a piece on a microwave-safe plate. Heat for 1-2 minutes, checking to see if it’s warm. If it needs more time, heat it in 30-second bursts. For the best taste, reheating in the oven is my favorite method. It keeps the texture nice and the cheese melty. Enjoy your delicious herb zucchini casserole again! For the full recipe, refer to the original section above. Can I use frozen zucchini for this recipe? I recommend fresh zucchini for the best taste and texture. Frozen zucchini can add extra water, making your casserole soggy. If you must use frozen, thaw and drain it well first. How long does the casserole last in the fridge? This casserole can last for about 3 to 5 days in the fridge. Store it in an airtight container to keep it fresh. Just reheat before serving. What can I substitute for ricotta cheese? You can use cottage cheese as a substitute. It offers a similar texture and flavor. Another option is cream cheese, but mix it with a bit of milk to soften it. How long to bake if using a different dish size? If you use a larger dish, your casserole may bake faster. Check it after 35 minutes. If using a smaller dish, it may need a bit longer. Always look for a golden top and bubbling cheese. Can I prepare this dish the day before? Yes, you can prep it the day before. Just layer everything in your dish and cover it. Store it in the fridge. Bake it the next day, adding a few extra minutes to the cook time if it’s cold. For the full recipe, refer back to the instructions above. This blog post covered a delicious herb zucchini casserole. We explored key ingredients like fresh zucchini, dairy, herbs, and spices. I provided easy steps, from prepping to baking. Handy tips helped you choose the right veggies and perfect your dish. We also touched on variations, making it fit for different diets. Finally, I shared storage tips and answered common questions. Enjoy creating this casserole, knowing you can tweak it however you like!](https://mysavedrecipe.com/wp-content/uploads/2025/07/9d480afd-6e62-4fdc-a2e9-2d546546fc9a.webp)
Looking for a simple yet flavorful dish to brighten your dinner table? This Herb Zucchini Casserole is the answer! With
![- 3 medium zucchinis, thinly sliced - 3 medium potatoes, thinly sliced - 1 medium onion, finely chopped - 2 cloves garlic, minced Zucchini adds a fresh texture. Potatoes bring heartiness. Onion gives sweet depth. Garlic adds flavor to every bite. - 1 cup shredded cheese (cheddar or blend) - 1 cup heavy cream - 1/4 cup breadcrumbs (for topping) Cheese creates a rich, creamy layer. Heavy cream binds all the ingredients. Breadcrumbs provide a crunchy topping that contrasts nicely. - 1 teaspoon dried thyme - 1 teaspoon salt - 1/2 teaspoon black pepper - 2 tablespoons olive oil Thyme offers an earthy taste. Salt enhances all the flavors. Black pepper adds a little kick. Olive oil helps with roasting and adds a nice sheen. This recipe is a true blend of flavors. Each ingredient plays a part in creating a dish you will love. For the full recipe, check the details above. - Preheat the oven to 375°F (190°C). - In a large bowl, combine: - 3 medium zucchinis, thinly sliced - 3 medium potatoes, thinly sliced - 1 medium onion, finely chopped - 2 cloves garlic, minced - 1 teaspoon dried thyme - 1 teaspoon salt - 1/2 teaspoon black pepper Toss everything until mixed well. - Start with the first layer of veggies. Add half of the zucchini and potato mix to your greased 9x13-inch dish. - Pour half of the cream mixture over the veggies. This mixture is made with: - 1 cup heavy cream - 1 cup shredded cheese (cheddar or a blend) Whisk these together in a separate bowl before pouring. - Repeat with the remaining vegetables and cream. Finish with leftover shredded cheese on top. - Cover the casserole with foil. - Bake for 30 minutes. - After that, remove the foil and bake for an extra 15-20 minutes. This helps the top get golden and crispy. - Once done, let it cool for a few minutes. Garnish with fresh parsley before serving. This full recipe makes a comforting and flavorful dish that you will love! To make the best zucchini potato casserole, slice your veggies evenly. This helps them cook at the same rate. You can use different cheeses like mozzarella or gouda for a new flavor twist. Try adding spices like paprika or basil to change the taste. Each twist makes the dish unique and fun. When serving, sprinkle fresh parsley on top. This adds color and freshness. You can serve it with a green salad or some crusty bread. These side dishes enhance the meal. If you have leftovers, store them in an airtight container in the fridge. They will last for three to four days. If you make a larger casserole, increase the baking time by 10 to 15 minutes. This ensures all the layers cook well. If you live at a higher altitude, your cooking time may vary too. Always start checking for doneness a bit earlier. The casserole is ready when the top is golden and the veggies are tender. {{image_2}} You can boost your casserole with more veggies. Here are some ideas: - Additional root vegetables: Carrots and parsnips work great. Slice them thin like your potatoes. - Other squash types: Yellow squash adds a nice color and flavor. Use them in place of some zucchini. - Leafy greens options: Spinach or kale can sneak in some nutrients. Just chop them and add with the other veggies. Making this dish fit your needs is easy. Consider these swaps: - Gluten-free adjustments: Use gluten-free breadcrumbs. They will give you that nice top crunch. - Vegan alternatives: Swap out the cheese for a plant-based version and use almond milk instead of cream. - Low-carb substitutes: Try cauliflower instead of potatoes. It’s a great way to cut carbs while keeping the taste. Add layers of flavor to make this dish even better: - Adding meats: Cooked bacon or sausage can elevate the dish. Just crumble it and mix it in. - Incorporating fresh herbs: Basil or oregano adds a fresh taste. Chop them and sprinkle on top before serving. - Using flavored creams: Try garlic or herb-infused cream. It adds a twist to the classic flavor. These variations keep your Zucchini Potato Casserole fresh and exciting. You can explore different tastes each time you make it. For the complete recipe, check the [Full Recipe]. To keep your Zucchini Potato Casserole fresh, store it in the fridge. Use an airtight container. It can last up to four days. For long-term storage, you can freeze it. Wrap the casserole tightly in plastic wrap and foil. It will stay good for three months in the freezer. When reheating, use the oven for the best taste. Preheat your oven to 350°F (175°C). Place the casserole in a covered dish. Heat it for about 20 minutes. If you're in a rush, use the microwave. Just heat it in short bursts. Check every 30 seconds to avoid overcooking. To keep the texture nice, add a splash of cream or water before reheating. This helps maintain moisture. How long does it last in the fridge? If stored properly, your casserole lasts about four days in the fridge. Always check for signs of spoilage before eating. What are the signs it's gone bad? Look for off smells, discoloration, or a slimy texture. If any of these appear, it's best to discard it. Enjoy your delicious Zucchini Potato Casserole while it's fresh! You should bake the casserole for about 45 to 50 minutes. Cover it with foil for the first 30 minutes. Then, take off the foil and bake for an extra 15 to 20 minutes. This helps the top turn golden brown. Yes, you can prepare the casserole a day ahead. Assemble it in the dish and cover it tightly. Store it in the fridge. When ready to bake, just add a few extra minutes to the cooking time. This dish pairs well with a fresh salad or crusty bread. You can also serve it with grilled chicken or fish. For a light meal, add steamed veggies on the side. No, peeling the potatoes is not necessary. The skin adds flavor and nutrients. Just wash them well and slice them thin. It keeps the dish colorful and rustic. Yes, you can use frozen vegetables. However, thaw them first and drain excess water. This helps the casserole stay from being too watery. Fresh veggies will give a better texture, though. Cheddar cheese works great, but feel free to mix it up. You can try a blend of mozzarella and gouda for a creamy taste. Experiment with your favorites to find the perfect flavor for your casserole. In this post, we explored making a delicious zucchini potato casserole. We covered key ingredients, like cheese and spices, along with step-by-step baking instructions. I shared tips on perfecting your dish and ways to modify it for different diets. You learned how to store leftovers and reheat them effectively. This casserole is flexible and easy to tweak. Enjoy experimenting with new veggies and flavors. I hope you make this dish soon and love it as much as I do!](https://mysavedrecipe.com/wp-content/uploads/2025/07/539bbeed-ef0e-412e-a68c-ac1aa4e58417.webp)
Craving a warm, heart-filling dish? Look no further than my Zucchini Potato Casserole! This comforting recipe blends fresh veggies, creamy

Looking for a warm and tasty dish that’s easy to make? You’ve found it! This Garlic Butter Zucchini Casserole combines
![Fresh zucchini gives this bread moisture. I use about one medium zucchini, grated. It adds a nice texture and a subtle flavor. Make sure to squeeze out some excess water after grating. This step keeps the bread from being too wet and helps it rise better. I use one cup of granulated sugar for sweetness. It balances well with the tart lemon. For oil, I prefer half a cup of olive oil. It adds richness without being too heavy. The oil also helps keep the bread moist and tender. You can replace it with another oil, but I find olive oil works best. The lemon juice and zest give this bread its bright flavor. I use a quarter cup of fresh lemon juice and the zest from one large lemon. The zest adds a punch of citrus aroma. This combination makes each bite fresh and lively. You won’t want to skip these ingredients in the full recipe. Start by gathering all your ingredients. You will need 1 cup of grated zucchini, which comes from about 1 medium zucchini. Grate it using a box grater or a food processor. This helps release moisture and flavor into the bread. Next, measure 1 cup of granulated sugar and 1/2 cup of olive oil to keep the bread moist. Grab 2 large eggs, 1/4 cup of freshly squeezed lemon juice, and zest from 1 large lemon. The zest adds a bright taste. For dry ingredients, you need 1 1/2 cups of all-purpose flour, 1 teaspoon of baking powder, 1/2 teaspoon of baking soda, 1/2 teaspoon of salt, and 1/2 teaspoon of ground cinnamon. If you like nuts, get 1/2 cup of chopped walnuts or pecans ready. In a large mixing bowl, combine the grated zucchini and sugar. Mix them well so the sugar starts to dissolve. Next, add the olive oil, eggs, lemon juice, and lemon zest. Whisk these ingredients together until blended. You want a smooth mix that brings out the fresh lemon flavor. This step is key for a light and airy bread. In another bowl, whisk together the dry ingredients: flour, baking powder, baking soda, salt, and cinnamon. Make sure to combine them well to avoid lumps. Gradually add this dry mix to the wet mix. Stir gently until they just come together. Be careful not to overmix; lumps are okay. If you choose to add nuts, fold them in now for extra crunch. Pour the batter into your greased loaf pan. Smooth the top with a spatula. Now, it's time to bake! Follow the [Full Recipe] for detailed baking instructions and enjoy the wonderful aroma that fills your kitchen. Choose firm, shiny zucchini. Look for ones without soft spots or blemishes. Smaller zucchinis work best. They have more flavor and less moisture. One medium zucchini gives you about one cup when grated. Remember, fresh zucchini makes a big difference in taste. When you mix your batter, do it gently. Stir until the dry ingredients just blend in. Overmixing can make your bread tough. It’s okay if a few lumps remain. This keeps your bread light and fluffy. Trust me, the texture will be much better! To check if your bread is done, use a toothpick. Insert it into the center of the loaf. If it comes out clean, your bread is ready. If it has wet batter on it, bake for a few more minutes. Let it cool before slicing. This helps the flavors settle. For more tips, check out the Full Recipe. {{image_2}} You can make your lemon zucchini bread even better by adding nuts or seeds. Chopped walnuts or pecans give a nice crunch. They also add healthy fats and protein. You can mix in about half a cup. Just fold them into the batter gently. If you prefer seeds, try sunflower seeds or pumpkin seeds. They will add a fun twist to the texture. Want to boost the flavor? Adding vanilla extract can enhance the taste. Just a half teaspoon is enough. You could also add warm spices like nutmeg or cardamom. These spices blend well with lemon and zucchini. They give your bread a cozy flavor. Experiment with different amounts to find your perfect mix. A sweet glaze can brighten your bread. Mix powdered sugar with a bit of lemon juice for a quick glaze. Drizzle it on top after the bread cools. You could also use a cream cheese frosting for a richer treat. For a lighter option, sprinkle powdered sugar over the slices. Fresh lemon slices on the plate add a nice touch. For the full recipe, check out the details above. After you bake the lemon zucchini bread, let it cool. Once cool, wrap it tightly in plastic wrap. This keeps the bread fresh. You can also place it in an airtight container. Store it at room temperature for up to three days. If you want to keep it longer, consider freezing it. To freeze lemon zucchini bread, slice it first. Wrap each slice in plastic wrap. Then, place the wrapped slices in a freezer bag. Squeeze out as much air as possible before sealing. This helps prevent freezer burn. You can freeze the bread for up to three months. When you're ready to eat it, just thaw it in the fridge overnight. To reheat the bread, simply take a slice out. Place it on a microwave-safe plate. Heat it in the microwave for about 15 to 20 seconds. If you prefer, you can toast it in a toaster oven. Toasting brings back the fresh, warm taste. Enjoy your delicious lemon zucchini bread fresh, even after storing! For the full recipe, check out the Lemon Zucchini Delight. Yes, you can swap some ingredients in this recipe. For example, you can use coconut oil instead of olive oil. You can also replace granulated sugar with brown sugar for a deeper flavor. If you want a gluten-free option, try a gluten-free flour blend. Just make sure to keep the same ratios. This keeps the bread moist and tasty. To check if the bread is done, use a toothpick. Insert it into the center of the bread. If it comes out clean, your bread is ready. If there are wet crumbs or batter, bake it a little longer. Usually, it takes about 45-50 minutes in the oven. Zucchini bread has some great health perks. Zucchini is low in calories but high in fiber. This helps with digestion and keeps you full. It also has vitamins A and C, which are good for your skin and eyes. Plus, using olive oil adds healthy fats. So, this bread can be a tasty treat that offers nutrition too! For the full recipe, check out the details above. This blog post shared a simple recipe for lemon zucchini bread. We covered key ingredients, including fresh zucchini, sugars, and oils. I gave you step-by-step instructions for easy preparation. Tips helped you select the best zucchini and avoid overmixing. We explored tasty variations to make your bread unique. Lastly, I provided storage advice to keep leftovers fresh. Enjoy making delicious lemon zucchini bread that friends and family will love.](https://mysavedrecipe.com/wp-content/uploads/2025/07/cb975a6e-be5d-40a7-a10c-b98a4e680de5.webp)
If you’re craving a tasty, moist loaf that brightens up your day, you’ve found it! My Lemon Zucchini Bread is
![- 1 cup crushed graham crackers - 1 cup cream cheese, softened - 1/2 cup powdered sugar - Zest of 1 orange - 1/4 cup fresh orange juice - 1 teaspoon vanilla extract - 1 cup white chocolate chips, melted - Orange sprinkles (for garnish) To make No-Bake Orange Creamsicle Truffles, you'll need a few key ingredients. First, the crushed graham crackers give the truffles a nice base and texture. Cream cheese is next, adding creaminess that balances the sweetness. The powdered sugar sweetens the mix, while the zest and juice from the orange bring in that bright, citrus flavor. Vanilla extract adds depth, and melted white chocolate provides a sweet outer layer. Don't forget the orange sprinkles for a fun look! The combination of these ingredients creates a treat that is both tasty and visually appealing. These truffles are simple to prepare. Just gather all the ingredients and follow the steps in the [Full Recipe]. You will love how easy these are to make! - In a large bowl, combine: - 1 cup crushed graham crackers - 1 cup cream cheese, softened - 1/2 cup powdered sugar - Zest of 1 orange - 1/4 cup fresh orange juice - 1 teaspoon vanilla extract Mix these until you get a smooth dough. It should feel soft but not sticky. Use your hands to form small balls, about 1 inch in size. Place those on a lined baking sheet. This part is super fun, and you can even get kids involved! Next, chill the truffles in the fridge for about 30 minutes. This helps them firm up nicely. While they chill, melt 1 cup of white chocolate chips. Heat them in a microwave-safe bowl in 30-second bursts, stirring in between. You want it smooth and shiny. Once the truffles are stiff, take them out. Dip each one into the melted white chocolate, ensuring they are fully coated. Place them back on the lined sheet and sprinkle orange sprinkles on top while the chocolate is still warm. This adds a fun pop of color and zest! Put the tray back in the fridge for an extra 15 minutes. This time allows the chocolate to harden properly. When they are cold and set, they are ready to serve. Enjoy your No-Bake Orange Creamsicle Truffles as a delightful treat! For the full recipe, check out the details above. To make great No-Bake Orange Creamsicle Truffles, your mixture must have the right feel. If it is too sticky, add more crushed graham crackers, about a tablespoon at a time. Mix it until the dough holds together but feels smooth. Chilling is key! Place the truffles in the fridge for 30 minutes. This helps firm them up, making them easier to coat in chocolate. Achieving a smooth chocolate coat is easy if you follow a few steps. First, melt the white chocolate carefully. Use a microwave in 30-second bursts, stirring well in between. This way, you will avoid burning the chocolate. When you dip each truffle, ensure it is fully covered. If you see clumps of chocolate, gently tap the truffle against the side of the bowl to let excess chocolate drip off. Want to take your truffles to the next level? Consider adding a few drops of almond extract. It adds a nice depth to the flavor. You can also try mixing in some finely chopped nuts or shredded coconut for extra texture. These small tweaks can make your truffles even more special. For the full recipe, check out the instructions above! {{image_2}} You can switch up the flavor by using dark or milk chocolate instead of white. This change adds a rich taste. If you want to get creative, consider using fun toppings. Sprinkles, crushed nuts, or even shredded coconut can make your truffles pop. The choice is yours. Want to mix it up? Try using other citrus fruits like lemon or lime. These fruits add a zesty twist to your truffles. You can also add nuts or shredded coconut for a nice crunch. These additions can enhance the texture and flavor greatly. If you're looking for a healthier choice, you can swap cream cheese for Greek yogurt. This change reduces fat while keeping a creamy texture. Lower sugar options are also available. Consider using natural sweeteners like honey or maple syrup. These swaps keep your truffles delicious but a bit lighter. You can find the full recipe online for more ideas. To keep your No-Bake Orange Creamsicle Truffles fresh, store them in an airtight container. This helps keep the moisture in and stops them from drying out. Place a piece of parchment paper between layers if you stack them. It prevents sticking and keeps them nice and smooth. Always store them in the fridge. This helps them stay firm and tasty. You can freeze these truffles for later. To do this, place them in a single layer on a baking sheet and freeze until firm. Then, transfer them to an airtight container or a freezer bag. This way, they won't stick together. When you're ready to eat them, just take out the number you want. Let them thaw in the fridge for a few hours. This keeps the texture nice and prevents melting. In the fridge, these truffles last about a week. If you freeze them, they can last up to three months. Just remember to keep them in the right container! This helps you enjoy your No-Bake Orange Creamsicle Truffles at a later date. Yes, you can use low-fat cream cheese. However, this change may affect the texture and flavor. Low-fat cream cheese is softer and less creamy. Your truffles might not hold their shape as well. They could also lack some richness. If you choose this option, chill the mixture longer before forming the balls. Adjusting sweetness is easy. You can add or reduce powdered sugar in the recipe. If you want it sweeter, add more sugar, one tablespoon at a time. Taste the mixture after each addition. If it's too sweet for you, add a bit more cream cheese to balance it out. Yes, these truffles are great for making ahead. You can prepare them a day or two in advance. Just keep them stored in the fridge. When you are ready to serve, you can dip them in chocolate and add sprinkles. This makes them perfect for parties or gatherings. If you want to change the flavor, you have options. Try using lemon or lime juice for a tart twist. You can also use almond extract for a nutty flavor. Coconut gives a tropical vibe too. Feel free to be creative and mix flavors to find your favorite! These No-Bake Orange Creamsicle Truffles are easy to make and fun to enjoy. We covered all the ingredients needed, preparation steps, and tips to make them perfect. You can customize flavors and coatings to fit your taste. Plus, storing them is simple. Remember, with a few tweaks, these truffles can be a hit at any gathering. Don't hesitate to experiment and find your favorite version. Enjoy making and sharing these delightful treats!](https://mysavedrecipe.com/wp-content/uploads/2025/07/549036e3-4c4e-4b3e-ba9e-92372236a945.webp)
Looking for a fun and simple dessert? Try my No-Bake Orange Creamsicle Truffles! These tasty bites combine creamy goodness and

Get ready to treat your taste buds with my Lemon Poppy Seed Cheesecake Cookies! These delightful snacks blend zesty lemon,
![To make Grilled Cowboy Butter Chicken Skewers, you need these key ingredients: - 1 lb boneless, skinless chicken thighs - 1/2 cup unsalted butter - 2 tablespoons olive oil - 4 cloves garlic - Fresh herbs: parsley, chives - Spices: smoked paprika, onion powder, cayenne pepper - Salt and pepper - Lemon (zest and juice) - Skewers Each ingredient plays a big role in flavor. The chicken thighs give the dish its heartiness. They stay juicy and tender when cooked. The unsalted butter is the star of the show. It adds richness and depth. Olive oil helps the butter blend well and adds a nice touch. Garlic brings in a punch of flavor that you can't miss. Fresh herbs lift the taste and freshness. The spices, especially smoked paprika, give a warm, smoky note. Don't forget the lemon! It brightens and balances the richness of the butter. Lastly, skewers make it fun and easy to grill. For best results, soak wooden skewers in water first. This helps prevent burning on the grill. For the full recipe, check the detailed cooking steps to bring these flavors together for a tasty delight! To make the Cowboy Butter, gather your ingredients first. In a large bowl, add the softened butter and olive oil. Then, mix in the minced garlic, fresh parsley, and chives. Next, sprinkle in the smoked paprika, onion powder, cayenne pepper, salt, and pepper. Finally, add the lemon zest and juice. - Combining ingredients: Use a fork or spatula to mix everything well. Ensure the butter is smooth and all ingredients are evenly distributed. - Tips for mixing: If the butter is too thick, let it sit at room temperature. This will help with mixing. Take your chicken thighs and place them in the bowl with the Cowboy Butter. Toss the chicken well to coat it fully. - Coating with Cowboy Butter: Make sure every piece is covered. This helps infuse flavor into the chicken. - Recommended marination time: Let the chicken marinate for at least 30 minutes. If you have more time, let it sit for up to 2 hours in the fridge for deeper flavor. Before grilling, you need to preheat your grill. Set it to medium-high heat. If you are using a charcoal grill, wait until the coals are covered with white ash. - Threading the chicken onto skewers: Take the marinated chicken and thread it onto the skewers. Leave some space between each piece for even cooking. - Cooking times and temperature: Place the skewers on the grill and cook for about 12-15 minutes. Turn them occasionally. Check that the chicken reaches an internal temperature of 165°F (75°C). This is a simple way to make tasty grilled chicken skewers. For a full recipe, check the details above. To get perfect grill marks, start by preheating your grill. This ensures even cooking. Keep the grill at medium-high heat. When you place chicken on the grill, do not move it right away. Let it sit for a few minutes. Turn the skewers only after you see nice grill lines. This method helps lock in the flavor. Monitor your grill temperature closely. If the heat is too high, the chicken can burn. If it’s too low, it may cook unevenly. A reliable grill thermometer can help you maintain the right temperature. Feel free to get creative with spices! You might try adding cumin or rosemary for a new twist. If you like heat, consider more cayenne pepper. You can also mix in some lemon pepper for a zesty touch. Don’t forget about leftover Cowboy Butter. Use it to baste the chicken while grilling. This adds a rich taste and keeps the chicken juicy. You can also drizzle it over the finished skewers for extra flavor. Pair your skewers with sides like grilled corn or a fresh salad. These sides complement the chicken well. You might also serve some garlic bread to soak up any leftover Cowboy Butter. For a great presentation, arrange the skewers on a large platter. Drizzle with Cowboy Butter and sprinkle fresh herbs on top. This makes the dish look vibrant and inviting. {{image_2}} You can switch up the proteins in this recipe. Try using shrimp or tofu for a twist. Both options will soak up the Cowboy Butter flavor well. If you want more depth, play with different herbs and spices. Fresh basil or cilantro can add zest. You can even try a dash of cumin for warmth. You don’t have to grill these skewers if you prefer other methods. Oven-baking works great too. Just preheat your oven to 400°F (200°C). Place the skewers on a baking sheet and cook for about 20-25 minutes. You should flip them halfway through to ensure even cooking. Another option is using an air fryer. Set the air fryer to 375°F (190°C) and cook for about 10-12 minutes. This gives you a crispy finish without all the oil. Feeling adventurous? You can make spicy variations by adding more cayenne pepper or even crushed red pepper flakes. For a sweet and tangy version, mix in honey or maple syrup with the Cowboy Butter. This adds a nice contrast to the savory chicken. You can also add a splash of vinegar or lime juice for extra zing. Each variation offers a unique taste experience with the same base recipe. Explore, and enjoy the flavors! For the complete guide on making these delicious skewers, check out the Full Recipe. To keep your Grilled Cowboy Butter Chicken Skewers fresh, use an airtight container. This helps lock in moisture and flavor. Store them in the refrigerator. They will stay good for about 3 to 4 days. If you want to keep them longer, consider freezing. When reheating your skewers, use a low heat setting. This method helps avoid dryness. You can use an oven or a grill. Heat them for about 10 minutes or until warm. If using a microwave, cover them with a damp paper towel. This keeps the chicken moist while heating. To freeze your skewers, wrap them tightly in plastic wrap. Then, place them in a freezer bag. This prevents freezer burn. You can keep them frozen for up to 3 months. When ready to eat, thaw them in the fridge overnight. Then, reheat as needed. Enjoy the flavors of your Cowboy Butter! You can use either wooden or metal skewers. Wooden skewers are great for soaking in water. This helps prevent burning. Metal skewers are durable and easy to clean. They also help the chicken cook evenly. For both types, remember to leave space between the pieces. This ensures even cooking and nice grill marks. Yes, you can grill indoors! Use a grill pan or an electric grill. Both tools give great results. Make sure your kitchen is well-ventilated. This helps reduce smoke. Keep an eye on the heat. You want medium-high heat for the best cooking. The most reliable way is to check the internal temperature. Chicken should reach 165°F (75°C) to be safe. Use a meat thermometer for accuracy. Insert it into the thickest part of the chicken. This method ensures juicy, safe chicken every time. Always practice safe cooking by washing your hands and surfaces after handling raw chicken. To make it gluten-free, check all your ingredients. Ensure your spices and butter do not have gluten. Use gluten-free alternatives if needed. You can also swap regular soy sauce for gluten-free soy sauce. Adjust the cooking workflow by using clean tools and surfaces. This will prevent cross-contamination. Enjoy your tasty Cowboy Butter Chicken Skewers without worry! For the complete recipe, check the [Full Recipe]. In this blog post, we explored a tasty chicken skewer recipe. We covered key ingredients like chicken thighs and Cowboy Butter. You learned to prepare, marinate, and grill for perfect skewers. We shared tips for ideal grill marks and side dish pairings too. Remember, substitutions can keep things fresh, and proper storage keeps leftovers tasty. Enjoy grilling with this recipe and make it your own!](https://mysavedrecipe.com/wp-content/uploads/2025/07/8a48fe73-df6c-4fc2-95a4-a3978cd121f9.webp)
Craving something delicious? Let me share my Grilled Cowboy Butter Chicken Skewers that will wow your taste buds! This easy
