Skip to content
DisclaimerTerms Of UseGDPR PolicyCookie Policy

My Saved Recipe

  • Home
  • Drinks
  • Appetizers
  • Dinner
  • Dessert
  • About
  • Contact
  • Privacy Policy
DisclaimerTerms Of UseGDPR PolicyCookie Policy

Savannah

To make these tasty rolls, you need a few key items: - 2 ripe bananas, mashed - 1/4 cup granulated sugar - 1/4 cup brown sugar, packed - 1/2 cup unsalted butter, melted - 1 large egg - 1 teaspoon vanilla extract - 2 cups all-purpose flour - 1 tablespoon baking powder - 1/2 teaspoon baking soda - 1/2 teaspoon salt - 1 tablespoon ground cinnamon - 1 cup chopped nuts (walnuts or pecans) (optional) These ingredients blend well to create a soft, sweet dough that holds the flavors of banana and cinnamon. For the filling that makes these rolls special, gather: - 1/2 cup brown sugar, packed - 1 tablespoon ground cinnamon - 1/4 cup unsalted butter, softened This mix adds a warm, sweet swirl to each bite, enhancing the banana flavor. To top your rolls with a sweet glaze, you'll need: - 1 cup powdered sugar - 2 tablespoons milk - 1/2 teaspoon vanilla extract The glaze brings a smooth finish that ties all the flavors together. For the full recipe, check out the instructions in the main section. To start, preheat your oven to 375°F (190°C) and grease a 9x13-inch baking dish. In a large bowl, mix together 2 ripe bananas, 1/4 cup granulated sugar, 1/4 cup brown sugar, and 1/2 cup melted butter. Add 1 large egg and 1 teaspoon vanilla extract. Stir until smooth. In another bowl, whisk together 2 cups all-purpose flour, 1 tablespoon baking powder, 1/2 teaspoon baking soda, and 1/2 teaspoon salt. Gradually mix the dry ingredients into the banana mixture until just combined. If you like, fold in 1 cup of chopped nuts. Now, roll out the dough on a floured surface into a rectangle, about 1/4 inch thick. For the filling, mix 1/2 cup brown sugar and 1 tablespoon cinnamon in a small bowl. Spread 1/4 cup softened butter evenly over the dough, then sprinkle the cinnamon-sugar mixture on top. Starting from one long edge, roll the dough tightly into a log. Slice the log into 12 equal pieces and place them in the greased baking dish, leaving space between each roll. Bake the rolls in the preheated oven for 25-30 minutes or until they turn golden brown. While the rolls bake, make the glaze by whisking together 1 cup powdered sugar, 2 tablespoons milk, and 1/2 teaspoon vanilla extract until smooth. Once the rolls are out of the oven, let them cool for a few minutes. Drizzle the glaze over the warm rolls for a sweet finish. For the full recipe, check out the complete instructions above. Enjoy your delicious treat! Baking banana bread cinnamon rolls can be easy with a few tips. First, always use ripe bananas. They add more flavor and moisture. Second, don’t overmix the dough. Mix just until combined. This keeps the rolls soft and fluffy. Finally, let the rolls rise for a bit before baking. This step helps them grow tall and light. To get a moist banana bread base, use enough mashed bananas. Two ripe bananas work well for this recipe. They not only add moisture but also flavor. Adding melted butter also helps. Use unsalted butter for the best taste. Make sure you mix the wet ingredients well before adding the dry ones. This helps blend all the flavors nicely. When serving banana bread cinnamon rolls, warmth is key. Serve them straight from the oven for the best taste. You can drizzle the glaze on top for a sweet finish. For a nice touch, add chopped nuts or a sprinkle of cinnamon. Use a pretty plate to make the rolls look even more inviting. This adds a special touch to your treat. For more ideas, check out the Full Recipe for variations and fun toppings. {{image_2}} You can make your banana bread cinnamon rolls even more fun with some tasty add-ins. Many people love using chopped nuts like walnuts or pecans. They add a nice crunch and pair well with the soft bread. You can also mix in chocolate chips for a sweet touch. Dark or milk chocolate works great here. If you want a fruity twist, add dried fruit like raisins or cranberries. Just remember to adjust the sugar if you add sweet dried fruit. For a healthier version, consider using whole wheat flour instead of all-purpose flour. This swap gives your rolls more fiber and nutrients. You can also cut back on the sugar. Try using half the amount or substituting with natural sweeteners like honey or maple syrup. These options still taste great and will keep your rolls light and fluffy. If you want a vegan treat, it's easy to make your banana bread cinnamon rolls without eggs and dairy. You can use flaxseed meal mixed with water as an egg substitute. Just mix one tablespoon of flaxseed meal with three tablespoons of water and let it sit for a few minutes. For the butter, use coconut oil or a vegan butter spread. Make sure to use plant-based milk in the glaze too. These simple swaps let everyone enjoy this sweet delight! You can find the full recipe above. To keep your leftover cinnamon rolls fresh, place them in an airtight container. You can also wrap them tightly in plastic wrap. This method helps keep them soft and moist. Store them at room temperature for up to three days. If you want to keep them longer, consider freezing them. If you plan to save the rolls for later, freezing is a great option. First, let the rolls cool completely after baking. Then, wrap each roll in plastic wrap. After that, place them in a freezer bag or container. Make sure to squeeze out as much air as possible. They will stay fresh in the freezer for up to three months. To enjoy your cinnamon rolls again, you can reheat them easily. If they are frozen, let them thaw in the fridge overnight. Then, place them on a baking sheet. Preheat your oven to 350°F (175°C) and warm them for about 10-15 minutes. You can also microwave them for about 15-20 seconds. Serve warm with a drizzle of glaze from the Full Recipe for the best taste. You can tell when the rolls are done by their color. They should turn golden brown. You can also use a toothpick. Insert it into the center of a roll. If it comes out clean, the rolls are ready. If it has dough on it, bake them a bit longer. The rolls should feel firm but soft. Let them cool slightly before adding the glaze. Yes, you can use banana puree instead of ripe bananas. One medium banana equals about 1/3 cup of puree. Keep in mind that the texture may change a little. The flavor remains sweet and delicious. Puree gives a smoother batter, which some may prefer. Just make sure the puree is not too watery, or it may affect the dough. The best way to frost cinnamon rolls is while they are warm. This allows the glaze to melt into the rolls. Start with a drizzle from the center and work your way out. You can use a spoon or a small whisk for control. If you want, sprinkle some nuts or cinnamon on top for extra flavor. For a fun twist, try adding a pinch of sea salt to the glaze for balance. For the complete recipe, check out the Full Recipe. In this post, we covered how to make tasty banana bread cinnamon rolls. We discussed the main ingredients and sharing tips for perfect rolls. The variations allow you to customize the taste and healthiness. Storing and reheating tips ensure your rolls stay fresh. Final thoughts: You can create amazing treats that everyone will love. Enjoy baking and experimenting!

Banana Bread Cinnamon Rolls Delightful and Simple Treat

Are you ready to elevate your snack game? These Banana Bread Cinnamon Rolls are not just easy to make—they are

- 2 cups cooked chicken, shredded - 1 cup mushrooms, sliced (cremini or button) - 1 medium onion, diced - 2 cloves garlic, minced - 3 cups chicken broth - 1 cup heavy cream - 2 tablespoons olive oil - 1 tablespoon butter - 1 teaspoon dried thyme - Salt and pepper to taste - Fresh parsley, chopped for garnish Every ingredient plays a key role in making this creamy chicken mushroom soup tasty. The cooked chicken gives it heartiness. You can use leftover chicken or rotisserie chicken for easy prep. Mushrooms add a rich flavor and nice texture. I love using cremini or button mushrooms for this recipe. Onions and garlic boost the overall taste. They add depth and warmth. Chicken broth forms the base of the soup, making it comforting and savory. Heavy cream is what makes this soup creamy and rich. Using olive oil and butter helps sauté the veggies and adds flavor. Thyme brings a wonderful aroma and taste. Finally, season with salt and pepper to your liking. Fresh parsley adds a pop of color and freshness. For the full recipe, check out the details provided above. - Heat olive oil and butter in a large pot. - Sauté onion until translucent. To start, I heat two tablespoons of olive oil and one tablespoon of butter in a big pot. I place the pot over medium heat. Once the butter melts, I add one medium diced onion. I sauté it until it turns translucent, which usually takes about five minutes. This step builds a great base for flavor. - Add garlic and mushrooms, cooking until softened. - Stir in thyme, salt, and pepper. Next, I add two cloves of minced garlic and one cup of sliced mushrooms to the pot. I let them cook for about five minutes until the mushrooms soften and get a nice brown color. Then, I sprinkle in one teaspoon of dried thyme, salt, and pepper to taste. This brings a warm, herbal note to the soup. - Pour in chicken broth and bring to a boil. - Add shredded chicken and simmer. - Incorporate heavy cream and adjust seasoning. - Serve and garnish with parsley. After that, I pour in three cups of chicken broth. I bring the mixture to a gentle boil. Once boiling, I reduce the heat to low and stir in two cups of shredded cooked chicken. I let it simmer for about ten minutes to let the flavors blend. Now comes the creamy part! I slowly add one cup of heavy cream while stirring. This makes the soup rich and smooth. I taste it and adjust the seasoning as needed. Finally, I ladle the soup into bowls and garnish with fresh chopped parsley. For the full recipe, check out the details above. Enjoy this creamy delight! To boost flavor, use homemade chicken broth. It makes the soup richer and tastier. You can also add spices like paprika or nutmeg. These spices give a warm touch to the soup. For a creamier soup, blend a portion of it. This gives a smooth feel while keeping some chunks. Also, try a mix of mushrooms, like cremini and button. Different mushrooms add unique textures and flavors that make every bite exciting. Pair your creamy chicken mushroom soup with crusty bread. It’s perfect for dipping and adds a nice crunch. You can also enjoy it with a fresh salad for a light meal. This soup works well as an appetizer or a main dish, making it very versatile. Explore more with the Full Recipe for detailed steps. {{image_2}} You can make this creamy chicken mushroom soup fit your needs. If you want a dairy-free option, use coconut milk or almond milk. This keeps the soup creamy without dairy. For gluten-free adjustments, check your broth and seasoning. Many brands offer gluten-free products. You don’t have to stick with chicken! Try turkey or tofu instead. This adds a fun twist and makes it vegetarian. You can also mix in different veggies. Spinach or carrots work well and boost nutrition. Make it exciting by changing how you serve the soup. You could add noodles to turn it into a pasta dish. This makes it even heartier. Another fun idea is to serve it in a bread bowl. It’s interactive and delicious! For the full recipe, check out the detailed instructions. To store leftovers, let the soup cool to room temperature. Then, pour it into an airtight container. This keeps the soup fresh. Make sure to seal it well. You can store it in the fridge for up to three days. If you want to enjoy it later, freezing is a great option. If you plan to freeze the soup, first let it cool. Then, transfer it to freezer-safe containers. Leave some space at the top since soup expands when frozen. This soup can last for up to three months in the freezer. To reheat, thaw it in the fridge overnight. Then, heat it on the stove over low heat. Stir often to keep the texture smooth and creamy. For easy meal prep, you can assemble the soup ahead of time. Chop your ingredients and store them in separate containers. Keep the broth and cream separate until cooking. This keeps everything fresh. When you are ready to cook, just combine everything in a pot. It makes dinner quick and simple. This method helps you enjoy a warm meal any night of the week. For the full recipe, refer to the beginning section. How long does creamy chicken mushroom soup last in the fridge? This soup lasts about 3 to 4 days in the fridge. Store it in an airtight container. Make sure it cools down first before sealing. Can I use frozen chicken for this recipe? Yes, you can use frozen chicken. Just ensure you cook it all the way through. If using frozen, add more time to cook it properly. Is it necessary to sauté the onions and mushrooms before adding broth? Yes, sautéing the onions and mushrooms adds flavor. This step helps to release their natural sweetness. It makes the soup taste richer and more complex. Can I use other types of meat for this soup? Absolutely! You can use turkey or even shredded beef. Just adjust the cooking time as needed. Each meat will give a different taste to the soup. How many calories are in creamy chicken mushroom soup? One serving has about 350 calories. This can vary based on specific ingredients. Always check the labels for exact numbers. What are the health benefits of mushrooms in this recipe? Mushrooms are low in calories and packed with nutrients. They provide vitamins like B and D. Plus, they are a good source of antioxidants, which help keep you healthy. This article covered making a delicious creamy chicken mushroom soup from scratch. We explored key ingredients, step-by-step directions, and tips for adding flavor and texture. You can modify the recipe to suit dietary needs and even switch up ingredients. Proper storage can keep leftovers fresh, making this a perfect meal prep option. Enjoying this soup can warm any chilly day or impress at dinner. With simple steps, you can create a comforting dish that you’ll want to share again and again. Dive in and savor every bite!

Creamy Chicken Mushroom Soup Simple and Delicious Recipe

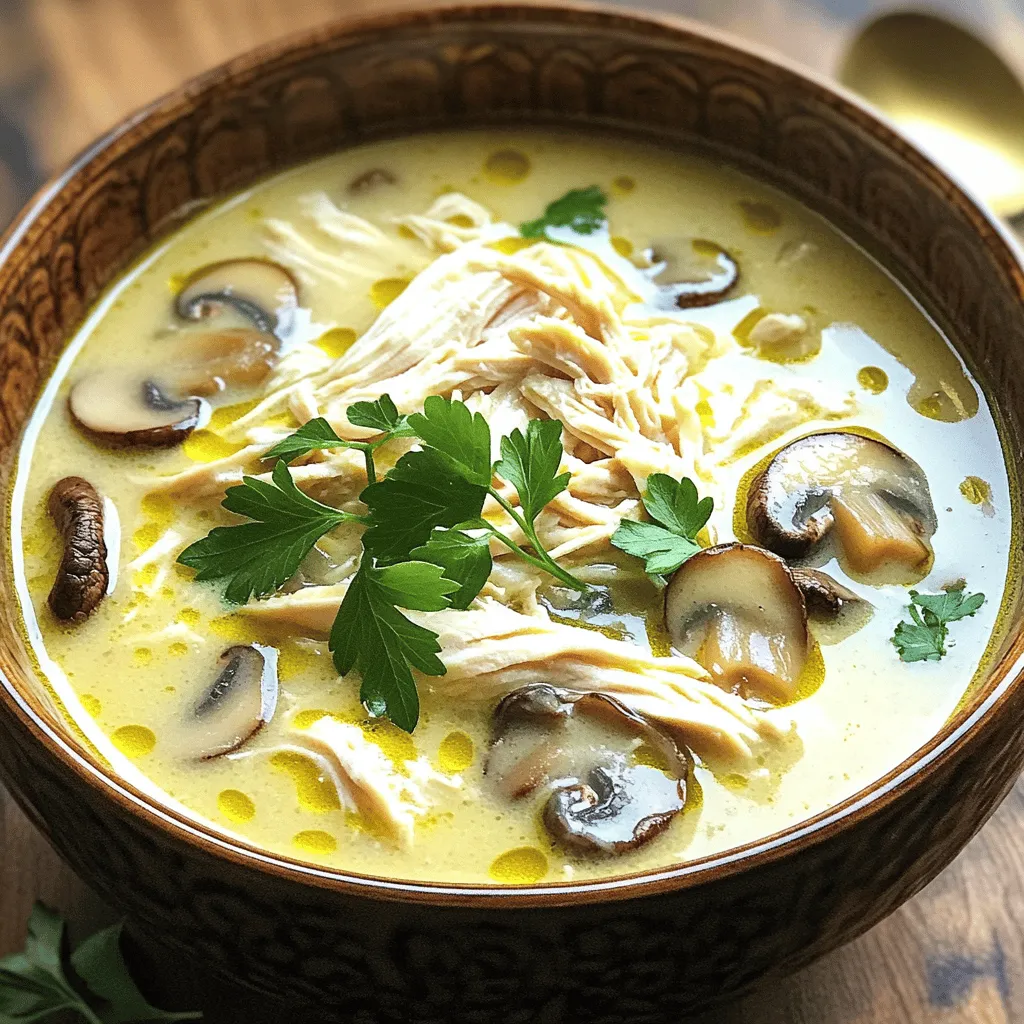
Creamy Chicken Mushroom Soup is a cozy dish that’s simple to make. With just a few ingredients, you can create

To make delicious blueberry cream cheese bars, you need some key ingredients. Here’s what you will need: - 1 cup all-purpose flour - ½ cup unsalted butter, softened - ½ cup granulated sugar - 1 teaspoon vanilla extract - ½ teaspoon baking powder - ¼ teaspoon salt - 8 oz cream cheese, softened - 1/3 cup powdered sugar - 1 egg - 1 cup fresh blueberries - Zest of 1 lemon Each ingredient plays a role. The flour gives structure, while butter adds richness. Sugar sweetens your bars, and cream cheese brings creaminess. Fresh blueberries add a burst of flavor, and lemon zest brightens it all up. You can add a few optional ingredients for extra fun. Consider these: - 1 teaspoon cinnamon for warmth - 1 tablespoon honey for extra sweetness - A pinch of nutmeg for depth These flavors can elevate your bars. Cinnamon and nutmeg add warmth, while honey offers a different kind of sweetness. Feel free to mix and match based on your taste! To make the process smooth, gather these tools: - 9x9-inch baking pan - Mixing bowls - Electric mixer or whisk - Rubber spatula - Measuring cups and spoons Having the right tools makes cooking easier. A good mixer helps create a smooth filling, while a spatula ensures you get every bit from the bowl. This setup will help you craft tasty blueberry cream cheese bars with ease! For the full recipe, check out the detailed instructions. Start by gathering all your ingredients. You need flour, butter, sugar, vanilla, baking powder, salt, cream cheese, powdered sugar, an egg, blueberries, and lemon zest. Make sure everything is at room temperature. This helps with mixing and gets a smooth texture. In a medium bowl, mix the softened butter and granulated sugar. Beat them together until it looks light and fluffy. Then, add in the vanilla, baking powder, and salt. Stir to combine. Next, slowly add the flour. Mix until just combined. Don't overmix, or the crust may become tough. In another bowl, beat the softened cream cheese and powdered sugar. Mix until the cream cheese is smooth and creamy. Then, add the egg and lemon zest. Mix again until everything is well blended. This filling adds a rich taste to your bars. Once the crust is baked, take it out of the oven. Pour the cream cheese mixture over the hot crust. Spread it evenly with a spatula. Now, bake the dish again for 25 to 30 minutes. The center should be set and just slightly jiggly. Let the bars cool in the pan at room temperature. Then, refrigerate them for at least 2 hours. This helps the flavors meld and makes cutting easier. Once chilled, cut into squares. Now, you’re ready to enjoy these tasty treats! For the full recipe, check the earlier section. To make a great crust, start with soft butter. It blends better with sugar. Mix them until light and fluffy. This adds air and makes the crust nice and crisp. Use all-purpose flour for the right texture. Make sure to press the crust firmly in the pan. This helps it hold its shape while baking. Bake it until it’s just lightly golden. If you bake it too long, it gets hard. Keep an eye on it during baking. For a smooth filling, use softened cream cheese. It blends easily with powdered sugar. Mix them well until there are no lumps. Add the egg and lemon zest slowly. This gives the filling a fresh taste. When folding in the blueberries, be gentle. You want to keep them whole for texture. This step also adds a burst of flavor in every bite. Avoid overmixing once you add the blueberries. This keeps the filling creamy and light. These bars are great chilled or at room temperature. Serve them fresh from the fridge for a cool treat. You can also drizzle a bit of honey on top. This adds a nice touch of sweetness. For a fun twist, add some whipped cream. It pairs well with the tangy filling. If you want to impress guests, garnish with mint leaves. This adds color and freshness. For a casual gathering, cut them into bite-sized pieces. This makes sharing easier and more fun. You can find the full recipe below to make your own! {{image_2}} You can change the flavor of Blueberry Cream Cheese Bars easily. For a Lemon Blueberry twist, add more lemon zest to the cream cheese mix. This gives a fresh and zesty taste. If you prefer strawberries, swap the blueberries for fresh strawberries. Just chop the berries into small pieces. This adds a sweet and fruity flavor with a lovely color. To make these bars gluten-free, use a gluten-free flour blend instead of all-purpose flour. Many blends work well in baking. Make sure to check the package for a one-to-one ratio. This way, you can still enjoy the same great taste without gluten. You can also make a vegan version. Replace the cream cheese with a vegan cream cheese alternative. Use a flax egg instead of a regular egg. To make a flax egg, mix 1 tablespoon of ground flaxseed with 2.5 tablespoons of water. Let it sit for five minutes until it thickens. This keeps your bars creamy and rich while being plant-based. Check out the Full Recipe for more details on making these tasty treats. To keep your blueberry cream cheese bars fresh, store them in an airtight container. Place a piece of parchment paper between layers to avoid sticking. This helps maintain their texture. You can keep them in the fridge for up to five days. Always check for any signs of spoilage before eating. To freeze blueberry cream cheese bars, wrap them well in plastic wrap. Then, place the wrapped bars in a freezer bag or a container. This protects them from freezer burn. They can last for up to three months. When you’re ready to enjoy, simply thaw them in the fridge overnight. After storing, I recommend serving the bars chilled. They taste best when cold. If they have sat at room temperature, pop them back in the fridge for 20 minutes. This helps the flavors come alive again. Remember, you can also dust them with powdered sugar before serving for a nice touch. For the full recipe, check out the previous section. Yes, you can use frozen blueberries. They work well in this recipe. Just remember to thaw and drain them first. This avoids excess moisture in your bars. These bars last about five days in the fridge. Store them in an airtight container. This keeps them fresh and tasty. Absolutely, you can make these bars a day or two ahead. Just cool and chill them in the fridge. This allows the flavors to blend nicely. Serve these bars chilled or at room temperature. They pair well with whipped cream or a scoop of vanilla ice cream. For a fun twist, dust them with powdered sugar before serving. For the full recipe, check here. In this post, we explored making blueberry cream cheese bars. You learned about essential and optional ingredients, tools, and a step-by-step baking guide. We shared tips for a perfect crust and filling, plus fun variations like vegan or gluten-free options. Remember, baking these bars can be fun. Experiment with flavors and enjoy your tasty treats! Store them well to keep them fresh, and serve with joy. Happy baking!

Blueberry Cream Cheese Bars Simple and Tasty Treat

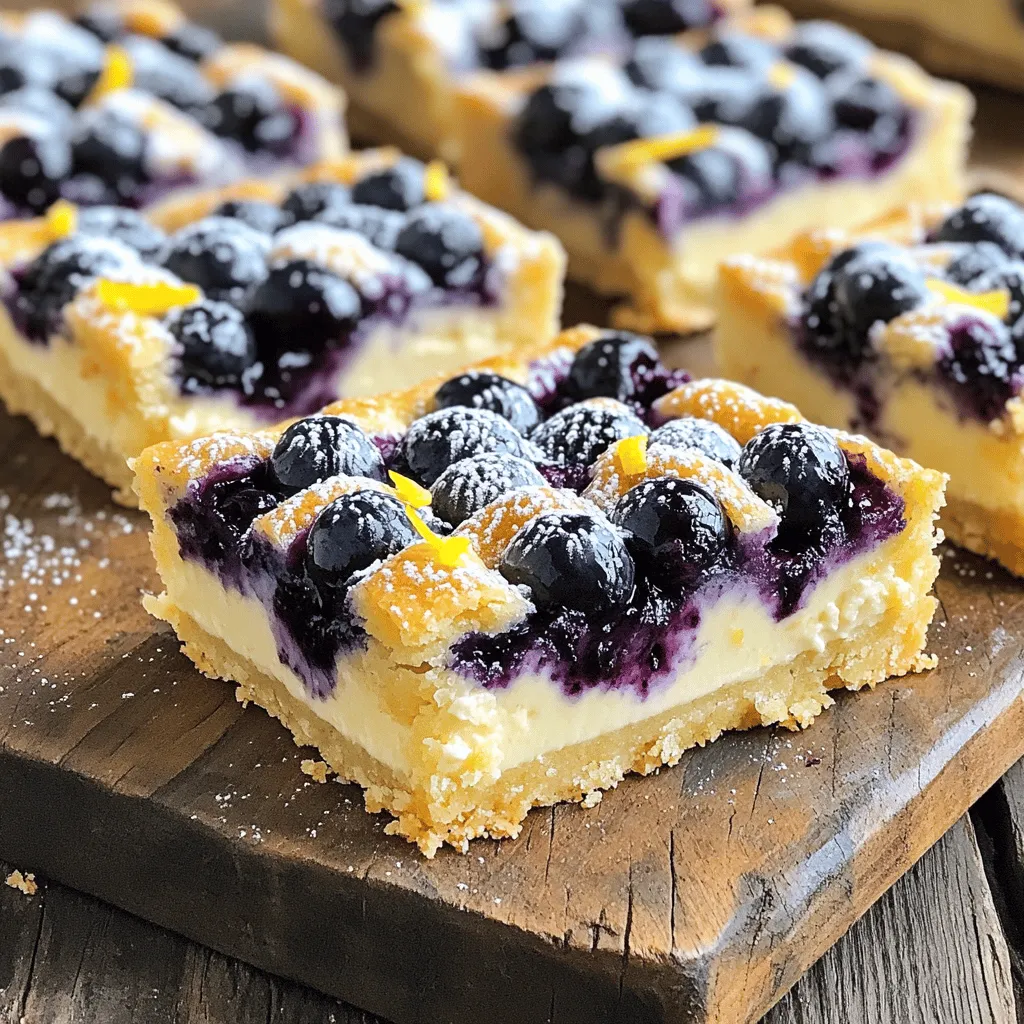
Are you ready to whip up a sweet treat that’s both easy and delicious? Blueberry Cream Cheese Bars offer a

- 2 large apples, peeled, cored, and diced - 1/2 cup brown sugar - 1 teaspoon ground cinnamon - 1/4 teaspoon nutmeg - 1 tablespoon lemon juice - 1 tablespoon cornstarch - 1 package of pre-made pie crusts - 1 egg, beaten - 1 tablespoon granulated sugar For the best flavor in your mini apple pies, I suggest using Granny Smith or Honeycrisp apples. These types balance sweetness and tartness well. If you want to make your own pie crust, you can use flour, butter, and water. This gives a fresh taste. Also, feel free to swap brown sugar with maple syrup or honey for a different sweetness. You will need a muffin tin to shape the pies. Mixing bowls are great for combining ingredients. A baking sheet will catch any drips while baking. 1. Preheat the oven and prepare the filling Start by preheating your oven to 375°F (190°C). This step is key for a crispy crust. In a medium bowl, mix together 2 large apples, 1/2 cup brown sugar, 1 teaspoon ground cinnamon, 1/4 teaspoon nutmeg, 1 tablespoon lemon juice, and 1 tablespoon cornstarch. Toss everything until the apples are well coated. Let the mixture sit so the flavors blend. 2. Prepare the muffin tin and pie crusts Lightly grease a muffin tin with non-stick spray or butter. This will help prevent sticking when you bake. Roll out your pre-made pie crusts on a floured surface. Use a round cutter, about 4 inches wide, to cut out 12 circles from the dough. 3. Create the pie shells Place each dough circle into a muffin tin cup. Press it gently against the sides and bottom. This will form a small pie shell that holds your filling. 1. Fill the shells with apple mixture Spoon the apple filling into each mini pie shell. Fill them just to the top, but don’t overfill. You want to allow room for bubbling as they bake. 2. Add decorative tops Use the leftover dough to cut out smaller circles. You can also make fun shapes, like stars, to place on top. This adds a nice touch to your pies. If you prefer, you can leave them open-faced for a rustic look. 3. Bake until golden brown Brush the tops with a beaten egg for a golden finish. Sprinkle granulated sugar on top for added sweetness and crunch. Bake in your preheated oven for 20-25 minutes. Look for a golden brown crust and bubbling filling. 1. Cooling time and techniques Once baked, let the mini apple pies cool in the muffin tin for about 10 minutes. This makes them easier to remove. After that, carefully lift them out and place them on a wire rack to cool completely. 2. Presentation tips Serve these tasty treats warm. They pair wonderfully with a scoop of vanilla ice cream or a drizzle of caramel sauce. For an elegant touch, add a sprig of mint on top. This makes your mini apple pies not just delicious, but beautiful too. For the full recipe, check out the details provided earlier. Enjoy your baking! To make your muffin tin mini apple pies perfect, focus on the crust. To avoid soggy crusts, use fresh pie crusts and bake them at the right temperature. Pre-baking the crust slightly can help too. This step helps firm it up. For even baking, rotate your muffin tin halfway through baking. This ensures all pies get equal heat. Check the pies at the 20-minute mark. You want them golden brown and bubbling. Using pre-made pie crusts is a great way to save time. They help you skip the dough-making step. You can find them in any grocery store. Just roll them out and cut them into circles for your mini pies. Batch prepping is another smart move. You can prepare the apple filling ahead of time. Store it in the fridge for up to three days. This makes your baking day quick and easy. One mistake to watch for is overfilling the pies. If you fill them too high, the filling will ooze out. This can cause a mess in your oven. Aim to fill them just to the top for best results. Not cooling the pies properly before serving is also a common error. Let them cool for about 10 minutes in the tin. This makes them easier to remove and helps the filling set. Enjoy these tips to make your Muffin Tin Mini Apple Pies delicious! For the full recipe, check out the provided link. {{image_2}} You can switch up the flavor of your mini apple pies in fun ways. One great option is to make caramel apple mini pies. To do this, simply add a few tablespoons of caramel sauce to your apple filling. This adds a sweet and rich taste. Another fun twist is a cinnamon roll-inspired version. Use cinnamon roll dough instead of pie crust. Place it in the muffin tin and fill it with your apple mixture. The result is a warm, gooey treat that feels like a dessert and breakfast all in one. If you need gluten-free options, use a gluten-free pie crust. Many brands offer good choices. This way, everyone can enjoy your mini pies without worry. For vegans, you can substitute the butter in the crust with coconut oil. Use maple syrup or agave instead of brown sugar in the filling. These changes keep the flavor while making it plant-based. Serve your mini pies warm for the best taste. Pair them with a scoop of vanilla ice cream for a classic touch. The cold ice cream mixes well with the warm pie, creating a great experience. You can also drizzle the pies with caramel sauce for extra sweetness. For a creative look, arrange them on a platter and garnish with mint leaves. This adds a fresh touch that makes the dessert even more appealing. To keep your mini apple pies fresh, store them in an airtight container. Place a piece of parchment paper between layers to avoid sticking. The pies will stay good in the fridge for about 3 to 4 days. If you want to save some for later, freezing is easy. First, let the pies cool completely. Then, wrap each pie in plastic wrap and place them in a freezer bag. They can last up to 2 months in the freezer. To reheat, simply bake them at 350°F (175°C) for about 15-20 minutes. This will keep the crust nice and crispy. If you have leftover pie crusts or apple filling, you can make other tasty treats. Use extra pie crusts to make cookies or tarts. For leftover apple filling, try adding it to oatmeal or yogurt for a sweet twist. You can also make an apple crisp by layering the filling with oats and butter. These ideas let you enjoy every bit of your ingredients! To balance sweetness in the filling, choose tart apples. Granny Smith is a great choice. You can also reduce the brown sugar by a few tablespoons. Adding lemon juice brightens the flavor and cuts the sweetness. A pinch of salt can also help balance the flavors. Yes, you can use frozen apples. Thaw them first and drain excess liquid. Frozen apples might be softer than fresh ones. They work well if you want to save time. Just adjust the sugar if your frozen apples are sweetened. To reheat mini apple pies, use an oven. Preheat it to 350°F (175°C). Place the pies on a baking sheet. Heat them for about 10 minutes. This keeps the crust crispy and warms the filling. Microwave can make the crust soggy, so avoid that. These mini apple pies take about 20-25 minutes to bake. Watch for the crust to turn golden brown. The filling should bubble slightly. If you see this, your pies are done. Always check them a few minutes early to avoid overbaking. You can create delicious mini apple pies with simple ingredients and easy steps. We covered everything from ingredients to common mistakes. Remember to choose the right apple types for great flavor. Pay attention to cooling and presentation for the best results. With practice, you will impress friends and family. Enjoy making these tasty treats, and don’t forget to get creative with your variations and serving ideas! Happy baking!

Muffin Tin Mini Apple Pies Tasty and Simple Treat

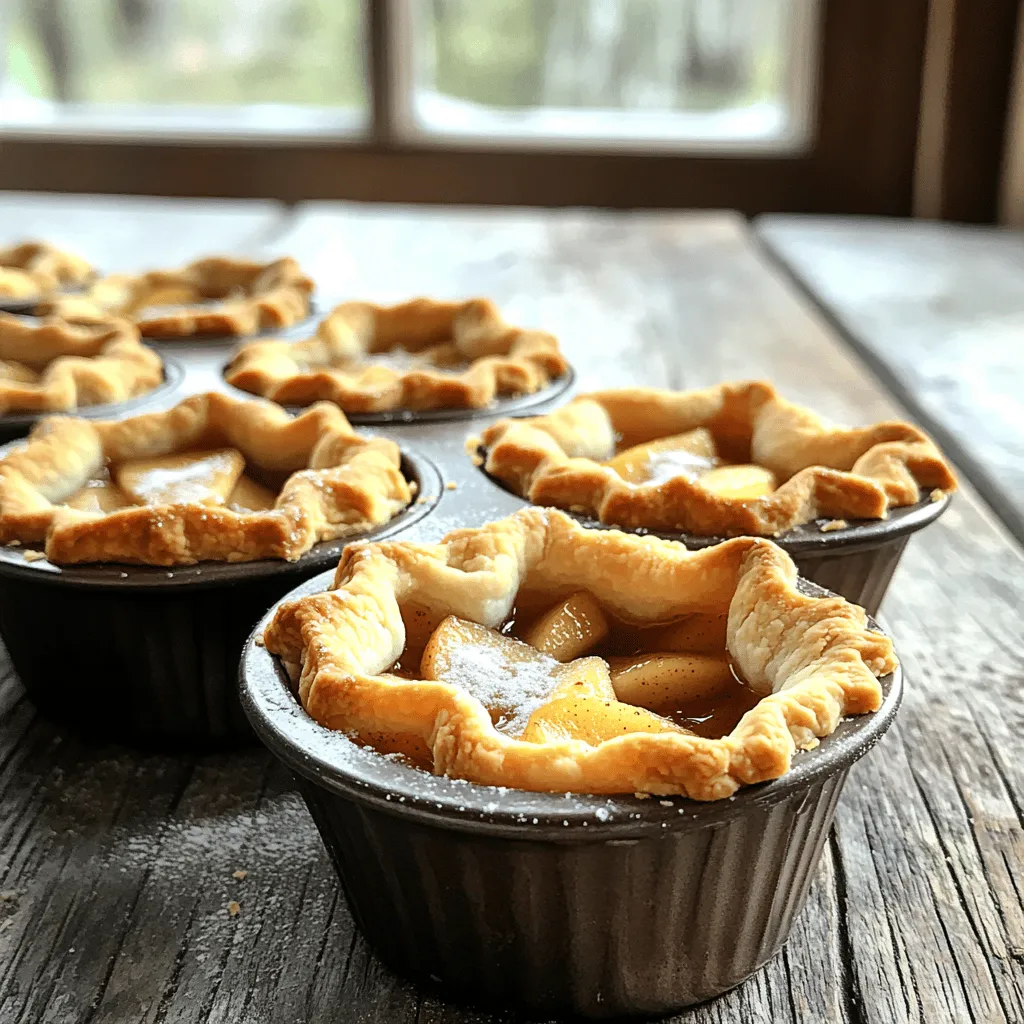
Craving a tasty treat that’s simple to make? Look no further! My Muffin Tin Mini Apple Pies pack all the

- 1 ¾ cups all-purpose flour - 1 teaspoon baking soda - ½ teaspoon baking powder - 1 teaspoon ground cinnamon - ½ teaspoon ground nutmeg - ½ teaspoon ground ginger - ½ teaspoon salt - 1 cup granulated sugar - ½ cup brown sugar - ½ cup vegetable oil - 3 large eggs - 1 cup pumpkin puree - 1 teaspoon vanilla extract - 1 cup chopped walnuts or pecans (optional) - Ingredients for Cream Cheese Frosting: - 8 oz cream cheese, softened - ½ cup unsalted butter, softened - 2 cups powdered sugar - 1 teaspoon vanilla extract - A pinch of salt To make pumpkin bread with cream cheese frosting, you need fresh, tasty ingredients. The dry ingredients create the base of the bread. Flour gives it structure. Baking soda and baking powder help it rise. Spices like cinnamon, nutmeg, and ginger add warmth and flavor. The salt balances the sweetness. For the wet ingredients, the sugars add sweetness and moisture. Vegetable oil keeps the bread soft. Pumpkin puree makes it rich and moist. Eggs bind everything together and provide lift. Vanilla extract enhances the overall taste. If you want a crunch, add walnuts or pecans. They also give a nice texture. The cream cheese frosting takes it to the next level. It is creamy and sweet. Softened cream cheese and butter blend well. Powdered sugar adds sweetness. A pinch of salt rounds out the flavors. For the full recipe, check the link above. This joy-filled bread is perfect for fall and any gathering. First, you need to preheat your oven to 350°F (175°C). This makes sure your bread cooks evenly. Next, grease a 9x5 inch loaf pan with butter or oil to prevent sticking. In a medium bowl, whisk together the dry ingredients: 1 ¾ cups all-purpose flour, 1 teaspoon baking soda, ½ teaspoon baking powder, 1 teaspoon ground cinnamon, ½ teaspoon ground nutmeg, ½ teaspoon ground ginger, and ½ teaspoon salt. This step blends the flavors well. Now, move to a large bowl. Mix together the granulated sugar, brown sugar, and ½ cup vegetable oil until smooth. This mixture will help the bread rise and stay moist. Add in 3 large eggs, one at a time, beating well after each. Finally, mix in 1 cup pumpkin puree and 1 teaspoon vanilla extract. Keep mixing until everything is smooth. Now, it’s time to combine the wet and dry mixtures. Gradually add the dry mixture to the wet mixture. Stir gently just until no flour streaks remain. Be careful not to over-mix, or your bread may turn out tough. If you want, fold in 1 cup chopped walnuts or pecans for some crunch. Pour the batter into your prepared loaf pan. Smooth the top with a spatula for an even bake. Place the pan in the oven and bake for 60-70 minutes. You’ll know it’s done when a toothpick inserted into the center comes out clean. While the bread bakes, it will fill your kitchen with a wonderful smell. Once finished, let the bread cool in the pan for about 10 minutes. Then, transfer it to a wire rack to cool completely before adding the frosting. While the bread is cooling, let’s whip up the cream cheese frosting. In a bowl, beat together 8 oz of softened cream cheese and ½ cup unsalted butter until smooth. This will create a creamy base for your frosting. Gradually add in 2 cups of powdered sugar, 1 teaspoon vanilla extract, and a pinch of salt. Mix until it’s fluffy and well combined. Once your pumpkin bread has cooled completely, you can spread a generous layer of cream cheese frosting on top. This will add a delightful sweetness to the spicy bread. You can find the full recipe for Pumpkin Spice Delight Bread and enjoy this treat any time! To make your pumpkin bread great, avoid over-mixing the batter. When you mix too much, the bread can get tough. Stir just until you no longer see flour streaks. This keeps your bread soft and moist. Next, check for doneness with a toothpick. Insert it into the center of the bread. If it comes out clean, your bread is ready. If it has wet batter on it, give it more time in the oven. Always let the bread cool completely before adding frosting. This prevents the frosting from melting and sliding off. It also helps the flavors settle. To apply frosting evenly, use a spatula. Start from the center and spread outwards. This gives a nice, smooth finish. You can also add decorative touches for a pretty look. Try adding a sprinkle of cinnamon or some chopped nuts on top. If your bread turns out too dry or dense, you might have mixed it too long or baked it too much. Always check the baking time and adjust as needed to ensure a light texture. If your frosting is too thin or runny, add more powdered sugar a little at a time. Mix until you reach a spreadable consistency. It should hold its shape well when spread on the bread. {{image_2}} You can easily change the flavor of your pumpkin bread. Here are some great add-ins: - Chocolate chips: Add about 1 cup for a sweet twist. The chocolate melts and pairs well with pumpkin. - Dried cranberries or raisins: These add a nice chew and burst of flavor. Use about 1 cup for a fruity touch. If you want to switch up the frosting, try these options: - Maple frosting: Replace the cream cheese with maple syrup for a rich flavor. - Whipped cream topping: Light and airy, this makes a beautiful finish. Just whip heavy cream with a bit of sugar and vanilla. You can enjoy this bread even with dietary needs. Here are some ways: - Substituting flour: Use a gluten-free blend instead of all-purpose flour. This keeps the texture nice. - Egg replacements for vegan diets: Use one of these: 1/4 cup applesauce or 1 mashed banana for each egg. This keeps it moist and fluffy. For the complete recipe, check out the Full Recipe for all the details! To keep your pumpkin bread fresh, you have two great options. - Refrigeration: Wrap the bread tightly in plastic wrap. Place it in an airtight container. This keeps moisture in and prevents it from drying out. - Room Temperature: If you plan to eat it within a few days, store it at room temperature. Just keep it in a cool, dry place. Want to save some for later? Freezing is a smart choice. - Freezing the Bread: Let the bread cool completely. Wrap it in plastic wrap, then in foil. This prevents freezer burn. You can keep it frozen for up to three months. - Freezing the Frosting: You can freeze the cream cheese frosting too! Place it in an airtight container. Thaw it in the fridge when you're ready to use it. When you want to enjoy your frozen bread, here’s what to do: - Remove the bread from the freezer. Let it thaw overnight in the fridge. - If you need it fast, you can leave it out at room temperature for a few hours. You may wonder how long your homemade pumpkin bread lasts. - When stored properly, it can last about one week at room temperature. In the fridge, it can last up to two weeks. - Look for signs of spoilage. If you see mold or it smells off, it’s best to throw it away. Make sure to check the full recipe for all the details on making this delicious treat! Yes, you can use fresh pumpkin. Start by cooking the pumpkin. Cut it open, remove the seeds, and roast it until soft. Then, mash it until smooth. This will give your bread a fresh taste, but canned pumpkin is easier to use. You can replace eggs with several items. Use 1/4 cup of applesauce for each egg. Alternatively, use a mashed banana or a mix of flaxseed and water. One tablespoon of flaxseed meal mixed with three tablespoons of water works well. To reduce sweetness, cut back on sugars. You can use half the granulated sugar or brown sugar. Adding spices like cinnamon can enhance flavor without extra sugar. Taste the batter to find the right balance. Absolutely! If you don’t like nuts, just leave them out. The bread will still taste great. You can also add chocolate chips or dried fruit for extra flavor and texture. The cream cheese frosting lasts about a week in the fridge. Store it in an airtight container. If you freeze it, it can last up to three months. Just defrost it in the fridge before using. Find the complete recipe for Pumpkin Spice Delight Bread [here](#). You learned how to make a delicious pumpkin bread from scratch. We covered ingredients, steps, and tips to make it perfect. You can also explore variations and storage tips. With this knowledge, you can bake pumpkin bread with confidence. Share it with friends or keep it as your secret recipe. Enjoy every slice and make it your own!

Pumpkin Bread with Cream Cheese Frosting Delight

Get ready to delight your taste buds with my favorite Pumpkin Bread with Cream Cheese Frosting! This recipe blends warm

- 2 medium-sized apples (Granny Smith or Honeycrisp) - 1 cup granulated sugar - 1/2 cup unsalted butter - 1/3 cup light corn syrup - 1 teaspoon vanilla extract - 1/8 teaspoon salt - 1 cup chopped nuts (pecans or walnuts) - 1 cup mini chocolate chips (optional) - Additional toppings like sprinkles or sea salt To make these caramel apple bites, you start with fresh apples. I love using Granny Smith or Honeycrisp. Their tartness balances the sweet caramel. You’ll need sugar, butter, corn syrup, vanilla, and a pinch of salt. These form the rich, sticky caramel that makes this treat special. For toppings, you can get creative. Chopped nuts add a nice crunch. Mini chocolate chips give a fun twist. You can also use sprinkles for color or sea salt for a savory touch. Each ingredient adds a unique flavor and texture. This recipe is perfect for fall gatherings or a family snack. You can find the Full Recipe to follow along and create your own delicious bites. - Wash and dry the apples well. - Cut the apples into bite-sized wedges. Remove the cores. - Insert a skewer or toothpick into each wedge. - In a medium saucepan, combine sugar, butter, corn syrup, and salt. - Stir over medium heat until the butter melts and the sugar dissolves. - Turn the heat to medium-high. Let the mixture boil for 4-5 minutes. - Check the caramel temperature. It should reach 240°F (115°C). - Quickly dip each apple wedge into the hot caramel. Make sure to coat it well. - Let excess caramel drip off before moving to the next step. - Roll each caramel-coated wedge in chopped nuts or sprinkle with chocolate chips. - Place the bites on a parchment-lined baking sheet to cool. Let them set for about 30 minutes. For the full recipe, check the detailed instructions above. You'll create a treat that's perfect for fall! To make great caramel, I always use a candy thermometer. This tool helps me get the right temperature. For caramel, aim for 240°F (115°C). This ensures a nice, smooth finish. The right consistency is key. When your caramel cools, it should be thick but still pourable. If it’s too thin, it won’t stick. If it’s too thick, it might break. To avoid grainy caramel, stir gently while melting. Do not stir once it starts boiling. This keeps the sugar from crystallizing. If you see any sugar crystals, wipe the sides of the pot with a wet brush. For plating, I love to use a colorful platter. You can arrange the bites in a circle or in rows. Add some fresh apple slices around the bites for color. Drizzle some melted chocolate on top for flair. Pair caramel apple bites with dips or sauces. Creamy caramel sauce or rich chocolate sauce are great choices. You can even serve them with a side of whipped cream. These bites fit many occasions. Serve them at fall parties, game nights, or family gatherings. Kids and adults will love these treats! {{image_2}} You can easily change the flavor of your caramel apple bites. Try adding flavored extracts like cinnamon or almond. A few drops can give your bites a fun twist. You can also experiment with different types of chocolate. Dark, white, or even milk chocolate can work great. Each choice brings a new taste to the table. If you need gluten-free options, use gluten-free granulated sugar and ensure your toppings are safe. You can also make these bites vegan. Substitute the butter with coconut oil and use a plant-based cream. This way, everyone can enjoy caramel apple bites, no matter their diet. Make your caramel apple bites even more fun with different fruits. You can skewer them with strawberries or bananas. This adds color and flavor. For a sparkly touch, use edible glitter or colored candies. These small details make your treats eye-catching and fun for any gathering. To keep your caramel apple bites fresh, use an airtight container. This will stop air from drying them out. You can stack them carefully, but don’t crush them. If you have a lot, use separate layers of parchment paper. Store them in the fridge for the best results. The cool air helps keep the caramel soft. If you want, you can leave them at room temp for a short time. Just be careful; they might get sticky if it’s warm. Caramel apple bites stay fresh for about 5 days in the fridge. After that, they may lose their taste and texture. Look for signs that they’ve gone bad. If the caramel looks dry or hard, it’s time to toss them. Also, check for any strange smells or mold. If you see any of these signs, don’t eat them. If your caramel gets hard, don’t worry. You can fix it! Place the bites in a microwave-safe bowl. Heat them in short bursts of 10 seconds. Check after each burst to avoid melting them too much. To keep them soft, try wrapping them in plastic wrap or foil. This will help hold in moisture. If you need to, add a slice of apple to the container. This will help keep everything nice and fresh. For the full recipe, check out my complete guide to making these tasty treats! To make caramel apple bites stick, ensure your apples are dry. The caramel needs a clean surface to grip. You can also chill the apple wedges before dipping them. This helps the caramel set better. Yes, you can make caramel apple bites in advance. After coating them in caramel, let them cool completely. Then, store them in an airtight container in the fridge. They taste best within a couple of days. You can find pre-made caramel apple bites at many grocery stores. Check the candy aisle or the seasonal section during fall. Some bakeries also sell them. They may not taste as fresh as homemade ones. The best apples for caramel apple bites are Granny Smith or Honeycrisp. Granny Smith gives a tart flavor that pairs well with sweet caramel. Honeycrisp is crunchy and sweet, making it a favorite for many. To prevent the caramel from hardening too quickly, work fast. Dip the apples as soon as the caramel reaches the right temperature. Keep the caramel warm on low heat as you coat each apple. This keeps it runny and easy to use. We covered how to make delicious caramel apple bites from scratch. You learned about key ingredients, step-by-step instructions, and helpful tips. You also discovered fun variations and storage methods for your treats. Remember, feel free to get creative with flavors and toppings. These bites are perfect for parties or a cozy night in. Enjoy making and sharing this tasty snack with friends and family!

Caramel Apple Bites Tasty Fall Treat for Everyone

Fall is here, and it’s the perfect time for a sweet treat: Caramel Apple Bites! These bites blend crisp apples

- 12 oz (340g) pasta: I recommend using penne or fettuccine for great texture. - 2 cups butternut squash: Peel and dice it for even cooking and sweet flavor. - 1 tablespoon olive oil: This adds richness and helps cook the squash. - 1 pound (450g) Italian chicken sausage: Remove casings to mix well with the other ingredients. - 3 cloves garlic: Mince it for a strong, aromatic base. - 4 cups fresh spinach: Roughly chop it to easily blend into the pasta. - 1 teaspoon dried oregano: This brings a nice earthy flavor. - 1/2 teaspoon nutmeg: It adds warmth and depth to the dish. - Salt and pepper: Season to taste; these enhance all flavors. - 1/2 cup grated Parmesan cheese: Mix it in for creaminess, and save some for serving. - Red pepper flakes: Optional, but they add a little heat if you like spice. These ingredients come together to create a hearty, satisfying meal. Each component plays a role in making this dish special. You can find the Full Recipe at the end for easy reference. Start by boiling a large pot of salted water. Once the water is at a rolling boil, add 12 oz of your favorite pasta, like penne or fettuccine. Cook it according to the package instructions, usually around 8-10 minutes, until it is al dente. This means it should be firm but not hard. Don’t forget to reserve 1 cup of pasta water before draining it. This water helps to make the sauce creamy later. While the pasta cooks, grab a large skillet and set it over medium heat. Pour in 1 tablespoon of olive oil. When the oil is hot, add 2 cups of diced butternut squash. Stir it every few minutes for about 5-7 minutes. You want the squash to start softening but still hold its shape. To check for doneness, poke it with a fork. If it goes in easily but the squash is not mushy, it's ready. Now it’s time to add the sausage. Push the butternut squash to one side of the skillet and add 1 pound of Italian chicken sausage to the empty space. Use a wooden spoon to break apart the sausage. Cook it for about 5-6 minutes until it turns brown and is cooked all the way through. Mixing the sausage with the squash helps blend their flavors. Once the sausage is cooked, add 3 cloves of minced garlic to the skillet. Stir it for about 1 minute until it smells good. Next, toss in 4 cups of roughly chopped spinach. Stir everything together and cook for another 2-3 minutes until the spinach wilts down. This adds great color and nutrition to your dish. Now it’s time to bring everything together. Add the drained pasta to the skillet. Sprinkle in 1 teaspoon of dried oregano, 1/2 teaspoon of nutmeg, and season with salt and pepper to taste. Toss everything together. If the mixture looks too dry, add some of that reserved pasta water a little at a time. This helps to make the sauce smooth and creamy. For serving, plate the pasta in shallow bowls. Top each bowl with some grated Parmesan cheese. You can add a sprinkle of red pepper flakes for a bit of heat if you like. Drizzling a touch of olive oil on top makes the dish shine. For an extra pop, garnish with freshly cracked black pepper and a sprig of fresh basil. This makes your meal look and taste even better. For the full recipe, check the detailed instructions provided earlier. Enjoy your Butternut Squash Sausage Spinach Pasta! To save time, use pre-diced butternut squash. You can find this in most grocery stores. This way, you skip peeling and cutting. For the sausage, opt for ground sausage instead of links. It cooks faster and mixes well. You can also prepare all your ingredients ahead of time. Chop the garlic and spinach in advance. This helps you stay organized. When you start cooking, everything will be ready to go. For the best flavor, always use medium heat. This allows the butternut squash to caramelize. It brings out its natural sweetness. A large skillet works best for this dish. It gives you enough space to mix everything easily. Using a wooden spoon helps break up the sausage. It keeps the texture nice and even. You can also use a spatula to stir the pasta and sauce together. Feel free to add your favorite spices. Try adding smoked paprika or thyme for a twist. If you like heat, add red pepper flakes to the mix. They add a nice kick! If you want a vegetarian option, swap the sausage for lentils or mushrooms. Both add great flavor and texture. You can also skip the cheese or use a plant-based alternative. {{image_2}} If you want to change things up, you can swap the sausage. Try turkey sausage or even a plant-based version. These options still give great flavor without the extra fat. You can also use ground beef or pork if you prefer. When it comes to veggies, feel free to mix in others. Carrots, zucchini, or bell peppers add nice texture and taste. You could even use kale instead of spinach for a different twist. To make the dish creamy, you can add cream or cheese. Start by stirring in heavy cream after cooking the sausage. This will give a rich base. You can also mix in cream cheese or ricotta for a smooth texture. Adjust your cooking method by lowering the heat. This helps the cream blend well without curdling. Stir gently to combine everything smoothly. This dish pairs well with simple sides. A fresh green salad with vinaigrette works nicely. Garlic bread is another great choice for soaking up sauce. For wine lovers, a light white wine is perfect. Try a Sauvignon Blanc or a Pinot Grigio. These wines complement the flavors in the dish without overpowering them. You can find the Full Recipe for a detailed guide on how to make this wonderful meal! To keep your butternut squash sausage spinach pasta fresh, store it right. First, let it cool completely. Then, place it in an airtight container. This helps prevent moisture loss. You can use glass or plastic containers for this purpose. Glass containers are great for reheating since they can go in the oven or microwave. If you want to freeze the dish, follow these steps. Once it cools, portion it into freezer-safe bags or containers. Squeeze out any air before sealing. This helps avoid freezer burn. You can freeze it for up to three months. When you're ready to eat, thaw it in the fridge overnight. To reheat, place it in a pan over medium heat, adding a splash of water or broth to keep it moist. Stir until heated through. In the fridge, the pasta lasts about three to four days. If you freeze it, it will stay good for three months. Check for signs of spoilage before eating. If you see mold or smell something off, it's best to throw it away. Keeping track of the storage time is key to enjoying this delicious meal safely. I recommend using penne or fettuccine for this dish. Penne’s tubes catch the sauce well. Fettuccine offers a nice, flat surface for the sauce to cling to. Both options create a great balance with butternut squash and sausage. Yes, you can easily make this dish vegetarian. Swap out the Italian sausage for plant-based sausage. You can also use mushrooms or lentils for added texture. This keeps the dish hearty and delicious without meat. To make this dish gluten-free, choose gluten-free pasta. Many brands offer rice, quinoa, or chickpea pasta. These options work well and maintain a good texture. Just cook them according to package instructions. You can prepare this dish ahead of time. Cook the pasta and sauce separately and store them in the fridge. When you’re ready to eat, just heat them together. This keeps the pasta from getting mushy. A simple side salad pairs well with this pasta. You can also serve garlic bread or roasted vegetables. These sides add freshness and balance to the meal. You can find the Full Recipe for butternut squash sausage spinach pasta [here](#). This link has all the cooking steps and tips you need. This blog post covered how to make a delicious butternut squash, sausage, and spinach pasta. We talked about the right ingredients, step-by-step cooking directions, and tips that make it easy. Remember, you can switch ingredients to suit your taste or needs. Whether you serve it fresh or store it for later, this dish is both satisfying and flexible. Enjoy creating your own versions and sharing them with family and friends!

Butternut Squash Sausage Spinach Pasta Delightful Meal

Discover the perfect fall dish with my Butternut Squash Sausage Spinach Pasta! This delightful meal balances creamy, savory flavors with

To make these tasty Pumpkin S’mores Cookies, you need a mix of simple ingredients. Here’s what you will need: - 1 cup all-purpose flour - 1/2 cup rolled oats - 1/2 teaspoon baking soda - 1/2 teaspoon baking powder - 1/4 teaspoon salt - 1 teaspoon ground cinnamon - 1/2 teaspoon ground nutmeg - 1/4 cup unsalted butter, softened - 1/2 cup brown sugar, packed - 1/4 cup granulated sugar - 1/2 cup pumpkin puree - 1 teaspoon vanilla extract - 1/2 cup mini marshmallows - 1/2 cup chocolate chips - 1/2 cup crushed graham crackers These ingredients create a soft, chewy cookie. The pumpkin adds moisture and flavor. The oats give a nice texture. Chocolate, marshmallows, and graham crackers make it a true s’mores treat. You can play with these cookies by adding some fun extras. Consider these options: - Chopped nuts like walnuts or pecans for crunch. - A sprinkle of sea salt on top for a salty bite. - White chocolate chips for a different sweet flavor. - Dried fruit like cranberries for a chewy element. These add-ins can make your cookies unique. Feel free to mix and match! Not all ingredients may be on hand. Here are some easy swaps: - Use whole wheat flour instead of all-purpose for more fiber. - Swap pumpkin puree with applesauce for a lighter taste. - If you need a dairy-free option, use coconut oil instead of butter. - Maple syrup can replace granulated sugar for a natural sweetener. These substitutions keep the cookie delicious while meeting dietary needs. Experiment to find your favorite version! For the full recipe, check out the instructions above. First, I preheat the oven to 350°F (175°C). This step ensures the cookies bake evenly. Next, I line a baking sheet with parchment paper to prevent sticking. In a bowl, I mix the dry ingredients. I combine 1 cup of all-purpose flour, 1/2 cup of rolled oats, 1/2 teaspoon of baking soda, 1/2 teaspoon of baking powder, 1/4 teaspoon of salt, 1 teaspoon of ground cinnamon, and 1/2 teaspoon of ground nutmeg. I whisk these until they blend well. In another bowl, I cream together 1/4 cup of softened unsalted butter, 1/2 cup of packed brown sugar, and 1/4 cup of granulated sugar. I beat this mixture until it gets light and fluffy. Then I add 1/2 cup of pumpkin puree and 1 teaspoon of vanilla extract. I mix until smooth. Now, I gradually add the dry mix to the wet mix. I stir until just combined, being careful not to overmix. Finally, I fold in 1/2 cup each of mini marshmallows, chocolate chips, and crushed graham crackers. This gives the cookies that s’mores flavor. With the dough ready, I scoop tablespoon-sized portions onto the prepared baking sheet. I space them about 2 inches apart to allow room for spreading. I bake them for 12-15 minutes. The edges should be lightly golden, and the cookies should look set at this point. After baking, I let the cookies cool on the sheet for 5 minutes. This helps them firm up a bit. Then I transfer them to a wire rack to cool completely. For serving, I like to arrange the cookies on a rustic wooden board. A sprinkle of whole graham crackers and chocolate chips adds a nice touch. I often serve them warm with a glass of cold milk. A mini s’mores skewer makes a fun garnish! For the full recipe, check out the [Full Recipe]. Enjoy your delicious Pumpkin S’mores Cookies! To make these cookies stand out, use fresh pumpkin puree. It adds a rich flavor. You can also chill your dough for 30 minutes before baking. This helps the cookies hold their shape. Bake them until the edges are golden but the centers stay soft. This gives a nice texture. One common mistake is overmixing the dough. This can make the cookies tough. Mix just until ingredients combine. Another mistake is not measuring ingredients correctly. Use proper measuring cups for dry and wet ingredients. Lastly, don’t skip the parchment paper. It prevents sticking and helps with even baking. You’ll need a few key tools to make these cookies. A large mixing bowl works best for combining ingredients. Use a whisk for dry ingredients and a hand mixer for wet ones. A cookie scoop makes portioning easy and uniform. Finally, a baking sheet lined with parchment paper is essential. These tools help ensure your cookies turn out great every time. For the full recipe, check out the details above! {{image_2}} You can make gluten-free pumpkin s’mores cookies with a few easy swaps. Use a gluten-free all-purpose flour blend instead of regular flour. The blend will help keep the cookie texture just right. Make sure the oats you use are certified gluten-free. This will keep the cookies safe for anyone who needs to avoid gluten. The taste remains rich and delicious, just like the original. To make these cookies vegan, you’ll need to change a few ingredients. Replace the unsalted butter with coconut oil or vegan butter. Use a flax egg instead of a regular egg. To make a flax egg, mix one tablespoon of ground flaxseed with three tablespoons of water. Let it sit for five minutes until it thickens. You can still enjoy the same sweet flavors while keeping it plant-based. You can get creative with flavor variations, too! Try adding white chocolate chips for a fun twist. Chopped nuts like pecans or walnuts add a nice crunch. You can also mix in pumpkin spice for extra warmth. For a fun seasonal touch, consider adding a sprinkle of sea salt on top before baking. Each variation keeps the spirit of s’mores alive while offering new tastes. For the full recipe, check out the steps earlier in this article. Once your pumpkin s’mores cookies cool, you can store them easily. Place the cookies in an airtight container. This keeps them fresh and soft. You can layer parchment paper between the cookies to prevent sticking. Store them at room temperature for up to one week. If you want, you can also keep them in the fridge. Just remember, they may dry out a bit. Freezing cookies is a smart way to save them for later. To freeze your pumpkin s’mores cookies, wait until they cool completely. Then, place them in a single layer on a baking sheet. Freeze them for about an hour. After that, transfer the cookies to a freezer bag. Remove as much air as possible before sealing. They can stay fresh for up to three months in the freezer. When you are ready to eat, let them thaw at room temp. To keep your cookies fresh, avoid mixing flavors. Store different cookies in separate containers. You can also add a slice of bread to the container. This helps keep cookies soft for longer. If you notice them getting hard, you can warm them in the oven for a few minutes. Always check your cookies for signs of spoilage. Fresh cookies should smell sweet and look appealing. To make your Pumpkin S’mores Cookies chewy, focus on two things: moisture and baking time. First, ensure you use enough pumpkin puree. The moisture from the puree keeps the cookies soft. Second, do not overbake them. Take them out when the edges are lightly golden. They will continue to cook slightly on the baking sheet. This method will give you that perfect chewy texture you crave. Yes, you can use canned pumpkin! Canned pumpkin is a great option. It saves time and provides a consistent flavor. Just make sure you choose pure pumpkin puree, not pumpkin pie filling. The filling has added sugars and spices that might change the taste of your cookies. Using pure pumpkin keeps your cookies true to the recipe. It adds moisture and rich flavor without extra work. Pumpkin S’mores Cookies are best served warm. They are delicious with a glass of cold milk. For a fun twist, you can create mini s’mores skewers. Just use a toothpick to stack mini marshmallows, chocolate pieces, and graham crackers. Place these on the side when serving. You can also arrange the cookies on a rustic wooden board. This adds a cozy fall vibe to your gathering. For the full recipe, check the section above. In this post, I shared how to make Pumpkin S’mores Cookies. We explored the ingredients, step-by-step instructions, and essential tips. I also offered ideas for variations and storage. Remember, using the right tools helps create tasty cookies. Avoid common mistakes for the best results. Enjoy these treats fresh or try freezing them for later. Keep experimenting with flavors and enjoy the fun!

Pumpkin S’mores Cookies Irresistible Fall Treat

Fall is here, and it’s time to indulge in a sweet twist on a classic treat! In this post, I’ll

To make this tasty dish, you need some key ingredients. Here’s a list: - 2 pounds boneless, skinless chicken thighs, cut into bite-sized pieces - 1 cup unsalted roasted peanuts - 1 red bell pepper, diced - 1 green bell pepper, diced - 1 small onion, diced - 3 cloves garlic, minced - 1 tablespoon fresh ginger, minced - 1/4 cup soy sauce (low sodium) - 1/4 cup chicken broth - 2 tablespoons rice vinegar - 2 tablespoons brown sugar - 1 tablespoon cornstarch - 1/2 teaspoon crushed red pepper flakes (adjust to taste) - 1 tablespoon sesame oil - Salt and pepper to taste - Chopped green onions and sesame seeds for garnish These main ingredients create a rich and flavorful dish that warms your stomach. You might want to tweak the recipe to fit your taste. Here are some ideas: - Vegetables: Add snow peas or carrots for extra crunch. - Nuts: Use cashews instead of peanuts if you prefer. - Sweetness: Swap brown sugar with honey or maple syrup for a different taste. - Spiciness: If you love heat, add more crushed red pepper or chili paste. These optional ingredients help you customize your meal. Experiment and find your perfect mix. You only need a few tools to make this easy dish: - Crockpot: This is key for slow cooking. - Cutting board and knife: To chop your veggies and chicken. - Mixing bowl: Use this to mix your marinade. - Measuring cups and spoons: For accurate ingredient amounts. Having the right tools makes cooking smoother and more enjoyable. With these items, you're all set to create a delicious Crockpot Kung Pao Chicken. For the step-by-step guide, check out the Full Recipe. Gather all your ingredients first. This makes cooking easy and fun. You need: - 2 pounds boneless, skinless chicken thighs, cut into bite-sized pieces - 1 cup unsalted roasted peanuts - 1 red bell pepper, diced - 1 green bell pepper, diced - 1 small onion, diced - 3 cloves garlic, minced - 1 tablespoon fresh ginger, minced - 1/4 cup soy sauce (low sodium) - 1/4 cup chicken broth - 2 tablespoons rice vinegar - 2 tablespoons brown sugar - 1 tablespoon cornstarch - 1/2 teaspoon crushed red pepper flakes (adjust to taste) - 1 tablespoon sesame oil - Salt and pepper to taste - Chopped green onions and sesame seeds for garnish In a large mixing bowl, add the chicken thighs. Pour in the soy sauce, chicken broth, and rice vinegar. Then, add brown sugar, cornstarch, minced garlic, minced ginger, and crushed red pepper flakes. Mix it well until the chicken is coated in the marinade. Now, transfer the chicken mixture into the crockpot. This is where the magic happens! On top of the chicken, add the diced red and green bell peppers and onions. Drizzle the sesame oil over everything. This will give it a nice flavor. Cover the crockpot with a lid. Set it to cook on low for 6-8 hours or high for 3-4 hours. You want the chicken to be tender and fully cooked. About 30 minutes before you plan to serve, add the roasted peanuts to the crockpot. Stir gently so the peanuts mix in but stay whole. This adds a nice crunch to your meal. Once done, taste the dish. Adjust with salt and pepper if needed. Serve the Kung Pao Chicken hot. Garnish with chopped green onions and a sprinkle of sesame seeds for that final touch. Enjoy your flavorful dinner delight! For the complete recipe, check out the Full Recipe. To boost the flavor of your Crockpot Kung Pao Chicken, use fresh ingredients. Fresh garlic and ginger make a big difference. You can also add more veggies, like carrots or snap peas, for extra crunch. Toasting the peanuts briefly before adding them enhances their nutty taste. If you like more heat, add extra crushed red pepper flakes. Marinate the chicken for a few hours before cooking. This lets the flavors soak in well. If your chicken turns out dry, it could be overcooked. Always check the time and temperature. If the dish is too salty, add a little sugar to balance it. Too much sauce can make your meal watery. You can thicken it with cornstarch mixed in water. If the sauce is bland, a splash more soy sauce or vinegar can help. Taste as you go to find the right flavor. Serve your Kung Pao Chicken over white or brown rice. This helps soak up the sauce. You can also serve it with steamed broccoli or snap peas for color and nutrition. A side of egg rolls or spring rolls pairs nicely too. For a fun twist, try it in lettuce wraps. Garnish with green onions and sesame seeds to make the dish pop. Check out the [Full Recipe] for more tips! {{image_2}} You can easily make this dish vegetarian or vegan. Instead of chicken, use tofu or tempeh. Cut them into bite-sized pieces. Marinate them just like the chicken. The sauce still brings a great flavor. You can add extra veggies, like broccoli or snap peas. This keeps the dish colorful and tasty. Do you want to switch things up? Try using shrimp or pork. Shrimp cooks quickly and adds a nice flavor. Pork can also work well, but make sure it is tender. Just follow the same cooking time as the chicken. The sauce will blend well with any protein you choose. Do you like a kick in your food? You can add more crushed red pepper flakes. Start with one teaspoon for a good heat. If you prefer it mild, reduce the flakes. You can also use sweet chili sauce for a twist. It gives the dish a sweet and spicy taste. Adjust it to match your taste buds! For the full recipe, click [here](#). After enjoying your Crockpot Kung Pao Chicken, let it cool. Place it in an airtight container. Store it in the fridge for up to four days. If you want to keep it longer, freezing is a great option. To reheat, take the chicken out of the fridge. You can use a microwave or a stovetop. If using a microwave, heat it in short bursts. Stir it often to ensure even heating. On the stovetop, warm it over low heat. Add a splash of water or broth to keep it moist. If you freeze leftovers, use a freezer-safe container. Label it with the date so you remember when you made it. To thaw, move it to the fridge overnight. You can also use the microwave for quick thawing. Once thawed, reheat it properly before serving. For the full experience, check out the Full Recipe for more tips. If you need a peanut substitute, try cashews or almonds. Both give a nice crunch. You can also use sunflower seeds for a nut-free option. These will add a similar texture without the peanut flavor. Just keep in mind that the taste will change slightly. Make sure to adjust your cooking time if you use softer nuts. To add more heat, use extra crushed red pepper flakes. Start with one teaspoon and add more if you like it hot. You can also add chopped fresh chili peppers. Another option is to use spicy chili sauce in the sauce mix. Just be sure to taste as you go. Everyone’s spice level is different! Yes, you can use chicken breasts instead of thighs. However, they may cook faster and can dry out if overcooked. I recommend checking them at the 3-hour mark if cooking on high. If you want juicy meat, thighs are best since they stay tender. For the best taste, stick to the recipe for now. You can find the full recipe to guide you through the process. This blog post shared how to make tasty Crockpot Kung Pao Chicken. We covered the main ingredients, optional swaps, and the right tools. You learned step-by-step how to prepare, cook, and serve this dish. I also shared tips for boosting flavor and solving common issues. We explored variations for different diets and gave storage advice. Now, you can enjoy a delicious meal any day of the week. Dive into cooking and have fun!

Crockpot Kung Pao Chicken Flavorful Dinner Delight

Craving a meal that’s both flavorful and easy to make? You’re in the right place! In this blog, I’ll guide

To make these enchiladas, start with the main items. You will need: - 2 lbs boneless, skinless chicken breasts - 1 can (10 oz) enchilada sauce (choose red or green) - 1 can (15 oz) black beans, rinsed and drained - 1 can (15 oz) corn, drained - 1 cup salsa - 1 tsp ground cumin - 1 tsp garlic powder - 1 tsp onion powder - 1 tsp chili powder - 8 large tortillas (either corn or flour) - 2 cups shredded cheese (opt for cheddar or a Mexican blend) These ingredients come together to create a hearty, flavorful meal. The chicken absorbs all the spices and sauce, making each bite delicious. Feel free to add your own touch to the enchiladas. Some optional ingredients are: - Diced bell peppers - Sliced jalapeños for heat - Chopped onions - Avocado slices for a fresh taste - Black olives for an extra layer of flavor These options let you customize your dish to match your taste. You can mix and match as you like! Cheese is a key part of the enchiladas. I recommend: - Cheddar cheese for its sharp flavor - Mexican blend cheese for a nice variety - Monterey Jack for creaminess Using different cheeses can change the flavor profile. Cheese adds that gooey texture that enchiladas need. Check out the Full Recipe for more details on assembly and cooking! First, gather your ingredients. You need chicken, enchilada sauce, black beans, corn, and spices. Place the two pounds of chicken breasts in the bottom of your slow cooker. In a bowl, mix the enchilada sauce, black beans, corn, salsa, and spices. Stir this mix well. Pour it over the chicken in the slow cooker. Make sure the chicken is fully coated in the sauce. Now, cover the slow cooker. Cook on low for 6-7 hours or on high for 3-4 hours. The chicken should become tender and easy to shred. When the cooking time is up, take out the chicken. Use two forks to shred it. Return the shredded chicken to the sauce in the slow cooker. Stir everything together well. Preheat your oven to 350°F (175°C). Take a tortilla and place some chicken mixture in the center. Sprinkle cheese on top of the chicken. Roll the tortilla tightly and place it seam-side down in a greased baking dish. Repeat this with all your tortillas. Pour any leftover sauce from the slow cooker over the rolled enchiladas. Top with more cheese. Bake in the oven for 20-25 minutes. The cheese should melt and bubble. Garnish with cilantro before serving. For the full recipe, check the earlier section. To make your enchiladas burst with flavor, focus on your sauce. Use a good quality enchilada sauce. You can make your own too! Combine canned tomatoes, chili powder, and spices. This adds depth. Adding black beans and corn adds texture and taste. Don't skip on seasoning. A bit of cumin and garlic powder enhances the dish. Taste the sauce before pouring it over the chicken. Adjust the spices as needed to suit your taste. Shredding chicken can be simple. After cooking, let the chicken cool a bit. Use two forks to pull apart the chicken. If you want an easier method, use a hand mixer. Just place the chicken in a bowl and mix on low speed. This shreds the chicken fast and saves your hands. Shredded chicken mixes well with the sauce. It helps keep each bite flavorful and moist. To get that perfect cheese melt, use shredded cheese. This melts evenly and quickly. Mix different cheese types for more flavor. Cheddar and Monterey Jack work great together. Before baking, sprinkle cheese on top and pour some sauce over it. This creates a delicious crust. Bake the enchiladas until the cheese is bubbly and golden. Keep an eye on them to avoid burning. Enjoy the gooey, cheesy goodness! {{image_2}} You can make a tasty vegetarian version of enchiladas. Simply swap the chicken for veggies. Try using zucchini, bell peppers, and mushrooms. You can also add black beans for protein. Use the same enchilada sauce and spices for great flavor. This option is healthy and still very filling. If you prefer beef or turkey, you can easily switch the protein. Use the same amount of ground beef or turkey. Brown the meat in a pan before adding it to the slow cooker. This adds depth to the flavor. Just follow the same steps in the recipe. The enchiladas will be hearty and satisfying. To make gluten-free enchiladas, use corn tortillas instead of flour ones. Corn tortillas work well and add a nice texture. You can find gluten-free tortillas at many grocery stores. This way, everyone can enjoy enchiladas, regardless of dietary needs. Just remember to check the labels for any hidden gluten. For the full recipe, refer to the Slow Cooker Chicken Enchiladas recipe above. To store leftover enchiladas, let them cool first. Place them in an airtight container. Make sure to cover them well to keep them fresh. You can keep them in the fridge for up to three days. If you want to enjoy them later, freezing is a great option. When you are ready to eat your stored enchiladas, preheat your oven to 350°F (175°C). Place the enchiladas in a baking dish. Cover them with foil to keep them moist. Heat for about 20 minutes or until warmed through. You can also reheat them in the microwave for a quick option. Just heat for 1-2 minutes, checking to avoid overheating. To freeze your enchiladas, wrap each one tightly in plastic wrap. Then place them in a freezer-safe bag or container. They can last in the freezer for up to three months. When you are ready to enjoy them, thaw them in the fridge overnight before reheating. This way, you will keep all the flavors intact for a tasty meal. You can store slow cooker chicken enchiladas in the fridge for about 3-4 days. Keep them in an airtight container. This helps keep them fresh and tasty. If you want to eat them later, just reheat them in the oven or microwave. Yes, you can make slow cooker chicken enchiladas ahead of time. You can prepare them the day before. Just follow the steps in the Full Recipe. After cooking, let them cool. Then, cover and store in the fridge. When you are ready, bake them for a warm meal. Many side dishes go well with chicken enchiladas. Here are some ideas: - Mexican rice - Refried beans - Corn salad - Guacamole - Chips and salsa These sides add flavor and balance to your meal. You can mix and match to find your favorites! Slow cooker chicken enchiladas are easy and fun to make. We covered the main ingredients, tasty tips, and cooking steps. You can change things up with different proteins or make them vegetarian. Don’t forget to store leftovers right to keep them fresh. With these simple steps and tricks, you can enjoy your meal and impress others. Now, it's your turn to try this recipe and enjoy delicious enchiladas at home!

Savory Slow Cooker Chicken Enchiladas Easy Recipe

Are you ready to enjoy a delicious meal with minimal effort? This easy recipe for savory slow cooker chicken enchiladas

Older posts
Newer posts
← Previous Page1 Page2 Page3 Page4 … Page80 Next →

dsad

© 2025 My Saved Recipe • Built with GeneratePress

Our Policies

  • Copyright Policy
  • Cookie Policy
  • GDPR Policy
  • Privacy Policy
  • Disclaimer
  • Terms Of Use

More Information

  • Home
  • About
  • Contact
  • Appetizers
  • Dessert
  • Dinner
  • Drinks
©2025, My Saved Recipe About Back To Top