![To make a tasty Blackberry Coconut Chai Smoothie, gather these key ingredients: - 1 cup blackberries, fresh or frozen - 1 banana, sliced - 1 cup coconut milk (canned or cartoned) These ingredients bring flavor and creaminess to your smoothie. Blackberries add a sweet-tart taste, while the banana gives it a creamy texture. Coconut milk adds richness and a tropical touch. Next, you will need a few additional ingredients to enhance the flavor: - 1 teaspoon chai tea powder or 1 chai tea bag (brewed and cooled) - 1 tablespoon honey or maple syrup (adjust to taste) - 1 tablespoon chia seeds - ½ teaspoon vanilla extract Chai tea offers warm spice notes that pair well with the fruit. Sweeteners like honey or maple syrup help balance the flavors. Chia seeds add a boost of nutrition and thickness, while vanilla extract adds a lovely aroma. You can also include some optional ingredients for a fun twist: - Ice cubes (optional, for a chilled smoothie) - Garnishes for presentation Adding ice cubes makes the smoothie colder and more refreshing. You can garnish your drink with whole blackberries or chia seeds to make it look beautiful and inviting. For the complete recipe, check out the [Full Recipe]. To start, brew the chai tea. If you use a tea bag, steep it in one cup of hot water. Let the tea cool to room temperature. This step gives your smoothie the warm spices needed for a great flavor. Next, gather all your ingredients. In your blender, add these items: - 1 cup blackberries, fresh or frozen - 1 sliced banana - 1 cup coconut milk - 1 teaspoon chai tea powder or the cooled brewed tea - 1 tablespoon honey or maple syrup - 1 tablespoon chia seeds - ½ teaspoon vanilla extract Blend until everything is well mixed. If you like it colder, toss in a handful of ice cubes. When blending, keep an eye on the texture. Blend on high speed until smooth and creamy. You want to avoid any large blackberry chunks. If it’s too thick, add a bit more coconut milk. Taste your smoothie. If you want it sweeter, add more honey or syrup. Pour it into glasses and let it sit for a few minutes. This way, the chia seeds can expand, adding a nice texture. You can also garnish with whole blackberries or a sprinkle of chia seeds for a pretty touch. For the complete recipe, check out the Full Recipe section above. To adjust sweetness in your smoothie, start with honey or maple syrup. Add one tablespoon at first. Blend and taste. If it needs more sweetness, stir in a bit more. Remember, you can always add, but you can't take away. You can boost this smoothie’s nutrition easily. Leafy greens like spinach or kale work well. They blend smoothly and add vitamins without changing the taste much. You could also toss in a tablespoon of protein powder or flaxseeds for extra goodness. These small changes make a big difference. If you have leftover smoothie, store it in an airtight container. It will keep in the fridge for up to one day. However, smoothies taste best fresh. If you want to save it for later, pour it into ice cube trays. Freeze them, then blend the cubes later for a quick treat. {{image_2}} You can switch up the fruit in your blackberry coconut chai smoothie. Try using raspberries for a tart kick. Strawberries add sweetness and a lovely color. If you want tropical vibes, add some mango or pineapple. Each fruit brings its own flavor and health benefits. Mix and match to find your favorite combination. If you're looking for dairy-free options, try almond milk or oat milk. Both work well with the smoothie. Coconut milk is creamy, but almond milk is lighter. Oat milk adds a nice, smooth texture. You can even use rice milk if you need a nut-free option. Choose what fits your diet best. Want to play with flavors? Adjust the spices in your smoothie. Try adding a pinch of cinnamon for warmth. A dash of nutmeg can give a cozy feel. For extra kick, add a bit of ginger. These spices not only add flavor but also pack in health benefits. Experiment to find what you love. For the full recipe, check out the details above. You can keep this smoothie in the fridge for up to 24 hours. After that, it may lose some flavor and texture. I suggest you store it in an airtight container. This helps keep the smoothie fresh longer. If you see separation, just give it a good shake before drinking. To freeze your smoothie for later, pour it into an ice cube tray or a freezer-safe container. Leave some space at the top, as liquids expand when frozen. You can freeze the smoothie for up to three months. This way, you can enjoy a quick treat anytime! When you're ready to use your frozen smoothie, take it out of the freezer. The best way to thaw it is in the fridge overnight. If you’re in a hurry, you can also use the microwave on low. Just be careful not to overheat it. After thawing, blend it again to regain that creamy texture. Enjoy your refreshing drink! Yes, you can make this smoothie ahead of time. To do this, blend all the ingredients and pour it into a jar. Seal it tightly and store it in the fridge. It tastes best if you drink it within 24 hours. If you want it colder, you can freeze it in ice cube trays. When ready, blend the frozen cubes with a little water for a quick treat. If you don’t have coconut milk, try using almond milk or oat milk. Both options work well and keep the smoothie creamy. You can also use soy milk or cashew milk. Each of these choices gives a unique twist to the flavor. Just make sure to choose unsweetened versions to control the sweetness. Absolutely! Kids love the taste of blackberries and bananas. To make it even more fun, you can add a colorful straw or a cute cup. You can also let them help with blending. Kids enjoy being part of the cooking process. If they want more sweetness, you can add extra honey or maple syrup. They might even want to add sprinkles or whipped cream on top for a treat! You learned about the key ingredients for a tasty Blackberry Coconut Chai Smoothie. We explored preparation steps, tips for flavor, and ways to store your smoothie. You can mix different fruits and adjust sweetness to suit your taste. Remember to keep it fresh in the fridge or freeze for later. Smoothies can be made ahead of time, and there are easy ways to soften them when you're ready to enjoy. Get creative and have fun with flavors that you love!](https://mysavedrecipe.com/wp-content/uploads/2025/06/910be64e-7677-4211-84e2-073cf5e80335.webp)
Blackberry Coconut Chai Smoothie Refreshing and Creamy
Looking for a delicious way to cool off? My Blackberry Coconut Chai Smoothie is both refreshing and creamy, perfect for
Looking for a delicious way to cool off? My Blackberry Coconut Chai Smoothie is both refreshing and creamy, perfect for
![For the best flavor in your Mocha Coconut Cold Drip Tonic, choose a medium roast coffee. Medium roast gives a balanced taste with nice acidity. Look for coarsely ground coffee. This helps with cold brewing, allowing water to extract flavors well. Brands like Stumptown or Blue Bottle have great options for cold brew. Use full-fat coconut milk for creaminess. It adds a rich texture to your drink. You can find it in cans at most grocery stores. If you prefer a lighter version, try light coconut milk. Sweeteners like maple syrup add a natural sweetness. Adjust the amount based on your taste. You can also use honey or agave syrup. For extra flavor, add vanilla extract. It pairs well with chocolate and coconut. To make your drink pop, top it with toasted coconut flakes. They add crunch and a nice flavor. Dark chocolate shavings are also a great choice. They give a sweet finish that enhances the mocha taste. You can easily make them with a vegetable peeler. Just shave off some chocolate bar pieces. Enjoy these garnishes to elevate your drink's look and taste. For a complete Mocha Coconut Cold Drip Tonic recipe, check out the [Full Recipe]. To start, you need to combine coffee grounds and water. Use 1 cup of coarsely ground coffee and 4 cups of cold water. Stir gently to wet all the grounds. Cover it and let it steep in the fridge for at least 12 to 24 hours. This long steeping time helps create a rich coffee flavor. After steeping, it is time to filter the coffee. You can use a fine mesh strainer or a coffee filter. Pour the coffee mixture through the filter to remove the grounds. This step gives you a smooth and rich coffee concentrate. Make sure to press down gently on the grounds for the best flavor. Next, whisk together the coconut milk, cocoa powder, maple syrup, and vanilla extract. Use a bowl and a whisk for this. Start slowly and then speed up. Whisk until everything is smooth and well mixed. A smooth consistency is key for a great drink. Now, it is time to mix your cold brew and coconut cream. Use equal parts of both. This means if you have 1 cup of cold brew, add 1 cup of coconut cream mix. Stir gently to combine. For serving, fill a glass with ice cubes and pour the mocha coconut blend over the ice. If you want a creamier drink, add more coconut milk. Enjoy this refreshing drink and garnish it with toasted coconut flakes and dark chocolate shavings for a special touch. You can find the [Full Recipe] for more details. To make the best cold brew, start with fresh coffee. Use coarsely ground coffee for a smooth drink. A medium roast works well, as it balances flavor and acidity. Mix one cup of coffee with four cups of cold water. Let it steep for at least 12 hours in the fridge. The longer it steeps, the richer the flavor. Common mistakes to avoid include using hot water. Hot water can lead to bitter coffee. Also, don’t rush the filtering process. Take your time to ensure a clean concentrate without grounds. You can adjust the sweetness and creaminess of your tonic. If you prefer a sweeter drink, add more maple syrup. For a creamier texture, mix in additional coconut milk. Feel free to experiment with flavors too. Try adding a pinch of cinnamon or nutmeg for warmth. You can also swap cocoa powder for chocolate syrup for a different taste. Garnishes can elevate your drink. Consider using toasted coconut flakes for a crunchy touch. Dark chocolate shavings add a rich visual and taste. When serving, use a clear glass to show off the layers. You can even rim the glass with chocolate or coconut for a fun twist. Enjoy making your drink beautiful and tasty! {{image_2}} You can easily make this drink dairy-free. Use almond milk, oat milk, or any nut milk you prefer. These options give you a great taste and keep the drink creamy. If you want to make it vegan, just skip any animal products. This way, you can enjoy a delicious Mocha Coconut Cold Drip Tonic that fits your diet. Want to switch things up? Try adding spices like cinnamon or nutmeg. These spices add warmth and depth to your tonic. You can also mix in flavors like almond or mint for a fun twist. A splash of almond extract or a few mint leaves can take your drink to the next level. Experimenting with flavors makes this drink even more exciting. This tonic is perfect for hot or cold drinks. For a hot version, heat the cold brew and mix it with the coconut cream blend. Serve it in a cozy mug. If you want it iced, just follow the regular recipe and pour it over ice. Keep it cool and refreshing for warm days. Enjoy this drink any way you like! To keep your cold brew fresh, store it in an airtight jar. Glass jars work best because they do not absorb flavors or odors. Ensure the jar is sealed tightly. Refrigerate the concentrate. It stays fresh for about one week. After that, the flavor may fade. If you notice a sour smell, it’s time to toss it. For the coconut cream, store it in a separate airtight container. Keep it in the fridge for up to five days. To keep it fresh longer, consider freezing it. Simply pour it into ice cube trays. Once frozen, transfer the cubes to a freezer bag. This way, you can grab a cube when you need it. If you have a party or gathering, prepare the cold brew and coconut cream in advance. Make a large batch of cold brew by doubling the recipe. Store it in the fridge. For the coconut cream, you can also batch prepare it. Freeze it in cubes for easy use. This will save you time and effort when serving your guests. For cold brew, I recommend a medium roast coffee. It gives a nice balance of flavor. Brands like Stumptown and Blue Bottle are great choices. Use coarsely ground coffee for the best results. A grind size similar to sea salt works well. This helps avoid a bitter taste while steeping. Yes, you can! If you want a coffee-free drink, try using herbal tea or chai. These options provide unique flavors and still feel refreshing. You can also use roasted barley or dandelion root for a coffee-like taste. They add a nutty and rich flavor to your tonic. To adjust sweetness, use natural sweeteners like honey or agave. Start with a little and add more if needed. You can also use stevia or monk fruit for a low-calorie option. Taste as you go to find the perfect balance for your drink. You can find ready-made versions at specialty coffee shops or local grocery stores. Brands like Nitro Cold Brew and La Colombe offer pre-made options. Check the refrigerated section for these drinks. Online retailers like Amazon also carry ready-made versions. To make a larger batch, simply double or triple the ingredients. Use a big jar or pitcher for steeping. Keep the same coffee-to-water ratio for best flavor. This way, you can serve many guests without extra effort. We explored the essential steps for making a delicious Mocha Coconut Cold Drip Tonic. You now know the best coffee types, coconut milk choices, and how to customize your drink with sweeteners or spices. Remember to experiment with garnishes for a special touch. As you prepare this refreshing iced beverage, keep in mind storage tips for optimal freshness. Enjoy crafting your tonic and share it with friends for a delightful treat! Embrace your creativity and enjoy every sip.](https://mysavedrecipe.com/wp-content/uploads/2025/06/ba28db61-4742-41d3-b9a2-3276fe182343.webp)
Craving a refreshing drink that blends rich flavor with tropical goodness? Say hello to the Mocha Coconut Cold Drip Tonic!
![To make the Tangerine Mint Cooler, gather these fresh and tasty ingredients: - Fresh tangerine juice - Sparkling water or club soda - Fresh mint leaves - Honey or agave syrup - Lime juice - Ice cubes - Tangerine slices for garnish Each ingredient plays a key role. The fresh tangerine juice gives a bright and sweet flavor. Sparkling water adds fizz and lightness. Fresh mint leaves bring a cool touch. Honey or agave syrup sweetens the drink, while lime juice adds a zesty kick. Ice cubes keep everything chill, and tangerine slices make it look pretty. For the full recipe, check my detailed instructions to enjoy this refreshing drink. To start, grab your fresh tangerines. Cut each one in half. Juice them until you have 2 cups of fresh juice. If you like, strain the juice to remove pulp and seeds. This step helps create a smooth drink. Next, take a medium bowl. Pour in the fresh tangerine juice. Add honey or agave syrup, along with lime juice. Stir it all together until the sweetener dissolves. This mixture should taste bright and sweet with a hint of tartness. Now, let’s get to the mint. In a pitcher, gently muddle the fresh mint leaves. Use the back of a spoon or a muddler. The goal is to release the mint's oils without tearing the leaves. This step adds a lovely aroma to your drink. After muddling, pour the tangerine juice mixture over the mint in the pitcher. Then, add sparkling water or club soda. Stir gently to mix everything. You want to keep the fizz, so be careful not to stir too hard. To serve, fill glasses with ice cubes. Pour the tangerine mint mixture over the ice. Finally, garnish each glass with extra mint leaves and a slice of tangerine on the rim. This adds a nice touch and makes the drink look fancy. For the full recipe, check out the [Full Recipe]. To pick the best tangerines, look for firm ones. They should feel heavy for their size. A bright orange color shows ripeness. Avoid any with soft spots or wrinkles. Fresh tangerines taste sweet and juicy, making your drink great. You can change the sweetness to fit your taste. Start with two tablespoons of honey or agave. Stir until it dissolves. Taste the mix and add more sweetener if needed. Keep in mind that tangerines can vary in sweetness. You can add fun flavors to your cooler. Try a splash of ginger for warmth. A hint of vanilla can add depth. If you love spice, a pinch of cayenne pepper can give it a kick. Fresh herbs like basil can also complement the mint. To present your drink nicely, use tall glasses. Fill them with ice cubes first. Pour the tangerine mint mix over the ice. Garnish with mint leaves and tangerine slices on the glass rim. This adds a pop of color and charm. For a fun twist, serve with colorful straws or drink stirrers. Check out the Full Recipe for more tips! {{image_2}} You can add more fruit to your Tangerine Mint Cooler. Fruits like pineapple, strawberries, or mango can bring new flavors. Just blend them into the juice mixture. For a tropical twist, try using coconut water instead of sparkling water. This will give your drink a sweet, creamy taste. Mix and match to find your favorite combo! For a fun twist, you can make this drink boozy. Adding vodka or rum can elevate your cooler. Start with one ounce of your choice of spirit per glass. Stir it in after combining the tangerine juice and mint. Adjust the amount based on your taste. You can also try flavored spirits like coconut rum or peach vodka to add a new layer of flavor. You can swap mint for other herbs as well. Basil, rosemary, or cilantro can create exciting new flavors. Muddle the herbs just like you do with mint. Each herb brings a unique taste to the drink. Pair them with citrus for refreshing results. Don’t be afraid to experiment! To store your Tangerine Mint Cooler, pour any leftovers into a clean jar. Seal it tightly with a lid. Keep the jar in the fridge. This helps maintain the drink's freshness and flavor. Always use a glass container for the best results. The Tangerine Mint Cooler stays fresh for up to three days in the fridge. After that, the mint may wilt and the flavor can fade. To enjoy the best taste, consume it within this time frame. Before serving, give it a gentle stir to mix the flavors again. If you have extra tangerine juice, consider freezing it. Pour the juice into ice cube trays. Once frozen, transfer the cubes to a freezer bag. This way, you can use them later in smoothies or other drinks. Frozen tangerine juice lasts for about six months. Yes, you can make Tangerine Mint Cooler in advance. Prepare the juice mixture and muddle the mint leaves. Store them in the fridge for up to two days. Add the sparkling water just before serving. This keeps the drink fizzy and fresh. To make a non-carbonated Tangerine Mint Cooler, skip the sparkling water. Instead, use still water or coconut water. This gives you a smooth and refreshing drink. Mix the juice with your choice of water and muddle in the mint leaves. Serve it over ice for a tasty treat. Tangerines are packed with vitamins and nutrients. They are high in vitamin C, which helps boost your immune system. Tangerines also have antioxidants that help fight free radicals. Their fiber content aids digestion and keeps you feeling full. Enjoying tangerines can support your overall health. Making the Tangerine Mint Cooler vegan is easy. Use agave syrup instead of honey. This keeps your drink plant-based while still being sweet. All other ingredients are already vegan-friendly. Enjoy your refreshing drink without any animal products. Yes, you can use bottled tangerine juice for convenience. However, fresh juice has a brighter flavor. If you choose bottled juice, look for 100% pure juice without added sugars or preservatives. This way, you still get a tasty drink. For the best taste, I recommend using fresh juice when possible. In this post, I covered how to make a refreshing Tangerine Mint Cooler. We discussed ingredients, steps for preparation, and tips for the best taste. Remember, fresh ingredients like mint and tangerines make a big difference. Adjust the sweetness to your liking for the perfect drink. You can even explore fun variations or store extras for later. With these ideas, you can create a delightful drink that impresses everyone. Enjoy crafting your cooler!](https://mysavedrecipe.com/wp-content/uploads/2025/06/6a4a261f-e87c-4db2-94af-95050f5a7755.webp)
Looking for a refreshing drink to sip on during hot summer days? I’ve got just the thing! This Tangerine Mint
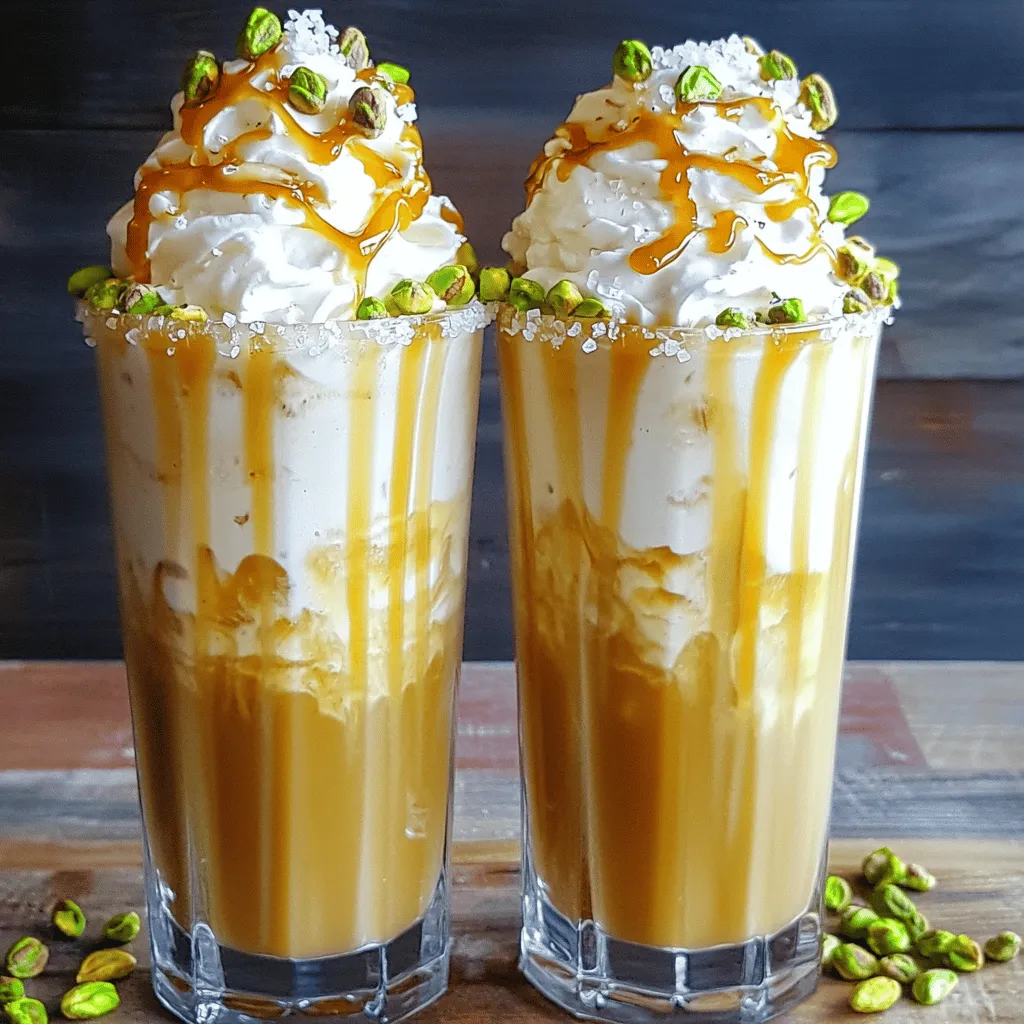
Craving a cool, sweet treat that’s also unique? Let’s whip up a Salted Pistachio Caramel Frappe! This delightful drink combines
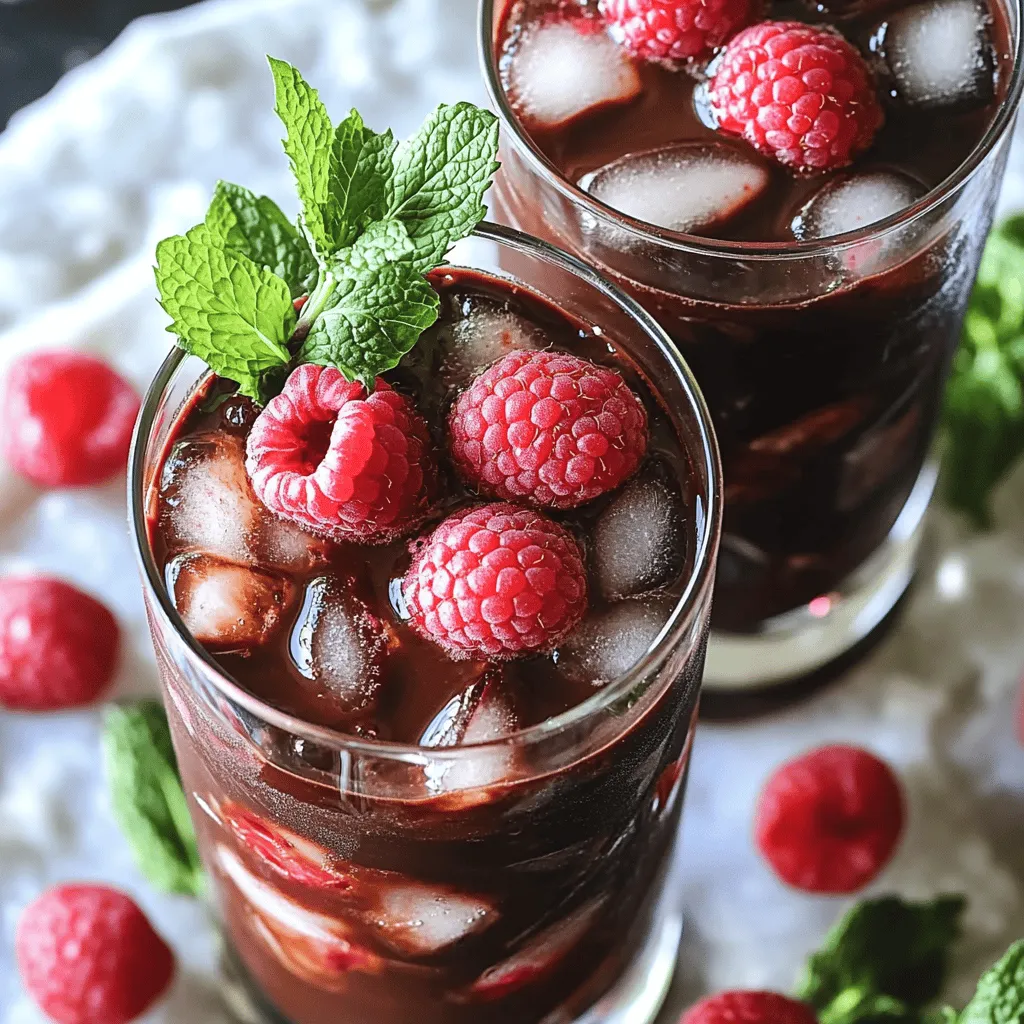
Are you ready for a drink that’s both simple and delicious? The Dark Chocolate Raspberry Refresher combines rich dark chocolate
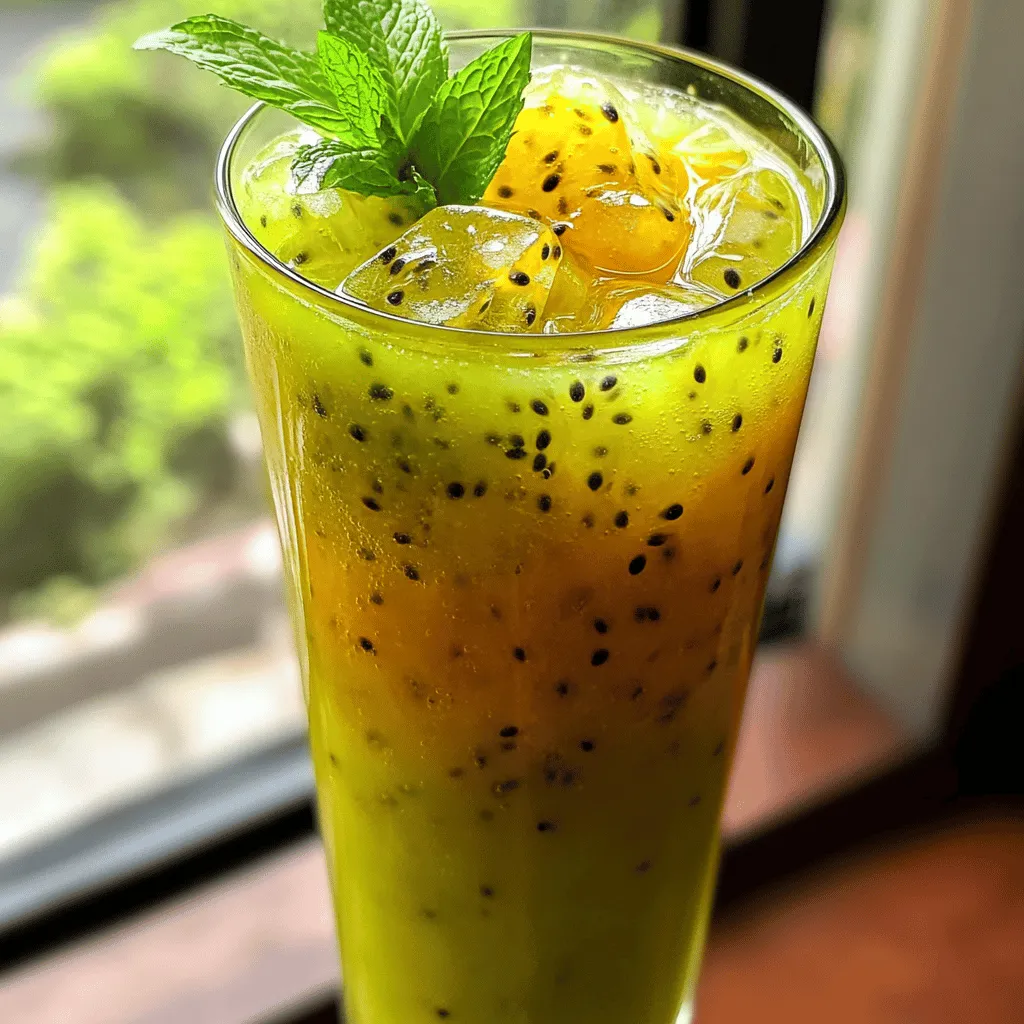
Are you ready to beat the summer heat with a refreshing treat? Kiwi Passionfruit Agua Fresca is the perfect way
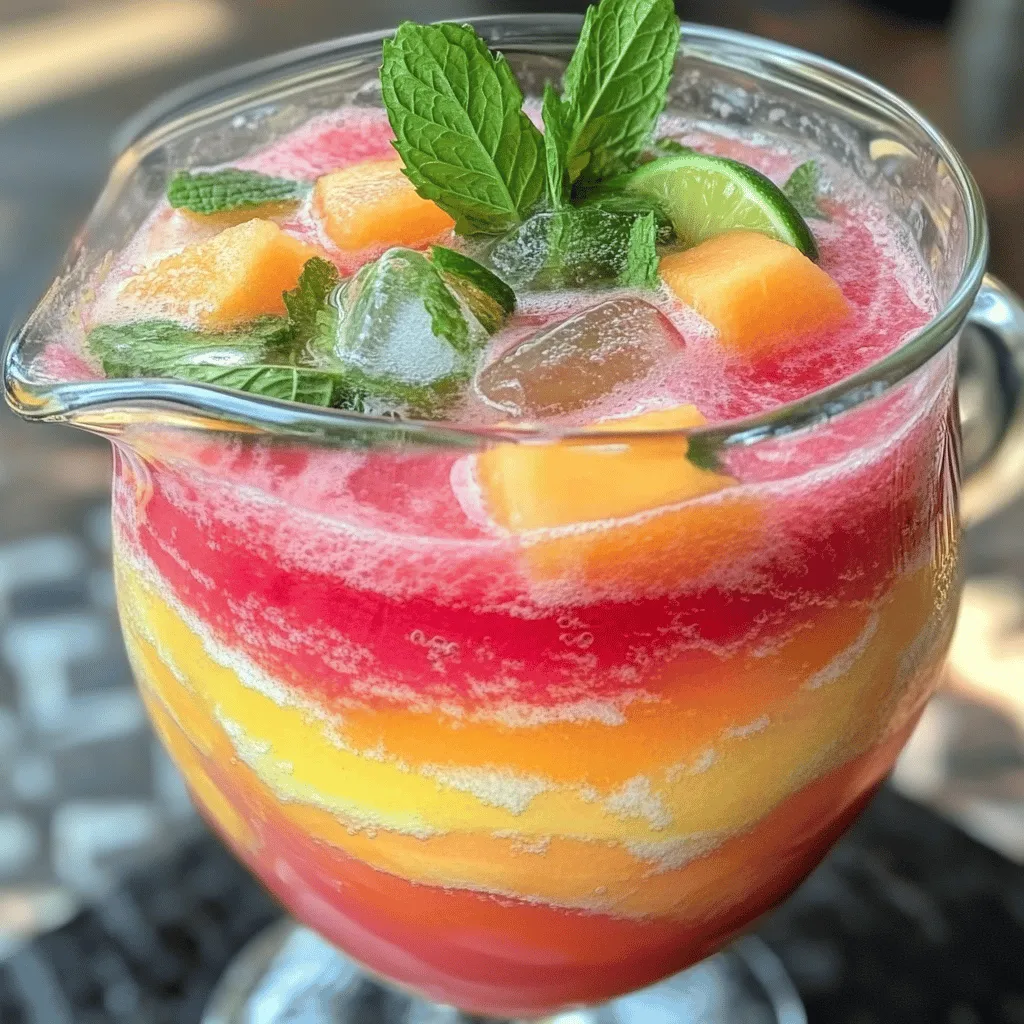
Looking for a cool drink to beat the summer heat? My Minted Melon Agua Fresca is the perfect choice! This
![This smoothie has some great, simple ingredients. Here’s what you need: - 1 ripe mango, peeled and diced - 1 banana, sliced - 1 teaspoon ground turmeric - 1/2 teaspoon ginger powder (or 1-inch fresh ginger, grated) - 1 cup coconut milk (or almond milk) - 1 tablespoon honey or maple syrup (optional, for sweetness) - 1 tablespoon chia seeds - 1/2 cup ice cubes - A pinch of black pepper These ingredients create a bright, tasty drink that is good for you. You can boost your smoothie with some extra flavors. Here are some ideas: - A handful of spinach or kale for greens. - A scoop of protein powder for extra energy. - A few berries for a sweet twist. - A splash of vanilla extract for a warm note. Feel free to try these options. They can change the taste and nutrition of your smoothie. Each ingredient in this smoothie has its own health perks: - Mango: Rich in vitamins A and C, it helps your skin and immune system. - Banana: High in potassium, it supports heart health and gives energy. - Turmeric: Known for its anti-inflammatory properties, it may help reduce pain. - Ginger: Aids digestion and can help with nausea. - Coconut Milk: Provides healthy fats and keeps your heart healthy. - Honey or Maple Syrup: Natural sweeteners that offer some antioxidants. - Chia Seeds: Packed with fiber, they help keep you full. - Black Pepper: Helps your body absorb turmeric better. These ingredients not only taste good but also support your health. You can find the full recipe to make this smoothie easily. Start by preparing your ingredients. Take a ripe mango, peel it, and dice it into small pieces. Next, slice the banana into rounds. If you're using fresh ginger, grate it finely. This step is key for flavor. Gather all your ingredients together. It makes blending easier and faster. In a blender, add the diced mango, sliced banana, turmeric, and ginger. Pour in one cup of coconut milk or almond milk. If you like it sweeter, add honey or maple syrup. Next, toss in one tablespoon of chia seeds and a pinch of black pepper. The black pepper helps your body absorb the turmeric better. Finally, add half a cup of ice cubes for a cool touch. Blend everything on high until the mixture is smooth and creamy. You may need to scrape down the sides to blend well. Taste your smoothie. If you want it sweeter, add more honey or syrup. Once your smoothie is ready, pour it into glasses. For a pretty touch, sprinkle some chia seeds or a little turmeric powder on top. This makes the drink look vibrant and inviting. Serve it right away for the best flavor and texture. Enjoy your refreshing Turmeric Mango Sunrise Smoothie! For the complete recipe, check out the [Full Recipe]. To create the perfect Turmeric Mango Sunrise Smoothie, start with a good blender. A strong blender makes a smooth drink. Cut your fruits into small pieces for easier blending. Add your liquids first; this helps everything mix well. Layering helps your blender work better. Always check the sides and scrape down if needed. This ensures everything blends evenly. If your smoothie is too thick, add more coconut milk or water. Blend again until smooth. If it’s too thin, add more frozen fruit or ice. For flavor, you can add more honey or maple syrup. Taste your smoothie before pouring. This way, you can make it just right for your taste buds. Enjoy your smoothie with some healthy sides. Whole grain toast or oatmeal pairs well. You can add nuts or seeds for crunch. Greek yogurt is also a great option for protein. A light breakfast helps keep you full. You can serve your smoothie alongside fresh fruit for added nutrition. For the complete recipe, check the [Full Recipe]. {{image_2}} You can boost your smoothie with protein powder. I often use whey or plant-based protein. These options add nutrition without changing the flavor much. Just one scoop is enough. It helps keep you full longer and supports muscle recovery. Don’t stop at mango and banana! You can add other fruits for a tropical twist. Pineapple, papaya, or passion fruit work great. They add sweetness and a fun taste. You can mix and match your favorites for a unique drink. Experiment with different fruits to find your perfect blend. If you want a creamier smoothie, try different milks. Almond milk or oat milk are great choices. Coconut milk gives a rich taste, while almond milk keeps it light. You can also use silken tofu for a thick texture. These options keep your drink dairy-free, too. If you have leftover smoothie, store it in a sealed jar. Keep it in the fridge. It will stay fresh for up to two days. When you are ready to drink it, give it a good shake. This helps mix everything well again. You can freeze any leftover smoothie for later. Pour it into ice cube trays or freezer bags. Once frozen, you can pop out cubes for quick use. Just remember to label the bags with the date. Smoothies can last up to three months in the freezer. To enjoy your frozen smoothie, take it out of the freezer. Let it thaw in the fridge overnight. If you're in a hurry, run it under cool water for a few minutes. Blend the thawed smoothie to restore its creamy texture. If it feels too thick, add a splash of milk or water to reach your desired consistency. Check out the Full Recipe for more details on making this delicious drink! Turmeric is more than just a spice. It has strong health benefits. The main active compound is curcumin. Curcumin can help reduce inflammation and fight free radicals. This spice may also support brain health and digestion. Some studies suggest it may even improve mood. Adding turmeric to your diet can boost your immune system. Its bright color also makes food look great! Yes, you can make the smoothie without banana. If you skip the banana, the smoothie may be less creamy. You can try using avocado instead. Avocado adds creaminess and healthy fats. Another option is to add more mango. This keeps the flavor bright and sweet. Feel free to experiment with other fruits too! To enhance the flavor, try adding fresh herbs. Mint or basil can brighten the taste. You can also add a squeeze of lime or lemon juice. This will give it a zesty kick. If you want sweetness, use more honey or maple syrup. You can even add a dash of cinnamon for warmth. These little changes can make a big difference in flavor. You learned how to make a tasty Turmeric Mango Sunrise Smoothie. We discussed key ingredients, optional add-ins, and health benefits, too. You also got step-by-step instructions for blending and serving. I shared tips for a better smoothie experience and fun variations to try. Lastly, we covered storage options and answered common questions. Now, you can enjoy this smoothie and feel great with each sip.](https://mysavedrecipe.com/wp-content/uploads/2025/06/27d0b948-6aa1-49d5-a2e8-05c8f1836585.webp)
Looking for a refreshing drink that boosts your energy and health? Try my Turmeric Mango Sunrise Smoothie! This tasty blend
![- 2 cups strong brewed chai tea - 1 cup coconut milk - Sweeteners: Honey or maple syrup The main part of this frozen treat is the chai tea. I love using strong brewed chai for the best flavor. You can cool it down before mixing in other ingredients. The coconut milk adds creaminess and a nice tropical twist. Sweeteners like honey or maple syrup let you adjust the level of sweetness to your liking. - Pure vanilla bean paste or vanilla bean seeds - Ground spices: cinnamon, ginger, nutmeg Vanilla bean paste or seeds brings a rich flavor. It blends perfectly with the chai. Ground spices like cinnamon, ginger, and nutmeg add warmth and depth. These spices boost the flavor, making each bite exciting. You can mix and match to find what you enjoy most. - Whipped cream (optional) - Garnishes: Cinnamon stick, additional spices Toppings can enhance your Vanilla Bean Chai Freeze. Whipped cream adds a fluffy texture. You can sprinkle extra spices on top for a pretty finish. A cinnamon stick as a garnish not only looks nice but also adds more flavor. The choice is yours! For the full recipe, check out the complete guide. Enjoy making this refreshing dessert! - In a large mixing bowl, combine 2 cups of cooled chai tea, 1 cup of coconut milk, and 1/4 cup of honey or maple syrup. - Add 2 teaspoons of pure vanilla bean paste, 1/2 teaspoon of ground cinnamon, 1/4 teaspoon of ground ginger, and a pinch of ground nutmeg. - Whisk until all ingredients are blended. Make sure the mixture is smooth and creamy. You can adjust the sweetness by adding more honey or syrup if you want it sweeter. - Pour the mixture into a freezer-safe container. Spread it evenly to ensure it freezes well. - Cover the container with a lid or plastic wrap, and freeze for about 4 hours, or until solid but not rock hard. - Every hour, take a fork and scrape the mixture. This helps break up icy layers and makes the texture light and fluffy. Keep doing this until it is fully frozen and fluffy. - Once your Vanilla Bean Chai Freeze is ready, scoop it into bowls or glasses. - If you like, top with whipped cream and a sprinkle of cinnamon or nutmeg for extra flair. You can also add a cinnamon stick for a fun touch. This Vanilla Bean Chai Freeze is a refreshing dessert delight that everyone will love. To get the best texture, scrape the mixture often. This helps break up icy bits. Use a fork to scrape every hour while it freezes. This step makes your freeze fluffier. If the freeze is too hard, adjust your freezing time. You want it firm but easy to scoop. Taste your mix to see if it needs more sweetness. This is key for a great dessert. You can add more honey or syrup as needed. For a healthier twist, try natural sweeteners like agave or stevia. These give you control over the final taste. Serve your Vanilla Bean Chai Freeze in clear bowls. This shows off its lovely texture and color. For garnish, sprinkle cinnamon on top. A cinnamon stick adds a nice touch. This simple trick makes your dessert look fancy and fun. Check out the Full Recipe for more details on this delightful treat! {{image_2}} You can easily make the Vanilla Bean Chai Freeze dairy-free. Just switch the coconut milk for almond milk or oat milk. Both options keep the creamy texture. Almond milk lends a nutty flavor, while oat milk brings a smooth sweetness. Choose the one you like best for your taste buds. Want to get creative? Try adding chocolate or coffee to the mix. Both flavors pair well with chai spices. If you crave something spicier, think about cardamom, allspice, or even a hint of black pepper. A touch of these spices can give your freeze a fun twist. Experiment and find what you love! You can also make this dessert into popsicles or ice cream. Just pour the mixture into popsicle molds instead of a container. You can even mix in fruits like berries or banana slices. Chopped nuts add a nice crunch, too. This way, you can enjoy a variety of frozen treats, all with that lovely chai flavor. For the complete recipe, check the [Full Recipe]. To keep your Vanilla Bean Chai Freeze fresh, store leftovers in airtight containers. This prevents freezer burn and keeps flavors strong. I recommend using glass or plastic containers with tight lids. After filling, smooth the surface to remove air. It helps to label and date each container. This way, you can track how long it has been in the freezer. If you want to re-freeze, do it with care. Always let the dessert thaw in the fridge first. This helps maintain its taste and texture. After thawing, avoid refreezing more than once. The texture may change, becoming icy or grainy. You want your freeze to stay smooth and creamy. For the best taste and texture, enjoy your Vanilla Bean Chai Freeze within two months. After that, it may still be safe, but the flavors can fade. Look for signs of spoilage, like ice crystals or a strange odor. If it smells off or looks discolored, it's best to toss it. Keep your freeze delicious and fresh! Yes, you can use store-bought chai tea. It saves time and effort. However, it may not match the flavor of freshly brewed chai. Pre-made options can be too sweet or weak. Always check the label for spices and sweetness levels. If you use it, adjust the sweetener in the recipe. Freshly brewed chai gives a richer taste. It’s worth the extra step if you have time. Coconut milk adds creaminess and a subtle flavor. If you need a substitute, try almond milk. Almond milk offers a light taste but less creaminess. Oat milk is another option, giving a smooth texture. Soy milk works well too, adding protein but a different taste. Each milk alters the final flavor, so choose based on your preference. For the best results, freeze for about four hours. This time allows the mixture to become solid but not rock hard. I recommend scraping the mixture every hour. This helps break up icy layers. It creates a fluffier texture that makes it delightful to eat. Adjust freezing time if your freezer runs colder or warmer. You can add alcohol for an adult twist. Rum or bourbon pairs nicely with chai flavors. Use about a tablespoon per serving for a light touch. Add it to the mixture before freezing. This will keep it from freezing too hard. Just be cautious; too much can change the texture. Enjoy experimenting with flavors! The Vanilla Bean Chai Freeze combines the rich flavors of chai tea, coconut milk, and sweeteners. You can enhance it with vanilla, spices, and toppings like whipped cream. Remember to scrape the mixture often and adjust sweetness to your taste. Feel free to experiment with dairy-free options or unique flavors. Store your freeze correctly to keep it fresh. Enjoy this treat as a delightful summer dessert or a cozy winter pick-me-up. It's a fun recipe that you can make your own!](https://mysavedrecipe.com/wp-content/uploads/2025/06/38fc46f4-8a84-4e2d-9a26-d8dbb11a4085.webp)
Looking for a cool treat that’s bursting with flavor? The Vanilla Bean Chai Freeze is your answer! This delightful dessert
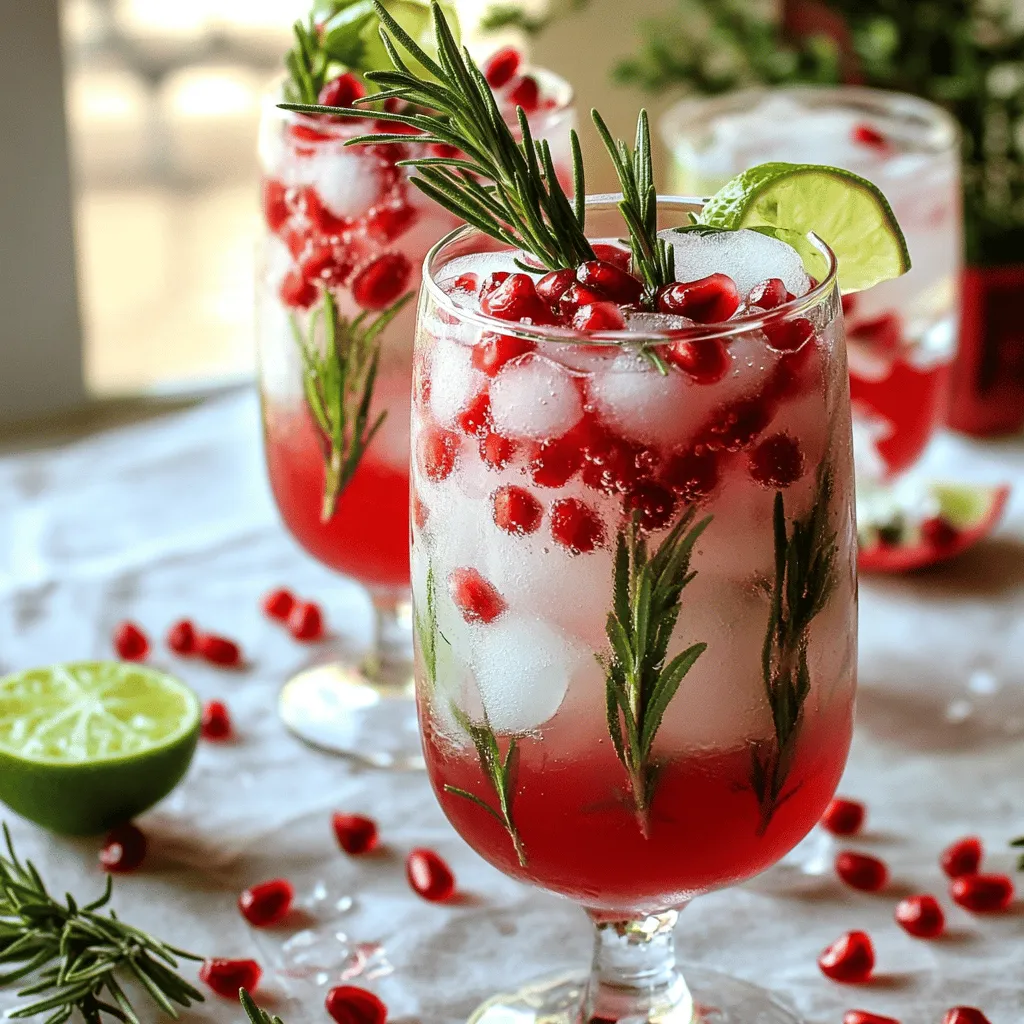
Looking for a drink that’s both refreshing and unique? The Pomegranate Rosemary Cooler is just what you need! With its
