Skip to content
DisclaimerTerms Of UseGDPR PolicyCookie Policy

My Saved Recipe

  • Home
  • Drinks
  • Appetizers
  • Dinner
  • Dessert
  • About
  • Contact
  • Privacy Policy
DisclaimerTerms Of UseGDPR PolicyCookie Policy

Savannah

- 2 cups cooked chicken breast - 1/2 cup pecans - 1/2 cup green grapes - 1/4 cup celery - 1/4 cup red onion - 1/2 cup Greek yogurt (or mayonnaise) - 1 tablespoon apple cider vinegar - 1 tablespoon honey - Salt and pepper to taste - Fresh parsley for garnish In this recipe, the main ingredients shine bright. You start with cooked chicken. I often use rotisserie chicken for ease. The pecans add a great crunch. Toast them for more flavor. The green grapes bring a sweet touch. Their juiciness balances the dish. Next, we add some crunch and flavor with celery and red onion. They give texture and a nice bite. For the creamy part, we use Greek yogurt or mayonnaise. I love Greek yogurt for its tangy taste and health benefits. Now, the seasoning is key. The apple cider vinegar and honey create a nice balance. Salt and pepper enhance all the flavors. Fresh parsley adds a pop of color and freshness. For the full recipe, refer to the earlier section. Get ready to mix these tasty ingredients and create a delightful salad! Start by gathering your ingredients. In a large bowl, combine 2 cups of cooked chicken breast, 1/2 cup of toasted and chopped pecans, 1/2 cup of halved green grapes, 1/4 cup of finely chopped celery, and 1/4 cup of finely chopped red onion. This mix brings a nice crunch and flavor. Next, prepare the dressing. In a small bowl, whisk together 1/2 cup of Greek yogurt, 1 tablespoon of apple cider vinegar, 1 tablespoon of honey, and salt and pepper to taste. This dressing adds creaminess and a hint of sweetness. Pour the dressing over the chicken mixture. Toss gently until all ingredients are coated evenly. Cover the bowl with plastic wrap and refrigerate for at least 30 minutes. This allows the flavors to blend nicely. Before serving, give the salad a gentle stir. You can garnish it with fresh parsley if you like. For a beautiful presentation, serve the salad on a bed of mixed greens or in hollowed-out tomato cups. This makes the dish look fancy while keeping it simple. Enjoy your Pecan Chicken Salad! To make your pecan chicken salad shine, start by adjusting seasoning to your taste. A pinch of salt can bring out the flavors. You might also want to add a dash of pepper or a squeeze of lemon. Using freshly toasted pecans adds a warm, nutty flavor. Toast them in a pan for a few minutes. Just watch closely, so they don’t burn. This step makes a big difference in taste. Want a quick meal? Use rotisserie chicken instead of cooking your own. This saves time and still tastes great. Just shred or chop it before mixing. You can also pre-chop your ingredients. Doing this in advance helps you throw the salad together fast. Chop celery, onion, and grapes, and store them in the fridge. For deeper flavor, let your salad chill longer in the fridge. This helps all the ingredients blend well. If you can, let it sit for an hour or more. Don’t be afraid to experiment with herbs. Adding dill or tarragon can add a fresh twist. These herbs give the salad a bright, lively taste. Enjoy crafting your own unique version of this dish! {{image_2}} You can switch things up by using different fruits. If you don’t have grapes, try using apples or cranberries. Both add a nice crunch and a sweet taste. You can also slice strawberries and mix them in for a fresh twist. The bright color and flavor of strawberries can make your salad pop! If you want to change the nuts, walnuts or almonds work great. They add a different flavor and texture to the salad. For a nut-free option, consider using sunflower seeds. They still give you that crunch without any nuts. Feeling adventurous with your dressing? Swap Greek yogurt for sour cream. This change gives a creamier texture and a different taste. You can also try using various vinegars, like balsamic, to add a unique flavor. Each option brings its own special touch to the dish. For the full recipe of this delightful salad, check out the [Full Recipe]. To keep your pecan chicken salad fresh, store it in an airtight container. This helps keep the flavors and moisture locked in. The salad is best eaten within 3-4 days. After that, the texture may change, and flavors can fade. I do not recommend freezing chicken salad. Freezing changes the texture of the chicken and other ingredients. If you want to meal prep, store the ingredients separately. This way, you can mix them fresh when you are ready to eat. Always check your salad for off smells. If it smells strange, it is best to toss it. Also, look for changes in texture. If the salad seems slimy or dry, do not eat it. When in doubt about freshness, discard the salad. Your health is more important! Yes, it can be prepared a day in advance. This dish tastes even better when the flavors mix overnight. Just store it in the fridge. When you're ready to serve, give it a quick stir. You can serve Pecan Chicken Salad with many sides. Here are some ideas: - Mixed greens for a fresh crunch. - Whole-grain bread for a hearty touch. - Crackers for a fun snack. - Sliced veggies for a healthy option. Pecan Chicken Salad is quite healthy. It has lean protein from chicken and healthy fats from pecans. A serving usually has around 300 calories, but this can vary. The Greek yogurt adds protein and less fat than mayonnaise. Plus, the grapes and veggies give you vitamins and fiber. You can easily adjust the recipe for dietary needs. For a gluten-free option, skip the bread. Use gluten-free crackers or veggies instead. If you want a low-carb dish, reduce the grapes or leave them out. You can also swap Greek yogurt with a dairy-free alternative. This blog post covered how to make a delicious pecan chicken salad. We explored main and additional ingredients, seasoning tips, and easy steps for prep. You learned about storage and ways to add your twist. For a tasty and healthy dish, feel free to mix ingredients or adjust flavors. With these tips, you can create a salad that suits your taste perfectly. Enjoy your cooking and the tasty meals that follow!

Pecan Chicken Salad Nutritious and Flavorful Dish

If you’re craving a meal that’s both tasty and healthy, look no further than pecan chicken salad! This dish packs

To make tasty Buffalo cauliflower bites, you need a few key items: - 1 medium head of cauliflower, cut into bite-sized florets - 1 cup all-purpose flour - 1 cup almond milk (or any plant-based milk) - 1 teaspoon garlic powder - 1 teaspoon onion powder - 1 teaspoon smoked paprika - 1/2 teaspoon salt - 1/2 teaspoon black pepper - 1 cup buffalo sauce (adjust to taste) - 2 tablespoons melted vegan butter (optional for extra richness) - Fresh parsley, chopped (for garnish) These ingredients work together to create a crispy and spicy snack. The batter coats each cauliflower piece, making it crunchy. The buffalo sauce adds heat and flavor. You can add more flavor with these choices: - A pinch of cayenne pepper for extra heat - 1 tablespoon of nutritional yeast for a cheesy taste - Chopped green onions for freshness Using these optional ingredients can boost the flavor profile. Feel free to adjust based on your taste. If you need substitutions, here are some ideas: - Use chickpea flour instead of all-purpose flour for a gluten-free option. - Swap almond milk for oat milk or soy milk if needed. - Try using hot sauce instead of buffalo sauce for a different kick. These alternatives keep the recipe tasty while meeting dietary needs. Always remember, cooking is about experimenting and finding what you love! For the complete recipe, check out the Full Recipe section. First, take a medium head of cauliflower. Cut it into bite-sized florets. This will help them cook evenly. Make sure the pieces are not too big. Smaller pieces get crispier and soak up more flavor. Rinse the florets under cold water to clean them. Pat them dry with a paper towel. The dryer they are, the better the batter will stick. In a large bowl, combine the flour, garlic powder, onion powder, smoked paprika, salt, and black pepper. Mix these dry ingredients well. This gives your cauliflower a great taste. Gradually pour in the almond milk. Whisk the mix until it’s smooth. There should be no lumps. This batter will coat the cauliflower and make it crispy when baked. Preheat your oven to 450°F (230°C) and line a baking sheet with parchment paper. Dip each cauliflower floret into the batter. Ensure they are fully coated. Place the coated florets onto the baking sheet. Bake them for 20 minutes or until they turn golden brown. While they bake, mix the buffalo sauce and melted vegan butter in a bowl. Once the cauliflower bites are crispy, toss them in the buffalo sauce. Make sure they are evenly coated. Return them to the baking sheet and bake for another 10-15 minutes. This will caramelize the sauce and add more flavor. Let them cool for a few minutes before serving. Enjoy your tasty Buffalo Cauliflower Bites! To make your Buffalo cauliflower bites super crispy, prep is key. First, coat the florets well in the batter. Make sure each piece is fully covered. Bake them at a high temperature, around 450°F (230°C). This high heat helps create that crunchy texture. Another trick is to flip the florets halfway through baking. This ensures even crisping on all sides. If you want them extra crispy, try adding a light sprinkle of cornstarch to the batter. It works wonders for the crunch! Balancing flavors is vital for tasty Buffalo cauliflower bites. The key is the buffalo sauce. If you love heat, go for a spicier sauce. If you prefer mild, choose a milder version. Mixing in some melted vegan butter with the sauce adds richness and depth. You can also adjust garlic and onion powder to fit your taste. A squeeze of lemon juice at the end brightens up the flavors. Serve your Buffalo cauliflower bites hot for the best taste. They shine on a platter garnished with fresh parsley. Pair them with creamy ranch or blue cheese dressing for dipping. These bites also work well as a side for veggie burgers or tacos. You can even toss them into a salad for a spicy kick. Explore different sauces to find your favorite pairing! {{image_2}} To kick up the heat, add cayenne pepper or hot sauce to your batter. You can also mix in some red pepper flakes for an extra kick. If you love spice, try using a hotter buffalo sauce. This will give your bites a fiery twist that spice lovers will enjoy. If you want to keep it vegan, you can use plant-based milk and vegan butter. There are many great options in stores. For the flour, consider using chickpea flour for a nutty taste. You can also try almond flour for a gluten-free version. These swaps keep the flavor while meeting dietary needs. You can cook these bites in an air fryer for a quick and healthy option. Set your air fryer to 400°F (200°C) and cook for about 15 minutes. Check them halfway, shaking the basket to ensure even cooking. Alternatively, you can fry them in oil for a crispy texture. Heat oil in a pan and fry until golden brown, then toss in the buffalo sauce. Each method brings a unique twist to the dish, so feel free to experiment! After enjoying your Buffalo Cauliflower Bites, let them cool. Place the leftovers in an airtight container. Store them in the fridge for up to three days. Make sure to keep them sealed to maintain their flavor and texture. To reheat, use an oven or an air fryer. Preheat your oven to 350°F (175°C). Spread the bites on a baking sheet. Heat for about 10 minutes. This will help restore their crispiness. If using an air fryer, set it to 350°F (175°C) and cook for about 5-7 minutes. Avoid microwaving, as it may make them soggy. You can freeze Buffalo Cauliflower Bites too! Place cooled bites in a single layer on a baking sheet. Freeze for about one hour. Once frozen, transfer them to a freezer bag. They can stay frozen for up to three months. When ready to eat, bake them straight from the freezer. This keeps them crispy and delicious. Yes, you can easily make Buffalo Cauliflower Bites gluten-free. Just swap regular flour for a gluten-free flour blend. Many brands offer great options that work well in this recipe. Look for blends made from rice flour or almond flour. These will hold the batter nicely without gluten. To boost the flavor of your cauliflower bites, add spices to the batter. Try mixing in cayenne pepper for heat or smoked paprika for a rich taste. You can also marinate the cauliflower in buffalo sauce before coating it. This extra step adds depth and makes each bite pop with flavor. The best dipping sauces for Buffalo Cauliflower Bites include ranch, blue cheese, or a creamy vegan dip. Ranch dressing pairs well with the spicy buffalo flavor. Blue cheese adds a tangy contrast. For a vegan option, mix cashew cream with herbs for a tasty dip. You can find the full recipe and all instructions for Buffalo Cauliflower Bites above. Enjoy making this easy and flavorful dish! Buffalo cauliflower bites are easy to make and full of flavor. We explored essential and optional ingredients, plus clever substitutions. The step-by-step guide helps you prepare and bake them for the best crunch. Remember the tips for crispiness and serving ideas to impress others. You can try various cooking styles and even store leftovers well. Enjoy these bites as a tasty snack or a fun party dish. Your kitchen will smell amazing, and everyone will want to try them!

Savory Buffalo Cauliflower Bites Easy and Flavorful Recipe

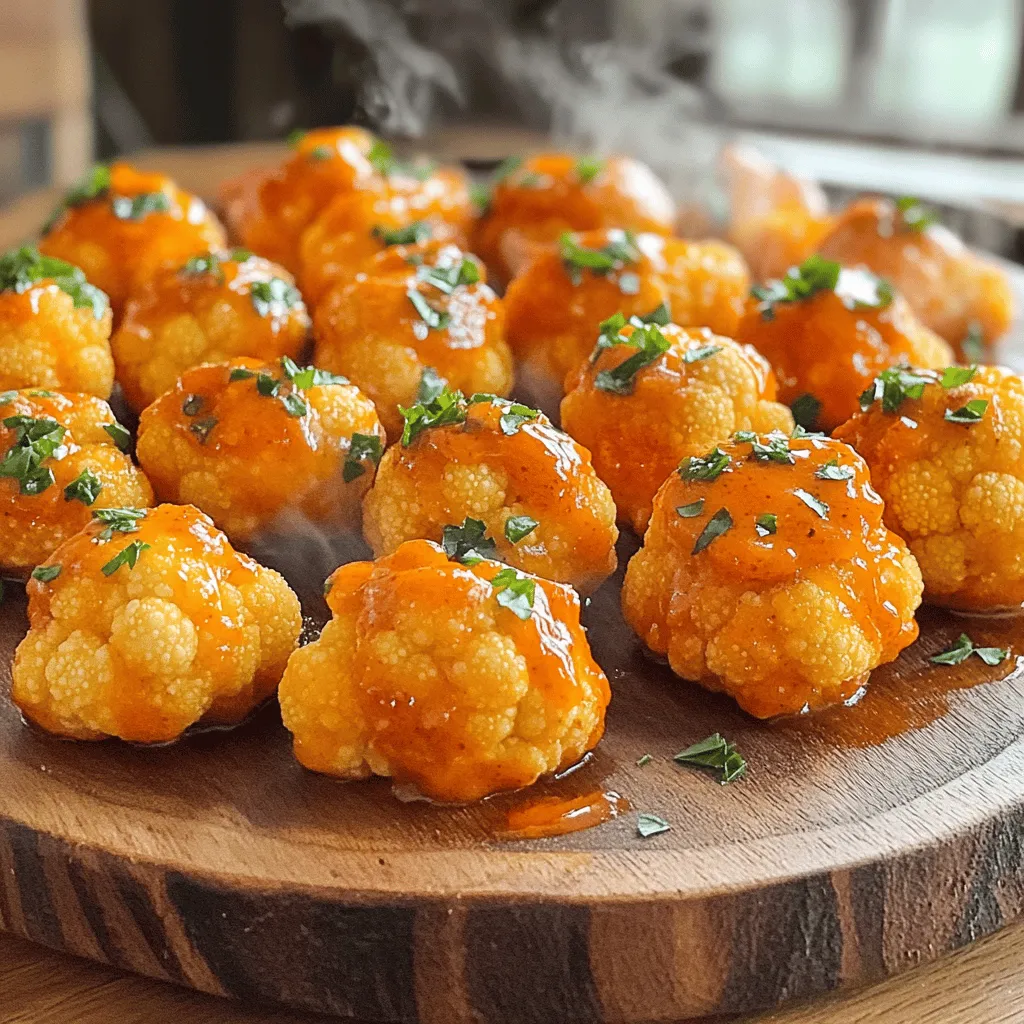
Are you ready for a tasty snack that’s both healthy and delicious? My Savory Buffalo Cauliflower Bites are easy to

- 4 large ripe peaches, peeled and sliced - 1 tablespoon lemon juice - 1 cup rolled oats - 1/2 cup all-purpose flour - 1/2 cup brown sugar, packed - 1/2 teaspoon ground cinnamon - 1/4 teaspoon nutmeg - 1/4 teaspoon salt - 1/3 cup unsalted butter, melted - 1/2 cup chopped walnuts (optional) - Vanilla ice cream or whipped cream, for serving (optional) For this peach crisp, fresh ingredients shine. Start with ripe peaches. They give the best taste and texture. The lemon juice adds a nice zing. It helps keep the peaches bright and fresh. Next, we move to the dry topping mix. Rolled oats give a hearty crunch. The all-purpose flour binds it all together. Brown sugar sweetens the mix, while cinnamon and nutmeg add warmth. Salt balances the flavors perfectly. Lastly, melted unsalted butter brings the topping to life. If you want more crunch, add walnuts. They give an extra layer of flavor. You can serve this peach crisp warm. Top it with vanilla ice cream or whipped cream for a treat. For the full recipe, check out the Peachy Delight Crisp. First, preheat your oven to 350°F (175°C). This step is key for even baking. While the oven heats up, prepare your peaches. Take four large ripe peaches, peel, and slice them into thin pieces. Next, place the peach slices in a bowl. Add one tablespoon of lemon juice and toss them gently. The lemon juice keeps the peaches fresh and bright. Now, it’s time to assemble your crisp. Grease a 9-inch baking dish with some butter. Spread the peach slices evenly in the dish. In another bowl, mix the dry ingredients for the topping. You will need one cup of rolled oats, half a cup of all-purpose flour, half a cup of brown sugar, half a teaspoon of ground cinnamon, a quarter teaspoon of nutmeg, and a quarter teaspoon of salt. Stir these together well. Next, pour in one-third cup of melted unsalted butter. Mix until the topping looks like coarse crumbs. If you want some extra crunch, fold in half a cup of chopped walnuts at this point. Sprinkle the oat topping evenly over the peach layer in the baking dish. This way, every bite will have that delicious oat crunch. Place the dish in the preheated oven. Bake for 30-35 minutes. Look for a golden brown top and bubbly fruit. This signals that your peach crisp is ready to enjoy! Once baked, let it cool a bit before serving. Enjoy your delightful peach crisp with a scoop of vanilla ice cream or whipped cream for that extra treat! To make the best peach crisp, use ripe peaches. They give great flavor and sweetness. If your peaches are very sweet, you might need less sugar. Taste them first to adjust the sugar to your liking. Check for doneness by looking for a golden top. You should also see the fruit bubbling. This means your crisp is ready. After baking, let it cool slightly. This helps the flavors blend well before serving. Serve your peach crisp warm. It tastes amazing with a scoop of vanilla ice cream or a dollop of whipped cream. For a fresh twist, pair it with a fruit salad. This adds bright flavors to the meal. Enjoy your delicious peach crisp! You can find the full recipe here: [Full Recipe]. {{image_2}} You can have fun with the fruit in your peach crisp. If you want a change, try nectarines instead of peaches. Both fruits taste great when baked. You can also mix in some berries. Blueberries or raspberries add a nice color and flavor. Another tasty option is to add summer fruits like cherries. They bring a sweet and tart balance to the dish. If you need a gluten-free version, swap all-purpose flour for almond flour. This keeps the crisp tasty and safe for those with gluten allergies. For a dairy-free option, use coconut oil instead of butter. It gives a nice flavor and keeps the topping crunchy. To boost the flavor, add a splash of vanilla or almond extract to the peach filling. This simple trick makes the dish smell and taste amazing. You can also add extra spices to the topping. A pinch of ginger gives it a warm kick. Try these tweaks to make your crisp even better. For the full recipe, check out the Peachy Delight Crisp. After you bake your peach crisp, let it cool down. This step is key! Once cool, cover the dish. Place it in an airtight container. You can store it in the fridge for up to 3 days. This keeps the crisp fresh and tasty. If you want to keep it longer, freeze your leftovers. Use an airtight container for freezing. Your peach crisp can last in the freezer for up to 2 months. When you want to eat it, the oven is your best friend for reheating. It helps keep that perfect texture. To thaw, move the frozen crisp to the fridge. Let it sit overnight. This makes sure it's ready to reheat. When you’re ready to enjoy it, preheat your oven to 350°F. Reheat until warmed through. This will make it taste just like fresh! Using canned peaches is possible. Just remember to drain and pat them dry. This helps avoid excess moisture in your peach crisp. Canned peaches can be sweet, so you might want to adjust the sugar in the recipe. This way, your dish stays balanced and delicious. To check if your crisp is done, look for a golden brown topping. You should also see juices bubbling up from the peaches. This means the fruit is soft and ready to eat. If it's not bubbly, give it a few more minutes in the oven. Yes, you can prepare the peach crisp a day before. Just cover it and store it in the fridge. When you are ready to serve, bake it just before you want to enjoy it. This makes it easy for gatherings or busy nights. If you don’t want to use walnuts, that’s okay! You can swap in pecans or almonds for a different crunch. If you prefer a nut-free version, simply leave them out. Your crisp will still taste great without them. This blog post covered how to make a delicious peach crisp. We went over fresh peaches, dry ingredients for the topping, and additional components. I shared easy steps for prepping, assembling, and baking your dessert to perfection. Remember, you can customize it with different fruits or dietary swaps. Finally, store leftovers properly to enjoy them later. With these tips, you’ll have a tasty treat that everyone will love. Enjoy your baking adventure!

Peach Crisp with Oat Topping Delightful and Easy Dish

There’s nothing quite like a warm Peach Crisp with Oat Topping to satisfy your taste buds. This dish combines sweet,

- 1 medium head of cauliflower, cut into florets - 2 tablespoons olive oil - 1 teaspoon cumin - 1 teaspoon smoked paprika - 1/2 teaspoon chili powder - 1/2 teaspoon garlic powder - Salt and pepper to taste - 8 small corn or flour tortillas - 1 cup fresh cilantro, chopped - 1 avocado, sliced - 1 cup red cabbage, shredded - 1 lime, cut into wedges To make these vegan cauliflower tacos, you need fresh and simple ingredients. First, you'll start with a medium head of cauliflower. Cut it into bite-sized florets. This is key for even cooking and great texture. Next, grab some olive oil. It helps the spices stick and adds flavor. Spices are crucial for taste. You will need cumin, smoked paprika, chili powder, and garlic powder. These give the tacos their warm and smoky flavor. Don't forget salt and pepper! They bring everything together. For the tacos, you can use either corn or flour tortillas. Both work well. Toppings are where you can get creative. I love fresh cilantro, creamy avocado, and crunchy red cabbage. They add color and taste. A squeeze of lime at the end gives a bright finish. These tacos are not just tasty; they are healthy too. Each serving has around 200 calories. You’ll get about 5 grams of protein and 8 grams of fat. Cauliflower is low in calories and high in fiber. It supports digestion and helps you feel full. Cauliflower is also packed with vitamins C and K. These are great for your immune system and bone health. Plus, this recipe is completely vegan. It fits well in plant-based diets. You can enjoy these tacos knowing they are good for you and the planet. For the complete recipe, check out the Full Recipe section. 1. Preheating and mixing ingredients: Start by preheating your oven to 425°F (220°C). This step ensures that the cauliflower gets crispy. In a large bowl, mix the cauliflower florets with olive oil, cumin, smoked paprika, chili powder, garlic powder, salt, and pepper. Toss well so each piece gets coated. 2. Roasting the cauliflower: Spread the cauliflower on a baking sheet lined with parchment paper. Roast for 25-30 minutes, flipping halfway. Look for a golden brown color. This gives the cauliflower a nice crunch. 3. Warming the tortillas: While the cauliflower roasts, heat a skillet over medium heat. Warm each tortilla for about 30 seconds on each side. This makes them soft and easy to fold. 1. How to layer ingredients: Once the cauliflower is ready, it’s time to build your tacos. Place a generous amount of roasted cauliflower in each tortilla. 2. Optimal portion sizes: Aim for about one-quarter cup of cauliflower per taco. This keeps them filled but not overflowing. 3. Presentation ideas: Top each taco with shredded red cabbage, avocado slices, and chopped cilantro. For a burst of flavor, squeeze a lime wedge over each taco. Serve them on a wooden platter with extra lime wedges and cilantro for a vibrant look. For the complete recipe, check the Full Recipe section. To make your cauliflower crispy, start with dry florets. Pat them with a towel. Toss them in olive oil and spices for great flavor. Use cumin and smoked paprika for warmth. Adjust the chili powder for heat. Roast the cauliflower at 425°F (220°C). Spread it in a single layer on a baking sheet. Flip the pieces halfway through cooking. This helps them brown evenly. Roast for 25-30 minutes until they are golden and crisp. Pair these tacos with fresh sides. Black beans or a mixed green salad work well. You can also serve them with rice for a filling meal. For drinks, try a light beer or sparkling water. A limeade or iced tea offers a nice touch too. You can customize these tacos for your taste. Add hot sauce for heat or guacamole for creaminess. If you like crunch, try topping with radishes or pickled onions. For the full recipe, check out the details above. Enjoy your culinary creation! {{image_2}} You can switch up the veggies in your tacos. Try sweet potatoes, zucchini, or bell peppers. Each one brings a new taste. For spices, consider adding your favorites. Try chili flakes for heat or oregano for earthiness. Mix and match to find what you love. If you need gluten-free options, corn tortillas work great. You can also use lettuce wraps for a fresh twist. Don’t stop at the basics. Add more veggies like diced tomatoes or jalapeños for crunch and flavor. You can also try sautéed mushrooms or grilled corn for extra taste. Sauces can elevate your tacos. Drizzle lime crema or a spicy salsa for a kick. A simple guacamole pairs well too. For a cheesy touch, use vegan cheese or cashew cream. It adds a creamy layer that enhances the flavor of your tacos. Explore these variations to make your vegan cauliflower tacos unique. Each change can create a new favorite dish. For the complete recipe, check the Full Recipe section. - Refrigerating cooked tacos: After you enjoy your vegan cauliflower tacos, store any leftovers in an airtight container. This keeps them fresh for up to three days. Make sure to separate the filling from the tortillas to prevent sogginess. - Freezing roasted cauliflower tips: You can freeze the roasted cauliflower for up to a month. Let it cool completely, then place it in a freezer-safe bag. Remove as much air as possible. When you're ready to eat, thaw it in the fridge overnight before reheating. - Best practices for keeping tortillas fresh: Store your tortillas in a sealed bag at room temperature if you plan to use them soon. For longer storage, place them in the fridge. This keeps them soft and ready for your next taco night. - How to rewarm tacos without losing texture: To reheat your tacos, use a skillet over medium heat. Heat them for about 2-3 minutes on each side. This helps keep the tortillas warm and crispy. - Microwaving versus oven reheating: If you're in a hurry, microwaving is quick but may make tortillas tough. For best results, use the oven. Preheat it to 350°F (175°C) and warm the tacos for about 10 minutes. This method keeps them nice and crunchy. If you want the full recipe for these tasty vegan cauliflower tacos, check out the Full Recipe section! How to make vegan cauliflower tacos? To make vegan cauliflower tacos, start by preheating your oven to 425°F (220°C). In a bowl, mix cauliflower florets with olive oil and spices. Bake the cauliflower for 25-30 minutes until crispy. Warm tortillas in a skillet, then fill them with the roasted cauliflower. Top with shredded cabbage, avocado, and cilantro. Finish with a squeeze of lime. For a detailed recipe, check the Full Recipe. Can these tacos be made in advance? Yes, you can prepare these tacos in advance. Roast the cauliflower and store it in the fridge. You can warm it up just before serving. You can also prepare toppings ahead of time. Just keep everything in separate containers. This way, you can assemble the tacos when you're ready to eat. What can I substitute for tortillas? If you want to substitute tortillas, you can use lettuce leaves for a low-carb option. You can also try rice paper wraps or whole grain wraps. Each option gives a different taste and texture. Choose what fits your meal best. Are vegan cauliflower tacos healthy? Yes, vegan cauliflower tacos are healthy. They are low in calories and high in nutrients. Cauliflower is a great source of fiber, vitamins, and minerals. The recipe uses healthy fats from olive oil and fresh toppings, making it a balanced option. What’s the protein content in this recipe? The protein content in vegan cauliflower tacos is moderate. Each serving provides about 5 grams of protein. The main protein sources are the cauliflower and any additional toppings you choose, like avocado or beans. If you want more protein, add legumes or tofu. We explored how to make delicious vegan cauliflower tacos from start to finish. We covered the main ingredients, like cauliflower and spices, and health benefits. You learned clear steps for preparation, assembly, and cooking tips to enhance flavor. The variations and storage tips will help you customize and keep your tacos fresh. No matter your taste, there's something for everyone. Enjoy experimenting with these recipes for tasty, healthy meals!

Vegan Cauliflower Tacos Yummy and Flavorful Delight

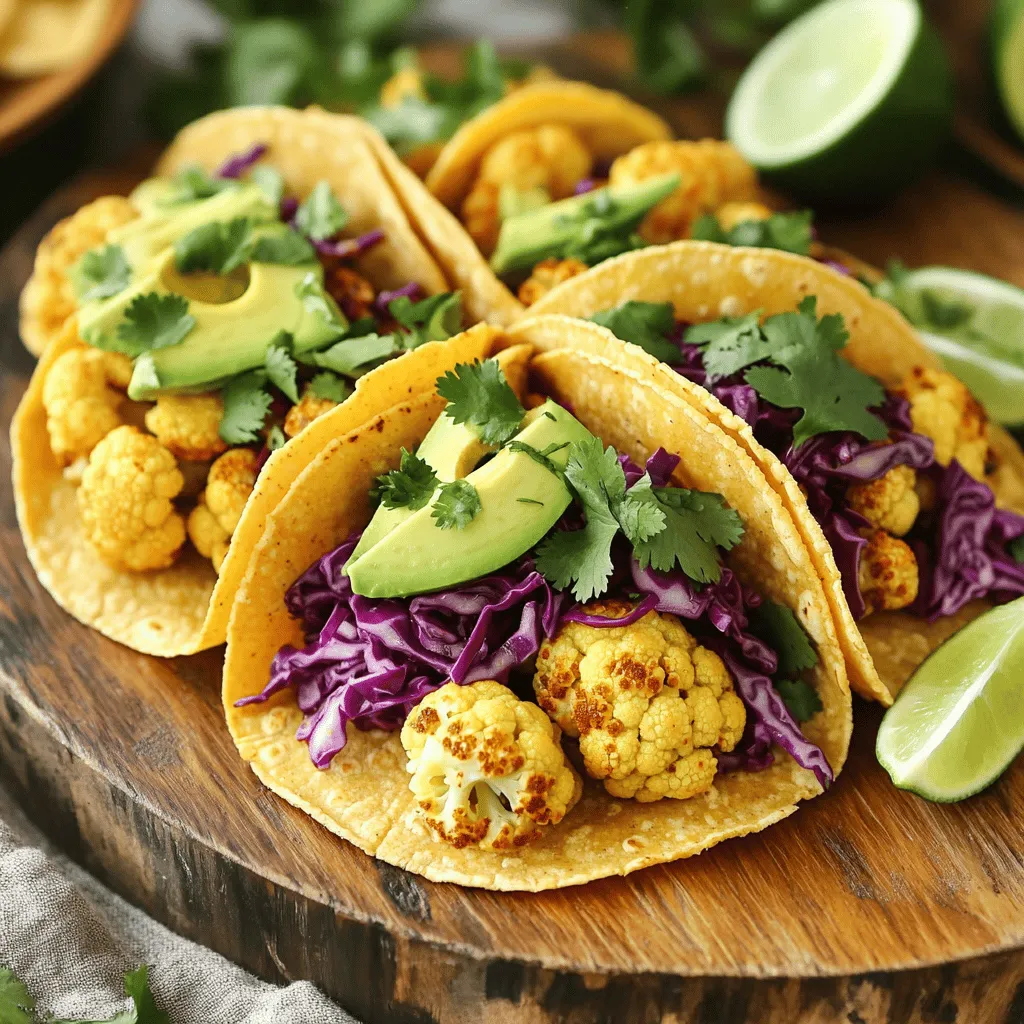
Looking for a tasty, plant-based meal that’ll wow your taste buds? Try my Vegan Cauliflower Tacos! This delightful recipe is

To make Lemon Basil Chicken Skewers, you will need: - 1 lb (450g) boneless chicken breast, cut into 1-inch cubes - 2 tablespoons olive oil - Zest and juice of 2 lemons - 1 teaspoon honey - 1 tablespoon Dijon mustard - 1 clove garlic, minced - 1 cup fresh basil leaves, chopped - Salt and pepper to taste - Wooden or metal skewers (if using wooden skewers, soak them in water for 30 minutes to prevent burning) If you don’t have some ingredients, you can swap them out. Use chicken thighs instead of breast for more flavor. You can replace olive oil with any neutral oil. If you want less acidity, use lime juice instead of lemon. Try maple syrup in place of honey for a different sweetness. You can also use dried basil if fresh is not available, but use less since dried is stronger. Want to make your skewers even better? Add cherry tomatoes, bell peppers, or zucchini to the skewers. These veggies add color and flavor. You could also sprinkle some red pepper flakes for a bit of heat. If you love cheese, feta crumbles make a great topping after grilling. For a tangy kick, drizzle some balsamic glaze over the finished skewers. Check the [Full Recipe] for more details on cooking these tasty treats! To start, gather your ingredients. In a large bowl, mix olive oil, lemon zest, lemon juice, honey, Dijon mustard, minced garlic, and chopped basil. Stir until everything blends well. This marinade is key for great flavor. The zest brings a bright taste, while the basil adds freshness. Next, cut your chicken breast into 1-inch cubes. Add these cubes to your marinade, tossing gently. Make sure each piece is well coated. Now, season with salt and pepper to your liking. Cover the bowl and let the chicken marinate in the fridge. Aim for at least 30 minutes, but longer, like 1 to 2 hours, will deepen the flavors. When you’re ready to grill, preheat your grill or grill pan to medium-high heat. If using wooden skewers, don’t forget to soak them for 30 minutes. Thread the marinated chicken onto the skewers, leaving space between pieces. This helps them cook evenly. Place the skewers on the grill once it’s hot. Grill for about 10 to 12 minutes, turning them often. Check the internal temperature; it should reach 165°F (75°C). After grilling, let them rest for a few minutes. This helps keep the chicken juicy and tender. For the full recipe, check out the complete list of steps to ensure a tasty grilled delight! To make the best marinade, use fresh ingredients. Fresh basil gives a bright taste. Use ripe lemons for zest and juice. The honey adds a touch of sweetness. Mix all the marinade ingredients well. Make sure the chicken cubes are fully coated. Marinate for at least 30 minutes. If you can, let it sit for 1-2 hours. This helps the flavors blend deeply into the chicken. Grill marks make your dish look great. Start with a hot grill to get those nice lines. Place the skewers on the grill and don't move them right away. Let them cook for about 3-4 minutes before turning. This helps form that perfect char. Use tongs to flip them gently. You want even cooking and nice marks on all sides. Always ensure your chicken is safe to eat. The internal temperature should reach 165°F (75°C). Use a meat thermometer to check this easily. If you see pink inside, it needs more time. Let the skewers rest for a few minutes after grilling. This helps the juices settle back into the meat. Enjoy your meal knowing it is safe and delicious! For the complete recipe, check out the Full Recipe. {{image_2}} You can switch the chicken for other proteins. Shrimp works well and cooks fast. Just marinate for about 15 minutes. You can also use cubed beef or pork. Choose lean cuts, like tenderloin, for the best results. Tofu is another great option if you want something plant-based. Firm tofu soaks up flavors well. For a tasty vegetarian skewer, use bell peppers, zucchini, and mushrooms. Cut them into bite-sized pieces. You can also add cherry tomatoes for a pop of color. Marinate these veggies in the same lemon basil mix. This gives them a bright flavor. Feel free to mix in some halloumi cheese for a bit of saltiness. To make the skewers even better, try adding spices. A pinch of red pepper flakes adds heat. You can also add a splash of soy sauce for a savory kick. Fresh herbs like parsley or cilantro can brighten the dish. Experiment with different citrus fruits, like lime or orange. Each one brings a unique taste to your meal. After cooking, let the skewers cool down. Place them in an airtight container. You can store them in the fridge for up to three days. If you have extra marinade, keep it separate. It can add flavor to your next meal. To reheat, use a microwave or an oven. If using a microwave, heat for one to two minutes. Check to make sure they are hot all the way through. If using an oven, preheat it to 350°F. Bake for about 10 minutes. This keeps the chicken juicy. You can freeze leftover skewers. Wrap them tightly in plastic wrap, then in foil. They will stay fresh for up to three months. When you are ready to eat, thaw them in the fridge overnight. Reheat as mentioned above. Enjoy your Lemon Basil Chicken Skewers again! For the full recipe, check out the details already provided. You should marinate the chicken for at least 30 minutes. For the best flavor, aim for 1 to 2 hours. This time allows the chicken to soak up the lemon and basil flavors. If you have time, marinating overnight works great too. Yes, you can use different herbs. Try parsley, cilantro, or oregano. Each herb brings a unique taste. If you change the herbs, adjust the other flavors to match. Experiment and find your favorite mix! These skewers pair well with many sides. A fresh summer salad is a great choice. Tzatziki sauce also works well for dipping. You can also serve them with grilled veggies or rice for a complete meal. Check the chicken's internal temperature. It should reach 165°F or 75°C. You can cut a piece in half to check for doneness. The meat should be white and juices should run clear. This ensures your chicken is safe and tasty. For the full recipe, check the [Full Recipe]. This article covered all you need for perfect Lemon Basil Chicken Skewers. We looked at ingredients, marinade prep, grilling tips, and storage info. You also learned about substitutions and variations. Enjoy making these skewers! You can adapt the flavors and keep leftovers fresh. Now, you’re ready to try new proteins or even vegetarian options. Cooking can be fun, so get creative!

Lemon Basil Chicken Skewers Tasty Grilled Delight

If you want a fun and tasty dish, look no further than my Lemon Basil Chicken Skewers! These skewers are
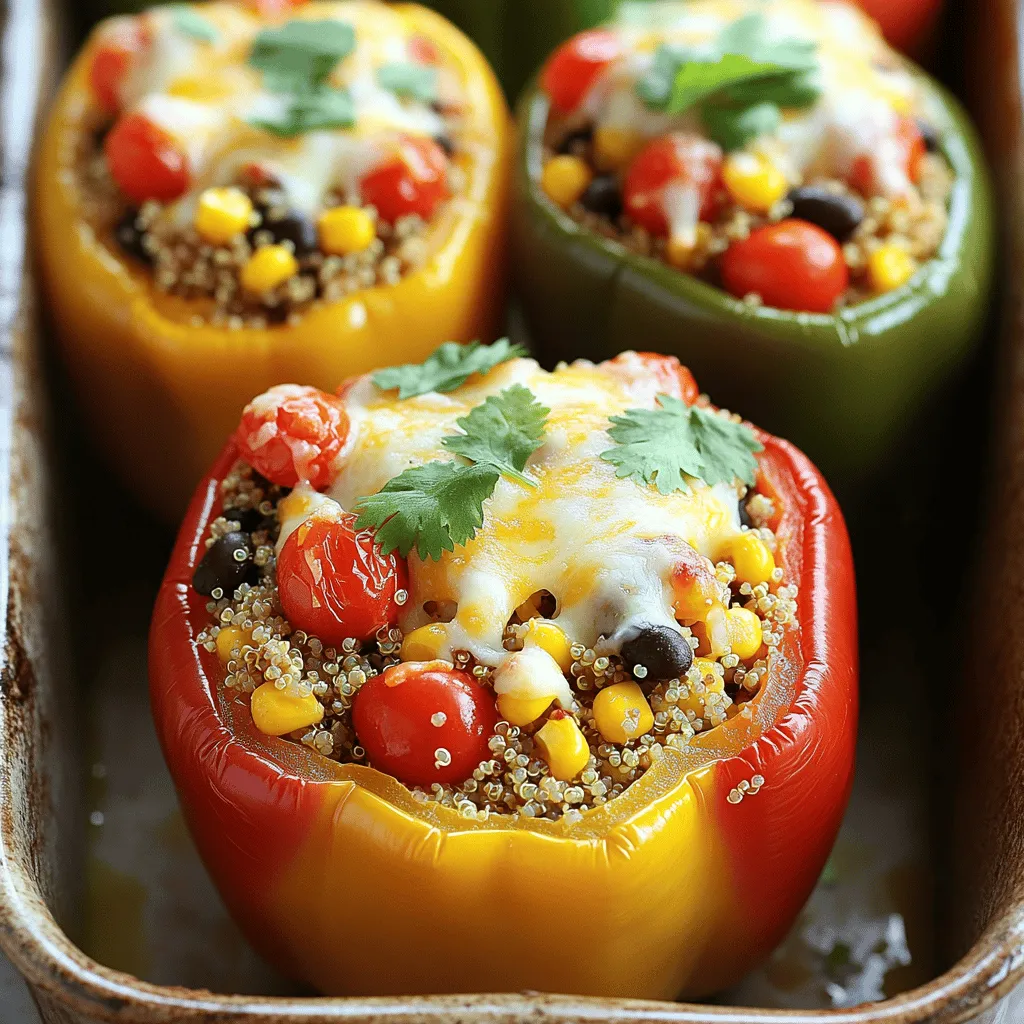
- 4 large bell peppers (any color) - 1 cup cooked quinoa - 1 can (15 oz) black beans, rinsed and drained - 1 cup corn kernels (fresh, frozen, or canned) - 1 small red onion, finely chopped - 2 cloves garlic, minced - 1 teaspoon cumin - 1 teaspoon smoked paprika - 1 teaspoon chili powder - 1 cup diced tomatoes (fresh or canned) - 1 cup shredded cheese (cheddar or Mexican blend) - Salt and pepper to taste - Fresh cilantro or parsley for garnish This dish is colorful and packed with flavor. The bell peppers come in many colors like red, yellow, and green. Each color adds a unique taste and looks great on your plate. Quinoa is a super grain that is high in protein. It makes the filling hearty. Black beans and corn add texture and sweetness. The spices like cumin and smoked paprika give this dish a warm kick. I like to use diced tomatoes for moisture and flavor. You can choose any cheese you love. Cheddar gives a sharp taste, while a Mexican blend adds a fun twist. Don’t forget to season your mix with salt and pepper. Fresh herbs like cilantro or parsley make it look fancy. For the full recipe with all the steps, check out the [Full Recipe]. - Preheat the oven to 375°F (190°C). - Cut the tops off the bell peppers and remove seeds. Start by preheating your oven. This step is key to getting that nice, tender pepper. Next, take your bell peppers and cut the tops off. Make sure to remove all the seeds and membranes inside. This will make room for your tasty filling. - Sauté red onion and garlic until fragrant. - Mix in cooked quinoa, black beans, and other ingredients. In a large skillet, heat some olive oil. Add the chopped red onion and minced garlic. Cook them for about three to four minutes. You want them to smell great and soften up. After that, stir in the cooked quinoa and black beans. Then add corn, tomatoes, cumin, smoked paprika, chili powder, salt, and pepper. Let this mix simmer for about five minutes. This helps all the flavors blend together. - Stuff each pepper with the quinoa mix. - Bake covered, then uncover to finish cooking. Now it’s time to stuff! Take your quinoa mix and fill each pepper tightly. Place the stuffed peppers upright in a baking dish. Once they’re all filled, sprinkle cheese on top. Cover the dish with foil and bake for 25 minutes. After that, remove the foil and bake for another 10 to 15 minutes. This will make the peppers tender and the cheese yummy and bubbly. For the full recipe, check out the details above. Choosing the right bell pepper makes a big difference. I prefer large, firm peppers. They hold the filling well and add nice color. Red, yellow, and orange peppers taste sweeter than green ones. You can mix colors for a beautiful dish. To avoid overcooked quinoa, cook it just right. Rinse the quinoa before cooking. This removes the bitter coating. Use a ratio of 1 part quinoa to 2 parts water. Bring it to a boil, then lower the heat. Simmer for about 15 minutes until the water is gone. Want more flavor? Add spices like oregano or thyme. A pinch of cayenne pepper gives a nice kick too. You can also try adding lime juice for a zesty twist. For cheese, think outside the box! Cheddar works great, but you can use feta for a tangy flavor. Goat cheese adds creaminess, while pepper jack gives a spicy touch. Experiment to find what you love. Stuffed bell peppers are great with sides. A fresh salad with vinaigrette complements them well. You might also enjoy serving them with rice or quinoa on the side. For garnishing, fresh herbs make a big impact. Sprinkle chopped cilantro or parsley on top. A dollop of sour cream or avocado adds creaminess and flavor. For the full recipe, check out the complete guide. {{image_2}} For a vegetarian meal, use plant-based cheese instead of regular cheese. This switch keeps your stuffed peppers creamy while staying meat-free. You can also add tofu or lentils for extra protein. Both options are healthy and very filling. Feel free to swap quinoa for other grains. Rice or farro works well too. If you want to change the veggies, try zucchini or mushrooms. They add a nice taste and texture. You can give your stuffed peppers a Mediterranean twist. Add feta cheese or olives for a salty bite. For a Southwestern style, mix in jalapeños or chipotle for some heat. Each variation brings new life to this dish. Check out the Full Recipe for ideas on how to mix it up! To keep your stuffed peppers fresh, place them in an airtight container. They stay good in the fridge for about 3 to 5 days. Make sure they cool down completely before sealing. This helps keep moisture out and keeps them tasty. If you want to freeze stuffed peppers, first let them cool. Wrap each pepper tightly in plastic wrap. Then, put them in a freezer bag or container. They can last up to 3 months in the freezer. For reheating, you can bake them from frozen. Preheat your oven to 375°F (190°C) and bake for about 30 to 40 minutes. This way, they warm up evenly. You can also microwave them for a quicker option, but they might not be as crispy. With these tips, you can enjoy your stuffed bell peppers with quinoa anytime! For the full recipe, check out the details above. Yes, you can prepare stuffed bell peppers ahead of time. Simply make the filling and stuff the peppers. Store them in the fridge for up to 24 hours. When ready to cook, just bake them as usual. This saves you time on busy days. The peppers are done when they are tender and the cheese is melted. You can check by gently poking them with a fork. If they feel soft and give easily, they are ready to eat. The cheese should be bubbly and golden. Absolutely! You can replace quinoa with rice, couscous, or even lentils. Each option adds its own flavor and texture. Just make sure to adjust the cooking time if needed. The key is to fill the peppers with something hearty. Stuffed bell peppers with quinoa are very nutritious. Each serving is rich in protein, fiber, and vitamins. Quinoa adds amino acids, while beans boost fiber. Bell peppers are low in calories, high in vitamin C, and full of antioxidants. It’s a well-rounded meal. Yes, stuffed peppers are gluten-free. The main ingredients, like quinoa and vegetables, contain no gluten. Just be sure to check any canned goods or added ingredients for gluten. This makes them a great option for those with gluten sensitivities. For a detailed recipe on how to make these delicious stuffed bell peppers, check the Full Recipe above. Stuffed peppers are a fun and healthy dish. We covered ingredients, steps, and helpful tips. You can make them vegetarian or vegan, too. Don't forget to try different flavors and variations! Proper storage keeps leftovers fresh for future meals. Enjoy exploring new ways to make this dish your own. Cooking should be simple and fun. Now, you can impress family and friends with tasty stuffed peppers. Get started today and enjoy your cooking journey!

Stuffed Bell Peppers with Quinoa Healthy and Filling

Are you looking for a healthy and filling dish that brings flavor to your table? Stuffed bell peppers with quinoa

To make delicious cinnamon roll pancakes, you need some pantry staples. Here’s what you need: - 1 cup all-purpose flour - 2 tablespoons granulated sugar - 1 teaspoon baking powder - 1/2 teaspoon baking soda - 1/2 teaspoon salt - 1 cup buttermilk (or 1 cup milk + 1 tablespoon vinegar) - 1 large egg - 2 tablespoons unsalted butter, melted For the cinnamon filling, gather these optional ingredients: - 2 tablespoons ground cinnamon - 1/4 cup brown sugar To top your pancakes, use these recommended ingredients for icing: - 1/4 cup cream cheese, softened - 1/2 cup powdered sugar - 1 tablespoon milk (for icing) - 1 teaspoon vanilla extract These ingredients come together to create a warm, sweet, and creamy breakfast treat. You can find the full recipe above to guide you through the process of making these tasty pancakes. Enjoy! To start, we need to prep our dry ingredients. In a big bowl, mix together: - 1 cup all-purpose flour - 2 tablespoons granulated sugar - 1 teaspoon baking powder - 1/2 teaspoon baking soda - 1/2 teaspoon salt Whisk them until they blend well. This step is key for fluffy pancakes. Next, let's combine our wet ingredients. Grab another bowl and mix: - 1 cup buttermilk (or 1 cup milk + 1 tablespoon vinegar) - 1 large egg - 2 tablespoons unsalted butter, melted Stir these together until they're smooth. Pour the wet mix into the dry mix. Stir gently. Don’t overmix; a few lumps are okay. Now, we make the cinnamon-brown sugar mixture. In a small bowl, mix: - 2 tablespoons ground cinnamon - 1/4 cup brown sugar This mix will add a sweet swirl to your pancakes. For cooking, the right heat is crucial. Heat your non-stick skillet or griddle over medium heat. Lightly grease it with butter or oil to prevent sticking. Pour about 1/4 cup of batter onto the skillet. Before it sets, sprinkle a teaspoon of the cinnamon-brown sugar mix on top. This creates that delicious cinnamon roll swirl. When you see bubbles form on the surface, it’s time to flip the pancake. Cook for another 1-2 minutes until it's golden brown. This ensures even cooking on both sides. Repeat with the rest of the batter. Now, let’s make the icing to top off our pancakes. You’ll need: - 1/4 cup cream cheese, softened - 1/2 cup powdered sugar - 1 tablespoon milk - 1 teaspoon vanilla extract In a small bowl, mix these ingredients until smooth. You want a creamy texture for drizzling. For a nice presentation, use a spoon to drizzle the icing over the stacked pancakes. This will make your dish look as good as it tastes. Enjoy your cinnamon roll pancakes! For the complete recipe, check out the Full Recipe. To make your pancakes fluffy, start by using fresh baking powder. Old baking powder can ruin your rise. Measure your ingredients accurately. A little too much flour can make pancakes dense. Mix wet and dry ingredients separately first. Then, combine them gently. Overmixing leads to tough pancakes. Just stir until you see a few lumps. One big mistake is overmixing the batter. This can make your pancakes chewy instead of fluffy. Another common issue is burning the pancakes. Keep your heat at medium, and check regularly. If the edges brown too fast, turn down the heat. A non-stick skillet helps prevent sticking and burning. For the icing, start with cream cheese and powdered sugar. If it's too sweet, add a bit more milk to balance it. You can also try yogurt or maple syrup for a twist. Drizzle your icing over warm pancakes for the best effect. A light hand with the icing makes for a beautiful presentation. {{image_2}} You can easily boost the flavor of your cinnamon roll pancakes. Adding a splash of vanilla makes them taste richer. Try mixing in a pinch of nutmeg for a warm spice kick. Fruits also work great. Thinly sliced apples add sweetness and texture. Bananas bring a soft and creamy element. Both options make your pancakes extra special. If you need a gluten-free version, swap the all-purpose flour for gluten-free flour. Many blends work well, so pick one you like. This simple change keeps the taste while being friendly for those with gluten sensitivities. Consider other dietary needs too. You can use dairy-free milk instead of buttermilk for a vegan option. This way, everyone can enjoy these delicious pancakes. When it comes to toppings, the sky's the limit! Chopped nuts add crunch and flavor. Fresh berries like strawberries or blueberries can brighten up your plate. Don’t forget about syrups! Maple syrup is a classic choice, but other flavors can shine too. Try caramel or chocolate syrup for a sweet twist. Each of these ideas can make your breakfast even more fun and inviting. For the full recipe, check out the [Full Recipe]. To keep your cinnamon roll pancakes fresh, let them cool completely at room temperature. Place them in an airtight container. This keeps the moisture in. You can also use plastic wrap to cover them tightly. Store the container in the fridge for up to three days. When you're ready to enjoy leftovers, reheat them in a non-stick skillet over low heat. This warms them gently and keeps them soft. You can also use a microwave, but cover the pancakes with a damp paper towel. This prevents them from drying out. If you're serving a crowd, keep the pancakes warm in a low oven while you finish cooking. To freeze pancakes, stack them with parchment paper between each one. This stops them from sticking together. Place the stack in a freezer bag or a tight container. They last for up to two months. When you're ready to eat, thaw them in the fridge overnight. Reheat as mentioned before, and enjoy your tasty treat again! For a full experience, check out the full recipe. Yes, you can make these pancakes ahead. To prepare, cook the pancakes and let them cool. Place the pancakes in a single layer, separated by parchment paper, in an airtight container. Store them in the fridge for up to three days. If you want to keep them longer, freeze the pancakes for up to three months. To reheat, just pop them in the toaster or microwave until warm. This way, you have a tasty breakfast ready in no time! If you don’t have buttermilk, you can easily replace it. Mix one cup of milk with one tablespoon of vinegar or lemon juice. Let it sit for five minutes, and it will thicken. You can also use plain yogurt or sour cream, thinning them with a bit of water or milk. These substitutes work well in the recipe and keep the pancakes tasty and fluffy. To make the pancakes vegan, swap the egg for one tablespoon of ground flaxseed mixed with three tablespoons of water. Let it sit for five minutes to thicken. Use plant-based milk, like almond or soy, instead of buttermilk. Replace the melted butter with coconut oil or a vegan butter substitute. These changes keep the flavor rich and the texture light. Yes, there is a big difference! Regular pancakes are light and fluffy. They have a simple taste. On the other hand, cinnamon roll pancakes have a swirl of cinnamon and sugar in the batter. This gives them a sweet, warm flavor. The texture is slightly denser, richer, and more indulgent, making them a special treat. You’ll enjoy the sweet icing drizzled on top, which adds even more flavor! You learned how to make delicious cinnamon roll pancakes from scratch. We covered essential ingredients, step-by-step cooking, and tips for perfect results. Variations, storage, and common questions helped you gain confidence in the kitchen. Remember, measure well, and don’t rush the cooking. The right heat is key to fluffy pancakes. Experiment with flavors and have fun serving them. Enjoy these pancakes with your favorite toppings or as a cozy treat any time. Happy cooking!

Cinnamon Roll Pancakes Irresistible Morning Treat

Imagine waking up to the sweet, warm aroma of cinnamon rolls but in pancake form! Cinnamon Roll Pancakes are an

To make a colorful and tasty Rainbow Veggie Quinoa Salad, you need: - 1 cup quinoa, rinsed and drained - 2 cups vegetable broth (or water) - 1 cup cherry tomatoes, halved - 1 cup cucumber, diced - 1 bell pepper (any color), diced - 1 cup shredded carrots - 1/2 cup red cabbage, thinly sliced - 1/4 cup fresh parsley, chopped - 1/4 cup feta cheese, crumbled (optional for a vegan option) - 1/4 cup olive oil - 3 tablespoons lemon juice - 1 teaspoon garlic powder - Salt and pepper to taste If you have dietary needs, you can easily change this recipe. For a vegan version, skip the feta cheese or use a plant-based alternative. Quinoa is naturally gluten-free, making it a safe choice for those with gluten issues. You can swap the vegetable broth for water if that's what you have at home. Fresh ingredients make a big difference in this salad. They add vibrant colors and bright flavors. Fresh veggies also provide essential nutrients. When you use fresh produce, you boost the salad's taste and health benefits. Always choose the best quality ingredients you can find. This makes your meal not just tasty, but also good for you. Enjoy the burst of flavors in every bite! To start, bring 2 cups of vegetable broth or water to a boil in a medium saucepan. Once boiling, add 1 cup of rinsed quinoa. Reduce the heat to low and cover the pot. Cook for 15 to 20 minutes. The quinoa is done when it is fluffy and has absorbed all the liquid. Remove it from the heat and let it cool a bit. While the quinoa cooks, you can chop your veggies. Take 1 cup of cherry tomatoes and cut them in half. Then, dice 1 cucumber and 1 bell pepper. Shred 1 cup of carrots and slice 1/2 cup of red cabbage thinly. Finally, chop 1/4 cup of fresh parsley. Place all these veggies into a large mixing bowl. This mix adds a rainbow of colors to your salad. In a small bowl, whisk together 1/4 cup of olive oil, 3 tablespoons of lemon juice, 1 teaspoon of garlic powder, and some salt and pepper to taste. This dressing brings all the flavors together. Once the quinoa has cooled, add it to the bowl with the veggies. Pour the dressing on top and toss gently. Make sure everything is evenly coated. If you like, fold in 1/4 cup of crumbled feta cheese for creaminess. Enjoy your fresh and flavorful Rainbow Veggie Quinoa Salad! You can find the full recipe above. Best practices for cooking quinoa To cook perfect quinoa, rinse it first. This removes the bitter coating. Use two cups of liquid for each cup of quinoa. Bring the liquid to a boil before adding the quinoa. Lower the heat, cover, and let it simmer. Cook for about 15-20 minutes. Once done, fluff it with a fork and let it cool. This keeps the quinoa light and airy. How to customize your salad with seasonal vegetables You can switch up the veggies as the seasons change. In spring, try adding peas or asparagus. In summer, swap in zucchini or sweet corn. Fall is great for roasted squash or beets. In winter, use hearty greens like kale or Brussels sprouts. Feel free to mix and match. This keeps your salad fresh and exciting. Presentation tips for an attractive serving Make your salad pop with color. Use a large bowl or individual plates. Layer the ingredients for a beautiful look. Garnish with fresh parsley or a lemon slice. You can also sprinkle some feta on top for added flair. A colorful salad not only tastes great but looks amazing too. Serve it chilled for the best flavor. Check out the Full Recipe for more details! {{image_2}} You can easily add protein to your Rainbow Veggie Quinoa Salad. Chicken works great here. Use grilled chicken for a tasty boost. Simply chop it into bite-sized pieces and mix it in. Chickpeas are another fantastic option. They add a nice texture and flavor. Just rinse a can of chickpeas and toss them in. They are also a great source of plant-based protein. To keep it vegan, consider adding black beans or lentils. Both options are full of protein and add a nice heartiness. The dressing can change the whole vibe of your salad. Try a balsamic vinaigrette for a tangy twist. Just mix balsamic vinegar with olive oil, salt, and pepper. For a creamy option, use a yogurt-based dressing. Combine plain yogurt, lemon juice, and garlic for a fresh taste. If you want a kick, try a spicy sesame dressing. Mix sesame oil, soy sauce, and a dash of chili flakes for a bold flavor. You can even make a citrus dressing with orange juice and olive oil. This will add a sweet and zesty note to the dish. Toppings can make your salad even more exciting. Add nuts like almonds or walnuts for a nice crunch. Just chop them roughly and sprinkle on top. Seeds like sunflower or pumpkin seeds add extra nutrition. They also give a nice texture. Just toss a handful over the salad before serving. If you want a burst of flavor, add some sliced olives or pickled jalapeños. They bring a salty and tangy taste that pairs well with the veggies. Lastly, consider adding fresh herbs like basil or cilantro. They add a fragrant touch and enhance the overall flavor. For the full recipe, check out the Rainbow Veggie Quinoa Salad details. To keep your Rainbow Veggie Quinoa Salad fresh, store it in an airtight container. Make sure to keep it in the fridge. The salad stays good for up to three days. If you notice any moisture, drain it before sealing. This helps prevent sogginess. Meal prepping this salad is easy and fun. Cook your quinoa and let it cool. Chop the veggies and mix them in a bowl. Keep the dressing separate until you are ready to eat. This keeps everything crisp and fresh. You can store the components in the fridge for up to five days. This salad tastes great cold, so there is no need to reheat it. If you prefer a warm dish, you can warm the quinoa slightly before adding it. Just remember, adding hot quinoa to fresh veggies can make them wilt. So, if you heat it, serve right away. Enjoy the bright colors and flavors! For the full experience, check out the Full Recipe. The best dressing is a mix of olive oil and lemon juice. This blend adds bright flavor. I also like to add garlic powder, salt, and pepper. This simple dressing brings out the taste of the veggies. You can adjust the lemon juice for more zing or add herbs for extra flavor. Yes, you can make this salad ahead of time. It tastes great after it sits a while. Just cover it and keep it in the fridge. The flavors blend nicely, making it even tastier. I suggest waiting to add feta cheese until you serve it. This keeps it fresh. The salad lasts about three to five days in the fridge. Store it in a sealed container. If you notice the veggies getting soggy, eat it sooner. Always check for freshness before eating leftovers. You want to enjoy every bite! Quinoa is very healthy. It is high in protein and fiber. This makes it great for your diet. Quinoa also contains many vitamins and minerals. Eating quinoa can help with digestion and keep you full. It is a perfect base for salads and bowls. Yes, you can use other grains if you like. Brown rice, farro, or bulgur will work well. Each grain has a different taste and texture. Experiment to see what you enjoy best. Just remember to adjust cooking times based on the grain you choose. For the full recipe, check out the complete guide. This blog post covers all you need for a Rainbow Veggie Quinoa Salad. We explored fresh ingredients for flavor and nutrition, step-by-step cooking tips, and ways to customize your salad. I shared storage tips to keep leftovers fresh and answered common questions about the salad. Try making this salad your own with different veggies or dressings. Remember, the key is fresh ingredients and presentation. Enjoy creating a vibrant dish that’s good for you!

Rainbow Veggie Quinoa Salad Fresh and Flavorful Dish

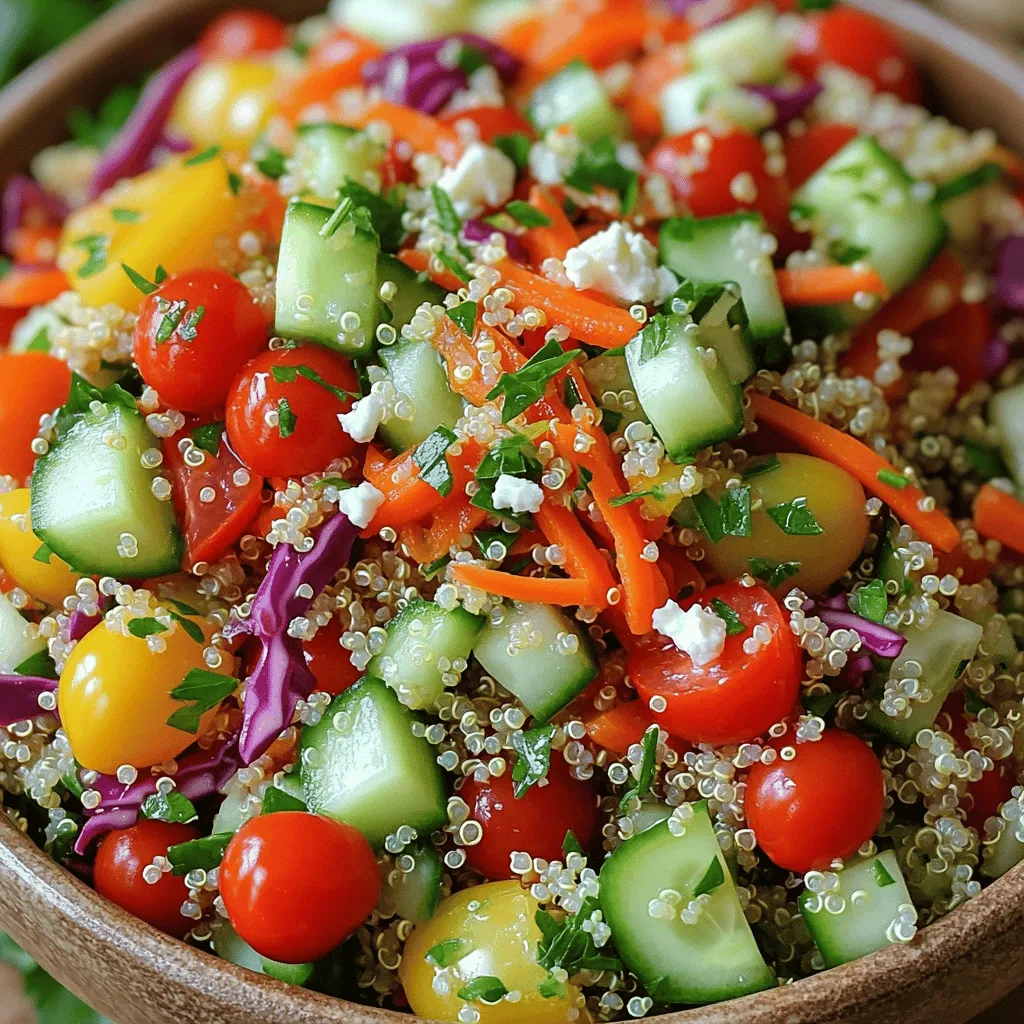
Looking for a fresh and flavorful dish that packs a colorful punch? Today, I’ll show you how to make a

- 1 cup semi-sweet chocolate chips - 1 cup mini marshmallows - 1 tablespoon unsalted butter - 1/2 teaspoon vanilla extract - 1/4 cup crushed graham cracker crumbs These simple ingredients make S'mores Dip easy and fun. First, you need chocolate chips. They give the dip its rich taste. Then, mini marshmallows add that sweet, gooey texture we all love. The butter helps everything melt smoothly together. Don’t forget the vanilla extract for a hint of flavor. Finally, crushed graham cracker crumbs provide a great crunch on top. - Graham crackers - Pretzels - Fruit slices (strawberries, bananas) Now, let’s talk about what to dip! Graham crackers are classic and perfect for this dip. They soak up the chocolate and marshmallow goodness. Pretzels offer a fun twist. Their salty crunch complements the sweet dip well. If you want something fresh, try fruit slices. Strawberries and bananas add a nice, fruity bite. You can mix and match these options for a great snack. For the full recipe, check out S'mores Dip Delight. First, preheat your oven to 350°F (175°C). This step ensures your dip bakes evenly. While the oven warms up, choose the right baking dish. I like to use a medium oven-safe skillet. It makes serving easy and keeps the dip warm. Next, melt the butter in your skillet over medium heat. Once it’s nice and melted, remove the skillet from heat. Now, add 1 cup of semi-sweet chocolate chips. Stir until the chocolate is smooth and fully melted. This is where the magic happens! To enhance the flavor, mix in 1/2 teaspoon of vanilla extract. This gives the dip a lovely depth. Now for the fun part! Evenly spread 1 cup of mini marshmallows over the melted chocolate mixture. Make sure they cover the chocolate well for that gooey texture. Then, sprinkle 1/4 cup of crushed graham cracker crumbs on top. This adds a delightful crunch. Place the dish in your preheated oven and bake for about 10-12 minutes. You want the marshmallows to turn golden and slightly toasted. Keep an eye on them; they can brown quickly! Once done, let it cool for a minute. Serve it hot with graham crackers, pretzels, or fruit slices. Enjoy this warm and gooey treat! For the full recipe, check out the section above. To make the best S'mores dip, focus on the consistency. You want it smooth and creamy. Melt the chocolate chips and butter together well. Stir until it is silky and free of lumps. This step is key to a great dip. For the marshmallows, an even toast makes a big difference. Spread them out evenly on top of the chocolate. This way, they all brown nicely. If you pile them too high, some may burn while others stay white. Serving this dip can be fun! You can use a cast-iron skillet for a rustic look. It keeps the dip hot longer. If you want something fancier, use a decorative bowl. This adds charm to your table. Get creative with garnishes, too! Try adding a drizzle of chocolate syrup on top. Some crushed graham crackers can also add texture. Fresh berries or mint leaves can brighten up the look. Watch out for overbaking the dip. Keep an eye on the marshmallows. They should turn golden brown, not burnt. If you leave them in too long, they can harden and lose their gooeyness. Also, be careful with your ingredient ratios. Too much chocolate can make it too sweet. If you don't use enough marshmallows, the dip won't have that classic S'mores taste. Stick to the Full Recipe for the best results. {{image_2}} You can change up the flavor of your S'mores dip easily. Adding peanut butter or Nutella gives it a rich, creamy taste. Just swirl it into the melted chocolate for a fun twist. You can also use different types of chocolate. Milk chocolate is sweet, while dark chocolate offers a deeper flavor. White chocolate makes it extra creamy and sweet. If you need gluten-free options, look for gluten-free graham crackers. Many brands now offer these. You can still enjoy the same great taste without gluten. For vegan substitutions, use dairy-free chocolate and marshmallows. Coconut oil works great instead of butter. These swaps let everyone enjoy the dip. You can make your S'mores dip fit the seasons. In the fall, add pumpkin spice for a cozy flavor. Just mix some pumpkin spice into the melted chocolate. During the holidays, try using peppermint extract. This adds a festive touch that everyone will love. These twists keep the dip exciting all year round. If you have leftover S'mores dip, don't worry! You can save it for later. First, let the dip cool down to room temperature. Then, scoop it into an airtight container. Make sure the lid seals tightly. This helps keep moisture in and air out. Store it in the fridge for up to three days. If you want to keep it longer, you can freeze it. Just remember to use a freezer-safe container. It can last for about a month in the freezer. When it's time to enjoy your dip again, reheating it is easy. The best way is to use the oven. Preheat your oven to 350°F (175°C). Transfer the dip to an oven-safe dish if needed. Cover it with foil to keep it from drying out. Bake for about 10 minutes or until warm. You can also use the microwave. Just heat it in short bursts of 20 seconds. Stir in between to keep the dip smooth. Enjoy the gooey goodness again! Yes, you can prepare S'mores Dip ahead of time! To do this, follow these steps: - Prep the dip: Make the dip up to the baking step. - Cool it down: Let the dip cool completely. - Store it: Cover it well and place it in the fridge for up to 24 hours. - Bake before serving: When ready, bake it at 350°F (175°C) for about 10-12 minutes. This way, you save time and enjoy warm dip when guests arrive! If you need alternatives to graham crackers, here are some tasty options: - Pretzels: Their salty crunch pairs well with sweet dip. - Fruit slices: Strawberries and bananas add a fresh twist. - Cookies: Try chocolate chip or digestive biscuits for extra flavor. These options give a fun twist to your S'mores experience! S'mores Dip can last in the fridge for about 3 days. Here are some tips for storage: - Use an airtight container: This keeps the dip fresh longer. - Check for freshness: If it smells off or looks strange, throw it away. Always ensure food safety to enjoy your dip safely! In this post, we explored how to make a delicious S'mores dip. We covered the key ingredients, step-by-step instructions, and tips for a perfect result. Remember to choose your dips wisely and avoid common mistakes. Get creative with flavors and storage methods, and you'll have a crowd-pleaser. Making this dip can be fun and rewarding. Enjoy the process and share your tasty creation with friends and family. It's a treat everyone will love!

S’mores Dip with Chocolate and Marshmallows Delight

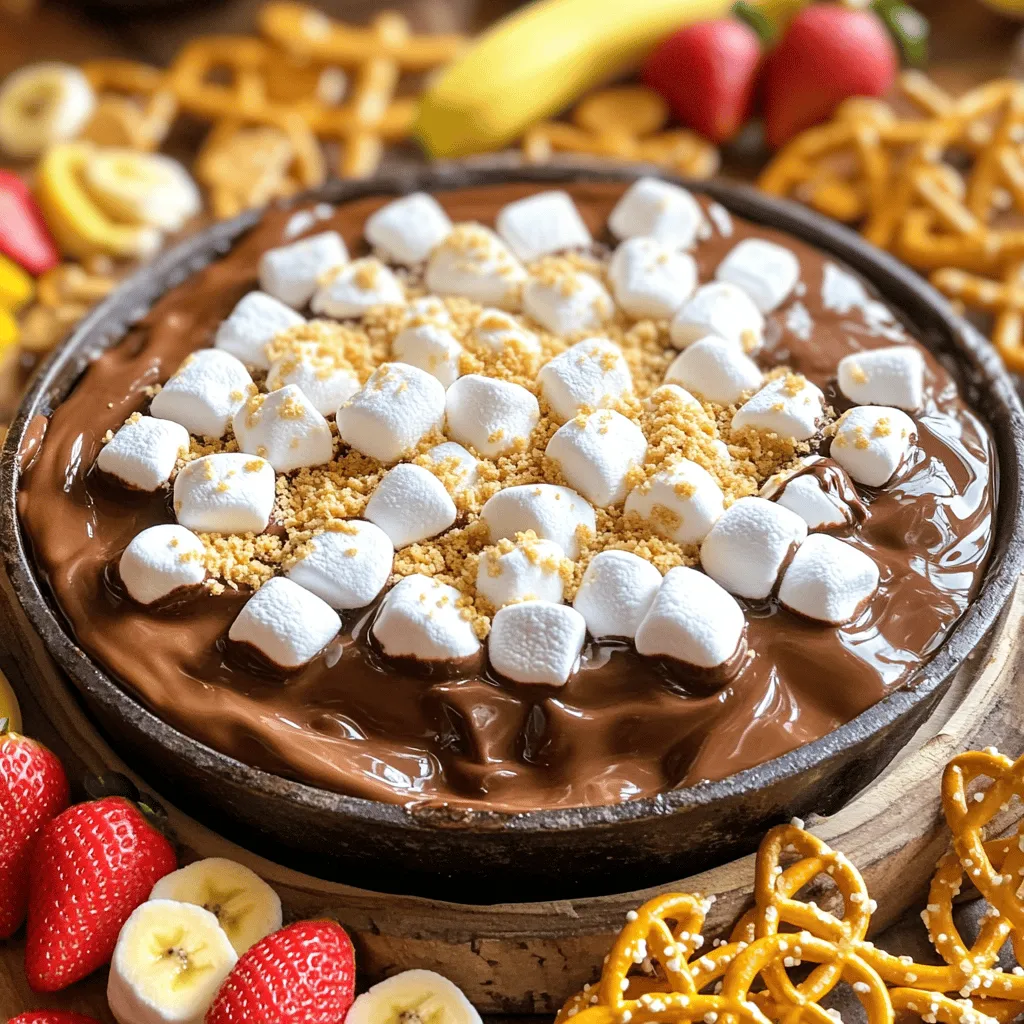
Get ready to dive into a warm bowl of gooey goodness with my S’mores Dip with Chocolate and Marshmallows Delight!

- 4 large bell peppers (any color) - 1 cup quinoa, rinsed - 2 cups vegetable broth - 1 can (15 oz) black beans, drained and rinsed - 1 cup corn kernels (fresh, frozen, or canned) - 1 small red onion, finely chopped - 2 cloves garlic, minced - Spices: cumin, smoked paprika, chili powder - Salt and pepper to taste - ½ cup cherry tomatoes, halved - 1 tablespoon olive oil - Fresh cilantro, chopped (for garnish) - ½ cup shredded cheese (optional, for topping) When it comes to making stuffed bell peppers, the ingredients are key. You want fresh, vibrant bell peppers. They add color and crunch. I love using a mix of colors for a fun look. Quinoa is my star here. It’s a great source of protein and cooks fast. Rinsing it helps remove the bitter taste. Vegetable broth adds flavor. It gives the quinoa a warm, savory base. Black beans bring protein and texture. They blend well with the other ingredients. Corn adds sweetness and a pop of color. Onions and garlic bring depth to the dish. Their aroma fills your kitchen. Spices like cumin and smoked paprika give a warm, earthy taste. A pinch of chili powder adds heat. Don't forget salt and pepper for balance. Cherry tomatoes add freshness and juiciness. You can top your peppers with cheese. It melts beautifully and adds creaminess. For garnish, fresh cilantro brings a bright flavor. This mix of ingredients creates a hearty and satisfying meal. For the full recipe, check out the Colorful Quinoa-Stuffed Bell Peppers. - Combine quinoa and vegetable broth in a saucepan. - Bring to a boil, then simmer until liquid is absorbed. To cook the quinoa right, I always start with rinsing it under cold water. This removes any bitterness. After this, the vegetable broth adds a great flavor. Boil the mixture, then reduce the heat. Cover the saucepan and let it simmer for about 15 minutes. When done, fluff it with a fork and set it aside. - Cut tops off and remove seeds. - Lightly brush with olive oil. Next, I focus on the bell peppers. I choose large ones that are firm and colorful. I cut the tops off and scoop out the seeds and membranes. This creates a nice space for the filling. After that, I brush the outside with olive oil. This step helps them roast nicely in the oven. - Sauté onions and garlic in a skillet. - Mix in quinoa, black beans, corn, tomatoes, and spices. Now comes the fun part—making the filling. I heat olive oil in a skillet over medium heat. I add the chopped onions and minced garlic and sauté them until the onions turn clear. This takes about 3-4 minutes. Then, I mix in the cooked quinoa, black beans, corn, halved cherry tomatoes, and spices. I stir it all together and let it heat for another 5 minutes. The smell is amazing! - Pack quinoa mixture into prepared peppers. - Add cheese on top if desired. Once the filling is ready, I start stuffing the peppers. I pack the quinoa mixture tightly into each pepper. It helps to press down a bit so they fit well. If I want, I sprinkle cheese on top for extra flavor. - Cover with foil and bake at 375°F. - Remove foil and bake until tender. I place the stuffed peppers upright in a baking dish. I cover the dish with foil and bake them at 375°F for 25 minutes. After that, I remove the foil and bake for another 10-15 minutes. This makes the peppers soft and the cheese bubbly. They are now ready to enjoy! For the full recipe, check out the details provided above. When choosing bell peppers, look for vibrant colors. Pick ones with firm skin. Avoid any that have spots or blemishes. Fresh peppers will give your dish a bright look and taste. Rinse quinoa thoroughly before cooking. This step helps reduce its natural bitterness. After cooking, fluff the quinoa with a fork. This will give it a light and airy texture that mixes well with other ingredients. Get creative with your filling! Add diced vegetables like zucchini or carrots for extra flavor. You can also toss in fresh herbs like parsley or basil. If you want a leaner option, substitute beans for meat. This keeps the dish healthy while adding protein. The beauty of stuffed peppers is their versatility! Feel free to mix and match ingredients to suit your taste. For the full recipe, check the earlier section. {{image_2}} For a vegan twist, simply omit the cheese. Use vegetable broth instead of chicken broth. This keeps the dish plant-based and still full of flavor. You won’t miss the cheese at all! The quinoa and veggies provide great taste and nutrition. If you need a gluten-free dish, make sure all your ingredients are certified gluten-free. Quinoa is naturally gluten-free, making it a perfect base. Just check the labels on your broth and beans to be safe. Enjoy a worry-free meal that everyone can savor. Want to change things up? You can create different flavor profiles with your stuffed peppers. Try Mediterranean flavors by adding olives and feta cheese. This gives a fresh and tangy taste. For a Mexican twist, mix in jalapeños and salsa. This adds heat and a burst of flavor. You can also play with spices like taco seasoning. Each variation opens up new possibilities for this tasty dish. You can keep your stuffed bell peppers in the fridge. Store them in an airtight container. They will stay fresh for up to 4 days. If you want to save them for later, freeze the stuffed peppers. First, prepare and cool them completely. Then, place them in a freezer-safe container before baking. This keeps them fresh for a long time. To reheat, you have two easy options. Bake them straight from frozen or thaw them overnight in the fridge. For a quick option, use the microwave. Heat them until warm, checking often to avoid overcooking. For the complete recipe, visit the Full Recipe. Stuffed bell peppers last up to 4 days if stored properly. Make sure to keep them in an airtight container to maintain freshness. Yes, you can prep and store them ahead of baking. This makes dinner easy on busy days. Just keep the stuffed peppers in the fridge until you're ready to bake. You can substitute quinoa with rice, farro, or couscous. Each option gives a different taste and texture. Experiment to find your favorite! Absolutely! Stuffed peppers can also be grilled for a smoky flavor. Just watch them closely to avoid burning. Yes, they are nutrient-dense and packed with vegetables, fiber, and protein. They make a great meal for those who want to eat healthy and feel full. Stuffed bell peppers with quinoa are tasty and healthy. You can mix flavors to suit your taste. Remember to pick fresh peppers and store leftovers properly. You can even freeze them for later. This fun meal is easy to prepare and offers many options. Enjoy creating your own versions of these stuffed delights. Try out the tips and tricks to make them your best dish yet!

Stuffed Bell Peppers with Quinoa Flavorful Recipe

Stuffed bell peppers with quinoa are a tasty and healthy meal option you’ll love. This colorful dish combines sweet peppers

Older posts
Newer posts
← Previous Page1 … Page53 Page54 Page55 … Page82 Next →

dsad

© 2025 My Saved Recipe • Built with GeneratePress

Our Policies

  • Copyright Policy
  • Cookie Policy
  • GDPR Policy
  • Privacy Policy
  • Disclaimer
  • Terms Of Use

More Information

  • Home
  • About
  • Contact
  • Appetizers
  • Dessert
  • Dinner
  • Drinks
©2025, My Saved Recipe About Back To Top