Skip to content
DisclaimerTerms Of UseGDPR PolicyCookie Policy

My Saved Recipe

  • Home
  • Drinks
  • Appetizers
  • Dinner
  • Dessert
  • About
  • Contact
  • Privacy Policy
DisclaimerTerms Of UseGDPR PolicyCookie Policy

Savannah

- 1 lb ground turkey or beef - 1 tablespoon olive oil - 1 small onion, finely chopped - 2 cloves garlic, minced - 1 packet taco seasoning - 1 cup black beans, drained and rinsed - 1 cup corn kernels (fresh or frozen) - 1 cup shredded cheese (cheddar or a blend) - Mini tortilla cups - Fresh cilantro, chopped - Sour cream and salsa To create Oven-Baked Taco Bites, you need simple, fresh ingredients. I love using ground turkey or beef for the filling. Ground turkey is leaner, while beef has a richer flavor. You can choose based on your taste. Olive oil gives a nice touch when you sauté the onions and garlic. The onion adds sweetness, and the garlic adds depth. These two work together like a dream, making your kitchen smell amazing! Taco seasoning is key here. It brings all the flavors together. I like to use a packet for convenience, but you can mix your own spices if you prefer. Black beans and corn add texture and nutrition. They make this snack hearty but still light. You can use fresh or frozen corn based on what you have. Finally, cheese! I like to use a blend of cheddar for its sharpness, but any shredded cheese works well. It melts beautifully and adds creaminess to each bite. For serving, mini tortilla cups are a must. They hold everything together and add a nice crunch. Don't forget fresh cilantro, sour cream, and salsa for garnishing. They add freshness and flavor to your Taco Bites. For the full recipe, you can check the detailed instructions above. - Preheat the oven to 375°F (190°C). - In a large skillet, heat 1 tablespoon of olive oil over medium heat. - Add 1 small onion, finely chopped. Sauté for about 3-4 minutes. - Stir in 2 cloves of minced garlic. Cook for 1 minute until fragrant. - Add 1 lb of ground turkey or beef to the skillet. - Cook until browned, breaking it apart, about 5-7 minutes. - Mix in 1 packet of taco seasoning, 1 cup of black beans, and 1 cup of corn. - Cook for another 3-4 minutes until everything is heated through. - Remove from heat and fold in half of the shredded cheese. - Place mini tortilla cups on a baking sheet. - Spoon the filling mixture into each cup, packing it gently. - Top each filled tortilla cup with the remaining cheese. - Bake in the preheated oven for 12-15 minutes until cheese is melted and bubbly. Follow these steps for a tasty treat! You can find the Full Recipe for more details. You can change the protein in this recipe. Try using chicken or a plant-based meat. Each option gives a new taste. To add some heat, sprinkle in chili powder or cayenne pepper. These spices wake up the flavors and make the bites exciting. For best results, make sure the meat browns evenly. This step helps lock in flavor. When filling the tortilla cups, don’t pack them too tightly. This allows the taco bites to cook evenly and stay crispy. Serve the taco bites warm. This way, the cheese melts and is gooey. Add fresh toppings like diced tomatoes, avocados, or shredded lettuce for extra crunch. For side dishes, consider serving with a simple salad or tortilla chips. These pair well and make for a fun meal. Enjoy your delicious taco bites! If you want to see the full recipe, check out the [Full Recipe]. {{image_2}} You can make Oven-Baked Taco Bites fit your diet. For gluten-free options, choose corn tortilla cups. They work great instead of regular flour ones. If you want a vegetarian version, use meat alternatives like lentils or textured vegetable protein. These swaps keep the taco bites tasty and satisfying. Feel free to play with the ingredients. You can use different types of cheese like pepper jack for a spicy kick. If you want to swap beans, try using pinto beans or chickpeas instead. These changes keep the recipe fresh and fun. Adding veggies to the filling can enhance taste. Consider bell peppers, zucchini, or spinach for extra crunch and nutrition. You can also experiment with different taco seasonings. Try spicy chipotle or smoky paprika to change the flavor profile. Each variation brings a new twist to your taco bites. For the full recipe, check out the earlier section. To store leftover taco bites, let them cool down first. Place them in an airtight container. This keeps them fresh and tasty. I recommend using glass or plastic containers with tight lids. They help avoid any unwanted odors in your fridge. Leftover taco bites can last for up to three days. If you want to freeze taco bites, first let them cool completely. Then, place them in a single layer on a baking sheet. Freeze them for about an hour. This step helps keep them from sticking together. After that, transfer the bites to a freezer-safe bag. Remove as much air as you can. Taco bites can stay good in the freezer for up to three months. When you're ready to eat them, you can use either the oven or microwave. The oven is best for keeping the bites crispy. Preheat your oven to 350°F (175°C). Place the taco bites on a baking tray and heat for about 10 minutes. If you use the microwave, heat them in 30-second bursts. This keeps them moist but may make them a bit soft. To keep the bites crispy, you can cover them with foil while reheating in the oven. For the full recipe, check out the earlier section. Oven-Baked Taco Bites stay fresh for about 3 to 4 days in the fridge. Store them in an airtight container to keep them tasty. If you want to save them longer, you can freeze them. In the freezer, they last for up to 3 months. Just make sure to wrap them well to avoid freezer burn. Yes, you can prep these bites ahead of time! You can cook the filling and store it in the fridge. Just keep it in a sealed container. You can also assemble the taco bites and place them on a baking sheet. Cover them with plastic wrap and store them in the fridge for up to a day. When you're ready, just pop them in the oven! If you can't find mini tortilla cups, don't worry! You can use small flour or corn tortillas. Cut them into smaller circles and then shape them into cups using a muffin tin. You can also use phyllo dough for a crispy twist. Another option is to serve the filling in lettuce cups for a fresh, low-carb choice. You now have a great recipe for Oven-Baked Taco Bites. We've covered the key ingredients, step-by-step cooking methods, and tips for serving. You can easily adjust this recipe to suit your needs or preferences. Whether you want to make it vegetarian or need gluten-free options, the possibilities are endless. Store leftovers properly for later enjoyment. Cooking can be fun and easy with this snack. Now, gather your ingredients and try making these bites today!

Oven-Baked Taco Bites Delicious and Easy Snack Recipe

Looking for a fun and tasty snack? You’ll love these Oven-Baked Taco Bites! They’re quick to make and packed with

Let’s go over what you need to make these tasty crispy chickpea tacos. Each ingredient plays a vital role in building flavor and texture. Here’s the list: - 1 can (15 oz) chickpeas, drained and rinsed - 1 tablespoon olive oil - 1 teaspoon smoked paprika - 1 teaspoon cumin - 1/2 teaspoon garlic powder - 1/2 teaspoon onion powder - Salt and pepper to taste - 8 small corn or flour tortillas - 1 avocado, sliced - 1 cup shredded red cabbage - 1/2 cup pico de gallo (store-bought or homemade) - Fresh cilantro, for garnish - Lime wedges, for serving Using canned chickpeas is quick and easy. Rinsing them removes excess salt. Olive oil adds richness and helps the spices stick. Smoked paprika and cumin give that warm, earthy flavor. Garlic and onion powders add depth. For the tacos, you can choose between corn or flour tortillas. Both work well, but corn has a nice crunch. Don’t forget the toppings! Creamy avocado, crunchy cabbage, and fresh pico de gallo bring the dish together. Cilantro adds a fresh note, and lime juice brightens the flavors. For the full recipe, check out the details to make your tacos a hit! - Preheat the oven to 400°F (200°C). - Rinse and dry the chickpeas. - Mix chickpeas with olive oil and spices. To start, I preheat my oven to 400°F (200°C). This step is key for crispy chickpeas. Next, I rinse the chickpeas under cold water. After draining, I pat them dry with a paper towel. Removing moisture helps them crisp up nicely. In a bowl, I mix the chickpeas with olive oil and spices. I use smoked paprika, cumin, garlic powder, onion powder, salt, and pepper. This blend adds a great flavor. - Spread chickpeas on a baking sheet. - Roast for 25-30 minutes, stirring halfway. Next, I spread the chickpeas on a baking sheet. They should be in a single layer. Then, I roast them for 25 to 30 minutes. I stir them halfway through to ensure even cooking. When they are done, they should be golden brown and crispy. The aroma fills the kitchen, making it hard to wait! - Warm tortillas and fill with crispy chickpeas. - Add toppings and serve. While the chickpeas roast, I warm up my tortillas. I can use a skillet or a microwave. A quick minute on each side in a skillet works well. Once warm, I fill each tortilla with a scoop of crispy chickpeas. I top them with sliced avocado, shredded red cabbage, and pico de gallo. Fresh cilantro adds a nice touch. A squeeze of lime on top enhances the flavor. Enjoy these tacos as a vibrant and tasty meal! To make perfect crispy chickpeas, start by drying them well. Wet chickpeas won’t get crunchy in the oven. Use a paper towel to pat them dry. This step is key for great texture. Next, roast the chickpeas at 400°F (200°C). This hot temperature helps them get crispy. Roast them for about 25-30 minutes. Be sure to stir them halfway through. This ensures even cooking and browning. When done, they should be golden brown and crunchy. Spices can take your chickpeas to the next level. Try smoked paprika for a smoky taste. Cumin adds warmth, while garlic and onion powders boost flavor. Feel free to mix and match spices based on your taste. You can also use different oils for added flavor. Olive oil is great, but avocado or coconut oil works too. Each oil adds its own unique taste. Experiment to find your favorite combination! These tacos pair well with fresh sides. A simple salad or some rice can complement them nicely. You might also enjoy them with a side of beans. If you have leftovers, get creative! Use the crispy chickpeas in salads or grain bowls. You can even add them to soups for extra crunch. The possibilities are endless! For the full recipe, check out the main article. {{image_2}} You can switch up the protein in these tacos. Black beans make a great choice. They add a rich texture and taste. Lentils work well too. They are packed with nutrients and flavor. Tofu is another option. It adds protein and absorbs flavors well. Don't be afraid to get creative with sauces and toppings. Try spicy salsa or creamy dressing. You can also use seasonal veggies for a fresh twist. Think sweet corn in summer or roasted squash in fall. Each season brings new flavors to explore. If you need gluten-free options, try lettuce wraps. They add a nice crunch. You can also use different sizes of tortillas. Mini tortillas are fun for small bites. Bigger ones work well for generous fillings. Mix and match to find your favorite! To keep your leftover tacos fresh, store the crispy chickpeas and toppings separately. This helps maintain their texture. Use airtight containers for best results. Place the chickpeas in one container, and the avocado, cabbage, and pico de gallo in others. Store everything in the fridge. This way, your tacos stay tasty for up to three days. When reheating crispy chickpeas, use an oven or an air fryer. Set the oven to 350°F (175°C). Spread the chickpeas on a baking sheet and warm them for about 10 minutes. This keeps them crunchy. For tortillas, warm them in a skillet over medium heat for about 30 seconds on each side. You can also use a damp paper towel in the microwave for 20 seconds. Both methods work well without drying them out. Yes, you can freeze the chickpeas! Spread them on a baking sheet and freeze until solid. After that, transfer them to a freezer bag. This keeps them fresh for about three months. When you're ready to eat, reheat directly from frozen. Just add a few extra minutes to the oven time. Keep in mind, tortillas do not freeze well. It’s best to prepare them fresh. Yes, you can make these tacos in advance. Prep the chickpeas and store them. Roast them just before serving. Keep all toppings separate. This way, your tacos stay fresh and crunchy. Yes, these tacos work great for meal prep. The chickpeas last about five days in the fridge. Keep the tortillas and toppings separate. This helps them stay fresh longer. Absolutely! Canned chickpeas are perfect for this recipe. They save time and still taste great. Just make sure to rinse and dry them well. This helps get that crispy texture. If you don’t have avocado, try hummus or vegan sour cream. Both options add creaminess to the tacos. You can even use tahini for a unique taste. Yes, this recipe can be gluten-free. Look for corn tortillas or gluten-free flour tortillas. Brands like Mission and Udi's offer good options. Always check the labels for gluten-free certification. We explored how to create delicious crispy chickpea tacos. You learned about the key ingredients, preparation steps, and ways to enhance flavor. I shared tips for achieving the perfect crunch and ideas for storing leftovers. You have options, too! You can switch proteins, add seasonal veggies, or choose different tortillas. Enjoy making this nutritious meal that fits your lifestyle. These tacos are fun to prepare and even easier to share!

Crispy Chickpea Tacos Flavorful and Satisfying Meal

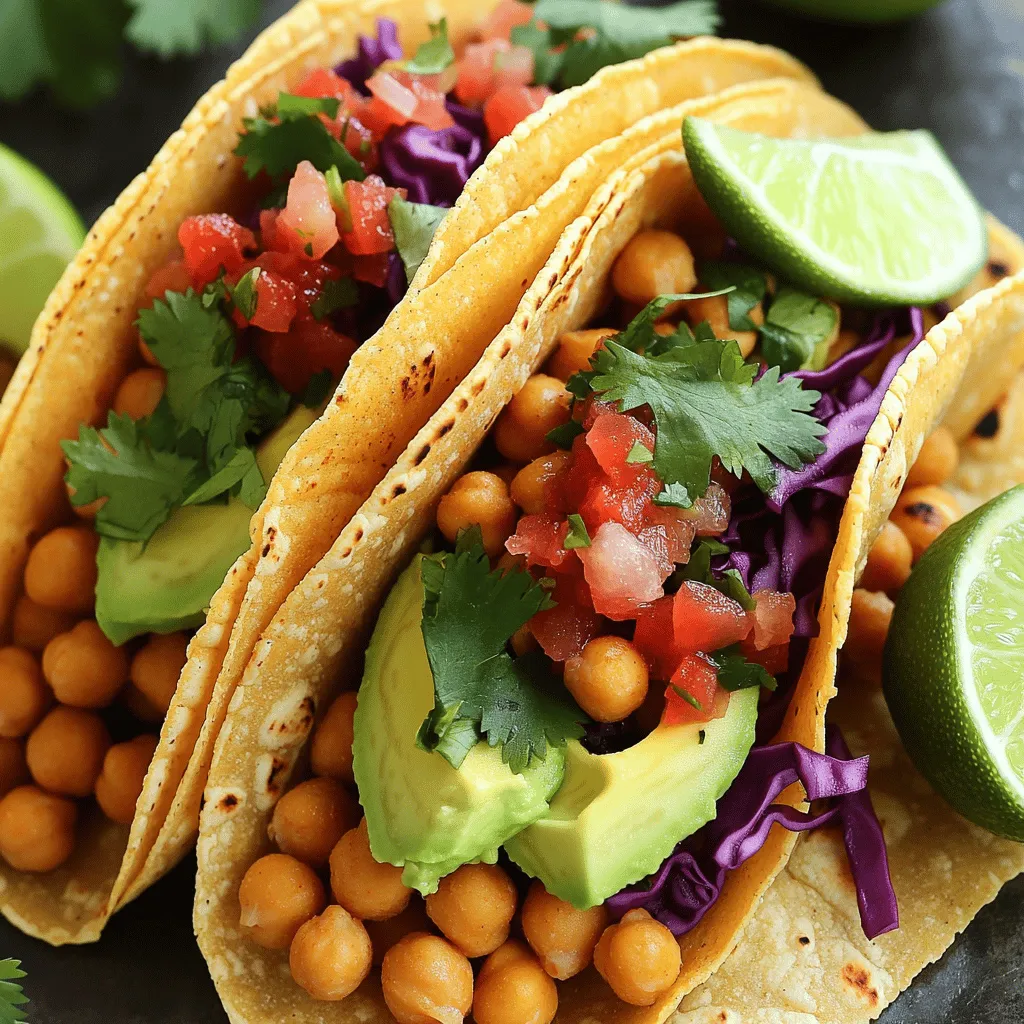
Are you tired of the same old taco night? Get ready to switch things up with crispy chickpea tacos! These

- 4 medium zucchinis - 1 cup fresh basil leaves - 1/4 cup pine nuts (toasted) - 1/4 cup grated Parmesan cheese (or nutritional yeast for a vegan option) - 2 garlic cloves - 1/3 cup extra virgin olive oil - Salt and pepper to taste - 1 cup cherry tomatoes, halved - 1/4 teaspoon red pepper flakes (optional) - Juice of 1/2 lemon Zucchini noodles with pesto is a fun and fresh dish. It’s simple to make and packed with flavor. First, I start with the zucchinis. I choose medium ones for the best texture. When you spiralize them, you get long, fun noodles. If you don’t have a spiralizer, a vegetable peeler works well too. Next, I gather the fresh basil leaves. They give the pesto its bright taste. I also use toasted pine nuts. They add a nice crunch and nutty flavor. Parmesan cheese gives the pesto richness. For a vegan option, I use nutritional yeast. It still tastes great! Garlic is a must. It gives the dish depth. I squeeze in fresh lemon juice for zing. Extra virgin olive oil helps blend everything into a creamy sauce. I season with salt and pepper for balance. Red pepper flakes add a nice kick, but you can skip them if you prefer. Lastly, I add halved cherry tomatoes. They bring a burst of freshness to the dish. This combination of ingredients makes zucchini noodles with pesto a quick and tasty meal. For the full recipe, check out the complete instructions to make your own! To start, you need to make the noodles. Use a spiralizer to turn the zucchinis into long, thin noodles. If you don’t have a spiralizer, grab a vegetable peeler. With it, you can create long strips that mimic traditional pasta. Aim for a consistency that is not too thick. Thin noodles cook better and absorb the flavors well. You can also sprinkle a little salt on the noodles. This helps draw out moisture and keeps them from getting soggy later. Next, it’s time to whip up the pesto. Gather your ingredients: fresh basil, toasted pine nuts, Parmesan cheese, garlic, and lemon juice. Toss these into a food processor. Pulse until everything is finely chopped. You want a nice blend, but not too smooth. With the processor running, slowly drizzle in olive oil. This makes the pesto creamy. Taste it, and feel free to add salt, pepper, or even red pepper flakes for some heat. Now, let’s cook the zucchini noodles. Heat a teaspoon of olive oil in a large skillet over medium heat. Add the noodles and sauté for only 2-3 minutes. You want them bright green and slightly soft, but not mushy. Serving them right away is key. The noodles taste best fresh and warm. If you wait too long, they lose their crisp texture. Once they are ready, mix them with the pesto and gently add halved cherry tomatoes for a burst of color and flavor. For a creamy pesto, I use pine nuts. But you can swap these with walnuts or almonds. If you prefer a nut-free option, try sunflower seeds. For cheese, Parmesan adds rich flavor. You can use nutritional yeast for a vegan twist. To enhance the taste, add more garlic for a kick. A squeeze of lemon juice brightens the flavor. You can also try adding a pinch of salt for extra depth. When cooking zucchini noodles, aim for 2 to 3 minutes. This time keeps them bright and tender. Overcooking makes them mushy. To maintain their crunchiness, sauté them over medium heat. Stir gently to avoid breaking them. If you like, you can serve them raw. This adds more crunch and freshness to your dish. Garnish your dish for a pop of color. Fresh basil leaves or extra Parmesan work well. A sprinkle of red pepper flakes adds spice. For a complete meal, pair it with grilled chicken or shrimp. A side salad or crusty bread also makes a great match. Enjoy your meal with a nice glass of white wine! You can find the full recipe for Zucchini Noodles with Pesto above. {{image_2}} You can easily make zucchini noodles even better by adding proteins. Chicken or shrimp works great. Just cook them in the skillet before adding the noodles. This adds flavor and makes the dish more filling. You can also add other vegetables like bell peppers or spinach. They bring color and extra nutrients. If you want a vegan version, skip the Parmesan cheese. Use nutritional yeast instead. It gives a cheesy flavor without any dairy. You can also try different pesto recipes. For example, use spinach or arugula instead of basil. These greens make a tasty and unique pesto. Change up the flavor of your pesto by using different herbs. Try cilantro or parsley for a fresh twist. You could also make it spicy by adding red pepper flakes or jalapeños. These simple changes can take your dish to a whole new level. Enjoy experimenting with flavors! To keep your zucchini noodles fresh, store them in an airtight container. Place a paper towel inside to absorb any moisture. This helps maintain their texture. You should eat them within two days for the best taste. For the pesto, use a clean jar with a tight lid. Pour a thin layer of olive oil on top before sealing. This helps keep the pesto vibrant and fresh. Store it in the fridge and use it within a week. Can you freeze pesto? Yes! Pesto freezes well. Pour it into ice cube trays and freeze. Once solid, transfer the cubes into a zip-top bag. This way, you can use it in smaller portions later. For zucchini noodles, freezing is not the best option. They can become mushy when thawed. If you must freeze them, blanch for just one minute, then cool in ice water. Drain and pack them in a bag. Use within three months for the best quality. When it's time to reheat, sauté the frozen zucchini noodles briefly in a hot pan. This helps keep their texture. Avoid cooking them too long to prevent mushiness. To spiralize zucchini, a spiralizer is best. You can also use a vegetable peeler. Here are some tips: - Choose firm zucchinis: They spiralize better and hold their shape. - Cut off the ends: This helps the zucchini fit in the spiralizer. - Turn slowly: Rotate the zucchini gently to get nice, long noodles. - Avoid over-spiralizing: Stop when you reach the seeds, as they can make the noodles mushy. Yes, you can prepare zucchini noodles and pesto ahead of time. Here’s how: - Zucchini noodles: Spiralize them and store in a sealed container. Use them within 2-3 days. - Pesto: Make it and store in an airtight jar. Pour a thin layer of olive oil on top to keep it fresh. It lasts up to a week in the fridge. Zucchini noodles last about 3-5 days in the fridge. Here are some signs of spoilage: - Slimy texture: This means they have gone bad. - Off smell: A sour or unpleasant smell is a red flag. - Discoloration: If they turn brown or mushy, it’s time to toss them. For the full recipe, check the details above. Zucchini noodles with pesto are simple to make and full of flavor. We covered all the must-have ingredients and the steps to prepare them perfectly. You can customize your dish with various flavors and explore different storage tips. Now, you can enjoy a healthy meal that's quick and tasty. With just a few easy steps, you can impress anyone at your table. Try it out today and enjoy your delicious creation!

Zucchini Noodles with Pesto Quick and Tasty Recipe

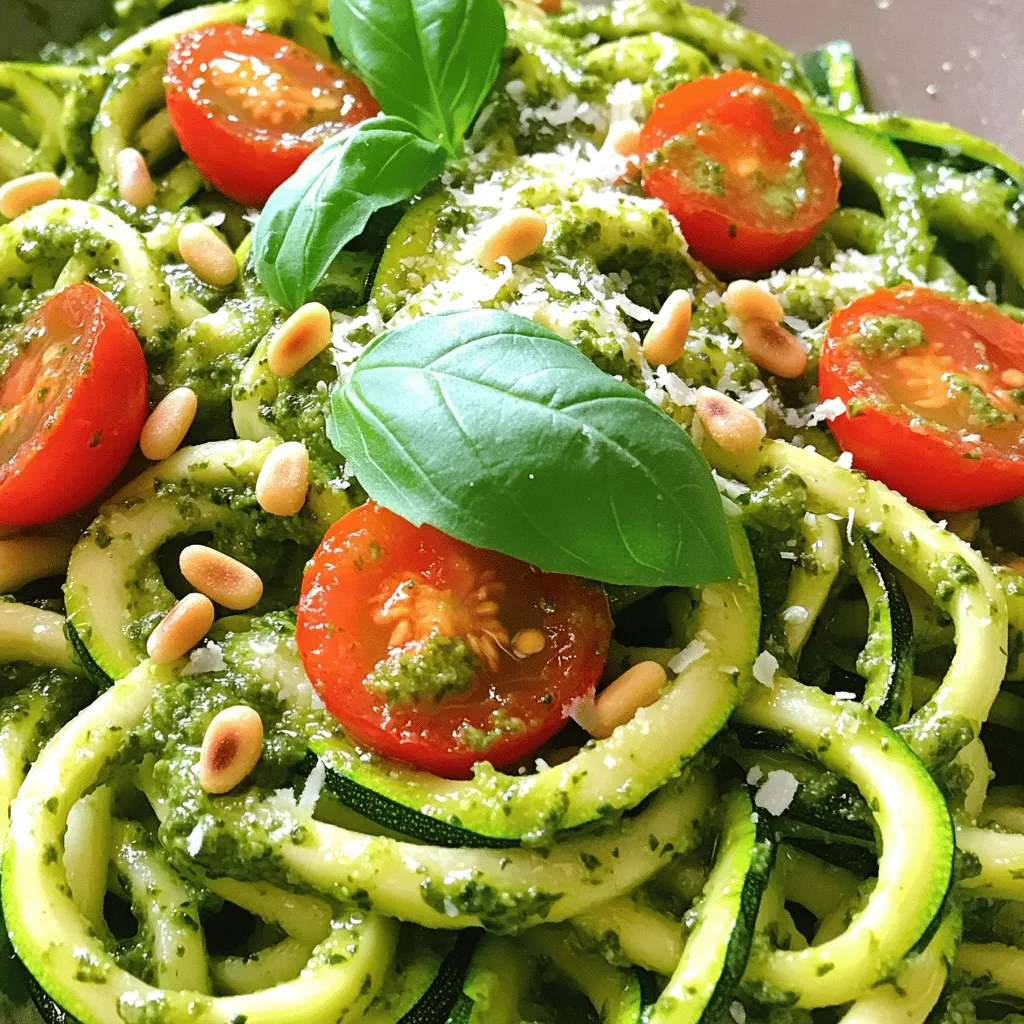
Looking for a quick and tasty meal? Zucchini Noodles with Pesto is your answer! This dish is not only colorful

- 2 ripe avocados, peeled and pitted - 1/2 cup unsweetened cocoa powder - 1/4 cup maple syrup (or agave syrup) - 1/4 cup almond milk (or any plant-based milk) - 1 teaspoon vanilla extract - A pinch of sea salt - Dark chocolate shavings (for garnish) - Fresh mint leaves (for garnish) When making Chocolate Avocado Mousse, you need fresh, ripe avocados. They give a creamy base. Look for avocados that yield slightly when you press them. This shows they are ready. Next, unsweetened cocoa powder adds rich chocolate flavor. Using a natural sweetener like maple syrup keeps it healthy. You can also swap it for agave syrup if you prefer. Almond milk helps blend the mousse smoothly. It also keeps the dessert plant-based. Vanilla extract adds a lovely aroma and depth to the flavor. Just a pinch of sea salt brightens the taste. Finally, dark chocolate shavings and mint leaves make the mousse look special. These garnishes add color and a fresh touch. - Calories per serving: About 200 - Breakdown of macronutrients: 15g fat, 20g carbs, 3g protein - Health benefits of avocados in desserts: Avocados are full of healthy fats and vitamins. They help improve heart health and skin. Using avocados in desserts makes them richer and creamier without adding dairy. You can enjoy a sweet treat that is good for you! To make this chocolate avocado mousse, start with your avocados. Choose ripe ones; they should feel soft when you squeeze them. Cut each avocado in half and remove the pit. Use a spoon to scoop out the green flesh into a bowl. Next, measure out your other ingredients. You will need: - 2 ripe avocados, peeled and pitted - 1/2 cup unsweetened cocoa powder - 1/4 cup maple syrup (or agave syrup) - 1/4 cup almond milk (or any plant-based milk) - 1 teaspoon vanilla extract - A pinch of sea salt Put all these ingredients near your blender. Now we blend! Place the avocado, cocoa powder, maple syrup, almond milk, vanilla extract, and sea salt into a food processor. Start blending on high speed. Scrape down the sides to mix well. You want a creamy texture. If it seems too thick, add a bit more almond milk. Taste your mousse! If it's not sweet enough, add a little more maple syrup. Blend again to mix it in. Aim for a smooth and silky consistency. Once your mousse is ready, scoop it into bowls or cups. Cover each bowl with plastic wrap. Chill them in the fridge for at least 30 minutes. This helps the flavors blend and the mousse firm up. When you’re ready to serve, take the mousse out of the fridge. Top each serving with dark chocolate shavings and a fresh mint leaf. This adds a nice touch and looks great! To make your mousse just right, adjust the sweetness if needed. Taste the mix before serving. If it’s too bitter, add more maple syrup. Blend again to make it smooth. You can also spice it up. A pinch of cinnamon adds warmth. For a coffee kick, stir in espresso powder. These small tweaks can make a big difference. Serving matters! Use clear dishes to show off the mousse's rich color. It looks great in glass cups. You can also drizzle extra maple syrup on top. This adds shine and sweetness. Try adding fresh mint leaves for a pop of green. Dark chocolate shavings make it look fancy too. Be careful when blending. Overblending can make the mousse too runny. Blend just until smooth and creamy. Check your avocados too. Always use ripe ones. Unripe avocados can ruin the taste and texture. Make sure they feel soft when you press them gently. Using the right ingredients ensures a perfect mousse. For the full recipe, check out the [Full Recipe]. {{image_2}} You can easily change the flavor of your chocolate avocado mousse. Adding peanut butter or almond butter gives it a rich, nutty taste. Just mix in about 2 tablespoons when you blend. You can also add spices to enhance the flavor. A pinch of cinnamon adds warmth, while a splash of espresso gives a nice coffee kick. These small changes make your mousse unique and exciting. This mousse is great for different diets. It is naturally gluten-free, making it perfect if you avoid gluten. If you follow a vegan diet, this recipe is already vegan-friendly. You can replace maple syrup with agave syrup or coconut sugar if you prefer. Just ensure all your ingredients are plant-based to keep it vegan. Serving your chocolate avocado mousse is fun and easy. You can pair it with fresh fruits like strawberries or bananas for a fresh taste. Adding nuts, like crushed almonds or walnuts, gives a nice crunch. For an extra treat, consider incorporating the mousse into other desserts. Use it as a filling for cakes or as a topping for pancakes. The options are endless! For the full recipe, check out the details above. To keep your mousse fresh, use airtight containers. Glass jars work well. They keep moisture out and flavor in. Store the mousse in the fridge for up to three days. After that, the texture may change. You don’t need to reheat mousse. If it feels dense, stir it gently. This helps restore its creamy texture. Serve it cold, right from the fridge. You can also add a splash of almond milk for a lighter feel. You can freeze the mousse if needed. Portion it into small containers. Leave some space at the top for expansion. To thaw, place it in the fridge overnight. You may need to blend it again to restore its smoothness. This mousse is a rich treat that can last longer with proper care. Chocolate avocado mousse is a treat that offers many health benefits. The main star, avocado, is rich in healthy fats and fiber. These fats help your heart and keep you full longer. Here are some key benefits: - Avocados: They provide good fats and vitamins like E and K. - Cocoa Powder: This adds antioxidants, which are great for your skin and heart. - Maple Syrup: It has nutrients like zinc and manganese, plus it’s a natural sweetener. - Almond Milk: A low-calorie option that is dairy-free and full of vitamins. This mousse lets you enjoy dessert without guilt. Yes, you can use other sweeteners in this recipe. While I love maple syrup, there are great alternatives. Here are some options: - Agave Syrup: It’s sweeter than maple syrup, so use less. - Honey: A natural choice that blends well. - Coconut Sugar: This offers a caramel flavor and is less processed. - Stevia: A no-calorie option if you want to cut sugar completely. Choose what you like best for your taste and health goals! Chocolate avocado mousse can last in the fridge for about 3 days. Store it in an airtight container to keep it fresh. If you want to save it longer, you can freeze it. It can last up to a month in the freezer. Just remember to thaw it in the fridge before enjoying it again. Freezing may change the texture a bit, but it still tastes great! In summary, this guide takes you through the delicious journey of making Chocolate Avocado Mousse. You learned about the key ingredients, how to prepare and blend them, and tips for serving. We also covered storage tips and common mistakes to avoid. This dessert is healthy, easy to make, and offers tasty variations. It’s perfect for impressing guests or enjoying a treat. Enjoy making this mousse, and remember to share your creations!

Chocolate Avocado Mousse Rich and Creamy Delight

Want a dessert that feels indulgent but is also healthy? Meet Chocolate Avocado Mousse! This rich and creamy delight combines

- 1 lb large shrimp, peeled and deveined - 1/4 cup honey - 1/4 cup soy sauce - 4 cloves garlic, minced - 1 tablespoon fresh ginger, grated - 1 tablespoon sesame oil - 1 tablespoon lime juice - 1/4 teaspoon red pepper flakes - Salt and pepper to taste - Fresh cilantro for garnish - Wooden skewers (soaked in water for 30 minutes) - Mixing bowl - Grill or grill pan You need fresh ingredients for the best taste. I prefer large, juicy shrimp for this dish. Honey adds sweetness, while soy sauce gives it a savory kick. Garlic and ginger bring a nice depth of flavor. You can add sesame oil for a nutty touch and lime juice for brightness. If you enjoy a bit of heat, toss in red pepper flakes. Don’t forget to soak your wooden skewers! This step keeps them from burning on the grill. A mixing bowl is handy for combining the marinade. You can use either a grill or grill pan to cook the skewers. For the full recipe and step-by-step instructions, check out the Honey Garlic Shrimp Skewers recipe. Enjoy cooking! To start, I whisk together the honey and soy sauce. Then, I add minced garlic, grated ginger, sesame oil, lime juice, and red pepper flakes. This mix creates a sweet and savory marinade packed with flavor. The balance of honey and soy sauce gives the shrimp a tasty glaze. Next, I season the shrimp with salt and pepper. I toss them in the marinade until they’re well coated. Cover the bowl and refrigerate the shrimp for 30 minutes. This time helps the flavors soak into the shrimp. The result is shrimp that burst with taste when cooked. After marinating, I preheat the grill or grill pan over medium-high heat. I make sure it’s well-oiled to stop the shrimp from sticking. Now, I thread the marinated shrimp onto the soaked wooden skewers. I leave a little space between each shrimp for even cooking. Once the grill is hot, I place the skewers on it. I cook the shrimp for about 2-3 minutes on each side until they turn pink and opaque. This gives a nice char while keeping them juicy. You can find the full recipe above for all the details! - Always oil your grill well to stop the shrimp from sticking. - Avoid placing too many shrimp on each skewer. This helps them cook evenly. - For a nice look, serve the skewers on a platter. Add lime wedges and extra cilantro. - Pair the skewers with rice or a fresh salad to make a full meal. - Soak wooden skewers in water for 30 minutes. This helps prevent burning. - Make sure the shrimp reach a safe internal temperature of 145°F. This keeps your meal safe to eat. Using these tips will help you create the best Honey Garlic Shrimp Skewers. For the Full Recipe, check out the details above. Enjoy cooking! {{image_2}} You can get creative with your shrimp skewers. If shrimp isn’t your favorite, try scallops or chicken. Both options work well with the honey garlic sauce. If you want a different sweet taste, swap honey for maple syrup. This change adds a unique flavor. To spice things up, add some paprika or chili powder to the marinade. This will give your skewers a nice kick. You can also play with herbs. Try adding parsley or basil to change the taste. These herbs add freshness and a new twist to the dish. Want to avoid grilling? You can oven-bake the skewers instead. Just broil them at high heat for about 6-8 minutes. This method cooks them evenly and keeps them juicy. If you’re cooking indoors, use a stovetop grill pan. It gives you that grilled flavor without the need for an outdoor grill. For the full recipe, check out the Honey Garlic Shrimp Skewers section. You can store your leftover Honey Garlic Shrimp Skewers easily. Just place them in an airtight container. This keeps them fresh for up to 2 days. If you want to save them longer, freeze the cooked skewers. They will last for up to 3 months in the freezer. When you're ready to enjoy your leftovers, reheat them in the oven. Set your oven to 350°F and heat for about 10-15 minutes. This method helps keep the shrimp juicy. You can also use a microwave for quick reheating. Just be careful not to overcook them, as this can make them tough. If you decide to freeze your skewers, place them between layers of parchment paper. This helps them separate easily when you take them out. It's also a good idea to label your container with the date. This way, you can keep track of how long they've been in the freezer. Marinate shrimp for at least 30 minutes for optimal flavor absorption. This time allows the shrimp to soak up the honey, garlic, and ginger flavors. You can even marinate them longer, but 30 minutes works perfectly. Yes, but ensure they are fully thawed and patted dry before marinating. Frozen shrimp can have extra moisture, which may dilute the marinade. Thawing and drying lead to better flavor and texture. Best served with rice, steamed vegetables, or a fresh salad. These sides complement the sweet and savory shrimp well. You can also add lime wedges for a zesty touch. Yes, these skewers can be grilled ahead of time and stored for easy meals throughout the week. They reheat well and maintain their taste. Store them in an airtight container in the fridge for up to two days. For the full recipe, check out the earlier sections. This blog post covered how to make delicious Honey Garlic Shrimp Skewers. We discussed key ingredients, preparation, grilling techniques, and safety tips. Remember, marinating your shrimp enhances flavor, and grilling adds that perfect touch. Get creative by switching out ingredients and trying different cooking methods. You can store leftovers easily and reheat them for future meals. Enjoy this tasty dish that fits into meal prep plans or a quick weeknight dinner!

Honey Garlic Shrimp Skewers Quick and Tasty Recipe

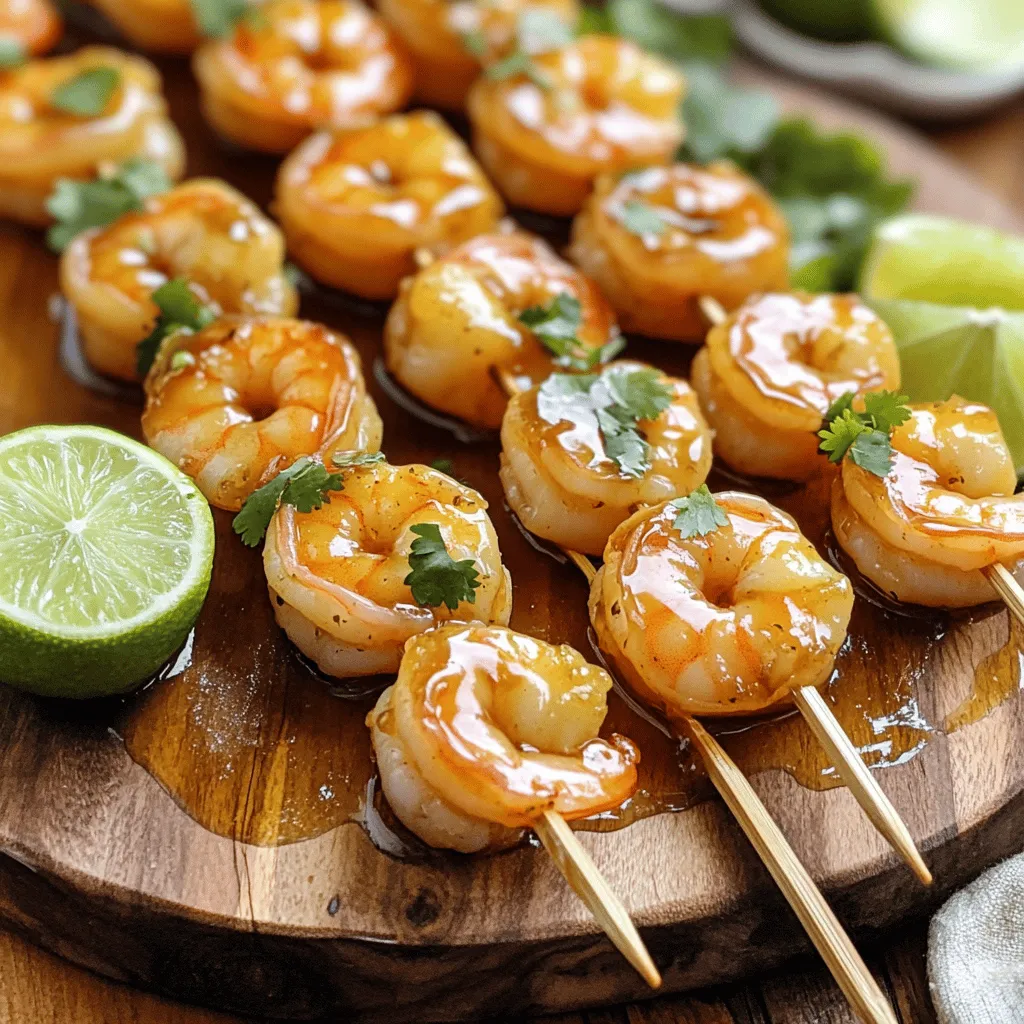
Are you ready to impress your friends with a quick and tasty dish? Honey garlic shrimp skewers are easy to

To make a tasty Peach Cobbler Dump Cake, gather these main items: - 2 cans (15 oz each) sliced peaches in syrup, drained - 1 cup brown sugar - 1 teaspoon cinnamon - 1 box yellow cake mix (15.25 oz) - 1 cup unsalted butter, melted (2 sticks) These ingredients provide a sweet and rich flavor. The peaches give a juicy base, while the cake mix forms a soft topping. For a little crunch, consider adding: - 1 cup oats Oats create a delightful texture. They add a chewy bite that balances the soft peaches. When it’s time to serve, here’s what I recommend: - Serve warm in bowls - Add a scoop of vanilla ice cream or a dollop of whipped cream This combination is pure joy! The warm cake pairs perfectly with the cold ice cream. You can also garnish with fresh peach slices or a sprinkle of cinnamon for an extra touch. First, set your oven to 350°F (175°C). Preheating is key for even cooking. This temperature ensures your cake bakes perfectly, with a golden top. Next, take two cans of sliced peaches. Drain them well to avoid excess syrup. Spread the peaches evenly in a 9x13 inch baking dish. This will be the base of your cake. Now, sprinkle one cup of brown sugar over the peaches. Add one teaspoon of cinnamon to boost the flavor. Then, open a box of yellow cake mix. Spread it evenly over the peach layer. Do not mix it; let the dry mix sit on top. If you want added crunch, sprinkle one cup of oats over the cake mix. Finally, drizzle one cup of melted butter over everything. This will create a delicious topping as it bakes. Place the dish in the preheated oven. Bake for 40-45 minutes. Keep an eye on it until the top becomes golden brown and bubbly. Once done, let it cool for a few minutes before serving. Enjoy your Peach Cobbler Dump Cake warm with a scoop of vanilla ice cream or a dollop of whipped cream. For the full recipe, refer to the earlier section. To make your Peach Cobbler Dump Cake truly shine, focus on the texture. Use ripe peaches for a juicy base. This gives the cake a wonderful moistness. If you want a crunch, add oats on top. They create a nice contrast with the soft peaches. Always pour the melted butter evenly. This helps the cake mix cook through and gives a golden finish. Adding spices can elevate your dump cake. A teaspoon of cinnamon adds warmth and depth. You can also try nutmeg or allspice. These spices work well with peaches and enhance the sweetness. If you love a bit of zing, add a splash of vanilla extract. This small touch can make a big difference in flavor. Sometimes, cakes don't turn out as expected. If your topping is too dry, it might need more butter. Drizzle a bit more melted butter on top before baking. If the cake is too soggy, check your peach syrup. Drain the peaches well to prevent excess liquid. If your topping burns, cover it with foil halfway through baking. This keeps it from overcooking while the rest bakes. For the full recipe, check the Peach Paradise Dump Cake section. {{image_2}} You can swap peaches for other fruits. Try using sliced apples or berries. Cherries or pears also work well. Each fruit brings its own flavor. Just remember to adjust the sugar based on the fruit's sweetness. For tart fruits, like cherries, you may want to add a bit more sugar. Experiment and find your favorite combination! If you need a gluten-free option, use a gluten-free cake mix. Many brands offer tasty versions. For a dairy-free cake, replace butter with coconut oil or vegan butter. You can also use almond milk instead of regular milk in recipes. These swaps make the cake safe for everyone to enjoy. You can add nuts for crunch or shredded coconut for a tropical twist. A sprinkle of chocolate chips can make it extra special too. For a spice kick, try adding nutmeg or ginger. You can also mix in some oats for a heartier texture. These additions can change the flavor and make each bake unique! For the full recipe, you can find it [here](#). After making your Peach Cobbler Dump Cake, let it cool. Once cool, cover it with plastic wrap or aluminum foil. Store it in the fridge. It will stay fresh for up to four days. If you want to enjoy it later, proper storage is key. To reheat, use the microwave or oven. If using the microwave, place a slice on a plate and cover it with a paper towel. Heat for 30 seconds to 1 minute. For the oven, cover the cake with foil and heat at 350°F for about 15 minutes. This keeps it warm without drying it out. To freeze, let the cake cool completely. Cut it into individual slices. Wrap each slice in plastic wrap, then in foil. Place the wrapped slices in a freezer bag. They can last for up to three months in the freezer. When ready to eat, thaw in the fridge overnight and reheat as needed. Enjoy your Peach Cobbler Dump Cake whenever you want! For more details, check the Full Recipe. Yes, you can use fresh peaches. Just peel and slice them first. Make sure they are ripe for the best flavor. Fresh peaches give a nice texture and taste. You may need to add a little sugar if they are not sweet enough. Peach Cobbler Dump Cake lasts about 3 to 5 days in the fridge. Store it in an airtight container to keep it fresh. You can also cover it with plastic wrap. The cake might lose some crispness over time, but it will still taste good. Yes, you can prepare the layers ahead. Just assemble everything in the baking dish, then cover it. Store it in the fridge for up to a day. When you are ready, bake it as usual. This saves time when you have guests. You can serve it warm with vanilla ice cream or whipped cream. Ice cream melts slightly and adds creaminess. Whipped cream is light and fluffy on top. You can also add fresh peach slices or a sprinkle of cinnamon for extra flavor. For the full recipe, check out the earlier section. Peach Cobbler Dump Cake is easy and fun to make. You learned about key ingredients, steps, and handy tips. Using different fruits can improve your cake. Don't forget to store leftovers for future treats. This dessert is great for gatherings or cozy nights. With practice, you'll master this recipe and impress others. Enjoy every bite as you share this warm, fruity delight!

Peach Cobbler Dump Cake Simple and Tasty Delight

Are you ready to enjoy a simple yet delicious dessert? Peach Cobbler Dump Cake is a snap to make and

To make Crispy Garlic Parmesan Brussels Sprouts, you will need: - 1 pound Brussels sprouts, trimmed and halved - 4 tablespoons olive oil - 4 cloves garlic, minced - 1/2 cup grated Parmesan cheese - 1 teaspoon garlic powder - 1 teaspoon onion powder - 1/2 teaspoon red pepper flakes (optional) - Salt and black pepper to taste - Fresh parsley, chopped (for garnish) For this recipe, gather these kitchen tools: - A large mixing bowl - A baking sheet - A sharp knife - A cutting board - Measuring spoons - A spatula These tools help you prepare and cook the Brussels sprouts easily. To keep your Brussels sprouts fresh: - Store them in the fridge in a plastic bag. - Use them within a week for the best taste and texture. - Avoid washing them until you are ready to cook. Fresh Brussels sprouts taste better and add more crunch to the dish! You can find the full recipe in the section above. Start by gathering all your ingredients. You need: - 1 pound Brussels sprouts, trimmed and halved - 4 tablespoons olive oil - 4 cloves garlic, minced - 1/2 cup grated Parmesan cheese - 1 teaspoon garlic powder - 1 teaspoon onion powder - 1/2 teaspoon red pepper flakes (optional) - Salt and black pepper to taste - Fresh parsley, chopped (for garnish) Next, preheat your oven to 425°F (220°C). This high heat helps make the sprouts crispy. In a large bowl, mix the halved Brussels sprouts with olive oil, minced garlic, garlic powder, onion powder, and red pepper flakes if you like some heat. Add salt and black pepper to taste. Toss everything well to coat the Brussels sprouts evenly. Now, it’s time to roast! Spread the Brussels sprouts on a baking sheet in a single layer. This helps them cook evenly. Sprinkle the grated Parmesan cheese over them. Place the baking sheet in your preheated oven. Roast for 20-25 minutes, flipping the sprouts halfway through. This flip ensures they get crispy all over. When they turn golden brown, they’re done! Remove them from the oven and let them cool for a few minutes. To get the crispiest Brussels sprouts, remember these tips: - Make sure to dry the Brussels sprouts well after washing. - Use a large enough baking sheet so they don’t overcrowd. - A hot oven is key; don’t skip preheating. - Flipping them halfway helps them cook evenly. Follow these steps, and you’ll have perfectly crispy garlic Parmesan Brussels sprouts. For the full recipe, check out the complete guide. To get the best crispy Brussels sprouts, follow these steps: - Use fresh Brussels sprouts. Look for bright green, firm ones. - Cut them evenly. Halve each sprout so they cook at the same rate. - Avoid overcrowding. Spread them out on the baking sheet. This helps them crisp up. - Flip halfway through. Turn them at the 10-15 minute mark for even cooking. - Watch the oven. Each oven is different, so keep an eye on them. You can change the flavors easily: - Add spices. Try smoked paprika or cayenne for heat. - Use different cheeses. Feta or blue cheese give a unique taste. - Add sweetness. Drizzle with honey or balsamic glaze before serving. - Mix in nuts. Toasted walnuts or pecans add a nice crunch. - Experiment with herbs. Thyme or rosemary can boost the flavor. Here are some things to watch out for: - Not preheating the oven can lead to soggy sprouts. - Skipping oil will make them dry. Always coat them well. - Using frozen sprouts can result in a mushy texture. Fresh is best. - Not seasoning enough can lead to bland flavors. Season generously. - Ignoring cooking time. Check often to prevent burning. For the full recipe, refer back to the earlier section. Enjoy your cooking! {{image_2}} You can easily make this dish vegan. Swap out the Parmesan cheese for a plant-based version. Nutritional yeast also works well. It adds a cheesy flavor without the dairy. Use a mix of olive oil and vegan butter for richness. This keeps the sprouts crispy and tasty. If you like heat, add more red pepper flakes. You can also toss in some cayenne pepper. For a smoky flavor, try smoked paprika. A dash of sriracha or chili oil before serving adds a nice kick. Adjust the spice level to fit your taste. Feel free to play with different spices. For a fresh twist, add lemon zest. Herbs like thyme or rosemary work beautifully too. Garlic lovers can increase the garlic powder. Try Parmesan blends with other cheeses, like Pecorino Romano. Each change brings a unique flavor to your Brussels sprouts. For the full recipe, check out the Crispy Garlic Parmesan Brussels Sprouts. After you make Crispy Garlic Parmesan Brussels Sprouts, let them cool. Place them in an airtight container. They stay fresh in the fridge for about 3 days. Keep them away from moisture to keep them crispy. If you want to save Brussels sprouts for later, freezing works well. Spread the cooled sprouts on a baking sheet. Make sure they are not touching each other. Freeze for 1-2 hours. Then, transfer them to a freezer bag. They last up to 3 months in the freezer. When you're ready to cook, do not thaw them. To reheat, preheat your oven to 400°F (200°C). Place the sprouts on a baking sheet. Bake for about 10-15 minutes until they are hot and crispy again. You can also reheat them in an air fryer for 5-7 minutes. This helps keep the texture nice. Enjoy your meal again! For the full recipe, check out the detailed steps above. Crispy Garlic Parmesan Brussels sprouts stay fresh for about 3 to 5 days in the fridge. Store them in an airtight container. Make sure they cool down first before sealing. This helps keep them crispy longer. If you notice moisture, use a paper towel to absorb it. Yes, you can use frozen Brussels sprouts. However, they may not get as crispy. Thaw them first and pat them dry with a towel. This removes extra moisture. I recommend roasting them for a few extra minutes to get that nice crunch. Brussels sprouts pair well with many dishes. Here are some ideas: - Roast chicken or turkey - Grilled steak or pork chops - Quinoa or wild rice salads - Pasta with garlic and olive oil - A simple green salad with lemon dressing These pairings enhance the rich flavor of the Brussels sprouts. You can also serve them with a dipping sauce for a fun twist. For the full recipe, check out the Crispy Garlic Parmesan Brussels Sprouts recipe above. This blog post covers how to make Crispy Garlic Parmesan Brussels Sprouts. We detailed the key ingredients, tools, and tips for freshness. I guided you through every step, from prep to cooking. Essential tips helped you avoid common mistakes and customize flavors. We also explored variations like vegan options and spicy twists. Lastly, I shared storage tips and answered common questions. Enjoy making this dish. With practice, your crispy Brussels sprouts will impress everyone!

Crispy Garlic Parmesan Brussels Sprouts Delight Recipe

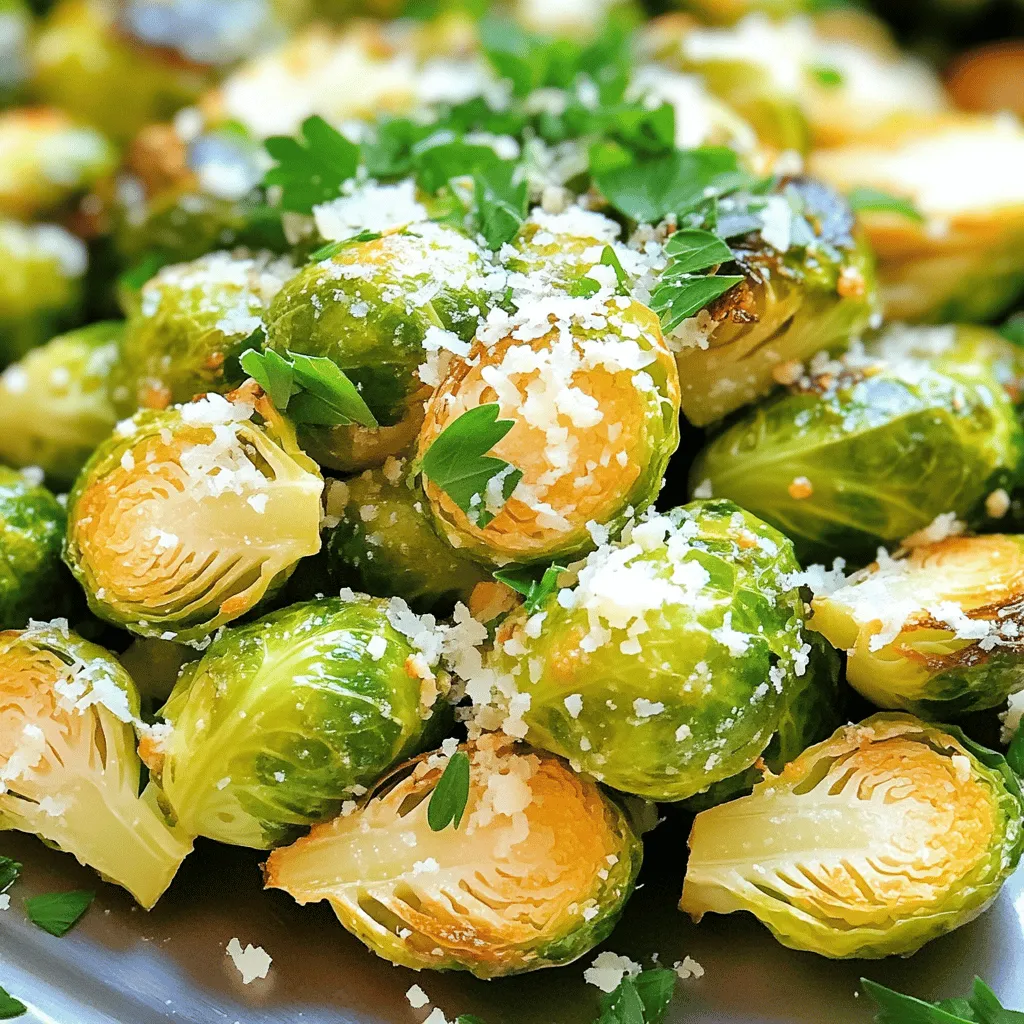
Are you ready to elevate your veggie game? My Crispy Garlic Parmesan Brussels Sprouts recipe transforms this often-overlooked vegetable into

To make easy chicken fajitas, gather these key items: - 1 lb (450g) boneless, skinless chicken breasts, thinly sliced - 1 bell pepper (red, yellow, or green), sliced - 1 medium onion, sliced - 3 cloves garlic, minced - 4-6 small flour tortillas These main ingredients give your fajitas a great base. The chicken provides protein, while the peppers and onion add color and crunch. Spices make your chicken fajitas burst with flavor. Here’s what you need: - 2 tablespoons olive oil - 1 tablespoon chili powder - 1 teaspoon cumin - 1 teaspoon paprika - ½ teaspoon salt - ½ teaspoon black pepper These spices enhance the taste of the chicken and vegetables. They create a warm, inviting flavor that makes your meal special. Add some fun to your fajitas with these garnishes and sides: - Fresh cilantro, for garnish - Lime wedges, for serving These extras give your fajitas a fresh twist. A squeeze of lime brightens up the dish, and cilantro adds a pop of color. For the full recipe, check out the complete guide. To start, grab your chicken breasts. Cut them into thin slices. This helps them cook evenly. Next, take a medium bowl and add your chicken. Sprinkle in the chili powder, cumin, paprika, salt, and black pepper. Mix it well until each piece of chicken is coated. This step packs the chicken with flavor. Now, slice your bell pepper and onion. Try to keep the pieces about the same size. This way, they cook at the same time. Heat a large skillet over medium-high heat. Pour in one tablespoon of olive oil. When the oil is hot, add the seasoned chicken. Cook it for about 5-7 minutes. Stir occasionally, so it cooks evenly. The chicken should turn golden brown and no longer be pink. This means it's cooked through. Once done, remove the chicken from the skillet and set it aside. In the same skillet, add the other tablespoon of olive oil. Now, toss in the sliced onion and bell pepper. Sauté them for about 4-5 minutes. You want them tender and slightly charred for extra flavor. After that, add the minced garlic and return the chicken to the skillet. Stir everything together and cook for 2-3 more minutes. This allows all the flavors to combine beautifully. Now, your chicken fajitas are ready to enjoy! Check out the Full Recipe for more details. To keep your chicken juicy, choose thin slices. Thin pieces cook fast and stay moist. Marinate the chicken for at least 15 minutes. This helps the flavors soak in. Use a mix of olive oil and spices for the marinade. When cooking, don’t overdo it. Cook just until the chicken is no longer pink. This keeps it tender and juicy. Start with a hot skillet. Heat your pan before adding oil. This helps veggies cook well and prevents sticking. Cut your peppers and onions into even pieces. This ensures they cook at the same rate. Stir them often, but let them sit for a moment to get a nice char. This adds great flavor. Aim for vibrant colors; they should be soft but still crunchy. Warm your tortillas before serving. You can do this in a skillet or microwave. Fill each tortilla with the chicken and veggies. Top with fresh cilantro for a bright touch. Squeeze some lime juice on top for a zesty kick. You can also add salsa, guacamole, or sour cream. These toppings add creaminess and extra flavor. For a fun twist, serve with rice or beans on the side. For the full recipe, check the details above. {{image_2}} You can make a tasty vegetarian version of fajitas using tofu. Choose firm tofu for the best results. Press the tofu to remove extra water. Cut it into thin strips. Marinate it like you would with chicken, using the same spices. Cook it in a hot skillet until golden brown. This way, you get a nice texture and flavor. Serve it just like traditional chicken fajitas, and enjoy the plant-based goodness. If you prefer beef or shrimp, you can switch the protein easily. For beef, use flank steak or sirloin. Slice it thinly against the grain for tenderness. Season it with the same spices as the chicken. For shrimp, use large, raw shrimp. Cook them until they turn pink and firm. Both options add a new twist to your fajitas. The key is to adjust cooking times to ensure everything is perfectly cooked. You can also change up the flavor by adding new spices. Try adding oregano for an earthy taste or cayenne pepper for heat. A dash of lime juice can brighten the dish, too. Experiment with smoked paprika for a deeper flavor. You can also add fresh herbs like cilantro or parsley. These small changes can make your fajitas exciting and unique. Don’t hesitate to be creative and find your favorite combination! For the complete recipe, check out the [Full Recipe]. To keep your leftover fajitas tasty, store them in an airtight container. Make sure to let them cool first. Place the chicken and veggies in one container. Keep the tortillas in a separate bag or container. This keeps everything fresh and prevents sogginess. Store your fajitas in the fridge for up to three days. When you are ready to enjoy your fajitas again, reheating is key. I like to use a skillet for the best results. Heat a small amount of oil over medium heat. Add the chicken and veggies to the skillet. Cook for about 4-5 minutes, stirring often. This helps the flavors come back to life. You can also use a microwave. Heat in short bursts to avoid drying them out. If you want to save your fajitas for a later date, freezing works great. Allow the chicken and veggies to cool completely. Place them in a freezer-safe bag or container. Remove as much air as possible to prevent freezer burn. You can freeze them for up to three months. When ready to eat, thaw in the fridge overnight. Then, heat them up as mentioned before. For the tortillas, wrap them in foil and freeze separately. This keeps them soft and fresh. Check out the Full Recipe for more details! The best tortilla for chicken fajitas is a small flour tortilla. Flour tortillas are soft and flexible, making them easy to fill and roll. They have a nice, chewy texture that pairs well with the chicken and veggies. You can also use corn tortillas if you prefer a gluten-free option. Just remember, corn tortillas can break more easily, so handle them gently. Yes, you can make chicken fajitas in advance. Cook the chicken and vegetables, then store them in the fridge. They will stay fresh for up to three days. When you're ready to eat, just warm them up in a skillet. You can also prepare the spice mix ahead of time. This saves you time on busy days. Just make sure to warm the tortillas right before serving for the best taste. These chicken fajitas are mild to medium in spice. The chili powder adds warmth, but it's not overpowering. If you like more heat, you can add jalapeños or a pinch of cayenne pepper. For less spice, reduce the chili powder. Adjusting the spice level makes it easy to suit your taste. Enjoy the flavor without the burn! You now have all the tools to make easy chicken fajitas. We covered the key ingredients, spices, and steps to prepare this dish. I shared tips to ensure juicy chicken and vibrant veggies. You also learned about fun variations, storage, and answers to common questions. Enjoy creating delicious fajitas that everyone will love. Your culinary skills will shine with this simple recipe. Happy cooking!

Easy Chicken Fajitas Quick and Flavorful Meal Guide

Looking for a quick and tasty meal? I’ve got you covered with Easy Chicken Fajitas! This simple guide takes you

- 2 cups cooked rice - 2 cups broccoli florets - 1 cup sharp cheddar cheese - 1 cup cream of mushroom soup - 1/2 cup milk - 1 small onion - 2 cloves garlic - 1/2 cup breadcrumbs - Fresh parsley for garnish This casserole is rich in flavor and comfort. Each serving has about 300 calories. It contains around 12 grams of fat and 10 grams of protein. You can enjoy this dish without guilt. The cheese gives it a rich taste, while broccoli adds fiber. Using cream of mushroom soup keeps it moist and creamy. You can find the Full Recipe above to make it yourself! 1. First, preheat your oven to 350°F (175°C). This step is key for even cooking. 2. Grab a large baking dish and grease it lightly. This helps prevent sticking. 3. Next, heat a drizzle of olive oil in a large skillet over medium heat. 4. Add the finely chopped onion and sauté until it turns translucent, about 3-4 minutes. 5. Once the onion softens, add the minced garlic. Cook it for an extra minute until it smells great. 6. Now, toss in the broccoli florets. Cook for 2-3 minutes until they are just tender. Remove from heat. 1. In a big mixing bowl, combine the cooked rice, the broccoli mix, cream of mushroom soup, milk, and paprika. 2. Stir everything until well combined. This is the base of your casserole. 3. Fold in half of the shredded cheddar cheese. Save the rest for later. 4. Don't forget to season with salt and pepper to taste. It adds flavor to your dish. 1. Transfer the mixture to the greased baking dish. Spread it evenly to ensure even cooking. 2. Sprinkle the remaining cheddar cheese on top for a cheesy finish. 3. If you like, add breadcrumbs for a crunchy topping. 4. Bake in the oven for 25-30 minutes. Look for a bubbly and golden top to know it's done. You can find the full recipe above to ensure you have all the details right! To make perfect rice, rinse it first. This removes extra starch. Use a ratio of 1 cup rice to 2 cups water. Bring water to a boil, add rice, cover, and simmer for 18-20 minutes. Fluff with a fork once done. For broccoli, steam it for 3-4 minutes. You want it bright green and tender but still crisp. This keeps its flavor and nutrients intact. Avoid overcooking, as it can turn mushy. If you don’t have cream of mushroom soup, use cream of chicken or vegetable soup. You can even make a homemade version with sautéed mushrooms and cream. It adds a fresh taste. For cheese, try using mozzarella or gouda instead of cheddar. Each type gives a unique flavor. Blend different cheeses for a richer taste. Just keep the total amount the same. Pair your casserole with a fresh salad or steamed green beans. This balances the richness of the dish. You can also serve it with garlic bread for a comforting meal. For presentation, use a vibrant plate. Sprinkle fresh parsley on top for color. Serve it hot and bubbly, so everyone enjoys the creamy goodness. For the full recipe, check out the Full Recipe above. {{image_2}} You can easily add proteins to your Cheddar Broccoli Rice Casserole. Chicken or sausage works great. Just cook them before adding to the mix. Chop the chicken into bite-sized pieces. For sausage, slice it into rounds. Both will add a tasty twist. If you prefer a meat-free option, consider using chickpeas or lentils. These will give you a good protein boost without meat. To change the flavor, you can add herbs or spices. Try thyme, rosemary, or even a pinch of cayenne for heat. These will wake up the dish and make it special. You can also switch the cheese. Instead of cheddar, use mozzarella or pepper jack for a different taste. Each cheese brings its own unique flavor to the casserole. Using seasonal vegetables can make this dish shine. In spring, add peas or asparagus for a fresh touch. In fall, try sweet potatoes or butternut squash. These veggies will not only taste great but also add color. You can also adjust the recipe for holidays. For example, add cranberry sauce for a festive flair. This makes your casserole perfect for gatherings. To store your Cheddar Broccoli Rice Casserole, let it cool first. Place it in an airtight container to keep it fresh. Make sure to cover it well. It will last for about 3 to 5 days in the fridge. Always check for any off smells or changes in texture before eating. If you want to freeze the casserole, I suggest cutting it into portions. Use a freezer-safe container or wrap it tightly with plastic wrap. This keeps the casserole fresh for up to 3 months. When you are ready to eat, thaw it overnight in the fridge. Reheat in the oven at 350°F (175°C) until it is hot throughout, about 20-25 minutes. For busy weekdays, make this casserole ahead of time. Prepare it and store it in the fridge for up to 2 days before baking. You can also bake it and then portion it out. Store single servings in containers for easy meals. This makes it super simple to grab and go any day of the week. You could find the full recipe to help you plan your next meal! You can make this casserole gluten-free by using specific ingredients. Here’s what to do: - Use gluten-free rice, like brown or white rice. - Substitute regular cream of mushroom soup with a gluten-free version or homemade soup. - Ensure the cheese you choose is labeled gluten-free. These swaps will help you enjoy the same great taste without gluten. Yes, frozen broccoli works well! Here are some benefits and tips: - Frozen broccoli is easy to prep and saves time. - It’s often picked and frozen at peak freshness, keeping nutrients intact. - Before adding to the casserole, thaw and drain any excess water. This step helps prevent a watery dish. Look for these signs to know your casserole is ready: - The top should be golden brown and bubbly. - You can insert a fork or knife in the center; it should come out clean. - The edges might start to pull away from the sides of the dish. These clues will guide you to perfect doneness every time. For the complete recipe, check out the Full Recipe. You now have a simple yet delicious recipe for Cheddar Broccoli Rice Casserole. We covered key ingredients, easy steps, and creative variations. Plus, I shared tips for storage and meal prep. This dish is perfect for any meal and can suit different diets. Try making it your own with extra flavors or proteins. Whether you serve it fresh or as leftovers, it will always please. Cooking can be fun and rewarding. Enjoy making this tasty casserole!

Cheddar Broccoli Rice Casserole Rich and Comforting Meal

Craving a warm, hearty meal that’s easy to make? Look no further than Cheddar Broccoli Rice Casserole! It combines creamy

- 3 large eggs, separated - 1/4 teaspoon cream of tartar - 3 ounces cream cheese, softened - 1/2 teaspoon garlic powder (optional) - 1/4 teaspoon salt - 1 tablespoon almond flour (for texture) These ingredients create a light and airy bread. Each one plays a key role. The eggs give structure, while cream cheese adds creaminess. Cream of tartar helps the egg whites hold their shape. Garlic powder boosts flavor, and almond flour gives texture. - Calories per serving: About 60 calories - Macronutrient breakdown: - Carbs: 1 gram - Fats: 5 grams - Proteins: 4 grams Keto Cloud Bread is low in carbs and high in protein. This makes it great for anyone on a keto diet. It helps you feel full without the carbs. The cream cheese adds healthy fats, which are good for energy. Keto Cloud Bread is gluten-free and low in carbs. It fits well into a keto lifestyle. Eating this bread can help you manage weight. It also supports stable blood sugar levels. Enjoying this bread can make meals more satisfying. Try it with your favorite keto spreads or use it in sandwiches. You will love how easy and tasty it is! For the full recipe, check the earlier section. 1. Preheat oven and prepare baking sheet Set your oven to 300°F (150°C). Line a baking sheet with parchment paper. This helps the bread not stick. 2. Separate eggs and prepare mixtures Take 3 large eggs. Carefully separate the whites from the yolks. Place the yolks in one bowl and the whites in another. This step is key for light, fluffy bread. 1. Beating egg whites for stiff peaks Grab an electric mixer. Beat the egg whites until they form stiff peaks. This takes about 3-5 minutes. Add 1/4 teaspoon of cream of tartar halfway through. This gives the whites more stability. 2. Combining cream cheese and egg yolks In the bowl with egg yolks, mix in 3 ounces of softened cream cheese. You may add 1/2 teaspoon of garlic powder and 1/4 teaspoon of salt if you like. Blend this until it is smooth and creamy. 1. Folding techniques for optimal texture Gently fold the beaten egg whites into the cream cheese mix. Use a spatula and be careful not to deflate the whites. You want a light and airy texture. 2. Tips for baking time and temperature Sprinkle in 1 tablespoon of almond flour and fold it in. Use a large spoon to scoop dollops onto the baking sheet. Make 6-8 rounds. Bake for 25-30 minutes. Look for golden tops and crisp edges. Enjoy your fluffy Keto Cloud Bread! For the full recipe, check the earlier section. To get the best texture in your Keto Cloud Bread, you must not deflate the egg whites. Egg whites need to be whipped until they form stiff peaks. This gives your bread its light and airy feel. Use an electric mixer for the best results. When you fold the egg whites into the cream cheese mixture, be gentle. The aim is to keep as much air in the batter as possible. You can easily change the flavor of your cloud bread. Try adding herbs like rosemary or thyme for a savory twist. Garlic powder can also enhance the taste. If you want more spice, add chili flakes or paprika. For toppings, think about using avocado, cheese, or smoked salmon. All these options fit well into a keto meal plan. Baking can be tricky, so here are some common mistakes. If your cloud bread is flat, your egg whites may not have been whipped enough. Be sure to check for stiff peaks. Some people might substitute ingredients without thinking. For instance, using regular flour instead of almond flour will not work. Stick to the recipe for the best outcome. For the full recipe, check the earlier section to ensure you get every detail right. {{image_2}} You can enjoy keto cloud bread in many ways. First, think about sweet versus savory options. For a sweet twist, add a bit of vanilla extract and a sugar substitute. You could also sprinkle in some cinnamon for a nice flavor boost. For savory cloud bread, garlic powder and herbs like oregano work wonders. You can also change the texture by adding different cheeses. Cream cheese is the base, but you can mix in mozzarella or cheddar. These additions give your cloud bread a unique taste. Keto cloud bread is versatile. You can use it as a base for sandwiches. Try filling it with turkey, lettuce, and avocado. Or, use it for a breakfast sandwich with eggs and cheese. It also makes a great snack. Just spread some almond butter or cream cheese on top. You can stack the cloud bread and secure them with a toothpick. This makes for a fun and tasty presentation. Pair it with your favorite keto dips or spreads. If you follow a vegan diet, you can make adjustments. Use a flaxseed meal or chia seeds mixed with water instead of eggs. This will help bind the bread and keep it fluffy. For gluten-free options, the recipe is already friendly since it uses almond flour. Just ensure that all your other ingredients are gluten-free. Cloud bread is a great choice for many diets. Check the Full Recipe for more ideas. You can store Keto Cloud Bread at room temperature for up to two days. Just keep it in an airtight container. This helps it stay soft and fresh. I recommend using a plastic or glass container with a tight lid. You can also wrap it in plastic wrap if you don't have a container. For longer storage, freezing is the best option. Place the bread in a freezer-safe bag or container. Be sure to remove as much air as possible to prevent freezer burn. You can freeze it for up to a month. When you want to eat it, take it out and let it thaw in the fridge overnight. This keeps the texture nice. To reheat Keto Cloud Bread, the oven works best. Preheat it to 300°F (150°C). Place the bread on a baking sheet. Heat for about 5-10 minutes. This helps the bread stay fluffy. You can also use a microwave for quick reheating. Just heat it for about 15-20 seconds. If you do this, cover the bread with a damp paper towel. This keeps the cloud bread soft and moist. Enjoy your tasty creation! Keto Cloud Bread uses simple ingredients that create a fluffy, low-carb bread. The main parts include: - 3 large eggs: They provide structure and fluffiness. - 1/4 teaspoon cream of tartar: This helps stabilize the egg whites. - 3 ounces cream cheese: It adds creaminess and moisture. - 1/2 teaspoon garlic powder (optional): This gives a nice flavor boost. - 1/4 teaspoon salt: It enhances the overall taste. - 1 tablespoon almond flour: This adds texture without many carbs. These ingredients work together to create a light and airy bread that fits perfectly into a keto diet. Yes, you can make Keto Cloud Bread without cream cheese. Some good alternatives include: - Mascarpone cheese: It offers a similar creamy texture. - Greek yogurt: This adds tanginess but may change the flavor. - Ricotta cheese: This is another creamy option, but it has a different taste. Using these substitutes may change the flavor, but they will still create a delicious cloud bread. Keto Cloud Bread lasts about 3 days at room temperature. Here’s how to store it: - Room temperature: Keep in an airtight container. - Refrigerator: It can last up to a week if stored properly. - Freezer: For longer storage, freeze it for up to a month. Wrap each piece well. Yes, Keto Cloud Bread is great for a keto diet. Here’s why: - Low in carbs: It has minimal carbohydrates, making it a good choice. - High in healthy fats: The cream cheese and eggs provide healthy fats. - Protein-rich: Eggs add protein to your diet. This bread can help you stay on track with your keto goals while enjoying tasty meals. Yes, you can toast Keto Cloud Bread! Here are some tips for toasting: - Toaster: Place the bread in the toaster on a low setting for a few minutes. - Oven: Use a preheated oven at 350°F (175°C) for 5-10 minutes. - Serving suggestions: Top with butter, cheese, or keto-friendly spreads after toasting. Toasting adds a nice crunch and enhances the flavor, making it even more enjoyable. For the full recipe, check out the detailed instructions. Keto Cloud Bread is a simple, low-carb bread perfect for a healthy diet. We discussed the essential ingredients and how to prepare them. You learned step-by-step instructions for mixing and baking. I provided tips to avoid common mistakes and enhance flavors. Finally, storage and serving ideas help you enjoy this treat longer. Embrace this recipe as a healthy alternative. It’s easy to make and delicious, too!

Keto Cloud Bread Simple and Tasty Recipe Guide

Are you craving a light, fluffy bread that fits perfectly into your keto lifestyle? If so, you’re in luck! Keto

Older posts
Newer posts
← Previous Page1 … Page57 Page58 Page59 … Page82 Next →

dsad

© 2025 My Saved Recipe • Built with GeneratePress

Our Policies

  • Copyright Policy
  • Cookie Policy
  • GDPR Policy
  • Privacy Policy
  • Disclaimer
  • Terms Of Use

More Information

  • Home
  • About
  • Contact
  • Appetizers
  • Dessert
  • Dinner
  • Drinks
©2025, My Saved Recipe About Back To Top