Skip to content
DisclaimerTerms Of UseGDPR PolicyCookie Policy

My Saved Recipe

  • Home
  • Drinks
  • Appetizers
  • Dinner
  • Dessert
  • About
  • Contact
  • Privacy Policy
DisclaimerTerms Of UseGDPR PolicyCookie Policy

Savannah

- 1 lb raw shrimp, peeled and deveined - 8 small corn tortillas - 1 ripe mango, diced - 1 tablespoon olive oil - 1 teaspoon chili powder - 1 teaspoon cumin - 1 garlic clove, minced - Salt and pepper to taste - 1/2 red bell pepper, diced - 1/4 red onion, finely chopped - 1 jalapeño, minced (optional) - 2 tablespoons fresh cilantro, chopped - 1 lime, juiced When making shrimp tacos, fresh ingredients make all the difference. You will need raw shrimp, which I prefer peeled and deveined for ease. The corn tortillas provide a nice base that adds flavor and texture. A ripe mango is essential for the salsa; it adds sweetness and freshness. For seasoning the shrimp, olive oil helps the spices stick. Chili powder and cumin give a warm, earthy flavor. Garlic adds depth, while salt and pepper enhance everything. The mango salsa is a star. Diced red bell pepper adds crunch, and red onion gives a mild bite. If you like heat, you can add jalapeño. Fresh cilantro brings brightness, and lime juice adds tang. Check out the Full Recipe for precise measurements and instructions. This combination of ingredients makes your shrimp tacos truly delightful! First, take your shrimp and put them in a bowl. Add one tablespoon of olive oil, one teaspoon of chili powder, one teaspoon of cumin, and one minced garlic clove. Sprinkle in salt and pepper to taste. Now, toss the shrimp until they are well coated. Next, heat a skillet over medium-high heat. Once hot, add the shrimp. Cook each side for about two to three minutes. The shrimp should turn pink and opaque. That's when you know they are ready. Once cooked, take them off the heat and set them aside. In another bowl, combine one diced ripe mango, half a diced red bell pepper, and a quarter of a finely chopped red onion. If you like some heat, add one minced jalapeño. Next, chop two tablespoons of fresh cilantro and squeeze in the juice of one lime. Mix all these fresh ingredients together. Taste the salsa and add salt if needed. Now, warm your eight small corn tortillas. You can do this in a skillet or microwave until they are soft. Take each tortilla and fill it with a few pieces of cooked shrimp. Top it off with a generous scoop of your mango salsa. If you want, you can add a dollop of sour cream or Greek yogurt on top. This adds a nice creaminess to the tacos. Enjoy your colorful and fresh shrimp tacos! For the complete recipe, check out the Full Recipe. To get the best shrimp, cook them just right. Overcooked shrimp can become tough and rubbery. You want them to be pink and opaque. When they curl into a C shape, they’re usually done. Keep a close watch! Want to jazz up your mango salsa? Try adding diced avocado or some lime zest for extra flavor. These ingredients can add creaminess and brightness. When picking mangoes, look for ones that are slightly soft to the touch. A sweet fragrance is also a good sign. These shrimp tacos pair well with fresh sides like a simple salad or black beans. For drinks, consider serving a cold limeade or a light beer. They complement the shrimp tacos nicely. If you're feeling adventurous, try a fruity sangria! If you're curious about the full recipe, check it out [here](insert-recipe-link). {{image_2}} You can swap shrimp for other seafood. Try using white fish like cod or tilapia. They grill well and offer a mild taste. Chicken is another great option. Just season it like you would the shrimp. For vegetarians, consider using grilled zucchini or portobello mushrooms. These add a hearty texture to your tacos. Mango salsa is fresh, but you can mix it up! Pineapple salsa adds a sweet twist. Try peach salsa for a juicy summer flavor. If you like heat, add diced jalapeños or serrano peppers. They give your salsa a nice kick. You can even mix and match fruits to create your own unique salsa. Dress up your tacos with a creamy avocado dressing. Just blend ripe avocado with lime juice and a pinch of salt. This adds creaminess and flavor. For those who crave spice, make a chipotle sauce. Mix mayonnaise with chipotle in adobo for a smoky sauce. This will elevate your tacos to the next level. For the full recipe, check out the Tropical Shrimp Tacos with Mango Salsa. To store your leftover shrimp tacos, keep the shrimp and salsa separate from the tortillas. Place the shrimp in an airtight container. You can store the salsa in another container. Both can stay in the fridge for up to three days. Make sure the shrimp is fully cooled before sealing it. This keeps flavors fresh and safe. Can you freeze cooked shrimp and salsa? Yes, you can freeze both! Place the shrimp in a freezer-safe bag. Remove as much air as possible before sealing. For the salsa, use a container that allows for some expansion. It can freeze for about one month. When you are ready to eat, thaw them in the fridge overnight. To reheat shrimp safely, set a skillet on low heat. Add the shrimp and warm it for a few minutes. To heat tortillas, place them in a dry skillet for about 30 seconds on each side. This will keep them soft and warm. To maintain the taco's texture, avoid microwaving the shrimp. Instead, use a skillet for the best results. Enjoy your flavorful tacos again! Making shrimp tacos is quick and easy. You can make them in about 25 minutes. This includes 15 minutes for prep and 10 minutes for cooking. You’ll have a tasty meal ready in no time. Yes, you can use frozen shrimp. Just make sure to thaw them first. Place them in a bowl of cold water for about 10-15 minutes. This helps keep the shrimp juicy. Fresh shrimp can taste better, but frozen shrimp works well too. If you don’t have corn tortillas, you can use flour tortillas. You can also try lettuce wraps for a low-carb option. For gluten-free needs, look for gluten-free tortillas at the store. Each option brings a unique flavor to your tacos. Serve your shrimp tacos with fresh sides like a crisp salad or rice. Black beans are a great choice too. For drinks, try a cold soda or fresh limeade. These pair nicely with the sweet and spicy flavors of the tacos. Shrimp tacos are simple and fun to make. You learned about the main ingredients like fresh shrimp and juicy mango. We covered steps for cooking shrimp perfectly and making tasty mango salsa. You can mix in your favorite sides and drinks. Try the variations for seafood, salsa, and dressings. Store any leftovers properly for later enjoyment. Enjoy your cooking adventure with shrimp tacos and mix it up to suit your taste!

Easy Shrimp Tacos with Mango Salsa Fresh Delight

Looking for a quick and tasty dinner idea? These Easy Shrimp Tacos with Mango Salsa are the answer! With tender

For the base of the peach crisp, you need fresh, ripe peaches. Here’s what you will gather: - 6 ripe peaches, peeled and sliced - 1/2 cup granulated sugar - 1 tablespoon lemon juice - 1 teaspoon cinnamon - 1/4 teaspoon nutmeg These ingredients create a sweet and tangy layer. The peaches should be juicy and fragrant. They should shine with flavor. The sugar helps to draw out their natural sweetness. The lemon juice adds a nice zing. Cinnamon and nutmeg give warmth and depth. Next, we’ll make the oat topping that adds crunch. Gather these ingredients: - 1 cup rolled oats - 1 cup all-purpose flour - 1/2 cup brown sugar, packed - 1/2 cup unsalted butter, melted - 1/4 teaspoon salt This topping is what makes the crisp special. Rolled oats provide a hearty texture. Flour helps bind everything together. Brown sugar adds a caramel-like sweetness. Butter gives richness and helps create a golden top. The salt balances the sweetness. You can add a twist to your crisp with these optional ingredients: - 1/2 cup chopped pecans Chopped pecans bring a delightful crunch. They also add a nutty flavor that pairs well with peaches. You can mix them into the oat topping for added texture. Feel free to skip them if you prefer a simpler taste. For the full recipe, check out the detailed instructions. Enjoy making this simple and delicious treat! Start with ripe peaches. Peel and slice them. You need six peaches for this recipe. Put the sliced peaches in a large bowl. Add half a cup of granulated sugar. Pour in one tablespoon of lemon juice. Sprinkle in one teaspoon of cinnamon and a quarter teaspoon of nutmeg. Mix everything well until the peaches are coated. This makes the filling sweet and fragrant. Once mixed, pour the peach filling into a greased 9x13-inch baking dish. In a new bowl, combine one cup of rolled oats and one cup of all-purpose flour. Add half a cup of packed brown sugar and a quarter teaspoon of salt. Pour in half a cup of melted unsalted butter. Mix with a fork until the mixture becomes crumbly. If you like, fold in half a cup of chopped pecans for a nutty crunch. This topping adds a nice texture to the crisp. Spread the oat topping evenly over the peach filling. Make sure to cover all the peaches. Now, bake in your preheated oven at 350°F (175°C). Bake for 30 to 35 minutes. The top should be golden brown, and the peaches should be bubbling. Once done, take it out of the oven and let it cool for ten minutes. This lets the flavors settle and makes it easier to serve. Enjoy your warm peach crisp! For the full recipe, check the details above. When picking peaches, look for ones that feel soft but not mushy. The color should be a warm yellow or golden hue. If you smell the peach, it should have a sweet scent. Avoid peaches with bruises or dark spots; these may be overripe. Try to choose organic peaches if you can. They often have better flavor and are grown without harmful chemicals. Adding spices makes your peach crisp even better. Cinnamon is a classic choice. It adds warmth and depth to the sweet peaches. Nutmeg brings a slightly nutty taste that pairs well with the fruit. You can also try ginger for a spicy kick. Just a pinch of each spice goes a long way. Feel free to mix and match to find your favorite flavor combo. The oat topping should be crumbly and golden brown. To get this, mix rolled oats with flour and brown sugar. Melted butter helps bind it all together. Make sure not to overmix; you want some chunks for texture. If you add nuts, chop them finely so they blend well. Bake until the topping is crisp. This makes the dish even more delicious. For a fun twist, add a pinch of salt to balance the sweetness. For the full recipe, check out the complete guide. {{image_2}} You can change the fruit in this crisp. Try using apples, pears, or berries. Each fruit brings its own taste. Apples give a nice tartness, while berries add a burst of flavor. Just keep the sugar amount similar. Adjust based on the sweetness of the fruit. For example, if you use tart apples, you might want more sugar. To make this peach crisp gluten-free, swap the all-purpose flour. Use a gluten-free flour blend instead. Many blends work well in baking. They help keep the crisp's texture. Ensure your oats are labeled gluten-free too. Some oats can have gluten due to cross-contamination. Adding nuts or seeds gives a great crunch. Pecans are tasty, but you can use walnuts or almonds. Chop them up and mix them into the oat topping. If you want more nutrition, add seeds like chia or flaxseed. They boost fiber and add healthy fats. This makes the dish more filling and fun! For the full recipe, check out the complete details on how to make this delightful treat. After you enjoy your peach crisp, store any leftovers in an airtight container. Keep it in the fridge for up to three days. This keeps the flavors fresh and the texture nice. If you want to save it for longer, freezing is a great option. To reheat your peach crisp, preheat your oven to 350°F (175°C). Place the crisp in a baking dish. Cover it with foil to prevent burning. Heat for about 15 to 20 minutes, or until it's warm throughout. You can also microwave it for quick reheating. Just heat in short bursts to avoid overheating. If you want to freeze your peach crisp, let it cool completely first. Wrap it tightly in plastic wrap or foil. Then, place it in a freezer-safe bag or container. It can stay in the freezer for up to three months. To enjoy it later, thaw in the fridge overnight before reheating. This keeps it tasting fresh and delicious, just like the day you made it. For the full recipe, check back in the sections above! Yes, you can use canned peaches. Make sure to drain them well. Canned peaches are soft, so your crisp may be a bit mushy. If you want a firmer texture, use fresh peaches when they are in season. Fresh peaches give a bright flavor and nice texture. Remember to adjust the sugar, as canned peaches may already be sweet. To make the topping healthier, you can replace some butter with Greek yogurt. This adds protein and cuts down on fat. You can also swap white flour for whole wheat flour. This change boosts fiber and nutrients. Add in some flaxseed or chia seeds for added health benefits. These small swaps keep the crisp tasty while improving nutrition. Serve the peach crisp warm from the oven for the best taste. A scoop of vanilla ice cream or a dollop of whipped cream makes it extra special. You can also sprinkle some chopped nuts on top for a nice crunch. For a fun twist, try adding a drizzle of honey or caramel sauce. Enjoy this simple dish at family dinners or gatherings! For the complete recipe, check out the Full Recipe. This blog post showed how to create a tasty peach crisp with oat topping. We covered fresh ingredients for the base, different topping options, and step-by-step instructions. Tips on choosing ripe peaches and flavor enhancements helped improve your dish. We also discussed variations, storage, and answered common questions. In the end, this recipe is versatile and easy. You can enjoy it your way, making it special for you. Now, grab those peaches and start baking!

Peach Crisp with Oat Topping Simple and Delicious Treat

Are you ready for a sweet treat that’s simple and tasty? Peach Crisp with Oat Topping is the perfect dessert

For this dish, I always choose sweet corn. It has a nice flavor that shines when grilled. Use four ears of corn, husked and cleaned. Fresh corn is best, but frozen corn works too. If you go for frozen, make sure it’s thawed first. Grilling fresh corn brings out its natural sweetness. The magic of flavor comes from the spices. You will need: - 2 tablespoons olive oil - 1 teaspoon chili powder - 1/2 teaspoon garlic powder - 1/2 teaspoon smoked paprika - 1 lime, juiced and zested - Salt and pepper to taste These spices give the corn a zesty kick. The chili powder adds heat, while the smoked paprika brings depth. Lime juice and zest brighten the flavors, making every bite refreshing. Toppings make this dish pop! I recommend: - 1/4 cup cotija cheese, crumbled (or feta as a substitute) - Fresh cilantro, chopped, for garnish Cotija cheese adds a creamy texture and a salty bite. The cilantro gives a burst of freshness. Together, they elevate the corn to gourmet status. For the full recipe, check out the complete guide to Chili Lime Corn on the Cob. Start by husking the corn. Remove all the green leaves and silk. Rinse the ears under cold water. This helps clean off any dirt. I love using fresh, sweet corn for this recipe. It makes the dish taste amazing. You can use frozen corn too, but fresh corn adds the best flavor. In a small bowl, combine olive oil, chili powder, garlic powder, and smoked paprika. Squeeze in the juice of one lime and add the zest. Add salt and pepper to taste. Mix well until it looks smooth. This dressing gives the corn a spicy and zesty kick. You can adjust the spice level based on your taste. Preheat your grill to medium-high heat. If you use a stovetop grill pan, set it to medium heat. Brush the corn with half of the chili lime dressing. Make sure every kernel gets some flavor. Place the corn on the grill. Cook for 10 to 12 minutes, turning often. You want it to be tender with nice char marks. After grilling, brush the corn with the rest of the dressing. Top with crumbled cotija cheese and fresh cilantro. Enjoy this tasty treat on a summer day! For the full recipe, see the details above. To perfect those grill marks, start with clean grates. This helps the corn not stick. Heat your grill to medium-high. When it's hot, place the corn at a 45-degree angle. This angle gives you nice, deep marks. Turn the corn every few minutes to get even charring. Aim for about 10-12 minutes of grilling. You want a balance of char and tenderness. The magic of chili lime corn comes from the marinade. Use olive oil, chili powder, and lime juice. This mix adds depth and zing. Brush half on the corn before grilling. Save the rest for after grilling. The lime juice will brighten the corn’s natural sweetness. If you want more heat, add cayenne or extra chili powder. Serve the corn hot off the grill. Sprinkle it with cotija cheese right away. This helps the cheese stick to the warm corn. Finish with fresh cilantro for color and flavor. You can also squeeze more lime juice over the top. Serve with lime wedges on the side. This dish pairs well with grilled meats or as a side for tacos. For the full recipe, check out Chili Lime Zesty Corn on the Cob. {{image_2}} To make a vegan version of chili lime corn, skip the cotija cheese. Instead, use nutritional yeast for a cheesy flavor. It adds a nice umami taste without dairy. You can also drizzle a little extra lime juice for brightness. The chili lime dressing keeps it tasty and fresh. If you love heat, add some diced jalapeños to the dressing. You can also sprinkle cayenne pepper on top after grilling. This spicy twist gives your corn a kick. You can adjust the spice level to fit your taste. Just start with a little and add more if you like it hot. You can switch up the cheese based on your preference. Feta works great as a substitute for cotija. You might also try queso fresco for a lighter taste. If you want a creamier touch, use goat cheese. Each cheese brings its own unique flavor, so feel free to experiment! For the full recipe, check out the [Full Recipe]. After grilling, let the corn cool down. Wrap the corn in foil or plastic wrap. Store it in the fridge for up to three days. This method keeps the corn fresh and juicy. If you keep it in an airtight container, it will last even longer. Just make sure it is tightly sealed. This way, you can enjoy the flavors of chili lime corn later. If you want to save corn for later, freezing is a great option. Start by husking the corn and removing the silk. Blanch the corn in boiling water for 4-5 minutes. Then, plunge it into ice water to stop the cooking. Once cooled, wrap each ear in plastic wrap. Place the wrapped corn in a freezer bag. Squeeze out as much air as you can. Frozen corn will stay good for up to six months. When it’s time to enjoy your corn again, there are easy ways to reheat it. You can grill it again for a smoky flavor. Heat your grill to medium and cook for about 5 minutes, turning often. Another option is to use the microwave. Wrap the corn in a damp paper towel and heat for 1-2 minutes. This keeps the corn moist. You can also reheat it in a skillet with a little butter for extra flavor. No matter how you heat it, your chili lime corn will taste great! To pick the best corn, look for bright green husks. The kernels should be plump and firm. Press the kernels with your thumb; they should feel full and juicy. Avoid corn with dry or brown husks. Fresh corn tastes sweeter and grills better. Yes, you can prepare the corn in advance. Husk the corn and mix the chili lime dressing. Store both in the fridge for a few hours or overnight. When ready to grill, brush the corn with the dressing. This saves time and keeps the flavor fresh. You can play with different spices to change the flavor. Try cumin for warmth or cayenne for heat. You can also use lemon zest instead of lime for a different twist. Experiment with fresh herbs like parsley or basil for extra flavor. Enjoy making this dish your own! We explored how to create the best Chili Lime Corn on the Cob. First, we reviewed key ingredients like fresh corn and spices. Then, I shared step-by-step instructions for preparing, dressing, and grilling the corn. We discussed tips for great grill marks and flavor boosts. You can try fun variations, like vegan options or spicy twists. Finally, I covered storage tips for your leftovers. Enjoy making this dish that’s bright, tasty, and sure to impress!

Chili Lime Corn on the Cob Perfect for Summer Grilling

Summer grilling calls for vibrant, tasty dishes, and there’s nothing better than Chili Lime Corn on the Cob. This recipe

To make baked sweet potato fries, you need just a few key items. Here’s what you will need: - 2 large sweet potatoes, peeled and cut into fries - 2 tablespoons olive oil - 1 teaspoon garlic powder - 1 teaspoon smoked paprika - 1/2 teaspoon ground cumin - 1/2 teaspoon salt - 1/4 teaspoon black pepper - Fresh parsley, chopped (for garnish) These ingredients combine to create a sweet and savory snack that you will love. The sweet potatoes bring natural sweetness, while the spices add bold flavor. You can make your fries even better with some optional ingredients. Consider adding: - Cayenne pepper for heat - Parmesan cheese for a cheesy twist - Fresh herbs like rosemary or thyme These extras can change the taste and make your fries unique. Try different combinations to find your favorite. Baked sweet potato fries are a healthy choice. They are high in vitamins A and C. They also provide fiber, which is good for digestion. Here's a quick look at the nutrition per serving: - Calories: Approximately 150 - Protein: 2g - Carbohydrates: 30g - Fiber: 4g - Fat: 5g These fries are a guilt-free treat. They can fit into many diets, making them a great option for everyone. For the full recipe, refer to the earlier section. First, I grab two large sweet potatoes. I peel them with a good knife. After that, I cut them into fries. Aim for about 1/4 inch thick. This size ensures they cook evenly. If you want extra flavor, soak them in cold water for 30 minutes. This step helps remove some starch. Drain them and pat them dry with a towel. In a large bowl, I add the sweet potato fries. I drizzle two tablespoons of olive oil over them. Then, I sprinkle one teaspoon of garlic powder, one teaspoon of smoked paprika, and half a teaspoon each of ground cumin, salt, and black pepper. Toss everything well. Make sure each fry gets coated in the tasty mix. You want them to be flavorful. Next, I preheat the oven to 425°F (220°C). While waiting, I line a baking sheet with parchment paper. After that, I spread the fries in a single layer. This step is key for crispiness. I bake them for about 25 to 30 minutes. Halfway through, I flip them to ensure even cooking. They should turn golden brown and crispy. Once done, I let them cool for a few minutes and garnish with fresh parsley. This adds a nice touch. For a fun twist, I serve them with a dipping sauce like spicy mayo or ketchup. For more details, check the Full Recipe. To make your baked sweet potato fries extra crispy, follow these steps. First, soak the cut fries in cold water for about 30 minutes. This helps remove excess starch. After soaking, dry them well with a towel. Moisture can make fries soggy. Use enough olive oil to coat them lightly. A good rule is about two tablespoons for two large sweet potatoes. Lastly, spread them out on the baking sheet. Give them space so they don't steam. One common mistake is overcrowding the baking sheet. This traps steam and makes fries mushy. Always keep them in a single layer. Another mistake is not preheating the oven. Make sure your oven is hot before baking. If you skip this, the fries won’t cook evenly. Lastly, avoid skipping the flipping step. Flipping halfway through ensures both sides get crispy. You can change the flavor of your fries easily. Try adding some chili powder for heat or cinnamon for a sweet twist. You can also mix in dried herbs like rosemary or thyme. If you love cheese, sprinkle some grated parmesan on top before baking. Experiment with your favorite spices to find your perfect blend. Enjoy the process and make it your own! For the full recipe, check it out. {{image_2}} You can spice up your sweet potato fries in many ways. Try adding cayenne pepper for heat. A sprinkle of cinnamon gives a nice sweet touch. Mix in some onion powder for a savory taste. You can also use taco seasoning for a fun twist. Each spice adds its own flavor, making every batch unique. If you want to switch it up, consider these alternatives. You can make sweet potato wedges instead of fries. Just cut the sweet potatoes into thicker pieces. Roasting them will still give you that crispy outside. Another option is to coat them in breadcrumbs for more crunch. You can even try sweet potato tots for a fun finger food. Dipping sauces can take your fries to the next level. A simple yogurt-based dip adds creaminess without the guilt. Mix Greek yogurt with lemon juice and herbs for a fresh taste. If you love a kick, try a spicy avocado dip. Blend ripe avocado with lime and jalapeño for a zesty flavor. These sauces not only taste great but also keep it healthy! For the full recipe, check out the Crispy Baked Sweet Potato Fries. After enjoying your delicious baked sweet potato fries, you may have some left. To store them, let the fries cool completely. Then, place them in an airtight container. You can keep them in the fridge for up to three days. Make sure to separate layers with parchment paper to avoid sogginess. Reheating fries can be tricky. You want them crispy, not soft. Preheat your oven to 400°F (200°C). Lay the fries in a single layer on a baking sheet. Heat them for about 10 minutes or until warm. This method brings back their crunch. You can also use an air fryer for a quicker option. Freezing fries is a smart way to save them for later. First, let them cool down completely. Spread them out on a baking sheet in a single layer. Place the sheet in the freezer for about an hour. Once frozen, transfer the fries to a freezer bag. They can last for up to three months. When you're ready to eat, bake them straight from the freezer. Just add a few extra minutes to the cooking time for crispiness. Yes, you can make baked sweet potato fries in an air fryer. The air fryer cooks them fast and makes them crispy. Start by preheating your air fryer to 400°F (200°C). Toss the sweet potato fries in oil and spices. Then, place them in a single layer in the air fryer basket. Cook for about 15-20 minutes, shaking the basket halfway through. This method cuts down on cooking time while still giving you that crunchy texture. You can tell sweet potato fries are done when they turn golden brown. Use a fork or tongs to check their crispiness. They should feel firm and look slightly crispy on the outside. Depending on your oven, this usually takes 25-30 minutes at 425°F (220°C). If they look soft or pale, give them more time in the oven. Baked sweet potato fries pair well with many dishes. They are great alongside burgers, grilled chicken, or fish. You can also serve them with a fresh salad for a lighter option. For a fun twist, try them with a spicy mayo or tangy ketchup for dipping. They add a sweet and savory crunch to any meal. Check out the Full Recipe for more ideas! You now know how to make baked sweet potato fries. We covered key ingredients and optional add-ins to boost flavor. You learned step-by-step instructions for prep, seasoning, and baking. The tips for extra crispiness and common mistakes were shared. We explored tasty variations and storage tips, too. Baked sweet potato fries are both fun and healthy. Enjoy experimenting with flavors, and don’t forget to dip!

Baked Sweet Potato Fries Crunchy and Flavorful Treat

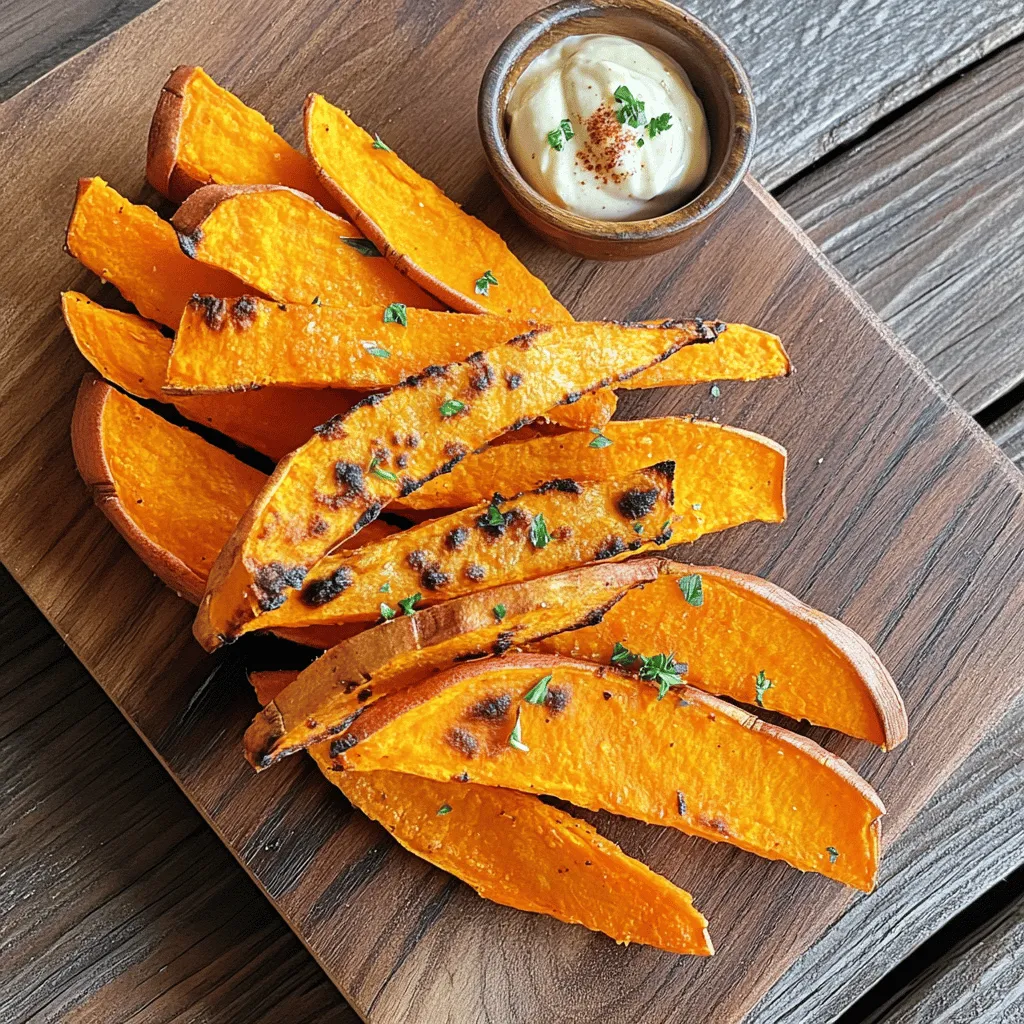
Are you ready to whip up a tasty snack that’s crunchy and healthy? Baked sweet potato fries are your answer!

This Caramelized Onion and Goat Cheese Tart is a tasty treat. It blends sweet onions and creamy goat cheese. You can make it with simple ingredients. Follow the Full Recipe for step-by-step guidance. - 1 pre-made puff pastry sheet - 3 large onions, thinly sliced - 3 tablespoons olive oil - 1 tablespoon balsamic vinegar - 1 teaspoon sugar - Salt and pepper to taste - 4 ounces goat cheese, crumbled - 1 tablespoon fresh thyme leaves (or 1 teaspoon dried thyme) - 1 egg (for egg wash) - Fresh arugula (for garnish) The puff pastry is light and flaky. It forms a perfect base for your tart. The onions bring sweetness and depth. Caramelizing them enhances their flavor. Olive oil adds richness. Balsamic vinegar gives a tangy kick. Sugar helps with browning. Goat cheese is creamy and tangy. Fresh thyme adds an earthiness. The egg wash makes the crust golden. Arugula adds a fresh touch when served. Each ingredient plays a role in creating a balanced dish. Start by preheating your oven to 400°F (200°C). Take the pre-made puff pastry sheet out of the fridge. Roll it out on a lightly floured surface until it fits your tart pan. Aim for about 12 inches in diameter. Once rolled, place the pastry into the tart pan. Push it gently into the edges and trim any extra pastry hanging over the sides. Use a fork to prick the bottom of the pastry. This helps it cook evenly. After that, refrigerate it while you make the onion filling. Now, grab a large skillet and heat it over medium heat. Pour in three tablespoons of olive oil and add the three thinly sliced onions. Sprinkle a pinch of salt over the onions. Cook them for about 15 to 20 minutes. Stir often until the onions turn soft and golden brown. Once they reach that lovely color, add a tablespoon of balsamic vinegar, one teaspoon of sugar, and more salt and pepper to taste. Cook for another five minutes. This will make the onions sticky and sweet. When done, remove them from heat and let them cool a bit. Take the chilled pastry shell from the fridge. Spread the caramelized onion mixture evenly over the base. Next, sprinkle four ounces of crumbled goat cheese and one tablespoon of fresh thyme leaves on top. Beat one egg in a small bowl. Brush the egg wash on the edges of the pastry. This gives it a golden finish. Bake the tart in the preheated oven for 20 to 25 minutes. You want the pastry to be golden and puffed, and the cheese should be slightly melted. Once baked, let it cool for a few minutes. Cut the tart into slices and serve warm or at room temperature. Garnish with fresh arugula for a lovely touch. For more details on the recipe, check the Full Recipe section. To get sweet, golden onions, cook them low and slow. Use medium heat and stir often. This helps them cook evenly. Add a pinch of salt early on. Salt draws out moisture, speeding up the process. To deepen flavor, add a teaspoon of sugar. Balsamic vinegar adds a nice tang. This mix creates a rich depth that pairs well with goat cheese. An egg wash gives your tart a shiny, golden crust. Beat one egg in a bowl. Use a pastry brush to apply the wash to the edges of the pastry. Cover all the exposed edges. This helps the pastry puff up nicely during baking. Ensure you don’t get any on the filling; it can make it soggy. A good egg wash boosts the look and taste of your tart. Cut the tart into slices for easy serving. Serve it warm or at room temperature. Garnish with fresh arugula for a peppery bite. A drizzle of balsamic glaze adds a touch of sweetness. Pair it with a light salad or a glass of white wine. For a fun twist, try serving with a fruit chutney. Each bite will delight with flavors and textures. For the full recipe, refer to the Full Recipe section. {{image_2}} You can switch the goat cheese for other cheeses. Feta gives a salty kick. Cream cheese creates a rich and smooth texture. For a sharp taste, try blue cheese. Each cheese adds a unique flavor to the tart. Feel free to mix and match! Adding seasonal vegetables can enhance the tart's taste. Try fresh spinach for a green touch. Sliced tomatoes bring a sweet and juicy flavor. Zucchini or bell peppers add a nice crunch. You can also use mushrooms for an earthy twist. These vegetables make the dish colorful and fresh! If you need a gluten-free option, use gluten-free puff pastry. Look for brands that mimic regular puff pastry well. You can also make a crust with ground almonds or rice flour. Just mix with a little butter and press it into the pan. This keeps the tart tasty while meeting dietary needs. For more details, check the Full Recipe. To keep your caramelized onion and goat cheese tart fresh, let it cool completely. Place any leftover slices in an airtight container. You can also wrap them tightly in plastic wrap. Store it in the fridge for up to three days. To reheat the tart, preheat your oven to 350°F (175°C). Place the tart slices on a baking sheet. Heat for about 10-15 minutes until warm. This keeps the pastry crispy. You can also use a microwave, but the crust may get soft. Heat it for 30 seconds at a time. Check until warm enough. You can freeze leftover tart for later. First, let it cool completely. Wrap each slice in plastic wrap, then place them in a freezer-safe bag or container. It will last for up to three months. To enjoy, thaw in the fridge overnight, then reheat as mentioned above. Enjoy your delicious tart anytime! Yes, you can use many types of onions for this tart. Yellow onions are common and sweet. Red onions add color and a mild taste. Sweet onions, like Vidalia, also work well. Each onion gives a unique flavor to the tart. Just remember, the sweeter the onion, the better the caramelization. You’ll know the onions are ready when they turn a deep golden brown. This usually takes about 15-20 minutes. Stir them often to prevent burning. Look for a soft, jam-like texture. The smell will also be sweet and fragrant. If they start to stick, add a splash of water or more oil. This tart pairs well with fresh salads. A simple arugula salad with lemon dressing works great. You could also serve it with roasted vegetables. For a heartier option, try a bowl of tomato soup. These sides enhance the flavors of the tart and create a balanced meal. We explored the ingredients and steps to make a tasty tart. You learned about key ingredients, steps for preparing puff pastry, and caramelizing onions. I shared tips to get a perfect finish and suggested variations for your tart. Lastly, I provided storage tips and answered common questions. With these insights, you can create a delicious, homemade tart that impresses anyone. Use your creativity and enjoy the cooking process!

Caramelized Onion and Goat Cheese Tart Delight

Imagine a warm, flaky tart bursting with the rich flavors of caramelized onions and tangy goat cheese. My Caramelized Onion

- 2 cups all-purpose flour - 1 cup granulated sugar - 1 tablespoon baking powder - 1/2 teaspoon baking soda - 1/2 teaspoon salt - 1/2 cup unsalted butter, melted - 2 large eggs - 1 cup buttermilk (or yogurt for a tangy twist) - Zest of 1 lemon - 1/4 cup fresh lemon juice - 1 1/2 cups fresh blueberries (can substitute frozen) - 1 teaspoon vanilla extract The ingredients for lemon blueberry muffins are simple and easy to find. Each one plays a key role in making these muffins taste great. If you want to switch things up, consider these alternatives: - Alternatives for all-purpose flour: You can use whole wheat flour or a gluten-free blend. These options will change the texture a bit but still yield tasty muffins. - Lightening the sugar content: You can reduce the sugar to 3/4 cup. You can also try using honey or maple syrup for sweetness. - Making it dairy-free: Use almond milk or coconut milk instead of buttermilk. This swap keeps the muffins moist and flavorful. These substitutions can help you cater to different diets and taste preferences while keeping the lemon blueberry muffins delicious. For the full recipe, check out the instructions provided. Preheat your oven to 375°F (190°C). This sets the right heat for baking. Next, prepare the muffin tin. You can use paper liners or grease the tin with non-stick spray. This will help the muffins release easily after baking. In a large mixing bowl, whisk together the flour, sugar, baking powder, baking soda, and salt. Make sure to measure these ingredients accurately. This step is key for the muffins to rise well. Too much flour or sugar can change the taste and texture. In another bowl, combine the melted butter, eggs, buttermilk, lemon zest, lemon juice, and vanilla extract. Whisk until everything mixes evenly. When adding lemon extract, start with a little. You can always add more if you want a stronger flavor. Pour the wet mixture into the dry ingredients. Stir gently until just combined. Be careful not to overmix! Overmixing can make your muffins tough. After this, fold in the blueberries. This ensures they are evenly spread without breaking. Fill each muffin cup about two-thirds full with batter. Bake in your preheated oven for 18-22 minutes. The muffins are done when they turn golden brown. Insert a toothpick into the center. If it comes out clean, they are ready! After baking, allow the muffins to cool in the tin for about 5 minutes. Then, transfer them to a wire rack. This helps them cool evenly. For serving, enjoy the muffins warm. A light dusting of powdered sugar adds a nice touch. Pair them with tea or coffee for a perfect treat. If you want, you can find the full recipe for more details. Using room temperature ingredients is key. Cold eggs and butter can make the batter tough. Let them sit out for about 30 minutes. This helps the muffins rise better and stay soft. Fresh blueberries give the best flavor. They burst and release juice while baking. However, frozen blueberries work too. Just add them straight from the bag. They might make the batter a bit purple, but they still taste great! Adding lemon zest boosts the lemon flavor. Zest is the outer yellow part of the lemon. Use a microplane or grater for this. Just a little zest makes a big difference! You can also try adding herbs like basil or thyme. They pair well with lemon. A pinch of cinnamon can add warmth too. Experiment and find your favorite twist on these muffins! For even baking, use a heavy muffin tin. A dark, non-stick tin helps the muffins brown nicely. If you use a light tin, the muffins might bake slower. Silicone liners are great for easy removal. They don’t stick at all! Paper liners are fine too, but spray them with a little oil. This prevents sticking and makes cleanup easier. {{image_2}} You can add almond extract to the batter for a sweet twist. This gives your muffins a warm, nutty flavor. Mixing in chopped nuts or seeds also adds crunch. Try walnuts or sunflower seeds for a fun texture. If you need a gluten-free option, use a gluten-free flour blend. This keeps the muffins light and fluffy. For vegan muffins, swap eggs for flax eggs and use plant-based milk. These options make the muffins inclusive for everyone. In summer, add fresh raspberries for a berry medley. This brightens the flavor and adds color. During the fall, consider adding spices like cinnamon or nutmeg. This gives your muffins a cozy, warm taste for the season. For the full recipe, check out the Zesty Lemon Blueberry Bliss Muffins. Enjoy experimenting with these variations! After baking, let your lemon blueberry muffins cool completely. This step helps stop sogginess. Store them in an airtight container at room temperature. They stay fresh for up to three days. For longer storage, wrap each muffin in plastic wrap and place them in a freezer-safe bag. This method keeps them tasty for up to three months. When you want to eat one, just take it out and thaw it at room temperature. To enjoy leftover muffins, you can reheat them quickly. The microwave is fast but may make them soft. Heat for about 10 to 15 seconds. If you prefer a crispy texture, use the oven. Preheat it to 350°F (175°C). Place muffins on a baking sheet and heat for about 5 to 7 minutes. This way, they regain their lovely texture and taste. Lemon blueberry muffins last about three days at room temperature. If you freeze them, they can stay good for up to three months. Check for signs of spoilage before eating. If the muffins look dry or have mold, it is best to throw them away. Fresh muffins will have a soft feel and a bright lemon smell. For a delightful experience, use them within the recommended time. For the full recipe, check out [Full Recipe]. To make lemon blueberry muffins from scratch, follow these steps: 1. Preheat your oven to 375°F (190°C). 2. Line a muffin tin with paper liners or grease it. 3. In a bowl, whisk together 2 cups of flour, 1 cup of sugar, 1 tablespoon of baking powder, 1/2 teaspoon of baking soda, and 1/2 teaspoon of salt. 4. In another bowl, mix 1/2 cup of melted butter, 2 eggs, 1 cup of buttermilk, zest of 1 lemon, 1/4 cup of lemon juice, and 1 teaspoon of vanilla. 5. Combine the wet and dry ingredients gently. 6. Fold in 1 1/2 cups of blueberries. 7. Fill each muffin cup about 2/3 full. 8. Bake for 18-22 minutes, until golden brown. 9. Cool muffins in the tin for 5 minutes, then transfer to a wire rack. This method gives you soft, fluffy muffins packed with flavor. Yes, you can use frozen blueberries! Frozen berries will make the muffins a bit denser. They may also release more juice, making the batter wetter. This can affect the texture of your muffins. To avoid this, toss the frozen blueberries in a little flour before adding them to the batter. This helps absorb excess moisture. Baking at high altitude can change the way your muffins turn out. Here are some tips: - Increase the oven temperature by 15-25°F. - Reduce sugar by 1-2 tablespoons. - Add an extra tablespoon of flour for stability. - Increase liquid by 1-2 tablespoons to keep moisture. These changes help muffins rise better and stay soft. To prevent muffins from sticking, follow these tips: - Use paper liners for easy removal. - Grease the muffin tins with butter or non-stick spray. - Dust the greased tins with flour. This will help ensure your muffins come out clean and intact. You can add many tasty toppings to lemon blueberry muffins. Here are some ideas: - A light glaze made with powdered sugar and lemon juice. - A sprinkle of coarse sugar for sparkle. - Fresh blueberries or lemon zest on top for garnish. - Cream cheese frosting for a rich twist. These toppings can enhance both taste and presentation. Lemon blueberry muffins are a delight made from simple ingredients. We covered how to mix, bake, and store these treats. With tips on substitutes and variations, you can customize your muffins easily. Remember to use fresh ingredients for the best taste. Enjoy your baking adventure! Whether you stick to the classic or try a twist, the joy of fresh muffins awaits. Happy baking!

Lemon Blueberry Muffins Delightful and Easy Recipe

Craving a burst of fresh flavor in your baked goods? You’re in the right place! This Lemon Blueberry Muffins recipe

- 2 cups all-purpose flour - 1 tablespoon baking powder - 1/2 teaspoon salt - 1/4 teaspoon black pepper - 1/4 cup cold unsalted butter, cubed - 1 cup shredded sharp cheddar cheese - 1/4 cup grated Parmesan cheese - 1 tablespoon fresh chives, chopped - 1 tablespoon fresh parsley, chopped - 3/4 cup whole milk - 1 large egg, beaten (for egg wash) Gather these ingredients before you start. Fresh herbs and good cheese make a big difference. The cheddar gives a sharp taste, while Parmesan adds a nice touch. Use cold butter for a flaky texture. Mixing in freshly chopped herbs will bring bright flavors. Whole milk keeps the scones moist and rich. Don't skip the egg wash; it helps the scones get a lovely golden color. For the full recipe, check out the detailed instructions. - Preheat oven to 400°F (200°C). - Line a baking sheet with parchment paper. - In a large bowl, mix 2 cups of flour, 1 tablespoon of baking powder, 1/2 teaspoon of salt, and 1/4 teaspoon of black pepper. - Whisk until well combined. This mix is the base of your scones. - Add 1/4 cup of cold, cubed unsalted butter into the flour mix. - Use your fingers or a pastry cutter to work the butter into the flour. - Keep mixing until it looks like coarse crumbs. - Now, stir in 1 cup of shredded sharp cheddar cheese, 1/4 cup of grated Parmesan cheese, 1 tablespoon of chopped chives, and 1 tablespoon of chopped parsley. Mix well to spread the flavors. - Make a well in the center of the dry mix. - Pour in 3/4 cup of whole milk. - Gently mix with a wooden spoon until everything comes together. - Avoid overmixing; this helps keep the scones light. - Turn the dough onto a floured surface. - Knead the dough gently a few times until it forms a ball. - Pat the dough into a 1-inch thick circle. - Cut it into 8 wedges with a sharp knife, or use a round biscuit cutter for circles. - Place the scones on your lined baking sheet, leaving space between each one. - Brush the tops with 1 beaten egg for a nice glaze. - Bake for 15-20 minutes, until they are golden brown and puffed up. - Watch for a nice rise and a golden top. For the complete recipe, refer to the earlier section. Enjoy making your savory herb and cheese scones! To get the best scone texture, use cold butter. Cold butter helps create flaky layers. When you mix the butter into the flour, it should stay in small pieces. These small pieces melt during baking, creating air pockets. Avoid overmixing your dough. When you add milk, mix just until it comes together. Overmixing can make the scones tough. Remember, they should be light and fluffy, not dense. You can enhance your scones by using different herbs. Fresh herbs like thyme, rosemary, or basil give a new twist. Each herb brings its own taste that pairs well with cheese. For cheese substitutions, try feta or gouda. Each cheese adds a unique flavor. Mix and match to find your favorite combination. Experimenting is fun and can lead to delightful surprises. These scones are great with spreads. Try butter, cream cheese, or even a tangy chutney. They also pair well with soups. A warm scone can balance out a hearty bowl of soup. Storing leftovers properly is key to keeping them fresh. Place them in an airtight container. They will stay good at room temperature for up to two days. If you want to keep them longer, store them in the fridge. Enjoy your savory herb and cheese scones anytime! For the full recipe, check out the details above. {{image_2}} You can change the flour for a gluten-free mix. This makes the scones safe for those who avoid gluten. Several brands offer nice gluten-free blends. Just make sure to use the same amount as the all-purpose flour. For cheese, consider using feta or goat cheese. These cheeses add a different taste and texture. They can make your scones more unique. Try mixing different cheese varieties to find your favorite flavor. Adding vegetables can give your scones a fun twist. Spinach adds a nice green color and nutrition. Sun-dried tomatoes bring a sweet and tangy flavor. Just chop them small and mix them in with the cheese. You can also play with herbs and spices. Basil or dill can offer a fresh taste. For some heat, add a pinch of red pepper flakes. These small changes can create a new flavor experience. You can turn your savory scone into a sweet one. Try adding a bit of sugar and some dried fruits. Cranberries or blueberries work well. This change can make a great breakfast treat. Mixing sweet and savory flavors is another fun idea. Add a bit of honey to the dough and top with cheese. This combo brings warmth and a unique taste. For the full recipe, check the earlier section. Enjoy experimenting with your scone creations! To keep your scones fresh, store them at room temperature in an airtight container. They will stay tasty for about two days. If you want to keep them longer, place them in the fridge. They may last up to a week this way. Just remember, cold can change their texture a bit. To reheat scones, use the oven. Preheat it to 350°F (175°C). Place the scones on a baking sheet. Heat them for about 5 to 10 minutes. This will help keep them soft and flaky. You can also use a microwave, but be careful! Heat them for only 15 to 20 seconds. Too long will make them tough. You can freeze scones either before or after baking. If you freeze them raw, place the cut scones on a baking sheet first. Freeze them for about 30 minutes. Then, transfer them to a zip-top bag, and store for up to three months. When ready to bake, you can cook them straight from the freezer. Just add a few extra minutes to the time. If you've baked them, let them cool first. Then, wrap them well and freeze. They can also last up to three months this way. Savory Herb and Cheese Scones last about 2-3 days when stored at room temperature. Keep them in an airtight container to maintain freshness. If you see any mold or if they smell off, it’s time to toss them. Yes, you can prepare the dough ahead of time. Form the scones and place them on a baking sheet. Cover them and chill in the fridge for up to 24 hours. When ready, bake them straight from the fridge. This keeps the scones fresh and tasty. If you don’t have buttermilk, you can make a quick substitute. Mix 3/4 cup of milk with 1 tablespoon of vinegar or lemon juice. Let it sit for about 5 minutes. This will give you a similar tangy flavor for your scones. Yes, these scones freeze well. You can freeze the dough before baking or freeze baked scones. To freeze dough, shape the scones and place them on a baking sheet. Once frozen, transfer them to a bag. For baked scones, let them cool completely before freezing. Thaw them in the fridge overnight before reheating. To make your scones fluffier, use cold butter and avoid overmixing the dough. The cold butter creates steam during baking, which helps the scones rise. Mix just until the ingredients come together. Overworking can lead to dense scones. This blog post covers the essential steps to make savory herb and cheese scones. You learned about the right ingredients, from flour to fresh herbs. I shared tips for perfect texture and flavor. You now know how to shape, bake, and store these tasty treats. Enjoy experimenting with variations and serving these scones warm. They make a great snack or side dish. With practice, you can master the art of scone-making. Enjoy every bite!

Savory Herb and Cheese Scones Flavorful and Easy Recipe

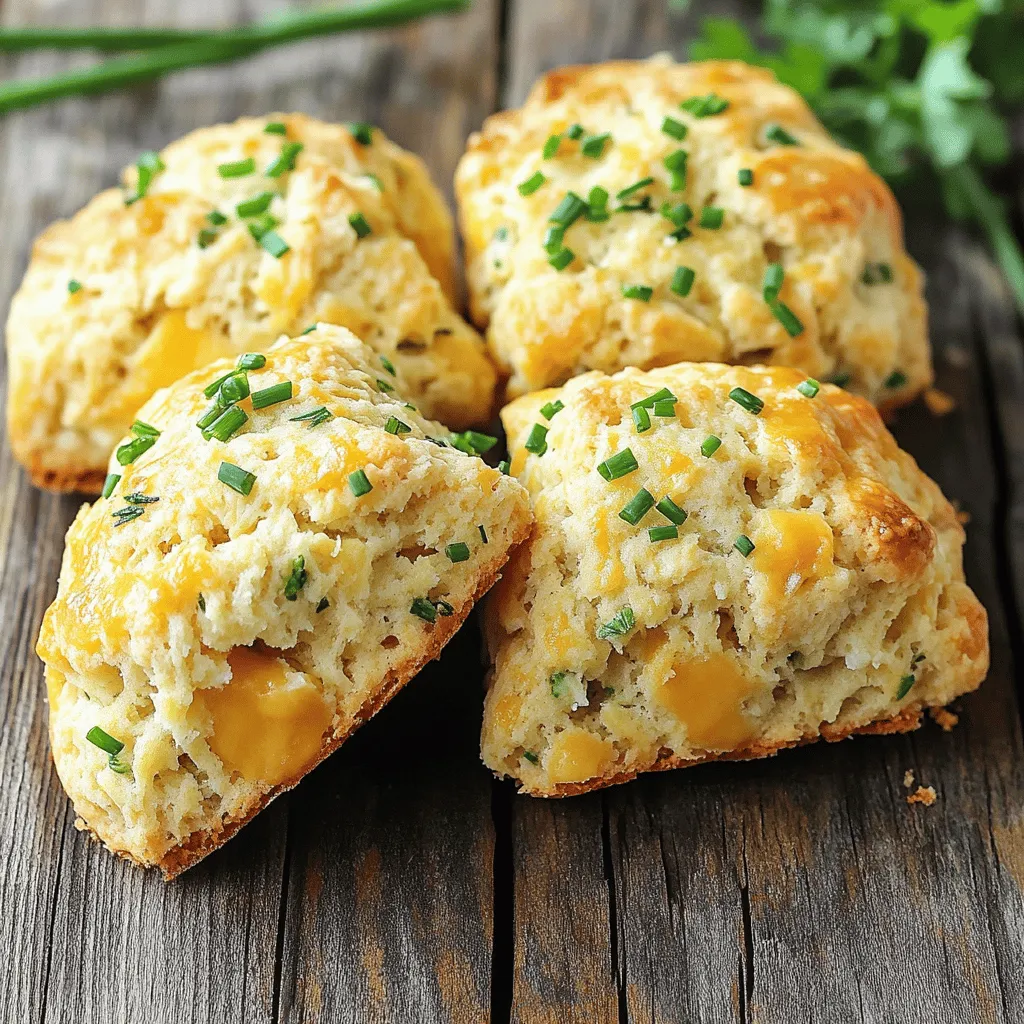
Looking to bake something delicious yet simple? My Savory Herb and Cheese Scones are perfect for you. With just a

To make creamy mushroom risotto, you need a few simple ingredients. This dish takes about 35 minutes to prepare. You can serve it to four people. For the full recipe, check the section above. Here are the key ingredients you will need: - 1 cup Arborio rice - 4 cups vegetable broth - 1 cup mushrooms, sliced (like cremini or shiitake) - 1 small onion, finely chopped - 3 cloves garlic, minced - 1/2 cup heavy cream - 1/2 cup grated Parmesan cheese - 2 tablespoons olive oil - 2 tablespoons unsalted butter - Salt and pepper to taste - Fresh parsley, chopped (for garnish) Each ingredient plays a crucial role in creating that rich, creamy texture. Arborio rice is special because it has high starch. This starch helps the risotto become creamy. Mushrooms add a deep, earthy flavor. The heavy cream and Parmesan cheese make it smooth and rich. If you have dietary needs, you can easily swap ingredients. Here are some ideas: - Use vegetable broth instead of chicken broth for a vegan option. - Swap heavy cream with coconut cream for a dairy-free version. - You can replace Arborio rice with farro for a whole grain option. - Nutritional yeast can stand in for Parmesan cheese if you want a cheesy flavor without dairy. These substitutions let you enjoy risotto no matter your diet. First, gather your ingredients. You will need: - 1 cup Arborio rice - 4 cups vegetable broth - 1 cup mushrooms, sliced - 1 small onion, finely chopped - 3 cloves garlic, minced - 1/2 cup heavy cream - 1/2 cup grated Parmesan cheese - 2 tablespoons olive oil - 2 tablespoons unsalted butter - Salt and pepper to taste - Fresh parsley, chopped Next, heat the vegetable broth in a saucepan over low heat. Keep it warm but do not boil it. This step is key, as adding cold broth can slow down the cooking process. In a large skillet, heat the olive oil and 1 tablespoon of butter over medium heat. Add the chopped onion and sauté for about 3-4 minutes. You want the onions to become soft and clear. This brings out their sweet flavor. Then, add the minced garlic and sliced mushrooms to the skillet. Cook for about 5-7 minutes. The mushrooms should be tender and release their moisture. This creates a rich base for your risotto. Now, stir in the Arborio rice. Mix well to coat the grains with oil. Toast the rice for about 2 minutes. This step adds a nice nutty flavor and helps the rice absorb the broth better. Start adding the warm vegetable broth one ladle at a time. Stir frequently. Allow the rice to absorb most of the liquid before adding the next ladle. This process takes about 20 minutes. You will know the risotto is ready when the rice is creamy and al dente. Once the rice reaches the right texture, remove it from heat. Stir in the heavy cream, grated Parmesan cheese, and the last tablespoon of butter. Season with salt and pepper to taste. Mix until everything is creamy and well combined. Let the risotto sit for a couple of minutes to thicken slightly. Then, give it a final stir. For a lovely presentation, serve the risotto in shallow bowls. Top with chopped fresh parsley and an extra sprinkle of Parmesan. Enjoy your creamy mushroom risotto! To get that creamy texture in your risotto, the type of rice matters. Use Arborio rice. Its high starch content helps create a rich, smooth dish. Stir the rice often while cooking. This action helps release the starch and makes the risotto creamy. Add broth slowly. One ladle at a time works best. This helps the rice absorb the liquid fully. Taste the rice as you cook. You want it al dente, soft but with a tiny bite. One common mistake is adding all the broth at once. This leads to uneven cooking. Another mistake is not stirring enough. Stirring helps release starch, which is key for creaminess. Avoid using low-quality broth. It impacts flavor. Lastly, don’t rush the cooking time. Good risotto takes patience. If you skip steps, the texture will suffer. A large skillet is your best friend here. It allows even cooking and easy stirring. Use a wooden spoon for stirring. It’s gentle on the rice and helps with even mixing. A ladle is essential for adding broth. Keep your vegetable broth warm in a saucepan. This helps maintain cooking temperature. Lastly, a good set of measuring cups ensures you use the right amounts. For the full recipe, check the ingredients listed above. {{image_2}} You can make a vegan version of creamy mushroom risotto. Replace heavy cream with coconut milk or cashew cream. For the cheese, use a vegan alternative or nutritional yeast. This keeps the dish rich and savory without animal products. Using a variety of mushrooms adds depth. Try shiitake or oyster mushrooms for a unique taste. If you want a dairy-free risotto, skip the Parmesan. Use a dairy-free butter made from olive oil or coconut oil. Coconut milk works great for creaminess. Adjust seasoning to ensure flavor remains rich and full. The key is to balance the flavors well, so taste as you go. Feel free to personalize your risotto. Add cooked peas or spinach for color and nutrition. Chopped herbs, like basil or thyme, enhance the flavor. You can also mix in roasted vegetables, such as zucchini or bell peppers. For a protein boost, add cooked lentils or chickpeas. Each tweak makes the dish yours, while still being delicious. For the full recipe, check the earlier section. To keep your creamy mushroom risotto fresh, let it cool first. Once it's cool, transfer it to an airtight container. This helps to seal in moisture and flavor. Store it in the fridge for up to three days. If you have leftovers, be sure to enjoy them! When reheating your risotto, add a splash of broth or water. This helps restore its creamy texture. Heat it in a saucepan over low heat. Stir it often to ensure even warming. You can also use the microwave, but be careful not to overcook it. If you want to save risotto for later, you can freeze it! Portion it into smaller containers. This makes it easy to thaw just what you need. When you're ready to eat, defrost it in the fridge overnight. Then follow the reheating instructions to enjoy a tasty meal again. The best broth for risotto is vegetable broth. It adds a rich flavor. You can also use chicken broth for a different taste. Choose a low-sodium option to control the salt. Always warm your broth before adding it to the rice. This helps the rice cook evenly and keeps the dish creamy. You can make risotto creamy without cream by using starchy rice. Arborio rice is great for this. It releases starch while cooking, creating a creamy texture. Stir the rice often. This helps release more starch. You can add a bit of extra broth if needed. Lastly, finish with cheese, like Parmesan, for added creaminess. Yes, you can prepare risotto in advance. Cook it until it is just al dente. Then, let it cool completely. Store it in an airtight container in the fridge. When ready to eat, reheat it slowly. Add a splash of broth to restore creaminess. Stir well to make it nice and smooth. For the full recipe, check out the Creamy Mushroom Risotto 🧄 section above. In this blog post, we explored the essential ingredients for a tasty risotto and detailed step-by-step cooking instructions. We shared tips to perfect the texture, avoid common mistakes, and highlighted variations to suit different diets. Remember, proper storage can extend your dish's life. By following these guidelines, you can create a delicious risotto tailored to your taste. Enjoy experimenting in the kitchen and making this dish your own!

Creamy Mushroom Risotto Simple and Satisfying Dish

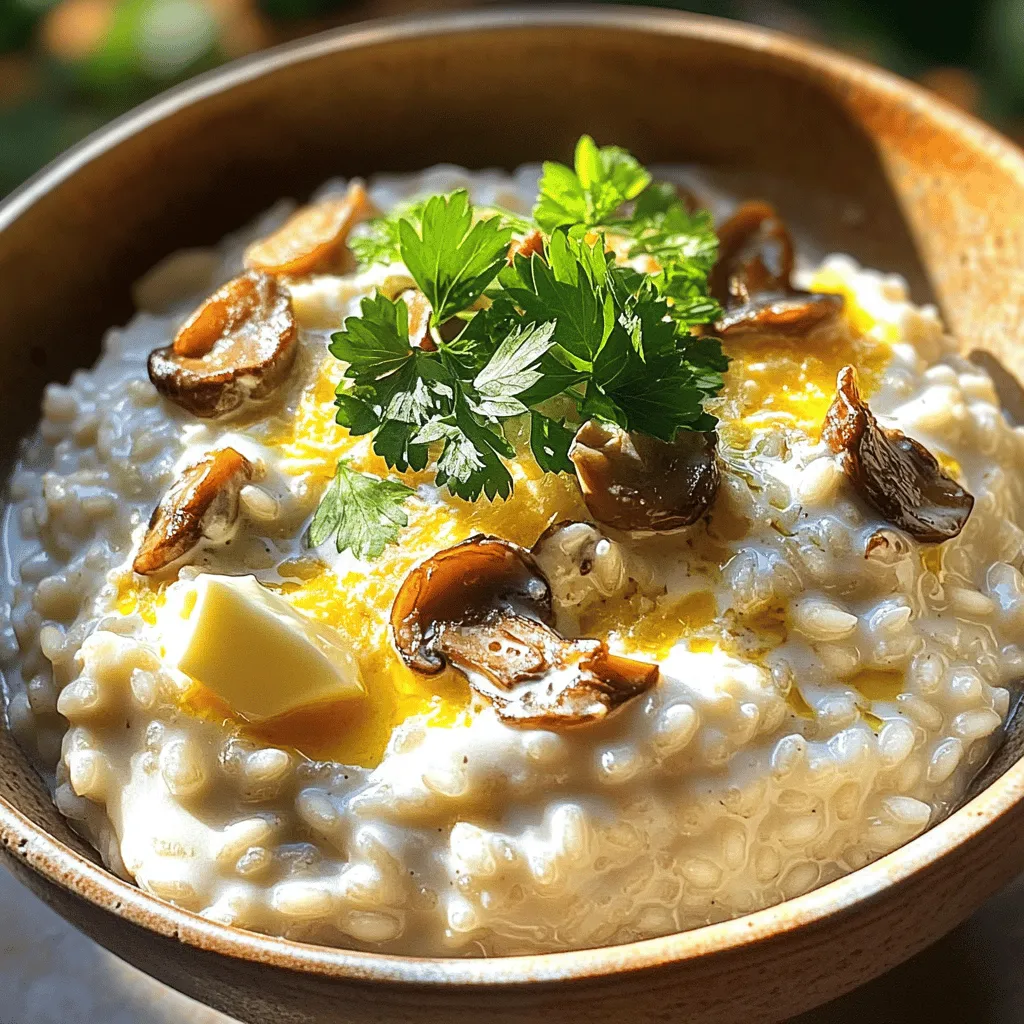
Welcome to my kitchen! Today, we are diving into the world of creamy mushroom risotto. This dish is easy to

- 1 can (15 oz) chickpeas, drained and rinsed - 1 medium cucumber, diced - 1 cup cherry tomatoes, halved - 1 red bell pepper, diced - 1/4 red onion, finely diced - 1 jalapeño, deseeded and minced - 1 avocado, diced - 1/4 cup fresh cilantro, chopped - 2 tablespoons olive oil - 2 tablespoons lime juice - 1 teaspoon cumin - 1 teaspoon smoked paprika - Salt and pepper to taste Each ingredient plays a key role in the salad. The chickpeas give protein and texture. Fresh veggies add crunch and color. The dressing ties it all together with flavor. You can make this salad vegan or gluten-free easily. Swap chickpeas for black beans or lentils. For spice, try cayenne or chili powder instead of jalapeño. You can also add spices like garlic powder or oregano for a twist. How to prepare chickpeas First, grab a can of chickpeas. Open it and drain the liquid. Rinse the chickpeas under cool water. This helps remove any salty taste. Place them in a large mixing bowl. Chopping vegetables Next, pick your fresh veggies. Dice the cucumber into small pieces. Halve the cherry tomatoes and add them to the bowl. Chop the red bell pepper and red onion finely. Mince the jalapeño, but don't forget to deseed it first. Lastly, dice the avocado and set it aside. Combining ingredients for dressing In a small bowl, combine olive oil, lime juice, cumin, and smoked paprika. Add salt and pepper to taste. Tips for whisking Use a whisk to blend the dressing well. Whisk it until it looks smooth. A good dressing coats the salad evenly. How to mix salad ingredients Pour the dressing over the chickpeas and veggies. Gently toss everything together. Make sure all the ingredients are mixed well. Folding in herbs Now, take the chopped cilantro and fold it into the salad. This adds a burst of fresh flavor. Taste the salad and adjust the seasoning if needed. You can add more salt, pepper, or lime juice. This Spicy Chickpea Salad is a bold and flavorful delight. Check out the Full Recipe for all the details you need. To make your salad pop, try adding spices. A pinch of cayenne or crushed red pepper gives it a nice kick. You can also use smoked paprika for a deeper flavor. Experiment with your favorite spices to find the right balance. Acidity is key to a great salad. Lime juice not only brightens the dish but also enhances other flavors. If you want more zing, try adding a splash of vinegar. Red wine vinegar or apple cider vinegar works well. When it comes to serving, presentation matters. Use a large bowl to showcase your colorful ingredients. For a fancy touch, serve on individual plates. Garnish with extra cilantro or lime wedges for a fresh look. Pair this salad with grilled chicken or fish. It also goes well with warm pita bread or rice. These options make a filling meal that everyone will love. You can prepare this salad ahead of time. Just chop your veggies and store them in the fridge. Keep the dressing separate until you're ready to serve. This way, it stays fresh and crunchy. For storing leftovers, use an airtight container. The salad stays good for about 2-3 days in the fridge. However, if you added avocado, eat it within a day for the best taste. {{image_2}} You can boost your Spicy Chickpea Salad by adding protein. Some great options include grilled chicken, shrimp, or quinoa. Quinoa is a smart choice. It adds a nutty flavor and makes the salad even more filling. Chicken gives a nice texture and pairs well with the spices. Adding protein has many benefits. It helps you feel full longer. It also provides important nutrients your body needs. Plus, it makes the salad a complete meal. If you want a quick meal, try adding grilled chicken. It cooks fast and adds great taste. Using seasonal vegetables can elevate your salad. In summer, add fresh corn or zucchini. These veggies add sweetness and crunch. In fall, try roasted sweet potatoes or butternut squash. They bring warmth and pair well with spices. The best times to enjoy this salad are during the warmer months. It feels refreshing and light. However, you can adapt it year-round. Just pick the freshest veggies available. This keeps the salad vibrant and tasty. Different dressings can change the flavor completely. You can try a tahini dressing for a creamy twist. A yogurt-based dressing adds a tangy contrast. If you prefer, use a store-bought vinaigrette. Just make sure it has good ingredients. Homemade dressings are often the best choice. They are fresher and healthier. Plus, you can control the flavors. Whisk together olive oil, lime juice, and spices for a quick mix. You can adjust the taste to your liking. For the full recipe, check out the Spicy Chickpea Salad above. To keep your Spicy Chickpea Salad fresh, store it in an airtight container. This helps keep the flavors locked in and prevents it from drying out. The salad stays fresh for about 3 to 5 days in the fridge. However, the longer it sits, the softer the veggies become. If you want to keep the crunch, it’s best to eat it within the first couple of days. Freezing this salad is not the best option. Some ingredients do not freeze well, like cucumbers and avocados. They can become mushy when thawed. If you want to freeze components, consider just the chickpeas and the dressing. To freeze, place them in separate freezer bags. Make sure to remove as much air as possible to prevent freezer burn. You should not heat the salad. It tastes best cold and fresh. If you have leftovers, simply give them a good stir. You can add a splash of lime juice or a drizzle of olive oil to refresh it. This will help revive the flavors and keep it tasty. Enjoy your Spicy Chickpea Salad straight from the fridge! Yes, you can make this salad ahead of time. It tastes even better after some time in the fridge. To do this, chop the veggies and mix them. Keep the dressing separate until you are ready to serve. This way, the salad stays fresh and crunchy. You can store it in an airtight container for up to two days. Just remember to stir it well before serving. To reduce the spice level, remove the seeds from the jalapeño. You can also use less jalapeño or skip it altogether. Another trick is to add more avocado. This creamy fruit helps balance the heat. You can also use mild bell peppers instead of the spicy ones. Adding a bit of honey or sugar can help, too. If you need a substitute for chickpeas, try black beans or white beans. They add a nice texture and flavor. You could also use lentils if you want something different. For a non-legume option, try diced tofu or cooked quinoa. These alternatives keep the salad hearty and tasty. You can find the Full Recipe for this flavorful dish above! This article covered the key ingredients for a Chickpea Salad, including chickpeas, fresh vegetables, and dressings. I shared how to prepare these items and detailed measurements for exactness. I also explored substitutions for dietary needs, variations for seasonality, and storage tips to keep your salad fresh. In summary, this salad is versatile and easy to adapt. Whether you are meal prepping or serving guests, this recipe offers simplicity and flavor. Enjoy making your own version while adding personal twists!

Spicy Chickpea Salad Bold and Flavorful Delight

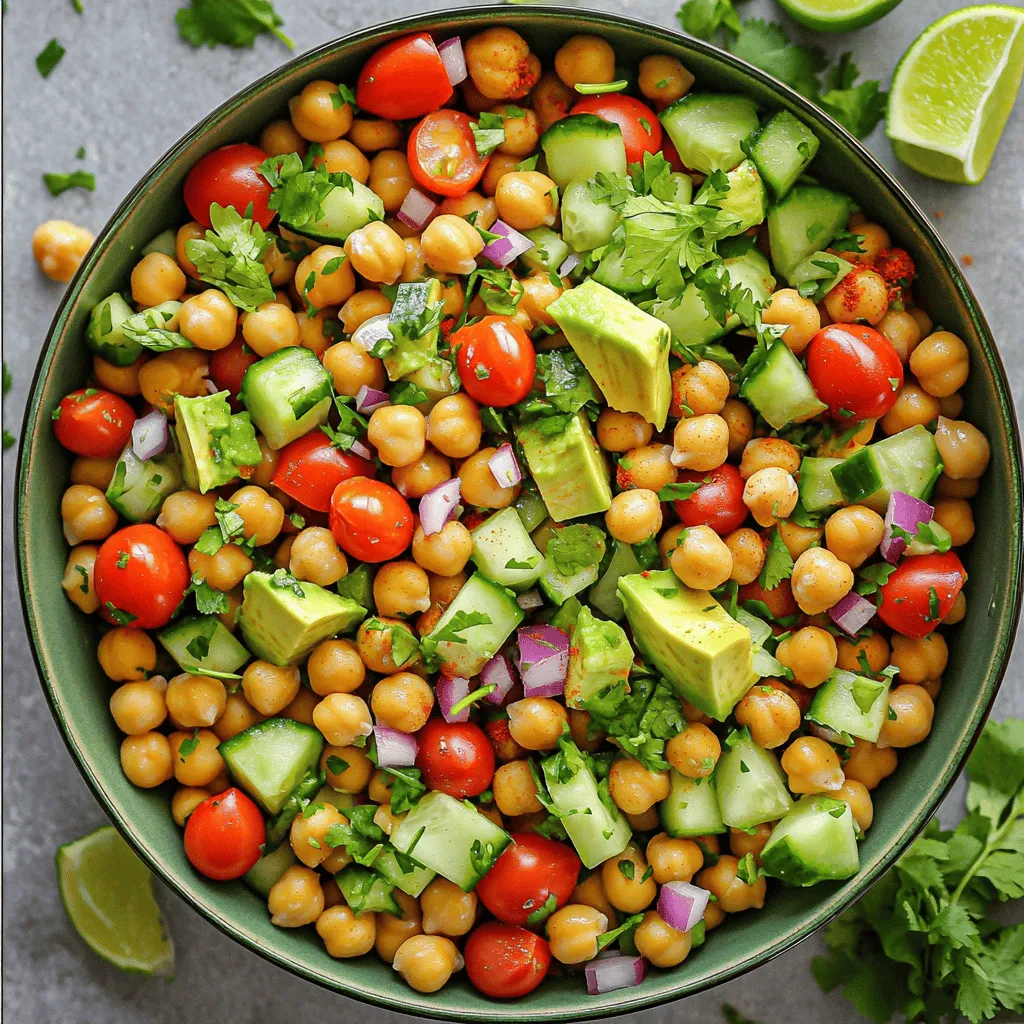
Welcome to the world of bold flavors! My Spicy Chickpea Salad is a delightful mix of hearty chickpeas and fresh

To make apple cinnamon overnight oats, you need: - 1 cup rolled oats - 1 cup unsweetened almond milk (or any milk of choice) - 1 medium apple, grated (reserve some slices for topping) - 1 teaspoon ground cinnamon - 1 tablespoon maple syrup (or honey) - 1/4 cup Greek yogurt (optional for creaminess) - 1 tablespoon chia seeds - A pinch of salt - Chopped walnuts or pecans for topping (optional) You can add other ingredients to enhance the taste. Some great options include: - A splash of vanilla extract for sweetness - A tablespoon of nut butter for creaminess - A handful of raisins or dried cranberries for chewiness - A sprinkle of nutmeg for a warm spice Each ingredient brings its own benefits: - Rolled oats: These are high in fiber. They help keep you full. - Almond milk: It is low in calories and dairy-free. This is great for many diets. - Apples: They add vitamins and natural sweetness. Plus, they have fiber. - Cinnamon: This spice can help manage blood sugar. It also adds flavor without sugar. - Maple syrup: It is a natural sweetener with minerals. Use it sparingly for a balanced taste. - Chia seeds: These add fiber and omega-3 fatty acids. They help with heart health. - Greek yogurt: This adds protein and creaminess. It is good for muscle health. With these ingredients, you create a tasty and healthy breakfast. You can find the full recipe by following the link. To start, gather your ingredients. You will need rolled oats, almond milk, a medium apple, ground cinnamon, maple syrup, Greek yogurt, chia seeds, and a pinch of salt. In a mixing bowl, add 1 cup of rolled oats. Pour in 1 cup of unsweetened almond milk. Next, grate the apple and add it to the bowl. Sprinkle in 1 teaspoon of ground cinnamon and 1 tablespoon of maple syrup. If you like it creamier, add 1/4 cup of Greek yogurt. Toss in 1 tablespoon of chia seeds and a pinch of salt. Stir everything together until well mixed. Once your oat mixture is ready, it's time to store it. Scoop the mixture into individual jars or containers. Make sure each jar has a lid to keep things fresh. Cover the jars tightly and place them in the fridge. It’s best to let them sit overnight or for at least 4 hours. This gives the oats and chia seeds time to soak up the liquid and expand. In the morning, grab your jars from the fridge. Give the oats a good stir. If you want the oats thinner, add a splash of almond milk. You can serve the oats in bowls or eat directly from the jars. For a lovely touch, add reserved apple slices on top. A sprinkle of cinnamon and some chopped nuts will add extra crunch and flavor. Enjoy your delicious apple cinnamon overnight oats! For the full recipe, check out the complete details above. To get the best texture, use rolled oats. They soak up the liquid well. Steel-cut oats can be too chewy. Use a mix of milk and yogurt for creaminess. Greek yogurt adds a nice tang. If you want it thinner, just add more milk before eating. A common mistake is not letting the oats sit long enough. Always refrigerate overnight. This helps the oats and chia seeds absorb the liquid. Another mistake is adding too much sugar. Stick to one tablespoon of maple syrup or honey for a balanced flavor. Avoid using too little liquid, as this can make the oats dry. You can switch out the apple for other fruits. Try bananas, berries, or pears. Add nuts like walnuts or pecans for crunch. For extra protein, mix in some nut butter. Don’t forget spices! A dash of nutmeg or ginger can give a nice twist. For a fun treat, top with granola or coconut flakes. Check out the Full Recipe for more ideas! {{image_2}} You can change the flavor of your overnight oats easily. Try adding peanut butter or almond butter for a nutty twist. You can also add cocoa powder for a chocolatey taste. If you like a little zing, try a splash of vanilla extract. Each option gives your oats a new and exciting flavor. If you have dietary needs, you can make swaps in this recipe. Use coconut milk if you want a dairy-free option. For a nut-free diet, try oat milk or soy milk. If you need gluten-free oats, make sure to choose certified gluten-free rolled oats. These swaps keep the dish tasty while meeting your needs. In spring, swap apples for fresh strawberries or raspberries. In summer, use peaches or blueberries for a bright flavor. Fall is perfect for pears or pumpkin puree, giving a warm, cozy taste. In winter, try dried fruits like cranberries or apricots for a chewy texture. Each season brings new options to keep your breakfast fresh and fun! To keep your apple cinnamon overnight oats fresh, store them in airtight jars. Glass jars work well for this. Always label your jars with the date. This helps you track how long they have been in the fridge. Keep them in the coldest part of your fridge. This ensures they stay safe and tasty. Apple cinnamon overnight oats can last up to five days in the fridge. After this time, the oats may lose their texture. They might also become watery or spoil. If you see any changes in smell or color, it’s best to toss them. Always check before eating. You can freeze apple cinnamon overnight oats for up to three months. Use freezer-safe jars or containers. Leave some space at the top for expansion. When you’re ready to eat, move your jar to the fridge. Let it thaw overnight. Stir well before enjoying. If needed, add a splash of milk for creaminess. Yes, you can easily make this recipe vegan. Just swap the Greek yogurt for a plant-based yogurt. Use almond milk or any other non-dairy milk. Replace honey with maple syrup for sweetness. Both swaps keep the oats creamy and tasty. To avoid soggy oats, use the right amount of liquid. Stick to one cup of milk for one cup of oats. Chia seeds also help absorb excess liquid. Store oats in a sealed jar to keep moisture in, but not too much. If you don’t have Greek yogurt, try regular yogurt or dairy-free options. You can also use silken tofu for a creamy texture. Applesauce is another great choice to add moisture without changing the flavor much. To adjust sweetness, add more or less maple syrup. You can also use mashed bananas or extra grated apples for natural sweetness. Taste your mixture before refrigerating. This way, you can find the perfect balance for your taste buds. Yes, you can reheat overnight oats. Just place them in the microwave for about 30 seconds. Stir well and check the temperature. If they’re too thick, add a splash of milk before heating. Enjoy your warm, comforting bowl! In this post, I shared how to make apple cinnamon overnight oats. We covered key ingredients, step-by-step instructions, and tips for the best texture. You learned different flavor variations and how to store them. Remember, personalizing your oats makes them unique to you. Keep these tips in mind, and enjoy this tasty, nutritious breakfast. With a little creativity, your oats can be delicious every day. Enjoy your cooking!

Apple Cinnamon Overnight Oats Simple and Tasty Meal

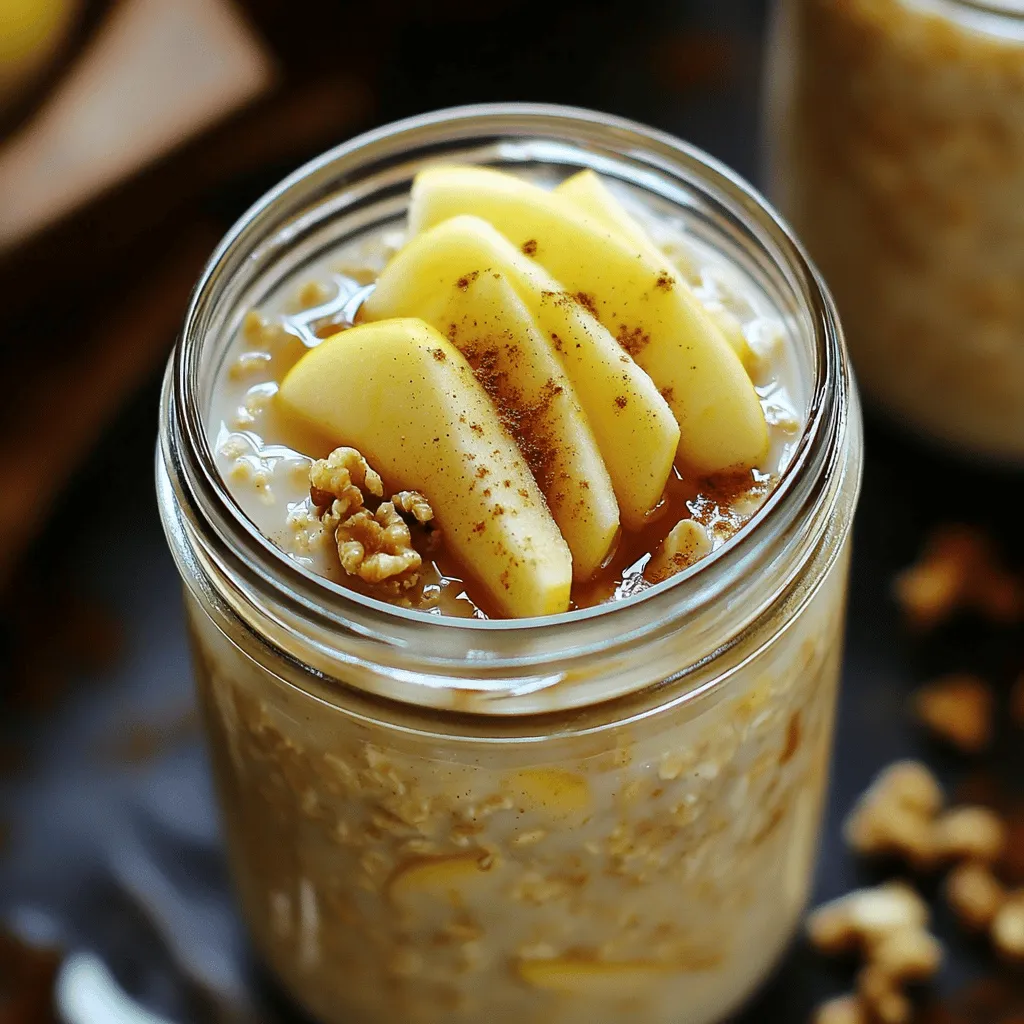
Start your day strong with my easy Apple Cinnamon Overnight Oats! This simple recipe combines the sweet taste of apples

Older posts
Newer posts
← Previous Page1 … Page58 Page59 Page60 … Page82 Next →

dsad

© 2025 My Saved Recipe • Built with GeneratePress

Our Policies

  • Copyright Policy
  • Cookie Policy
  • GDPR Policy
  • Privacy Policy
  • Disclaimer
  • Terms Of Use

More Information

  • Home
  • About
  • Contact
  • Appetizers
  • Dessert
  • Dinner
  • Drinks
©2025, My Saved Recipe About Back To Top