Skip to content
DisclaimerTerms Of UseGDPR PolicyCookie Policy

My Saved Recipe

  • Home
  • Drinks
  • Appetizers
  • Dinner
  • Dessert
  • About
  • Contact
  • Privacy Policy
DisclaimerTerms Of UseGDPR PolicyCookie Policy

Savannah

- 2 boneless, skinless chicken breasts, sliced into thin strips - 1 cup teriyaki sauce (store-bought or homemade) - 1 tablespoon sesame oil - 2 cups cooked jasmine rice - 1 cup broccoli florets - 1 red bell pepper, sliced - 1 cup shredded carrots - 2 green onions, chopped - 1 tablespoon sesame seeds - Salt and pepper to taste For the teriyaki chicken bowls, you need fresh chicken breasts. They give the dish a great flavor. Teriyaki sauce is key too. You can buy it or make your own. Fresh vegetables like broccoli, red bell pepper, and carrots add crunch. - Skillet or wok - Mixing bowls - Serving bowls You’ll want a good skillet or wok for cooking. A mixing bowl helps you marinate your chicken. Lastly, serving bowls are perfect for presenting your beautiful meal. - Calories: Approx. 480 - Macronutrients breakdown: - Proteins: 36g - Fats: 12g - Carbs: 58g Each serving packs a punch with solid protein from the chicken. The rice provides carbs for energy. This meal keeps you full and satisfied while tasting amazing. Don't forget to check the [Full Recipe] for more details! To marinate the chicken, start by slicing your chicken breasts into thin strips. Place them in a bowl and add half of the teriyaki sauce. This step is crucial. It lets the chicken soak up all the tasty flavors. I recommend marinating for at least 20 minutes. If you have more time, you can marinate it longer for even better flavor. Next, heat your skillet or wok on medium-high heat. Add one tablespoon of sesame oil. It gives the chicken a nice flavor. Once the oil is hot, add the marinated chicken. Cook it for about 5 to 7 minutes. The chicken should turn golden brown and caramelized. To check if it is done, make sure it is no longer pink in the center. You can use a meat thermometer; the chicken should reach 165°F. Now, it's time to stir-fry the veggies. In the same skillet, add broccoli florets, sliced red bell pepper, and shredded carrots. Stir-fry them for about 3 to 5 minutes. This keeps the veggies tender-crisp. Stir them often to ensure they cook evenly. You want them to keep their bright colors and crunch. After cooking the chicken and veggies, it’s time to combine everything. Pour the remaining teriyaki sauce over the chicken and vegetables. Stir well to coat all the ingredients evenly. Cook for an additional 1 to 2 minutes. This final stir is key. It helps blend all the flavors together. Now, you are ready to serve your mouthwatering teriyaki chicken bowls. For the full recipe, check out the complete instructions above. To get juicy chicken, start with marinating. Use half of your teriyaki sauce to coat the chicken. A marinating time of at least 20 minutes works best. The flavors really soak in during this time. Avoid cooking chicken straight from the fridge; let it warm up for 10 minutes. This helps it cook evenly. Cook the chicken on medium-high heat for about 5-7 minutes. Look for no pink in the center. It should be golden brown. Stir occasionally to avoid burning and ensure even cooking. You can switch up the teriyaki sauce for a fun twist. Try using a hoisin sauce or a sweet chili sauce. These add new layers of flavor. If you want a kick, add crushed red pepper or a dash of ginger. For toppings, consider adding crushed peanuts or diced avocado. These add texture and flavor to your bowl. A beautiful presentation makes your dish shine. Use colorful veggies to create a vibrant look. Arrange the chicken and vegetables neatly on top of the rice. For gatherings, serve in large bowls. Let guests build their own bowls. Offer extra toppings on the side. This adds fun and choice to the meal. For a lovely finish, drizzle some teriyaki sauce over the top and sprinkle sesame seeds. This makes each bowl look like a work of art! {{image_2}} You can easily swap chicken for shrimp, tofu, or beef. Each protein brings its own flavor and texture. Shrimp cooks quickly, so add it to the skillet for just 3-4 minutes. Tofu takes a bit longer to crisp up, around 5-6 minutes. Beef should be sliced thin and cooked for about 6-8 minutes. Adjust your cooking times based on the protein you choose. If you want a vegetarian or vegan dish, use tofu or tempeh as a chicken substitute. Both options soak up flavors well. You can also add a mix of vegetables like bell peppers, carrots, and snap peas. These will not only add color but also crunch to your bowl. While jasmine rice is a classic base, consider other grains like brown rice or quinoa. Brown rice offers more fiber and a nutty flavor. Quinoa is higher in protein and cooks faster than brown rice. Each grain choice adds its unique taste and nutrition to your teriyaki bowls. You can even use cauliflower rice for a low-carb option. To keep your teriyaki chicken bowls fresh, store them in airtight containers. This prevents air from spoiling your food. Place the leftover chicken and veggies in one container and the rice in another. This way, the rice stays fluffy. Make sure to refrigerate them within two hours after cooking. This will help prevent bacteria growth. When it's time to eat again, reheating is easy. You can use the microwave or a skillet. If using a microwave, heat on medium for about 2-3 minutes. Stir halfway through to heat evenly. For a skillet, warm on low heat for about 5 minutes. Add a splash of water or teriyaki sauce to keep it moist. If you want to save some for later, freezing works well. Let the chicken and veggies cool before packing them in freezer-safe bags. Remove as much air as possible. Rice can also be frozen but should be cooled first. When ready to eat, thaw the meals overnight in the fridge. Heat them thoroughly before serving. To make homemade teriyaki sauce, you need a few basic ingredients: - 1/4 cup soy sauce - 1/4 cup mirin - 2 tablespoons sugar - 1 tablespoon rice vinegar - 1 teaspoon cornstarch mixed with 1 tablespoon water (for thickening) Start by mixing the soy sauce, mirin, sugar, and rice vinegar in a small pot. Heat it over medium heat. Stir until the sugar dissolves. Once it simmers, add the cornstarch mix. Stir until the sauce thickens. This sauce is sweet and savory. For flavor adjustments, try adding garlic or ginger. You can also use honey instead of sugar for a different taste. Yes, you can use frozen vegetables. They are quick and easy to use. Frozen veggies may change the taste a bit. They can also release extra water while cooking. This may affect the sauce's thickness. For best results, use blends like stir-fry mixes. Look for broccoli, bell peppers, and snap peas. These maintain flavor and texture well. For side dishes, I recommend: - Steamed edamame - Cucumber salad - Miso soup These sides add freshness and balance to your meal. For beverage pairings, green tea works great. It complements the flavors without overpowering them. If you prefer something sweeter, try a light lemonade. For the full recipe of Teriyaki Chicken Bowls, check out the Full Recipe link! In this post, we explored how to make teriyaki chicken bowls from scratch. We covered key ingredients, tools, and nutrition. I provided step-by-step instructions to marinate and cook chicken perfectly. You also learned how to stir-fry vegetables and present the dish nicely. Remember, you can customize with different proteins and grains. Store and reheat leftovers correctly to enjoy this meal later. With these tips, you can create a delicious and satisfying dish for any occasion.

Mouthwatering Teriyaki Chicken Bowls Easy and Delicious

If you’re craving a quick, tasty meal, mouthwatering Teriyaki Chicken Bowls are your answer! I’ll guide you through easy steps

- 1 lb boneless, skinless chicken thighs, cut into bite-sized pieces - 1 cup plain yogurt - 3 tablespoons tikka masala spice blend - 2 tablespoons vegetable oil - 1 onion, finely chopped - 3 cloves garlic, minced - 1 tablespoon ginger, grated - 1 can (15 oz) diced tomatoes - 1 cup coconut milk - 2 tablespoons lemon juice - Salt to taste - Fresh cilantro for garnish To make Chicken Tikka Masala, you need a few key ingredients. First, the chicken is the star. I prefer using boneless, skinless thighs for their flavor and tenderness. The yogurt helps to tenderize the chicken and adds creaminess. The tikka masala spice blend gives it that signature flavor. You also need fresh aromatics like onion, garlic, and ginger. They add depth to your dish. The canned tomatoes and coconut milk create a rich sauce that ties everything together. Finally, a squeeze of lemon juice brightens the flavors, and fresh cilantro adds a pop of color. - Instant Pot - Mixing Bowl - Measuring Cups and Spoons Using the right tools makes cooking easier and more fun. The Instant Pot is essential for quick cooking and rich flavor. It builds pressure, which helps to lock in moisture and taste. A mixing bowl is great for marinating your chicken. Measuring cups and spoons help ensure you get the right amounts of each ingredient. This keeps your dish balanced and tasty. For the full recipe, check out the detailed instructions I’ve included. It will guide you step-by-step through this delicious dish! Start by cutting 1 pound of boneless, skinless chicken thighs into bite-sized pieces. In a large bowl, mix the chicken with 1 cup of plain yogurt and 3 tablespoons of tikka masala spice blend. Make sure to coat the chicken well. Cover the bowl and let it marinate for at least 30 minutes. You can also marinate it overnight for a deeper flavor. Next, turn on your Instant Pot and set it to sauté mode. Add 2 tablespoons of vegetable oil. Once the oil is hot, add 1 finely chopped onion. Sauté the onion for about 3 to 4 minutes until it becomes soft and golden. Then, add 3 minced garlic cloves and 1 tablespoon of grated ginger. Stir this mixture for about 1 minute until it smells amazing. Now it’s time to add the marinated chicken to the pot. Stir to coat it with the onion mixture. Let the chicken cook for about 5 minutes. This will give it a nice sear. After that, add the remaining tikka masala spice blend, 1 can of diced tomatoes (with their juice), and 1 cup of coconut milk. Mix everything well. Close the lid of the Instant Pot and ensure the valve is set to sealing. Cook on high pressure for 8 minutes. When the cooking time is up, carefully perform a quick release of the pressure. Be cautious of the steam. Once the lid is open, stir in 2 tablespoons of lemon juice. Adjust the salt to taste if needed. Your Chicken Tikka Masala is now ready to enjoy! Spice Adjustments To make your Chicken Tikka Masala shine, adjust the spices. Tikka masala spice blend can vary. If you like it spicy, add more chili powder. For a milder dish, use less. Taste as you go! This helps you find the right balance. Marination Time Marination is key for deep flavor. I recommend at least 30 minutes. If you have time, let it marinate overnight. This makes the chicken tender and flavorful. A longer marination also helps the spices soak in better. Overcrowding the Pot Avoid adding too much chicken at once. Overcrowding can lead to uneven cooking. It can also cause the chicken to steam instead of sear. Cook in batches if needed. This way, you get that lovely golden color. Improper Pressure Release Be careful with the pressure release. You should use a quick release after cooking. Don’t wait too long, or the chicken may overcook. Always check the valve is set to sealing before starting. This keeps your dish perfect every time. For a full recipe, check the Full Recipe section. {{image_2}} Substituting Coconut Milk You can swap coconut milk for plain Greek yogurt or almond milk. Both options cut calories while keeping flavor. Greek yogurt adds creaminess without extra fat. Almond milk offers a light, nutty taste. Using Different Protein Chicken is great, but you can use turkey, shrimp, or chickpeas. Turkey gives a leaner dish, while shrimp cooks quickly and adds a nice twist. Chickpeas make it vegetarian and are packed with protein. Adding Vegetables Try adding bell peppers, spinach, or peas to boost nutrients. Bell peppers add crunch and sweetness. Spinach adds color and vitamins. Peas bring a nice pop of texture and sweetness. Experimenting with Spices Feel free to mix in spices like cumin or coriander. These spices add depth and warmth. You can also adjust the tikka masala blend for your taste. Adding a pinch of cinnamon can create a unique flavor profile. After you make your Instant Pot Chicken Tikka Masala, it’s key to store it right. - Refrigeration Tips: Let the dish cool down before putting it in the fridge. Use an airtight container to keep it fresh. It can last about 3 to 4 days in the refrigerator. - Freezing Instructions: You can freeze Chicken Tikka Masala too. Place it in a freezer-safe container. Make sure to leave some space at the top since it can expand. It will be good for about 2 to 3 months in the freezer. When you’re ready to enjoy your leftovers, here are simple ways to reheat. - Microwave Method: Place a serving in a bowl, cover it loosely with a lid or paper towel. Heat on high for 1 to 2 minutes. Stir halfway to heat evenly. - Stovetop Method: Pour the dish into a pan over medium heat. Stir often, and heat for about 5 to 7 minutes until warm. Add a splash of water or coconut milk if it seems dry. These steps keep your Chicken Tikka Masala tasty and ready for your next meal! Cooking Chicken Tikka Masala in an Instant Pot takes about 50 minutes. This includes 30 minutes for marinating the chicken and 20 minutes for cooking. In just 8 minutes of high pressure, you get a tasty dish. Yes, you can use frozen chicken! Just add a few extra minutes to the cooking time. Make sure to check that the chicken is fully cooked before serving. Chicken Tikka Masala pairs well with many sides. Here are some great options: - Basmati rice - Naan bread - Raita (yogurt sauce) - Steamed vegetables These sides soak up the sauce and add more flavors. To reduce the spice level, you can do a few things: - Use less tikka masala spice blend. - Add a bit more coconut milk to mellow the heat. - Serve with yogurt, which can cool the spice. These changes help make it more mild. You can find the full recipe for Instant Pot Chicken Tikka Masala right here. It includes all the details you need for a successful dish! In this post, we explored how to make Chicken Tikka Masala in an Instant Pot. We covered essential ingredients, from chicken and marinades to sauces. I shared preparation steps and cooking tips, including the need for proper pressure release. Remember the variations you can try, like different proteins and spice adjustments. Storing leftovers is easy with the right methods. With these insights, you can create a delicious meal. Enjoy cooking and savoring this dish with family and friends!

Instant Pot Chicken Tikka Masala Simple and Tasty Dish

Are you ready to whip up a delicious meal in no time? In this blog post, I’ll show you how

To make chocolate chip cookie dough bites, you need these simple ingredients: - 1 cup all-purpose flour - 1/2 teaspoon baking soda - 1/4 teaspoon salt - 1/2 cup unsalted butter, softened - 1/2 cup brown sugar, packed - 1/4 cup granulated sugar - 2 teaspoons vanilla extract - 1 cup semi-sweet chocolate chips - 1/4 cup mini chocolate chips (for garnish) - 1/4 cup chopped walnuts or pecans (optional, for added texture) You can enhance the taste of your cookie dough bites with these options: - A pinch of cinnamon for warmth - A splash of almond extract for a nutty twist - Dried fruit like cranberries or cherries for a fruity touch - Sea salt flakes on top for a sweet-salty flavor Don't worry if you lack some ingredients. Here are some easy swaps: - Use coconut oil instead of butter for a dairy-free version. - Swap in whole wheat flour for a healthier option. - Use maple syrup instead of brown sugar for a unique taste. - Try dark chocolate chips if you prefer a richer flavor. These options keep the fun alive while cooking. Make sure to check the full recipe for all details. Enjoy your cooking adventure! Making chocolate chip cookie dough bites is simple and fun. You need just a few steps to create these tasty snacks. Gather all the ingredients before you start. This will help you stay organized and make the process smooth. 1. Mix Dry Ingredients: In a small bowl, whisk together the all-purpose flour, baking soda, and salt. Set this mix aside for later. 2. Cream Butter and Sugars: In a large bowl, beat the softened butter, brown sugar, and granulated sugar until light and fluffy. This usually takes about 2-3 minutes. 3. Add Vanilla: Pour in the vanilla extract and mix it in. This adds a nice flavor to your bites. 4. Combine Wet and Dry Ingredients: Slowly add the dry mix to the wet mix. Use low speed on your mixer to avoid overmixing. 5. Fold in Chocolate Chips: Gently fold in the semi-sweet chocolate chips. If you want a crunch, add chopped walnuts or pecans. 6. Form the Bites: Use a cookie scoop or your hands to shape the dough into small balls, about 1 inch in size. Place them on a baking sheet lined with parchment paper. 7. Chill the Dough: Once you form all the bites, put them in the fridge for at least 30 minutes. This helps them firm up. 8. Add Mini Chocolate Chips: After chilling, you can roll the bites in mini chocolate chips for extra flair. 9. Serve: Enjoy these bites chilled or at room temperature. They are perfect for snacking! You can find the Full Recipe for more detailed steps and tips. When making chocolate chip cookie dough bites, avoid using too much flour. If you add more than the recipe calls for, the bites can turn out dry. Also, mixing the dough too much can make it tough. Mix just until you see no dry flour. Remember, the dough should be soft and a bit sticky. To get the best texture, soften the butter before you start. Use room temperature butter for a smooth blend with sugar. It should feel creamy, not hard. Chilling the formed dough helps too. Letting it sit in the fridge for at least 30 minutes firms up the bites, making them easier to eat. You will need a few key tools for perfect bites. A mixing bowl and an electric mixer make mixing easy. Use a cookie scoop for even-sized bites. A spatula helps fold in the chocolate chips and nuts. Lastly, parchment paper is great for lining your baking sheet. It keeps the bites from sticking. For more detailed steps, check the Full Recipe. {{image_2}} You can easily switch up the flavor of your cookie dough bites. For a Nutella twist, replace half the butter with Nutella. This gives a rich, hazelnut taste that pairs well with chocolate chips. If you love peanut butter, swap in equal parts creamy peanut butter for the butter. This adds a fun, nutty flavor to your bites. You can even mix in some crushed pretzels for a salty crunch. Want a healthier treat? You can make vegan cookie dough bites. Use coconut oil instead of butter and maple syrup for sweetening. Substitute almond flour for the all-purpose flour to keep it gluten-free. These options let you enjoy the same great taste with fewer calories. You can also add a scoop of protein powder for an extra boost. Make your cookie dough bites match the season! For fall, add pumpkin spice and chopped pecans. This gives a cozy flavor perfect for autumn. Around the holidays, mix in crushed candy canes or dried cranberries for a festive touch. You can even use colored chocolate chips for a fun look at parties. These variations keep your bites exciting and fun throughout the year. You can find the full recipe for these delightful bites in this article. To keep your chocolate chip cookie dough bites fresh, store them in an airtight container. This helps to lock in moisture. You can keep them in the fridge for up to a week. If you want to keep them longer, consider freezing them. Always make sure they cool completely before storing. Freezing these bites is easy and a great way to save some for later. Place the bites on a baking sheet in a single layer. Freeze them for about two hours. Once frozen, transfer them to a freezer-safe bag. This way, you can grab just a few whenever you crave a treat. Chocolate chip cookie dough bites stay fresh in the fridge for about seven days. If you freeze them, they can last up to three months. To enjoy them at their best, eat them within a month or two. Always check for any signs of freezer burn, as this can affect the taste. Yes, you can eat cookie dough bites without baking them. The dough in these bites is safe. We use heat-treated flour to prevent any health risks. This means you can enjoy the sweet taste of cookie dough without worry. It’s a fun and tasty treat! To store leftover cookie dough bites, place them in an airtight container. Keep them in the fridge for up to one week. You can also freeze them for longer storage. Just make sure to separate each bite with parchment paper. This will help them not stick together. Each chocolate chip cookie dough bite has about 100 calories. They contain around 6 grams of fat and 10 grams of carbs. Each bite offers 1 gram of protein. For more detailed facts, check the specific brands of each ingredient used. Remember, these bites are a treat, so enjoy them in moderation! For the full recipe, you can refer to the section above. In this post, we broke down ingredients, cooking steps, and tips for chocolate chip cookie dough bites. You now understand the best practices for storage and variations to try. Remember, using the right tools makes the process easier. Avoid common mistakes for better results. Enjoy these sweet bites with your favorite flavors, knowing they’re easy to make. Now, gather your ingredients and start creating!

Chocolate Chip Cookie Dough Bites Tasty and Fun Snack

If you’re craving a sweet treat that’s easy to make and fun to eat, look no further! Chocolate chip cookie

- 2 cups mixed berries (strawberries, blueberries, raspberries) - 1 cup Greek yogurt (plain or vanilla) - 1 cup almond milk (or any milk of choice) - 2 tablespoons honey or maple syrup - 1 teaspoon vanilla extract - Fresh mint leaves for garnish (optional) What are the health benefits of berries? Berries are packed with vitamins, minerals, and antioxidants. They help fight disease and improve heart health. Eating mixed berries can boost your immune system too. Plus, they add natural sweetness to your popsicles. What are the advantages of Greek yogurt? Greek yogurt is rich in protein, which helps keep you full. It also contains probiotics that support gut health. Using Greek yogurt in your popsicles makes them creamy and adds a nice tang. What are the benefits of using almond milk? Almond milk is a low-calorie, dairy-free option. It has healthy fats and vitamin E, which is great for your skin. Using almond milk keeps these popsicles refreshing and light. Step 1: Blending the Ingredients First, gather your ingredients. Place the mixed berries, Greek yogurt, almond milk, honey, and vanilla extract into a blender. Blend on high speed until the mixture looks smooth and creamy. You can stop to scrape down the sides if needed. This step is key for a great texture. Step 2: Adjusting Sweetness Now, take a small taste of the smoothie mix. If it’s not sweet enough for you, add more honey or maple syrup. Blend again briefly to mix in the sweetness. You want it just right for your taste buds! Pouring the mixture into molds Once you achieve the desired taste, it’s time to fill the molds. Use a spoon to help pour the mixture into your popsicle molds. Make sure to leave a little gap at the top. The mixture will expand when it freezes. Inserting popsicle sticks After filling the molds, carefully insert popsicle sticks. Push them down gently until they are stable. This will help hold the popsicles together when they freeze. Recommended freezing time Now, place the molds in the freezer. Let them freeze for at least 4 to 6 hours. If you can wait longer, they will be even more solid. How to know when they're ready To check if the popsicles are ready, look for a firm and solid texture. You can run warm water over the outside of the molds. This will help release the popsicles easily. Gently pull on the sticks to remove them. Enjoy your delicious berry smoothie popsicles! To enjoy smooth popsicles, avoid ice crystals. First, blend the mixture well. This helps it stay creamy. If you notice ice crystals, try using fresh fruit instead of frozen. Fresh fruit blends easier and keeps the texture nice. For a creamier consistency, add more Greek yogurt. This makes the popsicles rich and thick. You can also use full-fat yogurt for an extra creamy treat. Another trick is to blend the mixture in smaller batches. This ensures each part gets fully mixed. If you want alternatives to honey or maple syrup, try agave or coconut sugar. Both options work great. You can also skip sweeteners if the berries are ripe. Taste the mix first, then add sweetness to your liking. For dietary needs, consider using stevia or monk fruit. These options are low in calories and still sweet. Adjust the amount based on your taste. Always remember, a little goes a long way. Garnishing can make popsicles look fancy. Try topping them with fresh mint leaves. This adds a pop of color and flavor. You can also sprinkle some crushed nuts for a crunchy touch. Pair these popsicles with yogurt or a fruit salad. They make a great snack or dessert. Serve them on hot days for a refreshing treat. Enjoying them with friends makes it even better! {{image_2}} You can change the fruit in your popsicles to keep things fresh. Try using seasonal fruits like peaches or cherries in the summer. They add a nice twist! In the fall, use apples or pears for a cozy flavor. For a tropical taste, mix in mangoes or pineapples. These fruits make your popsicles fun and exciting. You can also blend different berries together for a berry explosion in every bite. If you want a dairy-free treat, there are easy swaps. You can use coconut yogurt instead of Greek yogurt. It gives a rich and creamy texture. For milk, almond milk works great, but you can try oat or soy milk too. These options keep the popsicles creamy without dairy. They still taste amazing and are perfect for everyone. To make your popsicles extra special, consider adding flavors. Fresh mint or basil can bring a bright twist. Just a few leaves blended in can change everything! You can also sprinkle in a dash of cinnamon or nutmeg for warmth. If you like a sweeter taste, try agave syrup or stevia instead of honey. These changes can make your berry smoothie popsicles unique and delightful. For the full recipe, check out the detailed steps to make these delicious treats! You can store berry smoothie popsicles in the freezer for about three months. Use this time frame to enjoy their best taste and texture. For storing, I recommend using airtight containers or freezer-safe bags. This will help keep your popsicles fresh and tasty. To keep your popsicles fresh, wrap them in plastic wrap or aluminum foil. This extra layer stops air from getting in. It also helps prevent freezer burn, which can ruin their flavor and texture. If you notice ice crystals forming, it’s a sign of freezer burn. Enjoy your delicious popsicles within three months for the best experience! How do I get the popsicles out of the mold easily? To release the popsicles, run warm water over the outside of the molds for a few seconds. This warms up the sides and helps the popsicles slide out. Then gently pull on the sticks to free them. Can I use frozen berries instead of fresh? Yes, you can use frozen berries! They blend well and will still taste great. Just make sure to let them thaw a bit before blending for a smoother texture. How can I make the popsicles less sweet? To reduce sweetness, cut back on honey or maple syrup. You can also add more Greek yogurt or almond milk. This will balance the flavors without losing the yummy berry taste. What’s the best way to customize this recipe? You can mix different fruits like bananas or mangoes. Add spinach or kale for extra greens. Try using flavored yogurt or different milk types to change the taste. Get creative and find what you love! Can I use this recipe for a larger batch? Absolutely! Just double the ingredients if you want more popsicles. Make sure you have enough molds to hold the extra mixture. Following the [Full Recipe] will ensure you get the right blend every time. These berry smoothie popsicles offer a tasty and healthy treat. We explored the key ingredients, like mixed berries and Greek yogurt, which provide great nutrition. You learned step-by-step how to blend, freeze, and store these popsicles perfectly. Consider trying variations with different fruits or sweetening options to customize to your taste. With some simple tips, you can make these popsicles creamy and delicious. Enjoy your refreshing treats and share them with others for smiles all around.

Berry Smoothie Popsicles Delightful and Healthy Treat

Looking for a fun, healthy treat to beat the heat? You’ll love these Berry Smoothie Popsicles! Packed with sweet, juicy

To make this tasty dish, you will need: - 4 boneless, skinless chicken breasts - 1/4 cup olive oil - 2 lemons (juice and zest) - 4 cloves garlic, minced - 1 tablespoon dried oregano - 1 tablespoon fresh thyme leaves (or 1 teaspoon dried) - 1 tablespoon fresh rosemary, finely chopped (or 1 teaspoon dried) - Salt and pepper to taste - Fresh parsley for garnish (optional) If you don’t have certain items, you can swap them out. Use chicken thighs if you prefer. You can also use any cooking oil instead of olive oil. If fresh herbs are not available, just use dried herbs. Keep in mind, dried herbs are more potent, so use less. For lemon, you can use lime juice for a different taste. Using fresh herbs makes a big difference. They add bright flavor and aroma to the chicken. Fresh herbs can make your dish feel special. Dried herbs are useful, too. They last longer and are easy to store. Just remember to adjust the amount since dried herbs are stronger. Fresh herbs give your meal a vibrant touch, while dried herbs add depth. To start, grab a large mixing bowl. Add 1/4 cup of olive oil. Squeeze in the juice from 2 lemons. Don’t forget to zest those lemons too! Next, chop 4 cloves of garlic and add them in. Sprinkle in 1 tablespoon of dried oregano, 1 tablespoon of fresh thyme leaves, and 1 tablespoon of fresh rosemary. You can also use dried herbs if needed. Season with salt and pepper to taste. Whisk everything together until it blends well. This marinade is where the magic begins! Now, take your 4 boneless, skinless chicken breasts. Place them in a resealable plastic bag or a dish. Pour the marinade over the chicken, making sure they get a nice coat. Seal the bag or cover the dish tightly. Refrigerate the chicken for at least 1 hour. For the best flavor, let it marinate overnight. The longer the chicken soaks, the more flavor it absorbs. Before you grill, preheat the grill to medium-high heat, around 375°F (190°C). Lightly oil the grill grates to stop the chicken from sticking. Take the chicken out of the marinade and shake off any extra. Discard the leftover marinade. Place the chicken breasts on the grill. Cook them for about 6-7 minutes on each side. Use a meat thermometer to check if they reach 165°F (75°C). This ensures they are safe to eat. Avoid flipping them too much; let them sear to get those nice grill marks. Once cooked, take the chicken off the grill and let it rest for about 5 minutes. This keeps the juices inside, making it tender and juicy. You can garnish the chicken with fresh parsley if you like. Slice and serve it on a large platter with lemon wedges and some fresh herbs for color. Pair it with grilled veggies or a garden salad for a lovely meal. For the full recipe, check out the detailed instructions! To get those beautiful grill marks, start with a hot grill. Preheat it to medium-high heat. Place the chicken on the grill and do not move it for the first few minutes. This helps the chicken sear and creates those nice lines. After about 6-7 minutes, use tongs to flip the chicken. You will see lovely grill marks on each side. The best cooking temperature for juicy chicken is 165°F (75°C). To check this, use a meat thermometer. Insert it into the thickest part of the chicken. If it reads 165°F, your chicken is safe to eat. This ensures the chicken is cooked but not dry. Trust me, juicy chicken is always better! To stop the chicken from sticking, oil the grill grates before cooking. Use a paper towel dipped in oil and rub it on the grates. You can also lightly coat the chicken with olive oil before placing it on the grill. This extra step helps keep your chicken intact and makes for easier flipping. {{image_2}} You can give this dish a fun Mediterranean twist. Add some feta cheese and olives for a salty kick. You can also toss in sun-dried tomatoes for a sweet touch. These flavors blend well with the lemon and herbs. Try serving it with a side of couscous or a Greek salad for a full meal. If you want to switch things up, use different herbs and spices. Instead of thyme, try basil or dill. For a bolder taste, add smoked paprika or cumin. You can even use a pinch of chili flakes for some heat. This allows you to personalize the chicken to your taste. Pair your herbed lemon grilled chicken with tasty sides. Grilled vegetables like zucchini and bell peppers work great. You could also serve it with quinoa or rice for a filling meal. A fresh garden salad with a light vinaigrette adds a refreshing crunch. These sides enhance the juicy, flavorful chicken and make a complete dish. For more ideas, check out the Full Recipe. After you finish your meal, let the chicken cool down. Place any leftovers in an airtight container. It keeps well in the fridge for up to three days. Make sure it is sealed tightly. This helps keep it fresh and safe to eat. If you want to enjoy it later, consider freezing it. To reheat grilled chicken, use the oven or stovetop. These methods help keep the chicken juicy. Preheat your oven to 350°F (175°C). Place the chicken on a baking sheet, cover it with foil, and heat for about 15-20 minutes. On the stovetop, warm it in a pan over low heat. Add a splash of water or broth for moisture. This keeps it from drying out. Freezing grilled chicken is a great option for meal prep. Wrap each piece in plastic wrap, and then place them in a freezer bag. Be sure to remove as much air as possible. This helps prevent freezer burn. The chicken can stay frozen for up to three months. When you’re ready to eat, thaw it in the fridge overnight. This keeps the texture nice and tasty. For quicker thawing, you can use the microwave, but watch it closely to avoid cooking it. You can find the full recipe for Herbed Lemon Grilled Chicken to enjoy this delicious dish even more! I suggest marinating the chicken for at least one hour. If you have time, marinate it overnight. This gives the chicken more flavor. The longer it sits, the better it tastes. Just don’t forget to keep it in the fridge. Absolutely! Chicken thighs work great for this recipe. They stay juicy and tender while cooking. Thighs also have a richer flavor. Just adjust the cooking time, as thighs may take longer to cook than breasts. The best way is to use a meat thermometer. Insert it into the thickest part of the chicken. It should read 165°F (75°C) to be safe to eat. If you don’t have a thermometer, cut into the chicken. The juices should run clear, not pink. To add heat, mix in red pepper flakes or cayenne pepper in the marinade. Start with a small amount and taste as you go. You can also add chopped jalapeños for a fresh kick. If you like it spicy, don’t hold back! Check out the Full Recipe for more ideas. In this blog post, we covered how to make herbed lemon grilled chicken. We explored key ingredients, marinade steps, and grilling techniques. You learned tips for perfect grill marks and recommended cooking temperatures. We also touched on variations and storage tips for your leftovers. Remember, fresh herbs enhance flavor more than dried ones. Experiment with different spices and sides to make the dish your own. Enjoy your grilling!

Herbed Lemon Grilled Chicken Juicy and Flavorful Dish

Craving a juicy and flavorful meal? Herbed Lemon Grilled Chicken is your answer. This bright dish bursts with fresh flavors

- 1 medium head of cauliflower, riced (or 4 cups pre-riced cauliflower) - 1 cup mixed vegetables (carrots, peas, corn) - 3 green onions, sliced - 2 cloves garlic, minced - 2 large eggs, beaten - 3 tablespoons soy sauce (or tamari for gluten-free) - 1 tablespoon sesame oil - 1 tablespoon olive oil or avocado oil - Salt and pepper to taste - Optional: 1 teaspoon grated fresh ginger - Optional: Fresh cilantro or sesame seeds for garnish When I make cauliflower fried rice, I love to keep it simple yet tasty. The main star is the cauliflower. It gives you that rice-like texture without the carbs. You can use a whole head or grab some pre-riced cauliflower. The mixed veggies add color and crunch. You can pick whatever you like—carrots, peas, and corn work great! For a flavor boost, I often toss in garlic and ginger. The eggs add a nice protein touch. Soy sauce brings umami, while sesame oil gives it a lovely finish. Finally, a sprinkle of green onions and some cilantro or sesame seeds on top makes it look pretty. Each serving has about 150 calories. This dish is low in carbs and high in fiber. Cauliflower is a fantastic vegetable. It is low in calories and rich in vitamins. It can help with digestion and may reduce the risk of some diseases. You get all these benefits while enjoying a delicious meal. - Large skillet or wok - Food processor (if ricing cauliflower) - Wooden spoon or spatula - Measuring cups and spoons For this recipe, a large skillet or wok is key. It helps you stir-fry everything evenly. I prefer using a non-stick skillet for easy cleanup. A food processor makes ricing cauliflower quick and easy. A good wooden spoon or spatula will help you mix everything perfectly. I recommend durable brands like T-fal or Cuisinart. They last long and make cooking fun. To make cauliflower rice, start by cutting the cauliflower into florets. Place these florets in a food processor. Pulse them until they look like rice grains. This process is quick and easy. If you prefer, you can use pre-riced cauliflower. This saves time and effort. Look for it in the fresh or frozen section of your grocery store. Just make sure it’s not soggy or wet. Now, let’s cook our dish. Heat 1 tablespoon of olive oil in a large skillet over medium heat. Add minced garlic to the hot oil. Sauté it for about 30 seconds until it smells great. Next, add 1 cup of mixed vegetables. Stir-fry them for 3-4 minutes. They should become tender but still crisp. Move the vegetables to one side of the skillet. Pour the beaten eggs into the empty side. Scramble the eggs until they're fully cooked. Then, mix them with the vegetables. Add the riced cauliflower to the skillet next. Stir everything together. Cook for an additional 5-7 minutes. This allows the cauliflower to soften and get some color. Pour 3 tablespoons of soy sauce and 1 tablespoon of sesame oil over the mixture. Stir well to coat everything evenly. Season with salt and pepper to taste. For the final touch, sprinkle sliced green onions on top. Mix gently to combine all the flavors. Serve your cauliflower fried rice hot. You can garnish it with fresh cilantro or sesame seeds for a nice look. This makes the dish even more appealing. You’ll find the full recipe linked above for your convenience! To make your cauliflower fried rice burst with flavor, use spices and seasonings. - Ginger: Add fresh ginger for a warm, spicy touch. - Garlic: Always use fresh garlic to boost the taste. - Soy sauce: This gives an umami flavor. Use low-sodium soy sauce for a healthier option. For protein, you can add cooked chicken, shrimp, or tofu. If you prefer a vegan dish, skip the eggs and add chickpeas or edamame for protein. This keeps it nutritious and filling. Many people overcook cauliflower. This leads to mushy rice. To avoid this, stir-fry on high heat for a short time. Another mistake is not properly draining the cauliflower after ricing. Excess moisture can make the dish soggy. Ensure you pat it dry with a towel. If your fried rice tastes bland, it may need more seasoning. Start with a little salt and pepper, and adjust to your taste. Cauliflower fried rice pairs well with many dishes. Try serving it with grilled chicken or fish for a hearty meal. For a light meal, enjoy it alone or with a side salad. This dish is great for lunch, dinner, or meal prep. It is easy to store and reheat, making it perfect for busy days. Feel free to check out the Full Recipe for a complete guide! {{image_2}} You can change up your cauliflower fried rice with many vegetables. Try adding bell peppers, zucchini, or broccoli for color and taste. You can also use leafy greens like spinach or kale for added nutrients. Each vegetable brings its own flavor and texture. For sauces, you can swap soy sauce for coconut aminos if you want a sweeter taste. You might try teriyaki sauce for a richer flavor. Adding a splash of rice vinegar can brighten the dish. Feel free to experiment with different dressings to keep things fresh. This dish is naturally gluten-free if you use tamari instead of soy sauce. Other options include using a gluten-free stir-fry sauce or making your own from scratch. For low-carb variations, stick to the cauliflower and avoid high-carb veggies like corn and peas. You can use extra green onions and mushrooms to add bulk without adding carbs. This way, you keep the dish light but still filling. For an Asian twist, add sesame seeds and fresh ginger to boost flavor. You can also toss in some edamame for protein. To give it a Mediterranean flair, include olives, sun-dried tomatoes, or artichoke hearts. Use olive oil and fresh herbs like basil or oregano for a unique taste. Each twist changes the dish while keeping it fun and healthy. For the full recipe, check out the detailed instructions above. To store leftovers, let the cauliflower fried rice cool down. Place it in an airtight container. This keeps moisture locked in and prevents odors. Refrigerate your dish for up to four days. If you want to enjoy it later, make sure it is sealed well. To freeze, wait until the rice is cool. Use freezer-safe bags or containers. Remove as much air as possible. This helps avoid freezer burn. You can freeze it for up to three months. When ready to eat, thaw it in the fridge overnight. For reheating, the best method is using a skillet. Heat it over medium heat, add a splash of oil, and stir. This keeps the rice from getting soggy. You can also use a microwave. Just cover it with a damp paper towel to retain moisture. Always check that it’s heated through. Safety is key! Cauliflower fried rice is a low-carb dish that swaps rice for riced cauliflower. This meal is tasty and healthy. Cauliflower is rich in vitamins and fiber. It helps you feel full without many calories. This dish is also gluten-free, making it great for many diets. You can add your favorite veggies and proteins for more flavor. To make cauliflower fried rice taste great, use fresh garlic and ginger. These add a strong, nice flavor. You can also add soy sauce or tamari for a salty kick. Try using sesame oil, too; it gives a rich taste. Cook everything on high heat to get that fried rice texture. Don't forget to finish with green onions for freshness. Yes, you can make cauliflower fried rice ahead of time. Cook it and let it cool down. Then, store it in an airtight container in the fridge. It will last for about 3 to 4 days. When you are ready to eat, just reheat it in a skillet. You can also freeze it for longer storage. Just make sure to thaw before reheating. For more details, check the Full Recipe. In this article, we explored how to make cauliflower fried rice. We covered key ingredients, including optional flavors and their health benefits. You learned useful cooking tools and precise steps for preparation. We shared tips for enhancing flavor, avoiding common mistakes, and serving suggestions. Finally, we highlighted important storage info and variations for dietary needs. Now, you have the tools to enjoy a delicious, healthy dish anytime. Happy cooking!

Cauliflower Fried Rice Tasty Low-Carb Meal Idea

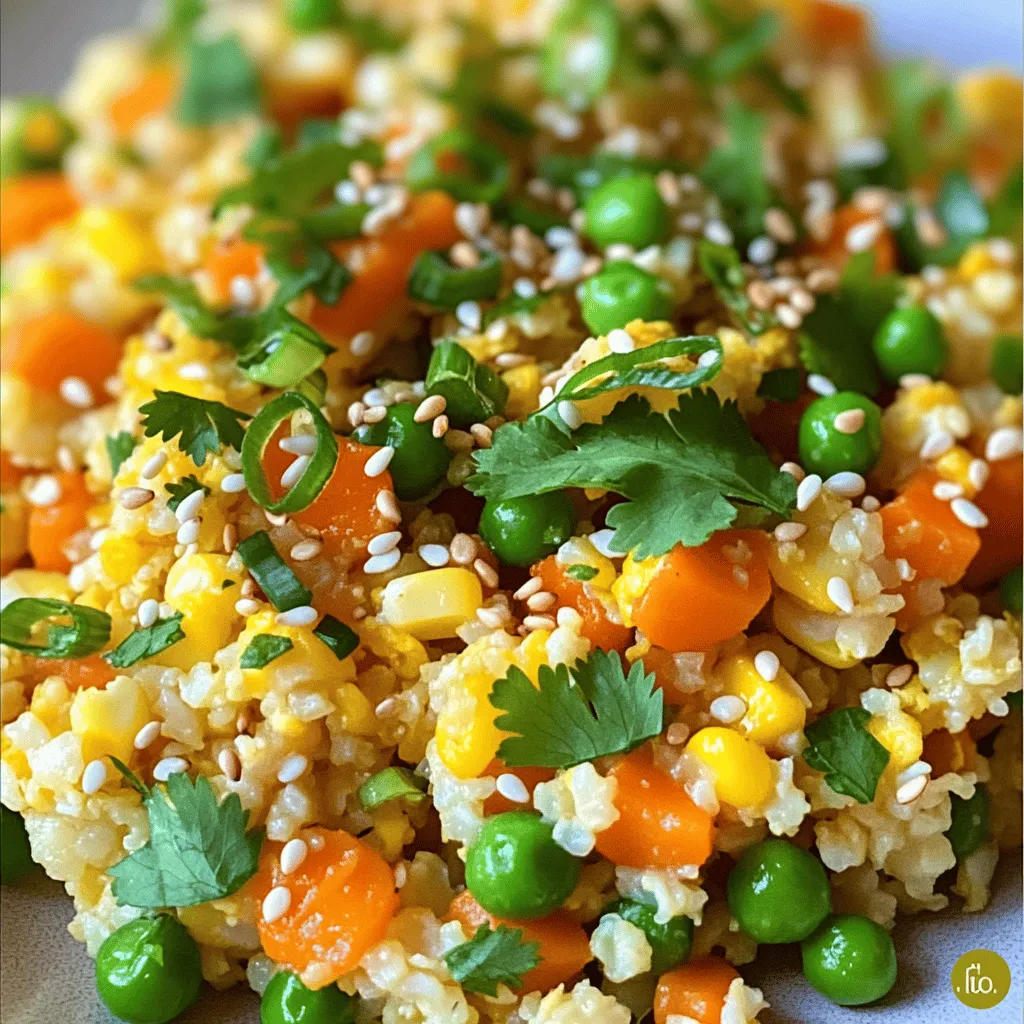
Looking for a low-carb meal that’s quick, tasty, and easy to make? Cauliflower Fried Rice is your answer! This dish

To make delicious Caprese salad skewers, you need: - 12 cherry tomatoes - 12 fresh basil leaves - 12 small mozzarella balls (bocconcini) - 2 tablespoons balsamic glaze - 1 tablespoon extra virgin olive oil - Salt and pepper to taste - Skewers (bamboo or metal) When picking your ingredients, choose ripe cherry tomatoes. They should feel firm and bright. Look for basil leaves that are vibrant green and free from browning. Fresh mozzarella should be soft to touch and have a milky scent. Always check for the best before date on the balsamic glaze and olive oil. Quality matters for great taste. For extra flavor, consider these options: - A pinch of red pepper flakes for heat. - Sliced olives or artichokes for a briny touch. - Avocado pieces for creaminess. - Fresh mint leaves for a unique twist. These additions can make your skewers even more exciting. Feel free to mix and match based on your taste. To make Caprese salad skewers, first, wash your cherry tomatoes and basil leaves. Dry them with a paper towel. This helps keep everything fresh. Next, take a skewer and thread on a cherry tomato. Add a basil leaf, then a small mozzarella ball. Repeat this pattern until the skewer is full. You can fit 4 to 5 of each ingredient on a skewer, depending on its length. Once you finish all the skewers, drizzle them with extra virgin olive oil and balsamic glaze. This adds great flavor! Finally, sprinkle salt and pepper on top to enhance taste. If you like heat, add a pinch of red pepper flakes. Caprese salad skewers are great for parties or snacks. You can serve them on a platter for a fun touch. Pair them with a glass of chilled white wine for a refreshing taste. They also go well with crusty bread or crackers. If you have leftovers, store them in the fridge. Just remember, these are best enjoyed fresh! To make your platter stand out, arrange the skewers in a circle or a straight line. Mix heights for a fun look. You can add lemon slices or extra basil leaves to fill spaces. Using a colorful platter adds to the appeal. This makes your dish eye-catching and fun at any gathering. For more detailed guidance, you can check the full recipe. To make perfect Caprese salad skewers, focus on fresh ingredients. I always choose ripe cherry tomatoes, fresh basil leaves, and soft mozzarella balls. These fresh items bring bright flavors and colors. Start by washing the tomatoes and basil well. Pat them dry to avoid sogginess. When you assemble the skewers, thread the ingredients in a pattern. I use one cherry tomato, one basil leaf, and one mozzarella ball. Repeat this until the skewer is full. This keeps the flavors balanced. Drizzle the skewers with olive oil and balsamic glaze. A sprinkle of salt and pepper will enhance the taste. For a little heat, add red pepper flakes. If you have leftover skewers, store them in the fridge. Place them in an airtight container. They stay fresh for up to two days. To keep the flavors, avoid adding the balsamic glaze until ready to serve. This keeps the skewers from getting soggy. One common mistake is using old ingredients. Always check for freshness. Another mistake is overloading the skewers. Too many ingredients can make them hard to eat. Keep it simple with a few of each item. Finally, don't forget to season well. Salt and pepper add great flavor. {{image_2}} You can switch the mozzarella for other cheeses. Burrata adds a creamy touch. Feta brings a salty flavor. Goat cheese gives a tangy twist. Each cheese makes the skewers unique. Try different cheeses for fun flavor. Caprese skewers are easy to make vegetarian. Just use the same ingredients minus the cheese. For vegan options, use vegan cheese or avocado slices. This keeps the dish fresh and plant-based. You can still enjoy the same great flavors. Caprese skewers pair well with many dips. A pesto dip adds a fresh taste. Hummus gives a creamy texture. You can also serve them with crusty bread. Fresh baguette or ciabatta works great. These pairings enhance the meal and add variety. Storing Caprese salad skewers is easy. If you have leftovers, wrap them tight in plastic wrap. Keep them in the fridge. This helps them stay fresh longer. Avoid stacking them too high. This keeps the cheese and tomatoes from getting squished. If you make them a day ahead, store them without dressing. Add the balsamic glaze and olive oil just before serving. When stored correctly, these skewers can last for about two days. After that, the ingredients may lose their crispness. The tomatoes can get mushy, and the basil can wilt. If you notice any change in smell or texture, it is best to toss them. Reheating Caprese salad skewers is not recommended. They taste best when fresh. If you must reheat, use a microwave for just a few seconds. Keep the heat low and check often. This way, you can avoid making the cheese rubbery. For the best flavor, enjoy them cold or at room temperature. Feel free to check the Full Recipe if you want to make these delicious skewers! The best way to assemble Caprese Salad Skewers is simple. Start with a skewer. Thread on one cherry tomato, then a basil leaf, and follow with a mozzarella ball. Repeat this until the skewer is full, usually 4-5 sets. Make sure to space them evenly. This arrangement keeps them fresh and tasty. You can also mix the order if you want a fun twist. Just remember to keep it colorful! Yes, you can prepare Caprese Salad Skewers ahead of time. You can make them a few hours before your event. Just cover them with a damp paper towel and place them in the fridge. This keeps them fresh and crisp. However, I suggest adding the balsamic glaze and olive oil just before serving. This way, the flavors stay bright and vibrant. The nutritional information for Caprese Salad Skewers is quite good. Each skewer has about 50 calories. They contain protein from cheese, vitamins from tomatoes, and healthy fats from olive oil. You get a mix of carbs, fats, and protein. This makes them a balanced snack or appetizer. For the full recipe, check out the details above. In this article, we explored the best ingredients and steps for making Caprese salad skewers. Freshness is key, and I shared tips for selecting the best produce. You learned how to prepare and assemble the skewers, along with serving and presentation ideas. I provided tips for storage and variations to fit different diets. Remember, practice makes perfect. Avoid common mistakes to enhance flavor and enjoyment. Enjoy making these delicious skewers for your next gathering!

Caprese Salad Skewers Fresh and Flavorful Appetizer

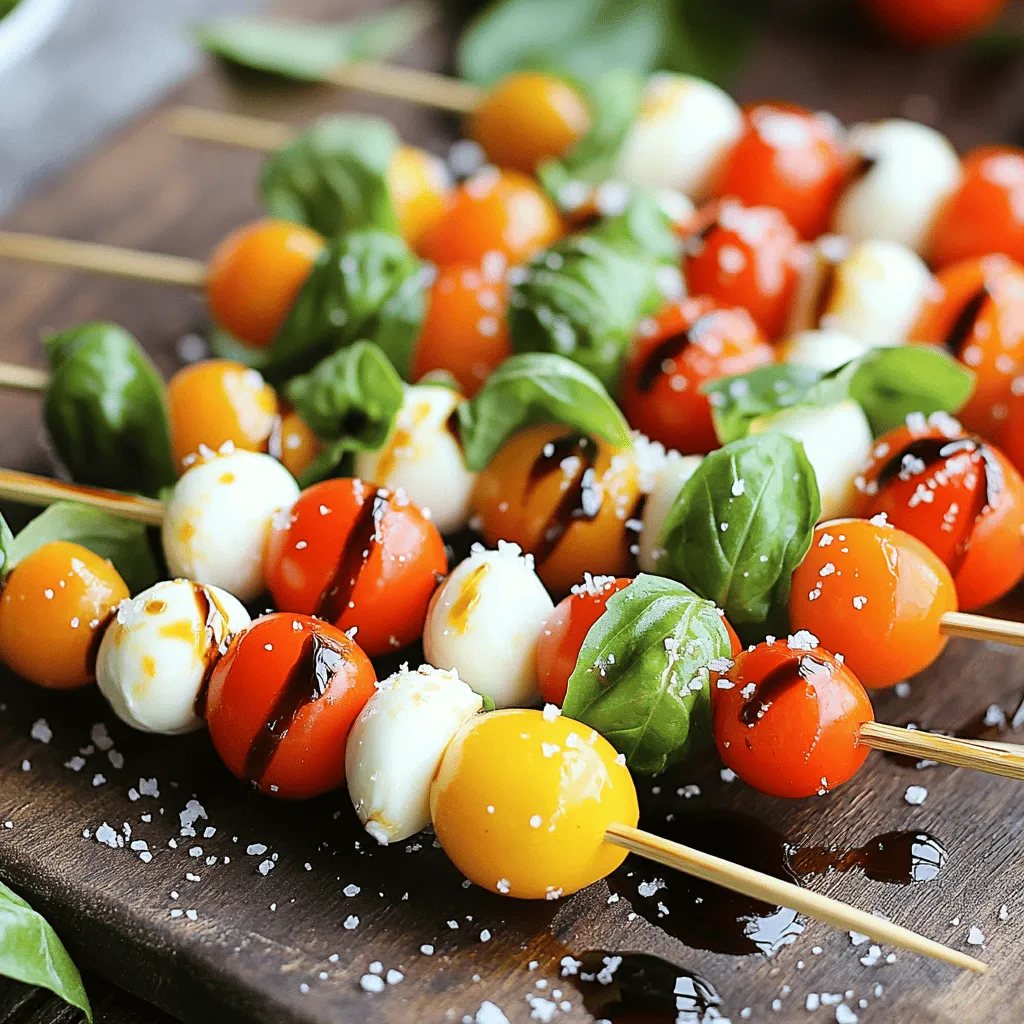
If you love fresh flavors, you’ll adore Caprese Salad Skewers! This simple appetizer lets you enjoy classic Italian tastes in

To make this refreshing Mango Salsa with Avocado, you need fresh, simple ingredients. Each one plays a role in creating the perfect balance of flavor. Here’s what you’ll need: - Ripe mango - Ripe avocado - Red onion - Red bell pepper - Jalapeño pepper - Fresh cilantro - Lime juice - Olive oil - Salt and pepper Using ripe mango and avocado is key. Their sweetness and creaminess make the salsa shine. The red onion and red bell pepper add crunch and color. The jalapeño gives a nice kick, but you can adjust it to your taste. Fresh cilantro brings brightness, while lime juice and olive oil add zest and richness. Finally, salt and pepper enhance all the flavors. For the full recipe, click [Full Recipe]. Now, let’s gather these ingredients and get ready to make a fresh, vibrant salsa! To make delicious mango salsa with avocado, follow these simple steps. - Dice mango and avocado: Start by peeling the mango. Cut it into small pieces. Then, take the avocado and cut it the same way. This gives nice bites in the salsa. - Chop red onion and red bell pepper: Next, take a small red onion. Chop it finely. Then, dice the red bell pepper. Make sure to keep the pieces small for even flavor. - Mince jalapeño pepper: If you like some heat, grab a jalapeño. Remove the seeds and chop it very finely. This will add a nice kick to your salsa. - Combine ingredients in a bowl: Now, take a medium bowl. Add the diced mango, avocado, chopped onion, diced bell pepper, and minced jalapeño. Gently mix them together. Be careful not to mash the avocado. - Mix lime juice and olive oil: In a small bowl, squeeze the juice from two limes. Add one tablespoon of olive oil. Whisk them together until well blended. Once you finish these steps, pour the lime and oil mix over the salsa. Add salt and pepper to taste. Toss it all gently for the best flavor. Let it sit for 15 minutes before serving. This is important because it lets the flavors come together beautifully. For the full recipe, check out the details above. Choosing ripe mango and avocado is key for great flavor. A ripe mango should feel slightly soft when you gently press it. Look for a bright color, too. For avocados, check for a dark skin. It should yield a bit when pressed. If they're hard, give them a few days to ripen. Chopping is an art. Use a sharp knife for smooth cuts. Start by slicing the mango and avocado in half. Remove the pit safely. Then, dice them into small cubes. For onion and bell pepper, chop them finely. This helps blend the flavors nicely. Allowing flavors to meld makes a big difference. After mixing all your ingredients, let your salsa sit for at least 15 minutes. This resting time allows the lime juice to soak in. The taste will be more vibrant and refreshing! For the full recipe, check out the details above. Enjoy your fresh and flavorful salsa! {{image_2}} Mango salsa with avocado is already a hit, but you can make it even better! Here are some fun ideas to mix things up. - Adding pineapple for sweetness: Pineapple adds a nice touch. It makes the salsa sweeter and more tropical. Just chop some ripe pineapple and mix it in. The sweetness of pineapple balances the heat from the jalapeño. - Incorporating black beans for protein: Want to make your salsa heartier? Add black beans! They bring protein and fiber. Rinse a can of black beans and stir them in. This twist makes the salsa filling and great for a meal. - Using different herbs like mint or basil: Want a fresh taste? Try using mint or basil instead of cilantro. Both herbs add unique flavors. Mint gives a cool touch, while basil adds a sweet note. Just chop your chosen herb and mix it in for a new twist. Feel free to try these variations and find your favorite! For the full recipe, check out the delicious Mango & Avocado Fiesta Salsa. To keep your salsa fresh, store it in a tight container. It’s best to refrigerate it right after making it. This keeps all the flavors bright and tasty. - Best practices for refrigerating: Place your mango salsa in an airtight container. This helps prevent air from getting in. The salsa will stay fresh for about 3 days in the fridge. After that, the ingredients may lose their crunch. - Freezing mango salsa: You can freeze your salsa if you want to keep it longer. Use a freezer-safe container and leave some space at the top. Salsa expands when it freezes. It stays good for up to 3 months. When you're ready to eat it, let it thaw in the fridge overnight. - Shelf life of ingredients: Each ingredient has a different shelf life. Fresh mango and avocado are best eaten quickly. They can spoil fast. Red onion and bell pepper last longer. They can stay fresh for about a week in the fridge. Keep an eye on them to enjoy the best taste. For a full recipe, check out the [Full Recipe]. Mango Salsa with Avocado can be mild or spicy. The heat comes from the jalapeño pepper. If you want less heat, remove the seeds and ribs from the jalapeño. For more spice, add more jalapeño or use a hotter pepper. This salsa is fresh and bright, not overpowering. Yes, you can make this salsa ahead of time. However, I recommend making it no more than a few hours before serving. The avocado can brown if left too long. To slow browning, squeeze extra lime juice over the avocado. This helps keep the color bright and fresh. Mango Salsa pairs well with many foods. Serve it with tortilla chips for a tasty snack. It also goes great on fish or chicken for a flavorful meal. Try it on tacos or salads for extra zing. You can even add it to sandwiches for a fresh twist. For the full recipe, check out the details above! In this blog post, we explored how to make delicious mango salsa with avocado. We went over the key ingredients, preparation steps, and helpful tips. You can add creative twists, like pineapple or black beans, to make it your own. Storing your salsa properly keeps it fresh longer. Remember, this tasty dish is easy to prepare and perfect for any occasion. Try it out and enjoy the bright flavors! You won’t be disappointed.

Mango Salsa with Avocado Fresh and Flavorful Recipe

Looking to add a burst of flavor to your meals? My fresh and easy Mango Salsa with Avocado recipe brings

- Cauliflower florets - Cheddar cheese (shredded) - Parmesan cheese (grated) - Cream cheese - Sour cream - Garlic (minced) - Onion powder - Smoked paprika - Salt and pepper The star of this dish is the cauliflower. It gives a light and fluffy texture. The cheese adds the creamy and cheesy taste. Both cheddar and Parmesan cheese work great together. Cream cheese and sour cream make the dish rich and smooth. The seasonings are key. Garlic adds a punch of flavor. Onion powder gives depth, while smoked paprika adds a hint of smokiness. Salt and pepper balance everything out. - Breadcrumbs for topping - Fresh chives for garnish - Other cheese varieties or vegetables You can add breadcrumbs for a crunchy topping. This gives a nice texture contrast. Fresh chives make the dish look bright and fresh. You can also swap in other cheese types. Mozzarella or gouda can bring a new twist. Adding veggies, like spinach or broccoli, can boost nutrition. For the full recipe, check the section above. - First, preheat your oven to 375°F (190°C). This heat will help the dish cook evenly. - While the oven heats, cut your large head of cauliflower into florets. You want them to be bite-sized. - Bring a large pot of salted water to a boil. Add the cauliflower florets and cook for about 5-7 minutes. This step makes the cauliflower tender but not mushy. Drain the florets and set them aside. - In a mixing bowl, combine the cream cheese, sour cream, 3/4 cup of the shredded cheddar cheese, and grated Parmesan cheese. Add minced garlic, onion powder, smoked paprika, and salt and pepper. Mix until smooth and creamy. - Gently fold the drained cauliflower into the cheese mixture. Make sure the cauliflower is well-coated. This ensures every bite is cheesy. - Next, transfer the cheesy cauliflower mixture into a greased baking dish. Spread it evenly so it cooks nicely. - If you like a crunchy topping, sprinkle breadcrumbs over the top. If not, add the remaining shredded cheddar cheese for extra gooeyness. - Now, place the dish in the preheated oven. Bake for 20-25 minutes, or until the cheese is bubbly and slightly golden. You want to see that nice golden brown on top. - Once done, take the dish out of the oven and let it cool for a few minutes. This helps the cheese set. - Before serving, garnish with fresh chives for a pop of color and flavor. They add a nice touch to the dish. For the complete recipe, you can refer to the [Full Recipe]. To cook cauliflower perfectly, start with fresh florets. Cut them into even pieces for uniform cooking. Boil salted water in a large pot. Add the florets and cook for 5-7 minutes. You want them tender but still firm. Drain them well to avoid a watery bake. For a smooth texture, mix the cheeses in a bowl first. Use a fork or spatula to blend them well. This ensures the blend is creamy and easy to coat the cauliflower. When you add the cooked florets, fold gently to keep their shape. There are many ways to serve cheesy cauliflower bake. It pairs great with grilled chicken or fish. You can also enjoy it as a side with steak or pork. For a fun presentation, try using individual ramekins. This makes each serving feel special. You can also serve it in the baking dish. Just sprinkle fresh chives on top for a pop of color. If you want a lower-calorie dish, consider using reduced-fat cream cheese. You can also swap sour cream for Greek yogurt. This keeps the creaminess while cutting calories. For dietary restrictions, use dairy-free cheese alternatives. There are many available now that melt well. You can also add other veggies, like spinach or mushrooms, to boost nutrition. {{image_2}} You can spice up your cheesy cauliflower bake by adding jalapeños. Just chop them finely and mix them in. This gives a nice kick to the dish. If you prefer fresh tastes, try adding herbs like thyme or rosemary. They add a bright flavor that pairs well with the cheese. Feel free to swap cheeses based on what you have. Mozzarella gives a stretchy texture, while gouda adds a smoky flavor. You can also pump up the nutrition by adding vegetables. Broccoli and spinach mix well and bring more color to the bake. If you want to make this dish faster, try the Instant Pot. Just cook the cauliflower on high for 3-5 minutes. You can also use the stovetop with a large pot. For outdoor cooking, grilling adds a unique flavor. Just wrap the mixture in foil and grill it for about 20-25 minutes. This method gives a nice char and smoky taste. To keep your cheesy cauliflower bake fresh, put it in an airtight container. This helps keep moisture in and air out. Make sure to cool the dish first. If you want to freeze it, let it cool completely. Then, wrap it tightly in plastic wrap. Place it in a freezer-safe bag or container. This way, the bake can last for a long time. When you are ready to eat the leftovers, you can reheat them in several ways. The best method is to use an oven. Preheat the oven to 350°F (175°C). Then, place the cheesy bake in an oven-safe dish. Cover it with foil to keep it moist and heat for about 20 minutes. You can also use a microwave. Just put it in a microwave-safe dish, cover it, and heat in short bursts. This keeps the texture nice. To maintain flavor, add a pinch of salt or fresh herbs when reheating. In the fridge, your cheesy cauliflower bake stays good for about 3 to 5 days. If you freeze it, it can last for 2 to 3 months. However, always watch for signs of spoilage. If you see mold or it smells strange, it's best to throw it away. Checking your leftovers often can help you enjoy them at their best! The best way to cook cauliflower is by boiling it. Start by bringing a pot of salted water to a boil. Add the cauliflower florets and cook for 5-7 minutes. You want the cauliflower to be tender but still firm. Drain it well before mixing it with the cheese. This method keeps the cauliflower bright and flavorful. Yes, you can make cheesy cauliflower bake ahead of time. Prepare the dish up to the baking step. Cover it tightly with plastic wrap or foil and store it in the fridge. When ready to bake, remove the cover and bake it directly from the fridge. This dish can save time on busy days. To make this dish gluten-free, skip the breadcrumbs on top. You can still achieve a crunchy texture by using gluten-free breadcrumbs or simply leave it off. The cheesy cauliflower will still be rich and tasty without them. It’s perfect for anyone who needs to avoid gluten. Yes, you can use frozen cauliflower instead of fresh. Just make sure to thaw it and drain any excess water. You may need to adjust the cooking time slightly since frozen cauliflower is often pre-cooked. This substitution can save time and still taste great. Cheesy cauliflower bake goes well with many side dishes. Here are some ideas: - Grilled chicken or fish for protein. - A fresh garden salad for crunch. - Roasted vegetables for added flavor. - Quinoa or rice for a hearty meal. These options complement the rich flavors of the bake and create a balanced plate. Cheesy cauliflower bake is a simple, tasty dish. We covered the key ingredients, like cauliflower and cheeses. I shared clear steps for preparation, cooking, and baking. You also learned helpful tips for serving and storing leftovers. Consider trying different flavors and methods for a fun twist. With these ideas, you can easily customize this dish to fit your taste. Enjoy cooking and let your creativity shine in the kitchen!

Cheesy Cauliflower Bake Delightful and Easy Recipe

Get ready to elevate your veggie game with my Cheesy Cauliflower Bake! This creamy, cheesy dish is easy to make

To make a creamy and flavorful mushroom risotto, you'll need: - 1 ½ cups Arborio rice - 5 cups vegetable broth (homemade or low-sodium) - 1 cup wild mushrooms (such as chanterelles, morels, or shiitake), cleaned and sliced - 1 medium onion, finely chopped - 2 cloves garlic, minced - ½ cup grated Parmesan cheese (plus extra for serving) - 3 tablespoons olive oil - 2 tablespoons unsalted butter - 1 cup fresh spinach, chopped - 1 teaspoon fresh thyme leaves - Salt and pepper to taste - Fresh parsley, chopped (for garnish) You can swap ingredients based on your diet or availability. Here are some ideas: - Instead of Arborio rice, use Carnaroli or Vialone Nano rice for a similar result. - Swap vegetable broth for chicken broth if you prefer a non-vegetarian option. - Use any fresh mushrooms you find, like button mushrooms or portobellos. - For a vegan version, replace Parmesan with nutritional yeast or a vegan cheese substitute. - You can use olive oil and skip the butter if you want a dairy-free dish. Mushrooms bring a rich flavor to your risotto. Here’s how to pick the best: - Look for firm, smooth caps without blemishes or dark spots. - Choose mushrooms that are dry, not slimy or wet. - Smell the mushrooms; they should have a fresh, earthy scent. - If buying wild mushrooms, ensure they are from a trusted source to avoid any unsafe varieties. - Store mushrooms in a paper bag in the fridge. This keeps them fresh and dry. These tips will help you create a risotto that’s not only tasty but also visually appealing. For the full recipe, check the section above! Start by heating 5 cups of vegetable broth in a medium saucepan. Keep this broth warm over low heat. This step helps the rice cook evenly. A warm broth makes for a creamy risotto. In a large skillet, heat 2 tablespoons of olive oil and 1 tablespoon of butter on medium heat. Add 1 finely chopped onion and cook until it turns soft, which takes about 5 minutes. Next, throw in 2 minced garlic cloves and 1 cup of sliced wild mushrooms. Cook until the mushrooms are soft, about 5 to 7 minutes. Season with salt, pepper, and 1 teaspoon of fresh thyme. This mix brings wonderful flavor. Now, add 1 ½ cups of Arborio rice to the skillet. Stir the rice for about 2 minutes. You want the edges of the rice to look translucent. This step adds depth to the dish. Start adding the warm vegetable broth one ladle at a time to the rice. Stir often. Wait until most of the liquid is absorbed before adding more. Continue this process for about 20 to 25 minutes. When the rice is creamy and tender, stir in 1 cup of chopped spinach, the rest of the butter, and ½ cup of grated Parmesan cheese. Adjust seasoning with salt and pepper as needed. Let the risotto sit for a couple of minutes. This resting time helps the flavors blend. For the Full Recipe, you can check the main article for precise details. To get that creamy texture in your risotto, use Arborio rice. This rice has high starch, which helps create a rich, smooth dish. Start with warm broth; this makes it easier for the rice to absorb the liquid. Add broth slowly, one ladle at a time. Stir often to release the starch. When the rice is tender yet firm, that’s the perfect time to add cheese and butter. This last step boosts the creaminess. Avoid using cold broth. Cold broth shocks the rice and slows cooking. Don’t rush the process. Risotto takes time, and patience is key. Skipping the toasting step can also lead to a less flavorful dish. Always toast the rice for a couple of minutes before adding broth. Lastly, don’t forget to taste as you cook. Adjusting seasonings early prevents a bland risotto. Start with salt when cooking the onions. This draws out their moisture and enhances flavor. As you add broth, taste often. This helps you achieve the right seasoning level. Finish with Parmesan cheese, which adds saltiness and depth. Fresh herbs like thyme or parsley elevate the dish. Remember, seasoning is personal, so adjust to your taste. For the full recipe, check the provided link. {{image_2}} You can use many types of mushrooms in your risotto. Each type adds its own flavor. For example, shiitake mushrooms give a rich taste. They are meaty and earthy. Chanterelles have a sweet, fruity flavor. Morels are delicate and nutty. Mix different mushrooms for a more complex taste. Using a blend can make your risotto extra special. Want to make your risotto heartier? Add protein or vegetables! You can include cooked chicken, shrimp, or even tofu for a meatless option. If you prefer veggies, try adding peas, asparagus, or roasted bell peppers. These add color and nutrition. Just toss them in during the last few minutes of cooking. This helps keep their texture and taste fresh. You can easily make a vegan version of this risotto. Simply skip the cheese and use vegetable broth. Replace butter with olive oil or vegan butter. For gluten-free risotto, stick with Arborio rice, as it is naturally gluten-free. Always check your broth and other ingredients to ensure they are gluten-free. This way, everyone can enjoy your creamy wild mushroom risotto. For the complete recipe, refer to the Full Recipe section. Store leftover risotto in an airtight container. Let it cool down first. Place it in the fridge and eat it within three days. If you want to keep it longer, freezing is a good option. When reheating, add a splash of broth or water. This helps restore the creamy texture. Heat it slowly over low heat. Stir often to avoid sticking. You want it warm, not dry. Yes, you can freeze risotto. However, the texture may change. To freeze, let it cool completely. Portion it into freezer bags. Remove as much air as possible. It can last up to three months. When ready to eat, thaw overnight in the fridge. Reheat gently, adding liquid as needed. For the full recipe, follow the steps to create this delicious dish. The best rice for risotto is Arborio rice. This rice has a high starch content. It helps create a creamy texture. Arborio rice absorbs liquid well and becomes tender. You can also use Carnaroli or Vialone Nano rice. Both options work great in risotto dishes. You can keep leftover risotto in the fridge for about three days. Store it in an airtight container. When you want to eat it again, check for any changes in smell or texture. Yes, you can make mushroom risotto ahead of time. But, it’s best when served fresh. If you make it early, store it in the fridge. Reheat it gently with a splash of broth to revive its creaminess. Mushroom risotto pairs well with many dishes. Try it with roasted vegetables or a fresh salad. Grilled chicken or fish also complement the flavors nicely. A glass of white wine can elevate your meal too. Mushroom risotto can be suitable for meal prep. However, it may lose some creaminess when stored. To keep it fresh, add cheese and butter when reheating. This restores its rich texture and flavor. For the full recipe, check out the Creamy Wild Mushroom Risotto section. It includes all the ingredients and steps you need for the perfect dish. Enjoy cooking! This blog post covered all you need for stellar mushroom risotto. We listed key ingredients and gave swaps for each. You'll cook to creamy perfection with our step-by-step guide. We shared tips to avoid mistakes and ways to personalize your dish. Plus, we discussed storage and reheating for leftovers. Enjoy your risotto journey and impress your guests with each bite!

Mushroom Risotto Creamy and Flavorful Delight

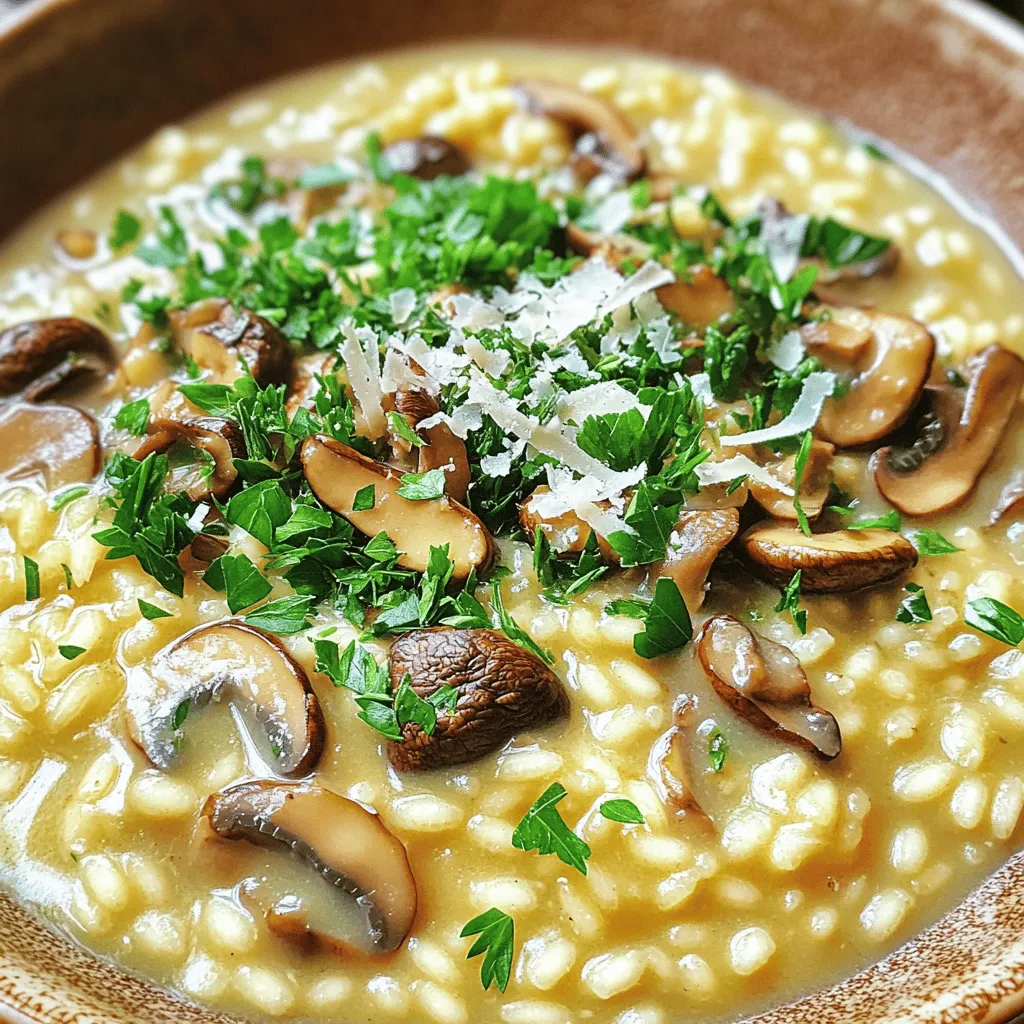
Mushroom risotto is a creamy and flavorful dish that warms the soul. You’ll find the perfect blend of rich flavors

Older posts
Newer posts
← Previous Page1 … Page67 Page68 Page69 … Page82 Next →

dsad

© 2025 My Saved Recipe • Built with GeneratePress

Our Policies

  • Copyright Policy
  • Cookie Policy
  • GDPR Policy
  • Privacy Policy
  • Disclaimer
  • Terms Of Use

More Information

  • Home
  • About
  • Contact
  • Appetizers
  • Dessert
  • Dinner
  • Drinks
©2025, My Saved Recipe About Back To Top