Skip to content
DisclaimerTerms Of UseGDPR PolicyCookie Policy

My Saved Recipe

  • Home
  • Drinks
  • Appetizers
  • Dinner
  • Dessert
  • About
  • Contact
  • Privacy Policy
DisclaimerTerms Of UseGDPR PolicyCookie Policy

Savannah

To make fluffy pancakes, gather these items: - 1 cup all-purpose flour - 1 tablespoon sugar - 1 tablespoon baking powder - 1/2 teaspoon salt - 1 cup milk (preferably whole) - 1 large egg - 2 tablespoons unsalted butter, melted - 1 teaspoon vanilla extract - 1 cup fresh blueberries (or frozen, thawed) - Additional butter or oil for cooking - Maple syrup and whipped cream for serving (optional) These ingredients work together to create a soft and light texture. Measuring your ingredients correctly is key for fluffy pancakes. Here are some tips: - Use a dry measuring cup for flour. Spoon the flour into the cup and level it off with a knife. - For liquids, use a clear measuring cup. Check the measurement at eye level. - Use a kitchen scale for precision, especially for flour. One cup usually weighs about 120 grams. Accurate measurements help create the right pancake texture. For the best flavor, choose high-quality ingredients: - Use fresh baking powder. Old powder may not rise well. - Whole milk adds creaminess. Low-fat milk can make pancakes tougher. - Select ripe, juicy blueberries. They should be firm, not mushy. Quality ingredients truly enhance the taste of your pancakes. For the full recipe, check above. To make fluffy pancakes, start by gathering your ingredients. You will need: - 1 cup all-purpose flour - 1 tablespoon sugar - 1 tablespoon baking powder - 1/2 teaspoon salt - 1 cup milk (preferably whole) - 1 large egg - 2 tablespoons unsalted butter, melted - 1 teaspoon vanilla extract - 1 cup fresh blueberries (or frozen, thawed) - Additional butter or oil for cooking - Maple syrup and whipped cream for serving (optional) In a large bowl, whisk the flour, sugar, baking powder, and salt. Mix until these dry items blend well. In another bowl, combine the milk, egg, melted butter, and vanilla extract. Stir until it is smooth. Next, pour the wet mix into the dry mix. Stir gently, but do not overmix. It is okay if the batter has a few lumps. Finally, fold in the blueberries. Make sure they spread evenly in the batter. Once your batter is ready, heat a non-stick skillet or griddle over medium heat. Lightly grease the surface with butter or oil. For each pancake, pour about 1/4 cup of batter onto the skillet. Cook the pancake until bubbles form on the surface, and the edges look set. This should take about 2 to 3 minutes. When it’s ready, flip the pancake with a spatula. Cook for another 1 to 2 minutes until it turns golden brown. If you see any remaining batter, repeat the cooking steps, adding more butter or oil as needed. Flipping pancakes can be tricky. Wait until you see those bubbles before you flip. This shows the pancake is ready. Use a wide spatula to make it easier. To serve, stack the pancakes on a plate. Drizzle with maple syrup and add whipped cream if you like. Enjoy your fluffy pancakes with blueberries that burst with flavor. For a complete guide, check the full recipe. To make your pancakes extra fluffy, use fresh baking powder. Old baking powder can lead to flat pancakes. Mix the dry ingredients well before adding wet ones. This helps create air pockets. When you mix the wet and dry ingredients, stir gently. Overmixing can make the pancakes tough. Leave some lumps in the batter; they are okay. Let the batter rest for a few minutes before cooking. This allows the flour to hydrate fully. A common mistake is not measuring ingredients correctly. Use dry and wet measuring cups for best results. Another mistake is cooking on too high heat. Medium heat works best to cook pancakes evenly. If you flip too soon, the pancakes might fall apart. Wait for bubbles to form on the surface. Lastly, don’t overcrowd the skillet. Cook a few pancakes at a time to ensure even cooking. Serve your fluffy pancakes warm with maple syrup. A dollop of whipped cream adds a nice touch. Fresh berries on top can add color and flavor. You can also sprinkle powdered sugar for a sweet finish. If you want something unique, try a scoop of yogurt. For a fun twist, add chocolate chips or nuts in the batter. Enjoy these pancakes with a side of bacon or sausage for a hearty meal. For the full recipe, check the section above. {{image_2}} If you need to change the recipe, it's easy. For gluten-free pancakes, use gluten-free flour. You can also swap milk for almond or oat milk. If you want to avoid sugar, use a sugar substitute like stevia. For a vegan option, replace the egg with a mashed banana or unsweetened applesauce. These swaps keep your pancakes tasty and fluffy. While blueberries are delicious, you can try other fruits too. Chopped bananas, strawberries, or raspberries work great. You might also add chocolate chips for a sweet touch. Nuts, like walnuts or pecans, can add a nice crunch. Just remember to adjust the amount to keep the batter thick and fluffy. Seasonal flavors can make pancakes even more fun. In fall, add pumpkin puree and spices like cinnamon. For winter, try crushed peppermint or a hint of nutmeg. In spring, mix in fresh lemon zest for a bright taste. Summer is perfect for peaches or nectarines. These variations keep breakfast exciting all year long. For the full recipe, refer to the Fluffy Blueberry Pancakes section. To store leftover pancakes, first let them cool. Place them in a single layer on a plate. Once cool, stack them between parchment paper in an airtight container. This keeps them fresh and prevents sticking. Store the container in the fridge for up to three days. When you’re ready to enjoy your pancakes again, reheat them for the best taste. You can use a microwave or a skillet. For the microwave, place one pancake on a plate. Heat for 20-30 seconds. If you use a skillet, warm it over medium heat. Add a little butter and cook each side for about one minute. This makes them warm and fluffy again. Freezing pancakes is a great way to save time. Start by letting them cool completely. Then, place them in a single layer on a baking sheet. Freeze them for about two hours. Once they are frozen, stack them in a freezer bag. Remove as much air as possible before sealing. You can freeze them for up to two months. To reheat, follow the same instructions as before. Enjoy your fluffy pancakes anytime! For the full recipe, check the details above. Pancakes get their fluffiness from a few key things. First, baking powder adds air to the batter. This makes the pancakes rise when they cook. Second, mixing the batter gently helps keep air in. If you overmix, the pancakes can turn flat. Lastly, using a bit of milk adds moisture. This helps create steam, which makes the pancakes puff up as they cook. Yes, you can use frozen blueberries. Just make sure to thaw them first. Drain any extra water to keep the batter from getting too wet. Frozen blueberries can still taste great in your pancakes. They may bleed a bit, turning the batter blue. But this can add a fun twist to your fluffy pancakes! You can make pancakes without eggs by using substitutes. Some good options include mashed banana or unsweetened applesauce. Use about 1/4 cup of either for each egg. You can also try a mixture of water, oil, and baking powder. This will help bind the batter together. Just remember, pancakes may not be as fluffy without eggs, but they can still be tasty! For a full recipe, check out the *Fluffy Blueberry Pancakes*. Fluffy pancakes start with the right ingredients and careful steps. Quality matters for the best taste. Follow the preparation and cooking tips to achieve the perfect texture. Remember to avoid common pitfalls that can ruin your pancakes. You can also try different flavors and dietary swaps. Store any extras properly so you can enjoy breakfast quickly later. With these tips, you’ll create delicious pancakes every time. Enjoy the process and make it a fun family meal!

Fluffy Pancakes with Blueberries Simple and Tasty Treat

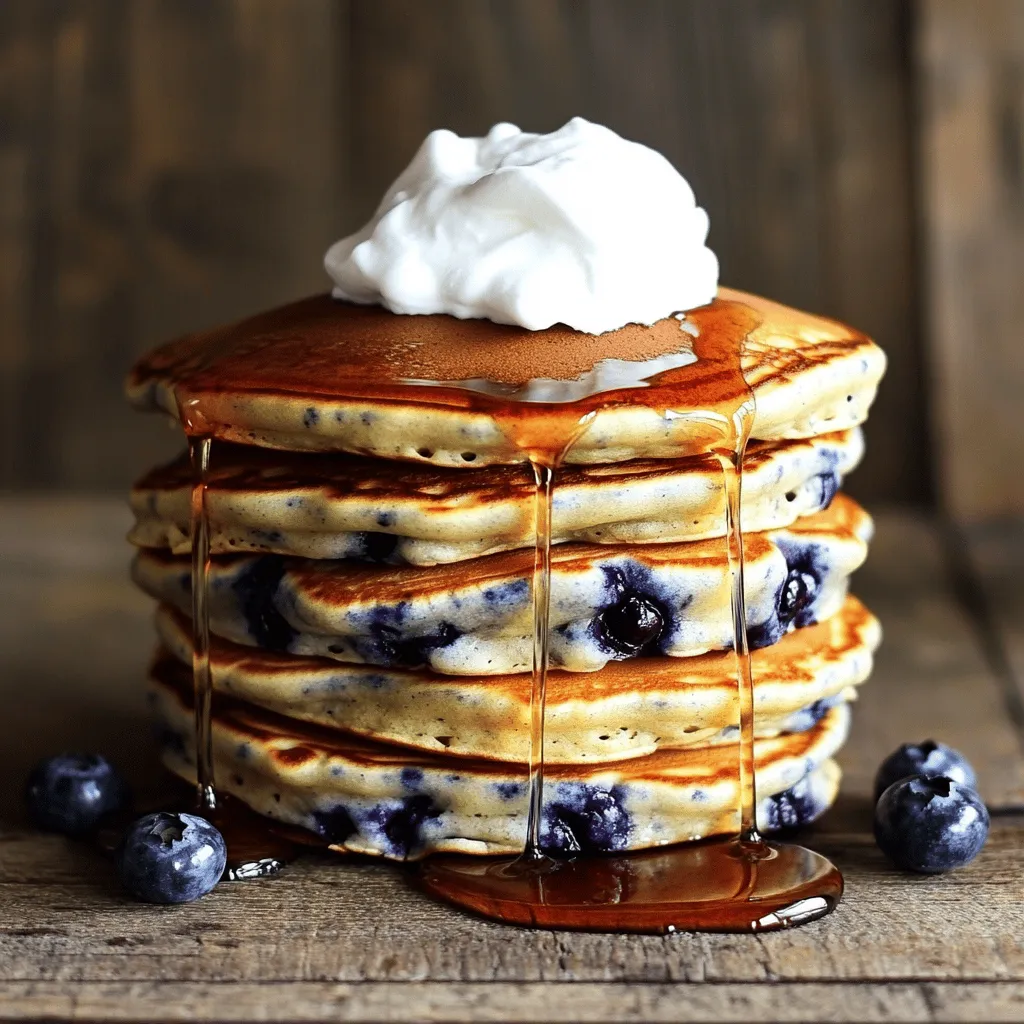
Who doesn’t love a stack of fluffy pancakes bursting with blueberries? In this post, I’ll guide you through making simple,

To make a great spicy chickpea curry, you need some key ingredients. Here they are: - 1 can (15 oz) chickpeas, drained and rinsed - 1 medium onion, finely diced - 3 cloves garlic, minced - 1 tablespoon fresh ginger, grated - 2 medium tomatoes, chopped - 1 can (14 oz) coconut milk - 2 tablespoons curry powder - 1 teaspoon turmeric powder - 1 teaspoon cumin seeds - 1 teaspoon red chili flakes (adjust to taste) - 2 tablespoons vegetable oil - Salt to taste - Fresh cilantro, for garnish - Juice of 1 lime These ingredients work together to create a rich and tasty dish. The chickpeas are the star, providing protein and texture. The coconut milk adds creaminess, while the spices bring heat and depth. If you want to add more taste, consider these optional ingredients: - Spinach or kale for extra greens - Bell peppers for sweetness and color - Peas for added texture - Cashews or almonds for crunch - A splash of soy sauce for umami Using these optional items can enhance the flavor and nutrition of your curry. Feel free to mix and match based on what you have at home. When shopping for your ingredients, always look for the freshest options. Here are some tips: - Choose chickpeas that are firm and free of cracks. - Pick onions that are smooth, firm, and heavy for their size. - Select garlic bulbs that are tight and plump. - Look for tomatoes that are ripe, with a deep color. - Coconut milk should be in a can, without any leaks or dents. Fresh ingredients make a big difference in flavor. Always take your time to choose the best ones. For the full recipe, visit the link provided. Start by heating vegetable oil in a large pan over medium heat. Add cumin seeds and let them sizzle for about 30 seconds. This step brings out their flavor. Next, add finely diced onion. Cook until golden brown, which takes about 5 to 7 minutes. After that, stir in minced garlic and grated ginger. Sauté these for 1 to 2 minutes until they smell great. Now, add chopped tomatoes to the pan. Cook while stirring for about 5 minutes, until they soften and break down. Now it’s time to mix in the spices. Sprinkle in curry powder, turmeric, and red chili flakes. Stir well to coat the onion-tomato mixture. Let this cook for an extra 2 minutes to blend the flavors. Add the drained and rinsed chickpeas, ensuring they mix well with the spices. Pour in the coconut milk and stir until everything combines. Bring the mixture to a simmer. Cook for 15 to 20 minutes so the sauce thickens and flavors meld together. Once the curry simmers, taste it and add salt to your liking. Just before serving, squeeze in the juice of one lime. This gives a nice tang to the dish. Remove from heat and garnish with fresh cilantro. Enjoy your delicious Spicy Chickpea Curry! For the full recipe, you can refer to the earlier section. To control the heat in your curry, start with less chili flakes. You can always add more as you cook. If the dish gets too spicy, add more coconut milk. This will cool the heat and keep the flavor rich. Lime juice also helps balance spicy notes, so don’t skip it. Using canned chickpeas is easy and quick. Just drain and rinse them well. For dried chickpeas, soak them overnight for the best texture. Cook them until tender before adding to your curry. This makes sure they blend well with the spices and sauce. One common mistake is not sautéing the onions long enough. They should be golden brown for the best flavor. Another mistake is adding salt too early. Salt can make the chickpeas tough if added at the start. Wait until the end to season with salt. Make sure to stir well when mixing in your spices. This helps release their full flavor. For the full recipe, check out the detailed instructions. {{image_2}} This spicy chickpea curry is already vegetarian and vegan. You can enjoy it without any meat or dairy. If you want, you can add tofu or tempeh for more texture. These options keep the dish plant-based. They also add a nice bite. You can marinate the tofu in spices before adding it to the curry. This boosts the flavor even more. Adding more veggies is a great way to make this dish even better. You can toss in spinach, kale, or bell peppers. These add color and nutrients. Cut them into small pieces so they cook well. You can add them when the chickpeas are stirred in. This will help them soften and blend with the sauce. You can also try sweet potatoes for a nice sweet touch. Want to change it up? You can use lentils or quinoa. These add protein and a unique taste. Cook the lentils separately and mix them in at the end. If you prefer quinoa, cook it before adding. This will help your dish stay hearty and filling. For a non-vegetarian option, add chicken or shrimp. Cook these proteins first, then mix them with the curry. For the full recipe, check out the details above. Enjoy your cooking! To keep your spicy chickpea curry fresh, store it in an airtight container. Let the curry cool to room temperature first. This helps avoid condensation inside the container. Place it in the fridge if you plan to eat it within three days. The flavors will meld and deepen as it sits. If you want to save the curry for later, freezing is a great option. Use a freezer-safe container or resealable bag. Make sure to leave some space at the top, as liquids expand when frozen. Label the container with the date. This dish can last up to three months in the freezer. When you're ready to enjoy your curry, thaw it in the fridge overnight. For quick reheating, use a microwave. Heat in short bursts, stirring in between. Alternatively, warm it up in a pan over low heat. Add a splash of water or coconut milk to bring back the sauce's creaminess. Enjoy your delicious meal! For the complete recipe, check out the Full Recipe section. You can serve Spicy Chickpea Curry with rice or naan. I love using basmati rice because it adds a nice touch. You can also add some yogurt on top for creaminess. Fresh cilantro makes a great garnish too. A squeeze of lime enhances the flavor and adds a zesty kick. Yes, you can use dried chickpeas! First, soak them overnight in water. This helps them cook faster. After soaking, boil them until tender, which may take 1 to 2 hours. Then, use them in the recipe like you would canned chickpeas. Just remember to adjust the cooking time. This recipe is already gluten-free! All the ingredients, like chickpeas, coconut milk, and spices, are safe. Always check labels on packaged items to ensure they are gluten-free. If you're adding any sides, like bread, choose gluten-free options. Enjoy your meal without worry! In this blog post, we covered how to make a tasty spicy chickpea curry. We looked at key ingredients and how to choose fresh ones. Step-by-step, I shared how to prepare a perfect base and add chickpeas and coconut milk. I also gave tips to adjust spice levels and avoid common mistakes. Finally, we explored variations for diet preferences, along with storage and reheating tips. Enjoy cooking your curry, and remember, a few tweaks can make it your own!

Spicy Chickpea Curry Flavorful and Easy Recipe

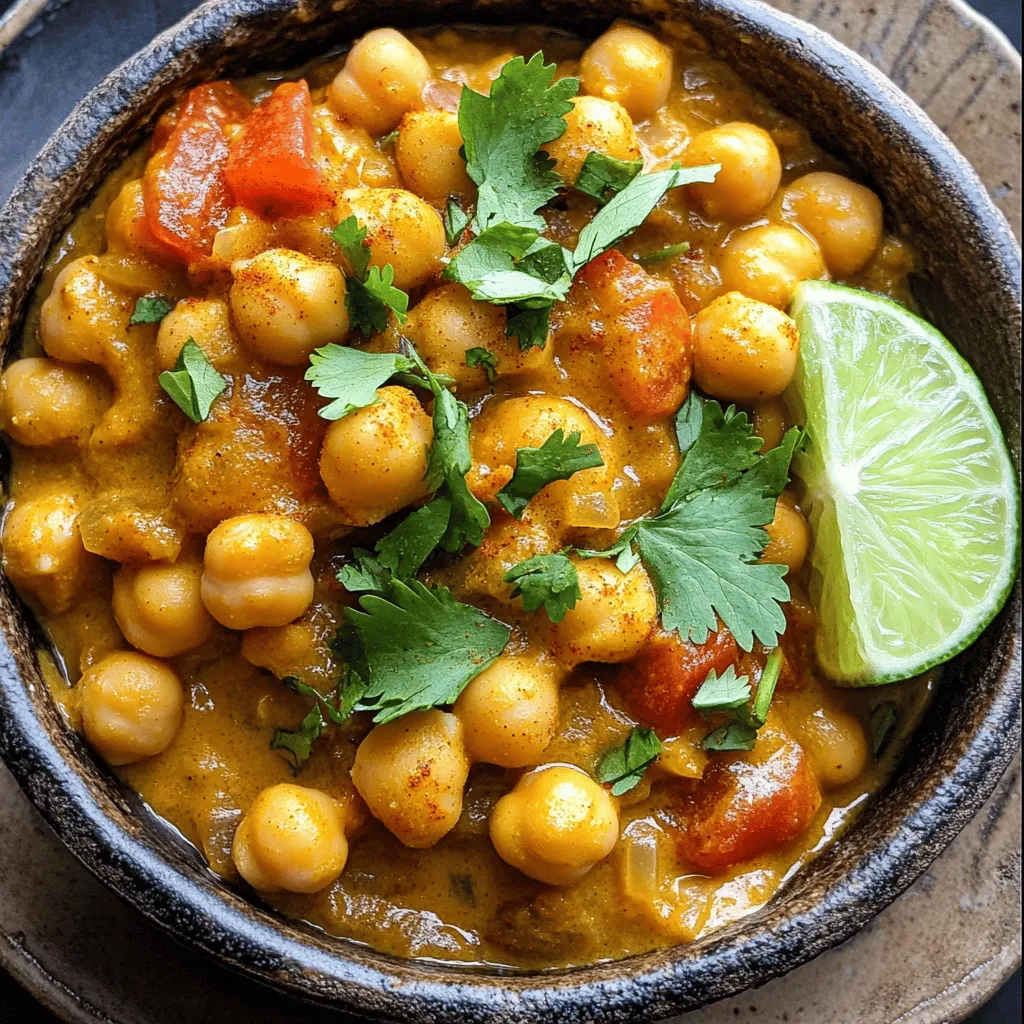
If you crave a dish that’s both flavorful and easy to cook, you’ve found it! My Spicy Chickpea Curry packs

To make this dreamy dessert, you need a few key ingredients: - 1 cup semi-sweet chocolate chips - 1 cup mini marshmallows - 1/2 cup graham cracker crumbs - 2 tablespoons unsalted butter, melted - 1/2 teaspoon vanilla extract - Pinch of sea salt - Extra graham crackers or fruit for dipping These ingredients come together to create a warm and gooey dip that tastes just like a campfire treat. You might want to swap some ingredients. Here are some great options: - Alternatives for chocolate: Use dark chocolate or milk chocolate chips if you prefer a different flavor. You can also use chocolate bars, chopped into small pieces. - Healthier options for graham crackers: Try whole wheat graham crackers or even crushed oats for a different texture. They add a nice nutty taste. - Vegan substitutes: Use dairy-free chocolate chips and coconut oil instead of butter. You can also find vegan marshmallows or skip them for a different style of dip. These swaps make it easy to enjoy S'mores Dip, no matter your dietary needs. Check out the Full Recipe for more details! Start by measuring your graham cracker crumbs. You need 1/2 cup for the crust. Place the crumbs in a bowl. Then, melt 2 tablespoons of unsalted butter. You can do this in the microwave or on the stove. Mix the melted butter into the crumbs. Add a pinch of sea salt. Stir until all crumbs are well coated. This step is key for great flavor. Next, layer your ingredients. Spread the crumb mixture in the bottom of a small baking dish. Press it down gently to form a crust. Now, sprinkle 1 cup of semi-sweet chocolate chips over this crust. Make sure to cover it evenly. Then, add 1 cup of mini marshmallows on top of the chocolate. Now, it’s time to bake! Preheat your oven to 350°F (175°C). Place the dish in the oven and bake for about 10-12 minutes. Watch for the marshmallows to turn golden brown. The chocolate should also look melted. Once done, remove the dish from the oven. Let it cool for a couple of minutes. This helps the dip set. Serve the dip warm for the best taste. I like to offer extra graham crackers or fruit for dipping. Strawberries or bananas work great! Enjoy this sweet treat right from the baking dish for a cozy feel. For the complete recipe, check the Full Recipe section. To achieve the ideal marshmallow toast, watch the oven closely. You want them golden, not burnt. Use mini marshmallows for a quicker melt and even toast. If you like a bit of char, broil the dip for the last minute. Adjusting sweetness levels is easy. Start with semi-sweet chocolate chips. If you prefer a sweeter dip, add a touch more chocolate. You can also use milk chocolate chips if you want extra sweetness. Overbaking the dip is a common issue. Keep an eye on the time. Bake for 10-12 minutes only. If the marshmallows look too brown, take it out to avoid a hard top. Improper ingredient ratios can ruin your dip. Stick to the recipe for the best taste. For instance, too many graham cracker crumbs can dry it out. Balance the chocolate and marshmallows well. Adding spices or flavorings can elevate your dip. Try a sprinkle of cinnamon or nutmeg for warmth. A few drops of almond extract can also give it a unique twist. Using flavored chocolate chips can change the game. Look for options like caramel or mint chocolate chips. These variations add fun flavors to your dip. For the full recipe, check out the Ultimate S'mores Dip . {{image_2}} You can make your s'mores dip even more fun. Try adding nuts or peanut butter for a nutty twist. Chopped walnuts or almonds mix well with the chocolate. If you love peanut butter, swirl some into the chocolate layer. It gives a rich taste and pairs perfectly with marshmallows. Fruits are another great choice. You can add sliced strawberries, bananas, or even cherries. The fresh fruit adds a juicy burst that balances the sweet chocolate and marshmallows. Don't be afraid to get creative with flavor! You can use many dippers with s'mores dip. Besides graham crackers, try pretzel sticks for a salty crunch. These provide a nice contrast to the sweet dip. You can also use cookies, like vanilla wafers, for a different taste. For a kid-friendly option, use fruit slices. Apples, pears, or even pineapple make fun dippers. Kids love the sweetness of the fruit with the creamy dip. You can even set up a dipping station. Let everyone choose their favorite dippers! S'mores dip can fit any season or holiday. For Halloween, add some candy corn on top. It gives a fun color and adds a chewy texture. During the winter, you might sprinkle crushed peppermint candies over the marshmallows. This adds a cool flavor and looks festive. You can also make dips inspired by other desserts. Think of cookie dough s'mores dip or a red velvet twist. Each theme brings a new and exciting taste. The Full Recipe is a great starting point for these fun variations! To keep your S'mores dip fresh, use an airtight container. Glass containers work best, but plastic ones are fine, too. Make sure the dip cools down before sealing it. Store it in the fridge for up to three days. When you want to enjoy the dip again, the best way to reheat it is in the oven. Preheat your oven to 350°F (175°C). Place the dip in an oven-safe dish and cover it with foil. Heat for about 10 minutes. This method helps it stay moist and tasty. You can also microwave it for 30-second bursts, stirring in between. If you do this, watch closely to avoid drying it out. Yes, you can freeze S'mores dip! However, it’s best to freeze it before baking. Put the unbaked dip in a freezer-safe container. It can stay fresh for about two months. When you're ready to eat it, thaw it overnight in the fridge. Then, bake it as per the Full Recipe instructions. This way, you get that warm, gooey goodness every time. You can make S'mores Dip using a microwave or stovetop. For the microwave, layer the ingredients in a safe bowl. Heat in short bursts, stirring in between, until melted. This takes about 1-2 minutes. For stovetop, melt chocolate in a pan. Add marshmallows and stir until they soften. Both methods work well! Yes, you can prepare S'mores Dip ahead! Mix all the ingredients and store them in a bowl. Cover it tightly and keep it in the fridge. When you are ready, just heat it up in the oven or microwave. This saves time and makes serving easy. There are many options if you want to skip graham crackers. You can use crushed cookies like Oreos or vanilla wafers. Rice cakes also work well for a gluten-free option. Try using pretzels for a sweet and salty mix. Get creative with your crust! S'mores Dip can be gluten-free if you use the right ingredients. Make sure to pick gluten-free graham crackers or any alternative crust. Most chocolate and marshmallows are gluten-free, but always check the labels. This way, everyone can enjoy the dip! A serving of S'mores Dip has about 250 calories. This can change based on the ingredients you use. For example, using dark chocolate or less butter can lower the calories. Always keep an eye on portion sizes to enjoy this treat without guilt. S'mores dip combines chocolate, marshmallows, and graham crackers for a tasty treat. We discussed key ingredients and how to substitute them. I shared easy steps for preparing, baking, and serving your dip. Tips and tricks helped you avoid common mistakes while enhancing flavor. Creative variations and storage tips ensure your dip stays fresh and delicious. Remember, this dessert is flexible, allowing for fun mix-ins and themes. Enjoy experimenting to find your perfect s'mores dip!

S’mores Dip Dreamy and Indulgent Dessert Delight

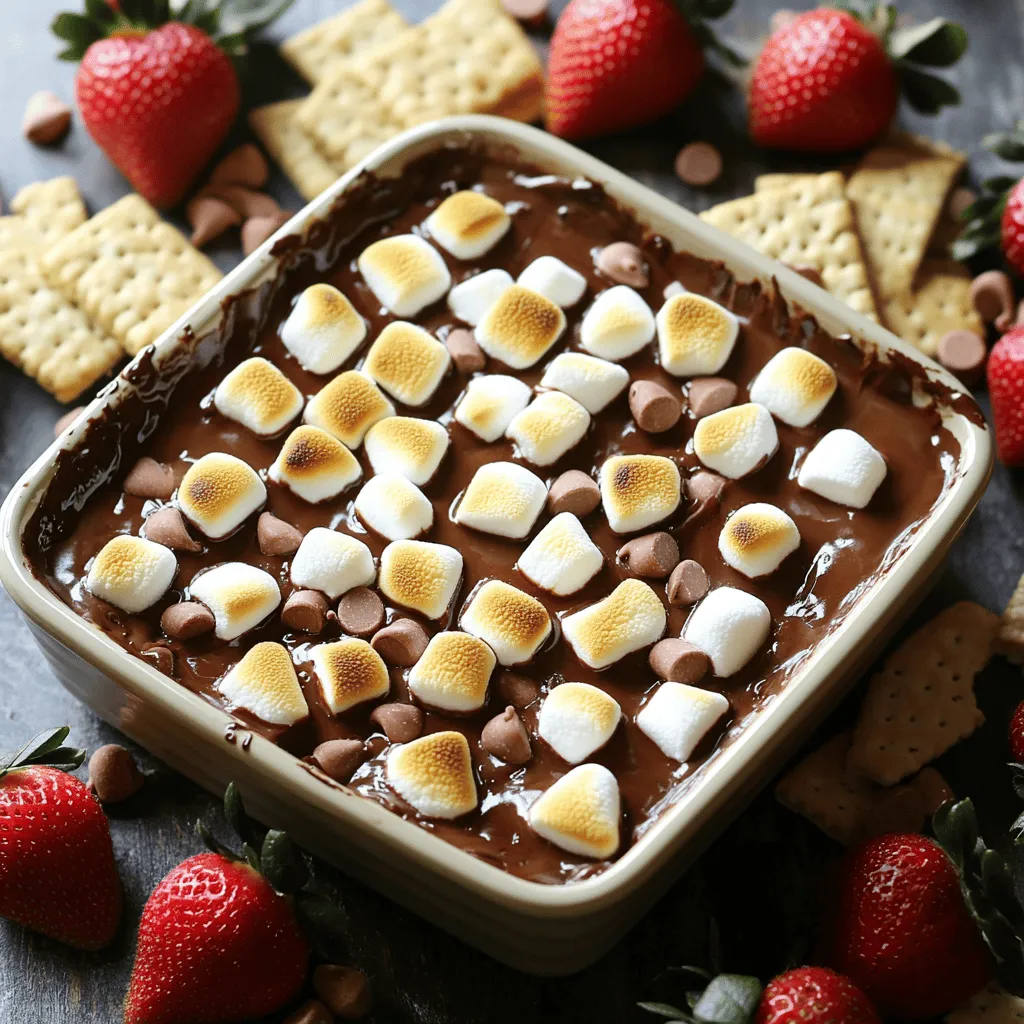
Do you crave a sweet treat that’s both cozy and fun? Look no further than S’mores Dip! This dreamy dessert

To make Coconut Lime Chicken, gather these key ingredients: - 4 boneless, skinless chicken breasts - 1 can (13.5 oz) coconut milk - 3 tablespoons lime juice (freshly squeezed) - Zest of 1 lime - 2 tablespoons honey - 2 cloves garlic, minced - 1 teaspoon ginger, grated - 1 teaspoon ground coriander - Salt and pepper to taste - 2 tablespoons olive oil - Fresh cilantro leaves for garnish - Lime wedges for serving You can add a few ingredients to boost the taste: - 1 teaspoon red pepper flakes for spice - 1 tablespoon fish sauce for umami - 1 tablespoon soy sauce for a savory touch - Fresh mint leaves for a bright note If you need to swap ingredients, here are some ideas: - Use chicken thighs instead of breasts for juicier meat. - Coconut cream can replace coconut milk for a richer sauce. - Brown sugar can work instead of honey for sweetness. - Fresh lime juice can be swapped with lemon juice for a different zing. These options help you customize the dish to your liking while still keeping it delicious. For the full recipe, check out the complete cooking instructions. First, gather your ingredients. You will need chicken breasts, coconut milk, lime juice, lime zest, honey, garlic, ginger, and spices. In a bowl, mix the coconut milk, lime juice, lime zest, honey, minced garlic, grated ginger, ground coriander, salt, and pepper. Whisk it well to combine everything. Next, place the chicken in a large zip-top bag or shallow dish. Pour the marinade over the chicken. Seal the bag or cover the dish to keep it fresh. Now, marinate the chicken in the fridge for at least one hour or overnight for more flavor. You can cook the chicken in two ways: grilling or using a skillet. If you choose to grill, preheat your grill to medium-high heat. For the skillet method, heat olive oil in a large skillet over medium-high heat. Remove the chicken from the marinade, but keep the marinade to make a sauce later. If grilling, cook the chicken for about 6-7 minutes per side. You want it fully cooked and reach an internal temperature of 165°F (75°C). If using a skillet, cook until golden brown and cooked through. After cooking, let the chicken rest for a few minutes. This helps keep it juicy. Now, slice the chicken into pieces. For a tasty finish, take the reserved marinade and bring it to a boil in a small saucepan. Simmer it for about 5 minutes until it thickens. To serve, plate the sliced chicken and drizzle the thickened sauce on top. Garnish with fresh cilantro leaves. Don’t forget lime wedges on the side for squeezing over the chicken. This adds a bright, zesty flavor. For the full recipe, refer to the earlier section. Enjoy your meal! To get the best taste from your Coconut Lime Chicken, marinating is key. Use a zip-top bag to coat the chicken well. This method helps the chicken soak up all the flavors. I recommend marinating for at least one hour. For even more flavor, try marinating overnight. The longer you let it sit, the better it gets! Cooking time can vary based on the thickness of the chicken breasts. If your pieces are thick, they may need more time. For thinner pieces, check for doneness at about 5-6 minutes per side. Always use a meat thermometer. The chicken should reach 165°F (75°C) to be safe. To thicken your sauce, bring the reserved marinade to a boil. Then, reduce the heat to simmer for about five minutes. This will help it become thicker and more flavorful. If you want an even richer sauce, you can add a cornstarch slurry. Just mix cornstarch with a little cold water before adding it to your sauce. This will give it a nice, smooth texture. For the full recipe, check out the Coconut Lime Chicken. Enjoy your cooking! {{image_2}} You can change up your coconut lime chicken by adding mango salsa. This fresh topping gives your dish a fruity twist. To make mango salsa, mix diced mango, red onion, jalapeño, cilantro, and lime juice. The sweet and spicy flavors pair well with the creamy chicken. Just sprinkle the salsa over the chicken right before serving. It makes the dish pop with color and taste. If you love heat, try making spicy coconut lime chicken. Add sliced jalapeños or crushed red pepper flakes to your marinade. This will give the chicken a nice kick. You can also serve it with a spicy dipping sauce. Combine yogurt with lime juice and hot sauce for a creamy side. The spicy flavor balances the sweet and tangy notes in the dish. For a meat-free option, use tofu instead of chicken. Press firm tofu to remove excess water. Then cut it into cubes and marinate just like the chicken. Grill or pan-fry the tofu until golden brown. The coconut and lime flavors will still shine through. Serve it with the same mango salsa for a vibrant, plant-based meal. For the full recipe, check out the details above. After cooking, let the Coconut Lime Chicken cool to room temperature. Place the chicken in an airtight container. This helps keep it fresh. Store it in the fridge for up to 3 days. If you want to keep it longer, freezing is a great option. To freeze, wrap the cooked chicken tightly in plastic wrap. Then, place it in a freezer bag. Make sure to remove as much air as possible. This prevents freezer burn. You can freeze the chicken for up to 3 months. When you're ready to eat it, thaw it in the fridge overnight. When reheating, avoid drying out the chicken. Use the oven or the microwave. If using an oven, preheat it to 350°F (175°C). Place the chicken in a covered dish with a splash of water. Heat for about 15-20 minutes. If using a microwave, cover the chicken and heat in short bursts. Check often to avoid overcooking. Enjoy your flavorful meal! For the full recipe, check the provided details. The best way to marinate chicken is to use a mix of wet and dry ingredients. In this recipe, I use coconut milk, lime juice, and spices. This blend adds flavor and keeps the chicken moist. Place the chicken in a zip-top bag or a shallow dish. Pour the marinade over it, making sure every piece is covered. Seal the bag or cover the dish. Let it sit in the fridge for at least one hour. For richer flavor, marinate overnight. Yes, you can use bone-in chicken for this recipe. Bone-in chicken adds more flavor and moisture. Just make sure to adjust the cooking time. Bone-in pieces will take longer to cook through. Check the internal temperature. It should reach 165°F (75°C) for safety. The cooking time may vary, so monitor it closely. You can know the chicken is done cooking by checking its internal temperature. Use a meat thermometer to check the thickest part. It should read 165°F (75°C). If you do not have a thermometer, cut into the chicken. The juices should run clear, not pink. Another sign is the chicken will feel firm to the touch. Always ensure it is fully cooked to avoid any risk. This article covers key ingredients, step-by-step cooking tips, and helpful storage info. I shared variations like Coconut Lime Chicken and vegetarian tofu options. You now have all the tools to create delicious meals. Remember to marinate for flavor and use proper cooking methods. Enjoy experimenting with variations and storing leftovers. Cooking should be fun and tasty, so get started now and make these dishes your own.

Coconut Lime Chicken Flavorful and Easy Dinner Recipe

If you’re looking for a mouthwatering dinner idea, try Coconut Lime Chicken. It’s quick, simple, and bursting with flavor. With

To make tasty Peanut Butter Bliss Balls, you need these ingredients: - 1 cup natural peanut butter - 1/2 cup rolled oats - 1/4 cup honey or maple syrup - 1/4 cup shredded coconut (unsweetened) - 1/4 cup mini chocolate chips - 1/4 cup ground flaxseed - 1 teaspoon vanilla extract - A pinch of sea salt Choosing the best ingredients matters. Here are my tips: - Natural Peanut Butter: Look for brands with just peanuts and salt. - Rolled Oats: Choose old-fashioned oats for the best texture. - Honey or Maple Syrup: Opt for pure varieties, not blends. - Coconut: Unsweetened shredded coconut adds flavor without extra sugar. - Chocolate Chips: Mini chips melt nicely and blend well. - Flaxseed: Ground flaxseed is best for nutrients and smoothness. You can switch ingredients to fit your needs. Here are some ideas: - Peanut Butter: Almond butter or sunflower seed butter works well. - Honey: Agave nectar can replace honey for a vegan option. - Oats: Use gluten-free oats if you need a gluten-free snack. - Coconut: Try chopped nuts instead of coconut for extra crunch. - Chocolate Chips: Use dried fruit for a healthier twist. These choices make your Peanut Butter Bliss Balls fun and tasty! You can find the full recipe to get started. To make Peanut Butter Bliss Balls, first gather your ingredients. You need natural peanut butter, rolled oats, honey or maple syrup, shredded coconut, mini chocolate chips, ground flaxseed, vanilla extract, and a pinch of sea salt. 1. Start by mixing the peanut butter, honey (or maple syrup), and vanilla extract in a medium bowl. Stir until it looks smooth. 2. Next, add the rolled oats, shredded coconut, ground flaxseed, and a pinch of sea salt. Mix well until everything is combined. 3. Now, fold in the mini chocolate chips gently. This helps them spread evenly in the mix. 4. To make handling easier, place the bowl in the fridge for about 30 minutes. This will help the mix firm up. 5. After chilling, take a small amount of the mixture and roll it into balls about 1 inch in size. 6. Place the balls on parchment paper or a plate. Return them to the fridge for another 15-20 minutes to set. 7. Finally, enjoy right away or store them in an airtight container in the fridge for up to one week. The prep time for these bliss balls is just 15 minutes. After you mix the ingredients, chilling takes about 30 minutes. Then, forming the balls takes another 10 minutes. So, in total, you will need about 1 hour to make these tasty snacks. While I can’t provide videos, I suggest looking up videos on how to make bliss balls. Visual aids can help you see the right consistency. Watching someone make them can also boost your confidence in trying the recipe. If you prefer, snap photos of your own process to share with friends! To get the best texture and flavor, use natural peanut butter. It has a rich taste and a smooth feel. Make sure to stir it well before using. This way, the oil mixes in nicely. Use rolled oats for a chewy bite. They add good texture and fiber. Don't skip the flaxseed; it adds healthy fats and helps bind the bliss balls. Always chill the mixture before rolling. This makes it easier to form nice, round balls. One common mistake is not measuring ingredients carefully. This can change the texture. Always use a measuring cup for accuracy. Another mistake is not chilling the mixture long enough. If it’s too soft, the balls will not hold their shape. Lastly, avoid over-mixing the ingredients. Doing this can make the bliss balls tough. Mix just until combined for the best results. You can serve peanut butter bliss balls in many fun ways. Try placing them on a colorful platter. Drizzle some extra peanut butter on top for a treat. Pair them with almond milk for a tasty snack. They also work well with fruits like bananas or apples. For a fun twist, roll them in cocoa powder or crushed nuts. This adds extra flavor and crunch. Enjoy these bliss balls anytime you need a quick energy boost! {{image_2}} You can easily change up the flavor of your bliss balls. Here are some fun ideas: - Chocolate Peanut Butter: Add 2 tablespoons of cocoa powder for a rich taste. - Fruit Burst: Mix in dried fruits like cranberries or apricots. This adds sweetness and texture. - Nutty Delight: Toss in chopped nuts like almonds or walnuts for a crunchy twist. - Spicy Kick: Add a pinch of cinnamon or cayenne for a warm flavor. Experiment with different combinations to find your favorite blend! Want to boost the health of your bliss balls? Try these additions: - Protein Powder: Stir in 1-2 scoops of your favorite protein powder. This makes a great snack after workouts. - Chia Seeds: Add 2 tablespoons for extra fiber and omega-3s. They help keep you full longer. - Superfoods: Consider mixing in superfoods like spirulina or acai powder for added nutrients. These changes keep your snack tasty and nutritious. You can make your bliss balls fit your dietary needs. Here’s how: - Vegan: Replace honey with maple syrup or agave. This keeps it plant-based. - Gluten-Free: Ensure your oats are certified gluten-free. This makes the snack safe for those with gluten allergies. These adaptations let everyone enjoy Peanut Butter Bliss Balls without worry! Store your Peanut Butter Bliss Balls in an airtight container. This keeps them fresh and tasty. Place a piece of parchment paper between layers if you stack them. This helps avoid sticking. Always keep the container in the fridge. This way, they stay cool and firm. Peanut Butter Bliss Balls can last up to one week in the fridge. To check for freshness, look for any changes in smell or color. If they smell off or look strange, it's best to toss them. When stored properly, they make a quick and easy snack. You can freeze these bliss balls for up to three months. To freeze, lay them on a baking sheet. Make sure they are not touching each other. Freeze until solid, then transfer to a freezer-safe bag. Remember to label the bag with the date. Thaw them in the fridge before enjoying. This keeps them great tasting and ready for snacking later. Check out the Full Recipe for more details! You can swap honey with maple syrup. Maple syrup gives a similar sweetness. You can also use agave nectar. For a sugar-free option, try mashed banana. It adds moisture and a hint of flavor. Just remember, the texture may change slightly, but the taste will still be great. Yes, you can use any nut butter you like. Almond butter and cashew butter work well. Each nut butter adds its unique flavor. Just ensure the nut butter is smooth and creamy. If you prefer, sunflower seed butter is a good nut-free choice. It keeps the bliss balls nut-free while still being tasty. Peanut Butter Bliss Balls offer many health benefits. They are rich in protein, thanks to peanut butter and flaxseed. Protein helps build muscle and keeps you full longer. The oats provide fiber, aiding digestion. Shredded coconut adds healthy fats that support heart health. Plus, these bliss balls contain natural sugars from honey or maple syrup, giving you a quick energy boost. Enjoy them as a snack to fuel your day! Peanut Butter Bliss Balls are simple and fun to make. We covered the best ingredients, preparation steps, and tips for texture and flavor. You can easily switch ingredients or customize flavors to suit your taste. Remember to store them right for the best freshness. Enjoy experimenting and sharing these tasty treats! You’ll find they are not only delicious but also healthy, making them a great snack for anyone. Dive in, and enjoy your cooking journey!

Peanut Butter Bliss Balls Easy and Tasty Snack Recipe

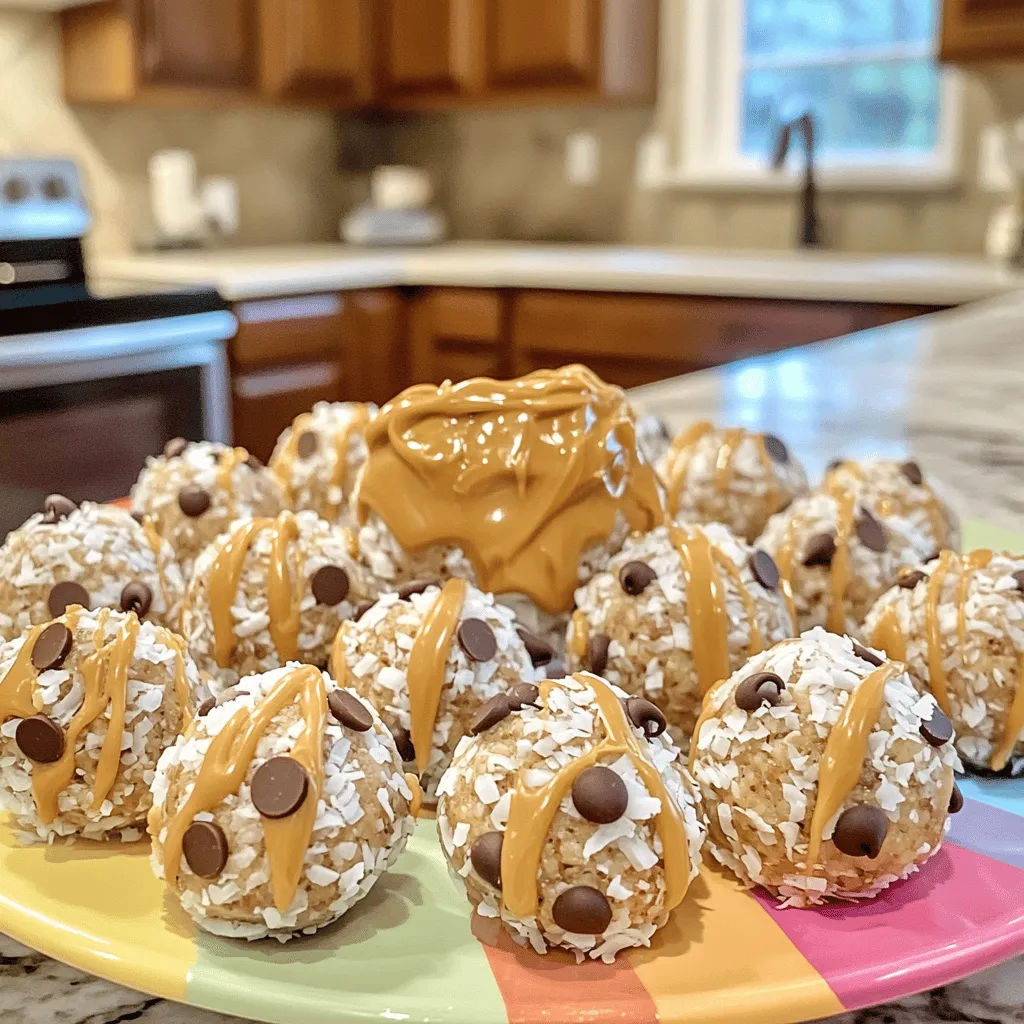
Looking for an easy snack that’s both tasty and rewarding? Peanut Butter Bliss Balls are just the treat for you!

- 1 cup dried green or brown lentils, rinsed and drained - 1 medium onion, finely chopped - 2 cloves garlic, minced - 1 large carrot, diced - 1 celery stalk, diced - 1 red bell pepper, diced - 1 can (14 oz) diced tomatoes - 4 cups vegetable broth - 1 tablespoon olive oil - 1 tablespoon curry powder - 1 teaspoon ground cumin - 1 teaspoon smoked paprika - 1/2 teaspoon cayenne pepper (adjust to taste) - Salt and pepper to taste - 2 cups fresh spinach or kale, chopped - Juice of 1 lime - Fresh cilantro for garnish To make a great spicy lentil soup, you need a few key items. Dried lentils are the star of this dish. They are easy to find and cook quickly. Fresh veggies like onion, garlic, and bell pepper add flavor. Carrots and celery give it a nice crunch. Spices make this soup shine. Curry powder, cumin, and smoked paprika bring warmth. Adjust the cayenne pepper for your taste. A little heat goes a long way! Don’t forget salt and pepper for balance. Greens like spinach or kale boost nutrition. Lime juice adds a bright kick. Finally, fresh cilantro on top makes it look and taste amazing. - Large pot or Dutch oven - Chopping board and knife - Measuring cups and spoons Having the right tools helps you cook well. A large pot or Dutch oven is best for this soup. It holds all the ingredients and allows for even cooking. A chopping board and knife are key for prep work. They help you cut your veggies quickly. Measuring cups and spoons make it easy to get the right amounts. This ensures your soup is tasty and just how you like it. Following the Full Recipe will guide you through the cooking process seamlessly. 1. Heat the olive oil in a large pot over medium heat. 2. Add the chopped onion, carrot, and celery. Sauté these until they soften, about 5-7 minutes. 3. Next, stir in the minced garlic, diced red bell pepper, curry powder, cumin, smoked paprika, and cayenne pepper. Cook these for another 2 minutes. You want the spices to release their aroma. 4. Now, add the rinsed lentils, diced tomatoes (with their juice), and vegetable broth to the pot. 5. Bring the mixture to a boil. This step wakes up all the flavors. 1. Once boiling, reduce the heat to low. Cover the pot and let it simmer for about 30-35 minutes. 2. Check the lentils for tenderness. They should be soft but not mushy. 1. Stir in the chopped spinach or kale. Cook for an additional 5 minutes until the greens wilt. 2. Finally, add lime juice, salt, and pepper to taste. 3. Serve hot, garnished with fresh cilantro. For the full recipe, check out the detailed steps above! You can easily change the heat of your soup. I like to add cayenne pepper for a kick. Start with half a teaspoon and taste as you go. If you want it spicier, add more! Another way to boost flavor is to adjust your spices. Adding a bit more cumin or smoked paprika can deepen the taste. Don’t hesitate to play with the spices. Cooking should be fun! Pair your spicy lentil soup with a thick slice of crusty bread. This combo makes the meal filling and satisfying. You can also enjoy it with a fresh salad for a lighter option. For a beautiful presentation, garnish each bowl with fresh cilantro. A slice of lime on the side adds brightness and color. If you want creaminess, add a dollop of yogurt. This will make each bite even more delicious. Try these tips for a meal that looks and tastes great! You can find the full recipe for spicy lentil soup to explore more ideas. {{image_2}} For a vegan version, use vegetable broth instead of chicken broth. This keeps the soup plant-based. If you have allergies, check labels on broth and spices. Some brands may add gluten or other allergens. Always choose products that fit your diet. You can swap vegetables based on what you have. Try adding sweet potatoes for sweetness. Zucchini or green beans work well too. For a hearty meal, add cooked chicken, sausage, or tofu for protein. Each option brings a unique flavor and texture to your soup. Check out the Full Recipe for more cooking ideas and tips on making your soup shine! You can keep the soup in the fridge for up to five days. Make sure to store it in an airtight container. This helps keep it fresh and tasty. If you want to save it longer, freezing is a great option. To freeze, let the soup cool completely. Then, pour it into freezer-safe bags or containers. Leave some space at the top, as the soup will expand when frozen. You can store it for up to three months. Just label the bags with the date for easy reference. To reheat the soup, use a pot on the stove. Pour the soup in and warm it over medium heat. Stir often to prevent it from sticking. This method keeps the flavors bright and fresh. If you’re in a hurry, you can use the microwave. Place the soup in a microwave-safe bowl. Cover it loosely to avoid splatters. Heat it in short bursts, stirring in between. This helps it heat evenly without losing its taste. For best results, always reheat only what you plan to eat. This keeps the remaining soup fresh for later. Enjoy your Spicy Lentil Soup with a side of crusty bread or a fresh salad! Can I make this soup ahead of time? Yes, you can make this soup ahead of time. It tastes even better the next day. Just store it in an airtight container in the fridge. The flavors will blend nicely as it sits. Is this recipe suitable for meal prep? Absolutely! This soup is great for meal prep. You can divide it into single-serving containers. It stays fresh in the fridge for up to a week. You can also freeze it for longer storage. Lentils are packed with nutrients. They are high in protein and fiber. This soup also has plenty of veggies, adding vitamins and minerals. Carrots, spinach, and bell peppers boost health benefits. A serving of this soup has about 200 calories. Each serving fills you up without adding too many calories. You can enjoy a bowl as a meal or a side. This recipe is nourishing and hearty. You get a balance of protein, carbs, and healthy fats. It’s a perfect option for a healthy lifestyle. For the full recipe, check the previous section. In this article, we explored making delicious spicy lentil soup. We discussed key ingredients like lentils, fresh veggies, and spices. You also learned about essential kitchen tools, preparation steps, and the cooking process. Tips on flavor enhancement and serving ideas offered great ways to enjoy your soup. Lastly, we covered storage tips, reheating methods, and answered common questions. Now, you have all the tools to create a warming, tasty soup. Enjoy the cooking journey and the joy it brings!

Spicy Lentil Soup Flavorful and Nourishing Delight

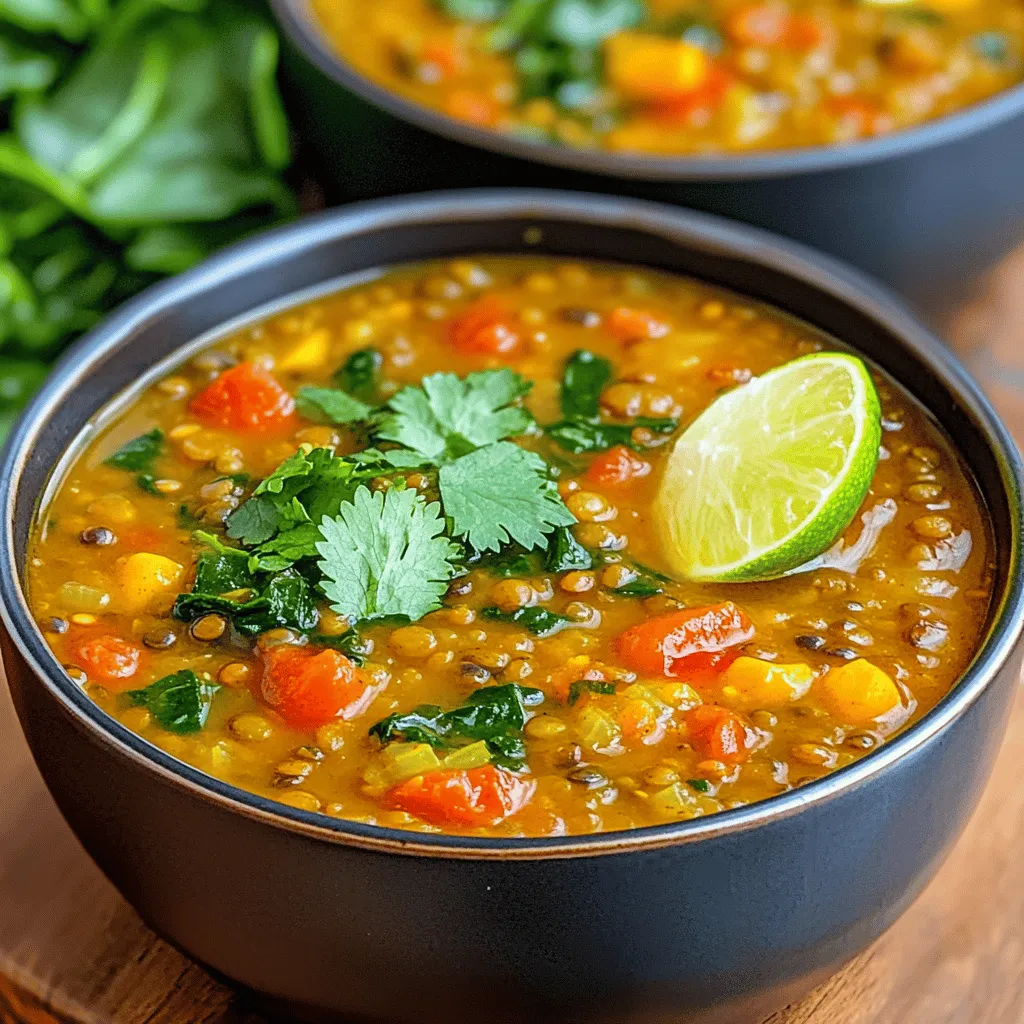
If you’re looking for a warm and filling dish, spicy lentil soup is the answer. It’s packed with nutrients, flavors,

To make tasty garlic herb grilled shrimp, you need fresh ingredients. Here’s what you’ll need: - 1 pound large shrimp, peeled and deveined - 3 tablespoons olive oil - 4 cloves garlic, minced - 1 tablespoon fresh lemon juice - 1 teaspoon lemon zest - 1 tablespoon fresh parsley, chopped - 1 tablespoon fresh basil, chopped - 1 teaspoon dried oregano - Salt and pepper to taste - Skewers (soaked in water if using wooden ones) These main ingredients give the shrimp flavor and make them juicy. The marinade is key to great flavor. It combines oil, garlic, herbs, and citrus. Here’s how it breaks down: - Olive oil adds richness and helps the shrimp cook well. - Minced garlic gives a bold taste that everyone loves. - Lemon juice and zest bring brightness. - Fresh herbs like parsley and basil add a fresh touch. - Dried oregano adds depth to the flavor. - Salt and pepper enhance all the tastes. Mix these ingredients together to create a delicious marinade. Want to kick it up a notch? Here are some optional ingredients to try: - 1/2 teaspoon red pepper flakes for a little heat - Extra fresh herbs for garnish These add-ons can make your dish even more exciting. You can find the full recipe, which includes these tips, at the top of this section. Enjoy creating your garlic herb grilled shrimp! To make the marinade, grab a mixing bowl. Add 3 tablespoons of olive oil. Next, add 4 cloves of minced garlic. Then, pour in 1 tablespoon of fresh lemon juice and 1 teaspoon of lemon zest. Now, add 1 tablespoon of chopped parsley and 1 tablespoon of chopped basil. Don’t forget 1 teaspoon of dried oregano, and if you like heat, add 1/2 teaspoon of red pepper flakes. Finally, season with salt and pepper. Whisk everything until it blends well. This mix brings out great flavors for your shrimp. Now, add 1 pound of peeled and deveined shrimp to your bowl. Toss the shrimp gently until they are all coated in the marinade. Let them sit for at least 30 minutes. You can also marinate them for up to 2 hours in the fridge. This time lets the shrimp soak up all those tasty flavors. Preheat your grill to medium-high heat, about 375°F to 450°F. While the grill heats, take wooden skewers and soak them in water to prevent burning. Thread the marinated shrimp onto the skewers. Aim for 4-5 shrimp per skewer. Once the grill is hot, place the skewers on it. Grill the shrimp for 2-3 minutes on each side. Look for them to turn pink and opaque. Be careful not to overcook them, or they will become tough. After grilling, let the skewers rest for a minute before serving. You can find the full recipe if you want all the details! For the best garlic herb grilled shrimp, heat your grill to medium-high. This means a range of about 375°F to 450°F. Cook the shrimp for 2-3 minutes on each side. The shrimp should turn pink and opaque when done. This quick cooking keeps them juicy and tender. Overcooking shrimp can make them tough. To prevent this, watch the color closely. Remove them from the grill as soon as they are pink and opaque. Use a timer if you need help keeping track. If you marinate the shrimp, they will also stay moist, helping with the cooking process. When serving garlic herb grilled shrimp, make it look great. Plate the skewers on a bed of fresh greens like arugula. This adds color and freshness. Drizzle a bit of extra olive oil or lemon juice over the shrimp. Serve with lemon wedges for a nice touch. This makes the dish pop and taste even better! For more ideas, check the Full Recipe. {{image_2}} You can play with the marinade to change the flavor. For a spicy kick, add more red pepper flakes or use hot sauce. If you enjoy sweet flavors, mix in some honey or maple syrup. For a tangy twist, add more lemon juice or a splash of lime juice. You might also try using fresh herbs like cilantro or dill for a different taste. Each variation gives the shrimp a new life. Grilling is fantastic, but you can also cook shrimp in other ways. Try broiling them in your oven. Just place the shrimp on a baking tray and cook for 3-4 minutes per side. If you prefer a stovetop method, sauté them in a pan over medium heat. This method takes about 5-6 minutes, and you can add the marinade directly to the pan for extra flavor. For a smoky taste, consider using a smoker or even a grill pan on your stovetop. Garlic herb grilled shrimp pairs well with many sides. A fresh salad made with mixed greens and a light vinaigrette complements the shrimp perfectly. You could also serve them with rice or quinoa for a hearty meal. Grilled veggies, like asparagus or bell peppers, add color and flavor. For a fun twist, try serving the shrimp in tacos with cabbage slaw and avocado. Each side brings out the best in the shrimp's flavor. For the complete recipe, check out the Full Recipe section! To store leftover shrimp, first, let them cool to room temperature. Place the shrimp in an airtight container. You can add a paper towel to absorb any moisture. This step helps keep the shrimp fresh. Seal the container tightly and store it in the fridge. Leftover shrimp will stay good for up to three days. Always check for any signs of spoilage before eating. When reheating shrimp, do it gently. You can use a microwave or a skillet. If using a microwave, heat the shrimp in short bursts. Start with 30 seconds and check. Stir after each burst to prevent overcooking. In a skillet, add a little olive oil over medium heat. Warm the shrimp for about 2-3 minutes, stirring often. This method keeps the shrimp juicy and tasty. If you want to freeze your shrimp, start with cooked shrimp. Place them in a single layer on a baking sheet. Freeze them for about one hour until firm. Once frozen, transfer the shrimp to a freezer bag. Remove as much air as possible before sealing. Label the bag with the date. Frozen shrimp are best used within three months. When you’re ready to use them, thaw in the fridge overnight. For grilling, I recommend using large shrimp. They hold up well on the grill. Look for shrimp that are fresh and firm. Wild-caught shrimp often taste better than farmed ones. Make sure they are peeled and deveined for easy cooking. If you can, try to use shrimp that are 16/20 count size. This means there are 16 to 20 shrimp per pound. This size gives you a nice balance between texture and flavor. You can marinate shrimp for 30 minutes to 2 hours. If you want a strong flavor, go for the longer time. Just make sure not to go beyond 2 hours. The acid in the marinade can make the shrimp mushy if left too long. I like to keep it around 1 hour for the best taste. This way, the shrimp soak up all the good flavors without losing their texture. Yes, you can make garlic herb grilled shrimp without skewers. If you skip the skewers, just place the shrimp directly on the grill. Use a grill basket or a piece of foil with holes to catch them. This way, you won’t lose any shrimp to the grill grates. It makes for easy cooking and cleanup. Still, using skewers makes it fun and easy to serve! Check out the Full Recipe for more details. Garlic herb grilled shrimp is a simple and tasty dish. We covered key ingredients, marinade components, and optional flavors. You learned step-by-step how to marinate and grill shrimp. Remember cooking times to prevent overcooking. I shared variations and side dish pairings to enhance your meal. Finally, I discussed how to store leftovers and answered common questions. With these tips, your shrimp will impress everyone. Happy grilling!

Garlic Herb Grilled Shrimp Flavorful and Easy Recipe

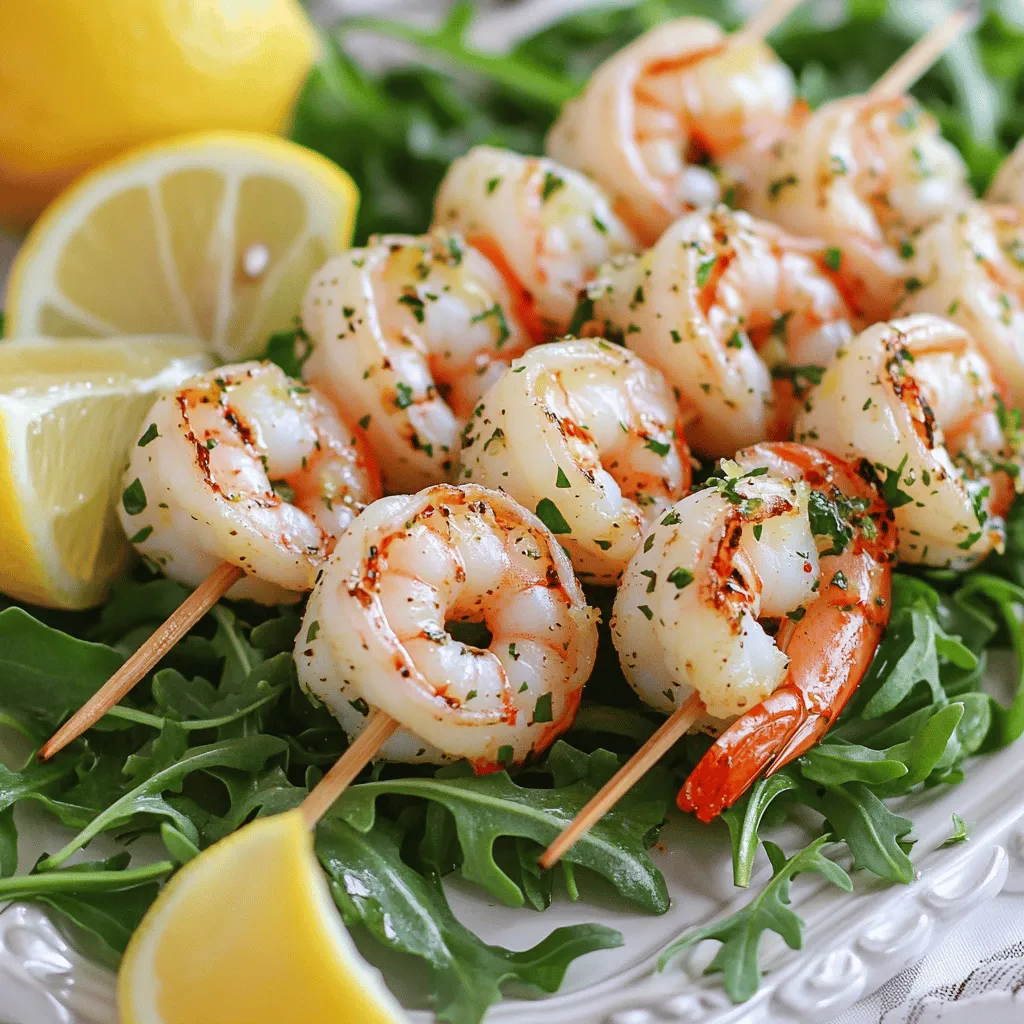
Are you craving a quick, tasty meal? Garlic Herb Grilled Shrimp is your answer! This dish bursts with flavor and

- 1 ½ cups all-purpose flour - ½ cup whole wheat flour - 1 cup fresh or frozen cranberries, roughly chopped - ¾ cup granulated sugar - 2 teaspoons baking powder - ½ teaspoon baking soda - ¼ teaspoon salt - 1 tablespoon orange zest - ½ cup freshly squeezed orange juice - ½ cup plain Greek yogurt - 1 large egg - ½ teaspoon vanilla extract - ¼ cup melted coconut oil (or butter) - Optional: powdered sugar for dusting Cranberry orange muffins are a delightful treat. The mix of tart cranberries and sweet orange is magic. Each bite bursts with flavor and freshness. You can use fresh or frozen cranberries, so no worries if it's off-season. The all-purpose flour gives the muffins a light texture. Whole wheat flour adds a bit of heartiness. Sugar sweetens the batter while balancing the tartness of the cranberries. Baking powder and soda help the muffins rise perfectly. Don't skip the orange zest! It adds a strong, bright flavor. Fresh orange juice keeps the muffins moist. Greek yogurt gives a nice richness and helps with texture. The egg binds everything together, making for a nice crumb. For a touch of sweetness on top, use powdered sugar. It looks beautiful and tastes great. You can find this combination in the Full Recipe, which guides you step-by-step. Enjoy baking! First, you need to preheat your oven to 375°F (190°C). This step is key for even baking. While it heats, grab a muffin tin. You can line it with paper liners or lightly grease it with nonstick spray. Both options work well to help the muffins pop out easily. In a large bowl, combine the dry ingredients. Use a whisk to mix together: - 1 ½ cups all-purpose flour - ½ cup whole wheat flour - ¾ cup granulated sugar - 2 teaspoons baking powder - ½ teaspoon baking soda - ¼ teaspoon salt - 1 tablespoon orange zest Mixing these dry ingredients well ensures even flavor and rise in your muffins. In another bowl, you will combine the wet ingredients. Add: - ½ cup freshly squeezed orange juice - ½ cup plain Greek yogurt - 1 large egg - ½ teaspoon vanilla extract - ¼ cup melted coconut oil (or butter) Whisk this mixture until it is smooth and creamy. This will add moisture and richness to your muffins. Make a well in the center of the dry ingredients. Pour in the wet mixture. Gently fold everything together using a spatula. Be careful not to overmix; some lumps are totally fine. Lastly, fold in: - 1 cup fresh or frozen cranberries, roughly chopped Evenly distribute the cranberries in the batter. Now, spoon the batter into the prepared muffin tin, filling each cup about ¾ full. Place the muffin tin in the preheated oven. Bake for 18-20 minutes. You know they are done when the tops are golden and a toothpick comes out clean. This step is crucial for a great texture. Once baked, remove the muffins from the oven. Let them cool in the pan for 5 minutes. Then, transfer them to a wire rack to cool completely. If you want to add a sweet touch, dust the cooled muffins with powdered sugar before serving. Enjoy your delicious treats! For the full recipe, see above. To keep your muffins moist, use Greek yogurt. It adds creaminess and helps with moisture. Using fresh orange juice instead of bottled juice also boosts flavor and moisture. Make sure not to bake the muffins too long. Check them a couple of minutes early. If you see golden tops, it's time to pull them out. Mix ingredients gently. When you combine dry and wet ingredients, use a spatula. Fold the batter, but leave some lumps. If you mix too much, your muffins become tough. Remember, a few lumps are okay. They help keep the texture light and tender. Watch your muffins closely as they bake. Start checking them at 18 minutes. Insert a toothpick into the center. If it comes out clean, they are done. If the toothpick has batter on it, bake for another minute or two. Every oven is different, so adjust as needed. This helps you get the perfect muffin every time. For a foolproof guide on making these tasty treats, check the Full Recipe. {{image_2}} You can easily make gluten-free cranberry orange muffins. Use gluten-free flour blends instead of all-purpose and whole wheat flour. Look for blends that contain xanthan gum. This helps mimic the texture of regular flour. The rest of the recipe stays the same. Your muffins will still taste great, and you won't miss the gluten! To make these muffins vegan, swap the egg for a flaxseed egg. Mix one tablespoon of ground flaxseed with three tablespoons of water. Let it sit for five minutes to thicken. Use almond or soy yogurt instead of Greek yogurt. Replace the coconut oil with melted coconut butter or vegetable oil. Your muffins will be just as soft and tasty! Get creative with unique flavors. Try adding chopped nuts for crunch, like walnuts or pecans. You can also mix in some chocolate chips for a sweet twist. For added zing, use lemon zest along with orange zest. Dried fruits, like apricots or cherries, can also add a fun twist. Experimenting with flavors makes baking more exciting! For the full recipe on how to make these delicious muffins, check out the [Full Recipe]. To keep your cranberry orange muffins fresh, let them cool completely. Place them in an airtight container. Store at room temperature for up to three days. If you want to keep them longer, consider freezing. This helps maintain their taste and texture. Freezing muffins is simple. First, wrap each muffin in plastic wrap. Then, place them in a freezer bag or airtight container. Be sure to remove as much air as possible. They can last for up to three months. When you are ready to enjoy them, thaw at room temperature or in the fridge overnight. To reheat, simply microwave the muffin for 10-15 seconds. This makes them warm and soft. You can also warm them in an oven at 350°F (175°C) for about 5-10 minutes. This method keeps them crispy on the outside. Enjoy your tasty treats warm! For the full recipe, check out the section above. To make cranberry orange muffins from scratch, gather your ingredients. Mix dry and wet items in separate bowls. Combine them carefully. Bake at 375°F for 18-20 minutes. You can find the full recipe above. Yes, you can substitute some ingredients. Use almond milk instead of yogurt for a dairy-free option. You can also swap coconut oil for butter. Whole wheat flour can be replaced with more all-purpose flour if needed. The best way to zest an orange is with a microplane or a fine grater. Hold the orange firmly and rub it over the grater. Be careful to only take the orange part of the skin. Avoid the white pith, as it can taste bitter. Muffins are done when the tops are golden brown. Insert a toothpick into the center. If it comes out clean, your muffins are ready. If it has batter on it, bake for a few more minutes. Yes, you can use dried cranberries instead of fresh. They will give a different texture and flavor. If you use dried ones, consider soaking them in warm water for 10 minutes. This helps them stay moist in the muffins. You learned how to make delicious cranberry orange muffins today. We covered essential ingredients, step-by-step instructions, and helpful tips. These muffins taste great and have healthy benefits from cranberries and oranges. You can even try variations to suit your diet. Storing and reheating them is easy too. I hope you feel inspired to bake! Enjoy every bite of your fresh muffins.

Cranberry Orange Muffins Simple and Delicious Treat

Craving a sweet treat that bursts with flavor? Look no further! My Cranberry Orange Muffins are simple to make and

To make the best zesty lemon bars, gather these key ingredients: - 1 cup all-purpose flour - 1/4 cup granulated sugar - 1/2 cup unsalted butter, softened - 1/4 teaspoon salt - 2 large eggs - 1 cup granulated sugar (for filling) - 2 tablespoons all-purpose flour (for filling) - 1/2 cup freshly squeezed lemon juice - Zest of 2 lemons - 1/2 teaspoon baking powder - Powdered sugar (for dusting) These ingredients create a bright, tangy filling and a buttery crust. The lemon juice and zest bring that refreshing zing. You can add extra flavors to your lemon bars. Here are some ideas: - 1 teaspoon vanilla extract for warmth - Fresh herbs like mint or basil for a twist - A pinch of salt to balance sweetness These optional ingredients can take your lemon bars to the next level. If you have dietary restrictions, you can still enjoy lemon bars. Here are some substitutions: - For gluten-free, use almond flour or a gluten-free blend. - For dairy-free, swap butter with coconut oil or a dairy-free margarine. - For vegan, replace eggs with flax eggs (1 tablespoon flaxseed meal + 2.5 tablespoons water per egg). These substitutions allow everyone to savor the delightful taste of zesty lemon bars. For the complete recipe, check the Full Recipe. Start by preheating your oven to 350°F (175°C). This step is vital to ensure even baking. Next, take an 8x8 inch baking pan. You can grease it with some butter or line it with parchment paper. This makes it easy to lift out the lemon bars later. Now, let’s make the crust. In a mixing bowl, combine these ingredients: - 1 cup all-purpose flour - 1/4 cup granulated sugar - 1/2 cup unsalted butter, softened - 1/4 teaspoon salt Mix these until the mixture looks like coarse crumbs. Press this mixture evenly into the bottom of your prepared pan. Bake the crust for 15-18 minutes. You want it to be lightly golden. Once done, remove it from the oven and let it cool slightly. For the lemon filling, grab another bowl. Whisk together these ingredients: - 2 large eggs - 1 cup granulated sugar - 2 tablespoons all-purpose flour - 1/2 cup freshly squeezed lemon juice - Zest of 2 lemons - 1/2 teaspoon baking powder Make sure to mix until smooth and well combined. Pour this lemon filling over your baked crust. Spread it evenly. Return the pan to the oven. Bake for another 20-25 minutes. The filling should set and turn a light golden color. After baking, remove the pan from the oven. Let it cool to room temperature. For a firmer texture, refrigerate the bars for at least 2 hours. For the final touch, dust the top with powdered sugar. Cut into squares or bars and enjoy! For the full recipe, refer to the main section. To get the right lemon flavor, start with fresh lemons. The zest adds bright flavor. If you want more tartness, add more zest. Use a microplane to get fine zest. This will give you a strong lemon taste. For a milder flavor, reduce the zest to just one lemon. You want the bars to be firm but not dry. When baking, check the center. It should be set and slightly jiggly. If it looks too wet, bake a little longer. You want a light golden top. Let the bars cool completely before cutting. This helps them firm up more. Serving your lemon bars nicely makes them more inviting. Place them on a decorative platter. Dust the top with powdered sugar for a nice look. Add fresh mint leaves or edible flowers for color. These small touches make your dish pop and impress your guests. For the full recipe, check out the earlier section. {{image_2}} You can switch up the flavor by using different citrus fruits. Lime or orange can give your lemon bars a fresh twist. Lime adds a zesty kick, while orange brings a sweet note. Simply replace the lemon juice with the juice of your chosen fruit. Use the zest too for added flavor. This keeps the bars bright and fun! Pair lemon bars with other flavors for a unique treat. Fresh berries, like raspberries or blueberries, add color and sweetness. You can also drizzle chocolate on top for a rich contrast. Chopped nuts, such as almonds or pistachios, give a nice crunch. Mix and match to find your favorite flavor combo! For those with dietary needs, there are easy swaps. Use almond flour or a gluten-free blend instead of regular flour. For a vegan option, substitute eggs with flaxseed meal or applesauce. Use coconut oil in place of butter for a dairy-free version. These changes keep the bars tasty while fitting your diet! For the full recipe, check out the Zesty Lemon Bars recipe above. To keep your lemon bars fresh, store them in the refrigerator. First, cut the bars into squares. Then, place them in an airtight container. This helps keep moisture out. Always add a layer of parchment paper between layers if stacking. This prevents sticking. Your lemon bars will stay fresh for up to one week. Freezing lemon bars is simple. Start by cutting them into squares. Wrap each square in plastic wrap. Then, place the wrapped bars in a freezer bag. Make sure to remove as much air as possible. You can freeze them for up to three months. To thaw, remove the bars from the freezer and place them in the fridge for a few hours. You can also let them sit at room temperature for about 30 minutes. Lemon bars last about one week in the fridge. If they sit longer, they may spoil. Look for signs like a change in color or an off smell. If the filling feels slimy or the crust is hard, it’s time to toss them. Always trust your senses when it comes to food safety. Enjoy your zesty lemon bars while they are fresh for the best taste! Yes, you can use bottled lemon juice. However, fresh lemon juice offers a brighter flavor. Fresh juice has more aroma and zest. The taste difference can affect the final product. If you use bottled juice, choose a brand with no added sugars or preservatives. For the best taste, always try to go for fresh lemons. To adjust sweetness, you can tweak the sugar amount. If you want them sweeter, add more sugar to the filling. Start with one or two extra tablespoons. If you prefer less sweetness, cut back on the sugar in the filling. You can also balance the sweetness with a bit more lemon juice. This gives a nice tartness that balances out the sugar. To cut lemon bars evenly, first, chill them well. Cold bars are firmer and easier to cut. Use a sharp knife for clean cuts. For nice squares, score the top with a knife before cutting all the way through. Wipe the knife with a damp cloth after each cut. This keeps the edges neat. You can also use a ruler to measure even squares. Zesty lemon bars are a delightful treat you can make at home. We discussed key ingredients like flour, sugar, and fresh lemons, plus optional flavor enhancers. I provided step-by-step instructions for making the crust and filling, tips for perfect texture, and variations using other citrus fruits. Remember, storing them properly is key to keeping them fresh. Whether you prefer traditional or vegan options, lemon bars are versatile and fun to create. Enjoy your baking journey and impress others with your zesty creations!

Zesty Lemon Bars Delightful Flavor in Every Bite

Craving a treat that bursts with bright flavor and sweetness? You’ll love my Zesty Lemon Bars! These bars are easy

- 1 ½ cups all-purpose flour - 1 tablespoon matcha green tea powder - ½ cup granulated sugar - ½ cup brown sugar, packed - 1 tablespoon baking powder - ½ teaspoon salt - 2 large eggs - ¾ cup milk (dairy or non-dairy) - ⅓ cup vegetable oil - 1 teaspoon vanilla extract - ½ cup white chocolate chips (optional) - ¼ cup chopped nuts (e.g., walnuts or almonds, optional) Matcha green tea muffins are not just tasty; they are also good for you. Matcha is rich in antioxidants. It helps boost energy and focus. With just a few simple ingredients, you can create a delightful morning treat. The main ingredient is matcha powder. This bright green powder comes from finely ground green tea leaves. It gives the muffins a unique flavor and vibrant color. The blend of sugars adds a nice sweetness without being too heavy. I love using a mix of dairy and non-dairy milk. You can choose what fits your diet best. The vegetable oil keeps the muffins moist. Eggs help bind everything together and add a fluffy texture. You can add white chocolate chips or nuts for extra flavor. They make each bite even more enjoyable. Feel free to skip them if you prefer a simpler muffin. With this complete ingredient list, you are ready to bake. Check out the Full Recipe for step-by-step instructions to make your perfect matcha green tea muffins! Start by gathering all your ingredients. You will need: - 1 ½ cups all-purpose flour - 1 tablespoon matcha green tea powder - ½ cup granulated sugar - ½ cup brown sugar, packed - 1 tablespoon baking powder - ½ teaspoon salt - 2 large eggs - ¾ cup milk (dairy or non-dairy) - ⅓ cup vegetable oil - 1 teaspoon vanilla extract - ½ cup white chocolate chips (optional) - ¼ cup chopped nuts (optional) Having everything ready will make your baking smooth. In a large bowl, whisk together the flour, matcha powder, granulated sugar, brown sugar, baking powder, and salt. Make sure there are no lumps. This mix gives your muffins that lovely green color and flavor. In a separate bowl, beat the eggs. Then add the milk, vegetable oil, and vanilla extract. Mix well until everything is smooth. This step helps to create a moist muffin. Pour the wet mixture into the dry mixture. Gently mix until just combined. Do not overmix, or your muffins may turn out tough. If you want extra sweetness, fold in the white chocolate chips and chopped nuts here. Preheat your oven to 375°F (190°C). Line a muffin tin with paper liners or grease it. Fill each muffin cup about ¾ full with the batter. Bake for 18-20 minutes. Check with a toothpick. It should come out clean when done. After baking, let the muffins cool in the pan for 5 minutes. Then transfer them to a wire rack to cool completely. Serve them warm, dusted with matcha powder or powdered sugar. Pair with fresh fruit for a great breakfast. Enjoy your Matcha Magic Muffins! To get soft and fluffy muffins, mix carefully. Combine wet and dry ingredients until just blended. If you overmix, your muffins can become tough. Use room temperature eggs and milk for the best rise. Also, avoid opening the oven door while baking; heat helps them rise well. You can make these muffins your own. Add fruits like blueberries or bananas for extra flavor. Swap half the all-purpose flour for whole wheat flour for a healthier option. For a fun twist, try adding spices like cinnamon or nutmeg. Don’t forget to check the full recipe for more ideas! If your muffins sink, you might have overmixed. Check that your baking powder is fresh, too. If they are too dry, you may have added too much flour. Use a light hand when measuring. For uneven tops, ensure your oven heats evenly. Rotating the muffin tin halfway through baking helps with this. {{image_2}} You can make these matcha muffins gluten-free. Replace all-purpose flour with a gluten-free blend. Many options are available at stores. Ensure the blend has xanthan gum for structure. This small change keeps the muffins soft and tasty. Get creative with add-ins for your muffins. Fresh or frozen berries work well. Blueberries, raspberries, or strawberries add a burst of flavor. You can also use bananas or apples for sweetness. Just chop them into small pieces before adding. This makes each bite exciting! To make these muffins vegan, swap eggs and milk with plant-based options. Use flax eggs or applesauce instead of eggs. For milk, almond or oat milk works great. The muffins still turn out light and fluffy. You will love how easy this adaptation is! For the full recipe, check out Matcha Magic Muffins. Store your matcha green tea muffins in an airtight container. This keeps them fresh for about 2 to 3 days. If you want to keep them soft, place a slice of bread in the container. The bread's moisture helps the muffins stay fluffy. For longer storage, freeze your muffins. Wrap each muffin in plastic wrap or foil. Place them in a freezer-safe bag or container. You can keep them this way for up to 3 months. When you want to enjoy them, just thaw them overnight in the fridge. To reheat, use your oven or microwave. Preheat your oven to 350°F (175°C). Place the muffin on a baking sheet and warm it for about 5 to 10 minutes. In the microwave, heat for about 15-20 seconds. This brings back their soft texture. Enjoy your muffins warm for the best flavor! To make matcha muffins, start by gathering your ingredients. You will need flour, matcha powder, sugars, baking powder, salt, eggs, milk, oil, and vanilla extract. Mix the dry ingredients in one bowl and the wet ones in another. Combine them gently and fill muffin cups. Bake at 375°F for about 18-20 minutes. For the full recipe, check the section above. You can swap matcha powder with green tea, but the taste will change. Matcha has a rich flavor and bright color. Regular green tea lacks this intensity. If you use green tea, brew it strong for more flavor. However, your muffins may not be as vibrant. Store your matcha muffins in an airtight container. Keep them at room temperature for up to three days. If you want to store them longer, refrigerate them for a week. You can also freeze muffins for up to three months. Just wrap them well. A matcha muffin has about 150-200 calories, depending on the recipe. Ingredients like sugars and chocolate chips can raise the count. If you want a lighter muffin, reduce the sugar or skip the chocolate. Yes, you can make these muffins ahead of time. They stay fresh for a few days when stored properly. You can also bake them and freeze them for later. Just thaw and reheat them when you are ready to enjoy! In this article, I shared a complete guide to making matcha muffins. We covered ingredients, health benefits, and step-by-step instructions. You learned tips for perfect texture and how to customize your recipe. Making these muffins can be fun and rewarding. Plus, you get tasty treats that are good for you! Now, you have the tools to bake and store delicious matcha muffins. Enjoy your baking journey!

Matcha Green Tea Muffins Your Perfect Morning Boost

Start your day right with Matcha Green Tea Muffins! These tasty treats are not only delicious—they’re packed with health benefits,

Older posts
Newer posts
← Previous Page1 … Page70 Page71 Page72 … Page81 Next →

dsad

© 2025 My Saved Recipe • Built with GeneratePress

Our Policies

  • Copyright Policy
  • Cookie Policy
  • GDPR Policy
  • Privacy Policy
  • Disclaimer
  • Terms Of Use

More Information

  • Home
  • About
  • Contact
  • Appetizers
  • Dessert
  • Dinner
  • Drinks
©2025, My Saved Recipe About Back To Top