![To make cinnamon sugar churros, gather these simple items: - 1 cup water - 2 tablespoons granulated sugar - 1/2 teaspoon salt - 1 cup all-purpose flour - 2 large eggs - 1 teaspoon vanilla extract - 1/4 cup vegetable oil (for frying) - 1/2 cup granulated sugar (for coating) - 1 tablespoon ground cinnamon If you prefer metric measurements, here they are: - 1 cup water = 240 ml - 2 tablespoons granulated sugar = 30 g - 1/2 teaspoon salt = 3 g - 1 cup all-purpose flour = 125 g - 2 large eggs = approx. 100 g - 1 teaspoon vanilla extract = 5 ml - 1/4 cup vegetable oil = 60 ml - 1/2 cup granulated sugar = 100 g - 1 tablespoon ground cinnamon = 8 g You can tweak the recipe if needed: - Swap vegetable oil for canola oil or coconut oil. - Replace all-purpose flour with gluten-free flour for a gluten-free option. - Use honey or maple syrup instead of granulated sugar for a natural sweetener. - If you don’t have cinnamon, try nutmeg or vanilla sugar for a different flavor. This selection ensures you have all you need for delicious cinnamon sugar churros. For the full recipe, check the provided link. 1. Boiling and Mixing Start by boiling water, sugar, and salt in a medium saucepan. Heat it until it gently bubbles. This step brings out the flavors. 2. Dough Preparation After boiling, take the pan off the heat. Add in the flour all at once. Stir hard with a wooden spoon until the mix forms a ball. It should pull away from the pan's sides. Let the dough cool a bit. Then, mix in the eggs one at a time. Make sure each egg is well mixed before adding the next. Finally, stir in the vanilla extract for extra flavor. 3. Frying Process Heat vegetable oil in a deep pan to 375°F (190°C). This is the perfect temperature for frying. Use a pastry bag with a star tip to pipe the dough. Make long strips, about 6 inches, into the hot oil. Cut the dough with scissors as you go. Fry each churro until golden brown and crispy. This takes about 2-3 minutes. Use a slotted spoon to move them to a plate with paper towels. This helps soak up the extra oil. - Use dry measuring cups for flour and sugar. - Level off the top with a knife for precise amounts. - For liquids, use a clear measuring cup and check at eye level. - Boil the water, sugar, and salt. - Mix flour into the boiling mix. - Add eggs and vanilla after cooling. - Fry churros until golden and crispy. - Roll in cinnamon sugar right after frying. For the full recipe, check out [Full Recipe]. Many people make errors when making churros. Here are some mistakes to watch out for: - Not cooling the dough: If you add eggs to hot dough, they can cook. - Wrong oil temperature: If the oil is too cold, churros absorb too much oil. If it's too hot, they burn outside and stay raw inside. - Overcrowding the pan: Fry small batches to keep the oil temperature stable. Crispy churros come from a few simple steps: - Use the right flour: All-purpose flour works best for the right texture. - Pipe quickly: Do not let the dough sit before frying. This avoids soggy churros. - Fry in small batches: This helps maintain the oil temperature. Fry until golden brown, about 2-3 minutes. Having the right tools makes a big difference: - Pastry bag: A piping bag with a star tip is essential for shaping churros. - Deep pan or fryer: Use a deep pan to fry churros evenly. - Slotted spoon: This helps drain excess oil after frying. - Candy thermometer: To check the oil temperature accurately, ensuring the perfect fry. For the full recipe, refer to the beginning of this article. {{image_2}} For a rich twist, try chocolate-dipped churros. After you coat them in cinnamon sugar, melt some chocolate. Use dark, milk, or white chocolate for dipping. The warm churros and cool chocolate create a tasty treat. Kids love this version! Stuffed churros are a fun way to change things up. You can fill them with cream, fruit, or even chocolate. To do this, pipe the dough in shorter strips. Once they cool, use a pastry bag to fill them. Strawberry jam or whipped cream works great inside! Get creative with flavors like pumpkin spice or matcha. For pumpkin spice churros, add pumpkin puree and spices to the dough. For matcha, mix in matcha powder for a bright green color. These unique flavors give churros a fun twist. These variations show how versatile churros can be. Each option offers a new taste experience. Explore them all for a delightful treat! For the base recipe, check out the Full Recipe. Store leftover churros in an airtight container. This keeps them fresh and helps maintain their taste. Avoid stacking them to prevent them from becoming soggy. If you plan to eat them later, let them cool first. This step is key to keeping them crunchy. To reheat churros, use an oven or an air fryer. Preheat your oven to 350°F (175°C). Place the churros on a baking sheet. Bake for about 5 to 7 minutes. This method helps restore their crispness. If using an air fryer, set it to 350°F (175°C) and heat for 3 to 5 minutes. Avoid using a microwave, as it makes them soft. You can freeze churros for later enjoyment. Allow them to cool completely, then place them in a single layer on a baking sheet. Freeze for about an hour, then transfer them to a freezer bag. This helps prevent them from sticking. When you're ready to eat, simply reheat as described above. Enjoy them warm and crunchy! To make cinnamon sugar churros from scratch, you need to follow a series of simple steps. First, boil water, sugar, and salt in a saucepan. Remove it from heat and mix in flour quickly. Once the dough cools, add eggs one at a time. Then, heat oil in a pan and pipe long strips of dough into the hot oil. Fry until golden brown and crispy. Finally, coat the churros in a mix of sugar and cinnamon. You can find the full recipe above. Yes, churros can be baked, but they won’t be as crispy. Baking can be a healthier option. To bake them, preheat your oven to 400°F (200°C). Pipe the dough onto a baking sheet lined with parchment paper. Bake for about 15-20 minutes or until golden. You may want to spray them with oil for a slight crunch. If you don’t want to make churros at home, you can find them at various places. Many bakeries and dessert shops sell freshly made churros. You can also check local fairs or food trucks, as they often serve this sweet treat. Some grocery stores may even have frozen churros in their freezer section. Churros pair well with a variety of dipping sauces. A classic choice is chocolate sauce, which adds a rich flavor. You can also serve them with dulce de leche for a sweet, caramel-like taste. Another fun option is whipped cream or even fruit sauces like raspberry. Each dip adds a unique twist to the churro experience! This blog covered all you need to know about churros, from ingredients to storage. We detailed how to make dough, tips for frying, and variations like chocolate-dipped churros. Remember, avoid common mistakes for great results. Enjoy your tasty treats fresh or stored for later. With practice, you'll master churros and impress anyone. Happy cooking!](https://mysavedrecipe.com/wp-content/uploads/2025/04/49468935-deeb-49d9-88d6-cc897d9fe5a5.webp)
Cinnamon Sugar Churros Crispy and Sweet Delight
Are you ready to indulge in a sweet and crispy treat? These Cinnamon Sugar Churros are the perfect blend of
Are you ready to indulge in a sweet and crispy treat? These Cinnamon Sugar Churros are the perfect blend of
![- 1 cup rolled oats - 1/2 cup protein powder (chocolate or vanilla) - 1/4 cup unsweetened cocoa powder - 1/2 cup almond butter (or peanut butter) - 1/4 cup honey or maple syrup - 1/2 cup brewed espresso or strong coffee, cooled - 1/2 cup dark chocolate chips - 1/4 teaspoon sea salt - 1 teaspoon vanilla extract - Optional: 1/4 cup chopped nuts (walnuts or almonds) for extra crunch When making mocha chip protein bars, I always start with high-quality ingredients. Rolled oats give them a hearty base. Protein powder adds a boost, making these bars filling. Cocoa powder gives a rich chocolate flavor. Almond or peanut butter adds creaminess and healthy fats. Honey or maple syrup acts as a sweetener. Brewed espresso provides a coffee kick. Dark chocolate chips are the best choice for a sweet surprise. Sea salt enhances all the flavors. Lastly, nuts add a nice crunch, making each bite exciting. Each bar has about 150 calories, 6 grams of protein, 8 grams of fat, and 14 grams of carbs. The rolled oats provide fiber, which keeps you full. Protein powder helps build muscle. Almond butter gives healthy fats for energy. Cocoa powder is rich in antioxidants, promoting heart health. Dark chocolate supports brain function with its flavonoids. By using these nutritious ingredients, you create a tasty snack that fuels your day. For the full recipe, check out the details above and start making these bars today! 1. Start by preheating your oven to 350°F (175°C). 2. Line an 8x8-inch baking dish with parchment paper. Leave some paper hanging over the edges. This helps with easy removal. 3. In a large bowl, mix the dry ingredients. Combine 1 cup rolled oats, 1/2 cup protein powder, 1/4 cup cocoa powder, and 1/4 teaspoon sea salt. Stir until evenly mixed. 4. In a separate bowl, whisk together the wet ingredients. Combine 1/2 cup almond butter, 1/4 cup honey (or maple syrup), 1/2 cup cooled brewed espresso, and 1 teaspoon vanilla extract. Mix until smooth. 5. Pour the wet mixture into the dry ingredients. Stir until fully combined. The mix will be thick and sticky. 6. Gently fold in 1/2 cup dark chocolate chips. If you want, add 1/4 cup chopped nuts for crunch. This adds texture and flavor to your bars. 7. Transfer the mixture into your prepared baking dish. Press it down firmly to create an even layer. 8. Bake in the preheated oven for 20-25 minutes. The bars should set but remain soft. Look for slightly crinkled edges. 9. Once done, let the bars cool in the dish for about 10 minutes. Then, use the parchment paper to lift them out. Allow them to cool completely on a wire rack. 10. After cooling, cut the bars into your desired size. Enjoy your delicious mocha chip protein bars! For the complete recipe, refer to the [Full Recipe]. To get the right consistency, mix the dry ingredients well. This step ensures even texture. When mixing the wet ingredients, make sure you whisk until smooth. The final mixture should feel thick and sticky. If you find it too dry, add a splash of coffee. Baking time is key. Check the bars at 20 minutes. They should look set but soft. If needed, add a few more minutes. Adding spices can make your bars pop. Try a pinch of cinnamon or a dash of nutmeg. You can also use almond or coconut extract for a fun twist. For toppings, drizzle melted dark chocolate on top. Chopped nuts or shredded coconut can add texture too. These little extras elevate the taste and make your bars special. Cut the bars into fun shapes. Use cookie cutters for stars or hearts. Wrap each bar in parchment paper. Tie with twine for a rustic touch. Serve them with a hot cup of coffee or a cold glass of milk. This combo makes for a great snack time. Enjoy your delicious mocha chip protein bars with friends or family! {{image_2}} You can mix up the flavors in your mocha chip protein bars. Here are some fun swaps to try: - Peanut Butter Chocolate: Replace almond butter with peanut butter. This change adds a rich, nutty flavor that many love. - Mocha Chai: Add chai spices like cinnamon and ginger for a warm twist. This variation gives a cozy feel to your snack. You can also change with seasonal flavors. For fall, swap vanilla extract with pumpkin spice. It brings a festive taste to your bars! If you have dietary needs, there are easy ways to adapt this recipe: - Gluten-Free: Use certified gluten-free oats. This swap keeps the bars safe for those with gluten sensitivities. - Vegan: Choose plant-based protein powders and maple syrup. This makes the bars suitable for a vegan diet. These changes ensure everyone can enjoy a tasty snack! You might want to make more or fewer bars depending on your needs. Here’s how to adjust the recipe: - Scaling Up or Down: To make more, double the ingredients. For fewer bars, halve everything. - Bake Time Adjustments: If you make a larger batch, bake for a few extra minutes. Keep an eye on the edges; they should look crinkled but not burnt. These tips help you serve the right amount for any occasion! For the full recipe, check the section above. To keep your mocha chip protein bars fresh, store them in an airtight container. If you leave them at room temperature, they last about five days. For longer freshness, the fridge is best. They can stay good for up to two weeks in the fridge. Just make sure the container seals well to keep out air. To maintain their texture, I suggest wrapping each bar in parchment paper. This protects them from drying out and makes them easy to grab on the go. If you want to keep your bars for longer, freezing is a great option. Start by cutting the bars into your desired sizes. Then, wrap each bar tightly in plastic wrap. Place them in a freezer-safe bag or container. This method helps prevent freezer burn. To thaw the bars, simply take one out and leave it at room temperature for about 30 minutes. If you're in a hurry, you can also microwave it for about 10-15 seconds. This will make it soft again. Just remember, for the best taste and texture, enjoy the bars within three months of freezing. Mocha chip protein bars can last about a week at room temperature. If you store them in the fridge, they can stay fresh for up to two weeks. Keep them in an airtight container to prevent them from drying out. Yes, you can use a different protein powder. Options include plant-based or whey protein. Just note that this may change the taste and texture slightly. If you choose a flavored powder, it may alter the final flavor of the bars. These bars provide a good amount of protein, which helps build muscle. The espresso gives you an energy boost without added sugar. Almond butter adds healthy fats and fiber, making them a nourishing snack choice. You can find mocha chip protein bars online or in health food stores. Brands like Quest and RXBAR offer high-quality options. Check local markets for fresh, homemade bars too. Absolutely! This recipe is great for meal prep. You can make a batch ahead of time and keep them for quick snacks. Just wrap them individually and store them in the fridge or freezer for convenience. Enjoy the full recipe to make your own mocha chip protein bars! You now have a simple, tasty recipe for mocha chip protein bars. We covered ingredients, preparation, baking, and even serving tips. These bars are great for energy and packed with nutrients. You can make lots of variations, too. Don’t forget about storage options; keeping them fresh is key. Lastly, enjoy making these bars both for yourself and to share. With these tips, I hope you feel ready to start baking delicious snacks!](https://mysavedrecipe.com/wp-content/uploads/2025/04/91e6353d-840d-4974-b075-0b93c5955509.webp)
Looking for a delicious snack that fuels your day? These Mocha Chip Protein Bars are your answer! Packed with wholesome
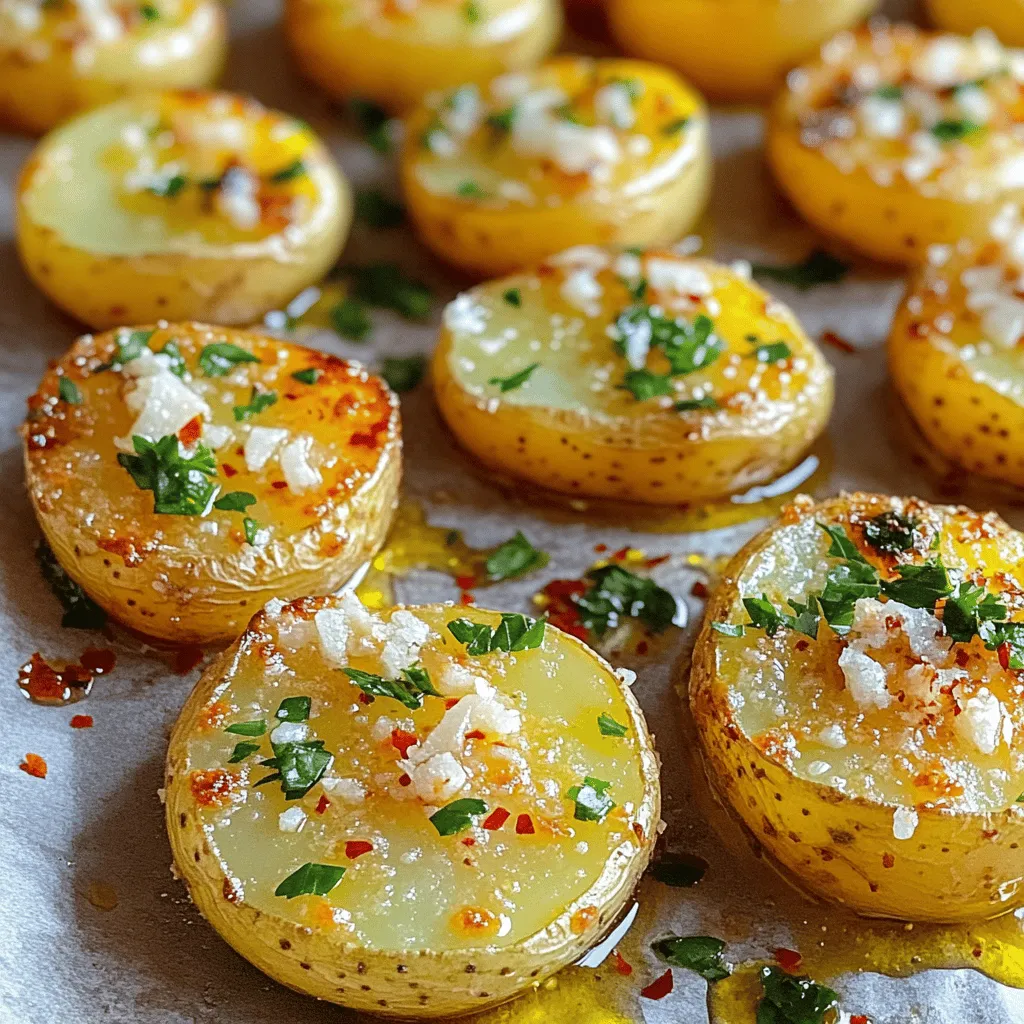
Are you ready to elevate your side dish game? Garlic Parmesan Roasted Potatoes are simple, tasty, and perfect for any
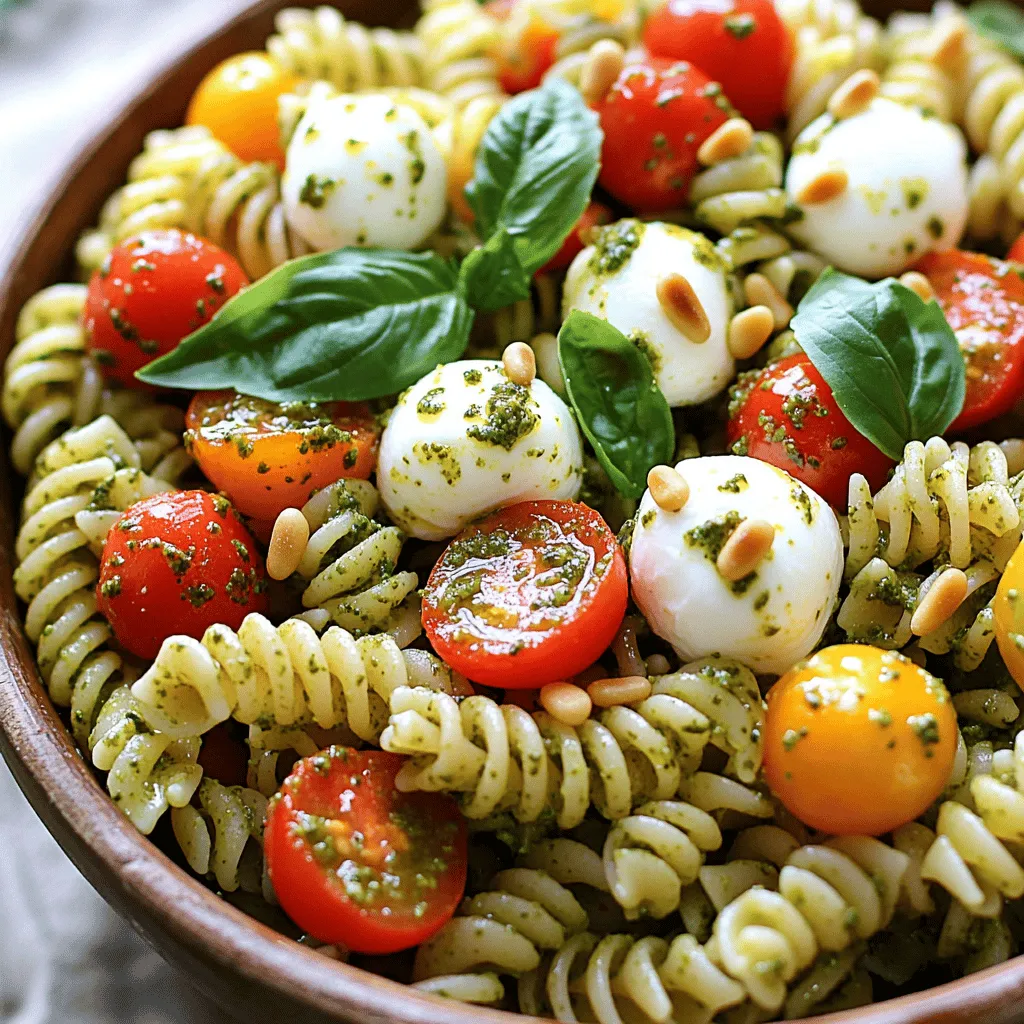
If you’re craving a dish that delivers fresh, vibrant flavors, look no further than Pesto Caprese Pasta Salad. This salad
![- 1 lb (450g) chicken breast, cut into 1-inch pieces - 1/4 cup soy sauce (low sodium) - 2 tablespoons honey - 1 tablespoon rice vinegar - 2 cloves garlic, minced - 1 tablespoon ginger, grated - 1 teaspoon sesame oil - Wooden skewers, soaked in water for 30 minutes The main ingredient for these skewers is chicken breast. It’s lean and juicy. You will also need soy sauce for that deep umami flavor. Honey adds a sweet touch. Rice vinegar brightens the taste. Garlic and ginger give it that warm, aromatic kick. Lastly, sesame oil offers a nutty finish. - 1/4 cup soy sauce (low sodium) - 2 tablespoons honey - 2 cloves garlic, minced - 1 tablespoon ginger, grated For the marinade, mix soy sauce and honey in a bowl. Garlic adds depth, while ginger provides a fresh zing. This blend makes the chicken flavorful. Let it sit to soak up all the goodness. - 1/4 cup green onions, chopped (for garnish) - 1 tablespoon sesame seeds (for garnish) Once grilled, add a pop of color. Chopped green onions give a fresh taste. Sprinkle sesame seeds for crunch. These simple garnishes make your dish look and taste great. For the full recipe, check out the complete instructions on how to create these tasty teriyaki chicken skewers! How to Prepare the Marinade To make the marinade, grab a mixing bowl. Add 1/4 cup of soy sauce, 2 tablespoons of honey, and 1 tablespoon of rice vinegar. Then, add 2 minced garlic cloves and 1 tablespoon of grated ginger. Lastly, stir in 1 teaspoon of sesame oil. Whisk everything until the honey dissolves. This mix gives the chicken a sweet and salty flavor. Marinating the Chicken Cut 1 pound of chicken breast into 1-inch pieces. Place the chicken in a resealable bag or shallow dish. Pour the marinade over the chicken. Make sure every piece gets coated. Seal the bag or cover the dish, then refrigerate for at least 30 minutes. You can marinate it for up to 2 hours. This step is key for flavor. Preheating the Grill Before grilling, preheat your grill to medium-high heat. Aim for around 375°F (190°C). Proper heat helps achieve those tasty grill marks and ensures even cooking. Assembling the Skewers Pull the marinated chicken from the fridge. Thread the chicken pieces onto soaked wooden skewers, leaving a little space between each piece. This space helps the heat reach all sides of the chicken. Grilling Techniques Place the skewers on the preheated grill. Cook them for about 10 to 12 minutes. Turn the skewers occasionally for even cooking. Brush some reserved marinade on the skewers during the last few minutes for extra glaze and flavor. Ensuring Proper Cooking Temperature To check if the chicken is done, use a meat thermometer. The internal temperature should reach 165°F (75°C). This ensures the chicken is safe to eat and juicy. When done, remove the skewers from the grill. Let them rest for a few minutes before serving. For the full recipe, check out the detailed instructions. - Avoiding Dry Chicken: To keep your chicken juicy, use fresh chicken breast. Marinate the chicken for at least 30 minutes. This adds moisture and flavor. Grill on medium heat. Too high heat can dry it out. - Flavor Enhancements: Add some crushed red pepper for heat. You can also mix in orange juice for a citrus twist. Try adding a splash of pineapple juice for extra sweetness. - Serving Suggestions: Serve the skewers on a wooden board. This gives a rustic look. Place sliced cucumbers or bell peppers alongside for color. Drizzle extra teriyaki sauce over the skewers for a glossy finish. - Garnishing Ideas: Use chopped green onions and sesame seeds to garnish. They add crunch and a pop of color. You can also add a sprig of cilantro for a fresh touch. - Essential Kitchen Equipment: A good grill is key for these skewers. You’ll also need a mixing bowl for the marinade. Use a whisk to mix well. A meat thermometer ensures the chicken is cooked through. - Recommended Skewers: Use wooden skewers that have been soaked in water for 30 minutes. This helps prevent burning. Metal skewers are also great, as they can be reused. Want to know the full recipe? Check out the [Full Recipe] for all the details! {{image_2}} Chicken Alternatives You can swap chicken breast for other meats. Try using: - Chicken thighs for juicier flavor. - Pork tenderloin for a different taste. - Shrimp for a lighter option. - Firm tofu for a vegetarian twist. Vegan Options For a vegan version, use: - Marinated tempeh for protein. - Seitan for a meat-like texture. - Grilled vegetables like bell peppers or zucchinis. Different Marinades You can change the flavor by using different marinades. Here are some ideas: - Teriyaki with orange juice for a citrus kick. - Honey and sriracha for a sweet-spicy blend. - Miso paste for a deeper umami flavor. Spice Level Adjustments If you want heat, add some spice! Consider: - Red pepper flakes for mild warmth. - Fresh chili slices for a bold kick. - Sriracha mixed into the marinade for heat. Oven-Baking If you can’t grill, try baking the skewers. Here’s how: 1. Preheat the oven to 400°F (200°C). 2. Place the skewers on a baking sheet lined with foil. 3. Bake for about 15-20 minutes, flipping halfway through. Skillet Cooking You can also cook skewers in a skillet. Follow these steps: 1. Heat a little oil in a pan over medium heat. 2. Add the skewers and cook for 8-10 minutes. 3. Turn occasionally for even cooking. For a full recipe, refer to the [Full Recipe]. After you enjoy your teriyaki chicken skewers, store any leftovers carefully. Place them in an airtight container. This keeps moisture in and prevents odors. You should refrigerate them within two hours of cooking. For longer storage, freezing is an option. First, let the skewers cool completely. Then, wrap them tightly in plastic wrap and place them in a freezer-safe bag. They can last up to three months in the freezer. When it's time to enjoy your leftovers, reheating is key. You can use an oven or a microwave. For the oven, preheat it to 350°F (175°C). Place the skewers on a baking sheet and cover them with foil. Heat for about 10-15 minutes until warm. If you prefer the microwave, place the skewers on a microwave-safe plate. Heat for 1-2 minutes. This method is quick but can make the chicken a bit rubbery. To keep the texture and flavor, brush with a little teriyaki sauce before reheating. Wondering how long your teriyaki chicken skewers last? In the fridge, they stay good for about 3-4 days. Always check for signs of spoilage. Signs include an off smell or a change in color or texture. If you see any of these, it's best to throw them out. Keeping your food safe is important for health. Enjoy your teriyaki chicken skewers fresh and flavorful! For the full recipe, check out the section above. What can I use instead of chicken? You can use tofu, shrimp, or beef. Tofu works well as a meat substitute. Just cut it into cubes and marinate it like chicken. Shrimp grills quickly, so adjust cooking time. Beef can also be cut into strips and cooked the same way. How do I know when the chicken is done? Check the chicken's internal temperature. It should reach 165°F (75°C). You can also look for clear juices. If the juices run clear, the chicken is likely done. Make sure it has nice grill marks too! Is it gluten-free? Teriyaki chicken skewers can be gluten-free. Use gluten-free soy sauce or tamari in your marinade. Always check labels to be sure. This helps avoid gluten for those with sensitivities. Can I make it low-carb? Yes, you can make it low-carb. Skip the honey or use a low-carb sweetener. Serve the skewers with low-carb veggies. Zucchini or bell peppers are great options. They add color and flavor without extra carbs. What to serve with teriyaki chicken skewers? Serve with rice or noodles for a full meal. You can also pair it with a fresh salad. A cucumber or carrot salad adds crunch and balances the flavors. Any side dish recommendations? Consider grilled vegetables or a simple stir-fry. You can also serve it with steamed broccoli or snap peas. These sides add color and nutrition to your meal. For an extra touch, drizzle some teriyaki sauce over everything for a tasty finish. For the complete method to make these delightful skewers, check the Full Recipe. In this article, we explored how to make delicious teriyaki chicken skewers. We covered key ingredients, from chicken and teriyaki sauce to garnishes. I shared step-by-step instructions for marination, grilling, and cooking. You learned tips to keep your chicken moist and tasty. We also discussed variations and how to store leftovers. Finally, I answered common questions to help you succeed. With these insights, you can easily create a tasty meal that impresses everyone. Enjoy your cooking journey!](https://mysavedrecipe.com/wp-content/uploads/2025/04/883cdec6-da6f-49f7-a2b3-676d19808b7c.webp)
Get ready to fire up your grill! Teriyaki Chicken Skewers are a tasty treat anyone can make. With juicy chicken
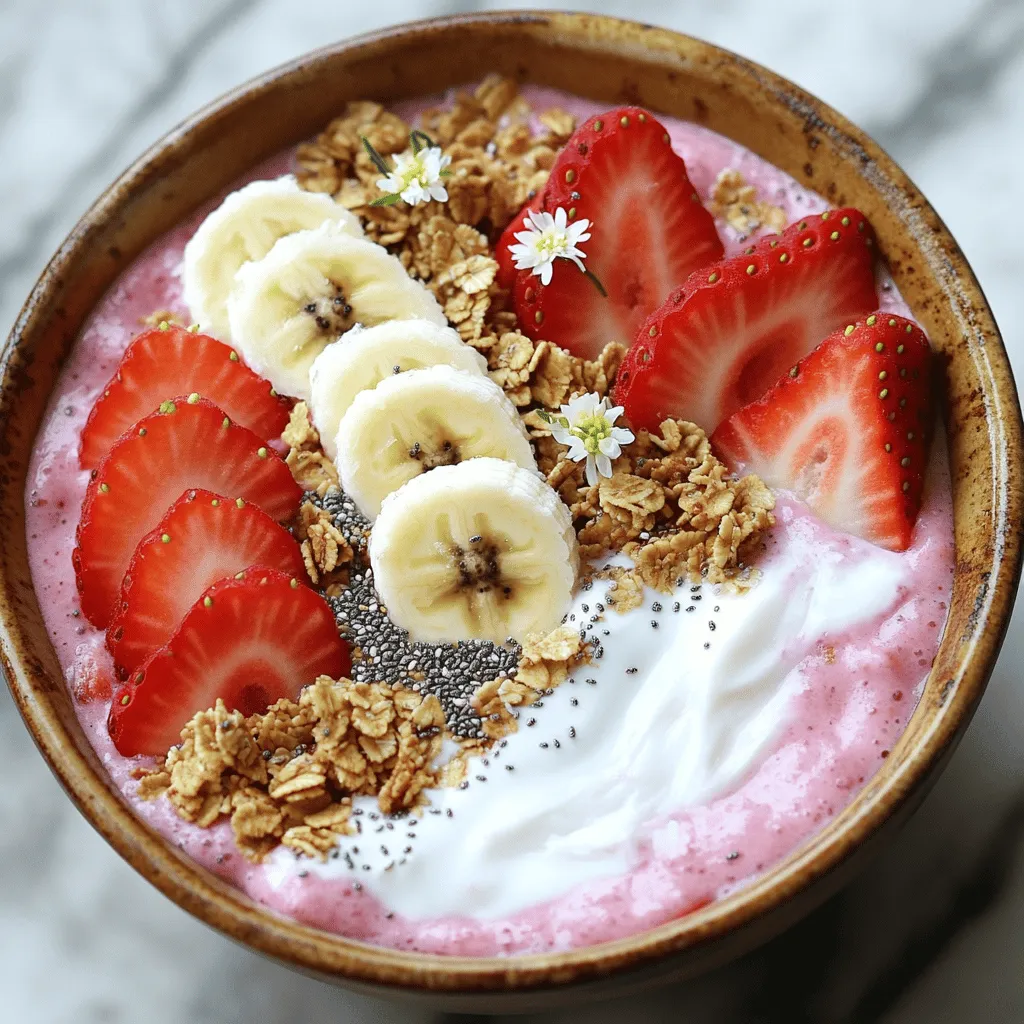
Looking for a quick and tasty breakfast? You’ll love this Strawberry Banana Smoothie Bowl! It’s simple to make and packed
. - Step 1: Boil water and salt Fill a large pot with water. Add a good amount of salt. Bring it to a boil. - Step 2: Cook spaghetti or linguine to al dente Add 12 oz of spaghetti or linguine. Cook it until it's al dente, about 8 to 10 minutes. Reserve 1 cup of pasta water, then drain the pasta. - Step 3: Blend avocado, garlic, lemon juice, and basil In your food processor, add 2 ripe avocados, 2 cloves of minced garlic, 2 tablespoons of fresh lemon juice, and 1/4 cup of fresh basil leaves. Blend until smooth. - Step 4: Add olive oil and Parmesan cheese, blend until smooth Pour in 1/4 cup of extra virgin olive oil and 1/4 cup of grated Parmesan cheese. Blend again until the sauce is creamy. If needed, add some reserved pasta water to make it smoother. - Step 5: Toss pasta with sauce In a large bowl, mix the pasta with the avocado sauce. Make sure all the pasta is well coated. - Step 6: Adjust seasoning and garnish Taste the dish. Add salt and pepper to your liking. For a bit of heat, sprinkle in 1/4 teaspoon of red pepper flakes. Serve the pasta with halved cherry tomatoes and extra basil leaves on top. For the full recipe, check out the details above. Enjoy your creamy avocado pasta! To get the right sauce consistency, blend the avocados until smooth. If it feels thick, add a bit of reserved pasta water. This will help loosen the sauce. For a dairy-free option, replace Parmesan cheese with nutritional yeast. It gives a cheesy flavor without any dairy. You can also add a bit more lemon juice for extra zing. To keep your pasta al dente, cook it just until tender. Taste a piece before draining. It should have a slight bite to it. Always reserve a cup of pasta water before draining. This starchy water helps bind the sauce to the pasta later. You can use it to adjust the sauce's thickness as needed. Pair your creamy avocado pasta with grilled chicken or shrimp for added protein. You can also toss in seasonal veggies like spinach or cherry tomatoes for extra color and nutrition. For a beautiful plate, twirl the pasta with a fork and place it in the center. Garnish with extra basil leaves and halved cherry tomatoes for a fresh look. This makes the dish not only tasty but also visually appealing. {{image_2}} You can easily make creamy avocado pasta your own. Want more protein? Add grilled chicken or shrimp. Both options taste great with the creamy sauce. If you prefer veggies, try mixing in seasonal vegetables. Fresh spinach, zucchini, or cherry tomatoes work well. Boost the flavor of your dish with spices or herbs. A pinch of garlic powder or a sprinkle of paprika can add zest. Fresh herbs like parsley or cilantro can brighten the dish. You can also switch up your cheese. Try feta or goat cheese for a different taste. Feel free to get creative with sauces. A creamy Alfredo or pesto sauce can be a fun twist. You can also mix the avocado sauce with classic marinara for a unique blend. Experiment and find what you love! Check out the Full Recipe for more ideas. To store creamy avocado pasta, place it in an airtight container. This keeps moisture in and prevents the pasta from drying out. You can also cover the container with plastic wrap if you don’t have a lid. Try to eat leftovers within two days for the best taste and texture. When reheating, do so gently on the stove or in the microwave. Add a splash of olive oil or a bit of reserved pasta water. This helps restore the creamy texture. Stir well to mix the sauce back into the pasta. You can also add fresh basil or cherry tomatoes to refresh the dish. Can you freeze creamy avocado pasta? It’s best not to freeze it. The avocado may change texture when thawed. Instead, you can freeze the sauce and pasta separately. For the sauce, place it in a freezer-safe bag or container. For the pasta, let it cool, then store in a separate container. When ready to use, thaw the sauce and reheat the pasta. This way, you keep the best flavors and textures. Creamy avocado pasta can last about 2 to 3 days in the fridge. Store it in an airtight container to keep it fresh. If you notice any browning on the avocado, that's a sign it’s starting to spoil. A strong or sour smell also means you should toss it. Yes, you can make creamy avocado pasta ahead of time! For best results, make the sauce and cook the pasta separately. When you're ready to eat, mix them together. This keeps the pasta from becoming mushy. You can warm it up gently on the stove. Add a splash of water if needed to loosen the sauce. If you want to switch things up, you can use zucchini noodles or gluten-free pasta. Zucchini noodles are light and fresh. They add a nice crunch. Gluten-free pasta works well for those with dietary needs. Both options keep the dish tasty and satisfying. In this blog post, we covered how to make creamy avocado pasta. We discussed the simple ingredients, step-by-step instructions, and helpful tips. You can customize this dish with add-ins or different flavors. Don't forget the storage tips for leftovers. Making this meal is easy and fun. It’s tasty, healthy, and great for any occasion. Try it out, and enjoy your creamy avocado pasta today!](https://mysavedrecipe.com/wp-content/uploads/2025/04/8ca2522b-e89a-4c40-96dd-26e11eee8f74.webp)
If you love quick and tasty meals, this creamy avocado pasta is for you! Made with fresh avocados, garlic, and
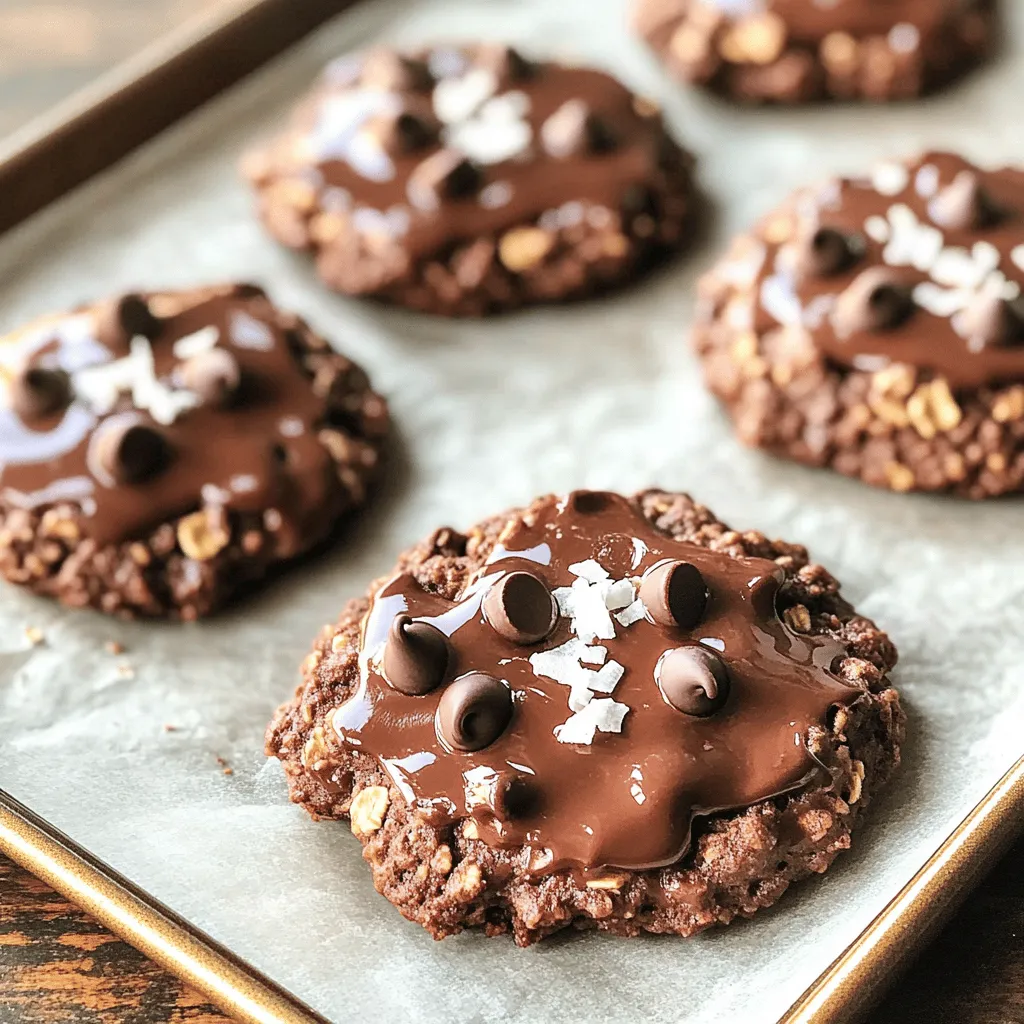
Craving a fast, tasty treat? I’m here to share my simple no-bake chocolate oatmeal cookies recipe! With just a few
![To make this recipe, gather these items: - 4 bone-in, skin-on chicken thighs - 1/4 cup honey - 1/4 cup Dijon mustard - 2 tablespoons soy sauce (or tamari for gluten-free) - 1 tablespoon apple cider vinegar - 2 cloves garlic, minced - 1 teaspoon fresh thyme leaves (or 1/2 teaspoon dried) - 1 teaspoon paprika - Salt and pepper to taste - 1 tablespoon olive oil - Fresh parsley, chopped (for garnish) If you need to swap ingredients, here are some ideas: - Use maple syrup instead of honey for a different sweetness. - Switch Dijon mustard with yellow mustard for a milder taste. - If you don't have apple cider vinegar, try white wine vinegar or lemon juice. - Fresh thyme can be replaced with rosemary or oregano. - Use chicken breasts if you prefer less fat. To enhance the flavor of your chicken thighs, consider these seasonings: - Add a pinch of cayenne pepper for heat. - Try using smoked paprika for a smoky flavor. - Include some fresh lemon zest for brightness. - Garlic powder can boost the garlic flavor if you love it. This recipe is flexible, so feel free to mix and match based on what you have at home. For a full, detailed recipe, check out the Full Recipe to enjoy these savory honey mustard chicken thighs. To start, gather your chicken thighs. I prefer bone-in, skin-on thighs for the best flavor. Rinse them under cold water and pat them dry with paper towels. Drying helps the skin crisp up nicely. You want to make sure there’s no excess water. This step is key for great texture later. Next, we prepare the marinade. In a bowl, combine honey, Dijon mustard, soy sauce, apple cider vinegar, minced garlic, thyme, paprika, salt, and pepper. Whisk them until they blend well. This mixture is both sweet and tangy, giving the chicken great depth. Place the chicken in a large zip-top bag or a shallow dish. Pour the marinade over the chicken, ensuring every piece gets coated. Seal the bag or cover the dish. Let it sit in the fridge for at least 30 minutes. If you have time, marinate it for up to 2 hours. This extra time allows the flavors to infuse deeply. After marinating, it’s time to cook. Preheat your oven to 400°F (200°C). In an oven-safe skillet, heat olive oil over medium-high heat. Take the chicken out of the marinade, letting the extra drip off. Place the thighs skin-side down in the skillet. Sear them for about 5-7 minutes until the skin is golden brown and crispy. This step adds flavor and texture. Once done, flip the thighs over. Pour the leftover marinade over the chicken and place the skillet in the oven. Bake for 25-30 minutes or until the internal temperature reaches 165°F (74°C). The chicken should be juicy, and the skin should remain crispy. Once finished, let the chicken rest for about 5 minutes before serving. Garnish with fresh parsley. For the full recipe, check out the details above. To get that perfect crispy skin, you need to start with dry chicken. Pat the thighs dry with paper towels. This helps the skin crisp up nicely. When cooking, always sear the chicken skin-side down first. Use a hot skillet with olive oil. Let it cook for about 5-7 minutes without moving it. This will create a beautiful golden crust. You can also use a high oven temperature for roasting. This keeps the skin crispy while cooking through. Marinating adds flavor and moisture to your chicken. Use a mix of honey, Dijon mustard, and soy sauce to create a balanced taste. Make sure to marinate for at least 30 minutes. For more flavor, let it sit for up to 2 hours. You can use a zip-top bag for easy marinating. Just seal it tight and give it a good shake. Make sure every piece of chicken gets coated in the marinade. To ensure your chicken cooks evenly, use a meat thermometer. The internal temperature should reach 165°F (74°C). This guarantees it's safe to eat. When baking, let the chicken rest for about 5 minutes before serving. This helps the juices settle back into the meat. If you follow these tips, your chicken thighs will turn out juicy and flavorful every time. For a detailed recipe, check out the Full Recipe. {{image_2}} You can add fresh herbs to boost the flavor. Try rosemary, sage, or oregano. Simply chop the herbs and mix them into the marinade. The herbs add a nice touch and make the chicken extra tasty. I love using fresh thyme, as it pairs well with honey mustard. You can also use dried herbs if that’s what you have on hand. For a kick, add some heat to your honey mustard chicken. You can stir in red pepper flakes or cayenne pepper. Just a pinch will do! This adds a warm spice that balances the sweetness of honey. If you want more heat, add a dash of hot sauce to the marinade. This variation is perfect for those who enjoy bold flavors! You don’t have to stick with thighs. You can use drumsticks or chicken breasts instead. Drumsticks will have a great flavor, and they stay juicy. If you prefer chicken breasts, just make sure not to overcook them. They can dry out quickly. No matter the cut, the honey mustard marinade works well, so feel free to mix it up! For a complete recipe, check out the [Full Recipe]. To keep your honey mustard chicken thighs fresh, let them cool first. Place the chicken in an airtight container. You can store it in the fridge for up to three days. If you want to keep it longer, consider freezing. When it's time to enjoy your leftovers, reheat them properly. You can use the oven or the microwave. For the oven, set it to 350°F (175°C). Place the chicken in a dish and cover it with foil. Heat for about 15-20 minutes. In the microwave, place the chicken on a plate, cover it, and heat for 2-3 minutes. Check that it’s hot all the way through. Freezing is a great way to save your honey mustard chicken thighs. Wrap each thigh in plastic wrap, then place them in a freezer bag. Make sure to squeeze out as much air as possible. You can freeze them for up to three months. To thaw, place the chicken in the fridge overnight. This keeps the flavor and texture intact. For the full recipe, check out the earlier section. Enjoy your cooking! Yes, you can use boneless chicken thighs. They cook faster than bone-in thighs. Adjust the cooking time to about 20-25 minutes. Make sure to check the internal temperature reaches 165°F (74°C). This will ensure the chicken is fully cooked and safe to eat. I love serving these chicken thighs with roasted vegetables. You can use carrots, broccoli, or Brussels sprouts. A side of fluffy rice or quinoa pairs well. You can also serve a fresh salad with a light vinaigrette. These sides balance the sweet and tangy flavors of the chicken. You can store leftovers in the fridge for up to 3 days. Keep the chicken in an airtight container. Make sure it cools to room temperature before sealing. This way, the chicken stays moist and tasty for your next meal. You can also reheat it in the oven or microwave. Remember to check the temperature before eating. For the full recipe, check out the details above! In this post, we covered how to make honey mustard chicken thighs. We listed the ingredients, shared substitution tips, and suggested seasonings. You learned how to prepare, marinate, and cook the chicken perfectly. We shared tricks for crispy skin and storage tips for leftovers. Now you can enjoy delicious variations, like adding herbs or spice. Use these steps to impress at your next meal. Follow this guide for tasty results every time. Enjoy cooking!](https://mysavedrecipe.com/wp-content/uploads/2025/04/f6801e4c-abe1-413e-96fb-9cd9455b7c97.webp)
Are you ready to delight your taste buds with a sweet and tangy twist? This easy Honey Mustard Chicken Thighs
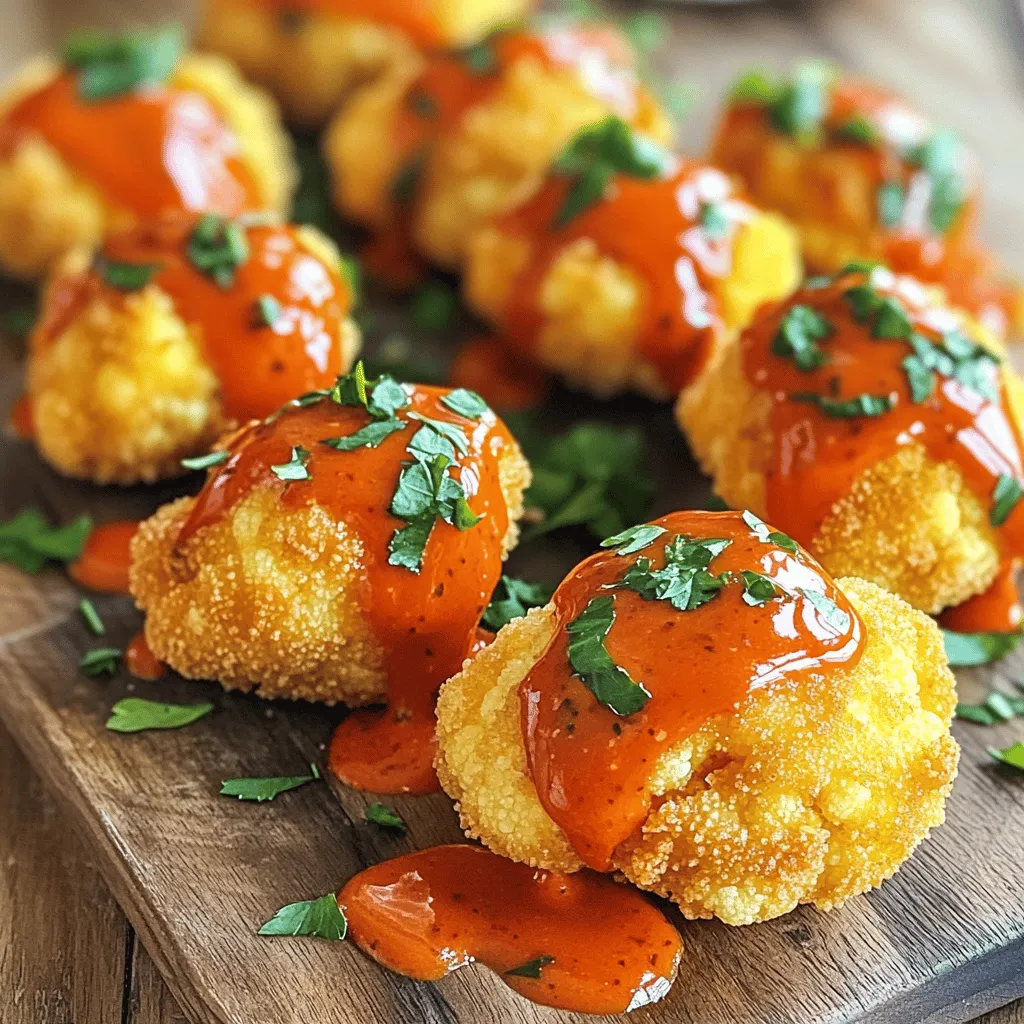
Are you ready to spice up your snack game? These Savory Buffalo Cauliflower Bites are easy to make, packed with
