![This smoothie has some great, simple ingredients. Here’s what you need: - 1 ripe mango, peeled and diced - 1 banana, sliced - 1 teaspoon ground turmeric - 1/2 teaspoon ginger powder (or 1-inch fresh ginger, grated) - 1 cup coconut milk (or almond milk) - 1 tablespoon honey or maple syrup (optional, for sweetness) - 1 tablespoon chia seeds - 1/2 cup ice cubes - A pinch of black pepper These ingredients create a bright, tasty drink that is good for you. You can boost your smoothie with some extra flavors. Here are some ideas: - A handful of spinach or kale for greens. - A scoop of protein powder for extra energy. - A few berries for a sweet twist. - A splash of vanilla extract for a warm note. Feel free to try these options. They can change the taste and nutrition of your smoothie. Each ingredient in this smoothie has its own health perks: - Mango: Rich in vitamins A and C, it helps your skin and immune system. - Banana: High in potassium, it supports heart health and gives energy. - Turmeric: Known for its anti-inflammatory properties, it may help reduce pain. - Ginger: Aids digestion and can help with nausea. - Coconut Milk: Provides healthy fats and keeps your heart healthy. - Honey or Maple Syrup: Natural sweeteners that offer some antioxidants. - Chia Seeds: Packed with fiber, they help keep you full. - Black Pepper: Helps your body absorb turmeric better. These ingredients not only taste good but also support your health. You can find the full recipe to make this smoothie easily. Start by preparing your ingredients. Take a ripe mango, peel it, and dice it into small pieces. Next, slice the banana into rounds. If you're using fresh ginger, grate it finely. This step is key for flavor. Gather all your ingredients together. It makes blending easier and faster. In a blender, add the diced mango, sliced banana, turmeric, and ginger. Pour in one cup of coconut milk or almond milk. If you like it sweeter, add honey or maple syrup. Next, toss in one tablespoon of chia seeds and a pinch of black pepper. The black pepper helps your body absorb the turmeric better. Finally, add half a cup of ice cubes for a cool touch. Blend everything on high until the mixture is smooth and creamy. You may need to scrape down the sides to blend well. Taste your smoothie. If you want it sweeter, add more honey or syrup. Once your smoothie is ready, pour it into glasses. For a pretty touch, sprinkle some chia seeds or a little turmeric powder on top. This makes the drink look vibrant and inviting. Serve it right away for the best flavor and texture. Enjoy your refreshing Turmeric Mango Sunrise Smoothie! For the complete recipe, check out the [Full Recipe]. To create the perfect Turmeric Mango Sunrise Smoothie, start with a good blender. A strong blender makes a smooth drink. Cut your fruits into small pieces for easier blending. Add your liquids first; this helps everything mix well. Layering helps your blender work better. Always check the sides and scrape down if needed. This ensures everything blends evenly. If your smoothie is too thick, add more coconut milk or water. Blend again until smooth. If it’s too thin, add more frozen fruit or ice. For flavor, you can add more honey or maple syrup. Taste your smoothie before pouring. This way, you can make it just right for your taste buds. Enjoy your smoothie with some healthy sides. Whole grain toast or oatmeal pairs well. You can add nuts or seeds for crunch. Greek yogurt is also a great option for protein. A light breakfast helps keep you full. You can serve your smoothie alongside fresh fruit for added nutrition. For the complete recipe, check the [Full Recipe]. {{image_2}} You can boost your smoothie with protein powder. I often use whey or plant-based protein. These options add nutrition without changing the flavor much. Just one scoop is enough. It helps keep you full longer and supports muscle recovery. Don’t stop at mango and banana! You can add other fruits for a tropical twist. Pineapple, papaya, or passion fruit work great. They add sweetness and a fun taste. You can mix and match your favorites for a unique drink. Experiment with different fruits to find your perfect blend. If you want a creamier smoothie, try different milks. Almond milk or oat milk are great choices. Coconut milk gives a rich taste, while almond milk keeps it light. You can also use silken tofu for a thick texture. These options keep your drink dairy-free, too. If you have leftover smoothie, store it in a sealed jar. Keep it in the fridge. It will stay fresh for up to two days. When you are ready to drink it, give it a good shake. This helps mix everything well again. You can freeze any leftover smoothie for later. Pour it into ice cube trays or freezer bags. Once frozen, you can pop out cubes for quick use. Just remember to label the bags with the date. Smoothies can last up to three months in the freezer. To enjoy your frozen smoothie, take it out of the freezer. Let it thaw in the fridge overnight. If you're in a hurry, run it under cool water for a few minutes. Blend the thawed smoothie to restore its creamy texture. If it feels too thick, add a splash of milk or water to reach your desired consistency. Check out the Full Recipe for more details on making this delicious drink! Turmeric is more than just a spice. It has strong health benefits. The main active compound is curcumin. Curcumin can help reduce inflammation and fight free radicals. This spice may also support brain health and digestion. Some studies suggest it may even improve mood. Adding turmeric to your diet can boost your immune system. Its bright color also makes food look great! Yes, you can make the smoothie without banana. If you skip the banana, the smoothie may be less creamy. You can try using avocado instead. Avocado adds creaminess and healthy fats. Another option is to add more mango. This keeps the flavor bright and sweet. Feel free to experiment with other fruits too! To enhance the flavor, try adding fresh herbs. Mint or basil can brighten the taste. You can also add a squeeze of lime or lemon juice. This will give it a zesty kick. If you want sweetness, use more honey or maple syrup. You can even add a dash of cinnamon for warmth. These little changes can make a big difference in flavor. You learned how to make a tasty Turmeric Mango Sunrise Smoothie. We discussed key ingredients, optional add-ins, and health benefits, too. You also got step-by-step instructions for blending and serving. I shared tips for a better smoothie experience and fun variations to try. Lastly, we covered storage options and answered common questions. Now, you can enjoy this smoothie and feel great with each sip.](https://mysavedrecipe.com/wp-content/uploads/2025/06/27d0b948-6aa1-49d5-a2e8-05c8f1836585.webp)
Turmeric Mango Sunrise Smoothie Energizing Drink Recipe
Looking for a refreshing drink that boosts your energy and health? Try my Turmeric Mango Sunrise Smoothie! This tasty blend
Looking for a refreshing drink that boosts your energy and health? Try my Turmeric Mango Sunrise Smoothie! This tasty blend
![- 2 cups strong brewed chai tea - 1 cup coconut milk - Sweeteners: Honey or maple syrup The main part of this frozen treat is the chai tea. I love using strong brewed chai for the best flavor. You can cool it down before mixing in other ingredients. The coconut milk adds creaminess and a nice tropical twist. Sweeteners like honey or maple syrup let you adjust the level of sweetness to your liking. - Pure vanilla bean paste or vanilla bean seeds - Ground spices: cinnamon, ginger, nutmeg Vanilla bean paste or seeds brings a rich flavor. It blends perfectly with the chai. Ground spices like cinnamon, ginger, and nutmeg add warmth and depth. These spices boost the flavor, making each bite exciting. You can mix and match to find what you enjoy most. - Whipped cream (optional) - Garnishes: Cinnamon stick, additional spices Toppings can enhance your Vanilla Bean Chai Freeze. Whipped cream adds a fluffy texture. You can sprinkle extra spices on top for a pretty finish. A cinnamon stick as a garnish not only looks nice but also adds more flavor. The choice is yours! For the full recipe, check out the complete guide. Enjoy making this refreshing dessert! - In a large mixing bowl, combine 2 cups of cooled chai tea, 1 cup of coconut milk, and 1/4 cup of honey or maple syrup. - Add 2 teaspoons of pure vanilla bean paste, 1/2 teaspoon of ground cinnamon, 1/4 teaspoon of ground ginger, and a pinch of ground nutmeg. - Whisk until all ingredients are blended. Make sure the mixture is smooth and creamy. You can adjust the sweetness by adding more honey or syrup if you want it sweeter. - Pour the mixture into a freezer-safe container. Spread it evenly to ensure it freezes well. - Cover the container with a lid or plastic wrap, and freeze for about 4 hours, or until solid but not rock hard. - Every hour, take a fork and scrape the mixture. This helps break up icy layers and makes the texture light and fluffy. Keep doing this until it is fully frozen and fluffy. - Once your Vanilla Bean Chai Freeze is ready, scoop it into bowls or glasses. - If you like, top with whipped cream and a sprinkle of cinnamon or nutmeg for extra flair. You can also add a cinnamon stick for a fun touch. This Vanilla Bean Chai Freeze is a refreshing dessert delight that everyone will love. To get the best texture, scrape the mixture often. This helps break up icy bits. Use a fork to scrape every hour while it freezes. This step makes your freeze fluffier. If the freeze is too hard, adjust your freezing time. You want it firm but easy to scoop. Taste your mix to see if it needs more sweetness. This is key for a great dessert. You can add more honey or syrup as needed. For a healthier twist, try natural sweeteners like agave or stevia. These give you control over the final taste. Serve your Vanilla Bean Chai Freeze in clear bowls. This shows off its lovely texture and color. For garnish, sprinkle cinnamon on top. A cinnamon stick adds a nice touch. This simple trick makes your dessert look fancy and fun. Check out the Full Recipe for more details on this delightful treat! {{image_2}} You can easily make the Vanilla Bean Chai Freeze dairy-free. Just switch the coconut milk for almond milk or oat milk. Both options keep the creamy texture. Almond milk lends a nutty flavor, while oat milk brings a smooth sweetness. Choose the one you like best for your taste buds. Want to get creative? Try adding chocolate or coffee to the mix. Both flavors pair well with chai spices. If you crave something spicier, think about cardamom, allspice, or even a hint of black pepper. A touch of these spices can give your freeze a fun twist. Experiment and find what you love! You can also make this dessert into popsicles or ice cream. Just pour the mixture into popsicle molds instead of a container. You can even mix in fruits like berries or banana slices. Chopped nuts add a nice crunch, too. This way, you can enjoy a variety of frozen treats, all with that lovely chai flavor. For the complete recipe, check the [Full Recipe]. To keep your Vanilla Bean Chai Freeze fresh, store leftovers in airtight containers. This prevents freezer burn and keeps flavors strong. I recommend using glass or plastic containers with tight lids. After filling, smooth the surface to remove air. It helps to label and date each container. This way, you can track how long it has been in the freezer. If you want to re-freeze, do it with care. Always let the dessert thaw in the fridge first. This helps maintain its taste and texture. After thawing, avoid refreezing more than once. The texture may change, becoming icy or grainy. You want your freeze to stay smooth and creamy. For the best taste and texture, enjoy your Vanilla Bean Chai Freeze within two months. After that, it may still be safe, but the flavors can fade. Look for signs of spoilage, like ice crystals or a strange odor. If it smells off or looks discolored, it's best to toss it. Keep your freeze delicious and fresh! Yes, you can use store-bought chai tea. It saves time and effort. However, it may not match the flavor of freshly brewed chai. Pre-made options can be too sweet or weak. Always check the label for spices and sweetness levels. If you use it, adjust the sweetener in the recipe. Freshly brewed chai gives a richer taste. It’s worth the extra step if you have time. Coconut milk adds creaminess and a subtle flavor. If you need a substitute, try almond milk. Almond milk offers a light taste but less creaminess. Oat milk is another option, giving a smooth texture. Soy milk works well too, adding protein but a different taste. Each milk alters the final flavor, so choose based on your preference. For the best results, freeze for about four hours. This time allows the mixture to become solid but not rock hard. I recommend scraping the mixture every hour. This helps break up icy layers. It creates a fluffier texture that makes it delightful to eat. Adjust freezing time if your freezer runs colder or warmer. You can add alcohol for an adult twist. Rum or bourbon pairs nicely with chai flavors. Use about a tablespoon per serving for a light touch. Add it to the mixture before freezing. This will keep it from freezing too hard. Just be cautious; too much can change the texture. Enjoy experimenting with flavors! The Vanilla Bean Chai Freeze combines the rich flavors of chai tea, coconut milk, and sweeteners. You can enhance it with vanilla, spices, and toppings like whipped cream. Remember to scrape the mixture often and adjust sweetness to your taste. Feel free to experiment with dairy-free options or unique flavors. Store your freeze correctly to keep it fresh. Enjoy this treat as a delightful summer dessert or a cozy winter pick-me-up. It's a fun recipe that you can make your own!](https://mysavedrecipe.com/wp-content/uploads/2025/06/38fc46f4-8a84-4e2d-9a26-d8dbb11a4085.webp)
Looking for a cool treat that’s bursting with flavor? The Vanilla Bean Chai Freeze is your answer! This delightful dessert
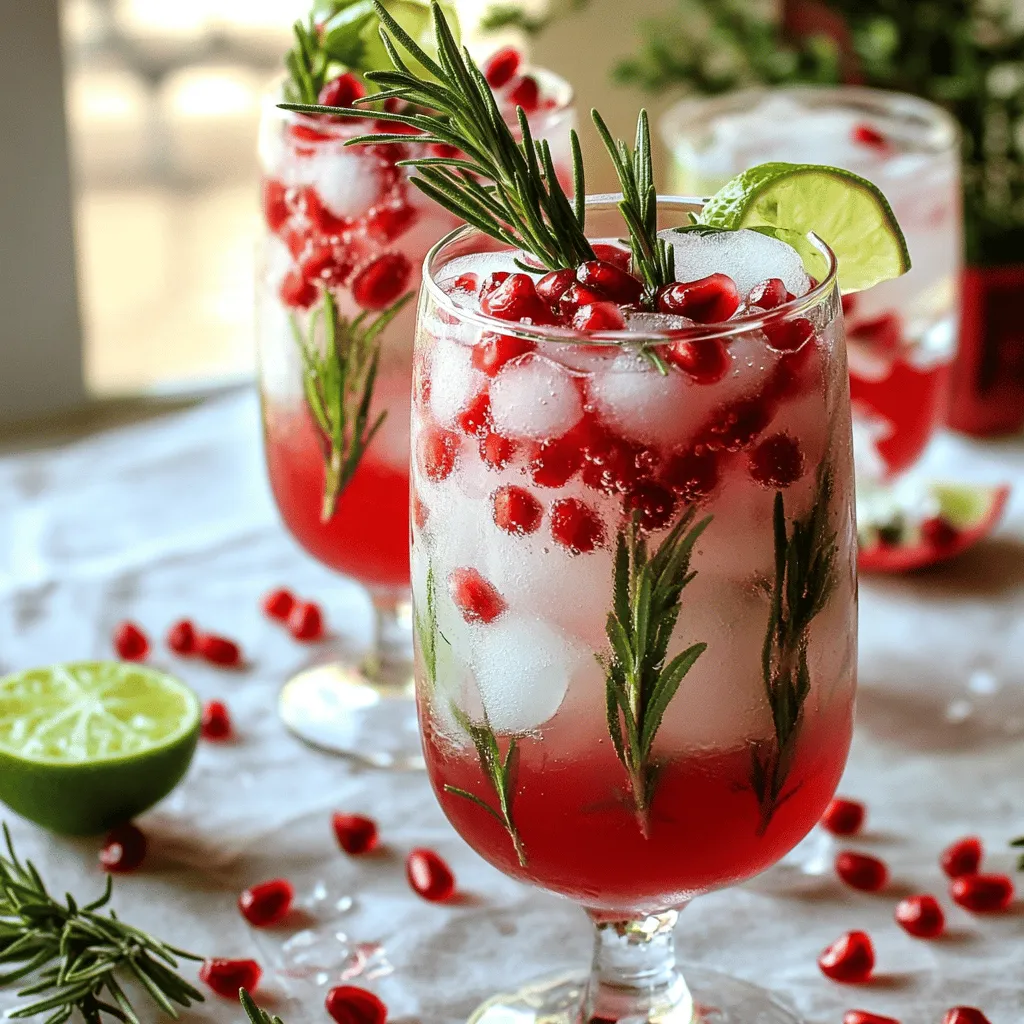
Looking for a drink that’s both refreshing and unique? The Pomegranate Rosemary Cooler is just what you need! With its
![- 2 teaspoons ceremonial matcha powder - 1 cup canned coconut milk (chilled) - 1 tablespoon honey or maple syrup (adjust to taste) - 1 cup ice cubes - 1/2 teaspoon vanilla extract - Whipped coconut cream (for topping) - Toasted coconut flakes (for garnish) - Matcha Powder: This green powder boosts energy and helps focus. It has antioxidants that support health. - Coconut Milk: It adds creaminess and healthy fats. Coconut milk may improve heart health and digestion. - Honey or Maple Syrup: These natural sweeteners provide energy and contain vitamins. They can replace refined sugar. - Ice Cubes: They chill your drink and add a refreshing touch. - Vanilla Extract: It enhances the flavor and has calming effects. - Whipped Coconut Cream: This topping adds richness and makes your drink feel special. - Toasted Coconut Flakes: They give a crunchy texture and a nutty flavor. - Matcha Powder: You can use green tea powder if matcha is not available. - Coconut Milk: Almond or oat milk works well for nut-free options. - Honey or Maple Syrup: Try agave syrup for a vegan-friendly choice. - Whipped Coconut Cream: Use regular whipped cream or a dairy-free option. - Toasted Coconut Flakes: You can skip this if you have a coconut allergy. For the full recipe, check the Matcha Coconut Cloud Frappe. To make the Matcha Coconut Cloud Frappe, start by gathering your ingredients. In a blender, mix: - 2 teaspoons ceremonial matcha powder - 1 cup chilled canned coconut milk - 1 tablespoon honey or maple syrup - 1 cup ice cubes - 1/2 teaspoon vanilla extract Blend all the ingredients on high speed. You want it smooth and frothy. This process takes about 30 to 45 seconds. After blending, taste your frappe. If you want it sweeter, add more honey or syrup. Next, pour the frappe into a tall glass, filling it three-quarters full. Top it with whipped coconut cream. Finally, sprinkle toasted coconut flakes for a crunchy finish. For the best blend, ensure your coconut milk is chilled. This keeps your frappe refreshing and cool. Always use fresh matcha powder for vibrant color and flavor. If your blender struggles, add a bit more coconut milk to help it blend. Remember to blend long enough to create that frothy texture. A well-blended frappe feels light and airy, giving you a delightful drink experience. Serve your Matcha Coconut Cloud Frappe right away for the best taste. Use a straw or a long spoon to enjoy every sip. Pair it with a light snack, like fruit or a cookie, for a perfect treat. For added fun, you can serve it in a fancy glass or with colorful straws. This makes the drink even more enjoyable! For the complete recipe, check out the [Full Recipe]. To make your Matcha Coconut Cloud Frappe even better, think about adding flavors. You can mix in a pinch of salt. This tiny bit can bring out the sweet notes. You could also try a splash of almond extract for a nutty twist. Experiment with mint or chocolate for a refreshing change. Each addition can change the taste and make it unique. Choosing the right matcha is key for a great frappe. Always look for ceremonial grade matcha. This type has a vibrant green color and a fine texture. It offers a smooth and rich taste. Read labels carefully. Some brands mix in fillers, which can ruin the flavor. If you can, smell the matcha before buying. It should have a fresh, grassy scent. A frothy texture makes your frappe delightful. When you blend, use high speed for about 30 to 45 seconds. Ice cubes help create air bubbles, so don’t skip them. If your frappe is too thick, add a splash more coconut milk. Pour it into your glass gently. This helps keep that wonderful foam on top. Enjoy your frothy drink with a straw or a spoon for the best experience. For the full recipe, check out the provided details. {{image_2}} For a dairy-free version, use almond milk or oat milk. Both options work well. Almond milk adds a nutty taste, while oat milk gives a creamy feel. You can even mix coconut milk with one of these for a fun twist. You can make your frappe even more exciting with flavor add-ins. Try adding a few mint leaves for a fresh hint. If you love chocolate, add cocoa powder or chocolate syrup. Both options blend well with the matcha and coconut. In fall, you can add pumpkin spice to your frappe. This spice mix gives a warm, cozy flavor. In winter, consider using peppermint extract for a festive touch. Seasonal changes keep your drink fun and interesting throughout the year. For the complete recipe, check out the Full Recipe. If you have leftover Matcha Coconut Cloud Frappe, pour it into an airtight container. Seal it tightly and place it in the fridge. The frappe stays fresh for about 24 hours. Before you drink it, give it a good shake. This helps mix the layers back together. You should not heat this frappe. It tastes best cold. If it separates, just stir or shake it. If you want to make it cold again, add some ice. This keeps it refreshing and smooth. Store matcha powder in a cool, dark place. Use an airtight container to keep it fresh. Coconut milk should stay in the fridge after opening. Be sure to use it within a week. Honey or maple syrup lasts a long time, so keep it in your pantry. Following these tips keeps your ingredients fresh and ready for your next frappe. Try the Full Recipe to enjoy this treat! Matcha is a fine green tea powder from Japan. Unlike regular green tea, you consume the whole leaf. This gives matcha a rich flavor and lots of health perks. It packs antioxidants, boosts energy, and helps focus. The bright green color comes from the high chlorophyll content. You can find matcha in many recipes, from drinks to desserts. In my Matcha Coconut Cloud Frappe, it adds a nice earthy taste. Yes, you can easily make a larger batch of this frappe. Just double or triple the ingredients. Use a bigger blender if needed. Make sure to adjust the sweetener to taste. This drink is perfect for sharing. You can serve it at parties or gatherings. Just blend and pour into multiple glasses. It stays smooth and tasty, even when made in bulk. Absolutely! You can sweeten your frappe with sugar alternatives. Options like stevia, agave, or coconut sugar work well. Just remember to adjust the amount to your taste. Some sweeteners are stronger than sugar. Always taste as you go. My recipe uses honey or maple syrup, but alternatives can be just as good. Feel free to experiment until you find your favorite flavor. This blog post covers how to create the perfect matcha frappe. You learned about essential ingredients and their health benefits. You also discovered dietary substitutions, detailed preparation steps, and flavor tips. Variations let you customize your drink, while storage info keeps it fresh. In conclusion, making a matcha frappe can be easy and fun. Use this guide to enjoy a tasty drink that fits your needs. Try new flavors and share it with friends. Enjoy every sip!](https://mysavedrecipe.com/wp-content/uploads/2025/06/c9ca7297-07d0-4526-ab9f-e49a1a481c51.webp)
Get ready to enjoy a drink that brings joy to your taste buds! The Matcha Coconut Cloud Frappe is a
![To make a delicious Blueberry Lemon Cheesecake Smoothie, gather these ingredients: - 1 cup fresh or frozen blueberries - 1 banana, frozen - 1 cup Greek yogurt - 1/2 cup cream cheese, softened - 1 cup almond milk (or any milk of your choice) - 2 tablespoons honey or maple syrup (optional) - Zest of 1 lemon - Juice of 1/2 lemon - 1/4 teaspoon vanilla extract - A pinch of salt Each ingredient plays a key role in creating that creamy delight. The blueberries give a sweet and tangy flavor, while the banana adds natural sweetness and creaminess. Greek yogurt and cream cheese help achieve that cheesecake-like texture, making this smoothie rich and satisfying. Almond milk keeps it light but creamy, and the lemon zest and juice add brightness that balances the flavors perfectly. You can easily customize this smoothie to fit your needs: - Alternative fruits to use: Try strawberries or raspberries for a different taste. Mango can add a tropical twist, too. - Dairy-free options: Use coconut yogurt and plant-based cream cheese for a dairy-free version. Oat or soy milk can replace almond milk. - Sweetener alternatives: Agave syrup or stevia can replace honey or maple syrup. Adjust to your taste, especially if you want it less sweet. By mixing and matching these ingredients, you can create your own version of this tasty smoothie. Don't forget to check out the Full Recipe for all the details! - Step 1: Combine ingredients in the blender Start by adding the blueberries, frozen banana, Greek yogurt, and cream cheese to your blender. This mix gives our smoothie a creamy texture and a rich flavor. - Step 2: Adjust sweetness and flavor Pour in the almond milk. If you like sweeter smoothies, add honey or maple syrup now. Next, add the lemon zest, lemon juice, vanilla extract, and a pinch of salt. These ingredients brighten the taste. - Step 3: Blend until smooth Blend on high speed until the mixture is smooth and creamy. You may need to stop and scrape down the sides of the blender for an even mix. Taste the smoothie. If you want it sweeter or more lemony, add more honey or lemon juice. - How to serve the smoothie Once blended, pour the smoothie into your favorite glasses. You can top each glass with extra blueberries or a sprinkle of lemon zest for a nice touch. This not only makes it look pretty but adds extra flavor too. - Best glasses to use I recommend using tall glasses or mason jars. These styles show off the lovely color of the smoothie and hold a good amount. Plus, they are fun to drink from! Check out the Full Recipe for more details and tips! To get a smooth texture, use a strong blender. This helps blend all the ingredients well. Start blending on low, then move to high speed. Stop to scrape the sides if needed. This ensures everything mixes evenly. If your smoothie is too thick, add more almond milk. Just pour in a little at a time. Blend again until you reach the right thickness. If it’s too thin, add more frozen banana or blueberries. They will help thicken it up without changing the flavor too much. You can add more fun flavors to your smoothie. Try mixing in some spinach for a green boost. It adds nutrients without changing the taste much. You could also use raspberries or strawberries instead of blueberries. Each fruit brings its own twist. When it comes to toppings, I love using a sprinkle of lemon zest. It adds a nice pop of flavor. Fresh blueberries on top look great and taste even better. You could also add a dollop of whipped cream for a creamy finish. For a crunch, consider crushed graham crackers. They give you that cheesecake feel. Try these tips to make your Blueberry Lemon Cheesecake Smoothie even more delightful! For the complete recipe, check out the [Full Recipe]. {{image_2}} You can make your Blueberry Lemon Cheesecake Smoothie even more fun! One great way is to add spinach. This gives your smoothie a bright green color and boosts the nutrients. Don't worry; the taste stays yummy because blueberries mask the spinach flavor well. You can also swap out blueberries for other berries. Raspberries, strawberries, or blackberries all work great. Each berry brings its unique flavor. Mix and match for a fun berry medley. If you want to make your smoothie lower in calories, you can change a few ingredients. Use low-fat cream cheese instead of regular. You can also use a sugar-free sweetener instead of honey or maple syrup. This way, you still get a tasty treat without the extra calories. For a high-protein version, try adding a scoop of protein powder to the mix. You can also use Greek yogurt with added protein. This change makes the smoothie great for breakfast or a post-workout snack. For the full recipe, check the earlier section. To keep your Blueberry Lemon Cheesecake Smoothie fresh, store any leftovers in an airtight container. This helps prevent oxidation and keeps the flavor intact. Place the container in the fridge and use it within two days for the best taste. If you want to prepare ahead, consider freezing the smoothie. Pour it into freezer-safe bags or containers. Leave some space at the top for expansion. When you're ready to enjoy it, let it thaw in the fridge overnight. You can also blend it again for a smooth texture. In the fridge, this smoothie lasts about 2 days. After that, the flavor and texture may change. If you freeze it, you can keep it for up to 3 months. Just remember to check for any off smells when you thaw it. Always trust your senses! Can I use frozen blueberries instead of fresh? Yes, you can use frozen blueberries. They work well and make the smoothie cold. Frozen fruit often blends better and gives a thicker texture. If you use frozen blueberries, there is no need for ice. Is this smoothie suitable for meal replacement? Yes, this smoothie can serve as a meal replacement. It has protein from Greek yogurt and cream cheese. Plus, the fruit provides vitamins and fiber. Just add a bit more protein or healthy fat if you want it to be more filling. Can I make it vegan? Yes, you can make this smoothie vegan. Use plant-based yogurt and cream cheese instead of dairy. Almond milk or coconut milk works great as milk options. Replace honey with maple syrup or agave for sweetening. What to do if it's too thick or too thin? If your smoothie is too thick, add more almond milk. Blend again until you reach the right consistency. If it’s too thin, add more frozen fruit or a bit of yogurt. This helps thicken it up. How to boost nutrition in a smoothie? You can boost nutrition easily. Add a handful of spinach for extra vitamins. Chia seeds or flaxseeds add fiber and omega-3s. You can also mix in protein powder for a protein boost. These additions keep your smoothie tasty and healthy. You can find the full recipe [here](#). This blog post covered a tasty smoothie recipe and tips for making it perfect. We discussed ingredients, substitutes, and step-by-step instructions for blending. You learned how to adjust flavors and consistency. We also explored storage tips and answered common questions. Smoothies are simple, healthy, and customizable. You can mix and match to fit your taste. Try new ingredients to keep things exciting. Enjoy your smoothie journey and make it your own!](https://mysavedrecipe.com/wp-content/uploads/2025/06/13418d7e-7ad5-46a5-8f6f-9341929ea62b.webp)
Get ready to treat yourself with a delicious Blueberry Lemon Cheesecake Smoothie! This creamy delight is packed with flavor and
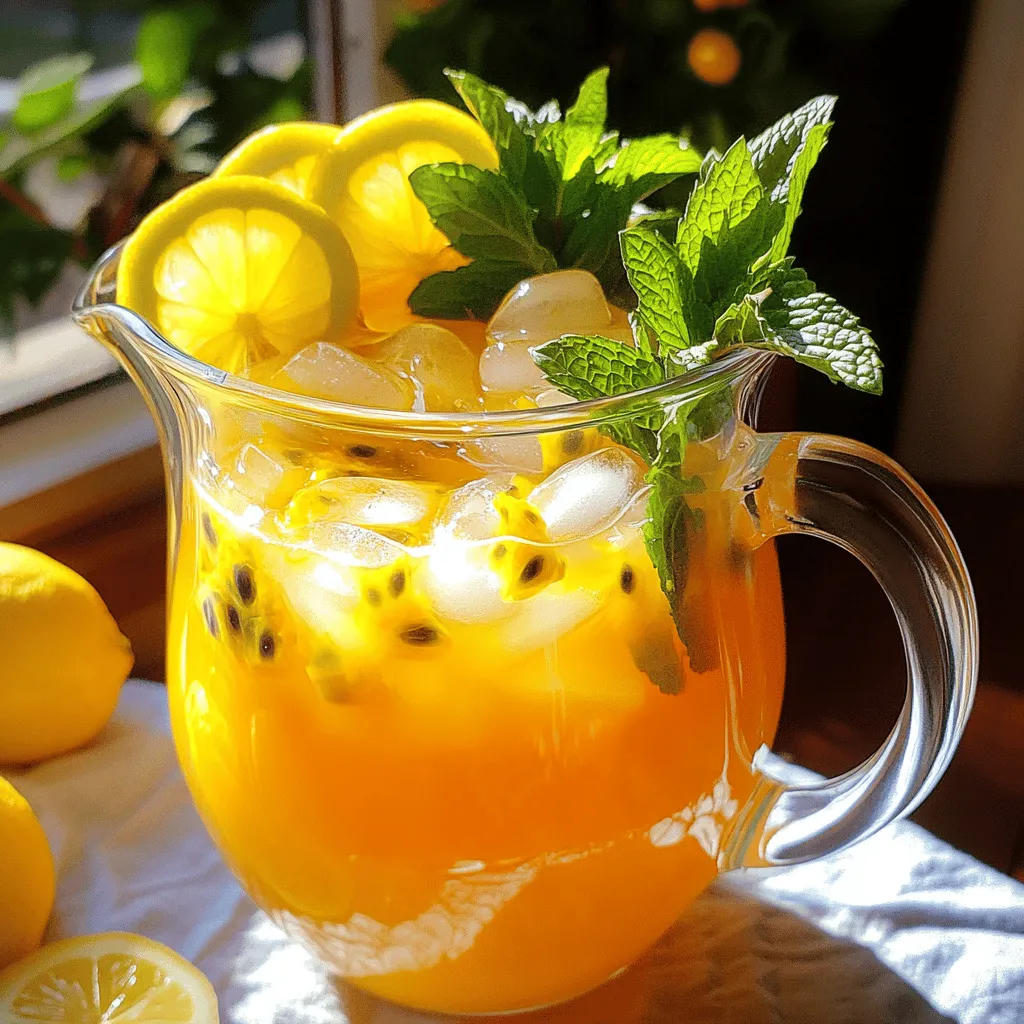
Looking for a refreshing summer drink that bursts with flavor? You’ll love my Passion Fruit Mint Iced Tea! This tasty
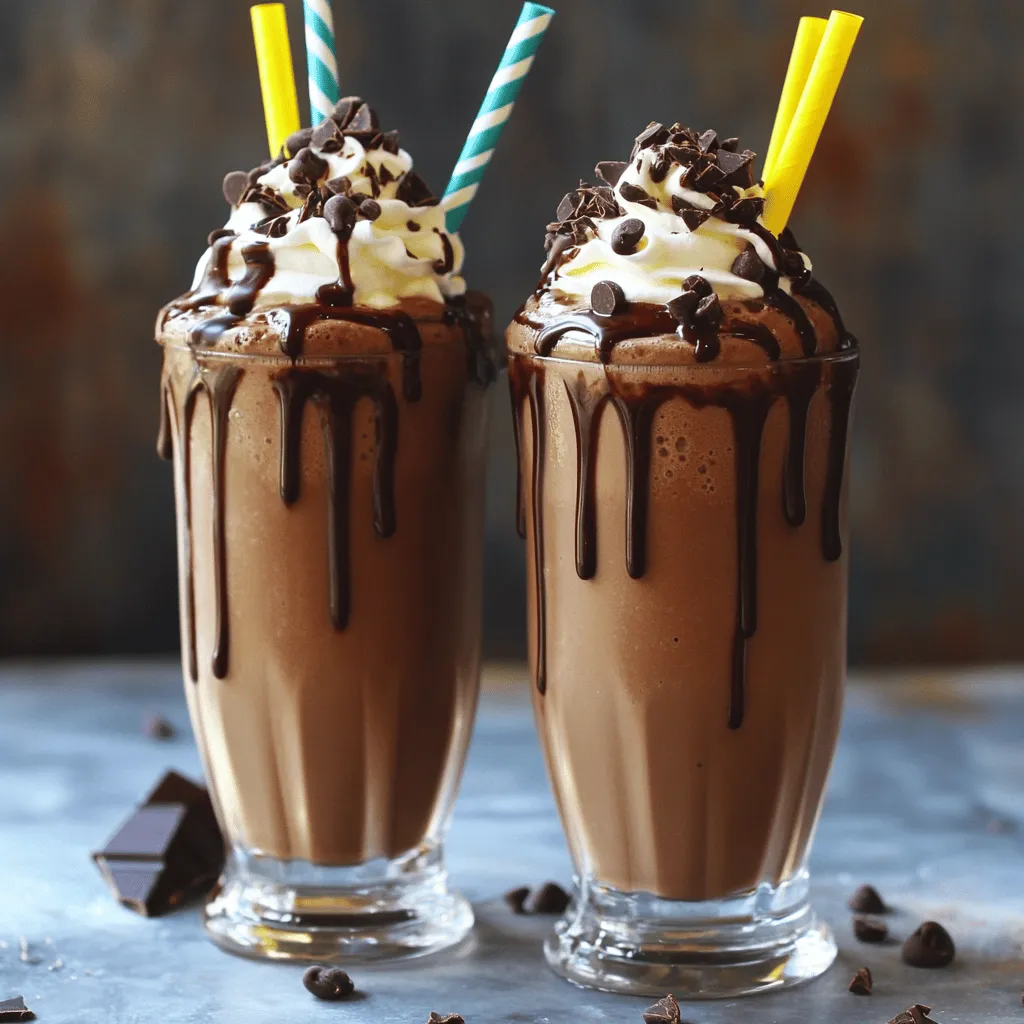
Indulge yourself with a creamy delight! The Double Chocolate Espresso Shake combines rich chocolate ice cream and bold espresso for

Looking for a drink that screams summer? The Lychee Lavender Lemon Spritz is your answer! This refreshing mix blends sweet
![- 2 cups watermelon, cubed - 10 fresh mint leaves - 2 tablespoons lime juice (freshly squeezed) - 1 tablespoon honey or agave syrup (adjust for sweetness) To create a Watermelon Mint Mojito Mocktail, you'll need these key ingredients. Watermelon gives the drink a sweet and juicy base. Fresh mint adds a burst of cool flavor. Lime juice brings a zesty kick. The sweetener helps balance the tartness of the lime. You can adjust the sweetness to fit your taste. - Lime wedges - Mint sprigs Garnishes make your mocktail pop! Adding lime wedges on the rim adds color. Fresh mint sprigs not only look nice but also boost the mint flavor. - Blender - Tall glass - Muddler When making this refreshing drink, you'll need a few tools. A blender mixes the watermelon into juice. A tall glass holds all the delicious layers. A muddler helps release the mint oils for a strong flavor. With these ingredients and tools, you can whip up a delightful Watermelon Mint Mojito Mocktail. For the full recipe, you can check the earlier sections. Enjoy your refreshing beverage! - First, take 2 cups of watermelon and cut it into cubes. - Next, place the cubes in a blender. Blend until it is smooth. - If you want a clearer drink, strain the juice with a fine mesh sieve. - In a tall glass, add 10 fresh mint leaves and 2 tablespoons of lime juice. - Use a muddler or the back of a spoon to gently smash the mint. This helps release the mint oils. - Add 1 tablespoon of honey or agave syrup to the glass. Stir well to combine with the mint and lime. - Fill the glass halfway with ice cubes, then pour the watermelon juice over the ice. - Top off your drink with sparkling water. Stir gently. - For a lovely finish, garnish with a lime wedge and a sprig of mint. For the complete recipe, check the [Full Recipe]. For the best taste in your Watermelon Mint Mojito Mocktail, adjust the sweetness. You can add more or less honey or agave syrup. This lets you control how sweet you want it. Next, think about the mint. If you love mint, add more leaves for a stronger flavor. Just remember, fresh mint can be potent! Serve your mocktail in chilled glasses for a refreshing touch. This keeps the drink cool and crisp. For extra flair, try garnishing with a slice of watermelon on the rim. You can also add mint leaves floating on top for a beautiful look. These simple touches make your drink feel special. You can prepare this mocktail in advance. Start by blending the watermelon juice and muddling the mint. Store the juice in the fridge. Just mix in the mint and sparkling water right before serving. This keeps the drink fresh and bubbly. Enjoy your delicious Watermelon Mint Mojito Mocktail anytime! For the full recipe, check out the [Full Recipe]. {{image_2}} You can switch up the watermelon for other fruits. Strawberries add a sweet touch. Mango brings a tropical vibe. Both blend well with mint and lime. You can mix different fruits for a fun twist. Citrus fruits like oranges or lemons also work great. They add a zesty kick to the drink. Blend the new fruits just like the watermelon. Want a unique flavor? Try using different herbs. Basil pairs nicely with the sweetness of the watermelon. Rosemary offers a more robust taste. Just like mint, muddle these herbs to release their oils. This adds depth to your mocktail. Experiment to find your favorite herb combo. If you want a low-calorie drink, there are great substitutes. Try using stevia or erythritol instead of honey. These sweeteners keep the flavor but cut calories. You can also use a sugar-free syrup for sweetness. Adjust the amount to your taste. This way, you can enjoy your mocktail without the extra sugar. To store leftover mocktail, pour it into a clean, airtight container. A glass jar or plastic bottle works well. Keep it in the fridge for up to two days. The taste may fade after a day, so enjoy it soon! You can freeze watermelon juice for later use. Pour the juice into ice cube trays. Once frozen, transfer the cubes to a freezer bag. This way, you can enjoy fresh-tasting juice later. To maintain flavor, avoid freezing for longer than three months. Get creative with stored mocktail! Blend it into smoothies for a refreshing drink. You can also use it to make popsicles. Simply pour the leftover mocktail into popsicle molds and freeze until solid. It's a fun way to enjoy the flavors again! For the full recipe, check out the Watermelon Mint Mojito Mocktail section. Yes, you can make this mocktail ahead of time. To keep it fresh, prepare the watermelon juice and store it in the fridge. Keep the mint leaves and sparkling water separate until serving. This way, the mint stays bright and the drink remains fizzy. When you are ready to serve, mix them together. Enjoy the same great taste! If you need a substitute for honey or agave, try using maple syrup or coconut sugar. Both will add sweetness without changing the flavor too much. You can also use fruit juice, like orange juice, for a fruity twist. Just remember to start with a small amount and adjust to your taste. Watermelon juice lasts about 2 to 3 days in the fridge. Store it in an airtight container to keep it fresh. Check for signs of spoilage, such as a sour smell or separation. If it looks or smells off, it’s best to toss it out. Fresh juice is always the tastiest! This blog post covered how to make a refreshing watermelon mocktail. You learned about key ingredients like watermelon, mint, and lime juice. The guide included clear steps for blending, muddling, and mixing. I shared tips to enhance flavor and suggested fruit and herb variations. Remember, making this drink can be easy and fun! Use your favorite fruits to customize it. Whether you sip it today or save leftovers for later, you can enjoy a tasty treat any time.](https://mysavedrecipe.com/wp-content/uploads/2025/06/1c26911c-b6f0-4e93-b685-c1fe848e3c85.webp)
Looking for a cool drink that bursts with flavor? The Watermelon Mint Mojito Mocktail is the perfect choice for hot
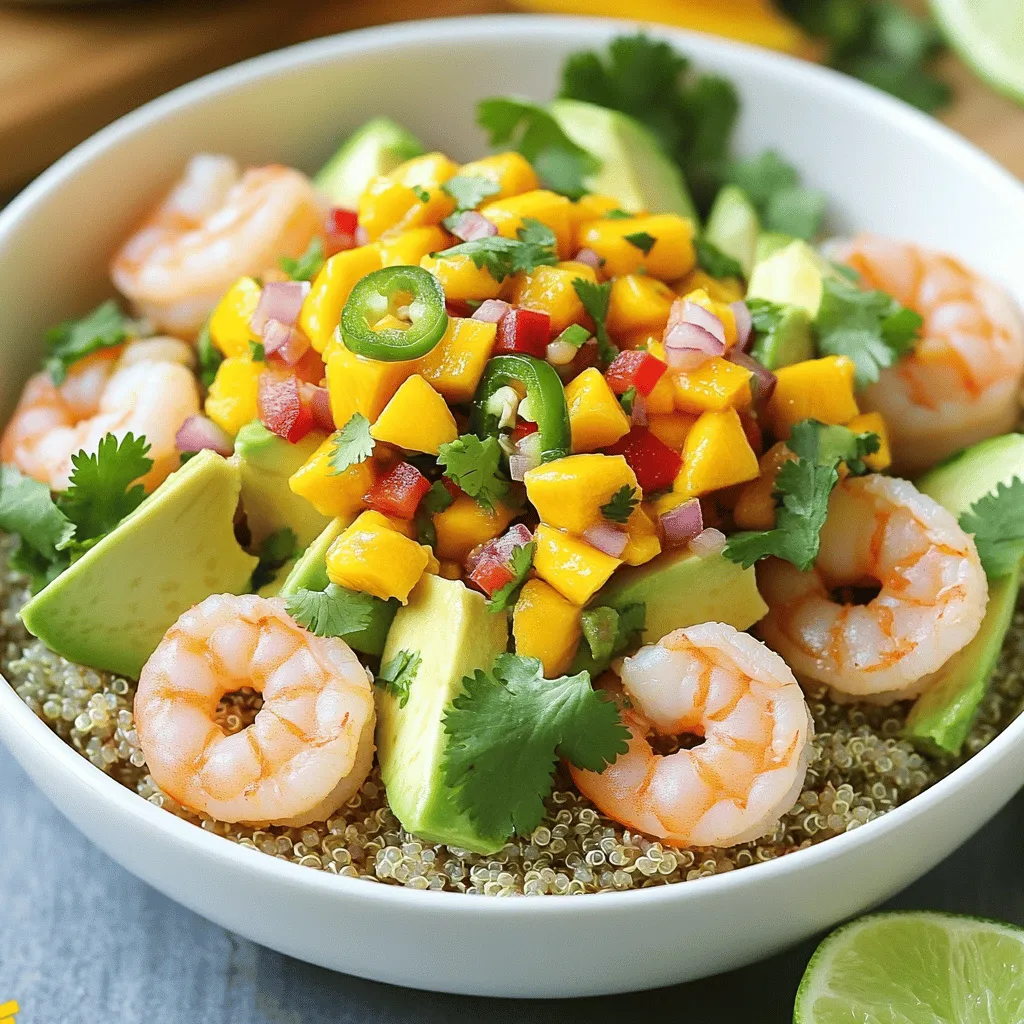
Are you ready to dive into a fresh and tasty dish? My Savory Shrimp and Avocado Bowls with Mango Salsa
