Skip to content
DisclaimerTerms Of UseGDPR PolicyCookie Policy

My Saved Recipe

  • Home
  • Drinks
  • Appetizers
  • Dinner
  • Dessert
  • About
  • Contact
  • Privacy Policy
DisclaimerTerms Of UseGDPR PolicyCookie Policy

Savannah

To make the best zucchini bread, you need some key ingredients. Here’s what you will need: - 2 cups all-purpose flour - 1 teaspoon baking soda - 1/2 teaspoon baking powder - 1 teaspoon ground cinnamon - 1/2 teaspoon nutmeg (optional) - 1/2 teaspoon salt - 3/4 cup granulated sugar - 1/4 cup brown sugar, packed - 1/2 cup vegetable oil - 3 large eggs - 1 teaspoon vanilla extract - 2 cups grated zucchini (about 2 medium zucchinis) - 1/2 cup chopped walnuts or pecans (optional) - 1/2 cup chocolate chips (optional) These ingredients work together to create a soft, moist bread. The zucchini adds moisture without a strong taste. The sugars give it sweetness, while the spices add warmth. You can make this zucchini bread your own by adding extras. Here are some fun ideas: - Chopped nuts: Walnuts or pecans add crunch. - Chocolate chips: These bring sweetness and richness. - Dried fruits: Raisins or cranberries add a chewy texture. - Coconut flakes: Shredded coconut adds a tropical twist. - Spices: Try ginger or allspice for a different flavor. Feel free to mix and match these options to suit your taste. If you need to swap ingredients, here are some easy changes: - Flour: Use whole wheat flour for a nuttier taste. - Oil: Replace vegetable oil with applesauce for a lighter bread. - Sugar: Use honey or maple syrup instead of granulated sugar. - Eggs: You can use flax eggs as a vegan option. These substitutions can change the flavor and texture slightly, but they work well. You can adjust to fit your dietary needs or preferences. For the full recipe, check out the Ultimate Zucchini Bread 🥒. Start by getting your ingredients ready. Gather these items: - 2 cups all-purpose flour - 1 teaspoon baking soda - 1/2 teaspoon baking powder - 1 teaspoon ground cinnamon - 1/2 teaspoon nutmeg (optional) - 1/2 teaspoon salt - 3/4 cup granulated sugar - 1/4 cup brown sugar, packed - 1/2 cup vegetable oil - 3 large eggs - 1 teaspoon vanilla extract - 2 cups grated zucchini (about 2 medium zucchinis) - 1/2 cup chopped walnuts or pecans (optional) - 1/2 cup chocolate chips (optional) Make sure your zucchinis are washed and grated. This gives your bread both flavor and moisture. Preheat your oven to 350°F (175°C). Grease a 9x5-inch loaf pan or line it with parchment paper. In a large bowl, mix the dry ingredients. Whisk together the flour, baking soda, baking powder, cinnamon, nutmeg, and salt. This step is key for even flavor and rising. In another bowl, blend the sugars, vegetable oil, eggs, and vanilla extract. Whisk well until the mix is smooth. Now, add the grated zucchini to this mixture and stir until combined. Carefully add the dry mix to the wet ingredients. Fold gently to combine. Do not overmix; a few lumps are okay. If you want, fold in chopped nuts or chocolate chips for extra texture. Pour the batter into your prepared loaf pan. Smooth the top with a spatula. Place the pan in your preheated oven and bake for 50 to 60 minutes. Check for doneness by inserting a toothpick into the center. If it comes out clean, your bread is ready. Once baked, take the pan out of the oven. Allow the zucchini bread to cool in the pan for about 10 minutes. Then, transfer it to a wire rack to cool completely. Enjoy the wonderful aroma as it cools! One common mistake is using too much water from the zucchini. Always squeeze out the excess moisture. If you don’t, your bread may turn out soggy. Another mistake is overmixing the batter. Mix just until combined. This keeps your bread light and fluffy. Lastly, don't skip greasing your pan. This will help your bread come out easily. To get the best texture, use fresh zucchini. Grate it right before you mix it in. This keeps the moisture just right. Also, consider adding a mix of sugars. Using both granulated and brown sugar adds depth. Brown sugar contributes to a softer crumb. If you want a lighter bread, use cake flour instead of all-purpose flour. You can boost the flavor by adding spices. Cinnamon is a classic choice. Nutmeg gives warmth, too. If you want something different, try adding fresh herbs. Chopped basil or mint can add a surprising twist. A pinch of ginger creates a warm spice note. Don’t forget to taste the batter. Adjust the spices to suit your liking. You can find the Full Recipe to guide you through these delicious steps. {{image_2}} To make a gluten-free zucchini bread, swap the all-purpose flour for a gluten-free blend. Look for a blend that contains xanthan gum. This will help the bread rise and hold together. Use the same amount of gluten-free flour as the recipe calls for. Your bread will still be moist and tasty! If you want to make vegan zucchini bread, you can replace eggs with flax eggs. To make a flax egg, mix 1 tablespoon of ground flaxseed with 2.5 tablespoons of water. Let it sit for a few minutes until it thickens. You can also use applesauce or mashed bananas instead of eggs. For the oil, use melted coconut oil or unsweetened applesauce for a lighter option! Zucchini bread is a great base for flavor twists! Consider adding spices like cardamom or ginger for a warm touch. You can mix in nuts like almonds or pecans for crunch. For a sweet twist, add dried fruits like raisins or cranberries. Got a sweet tooth? Toss in chocolate chips for a rich flavor! You can even swirl in peanut butter or Nutella for a fun surprise. Explore these ideas in your next batch for unique tastes! To keep your zucchini bread fresh, store it at room temperature. Use an airtight container or wrap it in plastic wrap. This method helps retain moisture and flavor. If you plan to eat it within a few days, this works great. For longer storage, consider freezing. To freeze zucchini bread, first let it cool completely. Wrap it tightly in plastic wrap, then in aluminum foil. This double layer helps prevent freezer burn. You can store it in the freezer for up to three months. When you’re ready to enjoy it, just thaw it in the fridge overnight. To reheat zucchini bread, preheat your oven to 350°F (175°C). Place the bread in the oven for about 10-15 minutes, or until warm. If you want it softer, cover it with foil. You can also use a microwave. Heat a slice for 15-20 seconds on medium power. Pair it with some cream cheese for a tasty treat! For the full recipe, check out the Ultimate Zucchini Bread. The secret to moist zucchini bread lies in the moisture of the zucchini. Use fresh, grated zucchini in your recipe. Make sure to squeeze out excess water before adding it to the batter. This helps keep the bread light and fluffy. Another tip is to use oil instead of butter. Oil keeps the bread moist longer. Adding a bit of yogurt or sour cream can also help boost moisture. Yes, you can use yellow squash instead of zucchini. They have a similar texture and flavor. The bread will still taste great. Just like zucchini, grate the yellow squash and remove excess water. This swap works well for those who want to try something different. You may notice a slight change in color, but the taste remains delicious. To know when your zucchini bread is done, insert a toothpick into the center. If it comes out clean or with a few crumbs, the bread is ready. If the toothpick has wet batter, it needs more time. Bake it for another 5-10 minutes. Keep an eye on the top; it should be golden brown. Trust your senses, and your bread will be perfect! For the complete recipe, be sure to check the Ultimate Zucchini Bread 🥒 section. You’ve learned how to make the best zucchini bread. We covered key ingredients, step-by-step instructions, and useful tips. I shared ingredient swaps and fun variations, like gluten-free or vegan options. You now know how to store, freeze, and reheat your bread as well. Making zucchini bread can be easy and fun. Experiment with flavors to find your favorite. Enjoy baking!

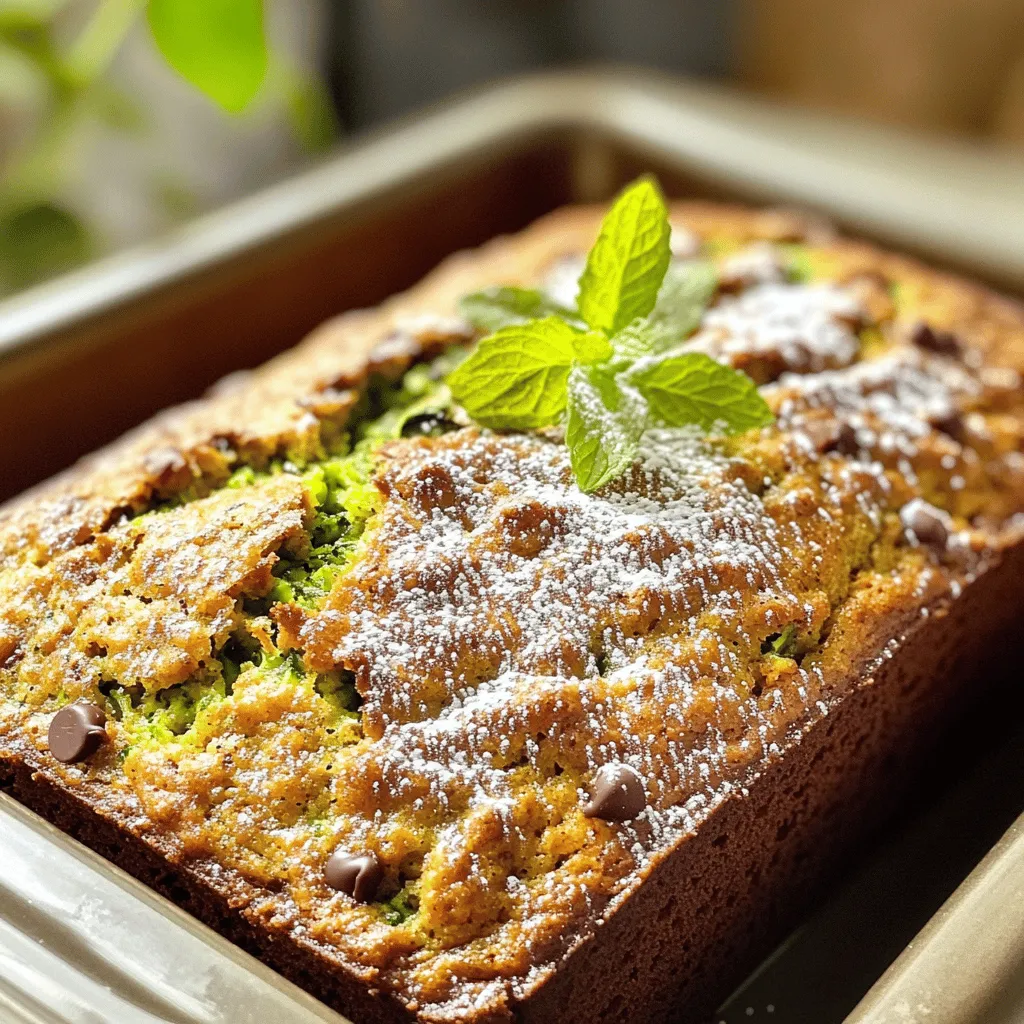
Best Zucchini Bread Recipe Simple and Delicious Guide

Are you ready to bake the best zucchini bread? In this simple and delicious guide, I’ll share my favorite recipe
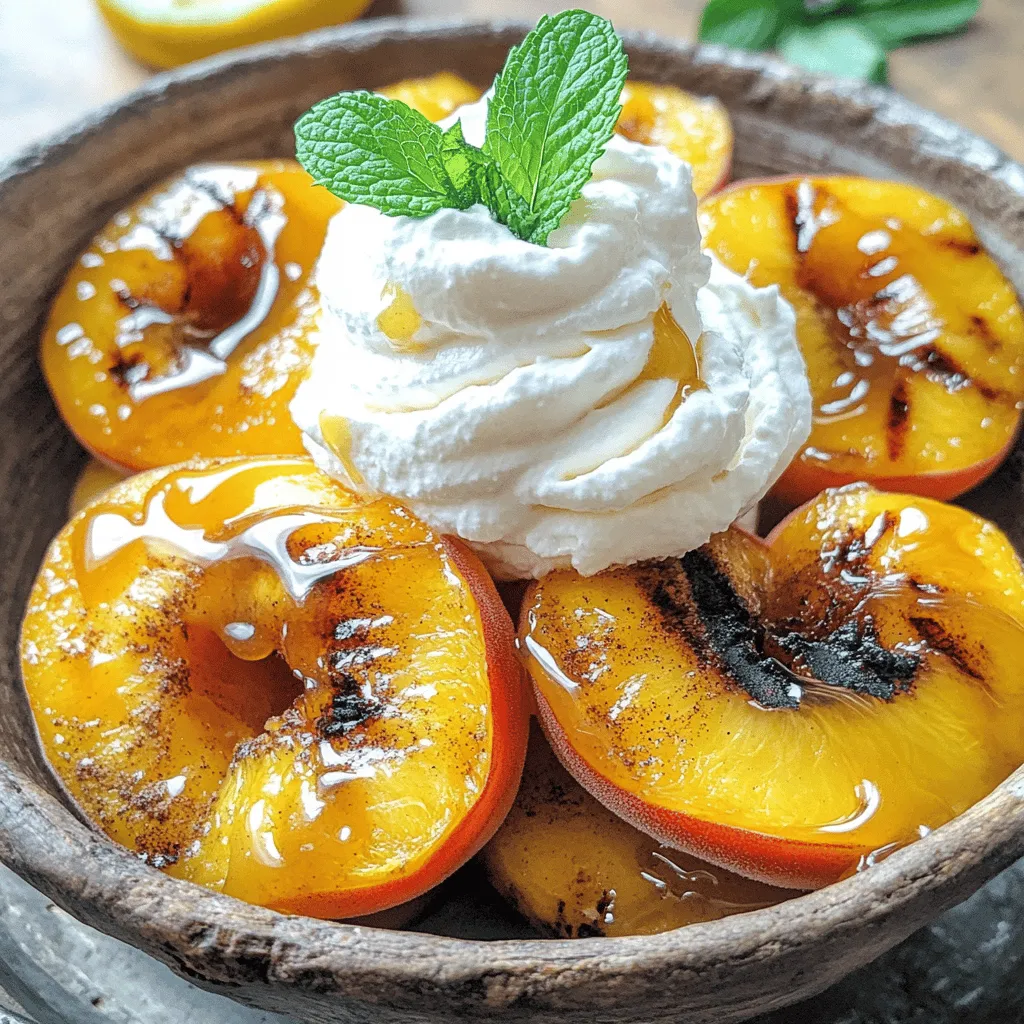
- 4 ripe peaches, peeled and sliced - 1 cup fresh blueberries - 1/2 cup sugar (adjust based on sweet peachiness) - 1 tablespoon lemon juice - 1 teaspoon vanilla extract - 1 teaspoon cinnamon - 1 cup all-purpose flour - 1 tablespoon baking powder - 1/2 teaspoon salt - 1/3 cup unsalted butter, melted - 3/4 cup milk - 1/2 cup brown sugar for topping - 1 teaspoon nutmeg - You can use frozen or canned peaches if fresh ones are not available. - Try raspberries or cherries to mix up the flavors. Using ripe peaches is key. They add a sweet and juicy taste. The bourbon gives the dish depth and warmth. It enhances the sweet flavors and adds a hint of spice. Just a splash will do. This drink adds a rich note that makes the cobbler stand out. For the best results, choose high-quality bourbon. You’ll love how it pairs with the fruit! For the full recipe, check out Peach Paradise Cobbler. - Preheat your oven to 350°F (175°C). - Grease an 8x8 inch baking dish with butter or cooking spray. In a large bowl, combine: - 4 ripe peaches, peeled and sliced - 1 cup fresh blueberries - 1/2 cup sugar (adjust based on sweet peachiness) - 1 tablespoon lemon juice - 1 teaspoon vanilla extract - 1 teaspoon cinnamon Gently toss the fruit. This helps the flavors blend. Let the mixture sit for about 10 minutes. This step allows the juices to come out and the fruits to sweeten. In a separate bowl, whisk together: - 1 cup all-purpose flour - 1 tablespoon baking powder - 1/2 teaspoon salt After mixing the dry ingredients, add: - 1/3 cup unsalted butter, melted - 3/4 cup milk Stir these until just combined. It's okay if some lumps remain. Overmixing can make the cobbler tough. Pour the batter evenly into your prepared baking dish. Next, spoon the peach and blueberry mixture on top. Allow some fruit to sink into the batter while leaving some on top. This makes for a nice presentation. In a small bowl, mix: - 1/2 cup brown sugar - 1 teaspoon nutmeg Sprinkle this over the fruit layer for added sweetness and spice. Bake in the preheated oven for about 45-50 minutes. Check for doneness by inserting a toothpick in the center. It should come out clean. Once baked, let it cool for about 10 minutes before serving. This helps the cobbler set up and makes it easier to cut. Enjoy your delicious Bourbon Peach Cobbler! For the complete recipe, check the Full Recipe. Add about 1 to 2 tablespoons of bourbon to your peach mix. This small amount brings a deep, warm flavor. Bourbon pairs well with spices like cinnamon and nutmeg. You can also try adding vanilla or almond extract for more depth. Serve your cobbler warm with a scoop of vanilla ice cream. Drizzle caramel sauce over the top for extra sweetness. Garnish with fresh mint leaves for a pop of color and freshness. This makes your dessert look beautiful and inviting. One common mistake is overmixing the batter. This can make your cobbler tough. Mix just until combined; it’s okay if there are lumps. Another mistake is using unripe or underripe peaches. Make sure your peaches are juicy and sweet for the best flavor. {{image_2}} You can switch up the fruits in this cobbler. Try using apples with warm cinnamon. This apple-cinnamon combo gives a cozy feel. You can also use seasonal berries. Blueberries, raspberries, or strawberries add a burst of color and flavor. Mixing different fruits makes it fun and fresh! If you need a gluten-free version, use gluten-free flour. It works well in this recipe. Look for a blend that includes xanthan gum for the best texture. You may need to bake it a bit longer. Keep an eye on it to ensure it stays moist and delicious. For a vegan treat, swap the butter and milk for plant-based options. Coconut oil or vegan butter works great. Use almond milk or oat milk for a creamy base. For sweeteners, maple syrup or agave nectar makes a nice touch. These changes keep the taste rich and the dessert kind to all diets. Feel free to explore the [Full Recipe] for more ideas! To keep your Bourbon Peach Cobbler fresh, let it cool first. Then, cover it tightly with plastic wrap. You can also use aluminum foil. Store it in the refrigerator. It stays good for up to three days. When you're ready to enjoy your cobbler again, try reheating it in the oven. Preheat your oven to 350°F (175°C). Place the cobbler in a baking dish. Cover it with foil to keep it moist. Heat for about 15-20 minutes. You can also use a microwave. Just heat it in short bursts to avoid drying it out. Serve it warm with a scoop of ice cream for a treat! You can freeze the cobbler if you want to save some for later. If you freeze it before baking, wrap it well in plastic wrap and then foil. Freeze for up to three months. When you’re ready to bake, no need to thaw! Just bake straight from the freezer, adding a few extra minutes to the time. If you freeze it after baking, let it cool completely first. Thaw it in the fridge overnight before reheating. Enjoy your cobbler anytime with these easy steps! If you want to swap out peaches, many fruits work well. You can use ripe nectarines for a similar taste. Plums add a nice touch with their tartness. Cherries can give a sweet and juicy flavor. Apples are also a great choice, especially if you like a firmer texture. Experimenting with berries like blueberries or raspberries can add a fun twist too. Just remember to adjust the sugar based on the sweetness of the fruit you choose. Yes, you can make this cobbler ahead of time. I recommend preparing the filling and batter separately. Store the filling in the fridge for up to two days. You can also mix the batter and keep it in the fridge for a short time. When you’re ready to bake, just combine and pour into your dish. This way, the flavors will meld and taste even better! You’ll know your cobbler is done when the top turns golden brown. A toothpick inserted into the center should come out clean. If you see wet batter, it needs more time. Keep an eye on it during the last few minutes of baking. If the edges look brown, but the center isn’t done, you can cover it loosely with foil. This helps the center cook without burning the edges. Adding nuts can boost flavor and texture! Walnuts or pecans work great in this cobbler. Chop them coarsely and mix them in with the fruit. You can also sprinkle some on top before baking. The nuts will toast and add a nice crunch. Just be careful if you are serving guests with nut allergies. Making a Bourbon Peach Cobbler is simple and rewarding. We covered key ingredients, preparation steps, and tips for the best flavor. You can mix and match fruits to fit your taste. Remember, ripe peaches and a hint of bourbon can elevate this dish. Store leftovers properly for fresh taste later. With some care, your cobbler will impress friends and family. Enjoy exploring variations and making this recipe your own!

Bourbon Peach Cobbler Delightfully Sweet Dessert Treat

If you’re craving a dessert that’s both comforting and indulgent, look no further than Bourbon Peach Cobbler. This sweet treat

- 4 cups of fresh pickling cucumbers - 1 cup granulated sugar - 1 cup apple cider vinegar - 1 teaspoon pickling salt To make the best refrigerator sweet pickles, fresh ingredients are key. I always choose pickling cucumbers because they stay crisp. These cucumbers have a firm texture and a nice flavor. Granulated sugar balances the tang of the apple cider vinegar. The vinegar adds a perfect zing and helps preserve the pickles. Pickling salt is a must. It enhances the flavor without making the pickles too salty. - 1 teaspoon mustard seeds - 1 teaspoon celery seeds - ½ teaspoon turmeric powder - ½ teaspoon black peppercorns The spices add depth to the pickles. Mustard seeds give a slight crunch and a tangy taste. Celery seeds add a hint of earthiness. Turmeric powder not only adds color but also a warm flavor. Black peppercorns lend a touch of spice without being overpowering. Together, these spices create a flavor profile that is both bright and rich. - 1 small red onion, thinly sliced - 2 cloves garlic, crushed For extra taste, I include sliced red onion. It adds sweetness and a beautiful color to the pickles. Crushed garlic provides a savory note that complements the sweetness. Both ingredients work well together and enhance the overall taste of the pickles. When you take a bite, the mix of flavors bursts in your mouth. You get a sweet, tangy, spicy, and savory taste all at once. You’ll find the full recipe linked above. This combination of ingredients makes for a delightful jar of sweet pickles. Start by slicing your fresh pickling cucumbers into rounds. I like to use about 4 cups for this recipe. Next, take a small red onion and slice it thinly. In a large bowl, combine the cucumber slices and onion. Sprinkle 1 teaspoon of pickling salt over the mix. Toss everything well to coat the pieces evenly. Let it sit for about 30 minutes. This step helps draw out extra moisture and makes your pickles crisp. Now, let’s make the brine! In a saucepan, combine 1 cup of granulated sugar, 1 cup of apple cider vinegar, and your spices. You'll need 1 teaspoon each of mustard seeds and celery seeds, along with ½ teaspoon of turmeric powder and ½ teaspoon of black peppercorns. Add 2 crushed garlic cloves for extra flavor. Heat this mixture over medium heat. Stir until the sugar completely dissolves and the mixture starts to simmer. This process infuses all the flavors into the brine. Once your brine is ready, let it cool for about 10 minutes. After cooling, pour the brine over the cucumbers and onions. Make sure every slice is submerged in the liquid. Next, pack the cucumber mix into clean, airtight jars. You can layer them if needed. Seal the jars tightly and place them in the refrigerator. For the best taste, let the pickles marinate for at least 24 hours, but a week is even better! You can find the full recipe for these delicious pickles above. To make sure your pickles stay crisp, start with fresh pickling cucumbers. The fresher, the better! They have a firm texture that gives your pickles a nice crunch. Next, do not skip the salting step. Salting draws out excess moisture from the cucumbers. This keeps them crunchy when you add the brine. For the best taste, let your pickles marinate for a week. This allows the flavors to blend well. If you want to get creative, try adding fresh herbs. Dill or basil can give your pickles a new flavor twist. Always use clean, sterilized jars when canning. This keeps harmful germs away from your food. Make sure the jars are sealed tightly before refrigeration. A tight seal prevents air from getting in, which helps your pickles stay fresh longer. For the full recipe, check out the details above! {{image_2}} You can easily change up the flavor of your sweet pickles. Add hot red pepper flakes for a spicier kick. This will give your pickles some heat and make them exciting. You can also try dill seeds for a fresh, herbaceous note. Dill seeds add a nice twist and bring a bright flavor to your pickles. If you want to switch things up, consider using different sweeteners. Substitute sugar with honey or agave syrup. These options will bring a new depth to your sweet pickles. You can also explore using flavored vinegar. Different vinegars can change the taste profile completely, making your pickles unique. Refrigerator sweet pickles pair well with many dishes. They make a perfect side for sandwiches or grilled meats. Their sweetness balances the savory flavors of your main dish. You can also serve them on charcuterie boards. They add color and flavor, making your board more appealing. For the full recipe, check out my complete guide to making these delicious pickles! Refrigerator sweet pickles taste best within 2-3 months. After that time, their flavor and crunch may fade. Always check for changes in color or smell. If they look different or smell off, it's best to toss them. To keep your pickles fresh, seal the jars tightly. This action helps prevent air from getting in. Store them away from strong-smelling foods, like onions or garlic. Strong odors can seep into the jars and affect the pickles' taste. Freezing refrigerator sweet pickles is not a good idea. The texture changes when they thaw. This change can make them mushy and less enjoyable. Stick to storing them in the fridge for the best results. Typically, refrigerator sweet pickles are best enjoyed within 2-3 months when stored properly. After that, they may lose their crispness and flavor. Yes, you can use regular cucumbers. However, keep in mind that the texture may be softer. Pickling cucumbers have a firmer texture, which makes them ideal for pickling. You can spot bad pickles by checking for off smells, mold, or unusual discoloration. If you see any of these signs, it’s best to toss them. Always trust your senses when it comes to food safety. Refrigerator sweet pickles are easy to make with fresh cucumbers, sugar, and vinegar. The brine and spices enhance their flavor. Remember to let them marinate for a week for the best taste. Use clean jars to keep them fresh. You can even try adding spices or different sweeteners for unique twists. These pickles last 2-3 months in the fridge. Now, you can enjoy your homemade pickles on sandwiches or charcuterie boards. They add fun flavor to any meal. Start your pickling adventure today!

Refrigerator Sweet Pickles Easy and Delicious Recipe

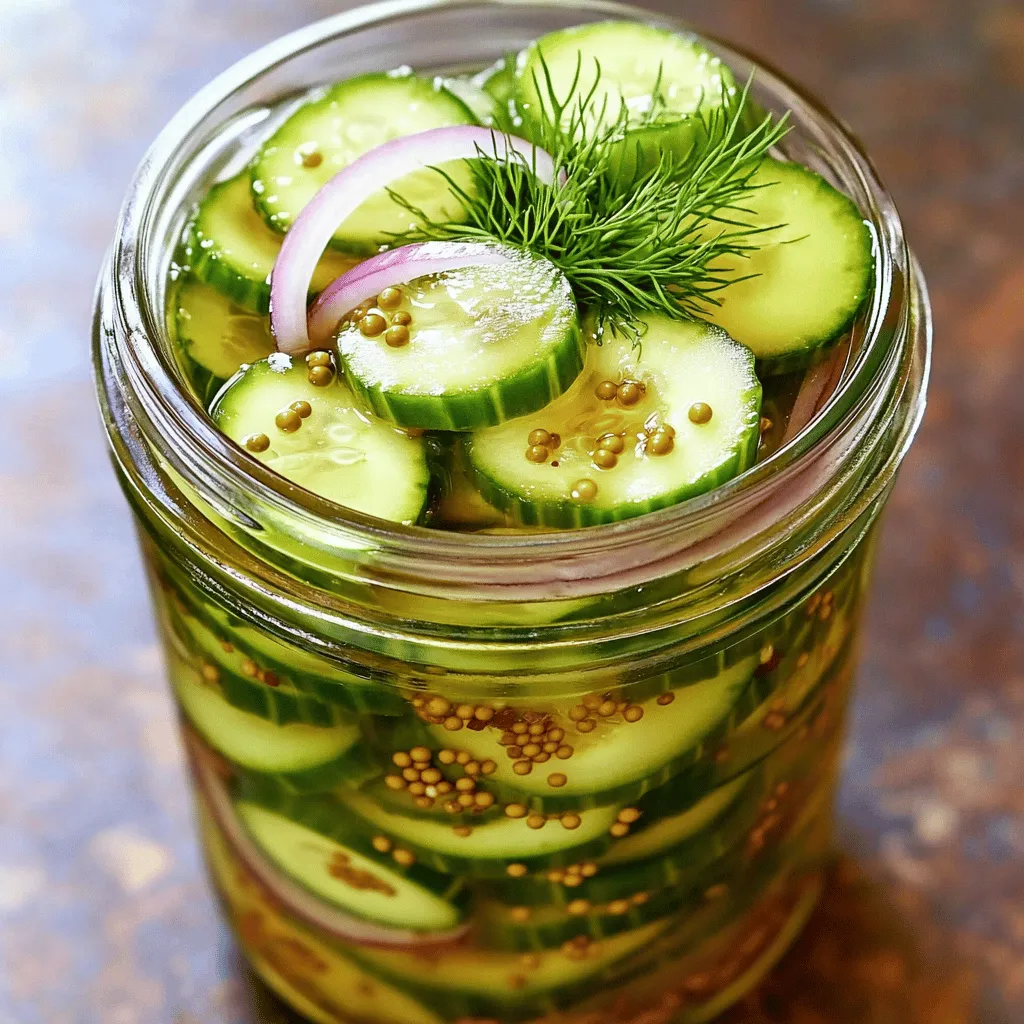
Looking for a quick and tasty addition to your meals? This easy Refrigerator Sweet Pickles recipe is perfect for you!

- 3 medium yellow squashes, sliced into thin rounds - 1 tablespoon olive oil - 1 small red onion, thinly sliced - 2 cloves garlic, minced - 1 bell pepper (red, yellow, or orange), diced - 1 teaspoon fresh thyme (or ½ teaspoon dried thyme) - 1 teaspoon lemon zest - Optional: ¼ cup feta cheese, crumbled When making sautéed yellow squash, you need fresh and bright ingredients. The yellow squash is the star. Its soft texture and mild taste make it easy to enjoy. I like to slice the squash into thin rounds. This helps it cook evenly and quickly. Using olive oil is key. It adds flavor and helps the squash brown nicely. A small red onion gives sweetness and depth. Minced garlic adds a punch of flavor. You can choose any bell pepper you like. The color adds fun to your dish. Fresh thyme brings a lovely herbal note. If you have dried thyme, that works too. Lemon zest brightens the dish and makes it pop. For a tasty twist, consider adding feta cheese. It brings a nice creaminess and salty taste. With these ingredients, you can create a simple yet tasty meal. Check out the Full Recipe for more details! To start, gather your ingredients. You'll need to slice the yellow squash and onion. Cut the squash into thin rounds. Aim for even slices. This helps them cook evenly. Next, for the onion, slice it thinly as well. This will help it soften fast. Mince the garlic finely. You want small pieces to spread the flavor well. Dice the bell pepper into small bits. I like using red, yellow, or orange for color. First, heat the olive oil in a large skillet over medium heat. Add the sliced onion. Cook it for about 2-3 minutes. You want it to soften but not brown. Now, stir in the minced garlic and diced bell pepper. Cook these for another 2 minutes. You’ll smell a nice aroma. Then, add the sliced yellow squash. Sprinkle in the fresh thyme, lemon zest, salt, and pepper. Stir everything together. Sauté for about 5-7 minutes. Keep stirring occasionally. You want the squash to be tender but still a bit crunchy. If you like, sprinkle crumbled feta cheese over the top. This adds a nice flavor. Remove the skillet from heat. Transfer the sautéed yellow squash to a serving dish. Serve it warm and enjoy this simple and flavorful dish. For the complete recipe, check out the Full Recipe. To sauté yellow squash well, use medium heat. This helps cook the squash without burning it. If the heat is too high, the outside gets charred while the inside stays raw. Stir the squash often. Frequent stirring ensures even cooking and keeps it from sticking to the pan. Fresh herbs add bright flavor. I love using fresh thyme in my sautéed squash. Dried herbs work too, but fresh gives a stronger taste. For a stunning presentation, serve the squash on a colorful platter. Garnish it with fresh thyme sprigs and a sprinkle of lemon zest. This makes the dish pop and look appealing. Yellow squash is packed with vitamins. It has vitamin C, vitamin A, and potassium. These nutrients help your body stay healthy. Eating yellow squash can improve digestion and support heart health. Adding it to your meals boosts your vegetable intake and keeps your diet balanced. {{image_2}} You can switch out yellow squash for zucchini. Zucchini has a similar taste and texture. You can also use other veggies like bell peppers or carrots. If you want a vegan twist, try using tofu or nutritional yeast instead of feta cheese. These options give you great flavor without dairy. To boost the taste, try adding spices like cumin or paprika. They bring warmth and depth. Fresh herbs like basil or parsley also work well. For a complete meal, pair the sautéed squash with chicken, shrimp, or even beans. This adds protein and makes it more filling. You can turn sautéed yellow squash into a casserole. Just layer it with cheese and breadcrumbs, then bake until bubbly. Another fun idea is to mix the sautéed squash with pasta. Toss it with olive oil and your favorite sauce for a quick meal. This makes a perfect dish for busy nights. For the full recipe, check out Sautéed Yellow Squash Delight. To keep your sautéed yellow squash fresh, store it in an airtight container. This prevents moisture loss and keeps it tasty. Place it in the fridge within two hours of cooking. It should stay good for about three to four days. If you want to freeze your sautéed yellow squash, here’s what to do. First, let it cool completely. Then, put it in freezer-safe bags or containers. Make sure to remove as much air as possible. It can last up to three months in the freezer. When you’re ready to eat it, thaw it overnight in the fridge. To reheat your sautéed yellow squash, you have two great options. The stovetop method helps keep its crunchy texture. Just add a splash of water to a skillet and warm it over medium heat. Stir it often until it’s heated through. If you prefer the microwave, place the squash in a bowl and cover it. Heat in short bursts of 30 seconds, stirring in between. This method is quick but may soften the squash a bit more. Choose the method that fits your time and texture needs. For the full recipe, check out the Sautéed Yellow Squash Delight section! To cut yellow squash for sautéing, start by washing the squash. Then, trim both ends with a knife. Place it flat on a cutting board for safety. Slice the squash into thin rounds, about ¼ inch thick. This size cooks evenly and enhances the texture. For a fun twist, try cutting it into half-moons or matchsticks. These shapes can add visual appeal to your dish. You should sauté yellow squash for about 5 to 7 minutes. This time allows the squash to become tender while keeping a slight crunch. Stir occasionally to ensure even cooking. If you like a softer texture, you can cook it a bit longer. Just watch closely to avoid overcooking. You can use frozen squash, but it may change the texture and taste. Frozen squash often becomes mushy when cooked. Fresh squash gives a crisp bite and vibrant flavor. If you use frozen, thaw it first and drain excess water. This helps maintain some texture for your sautéed dish. In summary, sautéed yellow squash is simple and tasty. With just three squashes, some olive oil, and a few other ingredients, you can make a great dish. Follow the steps to get the texture just right. Use the tips for flavor and storage to enhance your experience. Remember, you can adapt the recipe with other veggies or variations. Enjoy making this healthy meal, and share it with friends and family for added fun!

Sautéed Yellow Squash Simple and Flavorful Dish

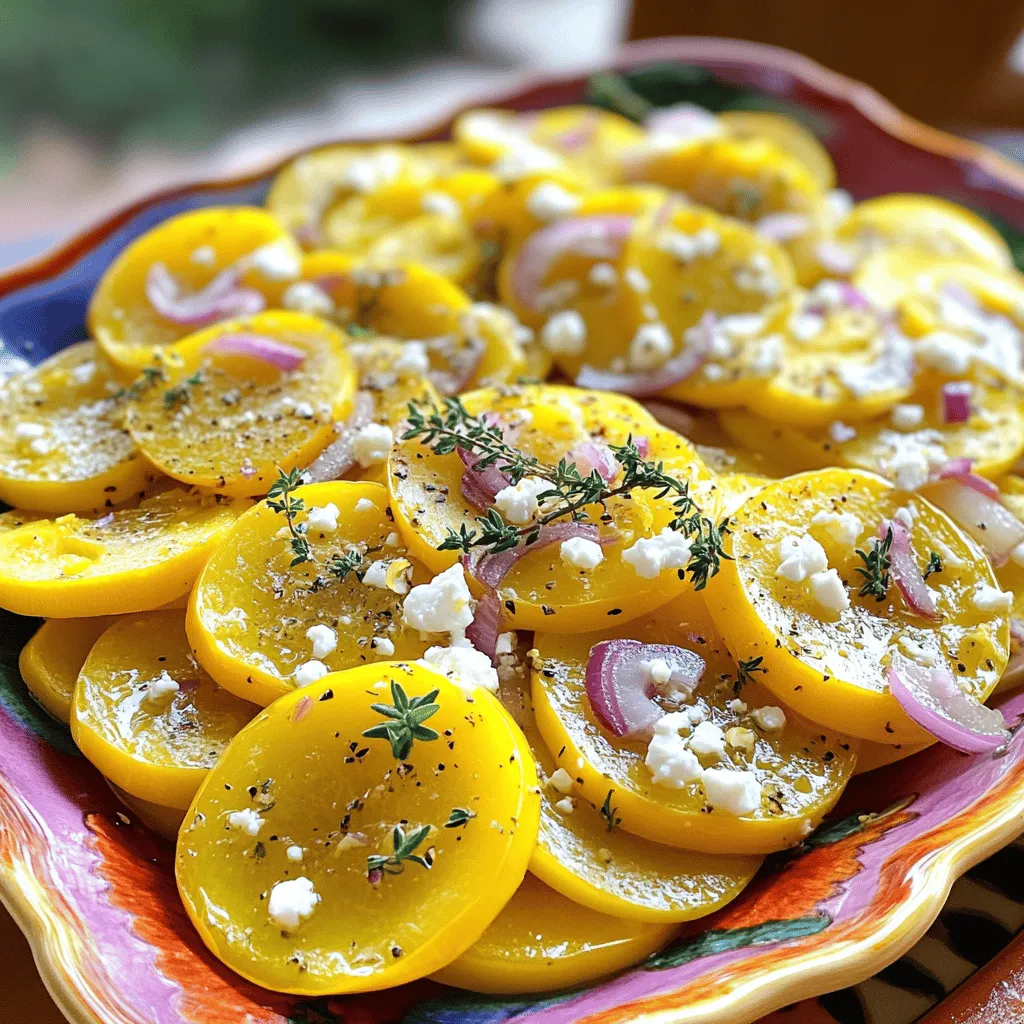
Are you ready to spice up your meals with a vibrant and simple dish? Sautéed yellow squash is both easy

- 3 medium yellow squash, sliced into thin rounds - 1 cup sugar - 1 cup apple cider vinegar - 1/2 cup water - 1 tablespoon salt - 1 teaspoon mustard seeds - 1 teaspoon black peppercorns - 1 teaspoon turmeric powder - 1 teaspoon crushed red pepper flakes - 1 teaspoon garlic powder - 1 small onion, thinly sliced - Fresh herbs like dill or cilantro Gathering the right ingredients is key to making great sweet yellow squash pickles. Start with fresh yellow squash. Look for ones that are firm and bright in color. The sugar and apple cider vinegar are what give this recipe its sweet and tangy kick. The water helps balance the brine. The spices add depth. Salt draws moisture from the squash, making them crisp. Mustard seeds, black peppercorns, and turmeric bring unique flavors. Crushed red pepper adds a touch of heat, while garlic powder gives a savory note. Sliced onions make the pickles even better. For garnishes, fresh herbs like dill or cilantro can add a lovely touch. These herbs boost flavor and look pretty too. Using high-quality ingredients ensures your pickles taste amazing. You can find the full recipe above if you want to dive right into making these delicious pickles! - Combine 3 medium yellow squash slices with 1 tablespoon of salt. - Let the squash sit for 1 hour to draw out moisture. - After an hour, rinse the squash slices under cold water. - Drain the slices well to remove excess salt. - In a medium saucepan, combine: - 1 cup sugar - 1 cup apple cider vinegar - 1/2 cup water - 1 teaspoon mustard seeds - 1 teaspoon black peppercorns - 1 teaspoon turmeric powder - 1 teaspoon crushed red pepper flakes - 1 teaspoon garlic powder - Bring this mix to a gentle boil over medium heat. - Stir until the sugar dissolves completely. - Reduce the heat and add 1 small thinly sliced onion. - Let it simmer for about 5 minutes to blend the flavors. - Remove the saucepan from heat and add the drained squash slices. - Mix well to coat all the squash with the hot brine. - Pack the mixture into clean, sterilized jars. - Make sure to include onions and spices in each jar. - Pour the hot brine over the squash until fully submerged. - Leave 1/2 inch of headspace at the top of each jar. - Seal the jars with lids and cool to room temperature. - Refrigerate the jars and let the pickles sit for at least 24 hours before serving. For the complete recipe, refer to the [Full Recipe]. - Ensure jars are sterilized properly. This keeps your pickles fresh and safe. - Use fresh, high-quality ingredients. Fresh squash gives the best flavor and crunch. - Adjust sugar for sweetness level. Taste the brine, and add more sugar if needed. - Modify spice amounts to taste. If you love heat, add more crushed red pepper flakes. - Serve pickles in decorative jars. A pretty jar makes your pickles look even better. - Garnish with fresh herbs for visual appeal. Fresh dill or cilantro adds color and flavor. These tips will help you create the best sweet yellow squash pickles. For more details, check out the Full Recipe. {{image_2}} For a sweet and spicy twist, consider adding more crushed red pepper flakes. This simple addition ramps up the heat. If you want even more fire, toss in some jalapeños. Slice them thin and mix them into the squash before packing the jars. This variation creates a fun kick that pairs well with rich meats. Another delightful option is to infuse your pickles with herbs. Fresh dill or rosemary adds a fresh taste to the brine. You can toss in a few sprigs during the cooking process. Don’t be afraid to experiment with other herbs too! Thyme, tarragon, or even basil can bring new flavors to your pickles. You can also try pickling different vegetables. Other summer squashes work great, and cucumbers are a classic choice. Consider blending the squash with colorful carrots or sweet bell peppers. This adds a beautiful look and varied taste to your jars. Mixing vegetables lets you create unique flavors that are fun and delicious. For more ideas, check out the Full Recipe. To keep your sweet yellow squash pickles fresh, store them in the fridge. This helps maintain their crunch and flavor. After making them, let your pickles sit for at least 24 hours. This resting time allows the flavors to blend nicely. Homemade pickles usually last about 2 to 3 weeks in the fridge. Look for signs of spoilage, such as off smells or mold. If the pickles seem slimy or the liquid looks cloudy, it's best to toss them. If you want to keep your pickles longer, consider canning. Use proper canning methods for safe long-term storage. Before canning, make sure your jars are clean and sterilized. This helps prevent bacteria growth and keeps your pickles safe to eat. Sweet yellow squash pickles last about 2 months in the fridge. If you can them properly, they can last up to a year on the shelf. Always check for signs of spoilage before eating. Yes, you can use other types of vinegar. White vinegar works well and gives a clean taste. Red wine vinegar adds a bit of depth and color. Experiment and see what you like best. You can serve these pickles in many ways. They pair nicely with sandwiches, burgers, or as a side for grilled meats. For a fun twist, add them to tacos or salads. A good serving size is about 1/4 cup per person. These pickles are great for picnics and parties. You can adjust the sweetness easily. Add more sugar for a sweeter taste or cut back for less sweetness. If you want a sugar substitute, try honey or agave syrup. Just remember to adjust the liquid in the brine. In this guide, we covered how to make sweet yellow squash pickles. We discussed the key ingredients, flavor tips, and the step-by-step process to pickle squash properly. Remember, adjusting sweetness and spice makes the pickles uniquely yours. Don't forget to store them safely for the best flavor. Enjoy your pickles as a tasty side or snack. Making them adds fun to your kitchen, and you can share them with friends! Happy pickling!

Sweet Yellow Squash Pickles Flavorful and Easy Recipe

If you love tangy, sweet flavors, you’re in for a treat! I’m excited to share my easy recipe for Sweet

To make tangy pickled vegetables, you'll need: - 2 cups carrots, julienned - 2 cups cucumbers, sliced - 1 cup radishes, thinly sliced - 1 cup red bell pepper, sliced - 1 cup white vinegar - 1 cup water - 3 tablespoons sugar - 1 tablespoon salt - 1 teaspoon mustard seeds - 1 teaspoon coriander seeds - 1 teaspoon black peppercorns - 2 cloves garlic, minced You can mix it up with these options: - Fresh dill sprigs for garnish - Other veggies like green beans or cauliflower - Sliced jalapeños for heat - A splash of lemon juice for extra tang Having the right tools makes pickling easy: - Medium saucepan for heating the pickling liquid - Sharp knife and cutting board for prepping veggies - Clean glass jar or jars for storing - Measuring cups and spoons for accuracy - A spoon for layering and packing the vegetables With these ingredients and tools, you're all set to create your tangy pickled vegetables. Follow the Full Recipe for the complete process! Start by gathering your ingredients. In a medium saucepan, mix the vinegar, water, sugar, salt, mustard seeds, coriander seeds, and black peppercorns. Heat the mixture over medium heat. Stir until the sugar and salt dissolve. Once it boils, remove the pot from heat. Let it cool for about 10 minutes. This cooling step helps the flavors blend nicely. While the pickling liquid cools, prepare your vegetables. I love using fresh carrots, cucumbers, radishes, and red bell peppers. First, julienne the carrots. Slice the cucumbers, radishes, and red bell pepper into thin pieces. Aim for uniform sizes to ensure even pickling. This step makes the vegetables look appealing and ensures they soak up the pickling liquid well. Now, it’s time to layer the vegetables in a clean glass jar. If you like, you can use multiple jars for individual servings. Start with a layer of carrots, followed by cucumbers, radishes, and peppers. Add minced garlic between the layers for extra taste. Once you fill the jar, pour the cooled pickling liquid over the vegetables. Make sure they are fully submerged. Press down gently to remove any air bubbles. Seal the jar with a lid. Let it cool to room temperature before placing it in the fridge. For the best flavor, refrigerate for at least 24 hours. Your tangy pickled vegetables are now ready to enjoy! Check out the Full Recipe for more details. To get that tangy taste, use fresh ingredients. Fresh vegetables make a big difference. The balance of vinegar and sugar is key. For a stronger tang, add more vinegar. If you want it sweeter, increase the sugar a bit. Experiment to find your perfect mix! Always start with clean jars to avoid spoilage. Make sure your vegetables are cut evenly. This helps them pickle evenly. Layer the veggies tightly in the jar. This keeps them submerged in the liquid. The pickling liquid should cover all the veggies fully. This ensures they soak up all the flavors. Don't skip the cooling step for the pickling liquid. Pouring hot liquid on the veggies can make them limp. Use a sharp knife when cutting vegetables. This helps to keep their shape. Lastly, remember to wait at least 24 hours before tasting. This time allows the flavors to blend well. For the full recipe, check out Tangy Pickled Vegetables. {{image_2}} You can use many types of vegetables for pickling. Try green beans, cauliflower, or even zucchini. Each veggie brings its own taste and crunch. For a colorful mix, combine yellow squash and purple cabbage. You can also use leftover veggies in your fridge. Just remember to cut them into similar sizes for even pickling. Adding spices can make your pickled veggies even better. Try adding red pepper flakes for heat. If you love sweet flavors, add a few slices of ginger. You can also use fresh herbs like thyme or rosemary. Experimenting with spices lets you find your favorite flavor. Just be careful not to overdo it; too many spices can clash. Serving pickled vegetables can be fun and creative. Use them as a topping for tacos or sandwiches. They make a great side for grilled meats. You can also add them to salads for a zing. For a unique appetizer, serve them with cheese and crackers. The bright colors and tangy flavor will impress your guests. For the full recipe, check the other sections! Store your tangy pickled vegetables in clean glass jars. Make sure the jars have tight lids. Keep them in the refrigerator right after you make them. This helps keep them fresh and crisp. Always ensure the vegetables are submerged in the pickling liquid. If they float, press them down gently. Your pickled vegetables will stay good for up to two weeks in the fridge. After this time, the taste may change. They might become softer. For the best flavor, eat them within the first week. Check your pickled vegetables often. Look for any changes in color or texture. If you see mold or an off smell, that means they are spoiled. Do not eat them if you notice these signs. Always trust your senses; they guide you well in the kitchen! Yes, you can use other vinegars. Apple cider vinegar adds a fruity flavor. Rice vinegar gives a milder taste. White wine vinegar provides a nice balance. Experimenting with different vinegars can change the flavor of your pickled vegetables. Just keep in mind that the acidity level should be similar for safe pickling. Pickled vegetables can be healthy. They are low in calories and high in nutrients. You get vitamins from the veggies, and they can aid digestion. The fermentation process can also increase probiotics. However, watch out for the salt and sugar used in the recipe. Too much can lead to health issues. To change the sweetness, add or reduce sugar. Start with one tablespoon at a time. For more tang, increase the vinegar amount. A splash of citrus juice can also boost tanginess. Taste the pickling liquid before pouring it over the vegetables. That way, you can tweak it to your liking. In this article, we covered the key ingredients and step-by-step methods for pickling vegetables. You learned about essential tools, tips for perfect flavors, and ways to add variety. Remember to store your pickles correctly to keep them fresh. Pickling is fun and easy. Experiment with different veggies and spices to make it your own. Enjoy the crunch and flavor of your homemade pickles.

Tangy Pickled Vegetables Easy and Flavorful Recipe

Looking to add a burst of flavor to your meals? Tangy pickled vegetables are the answer! In this easy and

- 3 ripe peaches, pitted and sliced - 1/2 cup unsalted butter, divided - 3/4 cup brown sugar - 1 cup all-purpose flour - 1 teaspoon baking powder - 1/2 teaspoon baking soda - 1/4 teaspoon salt - 1/2 teaspoon ground cinnamon - 1/2 cup granulated sugar - 2 large eggs - 1 teaspoon vanilla extract - 1/2 cup buttermilk When making this Peach Upside Down Cake, fresh, ripe peaches are key. They should be sweet and fragrant. The butter adds richness, while brown sugar gives that lovely caramel flavor. Using all-purpose flour ensures the cake has the right texture. Baking powder and baking soda work together to help the cake rise perfectly. Salt enhances all the flavors, and cinnamon adds a warm, cozy touch. Granulated sugar sweetens the batter, while eggs provide structure. Vanilla extract adds depth, and buttermilk keeps the cake moist. - Nuts (e.g., walnuts or pecans) - Additional spices (e.g., nutmeg or cardamom) If you want to boost the flavor, consider adding nuts. Chopped walnuts or pecans add a nice crunch. You might also explore spices like nutmeg or cardamom for a warm twist. These additions can take your cake to the next level. - 9-inch round cake pan - Mixing bowls - Hand mixer Gather your tools before you start. A 9-inch round cake pan is perfect for this cake. You’ll need mixing bowls to combine ingredients. A hand mixer makes it easy to cream the butter and sugar smoothly. With these tools, your baking will be a breeze! For the full recipe, check out the complete instructions that guide you step-by-step. - Preheat oven to 350°F (175°C). - Grease the cake pan properly. Start by preparing your oven. Set it to 350°F (175°C). This heat is perfect for baking. Next, grab a 9-inch round cake pan. Use butter or cooking spray to grease the pan well. Greasing helps the cake come out easily after baking. - Melt butter and brown sugar in a saucepan. - Pour caramel mixture into the pan. Now, let's make the caramel layer. In a small saucepan, melt 1/4 cup of unsalted butter over medium heat. As it melts, add 3/4 cup of brown sugar. Stir the mixture until it becomes smooth and bubbly. Once it’s ready, pour this caramel mixture into the bottom of your greased cake pan. Spread it evenly for a nice layer. - Cream together butter and granulated sugar. - Combine dry ingredients then mix with wet ingredients. For the cake batter, take a large mixing bowl. Add the remaining 1/4 cup of butter and 1/2 cup of granulated sugar. Use a hand mixer to cream them together until fluffy. This step adds air and makes the cake light. Next, add two large eggs one at a time. Beat well after adding each egg. Now, mix in 1 teaspoon of vanilla extract. In another bowl, whisk together 1 cup of all-purpose flour, 1 teaspoon of baking powder, 1/2 teaspoon of baking soda, 1/4 teaspoon of salt, and 1/2 teaspoon of ground cinnamon. This is your dry mix. Now, alternate adding this dry mix and 1/2 cup of buttermilk to the wet mix. Begin and end with the dry mix. Stir until just combined; do not overmix! - Pour batter over peaches. - Bake for 35-40 minutes until done. Now, let’s put it all together. Carefully pour the cake batter over the arranged peach slices in the pan. Smooth the top with a spatula for an even bake. Place the pan in your preheated oven. Bake for 35 to 40 minutes. To check if it's done, insert a toothpick into the center. It should come out clean. When it's ready, let it cool in the pan for about 10 minutes. Then, invert it onto a serving plate and enjoy your Peach Upside Down Cake! For the full recipe, check the link provided. - Use ripe, fragrant peaches for best flavor. - Do not overmix the batter. When you pick peaches, look for ones that smell sweet. They should give a little when you press them gently. This means they are ripe and ready to shine in your cake. Overmixing the batter can make your cake dense. Mix just until everything is blended. - Dust with powdered sugar. - Serve with vanilla ice cream. A dusting of powdered sugar adds a lovely touch. It looks pretty and gives a little sweetness. Pair your cake with a scoop of vanilla ice cream. The cold ice cream contrasts nicely with warm peaches and cake. - Addressing dense texture. - Fixing undercooked centers. If your cake is dense, check your mixing. Make sure you didn’t overmix. If the center is undercooked, bake it a bit longer. Every oven is different, so keep an eye on it towards the end. A toothpick should come out clean when it’s done. {{image_2}} You can change the fruit in your cake. Using nectarines gives a sweet twist. They taste similar to peaches but have a firmer texture. You might also try adding other fruits. Pineapple brings a tropical vibe, while cherries add a tart touch. Both options work well with the caramel layer. To enhance the flavor, consider adding citrus zest. Lemon or orange zest brightens the cake’s taste. It adds a fresh note that pairs nicely with peaches. You can also mix in extracts. A splash of coconut or almond extract adds depth. These flavors can elevate your cake to a new level. If you need a gluten-free option, try using gluten-free flour. Many brands offer blends that work well in baking. You can also make this cake lactose-free. Substitute regular milk with almond or oat milk. Both options keep your cake moist and delicious. To keep your cake fresh, store leftovers in an airtight container. This helps to lock in moisture. You can also cover the cake with plastic wrap. It is best to keep the cake at room temperature for up to three days. If you want, place it in the fridge to extend its life. If you want to save your Peach Upside Down Cake for later, freezing is a great option. To freeze, let the cake cool completely. Then, wrap it tightly in plastic wrap and place it in a freezer bag. The cake can last up to three months in the freezer. When you’re ready to enjoy it, thaw the cake in the fridge overnight. Reheat it gently in the oven at 350°F for about 10-15 minutes. This way, it will taste fresh and warm. In the fridge, the cake lasts about five days. You will know the cake is spoiled if it has a strange smell or mold. Always check for these signs before eating. Enjoy your Peach Upside Down Cake while it’s still at its best! For the full recipe, refer to the earlier section. To make a gluten-free version, use gluten-free flour blends. Almond flour or coconut flour also works well. Just remember, these flours change the cake’s texture. Almond flour gives a moist feel, while coconut flour is denser. Always check the blend for the right ratios, as it can affect how the cake rises. Yes, you can use canned peaches. They save time and still taste good. However, canned peaches often have added sugar. This can make the cake sweeter. Fresh peaches give a better flavor and texture. They also have a nice, juicy quality that shines when baked. For sides, try whipped cream or vanilla ice cream. Both add a nice touch to the warm cake. You could also serve it with fresh berries for extra color and flavor. As for drinks, a cold glass of milk or sweet tea pairs well. Coffee is also a great choice if you want something warm. To check if the cake is done, use a toothpick. Insert it into the center of the cake. If it comes out clean, the cake is ready. If there is wet batter on the toothpick, bake it longer. Keep checking every few minutes until it is done. This method works well and helps you avoid overbaking. This blog post covers all you need to create a delicious Peach Upside Down Cake. We explored the key ingredients, tools, and steps to make it perfect. You learned helpful tips for baking and how to present your cake nicely. In conclusion, this cake is not only tasty but also flexible. You can adjust flavors and make it fit your needs. Enjoy baking and impressing your friends and family with this sweet treat!

Peach Upside Down Cake Delightful and Easy Recipe

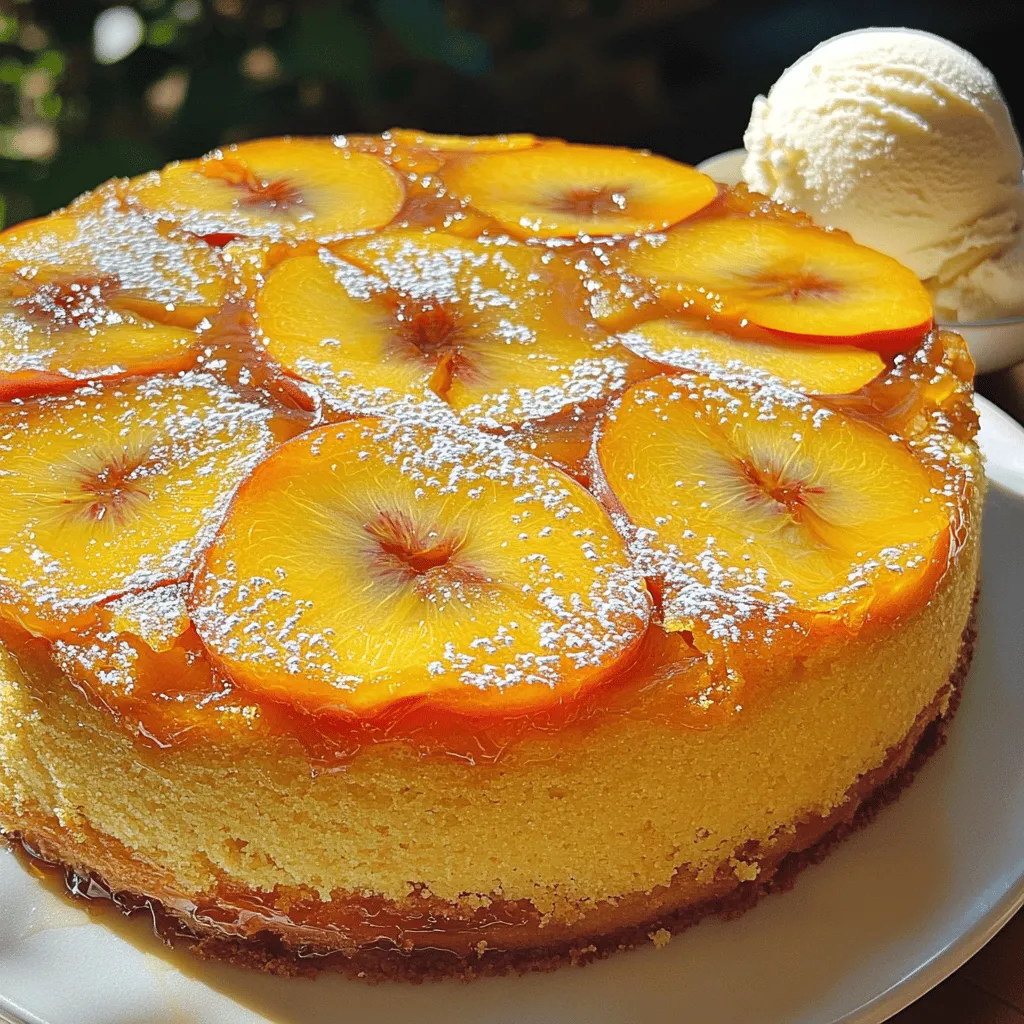
Are you ready to indulge in a delicious Peach Upside Down Cake? This easy recipe is a perfect blend of

Gather these fresh and simple ingredients for a tasty Cheesy Zucchini Casserole: - 4 medium zucchinis, thinly sliced - 1 large onion, chopped - 2 cups shredded mozzarella cheese - 1 cup grated Parmesan cheese - 3 large eggs - 1/2 cup milk - 1/2 cup breadcrumbs - 1 teaspoon garlic powder - 1 teaspoon Italian seasoning - Salt and pepper to taste - 2 tablespoons olive oil - Fresh parsley for garnish These ingredients blend well to create a creamy and cheesy dish. The zucchini adds a fresh crunch, while the cheeses melt together to give a rich flavor. Using fresh parsley as a garnish not only looks nice but adds a burst of color. I love how this dish combines simple items to make a comforting meal. You can find the full recipe [here](#). - Preheat the oven to 375°F (190°C). - In a large skillet, heat 2 tablespoons of olive oil over medium heat. - Add 1 chopped onion and sauté until it turns soft, about 5 minutes. - Next, add 4 thinly sliced zucchinis. Cook for 5-7 minutes until they are tender. - Season the zucchini with 1 teaspoon of garlic powder, 1 teaspoon of Italian seasoning, salt, and pepper to taste. - Remove the skillet from the heat and let it cool slightly. - In a large bowl, whisk together 3 eggs and 1/2 cup of milk until smooth. - Stir in 1 cup of shredded mozzarella cheese and 1/2 cup of grated Parmesan cheese. - Add the sautéed zucchini mixture into the egg and cheese mixture. Stir until everything is well mixed. - Transfer the mixture into a greased 9x13 inch casserole dish. Spread it out evenly. - In a separate bowl, mix the remaining mozzarella and Parmesan with 1/2 cup of breadcrumbs. - Sprinkle this breadcrumb topping evenly over the zucchini mixture in the casserole dish. - Bake in the preheated oven for about 30-35 minutes. Look for a golden brown top and bubbling edges. - Once baked, allow it to cool for a few minutes. Serve hot, garnished with fresh parsley. For the full recipe, check out the complete details above! - Choosing the right zucchinis: Look for firm zucchinis with smooth skin. Avoid any with soft spots. Fresh zucchinis have the best flavor and texture. - Achieving the best cheese melt: Use a mix of mozzarella and Parmesan. Mozzarella gives a nice stretch, while Parmesan adds sharpness. Grate the cheese yourself for better melting. - Adjusting baking time based on oven variations: Every oven is different. Keep an eye on your casserole. If the top is not golden after 35 minutes, bake a few more. - Pairing options for side dishes: This casserole pairs well with a fresh salad or crusty bread. You can also serve it with grilled chicken for extra protein. - Garnishing ideas with fresh herbs: Fresh parsley or basil adds a lovely touch. Sprinkle some on top before serving for color and flavor. - Best beverages to complement the dish: A light white wine or sparkling water enhances the meal. A crisp lemonade also works well, especially on warm days. For the full recipe, check out the complete instructions in the earlier section. {{image_2}} You can change the cheese in your casserole. Instead of mozzarella, try cheddar or gouda. For Parmesan, consider using pecorino or nutritional yeast for a twist. Adding proteins can also boost flavor. Chicken or sausage works well here. It makes the dish heartier and more filling. You can even add ground turkey for a leaner option. If you want more veggies, add bell peppers or spinach. They mix well with zucchini and add color. If you need a gluten-free dish, use gluten-free breadcrumbs or skip them altogether. You can also swap the eggs for flaxseed meal mixed with water. This works well for vegans. For cheese, try cashew cheese or vegan cheese brands. If you want to lower the carbs, skip the breadcrumbs and use more zucchini. You can also cut down on milk or use unsweetened almond milk. These changes keep the flavor while meeting your needs. To keep your cheesy zucchini casserole fresh, start by refrigerating leftovers. Place the casserole in an airtight container. This helps prevent it from drying out. Leftovers can last for about 3 to 5 days in the fridge. If you want to save some for later, freezing is a great option. Cut the casserole into serving sizes. Wrap each piece in plastic wrap and then in foil. This extra layer protects it from freezer burn. You can freeze the casserole for up to 2 to 3 months. When you are ready to enjoy it again, reheating is key to maintaining texture. You can reheat it in the oven at 350°F (175°C) for about 20 minutes. This method keeps the top crispy while warming the inside. Leftovers in the fridge usually last up to 5 days. After that, they may not taste as good. Always check for signs of spoilage. If you see any mold or the casserole smells off, it’s best to throw it away. Keep an eye out for changes in texture as well. If the casserole feels slimy or mushy, it’s time to discard it. Staying mindful of these signs helps you enjoy your dish safely. For the full recipe, you can refer to the earlier section. Can I make Cheesy Zucchini Casserole ahead of time? Yes, you can prepare the casserole a day before. Just follow the steps and store it in the fridge. When ready, bake it straight from the fridge. This saves time and allows flavors to meld. What’s the best way to slice zucchini? The best way to slice zucchini is to use a sharp knife. Aim for thin, even slices about 1/4 inch thick. This helps them cook evenly. You can also use a mandoline for speed and uniformity. Can I use frozen zucchini instead of fresh? Yes, frozen zucchini works, but it may have more water. Make sure to thaw and drain it well before using. This prevents a watery casserole. Fresh zucchini has a firmer texture, but frozen is fine in a pinch. How do I know when the casserole is done? You’ll know the casserole is done when the top is golden brown and bubbly. Insert a knife in the center; it should come out clean. Let it cool for a few minutes before serving for the best texture. For the full recipe, check out the section above. This blog post covered a delicious Cheesy Zucchini Casserole. We looked at the ingredients, from zucchini to cheese, and how to make it step by step. I shared tips to make it perfect and ways to serve it. You can even try variations to fit your taste and dietary needs. Remember to store leftovers properly to keep them fresh. With this simple recipe, you can enjoy a tasty dish that offers flexibility. Dive in and enjoy your cooking adventure!

Cheesy Zucchini Casserole Simple and Comforting Dish

Are you ready to savor a dish that’s both simple and comforting? My Cheesy Zucchini Casserole is the perfect blend

- 4 cups water - 4 black tea bags (or 4 teaspoons loose black tea) - 2 ripe peaches, pitted and sliced - 1/4 cup honey (adjust sweetness to taste) - 1 tablespoon fresh lemon juice - Fresh mint leaves for garnish - Ice cubes The ingredients for peach iced tea are simple and fresh. You start with water as the base. Black tea gives a robust flavor that pairs well with peaches. The ripe peaches add sweetness and a fruity touch. Honey sweetens the drink naturally. A splash of lemon juice brightens the flavor. Finally, fresh mint and ice cubes make it refreshing. Each serving has about 100 calories. The macronutrient breakdown includes: - Carbohydrates: 25 grams - Protein: 1 gram - Fat: 0 grams Peaches provide vitamins A and C. Black tea offers antioxidants. Honey adds a bit of energy with natural sugars. Black tea can be good for your heart. It has antioxidants that fight free radicals. Peaches are low in calories and high in vitamins. They help with hydration and digestion. Honey is a natural sweetener. It can soothe your throat and boost your energy. This iced tea is not just tasty; it also brings health benefits. Start by boiling 4 cups of water in a saucepan. Once it boils, remove the pan from heat. Add 4 black tea bags. Let the tea steep for 5 to 7 minutes, depending on how strong you want it. If you like stronger tea, let it steep longer. If you prefer a milder taste, steep it for less time. Now, let's focus on the peaches. Take 2 ripe peaches, pit them, and slice them. Place the peach slices in a blender. Add 1/4 cup of honey for sweetness. Blend the peaches until they turn into a smooth puree. This will add a fresh, fruity flavor to your tea. Once the tea has steeped, remove the tea bags. Add the peach puree to the warm tea. Stir well to mix the puree into the tea completely. Next, squeeze in 1 tablespoon of fresh lemon juice. This will balance the sweetness and add a bright flavor. Now, let the tea cool to room temperature. After it cools, refrigerate it for at least 1 to 2 hours until it is nice and cold. Serve over ice and enjoy your refreshing Peach Iced Tea! For more detailed steps, check out the Full Recipe. To change the sweetness of your peach iced tea, you can use many options. If you want to avoid honey, try agave syrup or maple syrup. These sweeteners blend well with the peach flavor. You can also use stevia or monk fruit for a low-calorie choice. To use natural sweeteners, add them slowly. Taste your tea as you mix. This way, you can stop when it reaches your desired level of sweetness. Remember, peaches are sweet too, so adjust carefully. Want to take your iced tea to the next level? Add spices or herbs. A pinch of cinnamon or a few slices of fresh ginger can give your tea a warm twist. You can also add basil or rosemary for a fragrant kick. When serving, consider the best taste experience. Serve your tea in clear glasses to show off the pretty color. Pair your drink with light snacks, like fruit or cheese. This adds more flavor to your meal. Garnishing your iced tea makes it look special. Try adding mint leaves for a pop of green. You can also float peach slices on top for a fresh look. A slice of lemon on the rim adds a nice touch too. For a great presentation, use tall glasses filled with ice. Pour the tea over the ice slowly to avoid splashes. This keeps your drink looking clean and inviting. A colorful straw can be fun, especially for kids. For the full recipe of peach iced tea, check out the details above. {{image_2}} You can switch up the tea base for peach iced tea. Try using green tea for a lighter taste. Herbal teas, like chamomile or hibiscus, add a unique twist. You can also blend different flavors. For example, adding ginger gives a spicy kick. Mint leaves can boost freshness and aroma. Experimenting with these options keeps your iced tea exciting and new. Want a fun twist? Mix peach iced tea with your favorite spirits. A classic choice is vodka. It blends well with the peach flavor. You could also try rum for a tropical touch. For a more sophisticated drink, add bourbon. Here’s a simple recipe: mix 1 part peach iced tea with 1 part spirit. Serve over ice and garnish with peach slices. Enjoy this refreshing cocktail at your next summer gathering. Peach iced tea popsicles are a cool treat for hot days. Start by making your iced tea as usual. Once it cools, pour it into popsicle molds. Add peach slices or mint for extra flavor. Freeze them for at least 4 hours. When ready, run warm water over the molds to help release the popsicles. These fruity pops are a hit with kids and adults alike. They make summer feel even sweeter. To keep your peach iced tea fresh, choose the right container. Glass jars or airtight plastic containers work best. Make sure the container is clean and dry before pouring in the tea. This helps prevent any strange tastes. When stored properly, peach iced tea lasts about 3 to 5 days in the refrigerator. Always check for any off smells or changes in color before enjoying. You can freeze peach iced tea for later use. Start by pouring the tea into ice cube trays or freezer-safe bags. Leave some space in the container, as liquids expand when frozen. Once frozen, the tea can last for up to 3 months. When you're ready to enjoy it, thaw the tea in the fridge overnight. For quick thawing, you can place the container in a bowl of cold water. Serve the thawed tea over ice for a refreshing drink. If you want to serve peach iced tea warm, the best method is to heat it gently on the stove. Use a low flame to warm it slowly. Stir often to avoid burning. After reheating, taste the tea. You might need to adjust the flavor by adding more honey or lemon juice to brighten it up. A warm peach iced tea can be a cozy treat on cooler days. To make your peach iced tea stronger, try these tips: - Use more tea bags or loose tea. - Steep the tea for longer. - Choose a bold black tea type, like Assam or Ceylon. - Blend in more peach puree for added fruit flavor. These methods enhance the tea's taste without losing the peach's sweetness. Strong tea balances the fruit's flavor well. Yes, you can use frozen peaches. They work well but may change the tea's texture. Frozen peaches might make the drink slightly slushier. They can also have a less vibrant flavor than fresh peaches. If you use frozen peaches, let them thaw a bit before blending. This step allows better blending and flavor release. Serve peach iced tea chilled for the best taste. Use tall glasses filled with ice cubes. This keeps the tea cold and refreshing. Garnish with mint leaves and peach slices for a beautiful touch. You can also use fun straws for added flair. Yes, you can sweeten your peach iced tea with several options. Here are some suggestions: - Stevia for a low-calorie option. - Agave syrup for a mild sweetness. - Maple syrup for a unique flavor. - Coconut sugar for a more natural sweetener. These options help you customize your tea according to your taste and dietary needs. Enjoy experimenting with flavors! Peach iced tea is a refreshing drink made with simple ingredients. We explored the key items like black tea, peaches, and honey, which provide flavor and health benefits. You learned about making the tea, creating a peach puree, and combining them for the perfect blend. Tips for adjusting sweetness and enhancing flavor help you craft a unique drink. From variations to handling leftovers, you have all the tools to enjoy this delightful beverage. Experiment, share your own twist, and enjoy each sip of your delicious peach iced tea!

Ingredient Peach Iced Tea Refreshing Summer Drink

Summer is here, and there’s no better way to cool off than with a glass of refreshing Peach Iced Tea.

To make Old Fashioned Peaches and Cream, you need fresh peaches. They should be ripe for the best flavor. Here’s what you’ll need: - 4 ripe peaches, halved and pitted - 1 tablespoon lemon juice Some simple items from your pantry will complete this dish. Make sure you have these on hand: - 2 tablespoons brown sugar - 1 teaspoon cinnamon - 1 cup heavy cream - 2 tablespoons powdered sugar - 1 teaspoon vanilla extract For a little extra flair, consider these garnishes: - Fresh mint leaves for garnish These add a nice touch and freshness to your dessert. You can find the Full Recipe for all the steps and details to make this dish shine! Start with ripe peaches. Look for peaches that are soft but not mushy. Cut each peach in half and remove the pit. This step is simple but very important for grilling. In a small bowl, mix two tablespoons of brown sugar, one teaspoon of cinnamon, and one tablespoon of lemon juice. This will be your peach glaze. Stir until the sugar dissolves. The glaze adds sweetness and a lovely flavor to the peaches. Preheat your grill or grill pan over medium heat. Brush the peach halves with the glaze. Make sure they are well-coated. Place the peaches cut-side down on the grill. Cook them for about four to five minutes. You want them caramelized with nice grill marks. While the peaches grill, prepare the whipped cream. In a medium bowl, add one cup of heavy cream, two tablespoons of powdered sugar, and one teaspoon of vanilla extract. Use an electric mixer or whisk to beat the cream. Stop when it forms soft peaks. Be careful not to overwhip, or it will turn to butter! Once the peaches are grilled, remove them and let them cool for a minute. In a bowl, place two peach halves. Spoon a generous amount of whipped cream over them. Drizzle any leftover glaze from the bowl on top if you wish. Finally, garnish with fresh mint leaves for a touch of color and flavor. Enjoy your delightful dessert! For the full recipe, check the details above. To make Old Fashioned Peaches and Cream shine, choose ripe peaches. Look for peaches that are firm but slightly soft when you press them. Their skin should have a warm hue, showing a bit of red or golden color. These signs mean they are sweet and juicy. Avoid peaches with green spots; they are not ripe yet. When you slice into a ripe peach, it should be fragrant and a bit juicy. These qualities make your dessert truly delightful. Whipping cream is easy, but you must pay attention. Start with cold heavy cream for the best results. Pour it into a clean bowl. Add powdered sugar and vanilla extract to enhance the flavor. Whip the cream until it forms soft peaks. Be careful not to overwhip; otherwise, it can turn into butter. Soft peaks mean the cream holds its shape but still looks smooth. This light and airy whipped cream will perfectly complement the rich peaches. When serving, make it look special. Place two grilled peach halves in a bowl. Spoon a generous amount of whipped cream over the peaches. Drizzle any leftover glaze on top for extra flavor. For a pop of color, add fresh mint leaves as a garnish. This dessert looks stunning and tastes even better. You can serve it warm or at room temperature. It’s perfect for summer gatherings or cozy family dinners. For the full recipe, check the earlier section. {{image_2}} If you want to change things up, try using other fruits. Grilled nectarines add a sweet twist. You can also use plums, which have a lovely tartness. Pineapple is another great choice. Grilled pineapple has a nice caramel flavor. You can even try apples for a crunchy bite. Each fruit brings its own charm to this dessert. For those who avoid dairy, there are simple swaps. Use coconut cream instead of heavy cream. It whips up nicely and has a great flavor. Almond milk or oat milk can replace regular whipped cream. Just make sure to choose a brand that whips well. This way, you still enjoy the creamy aspect of the dessert without the dairy. You can boost the flavor with a few easy additions. Try adding a splash of almond extract to the whipped cream. It adds a nice nutty taste. You can also mix in some orange zest for a fresh kick. If you want some warmth, add a pinch of nutmeg. Each of these additions creates a unique taste in your Old Fashioned Peaches and Cream. For more details on making this dish, check the Full Recipe. To store leftover Old Fashioned Peaches and Cream, first, let it cool. Place the peaches and cream in an airtight container. This keeps them fresh. Store in the fridge for up to three days. If you notice any liquid, drain it before storing. This helps keep the dessert from getting soggy. Reheating is simple. If you want warm peaches, place them in a microwave-safe dish. Heat them in short bursts of 15 seconds. Check after each burst. Be careful not to overheat, as they can become mushy. You can enjoy the whipped cream cold, so no need to heat that part. You can freeze peaches for later use. However, creamy toppings do not freeze well. To freeze, place the grilled peaches in a single layer on a baking sheet. Freeze them until solid, then transfer to a freezer bag. Use them within three months for the best taste. When you’re ready to use them, thaw in the fridge overnight. Old Fashioned Peaches and Cream is a simple dessert. It combines grilled peaches with sweet whipped cream. The peaches have a warm, caramelized flavor. The cream adds a rich, smooth touch. This dessert is fresh and perfect for summer. Yes, you can use canned peaches. However, fresh peaches taste best. If using canned, choose peaches in juice. Drain any syrup to avoid extra sweetness. You can grill them too, but they may not caramelize as well. You can prepare the peach glaze ahead of time. Just keep it in the fridge. You can whip the cream a few hours before serving. Store it in a covered bowl. Grill the peaches just before serving for the best taste. Old Fashioned Peaches and Cream pairs well with vanilla ice cream. You can also serve it with shortcake or pound cake. A sprinkle of nuts adds a nice crunch. For drinks, try sweet tea or a light white wine. In this blog post, I explored how to create a delicious Peaches and Cream dessert. We covered fresh ingredients, pantry staples, and optional garnishes to enhance your dish. I shared step-by-step instructions for preparing the peaches, making the glaze, grilling, and assembling it all. Tips on selecting the best peaches and serving suggestions were also included. Finally, I offered alternative fruits and storage tips for leftovers. Enjoy this simple yet delightful dessert with family or friends. It’s a treat you won’t want to miss!

Old Fashioned Peaches and Cream Delightful Dessert

Craving a simple, sweet treat? Discover the joy of Old Fashioned Peaches and Cream! This classic dessert celebrates fresh peaches

Older posts
Newer posts
← Previous Page1 … Page25 Page26 Page27 … Page72 Next →

dsad

© 2025 My Saved Recipe • Built with GeneratePress

Our Policies

  • Copyright Policy
  • Cookie Policy
  • GDPR Policy
  • Privacy Policy
  • Disclaimer
  • Terms Of Use

More Information

  • Home
  • About
  • Contact
  • Appetizers
  • Dessert
  • Dinner
  • Drinks
©2025, My Saved Recipe About Back To Top