Skip to content
DisclaimerTerms Of UseGDPR PolicyCookie Policy

My Saved Recipe

  • Home
  • Drinks
  • Appetizers
  • Dinner
  • Dessert
  • About
  • Contact
  • Privacy Policy
DisclaimerTerms Of UseGDPR PolicyCookie Policy

Savannah

- 1 pound fresh okra, trimmed Fresh okra is the star of this recipe. Look for firm and bright green pods. They should be smooth with no blemishes. Trim the stems to keep them whole. This helps them soak up all the flavors. - 1 cup distilled white vinegar - 1 cup water - 2 tablespoons granulated sugar - 1 tablespoon kosher salt The pickling liquid is key to making the okra tasty. The vinegar adds tang, while the water helps balance it. Sugar makes it sweet, and salt brings out the taste. Together, they create a perfect brine. - 4 cloves garlic, peeled and smashed - 1 teaspoon mustard seeds - 1 teaspoon coriander seeds - 1 teaspoon red pepper flakes - 2 sprigs fresh dill These spices boost the flavor of your okra. Garlic adds depth, while mustard seeds give a nice crunch. Coriander seeds add warmth, and red pepper flakes bring heat. Fresh dill gives a bright, fresh taste. Each ingredient works together to make every bite flavorful. For the full recipe, check out the instructions section. To make the pickling liquid, you need a few simple steps. First, grab a medium saucepan. Add 1 cup of distilled white vinegar, 1 cup of water, 2 tablespoons of granulated sugar, and 1 tablespoon of kosher salt. Place the pan over medium heat. Stir the mix as it heats up. You want the sugar and salt to dissolve fully. This usually takes just a few minutes. Once dissolved, remove the pan from the heat. Let it cool down a bit before using it. Now, let’s pack the jars! Start by trimming the okra stems while keeping the pods whole. Next, take two clean glass jars. Divide the smashed garlic, mustard seeds, coriander seeds, red pepper flakes, and fresh dill evenly between the jars. This will give your okra lots of tasty flavor. Now, pack the okra tightly into the jars. Be sure to arrange them nicely. Pour the warm pickling liquid over the okra, covering them completely. Leave about half an inch of space at the top of the jars. Once the jars are packed, it's time to seal them. Put the lids on tightly. Let the jars cool to room temperature first. After they cool, place them in the fridge. This is where the magic happens! Allow the okra to pickle for at least 24 hours. However, they taste even better after 3 to 5 days. The longer they sit, the more flavor they soak up. Enjoy your zesty quick pickled okra as a snack, side, or topping! For the full recipe, check the details above. When choosing okra, look for bright green pods. They should be firm, smooth, and without blemishes. Smaller pods, about three to four inches long, are often more tender and less fibrous. This makes them perfect for pickling. Always pick okra that feels heavy for its size. Freshness is key to great flavor. If you like heat, add more red pepper flakes. You can also use whole dried chili peppers for a different kick. For a milder taste, reduce the amount of red pepper. You can even leave it out. Taste your pickling liquid before pouring it over the okra. This way, you can adjust the spice to your liking. Make sure your jars are clean and dry before packing. This helps keep your pickled okra fresh. Once you pour in the pickling liquid, check for air bubbles. You can gently tap the jars to release them. Seal the jars tightly with lids. This prevents leaks and keeps the flavors inside. {{image_2}} You can change the flavor of your pickled okra with extra spices. Try adding a few whole black peppercorns for a warm bite. If you like heat, toss in some sliced jalapeños. You could also add fresh thyme or rosemary for a herby twist. Each spice brings a new taste, making your okra unique and fun. Vinegar plays a big role in pickling. While white vinegar works great, you can switch it up. Apple cider vinegar adds a fruity note. Rice vinegar gives a milder flavor. Even red wine vinegar can work well, adding depth. Each vinegar offers a different taste, so feel free to explore. Get creative with your pickled okra! You can add citrus peels, like lemon or lime, for a bright zing. Honey or maple syrup can replace sugar for a touch of sweetness. For a bold kick, use chili garlic sauce in the brine. The options are endless, so have fun making this recipe your own! For the full recipe, check out the details above. To keep your quick pickled okra fresh, you need to seal the jars well. After filling the jars with okra and pickling liquid, wipe the rim of each jar with a clean cloth. Make sure there are no food bits left. Place the lid on the jar and screw on the ring tightly. This helps create a good seal. If the jars are sealed properly, they will stay fresh longer. Quick pickled okra lasts about 2 to 3 weeks in the fridge. The flavor only gets better over time. However, for the best taste, enjoy them within a week or two. After that, they may lose their crunch and freshness. If you see any mold or if the jar smells bad, throw it away right away. Store your jars in the fridge, not at room temperature. The cool air helps to keep the pickled okra safe. Make sure the jars stay upright and are not crowded. You can also label each jar with the date you made them. This way, you can track how long they have been in the fridge. Proper storage keeps your quick pickled okra tasty and ready to enjoy whenever you like! For the complete recipe, refer to the Full Recipe section. It takes about 24 hours for the okra to pickle. However, for the best taste, let them sit for 3 to 5 days. The longer they sit, the more flavor they absorb. You can start enjoying them soon, but patience pays off! I do not recommend using frozen okra. Frozen okra loses its crisp texture. Fresh okra gives you that nice crunch that makes pickled okra so tasty. If you want to pickle okra, always choose fresh ones for the best results. Pickled okra adds a great zing to many dishes. You can enjoy it in salads, on sandwiches, or with charcuterie boards. Try adding it to tacos or enjoying it alongside fried chicken. It pairs well with spicy dishes, too, balancing out heat with its tangy crunch. You learned how to make quick pickled okra using fresh ingredients and simple steps. We covered the best okra, how to prepare your pickling liquid, and packing jars correctly. I shared tips to enhance flavor and ways to mix spices for unique tastes. Remember, proper sealing and storage are key for freshness. Quick pickled okra adds a fun crunch to many dishes. Enjoy your pickling journey! With these skills, you're ready to impress friends and family. Happy pickling!

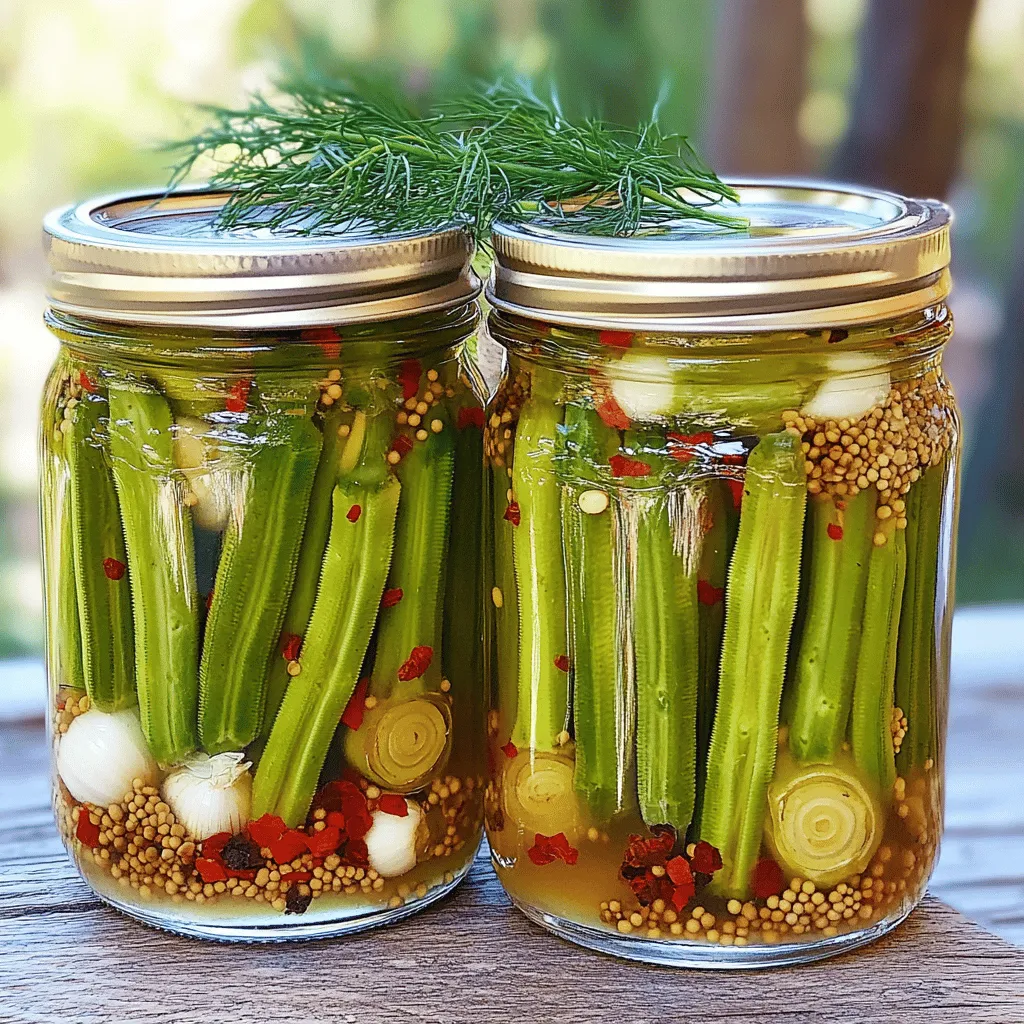
Quick Pickled Okra Flavorful and Simple Recipe

If you’re hungry for a crunchy snack with a zest, quick pickled okra is your answer. This easy recipe brings

- 2 medium zucchinis, grated - 1 cup granulated sugar - 1/2 cup brown sugar, packed - 3 large eggs - 1/2 cup vegetable oil The star of this recipe is the grated zucchini. It gives the bread a moist and tender crumb. The sugars add sweetness and a nice crust. Eggs provide structure, while vegetable oil keeps it soft. You can also use applesauce for a lighter touch. - 2 cups all-purpose flour - 1 teaspoon baking soda - 1/2 teaspoon baking powder - 1 teaspoon ground cinnamon - 1/4 teaspoon ground nutmeg - 1/2 teaspoon salt The dry ingredients balance the wet ones. Flour forms the base of the bread. Baking soda and baking powder work together to help it rise. Cinnamon and nutmeg add warm flavor. Salt enhances all the tastes. - 1 cup walnuts, chopped (optional) - 1/2 cup chocolate chips (optional) You can add chopped walnuts for crunch. Chocolate chips add a sweet touch. These optional ingredients let you customize your bread. Feel free to mix and match to suit your taste. This is just a glimpse of the ingredients you need for the best zucchini bread. For the full list and measurements, check the [Full Recipe]. 1. Preheat your oven to 350°F (175°C). 2. Grease and flour a 9x5 inch loaf pan or use parchment paper. 3. In a large bowl, combine the grated zucchini, granulated sugar, and brown sugar. 4. Mix well and let it sit for about 10 minutes. This helps release moisture. 1. In another bowl, whisk together the eggs, vegetable oil, and vanilla extract. 2. Make sure the mixture is smooth before moving on. 1. In a separate bowl, sift together the flour, baking soda, baking powder, ground cinnamon, ground nutmeg, and salt. 2. Gradually add the dry ingredients to the wet mixture. 3. Stir gently until just combined. Be careful not to overmix. This keeps your bread tender. 1. Pour the batter into the prepared loaf pan. 2. Smooth the top with a spatula. 3. Bake for 50-60 minutes. Check with a toothpick to see if it's done. 4. When the toothpick comes out clean, remove the bread from the oven. 5. Let it cool in the pan for about 10 minutes before transferring to a wire rack. For the Full Recipe, refer to the main article. You will love the results! To make your zucchini bread moist, start by squeezing out excess moisture from the grated zucchini. This step is key. Too much water makes the bread soggy. Use a clean kitchen towel or cheesecloth to press the zucchini. Then, let the mixture rest for about 10 minutes. This allows the zucchini to release more moisture, making your bread tender and soft. One common mistake is overmixing the batter. When you mix too much, the bread can turn out dense. Mix just until you see no dry flour. Another mistake is not measuring ingredients correctly. Use measuring cups and spoons for accuracy. A little too much or too little can change the texture and taste of your bread. You can enhance the flavor of your zucchini bread with spices like cinnamon and nutmeg. These warm spices add depth. Consider adding chopped walnuts or chocolate chips for texture. These extras make each bite a delight. Feel free to experiment with other mix-ins too, like dried fruits or seeds. This way, you can find the perfect combination that you love. {{image_2}} You can make zucchini bread healthier with a few easy swaps. - Using whole wheat flour: Whole wheat flour adds fiber and nutrition. It also gives a nutty flavor. Use it in a 1:1 ratio to replace all-purpose flour. - Lower sugar options: Cut down sugar without losing taste. Try using honey or maple syrup instead of granulated sugar. You can also reduce the sugar by one-third for a lighter loaf. Adding different flavors can make your zucchini bread special. - Adding spices like ginger or cloves: A pinch of ginger adds warmth and spice. Cloves can bring a nice depth. Just a quarter teaspoon of each works well. - Incorporating fruit such as applesauce: Adding unsweetened applesauce makes the bread moist and fruity. It also reduces the need for extra sugar. Swap out half of the oil for applesauce to keep it light. You can also play with seasonal ingredients to change the flavor. - Dried fruits (raisins, cranberries): These add sweetness and chewy texture. Mix in half a cup of dried fruits for a fun twist. - Seasonal spices like pumpkin pie spice: This spice blend brings a cozy taste, perfect for fall. Just a teaspoon can change everything. Try these variations to make the best zucchini bread your own! For the full recipe, check out Ultimate Zucchini Delight Bread. To keep your zucchini bread fresh, store it in an airtight container. This will help keep moisture in and prevent it from drying out. If you have leftover slices, you can wrap them in plastic wrap before placing them in the container. For long-term storage, freezing is a great option. Simply slice your zucchini bread, wrap each slice tightly in plastic wrap, and place them in a freezer-safe bag. When you want to enjoy a slice, just take it out and let it thaw at room temperature. How long does zucchini bread last? If stored properly, your zucchini bread can last about 1 week at room temperature. You can keep it in the fridge for up to 2 weeks if you want it to last longer. What are the signs that zucchini bread has gone bad? Look for changes in smell, color, or texture. If you notice any mold or an off smell, it's best to toss it out. Always trust your senses; if it doesn’t look or smell right, don’t eat it. For more details, check the Full Recipe for the best zucchini bread! Yes, you can use frozen zucchini. First, thaw the zucchini in the fridge overnight. After it is thawed, drain it well. You want to remove excess moisture to keep your bread from getting soggy. Squeeze the zucchini with a clean kitchen towel or paper towels until it is dry. Yes, you can make this bread gluten-free. Use a gluten-free flour blend instead of all-purpose flour. Look for blends that include xanthan gum for better texture. Almond flour or oat flour can also work, but you may need to adjust the liquid in the recipe. You can enjoy leftover zucchini bread in many ways! Try toasting slices and spreading butter or cream cheese on top. You can also use it to make French toast. Just dip the slices in an egg mixture and cook them on a skillet. For a fun twist, crumble it over yogurt or ice cream for dessert. Zucchini bread is a tasty treat you can easily make at home. We covered key ingredients like zucchini, sugars, and spices. I shared step-by-step instructions for mixing and baking. Tips showed you how to keep it moist and avoid common mistakes. You learned about variations and healthier options too. When stored correctly, your zucchini bread stays fresh longer. Now you can enjoy making delicious zucchini bread with confidence!

The Best Zucchini Bread Irresistible and Easy Recipe

Are you ready to bake the best zucchini bread that’s both irresistible and easy? This simple recipe combines fresh, grated

- 4 medium zucchinis, thinly sliced - 1 cup shredded mozzarella cheese - 1 cup cottage cheese - ½ cup grated Parmesan cheese - 1 large egg - 1 teaspoon garlic powder - 1 teaspoon dried oregano - 1 teaspoon salt - ½ teaspoon black pepper - 1 cup cherry tomatoes, halved (for garnish) - Fresh basil leaves, for garnish - Additional spices or herbs - Different cheese varieties You can swap mozzarella for other melting cheeses. Cheddar or gouda works well. Instead of cottage cheese, try ricotta for a creamier texture. If you want low-carb options, replace zucchini with eggplant or cauliflower. These swaps keep the dish tasty and fun. For a fresh twist, add herbs like thyme or rosemary. You can also mix in your favorite spices for a kick. If you want to make it vegan, use tofu instead of egg and a plant-based cheese. This Easy Cheesy Zucchini Bake has many options. You can make it your own with simple swaps. Check out the Full Recipe for all the details! - Preheat the oven to 375°F (190°C). - Grease a 9x13 inch baking dish with a little oil or butter. - In a large bowl, combine the thinly sliced zucchini with garlic powder, oregano, salt, and black pepper. Toss until the zucchini is well coated. - In another bowl, mix together the cottage cheese, egg, and half of the mozzarella cheese. Stir until the mixture is smooth and creamy. - Start by layering half of the seasoned zucchini slices at the bottom of the greased baking dish. - Next, spread half of the cheese mixture over the zucchini layer. Make sure it covers evenly. - Add the rest of the zucchini slices on top. Pour the remaining cheese mixture over this layer, spreading it out. - Lastly, sprinkle the grated Parmesan cheese and the remaining mozzarella cheese over the entire dish. - Bake in the preheated oven for 30-35 minutes. Watch for a golden, bubbly top. - For a perfect finish, let it cool for a few minutes before serving. This helps the layers set nicely. To keep your Easy Cheesy Zucchini Bake from being soggy, avoid excess moisture. Start by salting the zucchini slices. Place them on paper towels for about 15 minutes. This helps draw out water. Once they are dry, you can use them in your bake. Thinly slice your zucchinis for even cooking. Uniform slices ensure they cook at the same rate. This way, you get a nice texture throughout. Pairing sides with zucchini bake can enhance your meal. A simple green salad works great. You can add a light vinaigrette for a fresh taste. Garlic bread also makes a tasty side. It complements the cheesy flavors well. This dish is perfect for family dinners or casual gatherings. Serve it at parties or potlucks for a crowd-pleaser. Garnishing is key for a beautiful dish. Use halved cherry tomatoes on top for color. Fresh basil leaves add a nice touch, too. Arrange them artfully before serving. You can also serve the bake in individual ramekins. This adds a fun twist and makes it easy to serve. {{image_2}} You can easily change the taste of your Easy Cheesy Zucchini Bake. Adding herbs and spices can make it special. Fresh thyme or rosemary adds a nice touch. You can also try a bit of red pepper flakes for heat. Mix in some garlic or onion powder for extra flavor. Incorporating other vegetables is another fun option. Bell peppers, spinach, or mushrooms work well. Just remember to slice them thinly. This keeps the bake even and tasty. If you're looking for gluten-free options, this dish is simple to adapt. The main ingredients are naturally gluten-free. Just ensure your cheese brands are safe. Check labels if you're unsure. For vegan alternatives, swap out the cheese for plant-based options. Use tofu or cashew cheese instead of cottage cheese. You can also replace the egg with a flaxseed mixture. Mix one tablespoon of ground flaxseed with three tablespoons of water. Let it sit for a few minutes to thicken. You can give your bake an Italian twist. Add some marinara sauce and Italian seasoning for that flavor. Top it with fresh basil after baking for a lovely aroma. For a Southwestern flair, mix in black beans and corn. A sprinkle of taco seasoning adds zest. You can even top it with avocado after baking for a fresh finish. For the full recipe, check out the Easy Cheesy Zucchini Bake. To keep your Easy Cheesy Zucchini Bake fresh, use airtight containers. Glass or plastic containers work well. If you have a lot of leftovers, divide them into smaller portions. This helps with easy reheating later. Always let the dish cool before sealing it. This will prevent moisture build-up inside the container. You can reheat the zucchini bake in the microwave or oven. For the microwave, place a portion on a plate and cover it with a damp paper towel. Heat it for 1-2 minutes until warm. For the oven, preheat to 350°F (175°C). Place the bake in an oven-safe dish and cover with foil. Heat for about 15-20 minutes. This keeps the texture nice and creamy. If you want to save some for later, freezing is a great option. Cut the zucchini bake into portions and wrap each piece tightly in plastic wrap. Then, place them in a freezer bag. This helps prevent freezer burn. To thaw, move a portion to the fridge overnight. Reheat as mentioned above once thawed. Enjoy fresh flavors anytime with this dish! For the full recipe, be sure to check back for more details! Easy Cheesy Zucchini Bake lasts about 3-5 days in the fridge. Store it in an airtight container. This keeps it fresh and tasty. Make sure it cools down before you put it away. Yes, you can make this dish ahead of time. Prepare the layers and cover them. You can store it in the fridge for up to 24 hours. When ready, just bake it. This saves time on busy days. I love serving this dish with a fresh salad or garlic bread. You can also pair it with grilled chicken or fish. These sides add variety and balance to the meal. You can use frozen zucchini, but fresh is better. Frozen zucchini has more water, which can make the bake watery. If using frozen, thaw and drain it first. This keeps the texture nice. Yes, this recipe is great for meal prep. You can make a large batch and portion it out. Just reheating it is quick and easy. It’s perfect for lunches or quick dinners throughout the week. For the full recipe, check out the earlier section. In this post, we covered the tasty Easy Cheesy Zucchini Bake. You learned about the ingredients needed, the steps to prepare it, and essential tips for the perfect bake. We also explored variations and storage options for this dish. This recipe is simple and full of flavor. You can tweak it to fit your taste. Enjoy making this dish at home and share it with friends. It's a great meal for any occasion. Now, get cooking and enjoy the delicious results!

Easy Cheesy Zucchini Bake Simple and Delicious Dish

Looking for a tasty way to enjoy summer’s bounty? My Easy Cheesy Zucchini Bake is here to help! This simple

- 4 medium zucchinis, thinly sliced - 1 cup shredded cheddar cheese - 1 cup ricotta cheese - 1/2 cup grated Parmesan cheese - 1 medium onion, finely chopped - 3 cloves garlic, minced - 2 large eggs - 1 teaspoon dried oregano - 1/2 teaspoon crushed red pepper flakes - Salt and pepper to taste - 1 cup breadcrumbs - 2 tablespoons olive oil In this Cheesy Zucchini Casserole, the main stars are the zucchinis. Their fresh taste shines through. The cheeses add a rich, creamy layer. I love to use cheddar for its sharpness, and ricotta for creaminess. Parmesan gives a nice salty kick. Next, we have the onion and garlic. They add depth and warmth to the dish. I always chop the onion finely for even cooking. The garlic should be minced to release its full flavor. Eggs bind everything together, making the casserole firm yet fluffy. For added flavor, I sometimes add red pepper flakes. They give a slight heat, but this is optional. You can adjust salt and pepper to fit your taste. Breadcrumbs create a crunchy topping, and the olive oil keeps them golden brown. If you're looking for a twist, feel free to switch some ingredients. You can explore different cheeses or add fresh herbs. This recipe is versatile and fun to customize. You can find the full recipe in the earlier section. - Preheat the oven to 375°F (190°C). - Grease a 9x13 inch baking dish. I love the smell of a warm kitchen. First, preheating the oven makes everything cozy. Greasing the dish helps the casserole come out easily. - Heat olive oil in a skillet over medium heat. - Sauté chopped onion until translucent, about 5 minutes. - Add minced garlic and cook until fragrant. Next, I heat olive oil in a skillet. The oil helps cook the onions. I add the chopped onion and stir it until it turns clear. This takes about five minutes. Then, I throw in the minced garlic. It cooks for a minute and fills the kitchen with a lovely scent. - Combine sliced zucchinis, cooked onion and garlic, cheeses, eggs, oregano, salt, and pepper in a bowl. - Mix well and pour the mixture into the prepared baking dish. - Top with olive-oil-coated breadcrumbs. Now comes the fun part! I take a big bowl and add the sliced zucchinis. Next, I mix in the cooked onion and garlic. I also add the cheeses, eggs, oregano, salt, and pepper. Once it’s all in, I mix well. Then, I pour everything into the greased dish. Finally, I sprinkle olive-oil-coated breadcrumbs on top. This gives a nice crunch. - Bake for 30-35 minutes until golden brown. - Let the casserole cool for about 10 minutes before serving. I place the dish in the oven. It bakes for 30 to 35 minutes. The top gets golden brown, and the kitchen smells amazing! After baking, I let it cool for about 10 minutes. This helps the flavors settle before we dig in. - Sprinkle fresh herbs like parsley or basil for garnish. - Use different cheese combinations for varied flavors. These small changes can boost your dish. Fresh herbs add a bright taste and a nice look. You can mix cheeses like mozzarella or goat cheese to change the flavor. Each cheese offers something unique. Try different blends to find your favorite. - For a crunchier top, broil for the last 2-3 minutes. - Adjust breadcrumbs for desired crispiness. Broiling gives the casserole a delightful crunch. Just watch it closely; it can burn fast! For the breadcrumbs, you can use more or less based on your taste. More crumbs mean a crunchier bite, while fewer crumbs give a softer top. - Increase or decrease cooking time based on zucchini thickness. - Ensure the casserole is cooked until zucchini is tender. Thicker zucchini slices need more time in the oven. Keep an eye on it and test with a fork. You want the zucchini soft but not mushy. Adjusting the cooking time helps you get the perfect texture every time. For the Full Recipe, check out the complete guide to making this tasty dish! {{image_2}} You can make your Cheesy Zucchini Casserole even better by adding more veggies. Try bell peppers for some crunch. They can add color and taste. Mushrooms are another great choice. They give a rich flavor that pairs well with zucchini. If you want a twist, swap zucchini for summer squash. It’s just as tasty and adds a different look. If you need a gluten-free option, use gluten-free breadcrumbs. They work just as well in the dish. For a vegan version, substitute with plant-based cheeses. This keeps the creamy texture while making it dairy-free. Both choices allow everyone to enjoy this dish. To boost the flavor, add some Italian seasoning. This gives the casserole a nice herbal taste. If you like heat, diced jalapeños are a fun addition. They bring a spicy kick that many will love. Adjust the spice based on your taste. You can make this dish fit any palate. For the full recipe, check the link above. Store leftovers in an airtight container in the fridge for up to 3 days. This keeps the casserole fresh and tasty. You can enjoy it for lunch or dinner later in the week. Just remember to let it cool before sealing. You can freeze the unbaked casserole for up to 2 months. This is a great option if you want to prepare ahead. To bake, thaw it overnight in the fridge. It will be ready to bake the next day! To reheat, put the casserole in the oven at 350°F until heated through. This method helps maintain the texture. If you're in a hurry, use the microwave. Just know that the texture may change a bit. Enjoy your cheesy goodness! You can prepare the casserole and refrigerate it before baking. Just bake it before serving. This makes it easy for busy days. Fresh zucchini is preferred for best flavor and texture. However, thawed frozen zucchini can work in a pinch. Just be sure to drain excess water after thawing. I love to pair it with a mixed green salad or crusty bread. This adds freshness and makes it a complete meal. Leftovers can be stored in the refrigerator for up to 3 days. I suggest keeping them in an airtight container for best freshness. Yes! This casserole freezes well and is great for meal prep or leftovers. You can make a big batch and enjoy it later. This blog post covered a tasty Cheesy Zucchini Casserole recipe. We explored key ingredients, detailed easy steps, and shared tips for extra flavor. You can make it your own with variations and storage tips. Consider adding herbs or spices to find your favorite taste. This dish is simple, fun, and great for meal prep. Enjoy this delicious casserole with friends and family anytime!

Cheesy Zucchini Casserole Delightful and Easy Recipe

Are you looking for a simple and delicious way to enjoy zucchini? Then this Cheesy Zucchini Casserole is perfect for

To make peach cobbler pancakes, you need the following items: - 1 cup all-purpose flour - 2 tablespoons sugar - 1 tablespoon baking powder - 1/2 teaspoon salt - 1 cup milk - 1 large egg - 2 tablespoons melted butter - 1 teaspoon vanilla extract - 1 cup fresh peaches, peeled and diced (or canned, drained) - 1 teaspoon ground cinnamon - 1/2 cup chopped pecans (optional) - Maple syrup, for serving You can swap some ingredients if needed. Here are a few ideas: - Use whole wheat flour instead of all-purpose flour for a nutty taste. - Substitute honey or maple syrup for sugar for a healthier option. - Almond milk can replace regular milk for a dairy-free choice. - Use a flax egg instead of a large egg to make it vegan. Choosing the best peaches is key. Here’s how to find good ones: - Look for peaches that are firm yet slightly soft when you press them. - Check for a sweet smell. If they smell good, they will taste good. - Choose peaches with a golden hue. Avoid ones that are green or overly firm. - If you can, buy local peaches in season for the best flavor. Enjoy these tips as you prepare to make your delicious peach cobbler pancakes. For the full recipe, check out the earlier section! To make peach cobbler pancakes, start by gathering your ingredients. In a large mixing bowl, whisk together the flour, sugar, baking powder, and salt. Then, in a different bowl, mix the milk, egg, melted butter, and vanilla extract until smooth. Pour the wet mix into the dry mix and stir gently. It’s okay if the batter has some lumps; this helps keep the pancakes fluffy. Next, fold in the fresh or canned peaches, ground cinnamon, and pecans if you like. Preheat a non-stick skillet over medium heat. Lightly grease it with cooking spray or a bit of butter. Pour 1/4 cup of batter onto the skillet for each pancake. Cook until bubbles form on the surface. This should take about 2-3 minutes. Flip the pancake and cook for another 2-3 minutes until golden brown. Repeat with the rest of the batter, re-greasing the skillet as needed. Serve warm with extra peaches, cinnamon, and syrup. Flipping pancakes can be tricky, but I have a few tips that help. First, wait for bubbles to form on the surface. This shows the pancake is ready to flip. Use a wide spatula for better support. Slide the spatula under the pancake and lift it gently. If it sticks, give it a little wiggle to loosen it. If you feel unsure, you can even peek underneath to check the color. For light and fluffy pancakes, don’t over-mix the batter. A few lumps are okay and actually help keep them soft. Use the right heat; too high can burn the outside while leaving the inside raw. Medium heat works best. If you want a thicker pancake, use less milk, and if you want them thinner, add a bit more. This way, you can get the pancake texture just right for your taste! One of the biggest mistakes is over-mixing the batter. Mixing too much makes pancakes tough. Just stir until you see a few lumps. Another mistake is not using enough heat. Cooking on low heat makes pancakes soggy. Medium heat helps them cook evenly. Also, don’t forget to grease the pan. A non-stick skillet is great, but a little butter or spray helps. To take your peach cobbler pancakes to the next level, try adding toppings. Fresh diced peaches make a great choice. You can also sprinkle more cinnamon for warmth. A dollop of whipped cream adds creaminess and sweetness. If you like nuts, add chopped pecans for crunch. Finally, drizzle warm maple syrup on top. This combo makes each bite special. If you're using a cast-iron skillet, adjust the heat. Cast iron holds heat well, so use low to medium heat. For electric griddles, set it to about 375°F. This temperature helps pancakes cook through without burning. If you're using a non-stick pan, a little grease helps them slide off easily. Try different griddles to find what works best for you. Each one can change the texture and taste. For the full recipe, check out the details above and start cooking! {{image_2}} You can change up the flavor by adding different fruits. Try using fresh blueberries or strawberries. They add a nice sweetness and color. You can also mix in some raspberries for a tangy twist. Each fruit brings its own taste, making every pancake special. If you need a gluten-free option, swap the all-purpose flour for a gluten-free blend. Many brands work well, so choose one you like. You can also use almond flour for a nutty flavor. Just remember to check the texture. You want it to be fluffy and light. For a fun twist, try chocolate chip pineapple peach cobbler pancakes. Add 1/2 cup of chocolate chips to your batter. Then, mix in 1/2 cup of crushed pineapple, drained. This combo tastes like a tropical vacation. It’s sweet, fruity, and so delicious. Your family will love this fun variation! To keep your leftover pancakes fresh, stack them in a safe container. Use parchment paper between each pancake. Cover the container tightly with a lid or plastic wrap. This helps avoid drying out. Store them in the fridge for up to three days. You can freeze your pancakes for later. Just cool them first on a wire rack. Once cool, stack them with parchment paper in between. Place the stack in a freezer bag. Make sure to remove as much air as possible. You can freeze them for up to two months. To reheat, use either a microwave or a skillet. If using a microwave, place a pancake on a plate. Heat for 30 seconds, then check. If it needs more time, heat in 10-second bursts. For a skillet, warm it on medium heat. Add a little butter, then heat each pancake for about one minute on each side. Enjoy them warm for the best taste! Yes, you can use canned peaches. Just make sure to drain them well. Canned peaches save time and still taste great. They add sweetness and moisture to the pancakes. If you prefer fresh, they work beautifully too. Select ripe, juicy peaches for the best flavor. To make your pancakes fluffier, focus on the batter. First, don’t over-mix it; a few lumps are okay. Next, let the batter rest for a few minutes before cooking. This helps the baking powder work better. You can also add a bit more baking powder for extra lift. Maple syrup is the classic choice. Its rich flavor pairs well with the peaches. You can also try peach syrup for a fun twist. Honey works too if you want something different. Choose a syrup that complements the sweetness of the pancakes. You can find the full recipe for Peach Cobbler Pancakes in this article. Just scroll up to see all the steps and ingredients laid out for you. Follow the instructions, and you'll make a delicious breakfast treat! In this post, we explored how to cook delicious peach cobbler pancakes. We covered essential ingredients, substitutions, and tips for picking fresh peaches. I shared step-by-step cooking instructions and tricks for the perfect pancake flip. We also discussed common mistakes to avoid and ways to enhance flavor. Finally, I provided storage info and answered frequently asked questions. Remember, cooking should be fun and creative. Enjoy making these pancakes your own!

Peach Cobbler Pancakes Delicious and Simple Recipe

Are you ready to bring a burst of flavor to your breakfast table? Peach Cobbler Pancakes are the perfect blend

For a great creamy cheesy zucchini casserole, you'll need fresh zucchinis and a blend of cheeses. I use four medium zucchinis, sliced thin. The cheeses are key for flavor and texture. I recommend using: - 1 cup ricotta cheese - 1 cup shredded mozzarella cheese - 1/2 cup grated Parmesan cheese These cheeses melt well and give a rich taste to the dish. The creamy base is essential for this casserole. Heavy cream makes it rich and smooth. You’ll need 1 cup of heavy cream. It blends with the ricotta and adds depth. Seasonings bring the dish to life. I use: - 2 cloves garlic, minced - 1 teaspoon dried oregano - 1 teaspoon salt - 1/2 teaspoon black pepper - 1/2 teaspoon red pepper flakes (optional for heat) These flavors enhance the zucchini and cheese. For a crispy top, add 1 cup of breadcrumbs, preferably panko. Garnish with fresh parsley before serving for a pop of color. For the full recipe, check out the complete details above. Slicing the Zucchini Start by washing the zucchinis. Cut off both ends, then slice them thinly. Aim for about 1/4 inch thick slices. This size helps them cook evenly and blend well with the other ingredients. Mixing the Creamy Filling In a large bowl, combine ricotta cheese, heavy cream, minced garlic, oregano, salt, black pepper, and red pepper flakes if you like some heat. Stir everything until it mixes well and becomes smooth. This filling will give the casserole its creamy texture. Layering the Casserole Take a greased 9x13 inch baking dish. Begin by layering half of the sliced zucchini at the bottom. Next, spread half of the creamy filling over the zucchini. Then, sprinkle a mix of mozzarella and Parmesan on top. Repeat these layers with the remaining zucchini and filling. Finish with a generous layer of mozzarella and Parmesan cheese. Initial Baking with Foil Cover the casserole with aluminum foil. Place it in your preheated oven at 375°F (190°C) and bake for 25 minutes. This step helps to steam the zucchini, making it tender. Finishing Without Foil After 25 minutes, carefully remove the foil. Bake the casserole for an additional 15 to 20 minutes. You want the top to turn golden brown and bubbly. This creates a nice crust and enhances the flavor. Ideal Serving Temperature Let the casserole cool for about 5 minutes after baking. This cooling time helps it set up a bit. It’s best served warm, so the cheese is melty and the layers hold together. Garnishing Ideas For a fresh touch, sprinkle chopped parsley on top just before serving. You can also drizzle a little olive oil over the casserole for added flavor. Enjoy your delicious creamy cheesy zucchini casserole! Check out the Full Recipe for more details. The right cheese combination makes all the difference. Use ricotta for a creamy base. Add mozzarella for stretch and a nice melt. Parmesan gives a sharp flavor that balances the dish. This mix creates a rich and cheesy experience. Adjusting creaminess levels is key too. If you prefer a thicker dish, use less cream. For a smoother texture, add more cream. You can even swap in cream cheese for a different taste. Experiment to find what you love best. Avoiding soggy zucchini is crucial for a great casserole. Start by slicing the zucchini thin. This helps them cook evenly. After slicing, lightly salt the zucchini. Let them sit for about 15 minutes to draw out excess water. Pat them dry with paper towels before layering. Baking time variations can also change your results. If your oven runs hot, check the casserole a bit early. You want the top golden and bubbly, so watch closely. If you like a crustier top, bake it a little longer without foil. For the full recipe, check out the detailed instructions, and enjoy your cooking! {{image_2}} You can swap out cheeses in this casserole. Use your favorites to change the flavor. For creaminess, try mascarpone or goat cheese. For a sharp taste, consider cheddar or gouda. Each cheese brings its own unique twist to your dish. Zucchini is great, but you can use other squash too. Yellow squash works well and adds color. If you like a firmer texture, try pattypan squash. Each type offers a different taste and look. Herbs and spices can change the flavor profile. Add fresh basil for a bright note. Thyme or rosemary can give a warm, earthy flavor. A pinch of nutmeg also adds depth to the creamy mix. Don’t be afraid to experiment to find what you love. Want to make this casserole heartier? Add some protein! Cooked chicken or turkey works well. Ground beef or sausage can also spice things up. For a vegetarian option, try adding cooked lentils or chickpeas. These will add texture and make the dish more filling. For the full recipe, check out the complete guide to making this delicious dish. To keep your creamy cheesy zucchini casserole fresh, store leftovers in an airtight container. This helps maintain flavor and texture. Make sure to let the casserole cool completely before sealing it. You can keep it in the fridge for up to four days. When reheating, I suggest using the oven. It warms the casserole evenly and keeps the cheese melty. Preheat the oven to 350°F (175°C) and bake for about 20 minutes. You can cover it with foil to prevent the top from browning too much. You can freeze your casserole both before and after baking. To freeze before baking, assemble the casserole in your baking dish. Cover it tightly with plastic wrap and then with foil. This way, it stays fresh for up to three months. When you’re ready to bake it, thaw it in the fridge overnight before cooking. If you want to freeze it after baking, let it cool completely first. Then, cut it into portions. Wrap each piece in plastic wrap, then place them in a freezer bag. This method makes it easy to reheat just what you need. To thaw a frozen portion, place it in the fridge for several hours or overnight. For quicker thawing, use the microwave on defrost mode. When you’re ready to reheat, bake at 350°F (175°C) for about 15-20 minutes, or until hot. Always check the center to ensure it's thoroughly warmed through. Enjoy your casserole just like fresh! If you want the top crispy, you can leave it uncovered for the last few minutes of baking. For the full recipe, check out the guide above! Yes, you can make this recipe ahead of time. Prepare the casserole, but do not bake it. Cover it tightly with plastic wrap or aluminum foil. Store it in the fridge for up to 24 hours. When you're ready to bake, let it sit at room temperature for about 30 minutes. Then, bake it as per the instructions in the Full Recipe. This casserole pairs well with many side dishes. Try serving it with: - A fresh green salad for crunch. - Garlic bread for a tasty side. - Roasted vegetables for added flavor. - Quinoa or rice for a hearty meal. These options balance the creamy texture of the casserole. To keep the zucchini from being watery, follow these tips: - Salt the zucchini: Sprinkle salt on the sliced zucchini. Let it sit for about 30 minutes. This draws out excess moisture. Pat the slices dry with a paper towel before using them. - Choose firm zucchinis: Look for firm and small zucchinis. They tend to have less water than larger ones. - Cook briefly before baking: You can also sauté the sliced zucchini for a few minutes. This helps reduce moisture before layering in the casserole. Using these techniques ensures your casserole has the perfect texture. This article guides you through making a creamy cheesy zucchini casserole. We covered key ingredients like zucchini, cheese, and seasonings. You learned to prep, layer, and bake the dish for optimal flavor and texture. I shared tips on achieving the perfect creaminess and avoiding soggy zucchini. We also explored delicious variations and how to store leftovers. With these insights, you can create a delightful dish that impresses any guest. Enjoy your cooking journey!

Creamy Cheesy Zucchini Casserole Simple and Delicious

Are you ready for a dish that combines creamy goodness with cheesy delight? My Creamy Cheesy Zucchini Casserole is here

For this delicious olive oil zucchini bread, you will need: - 2 cups grated zucchini (about 2 medium zucchinis) - 1/2 cup extra virgin olive oil - 3 large eggs - 1 cup granulated sugar - 1 teaspoon vanilla extract - 2 cups all-purpose flour - 1 teaspoon baking powder - 1 teaspoon baking soda - 1/2 teaspoon salt - 1 teaspoon ground cinnamon - 1/2 teaspoon ground nutmeg - 1/2 cup chopped walnuts (optional) - 1/2 cup raisins or chocolate chips (optional) Each measurement in this recipe plays a key role in your bread's taste and texture. For instance, the zucchini adds moisture and keeps the bread soft. The olive oil not only enhances flavor but also creates a tender crumb. Using the correct amount of baking powder and baking soda is crucial. These ingredients help the bread rise and provide that lovely lightness. If you add too much, your bread might taste bitter. Too little, and it may turn out flat. Olive oil brings many benefits to this recipe. First, it adds a rich, fruity flavor that enhances the bread. Unlike butter, olive oil is a healthier fat source. It contains good fats that can help improve heart health. Another bonus? Olive oil helps keep the bread moist for longer. This means you can enjoy your zucchini bread for days without it drying out. Plus, using olive oil can make your baking stand out, giving it a unique twist compared to traditional recipes. For the full recipe, check out the detailed steps to create this moist and flavorful zucchini bread. First, gather your ingredients. You'll need grated zucchini, olive oil, eggs, sugar, and vanilla. You should also get flour, baking powder, baking soda, salt, cinnamon, nutmeg, and optional nuts or chocolate chips. Next, preheat your oven to 350°F (175°C). Grease a 9x5-inch loaf pan to prevent sticking. In a large bowl, whisk together the olive oil, eggs, sugar, and vanilla. Make sure these mix well. Then, stir in the grated zucchini. It adds moisture and flavor. In another bowl, sift together the dry ingredients: flour, baking powder, baking soda, salt, cinnamon, and nutmeg. This step helps to combine everything evenly. Gradually add your dry mixture to the wet mixture. Mix until just combined. Overmixing can make the bread tough, so be gentle. If you like, fold in chopped walnuts or raisins. These add texture and taste. Pour the batter into your prepared loaf pan. Smooth the top with a spatula for even baking. Now it's time to bake! Place the loaf pan in your preheated oven. Bake for 50 to 60 minutes. Check the bread by inserting a toothpick in the center. If it comes out clean, your bread is done. Make sure to keep an eye on it. Ovens can vary, so yours might cook faster or slower. Once baked, allow the bread to cool in the pan for about 10 minutes. This helps it set before moving. After that, transfer it to a wire rack to cool completely. To test if your bread is done, use a toothpick or a cake tester. Insert it into the center of the loaf. If it comes out clean or with a few crumbs, your bread is ready. If it has wet batter, bake a bit longer. Another test is to gently press the top. If it springs back, it’s done. It’s also good to check the edges. They should look golden brown. With these tips, you'll have perfect olive oil zucchini bread every time! For the full recipe, check the details above. When making olive oil zucchini bread, avoid overmixing your batter. Overmixing makes the bread tough. Mix only until the flour disappears. This keeps your bread soft. Also, ensure you grate the zucchini finely. Large pieces can lead to uneven baking. Drain excess water from the zucchini if it's too wet. Too much moisture can make your bread soggy. Start by mixing wet ingredients first. Combine the olive oil, eggs, sugar, and vanilla. Whisk them until smooth. Then, add the grated zucchini to the mix. This helps distribute the zucchini evenly. In a separate bowl, sift together the dry ingredients. This makes the flour lighter and mixes better. Gradually combine the dry and wet mixes. Do this gently for the best texture. To boost flavor, add spices like cinnamon and nutmeg. They pair well with zucchini. Consider folding in chopped walnuts or raisins for extra texture. You can also use orange zest for a bright twist. If you're feeling adventurous, try adding a bit of almond extract. Each of these ingredients makes the bread richer. For a moist finish, drizzle a little olive oil on top before serving. For the full recipe, refer to the main section. {{image_2}} You can make your olive oil zucchini bread even better by adding nuts and dried fruits. Chopped walnuts add a nice crunch. They also give the bread a rich flavor. You can use almonds or pecans if you prefer. For dried fruits, raisins work well. They add sweetness and moisture to the bread. You can also try dried cranberries or chopped dates for a twist. Just remember to toss the nuts or fruits in a bit of flour before adding them. This helps them mix in better. Spices can change the flavor of your zucchini bread. Cinnamon is a classic choice and warms it up. You can also add nutmeg for a hint of sweetness. If you want a unique flavor, try adding cardamom or ginger. These spices can give the bread a nice kick. For a fresh taste, consider adding lemon or orange zest. Just a teaspoon can brighten the whole loaf. You can also mix in some cocoa powder for a chocolate version. Making gluten-free zucchini bread is easy. Just swap the all-purpose flour for a gluten-free blend. Look for a blend that contains xanthan gum; it helps with texture. If you're watching sugar, try using a sugar substitute. Honey, maple syrup, or agave nectar can work well too. Just adjust the liquid in the recipe to balance things out. For a lower sugar option, use ripe bananas or unsweetened applesauce. These add natural sweetness and moisture. For more details, check the Full Recipe. To keep your Olive Oil Zucchini Bread fresh, store it in an airtight container. This helps retain moisture and flavor. Place the bread at room temperature for up to three days. If you want to keep it longer, refrigeration is an option, but it may dry out. You can wrap it in plastic wrap first, then place it in a container. Freezing your zucchini bread is a great way to save it for later. First, let the bread cool completely. Then, wrap it tightly in plastic wrap. After that, place the wrapped bread in a freezer bag. This method helps prevent freezer burn. You can freeze it for up to three months. When you’re ready to eat it, simply thaw it overnight in the fridge. To enjoy your Olive Oil Zucchini Bread warm, preheat your oven to 300°F (150°C). Place the slices on a baking sheet. Heat them for about 10-15 minutes. This gives the bread a nice warm texture. Alternatively, you can microwave a slice for about 15-20 seconds. Just be cautious not to overheat it, as it may become rubbery. Yes, you can use other oils. Canola or avocado oil works well too. They keep your bread moist and flavorful. Each oil gives a unique taste. Experiment to find your favorite! To make this recipe vegan, swap the eggs with flax eggs. Mix one tablespoon of ground flaxseed with three tablespoons of water. Let it sit for a few minutes to thicken. This mix acts like an egg in baking. You will still get a great texture and taste. If you can't find zucchini, try using grated carrots or apples. Both give sweetness and moisture. You can also use summer squash if you have it. This adds fun flavors while keeping the bread moist. Zucchini bread stays fresh for about 3 to 4 days at room temperature. Store it wrapped in plastic or foil. You can keep it in the fridge for longer, up to a week. Just remember to let it come to room temp before serving. Absolutely! You can add grated carrots or even cooked spinach. Both options give your bread a veggie boost. Just be careful not to add too much moisture. Keep the balance for the best texture. In this article, I shared how to make delicious olive oil zucchini bread. We covered key ingredients, preparation steps, and baking tips for perfect results. I also highlighted ways to enhance flavor and texture, plus storage solutions. Keep these tips in mind to avoid mistakes and create tasty variations. Remember, experimenting is part of the fun in baking. Enjoy your baking journey and savor the joy of your creations!

Olive Oil Zucchini Bread Moist and Flavorful Recipe

Welcome to your new favorite treat: Olive Oil Zucchini Bread! This recipe gives you a moist, flavorful loaf that’s perfect

- 1 cup dried figs, chopped - 1 cup walnuts, roughly chopped - 1 cup rolled oats - 1/2 cup almond butter - 1/4 cup honey or maple syrup - 1 teaspoon vanilla extract - 1/2 teaspoon cinnamon - 1/4 teaspoon salt - 1/4 cup mixed seeds (pumpkin, sunflower, etc.) for added crunch Each ingredient plays a key role in making Fig and Walnut Bars tasty and healthy. The dried figs add natural sweetness and fiber. Walnuts provide healthy fats and a nice crunch. Rolled oats give the bars a hearty base. Almond butter binds everything together and adds creaminess. Honey or maple syrup sweetens the mix. Vanilla extract enhances the flavor, while cinnamon adds warmth. Salt balances the sweetness. Finally, mixed seeds add extra crunch and nutrition. You can mix things up with some substitutions. Here are a few ideas: - Alternative nut butters: If you don’t have almond butter, use peanut butter or sunflower seed butter. - Different sweeteners: You can swap honey for agave syrup or coconut sugar. - Gluten-free oat options: If you need gluten-free, choose certified gluten-free rolled oats. These swaps keep the recipe flexible and fun. Enjoy trying different combinations! For the full recipe, check out the details above. 1. First, preheat your oven to 350°F (175°C). This helps the bars bake evenly. 2. Line an 8x8-inch baking dish with parchment paper. Let some hang over the edges. This makes it easy to lift the bars out later. 3. In a large bowl, combine 1 cup of chopped dried figs and 1 cup of roughly chopped walnuts. Mix them well so they blend together nicely. 1. In another bowl, prepare the oat mixture. Mix together 1 cup of rolled oats, 1/2 cup of almond butter, 1/4 cup of honey (or maple syrup), 1 teaspoon of vanilla extract, 1/2 teaspoon of cinnamon, and 1/4 teaspoon of salt. Stir until it’s smooth. 2. Pour this oat mixture over your fig and walnut blend. Stir until everything is coated well. 3. Fold in 1/4 cup of mixed seeds for extra crunch and flavor. 4. Spread this mixture evenly in your prepared baking dish. Press down firmly to create a compact layer. 5. Bake in the oven for 20-25 minutes. You want the edges to turn golden brown. 1. After baking, remove the dish from the oven. Let it cool completely in the dish. This can take around 30 minutes. 2. Once cool, lift the bars out using the parchment paper. Use a sharp knife to cut them into your desired size. Enjoy these Fig and Walnut Bars as a healthy snack! For the complete recipe, check out the Full Recipe section. To get the best texture for your Fig and Walnut Bars, press the mixture firmly into the pan. This helps the bars hold together when baked. Use a spatula or your hands to compact the mix. To prevent the bars from being too sticky, ensure you coat your hands or spatula with a bit of oil or water. This simple step makes it easier to handle the mix without it sticking to you. For serving, arrange the bars on a wooden board. Scatter extra figs and walnuts around them for a lovely look. This adds color and invites everyone to dig in. Pair the bars with a cup of herbal tea or a glass of milk. They also taste great with yogurt, making a healthy snack or breakfast choice. If you want to add flair, drizzle some honey or melted dark chocolate on top before serving. You can find the Full Recipe above to make these delicious snacks! {{image_2}} You can make fig and walnut bars even better by adding flavors. One fun option is to mix in chocolate chips. They add a sweet touch that pairs well with the figs. You can use dark or milk chocolate, based on your taste. Another way to change the flavor is by adding spices. Try nutmeg or ginger. These spices bring warmth and depth to your bars. A pinch of nutmeg can make the bars feel cozy. Ginger adds a nice zing. Both spices can transform the bars into a new treat. If you want to make these bars vegan, it’s easy! Just swap honey for maple syrup. This keeps the bars sweet without any animal products. You can also use almond butter or any nut butter you like. For those with nut allergies, try nut-free options. Use sunflower seed butter instead of almond butter. You can also skip the walnuts. Add more seeds or coconut flakes for texture. These changes keep your bars tasty and safe for everyone. For the full recipe, check out the Fig & Walnut Delight Bars section above. To keep your Fig and Walnut Bars fresh, choose the right container. Use an airtight container for best results. Glass or plastic containers work well. You can also use wax paper to wrap each bar. This method keeps them fresh and easy to grab. You can store your bars at room temperature for a few days. Just make sure they are in a cool, dry place. If you want to store them longer, put them in the fridge. The cold helps them last much longer. How long do Fig and Walnut Bars last? If kept at room temperature, they last about 4 to 5 days. In the fridge, they can last up to 2 weeks. This makes them a great option for meal prep. For longer storage, consider freezing your bars. Wrap them tightly in plastic wrap or foil. Then place them in a freezer-safe bag or container. They can last up to 3 months in the freezer. When you're ready to eat them, simply thaw them in the fridge overnight. Enjoy your delicious snack whenever you want! For the full recipe, check out the Fig & Walnut Delight Bars. To make Fig and Walnut Bars gluten-free, use gluten-free oats. Many stores sell certified gluten-free oats. Be sure to check the label. You can also use almond flour or coconut flour as a base if you want to switch things up. You can use fresh figs, but they will change the texture. Fresh figs contain more water. This may make the bars too wet. If you want to use fresh figs, dry them first or reduce the other liquids in your recipe. Fig and Walnut Bars are rich in fiber, healthy fats, and vitamins. Each bar has about 150 calories, with protein from nuts and oats. They offer a good mix of carbs and protein, making them a great snack. The bars are done when the edges turn golden brown. You can also poke them with a toothpick. If it comes out clean, they are ready. Let them cool completely before cutting for the best texture. For a full recipe, check out the recipe section above! This blog post covered all you need to know about Fig and Walnut Bars. We explored the key ingredients, including dried figs, walnuts, and oats. You learned about adjusting the recipe with substitutions and variations. I shared easy steps to make, bake, and serve these tasty bars. In the end, these bars are fun to make and tasty to eat. Enjoy sharing them with friends and family!

Fig and Walnut Bars Healthy and Flavorful Snack

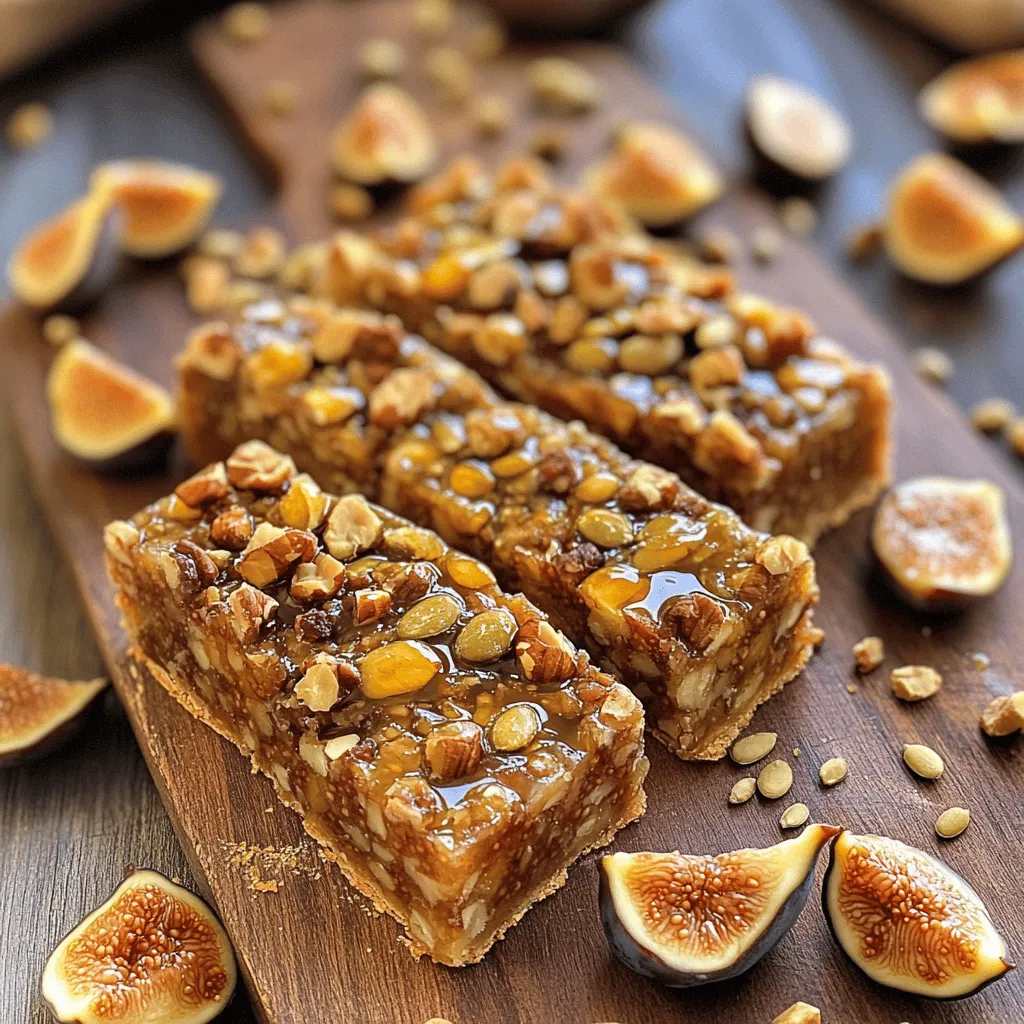
If you’re searching for a tasty yet healthy snack, Fig and Walnut Bars are a perfect choice! Packed with nutritious

- 4 medium yellow squash - 1 pound ground beef - 1 cup cooked quinoa - 1 small onion, diced - 2 cloves garlic, minced - 1 cup diced tomatoes (fresh or canned) - 1 teaspoon Italian seasoning - 1/2 teaspoon paprika - Salt and pepper to taste - 1 cup shredded mozzarella cheese - 2 tablespoons olive oil - Fresh basil for garnish Gather these ingredients to make your stuffed yellow squash with beef. The yellow squash gives a nice base for the filling. Ground beef adds great flavor and protein. Quinoa makes it hearty and healthy. The diced onion and minced garlic bring a sweet aroma as they cook. Diced tomatoes add moisture and tang. Italian seasoning and paprika give the dish a warm taste. Don't forget to add salt and pepper to enhance the flavors. The mozzarella cheese melts beautifully on top, making it extra tasty. Olive oil helps cook the filling and keeps it moist. Finally, fresh basil adds a pop of color and freshness when you serve it. For the full recipe, check the details shared earlier. - Preheat the oven to 375°F (190°C). - Slice the yellow squash in half lengthwise. Scoop out the seeds and flesh, leaving about a 1/4-inch shell. Set the flesh aside for later. Place the squash halves cut side up on a baking dish. - In a large skillet, heat 2 tablespoons of olive oil over medium heat. Add 1 small diced onion and 2 minced garlic cloves. Cook for about 3-4 minutes until the onion turns soft and clear. - Next, add 1 pound of ground beef to the skillet. Cook it until it turns brown, breaking it apart as it cooks. This should take around 5-7 minutes. - Now, stir in the reserved squash flesh, 1 cup of diced tomatoes, 1 cup of cooked quinoa, 1 teaspoon of Italian seasoning, 1/2 teaspoon of paprika, and salt and pepper to taste. Cook for another 5 minutes, mixing everything well until it's heated through. - Take the beef and vegetable mixture and spoon it generously into each squash half. - Top each stuffed squash with 1 cup of shredded mozzarella cheese. - Cover the baking dish with foil and bake in the preheated oven for 25 minutes. - After 25 minutes, remove the foil and bake for an additional 10 minutes, or until the cheese is melted and bubbly. - Once cooked, take it out of the oven, let it cool slightly, and garnish with fresh basil before serving. This savory dish combines simple flavors for a delightful meal. You can find the Full Recipe for more details. - Ensuring perfect squash texture To get the best texture, pick squash that feels firm. Soft spots mean it's overripe. When you scoop out the flesh, leave about a 1/4-inch shell. This keeps the squash sturdy and helps it hold the filling well. - Browning the beef for flavor Browning the ground beef adds depth to the dish. Heat your skillet on medium-high before adding the beef. Break it apart with a spatula as it cooks. Let it sit for a moment to brown on one side before stirring. This technique gives a rich flavor that elevates the entire meal. - Pairing with salads or sides Serve your stuffed squash with a fresh salad. A simple green salad with vinaigrette works well. You can also add roasted vegetables or garlic bread on the side. These sides complement the squash and add more color to your plate. - Presentation tips for serving For a beautiful presentation, use a colorful platter. Place the stuffed squash halves neatly on it. Drizzle with balsamic reduction for style. Add a fresh basil leaf on top of each squash for a pop of color and a hint of freshness. This makes the dish look as good as it tastes! Make sure to check the Full Recipe for complete details to create this delightful dish. {{image_2}} You can switch ground beef for turkey or chicken. This change makes the dish leaner. Turkey adds a mild taste, while chicken brings a nice flavor too. Both options work well with the spices in the recipe. Adding different vegetables also enhances the dish. You can try bell peppers, zucchini, or spinach. These veggies bring color and extra nutrients. Just chop them up and mix them in with the beef and quinoa. If you need a gluten-free meal, you can easily adjust the recipe. Use gluten-free quinoa instead of regular. Ensure all sauces and spices are gluten-free too. This way, everyone can enjoy the dish without worry. For a vegetarian option, swap the beef for lentils or chickpeas. Both options are packed with protein and work well with the other ingredients. Just cook them first and mix them in the filling. This keeps it flavorful and satisfying without meat. You can find the full recipe [here](#). To keep your stuffed yellow squash fresh, first let it cool. After cooling, store leftovers in the fridge. Wrap each squash half tightly in plastic wrap. You can also place them in an airtight container. This keeps moisture in and prevents odors from mixing. The dish stays fresh for about 3-4 days in the fridge. Use glass or plastic containers that seal tightly. They are great for storing your squash. Glass containers let you see the food inside. They are also easy to clean. Choose containers that fit the size of your leftovers. Avoid using aluminum foil for long-term storage. It can react with the food and change the taste. To enjoy the flavors again, reheat leftovers carefully. The best method is to use an oven. Preheat the oven to 350°F (175°C). Place the stuffed squash in a baking dish. Cover with foil to keep moisture in. Heat for about 15-20 minutes until warm. This keeps the squash tender and the filling moist. You can also use a microwave for quick reheating. Place the squash on a microwave-safe plate. Cover it with a damp paper towel to keep it from drying out. Heat in short bursts, about 1-2 minutes at a time. Check the temperature to avoid overheating. The oven gives a better result, but the microwave is faster. Choose the method that works best for you. Can I use frozen squash? Yes, you can use frozen squash. Just thaw it before using. Frozen squash may change the texture a bit, but it still tastes good. How long does the dish last in the fridge? Stuffed yellow squash lasts about three to four days in the fridge. Store it in an airtight container to keep it fresh. Can I prepare this in advance? Absolutely! You can prepare the filling a day before. Just store it in the fridge. When ready, stuff the squash and bake. What can I serve with stuffed squash? Stuffed squash pairs well with a fresh salad or crusty bread. You could also serve it with rice or quinoa for a complete meal. What temperature should the beef be cooked to? Cook the beef to an internal temperature of 160°F (71°C). This ensures it’s safe to eat and full of flavor. Can I bake the stuffed squash without the cheese? Yes, you can bake it without cheese. The dish will still taste great! If you want, add a sprinkle of herbs for extra flavor. This dish combines yellow squash, ground beef, and quinoa into a tasty meal. We covered gathering fresh ingredients, preparing, and cooking the squash perfectly. I shared tips for serving and storing leftovers, plus ways to adapt the recipe. Remember, feel free to change the meat or add veggies. With these steps and tricks, you can enjoy a hearty meal. Test the recipe, impress your friends, and dive into the flavors!

Stuffed Yellow Squash with Beef Flavorful Recipe

Are you ready to spice up your dinner routine? This delicious Stuffed Yellow Squash with Beef recipe is simple, tasty,

- 2 cups grated zucchini - 1 cup granulated sugar - 1/2 cup brown sugar To make Zucchini Orange Bread, you start with fresh zucchini. Grate it finely. This brings out its moisture. Next, you need sugar. I use both granulated and brown sugar. The brown sugar adds a rich flavor. - Zest of 1 medium orange - 1/4 cup freshly squeezed orange juice - 1 teaspoon pure vanilla extract Next, for flavor, you need orange zest. This brightens the bread. Fresh orange juice is also key. It adds a lovely tang. Don’t forget the vanilla extract. It blends all the flavors nicely. - 2 cups all-purpose flour - 1 teaspoon baking soda - 1/2 teaspoon baking powder Now for the dry ingredients. Use all-purpose flour. It gives the bread its structure. Baking soda and baking powder help it rise. This makes your bread fluffy and light. You can find the complete list of ingredients in the Full Recipe. - Preheat the oven to 350°F (175°C). - In a large mixing bowl, combine: - 2 cups grated zucchini - 1 cup granulated sugar - 1/2 cup brown sugar - 1/2 cup vegetable oil - 3 large eggs - 1 teaspoon pure vanilla extract - Zest of 1 medium orange - 1/4 cup freshly squeezed orange juice - Mix well until everything is fully combined. This step brings out the flavors. - In a separate bowl, whisk together: - 2 cups all-purpose flour - 1 teaspoon baking soda - 1/2 teaspoon baking powder - 1 teaspoon ground cinnamon - 1/2 teaspoon salt - 1/4 teaspoon ground nutmeg - Whisking helps to evenly distribute the leavening agents for a perfect rise. - Gradually add the dry mixture to the wet ingredients. - Fold gently until just combined. Remember, a few lumps are okay! - If you like nuts, fold in 1/2 cup chopped walnuts or pecans. - Pour the batter into the prepared loaf pan. Smooth the top with a spatula. - Bake in the preheated oven for 55-65 minutes. A toothpick inserted into the center should come out clean. - Once baked, cool in the pan for about 10 minutes. Then transfer to a wire rack to cool completely. This method gives you a moist and flavorful Zucchini Orange Bread that you will love. For more details, check the Full Recipe. - Do not overmix the batter. Overmixing can make your bread tough. Mix until just combined. - Use fresh zucchini for the best flavor. Fresh zucchini holds more moisture and taste. - Serve warm with cream cheese. The cream cheese adds a rich and tangy touch. - Sprinkle powdered sugar for added sweetness. This gives your bread a lovely look and taste. - Ensure the bread cooks evenly. Rotate your loaf pan halfway through baking for even heat. - Avoid dryness in the bread. Make sure not to bake too long; check with a toothpick. {{image_2}} You can add nuts to your Zucchini Orange Bread for extra crunch. Walnuts and pecans work great. They add a nice earthy flavor and texture. If you want to try something different, almonds or hazelnuts can also enhance your bread. Just chop them up and fold them into the batter. This small change can make your bread even more enjoyable. For a fun twist, think about adding chocolate chips. They bring a rich, sweet taste. You can mix in about half a cup for a delightful surprise in every bite. Dried fruits like raisins or cranberries are also tasty options. They add natural sweetness and chewiness. If you're looking for a different citrus kick, use lemon zest or juice instead of orange. This change gives your bread a fresh, bright flavor. Making a gluten-free Zucchini Orange Bread is easy. Just swap out the all-purpose flour for a gluten-free flour mix. You can find many options in stores. When using gluten-free flour, you may need to adjust the moisture. Add a bit more orange juice or zucchini to keep the bread moist. This way, everyone can enjoy this delicious treat, even if they have dietary restrictions. For the full recipe, check the earlier section. To keep your zucchini orange bread fresh, store it at room temperature. Place it in an airtight container or wrap it tightly in plastic wrap. This method keeps the bread moist and tasty for up to three days. If you want to store it longer, consider refrigeration. Wrap it well and place it in the fridge. This will extend its freshness for about a week. Freezing zucchini orange bread is easy and keeps it fresh for months. First, let the bread cool completely. Then, wrap it tightly in plastic wrap. For extra protection, place it in a freezer bag or container. When you want to enjoy it, simply take it out and thaw it in the fridge overnight. If you’re in a hurry, you can thaw it at room temperature for a few hours. To reheat, slice and warm individual pieces in the microwave or oven. Zucchini bread stays fresh for about three days at room temperature. If you store it in the fridge, it can last up to a week. When frozen, it can be good for up to three months. Watch for signs of spoilage, like a sour smell or mold. If you see these signs, it's best to toss the bread. Enjoy your delicious zucchini orange bread while it’s fresh! For the Full Recipe, check the earlier section. To keep your Zucchini Orange Bread from getting soggy, you must manage moisture. Here are some helpful tips: - Drain the zucchini: After grating, squeeze out excess water using a clean cloth or paper towel. - Use a light hand: Avoid overmixing the batter. That can add air and create a denser loaf. - Bake thoroughly: A toothpick should come out clean. This shows the bread is cooked through. - Cool properly: Let it cool in the pan for a bit, then move it to a rack. This helps avoid steam buildup. Yes, you can use frozen zucchini! Here are some guidelines: - Thaw and drain: Thaw the zucchini and squeeze out as much water as possible. This keeps the bread from being too wet. - Use the same amount: Measure out the same amount as fresh zucchini. Frozen zucchini works well in this recipe. - No need to cook: You can use it directly after thawing. There are many tasty ways to serve Zucchini Orange Bread! Here are some ideas: - Warm slices: Serve warm with a dollop of cream cheese for a rich taste. - Sprinkle sugar: Dust with powdered sugar for a sweet touch. - Add fruit: Pair with fresh fruit like berries for a colorful plate. - Toast it: Lightly toast the slices for a crunchy twist. For more ideas, check out the Full Recipe! Zucchini orange bread is a delightful treat that blends fresh flavors. You need simple ingredients, like zucchini, sugar, and orange juice. Following the steps ensures a soft, tasty loaf. Remember to avoid overmixing for the best texture. Don't forget to experiment with nuts or chocolate for fun variations. Store your bread properly to keep it fresh and tasty. This recipe is easy and a great addition to any meal or snack. Enjoy making this treat and sharing it with others!

Zucchini Orange Bread Delightful and Easy to Bake

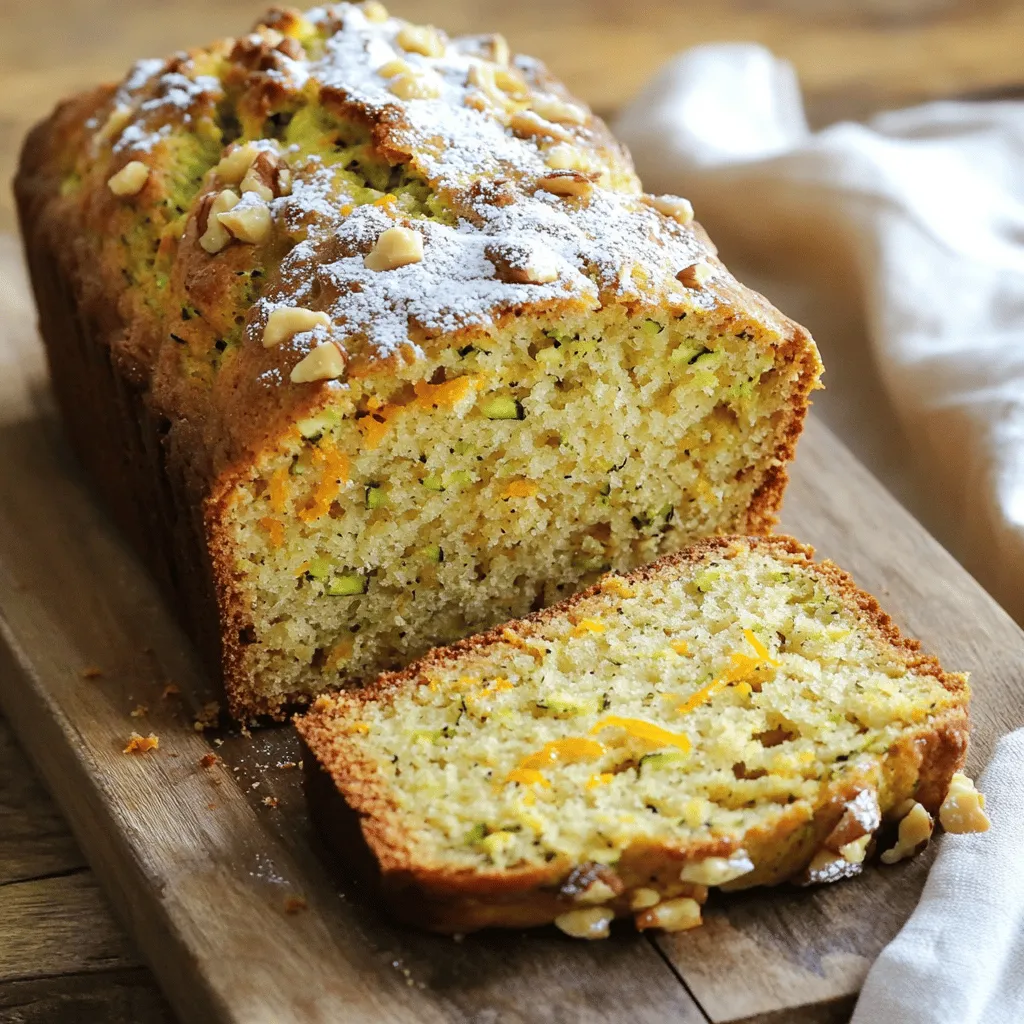
Are you ready to bake something truly delightful? This Zucchini Orange Bread combines fresh zucchini and bright orange zest for

Older posts
Newer posts
← Previous Page1 Page2 Page3 Page4 … Page66 Next →

dsad

© 2025 My Saved Recipe • Built with GeneratePress

Our Policies

  • Copyright Policy
  • Cookie Policy
  • GDPR Policy
  • Privacy Policy
  • Disclaimer
  • Terms Of Use

More Information

  • Home
  • About
  • Contact
  • Appetizers
  • Dessert
  • Dinner
  • Drinks
©2025, My Saved Recipe About Back To Top