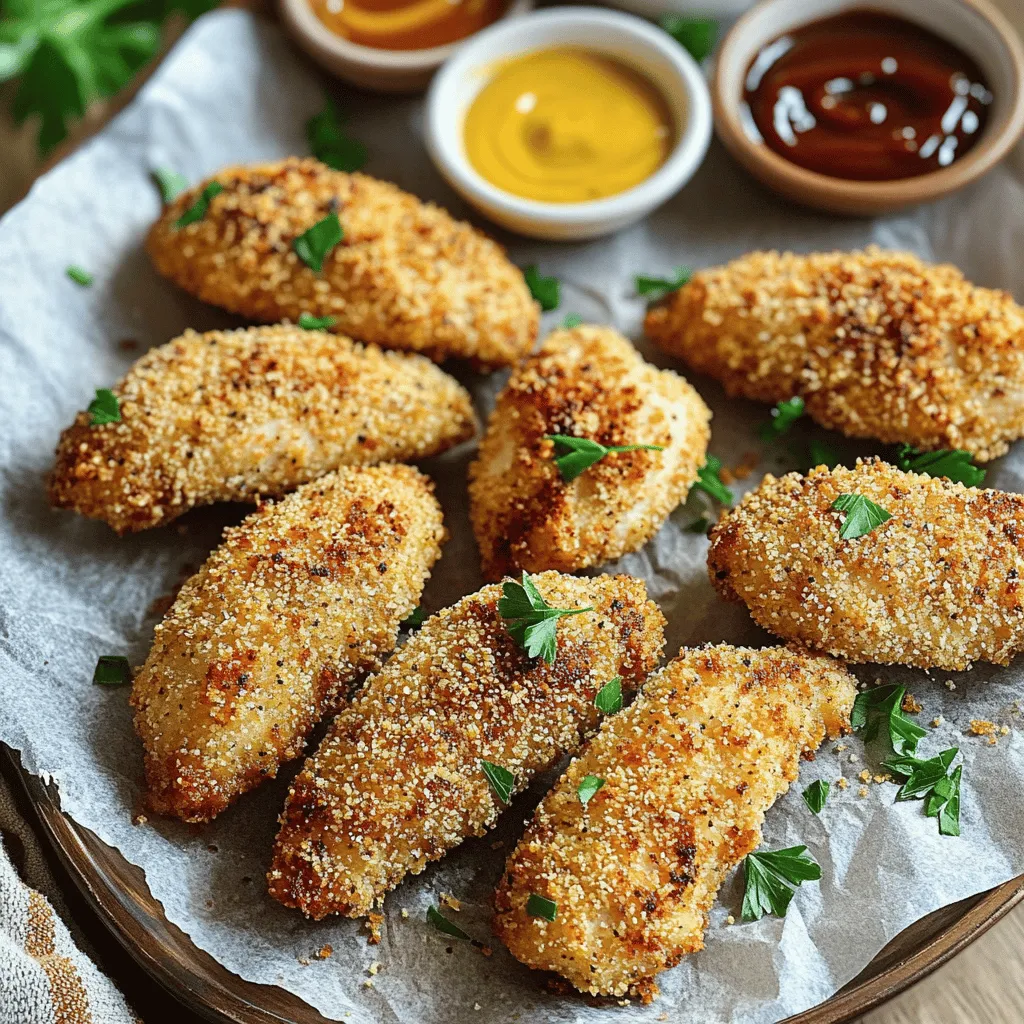
Skip to content
DisclaimerTerms Of UseGDPR PolicyCookie Policy

My Saved Recipe

  • Home
  • Drinks
  • Appetizers
  • Dinner
  • Dessert
  • About
  • Contact
  • Privacy Policy
DisclaimerTerms Of UseGDPR PolicyCookie Policy

Savannah

To make Crispy Parmesan Crusted Chicken, gather these simple ingredients: - 4 boneless, skinless chicken breasts - 1 cup grated Parmesan cheese - 1 cup breadcrumbs (preferably panko for extra crunch) - 2 eggs - 1 teaspoon garlic powder - 1 teaspoon onion powder - 1 teaspoon dried Italian herbs - Salt and pepper to taste - ½ cup all-purpose flour - Cooking spray or olive oil for greasing These ingredients create a crispy crust and juicy chicken. The Parmesan cheese adds a rich flavor. The panko breadcrumbs give it that extra crunch. If you want to use fresh herbs, feel free to substitute them. This dish is easy to make and perfect for a weeknight meal. You can find the full recipe in the article. Preparation Steps - Preheat your oven to 400°F (200°C). - Line a baking sheet with parchment paper and lightly grease it. - Set up a dredging station. Use three shallow bowls: - In the first bowl, mix flour with salt and pepper. - In the second bowl, whisk the eggs until smooth. - In the last bowl, mix the grated Parmesan, breadcrumbs, garlic powder, onion powder, and dried herbs. Coating the Chicken - Take each chicken breast and pat it dry. - First, dip the chicken into the flour, shaking off excess. - Next, dip it into the egg, covering it well. - Finally, press the chicken into the Parmesan-breadcrumb mix. Ensure both sides are well coated. - Place the coated chicken on the prepared baking sheet. - Repeat this process for all chicken breasts. Baking the Chicken - Once all pieces are coated, lightly spray the tops with cooking spray. - Bake in the preheated oven for 25-30 minutes. - Look for a golden brown color and an internal temperature of 165°F (75°C). - For extra crispiness, turn on the broiler for 2-3 minutes at the end. - Watch carefully to avoid burning. - After cooking, let the chicken rest for 5 minutes before slicing. For a detailed recipe, check out the Full Recipe. To get a crispy crust, you need the right temperature and timing. Preheat your oven to 400°F (200°C). Bake the chicken for about 25 to 30 minutes. Use a meat thermometer to check the internal temperature. It should reach 165°F (75°C) for safety. Panko breadcrumbs are key for that extra crunch. They are larger and flakier than regular breadcrumbs. This texture helps create a light and crispy crust. If you can, use panko for the best results. You can pan-fry the chicken for a different taste. Heat oil in a skillet over medium heat. Cook the chicken for about 5 to 7 minutes on each side. This method gives you a golden crust quickly. An air fryer is a healthy option too. It uses hot air to cook the chicken, making it crispy with less oil. Set the air fryer to 375°F (190°C). Cook for about 15 to 20 minutes, flipping halfway through. Adding spices or herbs to the coating can boost the flavor. Consider using smoked paprika for a smoky taste. You can also try adding cayenne pepper for a kick. Fresh herbs like parsley or thyme can add brightness. Mix them into the breadcrumb coating for a flavor-packed meal. For the full recipe, check out the [Full Recipe]. {{image_2}} You can change the flavor of your chicken by using different dried herbs. Try adding thyme for a fresh taste, or rosemary for a warm flavor. Basil gives a nice Italian touch. Oregano works well too! Mix and match to find your favorite blend. The key is to keep it balanced. Too many herbs may overpower the dish. Using various cheeses can really change the dish. Romano cheese offers a sharper taste than Parmesan. Cheddar can add a rich, creamy flavor. If you like it spicy, try pepper jack for a kick. You can also blend cheeses for a unique flavor profile. Just remember, adjust the amount for a perfect melt. If you need a gluten-free option, it's easy to switch things up. Use gluten-free breadcrumbs instead of regular ones. Almond flour is a great substitute for all-purpose flour. You can also use crushed gluten-free crackers. This way, everyone can enjoy Crispy Parmesan Crusted Chicken without worry. Just make sure to check all labels for hidden gluten. For the full recipe, check out the Crispy Parmesan Crusted Chicken. To store leftovers, let the chicken cool first. Wrap each piece in plastic wrap or place it in an airtight container. This keeps the chicken moist and tasty. Store it in the fridge for up to three days. If you want to enjoy it later, make sure it’s sealed well. For freezing, follow these steps: - Allow the chicken to cool completely. - Wrap each piece tightly in plastic wrap, then foil. - Place all wrapped pieces in a freezer bag or container. This method helps keep the chicken fresh for up to three months. To reheat and keep the chicken crispy, use the oven. Preheat your oven to 375°F (190°C). Place the chicken on a baking sheet. Heat for about 15-20 minutes or until warm. You can also use an air fryer. Set it to 350°F (175°C) for about 10 minutes. This helps keep the crust crunchy! For more tips and the complete recipe, check the Full Recipe. To know if the chicken is done, check the internal temperature. You want it to reach 165°F (75°C). This ensures all the juices stay locked in, making the chicken moist and safe to eat. Yes, you can prep this dish ahead. Coat the chicken breasts and place them in the fridge. This can make dinner time easier. Just bake them when you are ready! Great sides for this dish include: - Steamed broccoli - Roasted carrots - Garlic mashed potatoes - A fresh garden salad These sides balance the flavors and make your meal more complete. Absolutely! You can use non-dairy cheese options. Look for dairy-free Parmesan or nutritional yeast. These can give you a similar taste and texture without dairy. This blog post covered how to make Crispy Parmesan Crusted Chicken. We explored the ingredients, which are easy to find and prepare. I shared crucial steps for coating and baking the chicken, plus tips for a perfect crunchy crust. You can also try variations and methods for storage or reheating. In the end, this dish is simple, tasty, and versatile. Whether you want a quick dinner or meal prep, it will impress your family. Enjoy making it your own!

Crispy Parmesan Crusted Chicken Delightful Dinner Dish

Are you ready to elevate your dinner game? Crispy Parmesan Crusted Chicken is a delight that’s easy to make and

- 200g pasta (penne or fusilli) - 200g feta cheese - 400g cherry tomatoes, halved - 4 cloves garlic, minced - 1 teaspoon dried oregano - 1/2 teaspoon red pepper flakes (optional) - 1/4 cup extra virgin olive oil - Salt and pepper to taste - Fresh basil leaves for garnish - Zest of 1 lemon - If you want to switch feta, try goat cheese or cream cheese. Both can give a nice twist to the dish. - For pasta, you can use any shape you love. Bowties or spaghetti also work well. - To boost flavors, add olives, capers, or artichokes. These will add more depth to your meal. This mix of ingredients makes Baked Feta Pasta easy and fun. You can adjust it to fit your taste. For the full recipe, refer to the main section. 1. Preheating the oven: Start by preheating your oven to 400°F (200°C). This heat will help the feta and tomatoes cook perfectly. 2. Mixing tomatoes and aromatics: In a large baking dish, combine the halved cherry tomatoes, minced garlic, dried oregano, red pepper flakes, olive oil, salt, and pepper. Toss gently to coat the tomatoes evenly. This mix adds flavor to the dish. 1. Placing the feta and tomatoes in the oven: Now, place the block of feta cheese in the center of your dish, surrounded by the tomatoes. Drizzle a bit more olive oil over the feta and season it with a pinch of salt. 2. Cooking time details: Bake everything in the preheated oven for around 30 minutes. You’ll know it's done when the tomatoes blister and the feta turns golden and slightly melts. 1. Cooking pasta and mixing with the baked mixture: While the feta and tomatoes bake, cook your pasta according to package instructions until it is al dente. Don’t forget to save 1/2 cup of your pasta water before draining it. 2. Adjusting sauce consistency: Once the feta and tomatoes are out of the oven, stir everything together to create a creamy sauce. Add the drained pasta to the baking dish and mix it well with the feta and tomato mixture. If your sauce is too thick, add some reserved pasta water until you reach your desired consistency. Now you're ready to enjoy this delightful dish! For the full recipe, check the section above. To ensure a creamy consistency in your Baked Feta Pasta, follow these steps: - Use high-quality feta: A good feta melts better and adds rich flavor. - Add pasta water: This helps loosen the sauce and makes it creamier. To upscale the flavor profile, try these ideas: - Fresh herbs: Add thyme or rosemary for an aromatic twist. - Citrus zest: Lemon or orange zest brightens the dish and adds freshness. One common mistake is overbaking the feta. If you bake it too long, it becomes dry. Check for a golden color and a soft texture. Choosing the right pasta is also key. Use shapes like penne or fusilli, as they hold sauce well. Thin pasta can get lost in the creamy sauce. For this dish, you will need: - A large baking dish: This allows for even cooking and mixing. - A pot for boiling pasta: A standard pot works well. Best baking dish options include glass or ceramic, which retain heat well. Avoid metal dishes, as they can cause uneven cooking. {{image_2}} You can make baked feta pasta your own by adding veggies. Try spinach, bell peppers, or zucchini. These add color and make the dish more nutritious. You can also add protein like grilled chicken, shrimp, or chickpeas. These options boost flavor and make it filling. If you need gluten-free pasta, use brown rice or chickpea pasta. These work well but check the cooking times. For a dairy-free option, swap feta for a vegan cheese. Many brands make tasty dairy-free cheeses that melt nicely, giving you a creamy sauce. Pair baked feta pasta with a fresh salad or garlic bread. A light arugula salad with lemon dressing complements it well. For a creative garnish, sprinkle toasted pine nuts or chili flakes on top. Fresh herbs like parsley or chives also add great flavor and color. You can find the Full Recipe for this delightful dish in the earlier sections. To keep your Baked Feta Pasta fresh, place it in an airtight container. Make sure the dish is cool before sealing. Store it in the fridge for up to three days. If you want to save it longer, you can freeze it. Portion the pasta into freezer-safe bags or containers. It can last up to three months in the freezer. Just label the bags with the date for easy tracking. When you reheat Baked Feta Pasta, use the oven for the best results. Preheat your oven to 350°F (175°C). Place the pasta in an oven-safe dish, adding a splash of water. Cover it with foil to prevent drying out. Heat for about 15-20 minutes. You can also use the microwave. Just heat in short bursts, stirring in between. This keeps the pasta creamy and tasty. Leftovers should be eaten within three days when stored in the fridge. If frozen, try to eat them within three months for the best flavor. Signs of spoilage include a sour smell or visible mold. If you see these signs, it’s best to throw it out. Enjoy your Baked Feta Pasta while it's still fresh! For the complete recipe, check out the Full Recipe section. Baked feta pasta is a fun and tasty dish. It became popular on social media, especially TikTok. This dish hails from Finland and quickly spread worldwide. You bake feta cheese and cherry tomatoes together for a creamy sauce. The result is a rich and savory flavor. It pairs perfectly with pasta, creating a comforting meal. Yes, you can use other cheeses if you want. Goat cheese adds a tangy twist. Cream cheese makes it super creamy and smooth. Just keep in mind that the flavor will change. Each cheese gives a different taste, so pick what you like best. The recipe is mild but can have a kick. Red pepper flakes add a bit of heat, but it’s optional. If you like spice, add more flakes or even fresh chili peppers. For those who prefer less heat, simply skip the red pepper. You can adjust it to suit your taste. Absolutely! This dish works well for meal prep. You can make it ahead and store it in the fridge. Just keep the sauce and pasta together for best results. Reheat it gently to keep the texture nice. You can enjoy it for lunch or dinner throughout the week. This blog post covered the simple yet delicious baked feta pasta recipe. You learned about the key ingredients and helpful tips for perfecting the dish. I also offered ingredient substitutions, variations, and storage advice. Baked feta pasta is easy to customize and share. With these steps, you can create a tasty meal that suits your needs. Enjoy experimenting with flavors and making this dish your own!

Baked Feta Pasta Delightful and Simple Recipe

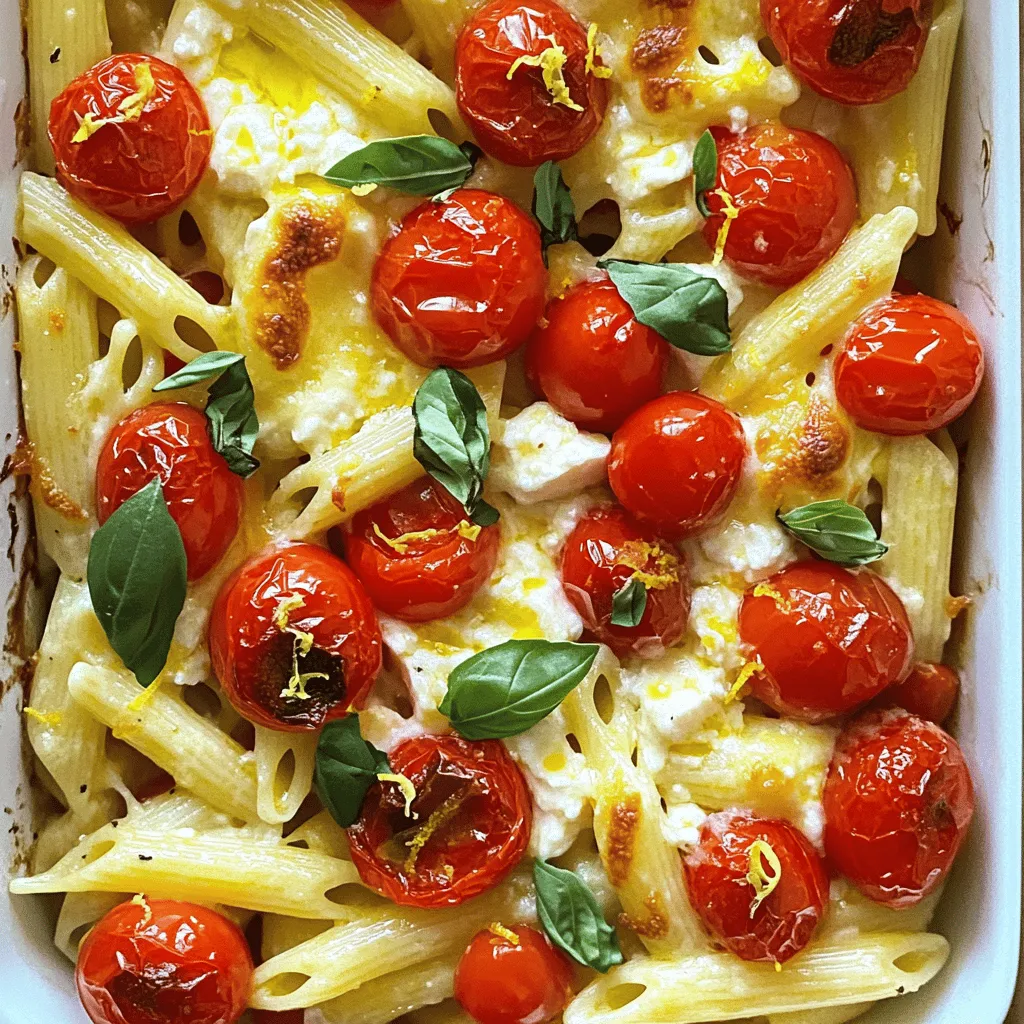
Craving something easy yet delicious? Let me introduce you to Baked Feta Pasta! This dish combines creamy feta, fresh tomatoes,

- 1 pound boneless, skinless chicken breasts - 1 bell pepper (red or green) - 1 large onion - 8 small flour or corn tortillas - 2 teaspoons chili powder - 1 teaspoon cumin - 1 teaspoon smoked paprika - Salt and pepper - Sour cream - Guacamole - Shredded cheese - Fresh cilantro For my easy chicken fajitas, I keep it simple and fresh. The main star is always the chicken. I love using boneless, skinless chicken breasts for this recipe. They cook quickly and stay juicy. You can slice them into thin strips for even cooking. Next, I add a bell pepper. You can pick a red or green one. Both bring a nice crunch and flavor. Then, I slice a large onion. The onion adds sweetness when cooked. These three ingredients form the base of my fajitas. Now, let's talk spices. I use chili powder for a warm kick. Cumin brings a nice earthiness, while smoked paprika adds depth. Salt and pepper finish this blend. They help bring out all the flavors. For optional toppings, I suggest sour cream and guacamole. They add creaminess. Shredded cheese can give a nice melt. Fresh cilantro adds a burst of freshness. You can find the full recipe later. But with these ingredients, you are ready for a quick and tasty dinner! To start, take your sliced chicken and put it in a large bowl. Add the garlic, chili powder, cumin, smoked paprika, salt, and pepper. Mix it well so every piece gets coated. This step is key for great flavor. Next, heat one tablespoon of olive oil in a large skillet over medium-high heat. Add the seasoned chicken to the pan. Cook it for about 5 to 7 minutes. Make sure there is no pinkness in the chicken. It should be fully cooked and delicious. Now, remove the chicken and set it aside. In the same skillet, add the rest of the olive oil. Toss in the sliced bell pepper and onion. Sauté them for about 4 to 5 minutes. You want them softened and slightly caramelized for the best taste. Once the veggies are ready, return the cooked chicken to the skillet. Mix the chicken and vegetables well. Let them cook together for another 2 to 3 minutes. This allows the flavors to meld beautifully. While the chicken and veggies finish cooking, warm the tortillas. You can use a dry skillet or the microwave. Make sure they are soft and pliable. This makes them easy to roll. Finally, it’s time to assemble your fajitas! Place a generous scoop of the chicken and veggie mixture onto each tortilla. Add your favorite toppings like sour cream, guacamole, shredded cheese, or fresh cilantro. Roll them up and enjoy your meal! For the complete process, check the Full Recipe. To get the most out of your chicken fajitas, adjust the seasoning. I recommend adding more chili powder for a bolder kick. You can also toss in a pinch of cayenne if you love heat. For tenderness, marinate the chicken for 30 minutes. This step helps the spices soak in and makes the meat juicy. Fajitas shine when paired with tasty sides. I suggest serving them with Mexican rice or a fresh salad. Black beans also add protein and flavor. For drinks, a nice cold beer or a fruity margarita complements the meal perfectly. Prepping ahead saves time. Slice chicken and veggies the night before. Store them in airtight bags to keep them fresh. Cooked fajitas can last in the fridge for up to three days. When storing leftovers, keep the chicken and veggies separate from the tortillas. This way, they stay crisp and fresh. {{image_2}} You can easily swap chicken for other proteins. Shrimp fajitas are light and quick. Just cook shrimp for 3-4 minutes until pink. Beef also makes a great option. Use flank steak, sliced thin. For a vegetarian dish, try black beans or tofu. Both options add protein and flavor. Switch up the bell peppers! Use yellow or orange peppers for sweetness. These colors add a fun twist to your fajitas. You can also use whole wheat tortillas. They offer more fiber and a nutty taste. This swap makes the dish a bit healthier. Want more spice? Add jalapeños or chopped serrano peppers. These peppers pack a punch! You can also mix in fresh herbs like cilantro. They add brightness and flavor. Try adding fresh lime juice for a zesty kick. For the full recipe, check the link above. To keep your fajitas fresh, place them in an airtight container. They store well in the fridge for up to three days. If you want to save them longer, freeze the chicken and veggies separately. When you’re ready to eat, thaw overnight in the fridge. Reheat in a skillet over medium heat for the best flavor. You can also use the microwave, but the skillet keeps the texture nice. When stored properly, your chicken fajitas can last up to three days in the fridge. If frozen, they can stay good for about two months. Always check for signs of spoilage. Look for a change in color or an off smell. If anything seems off, it’s best to toss it out. Leftover chicken and veggies work great in other meals. You can make a chicken salad by mixing them with greens and dressing. For a fun twist, add them to scrambled eggs for breakfast. You can also throw them in a wrap or quesadilla for lunch. These options help you enjoy your leftovers without feeling repetitive. To add heat to your chicken fajitas, you can include sliced jalapeños or serrano peppers in the mix. These peppers will give your dish a nice kick. You can also add a splash of hot sauce or a pinch of cayenne pepper to the spice blend. For extra flavor, try using spicy chili powder instead of regular. Yes, you can prepare fajitas ahead of time. First, marinate the chicken with spices a few hours before cooking. Store the marinated chicken in the fridge until ready to cook. You can also sauté the veggies in advance. Just keep them in an airtight container. When ready to serve, reheat the chicken and veggies in a skillet. To warm tortillas, heat a dry skillet over medium heat. Place the tortillas in the skillet for about 30 seconds on each side. This method makes them soft and pliable. If you prefer the microwave, wrap the tortillas in a damp paper towel and microwave them for about 20-30 seconds. This keeps them warm and soft. Yes, fajitas can be gluten-free. Use corn tortillas instead of flour tortillas for a gluten-free option. Check the labels on your spices and sauces to ensure they are gluten-free. Most spices are safe, but always read the packaging for peace of mind. Enjoy your fajitas without worry! To make tasty chicken fajitas, start with key ingredients like chicken, peppers, and spices. Follow the steps to cook and assemble your meal perfectly. Don’t forget to try different proteins and toppings for your recipes. Meal prep and storage tips help keep everything fresh. With these easy ideas, you can enjoy fajitas anytime. Exploring variations and enhancements offers fun ways to mix it up. Now you’re ready to impress with your fajita skills and flavor! Enjoy your cooking and have fun!

Easy Chicken Fajitas Flavorful and Quick Dinner Idea

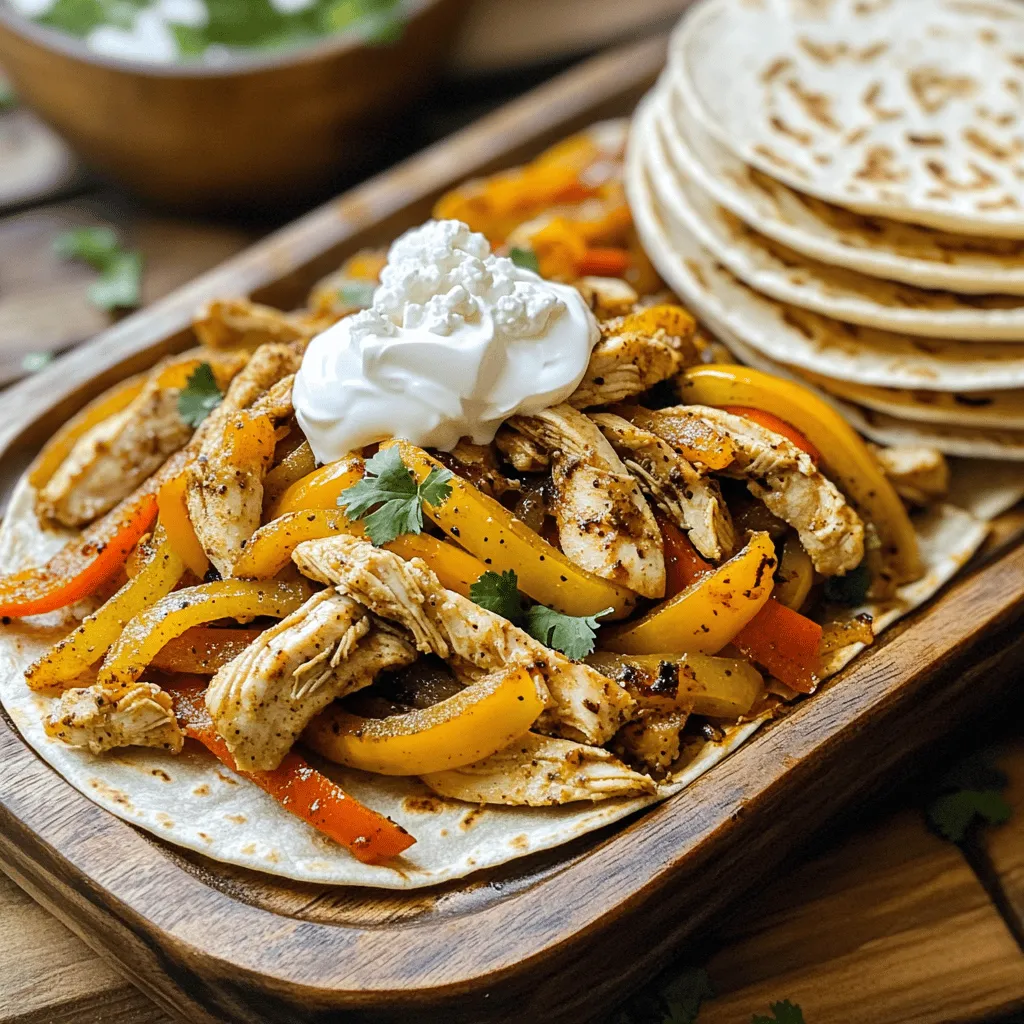
Looking for a quick and tasty dinner? Easy Chicken Fajitas are the answer! You only need a few simple ingredients,

To make Cheesy Jalapeno Popper Dip, you need a few key ingredients: - 2 cups cream cheese, softened: This gives the dip its creamy base. - 1 cup sour cream: This adds tanginess and smooth texture. - 1 cup shredded cheddar cheese: Cheddar brings sharp flavor and richness. - 1/2 cup shredded mozzarella cheese: Mozzarella adds a stretchy, gooey texture. - 1 cup jalapenos, diced (fresh or pickled): Jalapenos provide a spicy kick. - 1/2 cup green onions, chopped: These add a fresh, oniony taste. - 1 teaspoon garlic powder: Garlic powder enhances the dip’s flavor. - 1 teaspoon onion powder: This adds depth and sweetness. - Salt and pepper to taste: Seasoning is key to balance flavors. - 1/2 cup breadcrumbs (optional for topping): Breadcrumbs create a crunchy layer. - 2 tablespoons olive oil (for breadcrumbs, if used): Olive oil helps brown the topping. Using these ingredients, you can create a dip that is creamy and rich. For the full recipe, check the details above. To make Cheesy Jalapeno Popper Dip, follow these easy steps for a creamy, rich delight. Preheating the oven First, preheat your oven to 350°F (175°C). This step warms the oven so the dip cooks evenly. Mixing cream cheese and sour cream Next, take a large mixing bowl. Add 2 cups of softened cream cheese and 1 cup of sour cream. Mix these until they are smooth and creamy. This base makes the dip rich. Adding cheese and vegetables Now, add 1 cup of shredded cheddar cheese, 1/2 cup of shredded mozzarella cheese, 1 cup of diced jalapenos, and 1/2 cup of chopped green onions to the bowl. Stir these ingredients together well. The cheeses and jalapenos give the dip its cheesy and spicy flavor. Seasoning the mixture Then, add 1 teaspoon of garlic powder, 1 teaspoon of onion powder, and salt and pepper to taste. Mix everything together until well combined. The seasonings enhance the taste of the dip. Transferring to a baking dish After that, transfer the mixture to a baking dish. Spread it evenly across the dish. This helps it bake evenly. Optional breadcrumb topping preparation If you want a crunchy topping, mix 1/2 cup of breadcrumbs with 2 tablespoons of olive oil in a small bowl. Sprinkle this mixture evenly over the dip. Baking instructions Finally, place the dip in your preheated oven. Bake for 25-30 minutes or until the dip is hot and bubbly. If you used breadcrumbs, the top should be golden brown. Once baked, take it out and let it cool slightly before serving. You can find the full recipe linked earlier. To make Cheesy Jalapeno Popper Dip creamy, mix your ingredients well. Start with softened cream cheese. It should be at room temperature. This helps it blend smoothly with sour cream. Use a hand mixer or a sturdy spoon. Mix until you see no lumps. This step is key for a rich texture. If you want more heat, add extra jalapenos. You can use fresh or pickled ones. For a milder dip, cut back on the jalapenos. You can also try bell peppers for a sweet touch. They add color and flavor without the heat. Serve your dip with tortilla chips or toasted bread. Fresh veggies are great too! Carrots and celery add a nice crunch. For the best taste, serve warm. Let it cool just a bit after baking. This way, flavors meld nicely, and it stays creamy. For a fun twist, pair it with a refreshing drink! {{image_2}} You can switch up the cheese in this dip for fun. Try using pepper jack for extra heat. Gouda adds a rich, smoky flavor. If you want a sharp taste, go for aged cheddar. You can even mix in some cream cheese with a hint of herb flavor. If you need a dairy-free dip, use a nut-based cream cheese. Brands like Tofutti or Daiya work well. They give you that creamy texture without the dairy. Want to make it vegan? Use a plant-based sour cream and cream cheese. Nutritional yeast can add a cheesy taste. To keep it nut-free, skip the nut-based cheese options. Instead, focus on those creamy dairy-free brands. This way, you can enjoy the dip without any worries about allergens. For a twist, add some cooked bacon or sausage to the mix. This gives a nice meaty flavor. You can also try adding fresh herbs like cilantro or parsley. A sprinkle of smoked paprika can enhance the taste too. Don’t hesitate to experiment! Each addition can bring out a new layer of flavor in your dip. To keep your cheesy jalapeno popper dip fresh, store leftovers in airtight containers. This keeps the dip moist and tasty. Place it in the fridge right after serving. It can last for about three to five days. If you want to store it longer, freezing is a great option. Just make sure to use a freezer-safe container. The dip will stay good for about one to two months in the freezer. When it’s time to enjoy your dip again, reheating is key. The best method is to use the oven. Preheat your oven to 350°F (175°C). Place the dip in an oven-safe dish. Cover it with foil to keep moisture in. Heat for about 15 to 20 minutes or until it’s warm. If you want a crispy top, uncover it for the last few minutes. You can also use the microwave. Heat in short bursts of 30 seconds, stirring in between. Just be careful not to overheat it, or the dip may become rubbery. Enjoy your creamy and rich delight! For the full recipe, check the earlier section. You can serve Cheesy Jalapeno Popper Dip in a variety of ways. I recommend using a shallow baking dish. This allows for easy dipping. A large spoon or small spatula works best for serving. You can pair the dip with tortilla chips, pita chips, or fresh veggie sticks. These options add texture and flavor. Yes, you can make this dip ahead of time! Prepare the dip and put it in the baking dish. Cover it with plastic wrap and store it in the fridge. You can bake it when you're ready to serve. Just add a few extra minutes to the baking time. This helps heat it through. If you need an alternative to cream cheese, try using Greek yogurt. It adds creaminess and tang. You can also use cottage cheese for a lighter option. Blending it until smooth helps mimic the texture of cream cheese. Another option is vegan cream cheese. It provides similar flavors for a dairy-free choice. The spice level of the dip depends on the jalapenos you use. Fresh jalapenos tend to be hotter than pickled ones. If you want less heat, remove the seeds and ribs from the jalapenos before adding them. You can also substitute with milder peppers, like bell peppers. This way, you control the spice to fit your taste. This blog post guides you through making Cheesy Jalapeno Popper Dip. We explored essential ingredients, step-by-step instructions, and tips to achieve creamy perfection. You learned how to modify spice levels and swap ingredients for different flavors. Remember, this dip offers endless variations. Experiment with cheese and spices to suit your taste. Enjoy the process, and you’ll create a dish that wins every time! Your dip will be a hit at any gathering.

Cheesy Jalapeno Popper Dip Creamy and Rich Delight

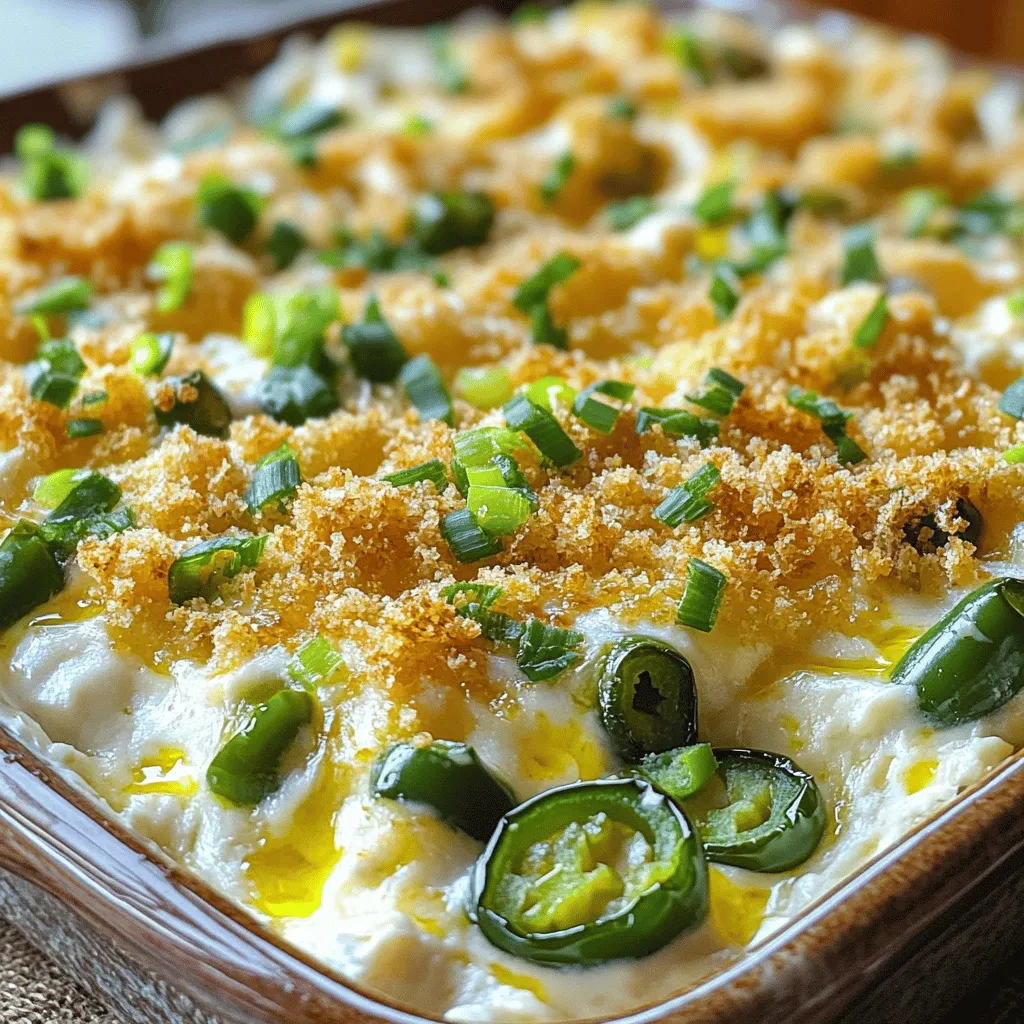
Are you ready to indulge in a rich, creamy delight? My Cheesy Jalapeno Popper Dip will transform your snack game

To make this dish, you will need the following ingredients: - 4 salmon fillets - 1/4 cup teriyaki sauce (store-bought or homemade) - 1 tablespoon honey - 2 teaspoons sesame oil - 2 cups broccoli florets - 1 red bell pepper, sliced - 1 cup carrots, sliced - 1 tablespoon olive oil - 1 tablespoon sesame seeds - 3 green onions, chopped - Salt and pepper to taste - Cooked jasmine rice for serving (optional) These ingredients come together to create a delicious and colorful meal. The salmon provides healthy fats, while the veggies add crunch and vitamins. This dish is not only tasty but also healthy. Each serving has around: - Calories: 350 - Protein: 30g - Fat: 15g - Carbohydrates: 25g - Fiber: 4g The salmon gives you protein and omega-3s. The veggies bring in fiber and vitamins. If you need to swap some items, here are some ideas: - Use chicken or tofu instead of salmon for a different protein. - Try different veggies like snap peas, zucchini, or asparagus. - Maple syrup can replace honey for a vegan option. - Use avocado oil instead of sesame oil for a milder flavor. These swaps keep the dish fresh and fun while still being healthy. For the full recipe, visit the complete section. Start by gathering all your ingredients. This makes cooking easier and faster. Preheat your oven to 400°F (200°C). In a small bowl, mix the teriyaki sauce, honey, and sesame oil. This will create a tasty marinade. Take a large baking sheet and place the salmon fillets in the center. Season them with salt and pepper for flavor. Pour half of the teriyaki marinade over the salmon. Set aside the rest for later. Next, prepare your vegetables. In a separate bowl, toss the broccoli, red bell pepper, and carrots with olive oil, salt, and pepper. Make sure they are well coated. Spread these vegetables around the salmon on the baking sheet. Now it's time to cook! Place the baking sheet in the preheated oven. Bake for about 15-18 minutes. The salmon should be cooked through and flake easily with a fork when done. In the last 5 minutes, brush the remaining teriyaki marinade over the salmon and vegetables. This adds a burst of flavor. Keep an eye on the salmon while it bakes. If you're unsure, check it at 15 minutes. Use a fork to test if it flakes easily. For the best taste, sprinkle sesame seeds and chopped green onions over the dish once it's out of the oven. You can serve this with cooked jasmine rice if you like. For the full recipe, visit the section above. Enjoy your delicious One Pan Baked Teriyaki Salmon! To get perfectly cooked salmon, watch the time closely. Bake the salmon for 15 to 18 minutes. It should flake easily with a fork when done. If you want it medium-rare, aim for 12 to 14 minutes. Always check the thickest part of the fillet. Use a meat thermometer if you like. The internal temperature should be 145°F (63°C). Let it rest for a few minutes before serving. This helps keep it moist and juicy. Marinades make a big difference in flavor. For this dish, you mix teriyaki sauce, honey, and sesame oil. Let the salmon soak in the marinade for at least 30 minutes. If you have more time, let it marinate longer in the fridge. This allows the flavors to soak in deeply. Always reserve some marinade to brush on later. Adding it during the last minutes of baking boosts flavor. To enhance flavor, sprinkle sesame seeds and green onions on top. This adds a nice crunch and freshness. For more color, consider adding sliced bell peppers or carrots. These vegetables not only taste great but also look beautiful. Serve the salmon with cooked jasmine rice for a full meal. The rice soaks up the extra teriyaki sauce, making it even better. You can find the full recipe for One Pan Baked Teriyaki Salmon above. {{image_2}} You can change the veggies in this dish to fit your taste. Try using snap peas, asparagus, or zucchini. Each of these options adds a different flavor and texture. You can also mix in some mushrooms for an earthy taste. Just remember to cut them into similar sizes, so they cook evenly. Salmon is great, but you can use other proteins too. Chicken breasts or thighs work well with teriyaki sauce. If you prefer seafood, shrimp or even tofu can replace salmon. Be sure to adjust cooking times. Tofu needs a bit longer to soak up the sauce, while shrimp cooks faster. To make this dish gluten-free, choose a gluten-free teriyaki sauce. Many brands offer this option. You can also skip the honey or use a sugar substitute for a low-carb version. Instead of rice, serve the salmon with cauliflower rice for a lighter meal. This keeps the flavors while cutting down on carbs. For the full recipe, check out the detailed instructions above. To store your leftover One Pan Baked Teriyaki Salmon, let it cool first. Place the salmon and vegetables in an airtight container. You can keep it in the fridge for up to three days. Make sure to separate the rice if you use any. This will keep it from getting soggy. When you're ready to enjoy your leftovers, preheat your oven to 350°F (175°C). Place the salmon and veggies on a baking sheet. Cover them with foil to keep them moist. Heat for about 10-15 minutes. You can also use a microwave. Just warm it for 1-2 minutes, but it may not taste as fresh. If you want to freeze your salmon, do it right after it cools. Wrap each piece tightly in plastic wrap, then place it in a freezer bag. Remove as much air as possible. It will last in the freezer for up to two months. To thaw, move it to the fridge for a few hours or overnight. This way, you can enjoy great flavor later! Baking salmon usually takes about 15 to 18 minutes. The exact time depends on the thickness of the fillets. A good way to tell if it is done is when it flakes easily with a fork. Cooking at 400°F (200°C) works best for this dish. Yes, you can use frozen salmon. Just remember to thaw it first. Thawing allows the salmon to cook evenly. You can leave it in the fridge overnight or run it under cold water for a quick thaw. One Pan Baked Teriyaki Salmon pairs well with several sides. You can serve it with cooked jasmine rice for a complete meal. Roasted vegetables or a fresh salad also make great options. These sides add texture and flavor to your plate. For the full recipe, check out the detailed instructions above! This blog post covered everything you need to know about One Pan Baked Teriyaki Salmon. We explored the ingredients, nutritional facts, and substitutions you can use. You learned step-by-step how to prepare, cook, and bake salmon perfectly. We also shared tips for marinades, flavor, and presentation. Plus, we looked at variations, storage, and answered common questions. With this information, you can enjoy delicious salmon any night. Cook smart and savor every bite!

One Pan Baked Teriyaki Salmon Easy and Flavorful Dish

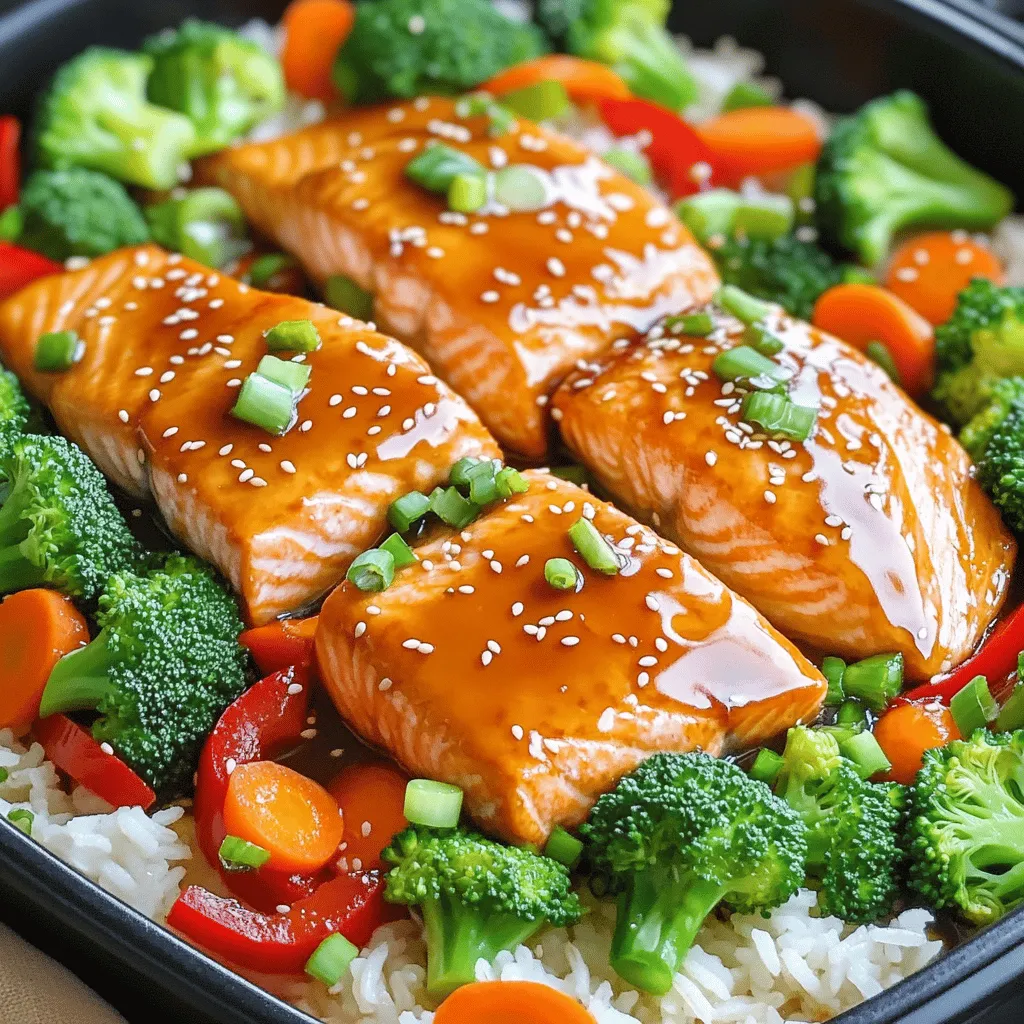
Looking for a quick and tasty dinner idea? My One Pan Baked Teriyaki Salmon is just what you need! This

- 1 pound chicken tenderloins - 1 cup buttermilk - 1 cup all-purpose flour - 1 teaspoon garlic powder - 1 teaspoon onion powder - 1 teaspoon paprika - 1 teaspoon salt - ½ teaspoon black pepper - ½ teaspoon cayenne pepper (optional) - 1 cup panko breadcrumbs - Cooking spray To make crispy air fryer chicken tenders, you need fresh and good-quality ingredients. Chicken tenderloins are great because they cook fast and stay juicy. Buttermilk is key for tenderizing the chicken. It adds flavor and moisture. If you do not have buttermilk, you can mix milk with a little vinegar or lemon juice. This works well. The all-purpose flour helps create a nice coat on the chicken. It binds the seasonings and panko breadcrumbs together. For the seasoning, garlic powder, onion powder, and paprika give a tasty kick. You can adjust the amounts to suit your taste. Panko breadcrumbs are a must. They make the chicken extra crispy. If you want some heat, add cayenne pepper. This is optional but adds a nice touch. Cooking spray helps the tenders crisp up in the air fryer. It is simple and makes cleanup easier. For the full recipe, check the instructions included above. - Marinate the chicken in buttermilk: Start by soaking 1 pound of chicken tenderloins in 1 cup of buttermilk. This step is key. It makes the chicken juicy and tender. Let it sit for at least 30 minutes. If you have time, marinate for up to 2 hours to boost the flavor. - Set up the breading station: You need two shallow dishes. In the first dish, mix 1 cup of all-purpose flour with 1 teaspoon each of garlic powder, onion powder, paprika, salt, and black pepper. For a spicy kick, add ½ teaspoon of cayenne pepper. In the second dish, place 1 cup of panko breadcrumbs. This will give your chicken a nice crunch. - Dredge in flour mixture: Take each chicken tender out of the buttermilk. Let the excess buttermilk drip off. Then, coat it in the flour mixture. Make sure it is fully covered. - Dip in buttermilk, coat with panko breadcrumbs: After dredging, dip the chicken tender back into the buttermilk. Next, coat it with the panko breadcrumbs. Press gently to help the crumbs stick well. This double coating gives the chicken a crispy outer layer. - Preheat the air fryer: Set your air fryer to 400°F (200°C) and preheat for about 5 minutes. Preheating helps the chicken cook evenly. - Cook chicken tenders until golden brown: Place the coated chicken tenders in a single layer in the air fryer basket. Lightly spray the tops with cooking spray for extra crispiness. Cook for 10-12 minutes, flipping halfway through. The chicken should turn golden brown and reach an internal temperature of 165°F. For the full recipe, check the complete instructions above. Enjoy your crispy air fryer chicken tenders! To make your chicken tenders crispy, use panko breadcrumbs. They provide a great crunch. After coating your tenders, lightly spray them with cooking oil. This helps them brown and crisp up nicely in the air fryer. Marinate your chicken in buttermilk for at least 30 minutes. This tenderizes the meat and adds flavor. For a deeper taste, add some spices to the buttermilk. Garlic powder, paprika, or even hot sauce can work wonders. To ensure even cooking, arrange your chicken tenders in a single layer. Overcrowding can lead to uneven cooking. Use a meat thermometer to check the internal temperature. It should reach 165°F for safe eating. {{image_2}} You can switch up the taste of your chicken tenders easily. For a spicy kick, add cayenne pepper to your flour mix. Just half a teaspoon gives a nice heat without being too much. If you want a fresh taste, try Italian seasoning. This mix adds herbs like oregano and thyme. It makes the tenders flavorful and bright. If you need a gluten-free option, use almond flour instead of regular flour. You can also use gluten-free breadcrumbs for the crunch you want. Another fun idea is to coat your tenders with crushed cornflakes. This gives them a unique texture and a fun crunch. The cornflakes will add a different flavor and make them stand out. Dipping sauces are a must with chicken tenders. Honey mustard, BBQ, or ranch pairs well. You can also serve these tenders with sides like crispy fries or a fresh salad. The mix of flavors and textures will make your meal exciting. For a full guide on making these delicious tenders, check out the Full Recipe. To keep your chicken tenders fresh, you can refrigerate them. Place the cooled tenders in an airtight container. They will stay good for about 3 to 4 days. If you want to save them for later, freezing is a great option. Make sure to wrap each tender in plastic wrap, then place them in a freezer bag. This helps prevent freezer burn. The best way to reheat your chicken tenders is in the air fryer. Preheat the air fryer to 375°F (190°C). Place the tenders in the basket in a single layer. Heat for about 5 to 6 minutes until they are crispy again. This method avoids sogginess and keeps them tasty. You can also use an oven, but the air fryer does the job best. When stored in the fridge, your chicken tenders will last about 3 to 4 days. If you freeze them, they can stay good for up to 3 months. Just remember to label your containers with the date. This way, you will know how long they have been stored. Enjoy your crispy air fryer chicken tenders anytime! For a full recipe, check out the earlier section. You can use several easy substitutes for buttermilk. One option is to mix regular milk with vinegar or lemon juice. Just add one tablespoon of vinegar or lemon juice to one cup of milk. Let it sit for about five minutes. Another option is to use yogurt. Mix plain yogurt with water until it reaches a buttermilk-like consistency. These substitutes will still give a nice flavor to your chicken tenders. Yes, you can use chicken breasts. Just cut them into strips about the same size as tenderloins. This helps them cook evenly. Keep in mind that chicken breasts may take a bit longer to cook through. Always check their internal temperature. They should reach 165°F (74°C) to be safe to eat. Many dipping sauces work great with chicken tenders. Here are some popular choices: - Honey mustard - Barbecue sauce - Ranch dressing - Buffalo sauce - Sweet and sour sauce Feel free to mix and match to find your favorite combo! To check if chicken tenders are done, use a meat thermometer. Insert it into the thickest part of the tender. The temperature should read at least 165°F (74°C). If you do not have a thermometer, make sure the chicken is no longer pink inside and the juices run clear. This way, you can be sure your tenders are safe to eat. This blog post covered how to make tasty air fryer chicken tenders. You learned about the key ingredients and steps to prepare, coat, and cook them. Using tips for crispy texture and variations increases your options. Proper storage will keep leftovers fresh for later. Cooking these tenders is simple and fun. Whether you stick to the classic recipe or try new flavors, you can't go wrong. Enjoy your delicious meal!

Crispy Air Fryer Chicken Tenders Easy and Delicious Meal

Craving something crispy and delicious? You’ve come to the right place! In this article, I’ll share my easy recipe for

- 2 ½ cups all-purpose flour - 1 teaspoon baking soda - ½ teaspoon salt - 1 cup unsalted butter, softened - ¾ cup brown sugar, packed - ¾ cup granulated sugar - 1 teaspoon vanilla extract - 2 large eggs - 2 cups semi-sweet chocolate chips - 1 cup chopped nuts (optional, walnuts or pecans) - ½ teaspoon sea salt for topping To make ultimate chocolate chip cookies, the right ingredients matter. Each one plays a big role in the taste and texture. First, we have all-purpose flour. It gives structure to our cookies. Next is baking soda. This helps the cookies rise and become soft. Then, we add salt. It enhances the sweetness of the chocolate. The star of the show is unsalted butter. Softened butter mixes well with sugars and makes cookies rich. We use both brown sugar and granulated sugar. Brown sugar adds moisture and flavor, while granulated sugar helps with crispiness. Vanilla extract brings warmth and depth to the cookies. Eggs add moisture and help bind the dough. Of course, we can’t forget semi-sweet chocolate chips. They are the heart of chocolate chip cookies. If you like a crunch, add chopped nuts. Walnuts or pecans work great. Finally, we finish with a sprinkle of sea salt on top. This adds a nice contrast to the sweetness. - Options for dairy-free butter: Use coconut oil or a plant-based butter for a dairy-free option. - Gluten-free flour alternatives: Almond flour or a gluten-free blend works well. - Sweetener alternatives: Swap brown sugar for coconut sugar or use stevia for a low-calorie choice. These swaps help you fit the recipe to your needs. Don't be afraid to get creative! - Preheat the oven to 375°F (190°C). - Line a baking sheet with parchment paper. First, you need to prepare your kitchen. Preheating the oven makes sure the cookies bake evenly. Next, lining your baking sheet with parchment paper helps with easy cleanup. It also keeps the cookies from sticking. - Mixing the dry ingredients - Creaming the butter and sugars - Combining wet and dry mixtures - Adding chocolate chips To start, mix the dry ingredients. In a medium bowl, whisk together the flour, baking soda, and salt. This step adds air and helps the cookies rise. Now, cream the butter with both sugars in a large bowl. Beat this mixture until it’s smooth and fluffy. Then, add the vanilla and eggs one at a time. Mix well after each egg to fully combine. Next, it’s time to combine the wet and dry mixtures. Gradually add the dry mix to the wet mix. Stir gently until just combined, so the dough stays soft. Finally, fold in the chocolate chips. This is where you can get creative. Choose semi-sweet chocolate chips or try dark or milk chocolate for a twist. - Proper cookie spacing on the baking sheet - Ideal baking time and temperature settings When you scoop the dough onto the baking sheet, space them about two inches apart. This gives them room to spread without merging into one giant cookie. Bake your cookies for 10-12 minutes. Watch for lightly golden edges and soft centers. The cookies will firm up as they cool. If you want a soft center, take them out just before they look done. For the full recipe, check out the Ultimate Chocolate Chip Cookies section. To get the best cookie texture, pay close attention to butter temperature. Use softened butter, not melted. Soft butter helps create a creamy mixture that traps air. This air gives your cookies a nice lift. Cold butter will not mix well and leads to flat cookies. Avoid overmixing the dough. Mix just until you see no flour. Overmixing makes cookies tough. You want a chewy texture, so be gentle when combining the wet and dry ingredients. Using high-quality chocolate chips makes a big difference. Choose semi-sweet or dark chips for rich taste. You can also try other types, like milk chocolate or even butterscotch. Each adds a unique twist to your cookies. Experimenting with different extracts can also boost flavor. Almond extract adds a nice nutty taste. Coffee extract gives a subtle depth that pairs well with chocolate. Just a small amount can change everything. Cooling your cookies is important. It allows them to set and keeps them from falling apart. Let them cool on the baking sheet for about five minutes. Then, move them to a wire rack. This helps air circulate, keeping them from getting soggy. For optimal freshness, store your cookies in an airtight container. This keeps them soft and delicious. If you want to keep them longer, freeze them. They hold their flavor well when stored properly. For the full recipe, check out the Ultimate Chocolate Chip Cookies. {{image_2}} To make your cookies even better, add nuts. Walnuts or pecans work great. They give a nice crunch and taste. You can also try other nuts. Macadamia nuts add a sweet touch. Hazelnuts bring a rich flavor. Mix and match to find your favorite! You can change the chips for a new taste. White chocolate adds sweetness. Dark chocolate gives a richer flavor. You can also use seasonal flavors. Pumpkin spice is perfect for fall. Peppermint is great for winter holidays. These small changes create a unique cookie experience. Want a lighter cookie? You can reduce the sugar. This helps cut calories but keeps the taste. Adding oats gives fiber and texture. You can also use whole wheat flour. This makes your cookies a bit healthier without losing flavor. Enjoy these tasty tweaks with your ultimate chocolate chip cookies from the Full Recipe. Store your cookies in an airtight container. This keeps them fresh and soft. I recommend using glass or plastic containers. If you stack them, place sheets of parchment paper between layers. This keeps them from sticking together. You can store cookies at room temperature. They stay fresh for about a week. If you want to keep them longer, use the fridge. Just remember, cold cookies lose some of their soft texture. Freezing cookie dough is simple and smart. First, scoop the dough into balls. Place them on a baking sheet lined with parchment paper. Freeze the dough for about 1-2 hours until firm. Then, transfer the balls to a freezer bag. Make sure to remove as much air as possible. They will last up to three months in the freezer. If you freeze baked cookies, let them cool completely. Place them in a single layer in a freezer bag. You can also use parchment paper between layers. This way, they won’t stick. They stay fresh for about two months in the freezer. Cookies have a pretty good shelf life. When stored properly, they can last up to a week at room temperature. If refrigerated, they last about two weeks. Look for signs of spoilage to know if they are bad. If they smell off or feel dry, it’s time to toss them. You want your cookies to taste fresh and soft. For the best flavor, eat them within the first few days. For the full recipe, check out the Ultimate Chocolate Chip Cookies section above. A chewy cookie uses more brown sugar and less flour. Brown sugar holds moisture. Adding more eggs also helps keep the cookie soft. You can mix the dough less for chewiness. A crunchy cookie has more flour and uses white sugar. This cookie bakes longer, making it crispy. Yes! You can use gluten-free flour blends. Look for a mix that has xanthan gum. Almond flour is another great option. It adds a nutty flavor and keeps it moist. Just be sure to check for other gluten sources in your other ingredients. Butter temperature is key. Use cold butter for less spread. If you want a thicker cookie, chill the dough before baking. Use a kitchen scale for accurate flour measurements. Too little flour can cause spreading too. Yes, you can double the recipe! Just keep the same measurements for each ingredient. Mix the dough in a big bowl to fit. Make sure to space the cookies well on the sheet. This ensures they bake evenly. Absolutely! You can make dough ahead and chill it. This helps the dough firm up. You can also freeze the cookie dough. Just scoop it into balls and freeze. Bake them straight from the freezer, adding a minute or two to the baking time. Chocolate chip cookies started in the 1930s. Ruth Wakefield created them in Massachusetts. She added chocolate chunks to her butter cookie recipe. This tasty treat quickly became popular. Now, it is loved worldwide. Fun fact: the first recipe was published in a cookbook in 1938! For more details, check the full recipe. In this article, I shared the essential ingredients and steps to make perfect chocolate chip cookies. We explored ingredient substitutions, baking techniques, and tips to enhance flavor and texture. Remember, the right butter temperature and avoiding overmixing can make all the difference. Enjoy experimenting with nutty variations or healthier versions. Whether you bake for fun or to impress, these cookies are sure to please. Happy baking, and don't forget to share your creations!

Ultimate Chocolate Chip Cookies Irresistible Flavor Boost

Craving the perfect chocolate chip cookie? You’re in the right place! In this guide, I’ll share my secrets for crafting

- 1 pound ground beef or turkey - 1 packet taco seasoning - 1 can (15 oz) black beans, rinsed and drained - 1 can (15 oz) corn, drained - 1 can (10 oz) diced tomatoes with green chilies The main ingredients make this dish a real winner. Ground beef or turkey gives it a hearty base. Taco seasoning adds a burst of flavor that ties everything together. Black beans and corn offer texture and nutrition. Diced tomatoes with green chilies bring a zesty kick. - 2 cups tortilla chips, lightly crushed - 2 cups shredded cheddar cheese - 1 cup sour cream - 1/4 cup sliced green onions - 1/4 cup fresh cilantro, chopped - Salt and pepper to taste Toppings make this taco casserole shine. Tortilla chips add crunch and a fun twist. Shredded cheddar cheese creates a gooey layer that melts perfectly. Sour cream gives it a rich, creamy touch. Green onions and cilantro add freshness and color. Don’t forget salt and pepper to taste. For the full recipe, check out the link provided. - Preheat the oven to 350°F (175°C). - In a large skillet, cook 1 pound of ground beef or turkey over medium heat until browned. Drain any extra fat. - In a 9x13 inch baking dish, spread a layer of 2 cups of lightly crushed tortilla chips. - Spoon the meat mixture over the chips. Spread it out evenly. - Top with half of 2 cups of shredded cheddar cheese. - Spread 1 cup of sour cream evenly over the cheese layer, then add the remaining cheese on top. - Bake in the preheated oven for 20-25 minutes. The cheese should be melted and bubbly. - Let it cool for a few minutes before serving. For the full recipe, check the detailed instructions above. Choosing the right meat is key. I often use ground beef for rich flavor. If you prefer leaner options, ground turkey works well too. Both meats absorb the taco seasoning nicely. To ensure even cheese melting, spread the cheese evenly across the top. Use a mix of cheddar and Monterey Jack for extra creaminess. Let the casserole sit for a few minutes after baking. This allows the cheese to set and makes it easier to serve. Don’t skip the toppings! Avocado slices add creaminess, while jalapeños bring a spicy kick. You can also use sour cream for a cool contrast. For a complete meal, serve it with a side salad or some fresh fruit. This adds freshness to your plate. One common mistake is overcooking the meat. Cook it just until browned for the best texture. This keeps it juicy and tender. Another mistake is skimping on the layer of crushed chips. Make sure to cover the bottom of the dish well. A generous layer adds crunch and keeps the casserole from becoming soggy. For the full recipe, check out the Super Easy Taco Casserole! {{image_2}} You can make this dish meat-free! Just swap the meat for lentils or tofu. Lentils give a nice texture. They also soak up all the taco flavors well. Tofu is great for a soft bite. Simply crumble it before adding. Both options are tasty and healthy. Want more heat? Add extra chili or jalapeños to the mix. You can slice them thin and sprinkle them in. For a fiery kick, use spicy taco seasoning. Just swap the usual packet for one labeled "spicy." Adjust the amount to fit your taste. It adds a fun twist! Feel free to get creative with your ingredients. Use different types of cheese, like pepper jack. You can also try corn tortillas instead of chips for a softer base. Have some leftover veggies? Toss them in! They can add great flavor and texture to your casserole. To keep your Super Easy Taco Casserole fresh, store leftovers properly. Use an airtight container. This helps keep the flavors intact. The casserole lasts in the fridge for three to four days. Make sure it cools down before sealing it up. This prevents condensation, which can make it soggy. You can freeze this casserole before or after baking. If freezing before baking, assemble the dish as normal. Wrap it tightly in foil and plastic wrap. It can last up to three months in the freezer. If you bake it first, let it cool completely. Then, freeze it in a similar way. To reheat, bake at 350°F (175°C) until hot, about 30-40 minutes. This dish is perfect for meal prep. You can prepare it in advance for busy nights. Portion it into individual servings for easy meals. Use small containers for each serving. This makes reheating simple. You can grab a serving and heat it up in minutes. Super Easy Taco Casserole lasts about three to four days in the fridge. To keep it fresh, store your casserole in an airtight container. This helps prevent moisture loss and keeps flavors intact. If you want to keep it longer, consider freezing it instead. Yes, you can use shredded chicken! It works great in this dish. Cooked rotisserie chicken is a fast option. Just mix it with the taco seasoning and follow the same steps. You can also use ground turkey or beef for a leaner choice. Taco Casserole pairs nicely with various sides. Here are some ideas: - Extra tortilla chips for crunch - A simple green salad for freshness - Guacamole or avocado slices for creaminess - Jalapeños for a spicy kick - Sour cream for added richness These sides will make your meal more colorful and fun. You can find the Full Recipe to try this delicious dish at home! This blog post covers how to make a tasty Taco Casserole. You start with simple ingredients like ground beef, beans, and cheese. I explained step-by-step how to prepare, layer, and bake it. You learned useful tips on perfecting your dish and ways to add your twist with variations. In the end, this casserole fits any meal and pleases everyone. Get creative and enjoy your time in the kitchen!

Super Easy Taco Casserole Flavorful Weeknight Dish

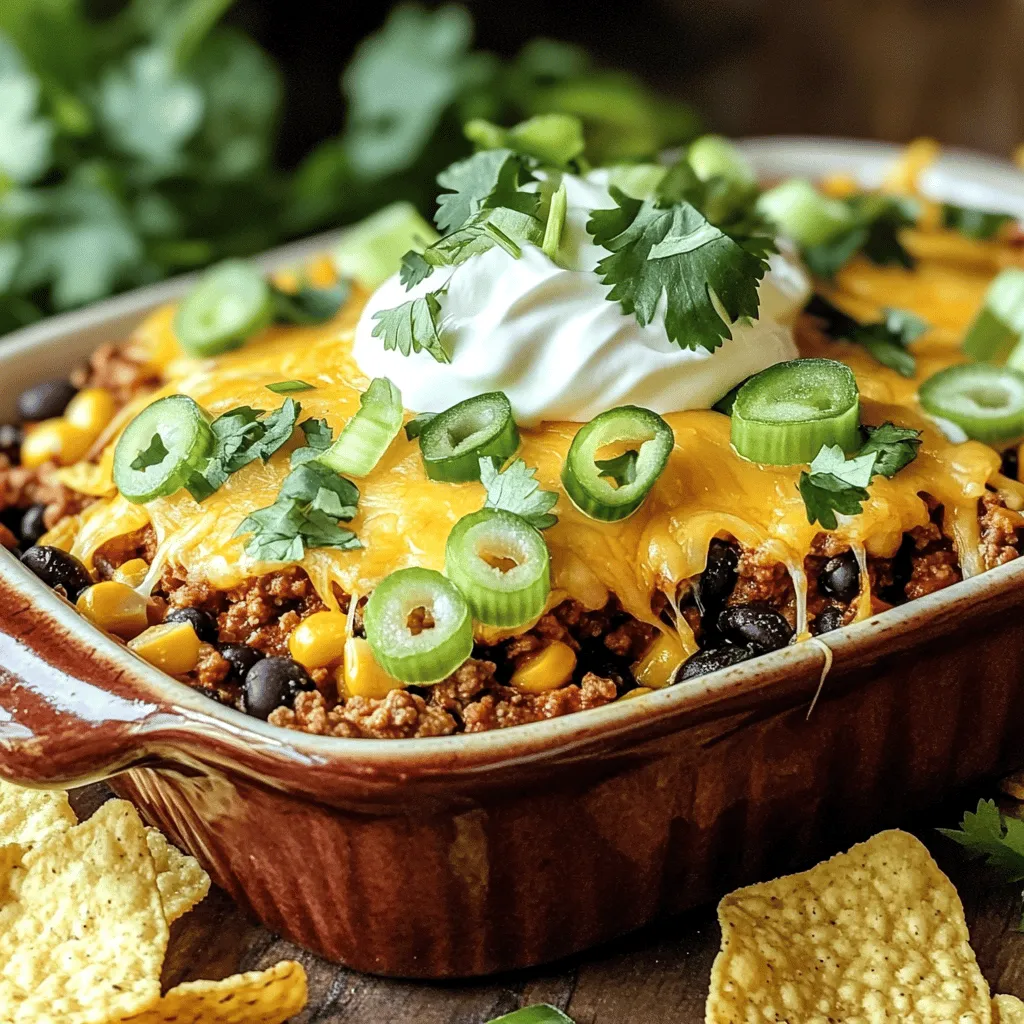
Looking for a quick and tasty meal for busy weeknights? The Super Easy Taco Casserole is your answer! This one-dish

- 12 ounces spaghetti or linguine - 1 pound large shrimp, peeled and deveined - 4 cloves garlic, minced - 1 tablespoon olive oil - 1 tablespoon unsalted butter - 1 lemon, zested and juiced To make One Pot Lemon Garlic Shrimp Pasta, you need simple ingredients. I love using spaghetti or linguine. They soak up the flavors well. Large shrimp add a nice touch with their sweet taste. Garlic gives a strong, rich flavor. Olive oil and butter make the dish creamy and smooth. The lemon adds a bright zest that lifts everything. - 1 teaspoon red pepper flakes (adjust to taste) - Salt and pepper to taste - 3 cups vegetable or chicken broth When it comes to seasoning, I use red pepper flakes for a kick. You can adjust how much you use based on your taste. Salt and pepper are must-haves for flavor. The broth brings everything together and makes the pasta tender. - 1/2 cup freshly grated Parmesan cheese - Fresh parsley, chopped for garnish For those who want to elevate the dish, I suggest adding Parmesan cheese. It melts beautifully and adds richness. Fresh parsley gives a pop of color and a fresh taste. These add-ins make the dish even more enjoyable and presentable. You can find the Full Recipe in the links above. - Start by heating 1 tablespoon of olive oil and 1 tablespoon of unsalted butter in a large pot over medium heat. - Once the butter melts, add 4 cloves of minced garlic and 1 teaspoon of red pepper flakes. Sauté for about 1 minute until the garlic smells great. - Next, add 1 pound of large shrimp, peeled and deveined. Season them with salt and pepper. Cook the shrimp for about 2 to 3 minutes on each side. They should turn pink and opaque. - Once cooked, remove the shrimp from the pot and set them aside. - In the same pot, add 12 ounces of uncooked spaghetti or linguine. Pour in 3 cups of vegetable or chicken broth, along with the zest and juice of 1 lemon. - Stir everything well to mix. Bring the pot to a gentle simmer. - Cover the pot and lower the heat to medium-low. Cook for about 10 to 12 minutes, stirring occasionally. The pasta should be al dente and absorb most of the liquid. - After the pasta cooks, return the shrimp to the pot. Toss everything together to combine. - Cook for another 2 minutes to warm through. If you like, stir in 1/2 cup of freshly grated Parmesan cheese until it melts. - Finally, taste and adjust the seasoning with more salt, pepper, or lemon juice if needed. This One Pot Lemon Garlic Shrimp Pasta is now ready to serve! For the full recipe, check the section above. To make the best shrimp, avoid overcooking them. Shrimp cook fast. They usually need just 2-3 minutes on each side. When done, they turn pink and opaque. If you cook them too long, they get rubbery and tough. For seasoning, I like to keep it simple. Use salt and pepper with fresh garlic. The garlic adds great flavor. A pinch of red pepper flakes gives a nice kick. Adjust the amount based on your spice level. Stirring is key when cooking pasta in one pot. This keeps the pasta from sticking together. It also helps the pasta absorb all the yummy flavors. You want each strand coated in that lemon garlic goodness. Use liquid absorption techniques to get the pasta just right. Start with enough broth so the pasta cooks well. Cover the pot to trap steam, which helps cook the pasta evenly. Stir every few minutes to ensure it cooks nicely. For presentation, serve the pasta in shallow bowls. This makes it look fancy. Top with chopped parsley and an extra sprinkle of Parmesan. A lemon wedge on the side adds a nice touch. Pair this dish with a light salad or garlic bread. A crisp white wine goes well too. It balances the lemon flavor in the pasta. For a non-alcoholic option, try sparkling water with a slice of lemon. Check out the Full Recipe for more details on making this dish! {{image_2}} You can swap shrimp for chicken or scallops. Chicken works well and cooks nicely. Just cut it into bite-sized pieces. Cook it until golden and fully done. Scallops are also a great choice. They add a sweet flavor. Sear them for a few minutes on each side. For a vegetarian option, use chickpeas or tofu. Both are packed with protein and easy to add. Adding vegetables can boost flavor and nutrition. Spinach or cherry tomatoes work great in this dish. Toss in fresh spinach near the end. It wilts quickly and adds color. For tomatoes, halve them and add with the pasta. You can also try fresh herbs. Basil or dill can give a bright taste. Just sprinkle them in before serving. If you need gluten-free, use gluten-free pasta. Many brands offer great options that cook well. You’ll still enjoy the same taste! For a lighter dish, try dairy-free swaps. Use nutritional yeast instead of Parmesan. It adds a cheesy flavor without the dairy. You can also skip the cheese altogether for a fresh twist. For the full recipe, check the section above. To keep your One Pot Lemon Garlic Shrimp Pasta fresh, store it in the fridge. Use airtight containers to prevent any moisture loss. Make sure to cool the pasta completely before sealing it. This helps avoid sogginess. Ideally, consume leftovers within three days for the best taste. When it's time to eat your leftovers, use the stovetop for reheating. Place the pasta in a pan over low heat. Add a splash of broth or water to keep it moist. Stir gently as it warms. Avoid the microwave, as it can make the shrimp tough. You can freeze leftover pasta, but remember shrimp does not freeze well. If you plan to freeze, only do so with the pasta without shrimp. Use freezer-safe containers and label them with the date. To thaw, place the container in the fridge overnight. Reheat on the stovetop with a little broth or water to keep it flavorful. Making this dish takes about 25 minutes. You spend 10 minutes prepping and 15 minutes cooking. This quick time makes it perfect for a busy day. Yes, you can use frozen shrimp. Just thaw them first. Place them in cold water for about 10-15 minutes. Once thawed, pat them dry. This helps them cook better and avoids extra water in the pot. You can serve this pasta with a fresh salad or garlic bread. A side of steamed vegetables also works well. These sides make your meal complete and tasty. For a drink, consider a light white wine or sparkling water. You can find the full recipe [here](#). This blog post shared how to make One Pot Lemon Garlic Shrimp Pasta. We covered all the main ingredients, including shrimp, garlic, and lemon. You learned step-by-step how to cook shrimp and pasta together for a quick meal. In the tips section, I discussed ways to perfect your dish and store it. We also looked at variations for different diets. Now, you can cook a delicious meal with ease. Enjoy your cooking and feel proud of your new skills!

One Pot Lemon Garlic Shrimp Pasta Simple and Tasty Meal

If you want a meal that’s both simple and delicious, try my One Pot Lemon Garlic Shrimp Pasta! This dish

To make Olive Garden Chicken and Shrimp Carbonara, you need fresh and tasty ingredients. Here’s what you’ll need: - 8 oz fettuccine pasta - 1 cup chicken breast, diced - 1 cup shrimp, peeled and deveined - 4 slices of prosciutto, chopped - 1 cup heavy cream - 1 cup parmesan cheese, grated - 2 cloves garlic, minced - 2 tablespoons olive oil - 1/2 teaspoon black pepper - Salt to taste These ingredients come together to create a creamy, savory sauce that coats the pasta and proteins beautifully. To make your dish even more special, consider adding these garnishes: - Fresh parsley, chopped - Extra parmesan cheese, grated - Red pepper flakes for some heat These garnishes not only add flavor but also make the dish look appealing. You will need some basic kitchen tools to prepare this dish. Gather the following: - Large pot for boiling pasta - Large skillet for cooking proteins and sauce - Colander for draining pasta - Wooden spoon for mixing - Measuring cups and spoons Having the right tools makes cooking easier and more fun. You can find the full recipe linked above for detailed steps. To start, boil a large pot of salted water. Add the fettuccine pasta. Cook it according to the package instructions. You want it to be al dente, which means it should be firm but not hard. This usually takes about 10-12 minutes. Once cooked, drain the pasta. Make sure to keep about half a cup of that pasta water. It’s great for later. Next, grab a large skillet and heat some olive oil over medium heat. Add the diced chicken to the skillet. Cook the chicken for about 5-7 minutes until it’s nice and brown. Make sure it cooks all the way through. Once done, remove the chicken and set it aside. In the same skillet, toss in the chopped prosciutto. Cook it for about 2-3 minutes until it gets crispy. After that, add the shrimp and minced garlic. Cook until the shrimp turns pink, which takes about 3-4 minutes. Remove everything from the skillet and set it aside again. Now, lower the heat on the skillet and add the heavy cream. Stir it gently to mix with the flavorful drippings. Gradually add in the grated parmesan cheese while stirring. This helps the cheese melt smoothly. Keep stirring until the sauce thickens a bit. It should become rich and creamy. It’s time to bring it all together! Add the cooked fettuccine, chicken, and shrimp back into the skillet. Toss everything in that creamy sauce, mixing well. If the sauce seems too thick, add some of the reserved pasta water until you reach the desired consistency. Finally, season with salt and black pepper to taste. Make sure everything is coated evenly. For an extra touch, garnish with fresh chopped parsley before serving. Enjoy your Olive Garden Chicken and Shrimp Carbonara Delight! To cook fettuccine the right way, start with a big pot. Use plenty of water and add salt. This helps flavor the pasta. Bring the water to a boil before adding the fettuccine. Stir the pasta to keep it from sticking. Cook it until just al dente, which means firm but not hard. This usually takes about 10 minutes. Always save some pasta water. It helps make the sauce creamy later. The sauce for this dish needs to be creamy and thick. Start by heating the heavy cream in the skillet over low heat. Add parmesan cheese slowly while stirring. This helps the cheese melt evenly. If the sauce is too thick, add a little pasta water. This will help loosen it up. Taste the sauce as you go and adjust with salt and pepper. The goal is a smooth, rich sauce that coats the pasta well. To boost flavor, consider adding a pinch of red pepper flakes. This gives a nice kick. Fresh herbs like basil or thyme can also add a lovely aroma. You can even squeeze a little lemon juice for brightness. If you like garlic, add more minced garlic when cooking the shrimp. Each small change can make a big difference in taste. {{image_2}} You can easily adjust this dish for different diets. For a gluten-free version, swap fettuccine for gluten-free pasta. If you're dairy-free, use coconut cream instead of heavy cream. You can also use nutritional yeast in place of parmesan for a cheesy flavor without dairy. These swaps keep the dish tasty while meeting dietary needs. Adding vegetables boosts nutrition and flavor. Try mixing in spinach, peas, or sun-dried tomatoes. You can also use bell peppers or zucchini for a fresh twist. Sauté them briefly with the chicken and prosciutto. This keeps the veggies crisp and colorful, making your meal even more appealing. Feel free to change the proteins in your carbonara. Instead of chicken and shrimp, use salmon or scallops for a seafood twist. You can also go vegetarian by using mushrooms or tofu. Each protein brings a unique flavor, letting you enjoy a new dish every time. To store your Olive Garden Chicken and Shrimp Carbonara, let it cool first. Use an airtight container for best results. Place the dish in the fridge. It will stay fresh for about three days. Make sure to label the container with the date. This way, you remember when you made it. When you are ready to eat, take out the leftovers. Place them in a skillet over low heat. Add a splash of water or cream to keep it moist. Stir gently until it’s hot all the way through. You can also use the microwave. Heat in short bursts, stirring in between. This keeps the dish from drying out. If you want to keep it longer, freezing is a great option. Portion the carbonara into smaller containers. This helps with quick meals later. Make sure to leave some space at the top of the container. The sauce will expand as it freezes. When ready to eat, thaw it in the fridge overnight. Then, reheat as mentioned above. Enjoy your creamy delight later on! Olive Garden Chicken and Shrimp Carbonara is a creamy pasta dish. It features fettuccine, chicken, and shrimp. The sauce blends heavy cream, parmesan cheese, and garlic. This dish has a rich flavor and a comforting texture. You can enjoy it as a main course. Yes, you can make Chicken and Shrimp Carbonara ahead of time. Cook the pasta and proteins, then mix them with the sauce before serving. Store it in the fridge in an airtight container. When ready to eat, just reheat it on low heat. You can easily customize this dish. Try using different proteins, like bacon or veggies. Add more garlic for extra flavor. You can also use whole wheat pasta for a healthy twist. Adjust the cheese type for a unique taste. Several sides go well with this dish. You can serve a fresh garden salad for crunch. Garlic bread is a classic choice that complements the meal. Steamed vegetables can add some color and health benefits. The nutritional value varies based on the ingredients used. On average, one serving has about 600 calories. It contains protein from chicken and shrimp. The heavy cream and cheese add fats and calcium. Keep this in mind if you watch your diet. You can find the Full Recipe in this article. It has all the steps and ingredients you need to create this tasty dish. You now have all the steps to make Olive Garden Chicken and Shrimp Carbonara. We covered the key ingredients, cooking methods, and even tips for the best results. Remember, you can tweak the recipe to fit your palate or dietary needs. With these methods, you’ll impress everyone at the dinner table. Enjoy your delicious meal!

Olive Garden Chicken and Shrimp Carbonara Delight

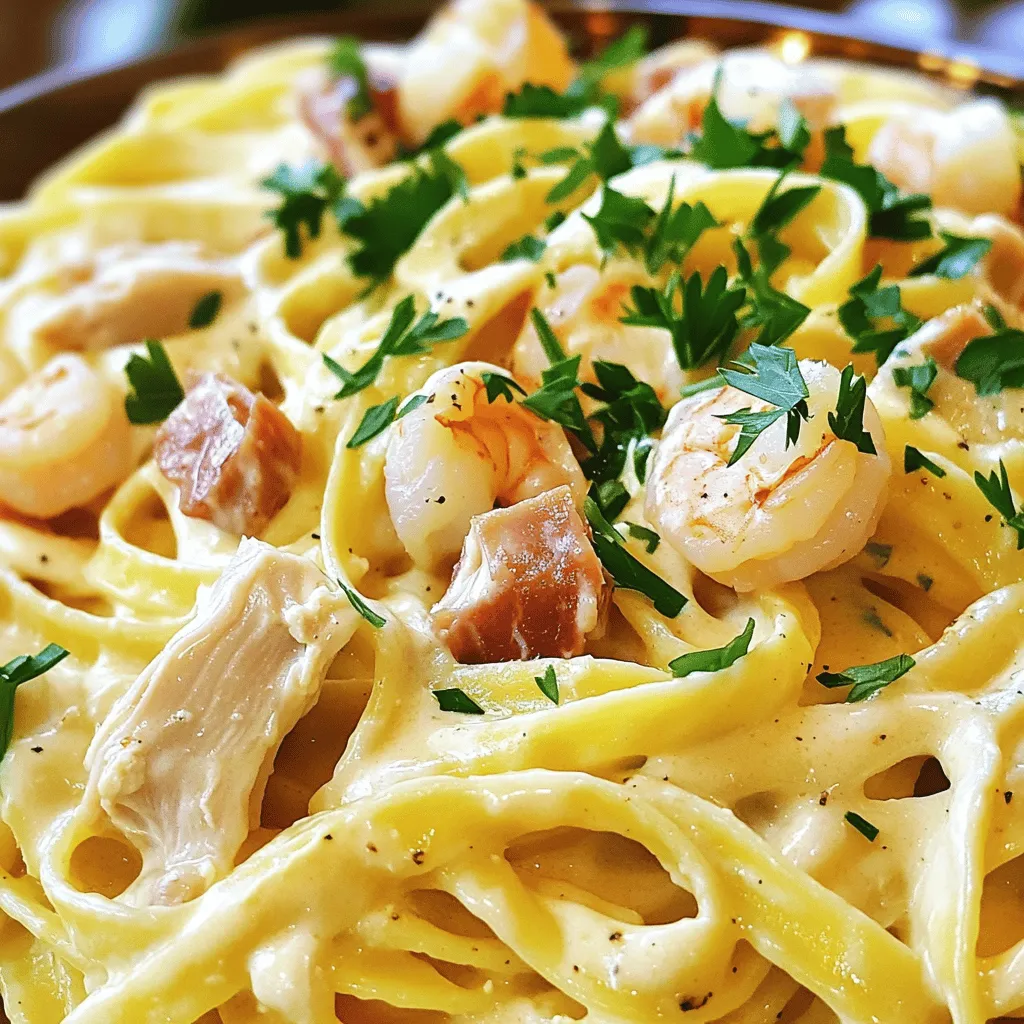
If you’re craving a creamy, hearty meal, Olive Garden’s Chicken and Shrimp Carbonara is a must-try. This dish combines tender

Older posts
Newer posts
← Previous Page1 … Page35 Page36 Page37 … Page77 Next →

dsad

© 2025 My Saved Recipe • Built with GeneratePress

Our Policies

  • Copyright Policy
  • Cookie Policy
  • GDPR Policy
  • Privacy Policy
  • Disclaimer
  • Terms Of Use

More Information

  • Home
  • About
  • Contact
  • Appetizers
  • Dessert
  • Dinner
  • Drinks
©2025, My Saved Recipe About Back To Top