Skip to content
DisclaimerTerms Of UseGDPR PolicyCookie Policy

My Saved Recipe

  • Home
  • Drinks
  • Appetizers
  • Dinner
  • Dessert
  • About
  • Contact
  • Privacy Policy
DisclaimerTerms Of UseGDPR PolicyCookie Policy

Savannah

- 4 salmon fillets (about 6 ounces each) - 1 red bell pepper, sliced - 1 cup broccoli florets - 1 cup snap peas - 1/3 cup low-sodium soy sauce - 1/4 cup honey - 2 tablespoons rice vinegar - 2 tablespoons sesame oil - 2 cloves garlic, minced - 1 tablespoon fresh ginger, grated - 2 tablespoons sesame seeds - 2 green onions, finely chopped - Salt and pepper to taste When I cook sheet pan teriyaki salmon, I love choosing fresh ingredients. The salmon is the star, and I pick fillets about six ounces each. They should be bright and firm. I also add vibrant vegetables, like red bell pepper, broccoli, and snap peas. The colors make the dish pop. For the teriyaki sauce, I keep it simple but flavorful. I use low-sodium soy sauce to control the salt. Honey adds sweetness, while rice vinegar gives it a tangy kick. Fresh ginger and garlic bring warmth and depth. This sauce is key in making the salmon and veggies shine. To finish, I sprinkle sesame seeds and chopped green onions. These add crunch and freshness. It’s not just about taste; it’s about making your plate look good too. For the full recipe, you can check out the link. To start, you’ll want to make the teriyaki sauce. Grab a mixing bowl and whisk together the following ingredients: - 1/3 cup low-sodium soy sauce - 1/4 cup honey - 2 tablespoons rice vinegar - 2 tablespoons sesame oil - 2 cloves garlic, minced - 1 tablespoon fresh ginger, grated Mix them well until everything blends smoothly. This sauce is sweet and salty, giving your salmon a rich flavor. Next, take your salmon fillets and place them in a shallow dish. Pour half of the teriyaki sauce over the salmon. Make sure each fillet is covered. Let the salmon marinate for at least 15 minutes. If you have time, let it sit for up to an hour in the fridge. This helps enhance the flavors even more. Now it’s time to bake! Preheat your oven to 400°F (200°C). Line a large sheet pan with parchment paper for easy cleanup. On the sheet pan, spread the sliced red bell pepper, broccoli florets, and snap peas. Drizzle a little olive oil and sprinkle some salt and pepper. Toss them to coat evenly. Remove the salmon from the marinade and place it among the veggies on the pan. Drizzle the remaining teriyaki sauce over everything. Bake for 12 to 15 minutes. The salmon should flake easily with a fork, and the veggies should be tender-crisp. For the full recipe, check out [Full Recipe]. Enjoy your delicious meal! For the best flavor, marinate your salmon for at least 15 minutes. If you have more time, try marinating for up to 1 hour. This allows the flavors to soak in and makes the salmon delicious. You can experiment with the teriyaki sauce, too. For a twist, add orange juice or pineapple juice for sweetness. You can also use brown sugar instead of honey for a deeper flavor. If you use thicker salmon fillets, adjust your bake time. Bake for about 15 to 18 minutes instead of the usual 12 to 15. This ensures your salmon cooks all the way through. For the vegetables, keep an eye on them. You want them tender-crisp, not mushy. They should stay bright and colorful for a fresh look. For a fun presentation, serve the salmon and veggies right from the sheet pan. This gives a rustic feel to your meal. If you want to dress it up, plate them individually. Add a sprinkle of extra sesame seeds and a slice of lime for a pop of color. You can pair this dish with rice or quinoa for a complete meal. Steamed jasmine rice or a fresh salad also works well. You will impress your family and friends with this simple yet tasty dish. Check out the Full Recipe for more details. {{image_2}} You can switch the salmon for chicken or tofu. Chicken thighs work well. They stay moist and soak up the teriyaki sauce. If you choose tofu, use firm tofu for the best texture. Press it first to remove excess water. This helps the tofu absorb flavors better. To boost flavor, try adding spices or different vegetables. You can use chili flakes for heat or garlic powder for extra depth. Swap in bell peppers, carrots, or zucchini for a colorful mix. Each vegetable adds a unique taste and crunch. This keeps the dish fresh and exciting each time you make it. While baking is simple, you can also grill the salmon. Grilling adds a smoky flavor that many people love. Keep an eye on the salmon so it doesn’t overcook. You can grill the veggies too. This makes for a great meal with different textures and tastes. To keep your sheet pan teriyaki salmon fresh, store leftovers in the fridge. Use an airtight container. This method helps the salmon and vegetables stay juicy. Consume the leftovers within three days for the best taste. If you want to store them longer, freeze the salmon and veggies separately. Place them in freezer-safe bags. They will stay good for up to three months. When ready to eat, just thaw them overnight in the fridge. When reheating, avoid the microwave if you can. Instead, use the oven or a skillet. Preheat your oven to 350°F (175°C). Place the salmon and vegetables on a baking sheet. Cover them with foil to keep them moist. Heat for about 10-15 minutes. If using a skillet, add a splash of water and cover it. This will help keep everything tender and flavorful. Meal prep makes weeknight dinners quick and easy. You can marinate the salmon a day ahead. Store it in the fridge with the sauce. Chop your vegetables in advance too. Keep them in the fridge in a sealed bag. On busy nights, just bake everything on the sheet pan and enjoy a tasty meal in no time. This dish works great for meal prep because it’s simple and quick. You can find the full recipe for even more help. To check if the salmon is done, look for a few signs. First, the flesh should turn from bright pink to opaque. You can also use a fork to gently flake the fish. If it flakes easily, it is ready. The internal temperature should reach 145°F (63°C). This is the safe zone for fish. Yes, you can use regular soy sauce. However, it will change the taste and salt level. Low-sodium soy sauce is milder and allows you to control the saltiness. If you use regular soy sauce, cut back on added salt in the recipe. This helps balance the flavors. Many sides pair well with this dish. Here are some ideas: - Steamed rice or quinoa - Stir-fried vegetables - Cucumber salad - Asian slaw - Noodles with sesame oil These sides enhance the meal and add variety. Each option complements the teriyaki flavor well. Enjoy mixing and matching! For the full recipe, check out the main article. We explored a simple recipe for Sheet Pan Teriyaki Salmon. We discussed key ingredients like salmon, veggies, and a tasty homemade sauce. You learned the steps to prepare, marinate, and bake your dish. Plus, we shared tips for the perfect meal. Remember, you can switch proteins or flavors for variety. Finally, proper storage and reheating keep leftovers fresh. Enjoy making this dish and impressing your family with your cooking skills!

Sheet Pan Teriyaki Salmon Flavorful and Simple Dish

Looking for a quick and tasty dinner? This Sheet Pan Teriyaki Salmon is both simple and packed with flavor. With

- 2 pounds baby potatoes, halved - 4 tablespoons olive oil - 4 cloves garlic, minced - 1/2 cup grated Parmesan cheese - 1 teaspoon dried oregano - 1 teaspoon smoked paprika - Salt and pepper to taste - Fresh parsley, chopped (for garnish) To make Garlic Parmesan Roasted Potatoes, you need fresh ingredients. Start with baby potatoes. These small potatoes cook well and have a nice texture. Halving them helps them roast evenly. You will also need olive oil. It adds flavor and helps the potatoes crisp up. Garlic is key for that rich taste. Use fresh cloves and mince them for the best flavor. Parmesan cheese is essential. It gives a salty and nutty taste. Dried oregano adds a hint of earthiness, while smoked paprika gives a gentle smokiness. Don’t forget salt and pepper to enhance all the flavors. Lastly, fresh parsley is perfect for garnish. It adds color and freshness to your dish. For the full recipe, check the details above. - Baking sheet - Parchment paper - Mixing bowl Gather your tools before you start. A good baking sheet helps your potatoes roast evenly. Line it with parchment paper for easy cleanup. A mixing bowl is where you combine all your ingredients. Make sure it's large enough to toss the potatoes well. These tools will make your cooking easier and more fun! 1. Preheat your oven to 425°F (220°C). This high heat helps the potatoes get crispy. 2. In a large mixing bowl, combine the halved baby potatoes, olive oil, minced garlic, dried oregano, smoked paprika, salt, and pepper. Toss them well so they are all coated. 1. Spread the potatoes in a single layer on a baking sheet. Use parchment paper to make cleanup easy. 2. Roast the potatoes in the preheated oven for 25 minutes. This step helps them become tender and golden. 3. After 25 minutes, take the baking sheet out. Sprinkle the grated Parmesan cheese evenly over the potatoes. 4. Return the baking sheet to the oven. Roast for an additional 10 to 15 minutes. The potatoes should turn golden brown, and the cheese will melt and bubble. Enjoy your Garlic Parmesan Roasted Potatoes! For the full recipe, check the earlier section. To get crispy potatoes, start by cutting them into even pieces. This helps them cook evenly. Make sure to toss the potatoes well with olive oil and seasonings. A good coating allows for that nice crunch. Spread them out on your baking sheet. If they are too close, they will steam instead of roast. Even seasoning is key. Use salt and pepper generously. This not only brings out the flavor but also helps achieve a golden crust. You can try seasoning them halfway through cooking for an extra flavor boost. You can mix things up with different herbs and spices. Consider using rosemary or thyme for a fresh taste. If you like a bit of heat, add some chili flakes. For toppings, try adding cheese varieties like cheddar or feta. You can also sprinkle on some crispy bacon bits for a savory crunch. Another idea is to add a dollop of sour cream or Greek yogurt for a creamy finish. For the full recipe, be sure to check out the instructions above. {{image_2}} You can use many kinds of potatoes for this dish. I love baby potatoes for their small size and creamy texture. They roast well and get crispy outside. You can also use regular potatoes. Just cut them into equal pieces. This way, they cook evenly. Both types give you a tasty result. Want to switch up the flavor? Try adding different cheeses. Cheddar or feta can give a nice twist. You can mix them with Parmesan for more depth. You can also add vegetables to the mix. Try bell peppers or onions. They roast nicely and add color. Just chop them up and toss them with the potatoes. This makes your dish even more vibrant. For the full recipe, check out the main section. To keep your Garlic Parmesan Roasted Potatoes fresh, store them in an airtight container. Place the container in the fridge. They will last for about three to four days. If you want to save them for later, you can freeze them. First, let the potatoes cool completely. Then, place them in a freezer-safe bag. Remove as much air as possible before sealing. They can stay in the freezer for up to three months. When it's time to enjoy your leftovers, you have two great options: the oven or the microwave. - Oven Method: Preheat your oven to 375°F (190°C). Spread the potatoes on a baking sheet. Bake for about 10-15 minutes. This method keeps them crispy and tasty. - Microwave Method: Place the potatoes in a microwave-safe dish. Cover them with a lid or wrap. Heat for 1-2 minutes, checking after each minute. This method is quick but may make them less crispy. For best results, I recommend the oven. You want those delicious crispy edges back! Can I use other types of cheese? Yes, you can use other cheeses. Cheddar or feta works well. Each cheese adds a different flavor. Experiment to find your favorite. How long do the potatoes take to cook? Cooking time is about 35 to 40 minutes. The first 25 minutes roast the potatoes. The last 10 to 15 minutes helps melt the cheese. Are these potatoes gluten-free? Yes, these potatoes are naturally gluten-free. You can enjoy them worry-free if you avoid gluten. How to make Garlic Parmesan Roasted Potatoes with fewer calories? To cut calories, reduce the amount of olive oil. You can also use a low-fat cheese. This keeps flavor while being lighter. What can I serve with Garlic Parmesan Roasted Potatoes? These potatoes pair well with grilled meats or a fresh salad. They also complement roasted vegetables nicely. Enjoy them with your favorite dish! In this post, I shared a simple recipe for Garlic Parmesan Roasted Potatoes. We covered the key ingredients you’ll need and the tools to use. I explained step-by-step how to prepare and cook them perfectly. We also discussed tips to enhance the flavor and texture and explored variations you can try. These potatoes serve as a great side for many meals. With a few easy swaps, you can make them your own. Enjoy making this dish and sharing it with others!

Garlic Parmesan Roasted Potatoes Crispy and Tasty Dish

If you crave a tasty side dish, Garlic Parmesan Roasted Potatoes are for you! This simple recipe gives you crispy,

- 1.5 lbs chicken thighs, boneless and skinless - 2 tablespoons gochujang (Korean red chili paste) - 1 tablespoon gochugaru (Korean red chili flakes) - 3 tablespoons soy sauce - 2 tablespoons honey or maple syrup - 2 cloves garlic, minced - 1-inch piece ginger, grated - 1 tablespoon sesame oil The chicken thighs are perfect for this dish. They stay juicy and tender when cooked. The gochujang and gochugaru bring heat and depth. Soy sauce adds salt and umami, while honey gives a sweet touch. Garlic and ginger add great flavor, and sesame oil gives a nice finish. - Chopped green onions - Sesame seeds - Suggestions for side dishes like kimchi or pickled vegetables Using green onions and sesame seeds as garnishes makes the dish pop. They add color and crunch. You can also serve it with kimchi or pickled veggies for extra taste and texture. These sides balance the heat and make your meal complete. For the full recipe, check the instructions to create this spicy delight! To make the marinade, grab a large mixing bowl. Add 2 tablespoons of gochujang, 1 tablespoon of gochugaru, and 3 tablespoons of soy sauce. Then, pour in 2 tablespoons of honey or maple syrup. Next, add 2 cloves of minced garlic, a 1-inch piece of grated ginger, and 1 tablespoon of sesame oil. Mix all these ingredients well until they form a smooth paste. This marinade gives the chicken its spicy and sweet flavor. Take 1.5 lbs of boneless, skinless chicken thighs and place them in the bowl with the marinade. Make sure each piece is well-coated. Cover the bowl with plastic wrap and let it sit in the fridge for at least 30 minutes. For even better flavor, you can marinate it overnight. The longer it sits, the more flavor it gets. You can choose between grilling or pan-searing the chicken. Grilling gives a nice smoky flavor, while pan-searing offers a great crust. Preheat your grill or skillet over medium-high heat. If you use a skillet, add a splash of oil to avoid sticking. Cook the chicken thighs for about 5-7 minutes on each side. The chicken should reach an internal temperature of 165°F (75°C). Let it rest for a few minutes before slicing. This step keeps the chicken juicy. Serve it over jasmine rice for a delicious meal. Check out the Full Recipe for more details! To make your Spicy Korean Chicken taste amazing, marination is key. Let the chicken soak in the marinade for at least 30 minutes. If you can, marinate overnight. This lets the flavors really sink in. For spice levels, start with the recipe’s amounts. If you want it spicier, add more gochujang or gochugaru. If you prefer less heat, reduce these ingredients. Taste as you go; adjust the flavors to suit your liking! To achieve a nice char, preheat your grill or skillet. This step is crucial! For grilling, oil the grill grates lightly. For skillet cooking, add a splash of oil to prevent sticking. Cook the chicken for about 5-7 minutes per side. Look for a golden brown color. An air fryer also works well. Cook at 375°F for 12-15 minutes. Check that your chicken reaches an internal temperature of 165°F. Serve your spicy chicken over cooked jasmine rice for a delicious meal. You can add sides like pickled vegetables or kimchi for extra flavor and crunch. For a beautiful presentation, arrange the chicken on top of the rice. Sprinkle with chopped green onions and sesame seeds. This adds color and makes the dish look gourmet. If you want, serve with extra sauce on the side for dipping. Enjoy your tasty creation! {{image_2}} You can make this recipe fit your needs. If you are gluten-free, use gluten-free soy sauce. It gives similar flavor. If you prefer different proteins, swap chicken thighs for chicken breast or try tofu. Tofu is great for a plant-based option. It absorbs the marinade well and cooks nicely. Want it milder? Use less gochujang and gochugaru. You can also add some sugar to balance the heat. For more spice, add red pepper flakes or fresh chili. Adjust the heat to suit your taste. Remember, you can always add more spice, but you can't take it away! Serve the spicy chicken in a wrap or salad for fun. You can use lettuce leaves for wraps. Add fresh veggies like cucumbers or carrots for crunch. For a bowl, layer the chicken over rice and top with seasonal veggies. This adds color and freshness to your meal. Enjoy this recipe with its many variations! For the full recipe, check the earlier section. After you finish your spicy Korean chicken, let it cool. Place leftovers in an airtight container. Store it in the fridge for up to three days. This keeps the chicken fresh and tasty. If you want to enjoy it later, remember to keep it sealed. This way, it won't soak up other fridge smells. To freeze portions for future meals, start with the cooled chicken. Cut it into smaller pieces for easy use. Place it in a freezer bag or container. Squeeze out the air before sealing. Label the bag with the date. You can freeze the chicken for up to three months. When you're ready to eat, just thaw it in the fridge overnight. When reheating, keep the chicken moist and flavorful. You can use the microwave, but it may dry out. Instead, try a skillet or oven. For a skillet, add a bit of water or broth, cover it, and heat on low. If using an oven, preheat to 350°F. Heat for about 10-15 minutes. This will help the chicken stay juicy. Enjoy your meal again with that same great taste! If you need a substitute for gochujang, you can use sriracha or chili paste. These options bring some heat, but they change the flavor a bit. You can mix in a little sugar to mimic the sweetness of gochujang. Yes, you can use chicken breast. However, chicken thighs are juicier and more tender. Breasts can dry out faster when cooked. If you use breasts, watch the cooking time closely. You can marinate the chicken for at least 30 minutes. For best flavor, aim for 2 to 4 hours. If you have time, an overnight marinate works wonders for taste. Some great side dishes are: - Kimchi: A spicy, fermented cabbage dish. - Pickled vegetables: These add a nice crunch. - Steamed broccoli: For a fresh veggie option. These sides balance the heat of the chicken. Serve the chicken on a large plate over jasmine rice. Slice the chicken into strips for easy eating. Add green onions and sesame seeds for color. This makes the dish look great and taste even better. For the full recipe, check out the details above. In this article, we explored how to create Spicy Korean Chicken from scratch. You learned about key ingredients, how to prepare the marinade, and different cooking methods. Tips for flavor and serving options made the dish even better. Don't forget variations to meet your preferences. Proper storage keeps leftovers fresh for later enjoyment. With these steps and ideas, you can make a savory and satisfying meal anytime. Now, it’s time to fire up your kitchen and enjoy this delicious dish!

Spicy Korean Chicken Flavorful and Easy Recipe

If you crave bold flavors and easy cooking, you’re in the right place! This Spicy Korean Chicken recipe packs a

- 2 cups cooked shredded chicken - 1 cup sharp cheddar cheese, shredded - ½ cup cream cheese, softened - 1 can (10 oz) enchilada sauce - 1 teaspoon garlic powder - 1 teaspoon cumin - 8 small flour tortillas - 1 cup black beans, rinsed and drained - ½ cup corn (fresh or frozen) - Salt and pepper to taste - Fresh cilantro for garnish The ingredients for Easy Chicken Enchiladas are simple and tasty. You need cooked shredded chicken, which adds protein and flavor. I love using sharp cheddar cheese for its rich taste. Cream cheese makes the filling creamy and smooth. Enchilada sauce gives the dish a zesty kick. Make sure to have garlic powder and cumin in your spice rack. They add warmth to the dish. For the base, I choose small flour tortillas. They hold the filling well and are soft to bite. Black beans and corn add texture and nutrition. Lastly, don't forget salt and pepper to make everything pop! - Sour cream - Salsa - Avocado slices Optional toppings can really elevate your meal. I recommend sour cream for creaminess. Salsa adds a fresh, zesty note. Avocado slices bring in healthy fats and taste great. Feel free to mix and match these toppings to suit your taste! For the complete recipe, check out the Full Recipe. - Preheat the oven to 350°F (175°C). - Prepare a 9x13 inch baking dish with enchilada sauce. Start by setting your oven. This step is key for cooking the enchiladas evenly. While the oven heats, grab your baking dish. Coat the bottom of the dish with half a cup of enchilada sauce. This helps prevent sticking and adds flavor. - Mix the chicken filling ingredients together. - Roll the tortillas with the filling and place them in the baking dish. In a large bowl, combine the cooked shredded chicken, cream cheese, and half a cup of sharp cheddar cheese. Add garlic powder, cumin, black beans, corn, salt, and pepper. Mix well until everything blends nicely. This filling is what makes your enchiladas tasty. Now, take a tortilla and scoop 2-3 tablespoons of the chicken mixture into the center. Roll it up tightly and place it seam-side down in the baking dish. Repeat this for all tortillas until you finish the filling. - Bake covered and then uncovered for optimal cheese texture. - Tips for checking doneness. Cover the dish with aluminum foil and bake for 20 minutes. This keeps the heat in and makes the filling warm. After 20 minutes, remove the foil. Bake for another 10 minutes. This helps the cheese melt and turn golden. To check if they are done, look for bubbly cheese and a light golden color. If you see this, your enchiladas are ready! Enjoy your delicious meal. - Use leftover chicken for quicker preparation. - Adjust spice level to taste with optional ingredients. Using cooked chicken cuts down your time. Shredded rotisserie chicken works great too. You can add jalapeños if you like heat. Or use mild cheese for a softer flavor. - Serve with sour cream and cilantro. - Add a side of salsa for extra flavor. For a nice look, sprinkle fresh cilantro on top. A scoop of sour cream adds creaminess. Serve with a bowl of salsa for dipping. This gives your meal a fresh kick. - Overstuffing tortillas leading to spills. - Not preheating the oven properly. Be careful not to pack too much filling into each tortilla. This helps keep them intact. Always preheat your oven. This ensures your enchiladas cook evenly and get bubbly. {{image_2}} You can easily make these enchiladas vegetarian. Just swap the chicken for black beans or tofu. Both options add protein and flavor. Black beans give a creamy texture. Tofu absorbs the flavors well. You can season tofu with spices to match the dish. This swap makes the meal just as tasty and satisfying. Want to change up the flavor? Try a green enchilada sauce instead! It adds a zesty kick. The green sauce pairs well with the chicken and cheese. If you love spicy food, go for a red sauce with a kick. Each sauce brings a unique twist to the meal. Feel free to mix and match for your perfect plate! Using different cheese can make your enchiladas special. You can try Monterey Jack or pepper jack cheese. These cheeses melt nicely and add unique flavors. Mixing cheeses can also give a great taste. Experiment with your favorites to find the best combo. Your enchiladas will be even more delicious! For the full recipe, check out Easy Cheesy Chicken Enchiladas. To store leftovers, cool the enchiladas first. Place them in an airtight container. They can stay in the fridge for about 3 to 4 days. This way, you keep them fresh and tasty. You can freeze enchiladas before or after baking. If freezing before baking, wrap them tightly in foil. For after baking, let them cool completely, then store them in a freezer-safe container. They last up to 3 months in the freezer. When you're ready to eat, thaw them in the fridge overnight. For reheating, bake them at 350°F (175°C) until hot. This keeps the tortillas soft and the cheese melted. Enjoy your easy chicken enchiladas again! For the full recipe, check out the Easy Cheesy Chicken Enchiladas . To make Easy Chicken Enchiladas, start by mixing cooked shredded chicken with cream cheese, cheddar cheese, garlic powder, cumin, black beans, corn, salt, and pepper. This mix is the heart of your enchiladas. Next, place some filling in a tortilla, roll it up, and lay it seam-side down in a baking dish. Pour enchilada sauce over the rolls and sprinkle with cheese. Bake at 350°F for about 30 minutes. This method ensures a tasty and quick meal. For detailed steps, check the Full Recipe. Yes, you can use corn tortillas instead of flour. Corn tortillas add a unique flavor and texture. They are also gluten-free, which is great for those with gluten allergies. Keep in mind that corn tortillas may break more easily when rolling. To help with this, warm them slightly in a pan or microwave before use. This will make them more pliable. Chicken Enchiladas taste great with various sides. Here are some ideas: - Mexican rice - Refried beans - Fresh guacamole - Salsa - A simple green salad These sides complement the flavors of the enchiladas and add freshness to your meal. Cooking Chicken Enchiladas takes about 30 to 40 minutes. This includes 20 minutes covered and 10 minutes uncovered for the cheese to melt and bubble. Prepping the ingredients only takes about 15 minutes. So, in less than an hour, you can enjoy a delicious meal. Yes, you can prepare enchiladas ahead of time. Assemble them and cover the baking dish with plastic wrap. Store in the fridge for up to 24 hours before baking. This saves time on busy days. You can also freeze them before baking. Just remember to thaw them overnight in the fridge if you freeze them. - Easy Cheesy Chicken Enchiladas This blog shared all you need for tasty chicken enchiladas. We listed simple ingredients and guided you through each step. You learned tips to make cooking easier and how to avoid common mistakes. Flavor twists and storage ideas help keep things fun. Now you can create these enchiladas to impress friends and family. Enjoy making and sharing this delicious dish!

Easy Chicken Enchiladas Quick and Tasty Meal

Looking for a quick and tasty meal? Try these Easy Chicken Enchiladas! They come together fast, making dinner stress-free. With

- 4 ripe tomatoes, sliced - 8 ounces fresh mozzarella cheese, sliced - 1 cup fresh basil leaves - 4 tablespoons extra-virgin olive oil - 2 tablespoons balsamic glaze - Salt and freshly ground black pepper to taste How to choose ripe tomatoes When you pick tomatoes, look for ones that feel firm. They should have smooth skin and vibrant color. A ripe tomato will smell sweet and fresh. Try to choose tomatoes that are slightly soft when you press them gently. This means they are ready to eat! Selecting high-quality mozzarella For the best flavor, choose fresh mozzarella. It should be soft and moist, not dry. Look for mozzarella packed in water or whey. This keeps it fresh. If you can, buy it from a local cheese shop or farmer's market for the best quality. Importance of fresh basil Fresh basil adds bright flavor to your salad. Look for basil with deep green leaves. Avoid any brown or wilted leaves. When you smell fresh basil, it should smell sweet and herbal. This smell means it is fresh and ready to use in your dish. For the full details on making this delightful salad, check out the Full Recipe. To make this salad, start with ripe tomatoes. Choose bright red tomatoes that feel slightly soft. Next, select fresh mozzarella. It should be creamy and firm. Slice the tomatoes and mozzarella into even pieces. Aim for about 1/4 inch thick. This helps each bite taste perfect. Use a sharp knife for clean cuts. Now it's time to layer the salad. Take a large platter. Start with a slice of tomato, then add mozzarella, and a basil leaf. Repeat this until all ingredients are used. Drizzle extra-virgin olive oil over the salad. This adds a rich flavor. Next, drizzle balsamic glaze for sweetness and tang. Season your salad with salt and freshly ground black pepper. This boosts the taste. For a spicy kick, you can add red pepper flakes. Allow the salad to rest for about 5 minutes. This helps the flavors blend nicely. Enjoy your Simple Caprese Salad Delight! You can find more details in the Full Recipe. Serve your Caprese salad cold for the best taste. A cool salad brings out fresh flavors. Pair it with crusty bread or a light white wine. This adds depth and makes the meal even better. To add a kick, sprinkle red pepper flakes on your salad. This small step makes a big difference. You can also try different oils, like infused olive oil. Each oil brings a new twist to the dish. For gatherings, serve your salad on a large, colorful platter. This makes the dish eye-catching. You can also use creative bowls or even rustic wooden boards. Add extra basil leaves on top for a pop of color. These small touches make your Caprese salad stand out. For the full recipe, check out the Caprese Delight Salad 🥗 section above. {{image_2}} For your Caprese salad, you can switch up the cheese. Try using burrata for a creamier texture. Goat cheese also works well for a tangy twist. If you have seasonal veggies, toss in sliced cucumbers or peppers. They add a nice crunch and fresh flavor. You can also use heirloom tomatoes for a colorful and tasty option. If you want a vegan version, replace mozzarella with plant-based cheese. There are many good options made from nuts or soy. For a nut-free salad, ensure you choose a cheese that does not contain nuts. This way, everyone can enjoy your dish without worry. Infusing your olive oil can elevate your salad. Try adding garlic or herbs to the oil for extra flavor. Different balsamic reductions can also change the taste. A sweeter version can add depth, while a more tangy one can brighten the dish. Experiment with these ideas to make your Caprese salad unique. For the complete recipe, check out the [Full Recipe]. Store your Caprese salad in a clean, airtight container. This keeps it fresh and tasty. Use a glass or plastic container with a tight lid. The salad stays good in the fridge for 1-2 days. After that, the ingredients may wilt or lose flavor. If you want to keep your salad fresh for longer, store the parts separately. Keep the tomatoes, mozzarella, and basil in their own containers. This way, they stay crisp and flavorful. Assemble your salad just before you plan to eat. If you have a ready-to-eat salad, eat it within one day for the best taste. Freezing Caprese salad is not ideal. The tomatoes and mozzarella can become mushy when thawed. If you must freeze, consider just the basil. Chop it and freeze it in a small bag. To thaw, place it in the fridge overnight. Use it in soups or sauces later. For best results, enjoy your salad fresh using the Full Recipe. Caprese salad stays fresh in the fridge for about two days. After that, the tomatoes and mozzarella may get soggy. To keep it fresh, store it in an airtight container. Yes, you can prepare Caprese salad ahead of time. However, it’s best to add the oil and glaze just before serving. This keeps the flavors vibrant and the texture fresh. You can add a few herbs to your Caprese salad. Fresh oregano or parsley works well. You can also try mint for a unique twist. Mix and match to find your favorite flavor. Balsamic vinegar is a raw, tangy liquid. Balsamic glaze is thicker and sweeter, made by cooking down the vinegar. The glaze adds a rich finish to dishes like Caprese salad. Yes, Caprese salad is gluten-free. It contains no wheat or gluten ingredients. You can enjoy this salad without worrying about gluten. This blog shared how to create a delicious Caprese salad. We covered fresh ingredients, easy steps, and great tips. Choosing ripe tomatoes and fresh mozzarella is key to flavor. Layer your salad carefully for the best look. Remember to season and let it rest for better taste. Feel free to experiment with variations and enjoy it fresh. Whether it’s for a meal or a gathering, your Caprese salad will impress. Keeping ingredients fresh ensures a delightful experience every time. Happy cooking!

Simple Caprese Salad Delight for Fresh Flavors

If you love fresh flavors, you’ll adore my Simple Caprese Salad Delight! This easy recipe showcases ripe tomatoes, creamy mozzarella,

For this recipe, you need 2 pounds of chicken wings. I like to use a mix of drummettes and flats. They cook evenly and are great for dipping. The right seasonings make all the difference. Here’s what you will need: - 2 tablespoons olive oil - 1 teaspoon garlic powder - 1 teaspoon onion powder - 1 teaspoon smoked paprika - 1 teaspoon salt - ½ teaspoon black pepper - ½ teaspoon crushed red pepper flakes (optional for heat) These seasonings give the wings a tasty and bold flavor. You can adjust the heat by adding more or less red pepper flakes. Garnishes make your dish pop. Use these for a fresh touch: - ½ cup grated Parmesan cheese - Fresh parsley, chopped (for garnish) The Parmesan adds a rich, savory layer. The parsley gives a nice color and brightness. You can also serve the wings with ranch or blue cheese for dipping. This adds even more flavor to each bite. For the full recipe, check the details above. Start by washing your chicken wings under cold water. Then, pat them dry with paper towels. This step is key. Removing moisture helps the wings get crispy. Lay them on a clean plate. Make sure they are not touching. This will help them cook evenly. In a large mixing bowl, add your chicken wings. Drizzle in the olive oil. Then, sprinkle the garlic powder, onion powder, smoked paprika, salt, black pepper, and crushed red pepper flakes. Use your hands to mix well. Make sure every wing is coated evenly. The oil and spices will give the wings great flavor. Preheat your air fryer to 400°F (200°C). This should take about five minutes. Once hot, place the wings in a single layer in the basket. If your air fryer is small, do this in batches. Cook the wings for 25 to 30 minutes. Shake the basket halfway through to let them crisp up all around. When done, check the internal temperature. It should reach 165°F (74°C). Carefully take the wings out and toss them with grated Parmesan cheese in a bowl. They will be hot, so use tongs. Finally, serve them on a platter with fresh parsley on top. Enjoy your crispy and flavorful wings! For the full recipe, check out the detailed instructions. To get crispy chicken wings, you need to dry them well. Use paper towels to pat them dry. This step is key. Moisture will make wings soggy. After drying, coat the wings lightly with olive oil. This helps them crisp up in the air fryer. Try to place the wings in a single layer in the basket. Crowding the basket traps steam. This can lead to less crispy wings. If you have many wings, cook them in batches. Shaking the basket halfway through helps the wings cook evenly. For perfect wings, set your air fryer to 400°F (200°C). This temperature works great to achieve a nice crunch. Cook the wings for 25 to 30 minutes. Check for doneness by using a meat thermometer. The inside should reach 165°F (74°C). Don’t forget to preheat your air fryer for about 5 minutes. This allows the wings to start cooking right away. It also helps them get that golden color faster. One mistake is not drying the wings enough. This can ruin crispiness. Another mistake is using too much oil. It can make the wings greasy instead of crispy. Also, avoid overcrowding the basket. Wings need space to cook and crisp up. Make sure to shake the basket halfway through cooking. This helps all sides get crispy. Lastly, don’t skip the cheese! Tossing the wings in grated Parmesan adds flavor and crunch. For detailed instructions, check the Full Recipe. {{image_2}} Buffalo wings are a classic! To make these, add hot sauce to the mix. After cooking, toss your crispy wings in a mix of melted butter and hot sauce. This gives the wings that spicy kick. You can use your favorite hot sauce, like Frank's RedHot or a homemade blend. Serve with celery sticks and blue cheese. For a sweet twist, try honey garlic wings. Mix honey, soy sauce, and minced garlic in a bowl. After cooking your wings, toss them in this mixture for a sticky, sweet glaze. This adds a lovely shine and flavor. Top with sesame seeds and green onions for an extra touch. It’s a great way to balance sweet and savory. To make spicy garlic Parmesan wings, follow the original recipe. After cooking, toss the wings in a mix of garlic, Parmesan, and crushed red pepper. This adds heat and a cheesy flavor. You can adjust the heat by adding more or less crushed red pepper. The crunch from the cheese makes these wings extra special. Enjoy these tasty variations! Each one brings a new flavor to your air fryer chicken wings. For the full recipe, check out the crispy garlic Parmesan air fryer chicken wings. Once you finish your meal, let the wings cool down. Place them in an airtight container. This keeps them fresh for up to three days. For best results, store them in the fridge. If you want to keep them longer, freezing is a great option. To reheat your chicken wings, use the air fryer again. Set it to 350°F (175°C). Air fry for about 5 to 10 minutes. This keeps the wings crispy and tasty. If you don't have an air fryer, you can use the oven. Preheat it to 350°F (175°C). Bake the wings for about 15 minutes. Make sure they are heated all the way through. If you want to freeze the wings, wrap them tightly in foil or freezer bags. This helps prevent freezer burn. Label the bags with the date. Frozen wings can last up to three months. When you’re ready to eat them, thaw them in the fridge overnight. Reheat them in the air fryer as mentioned above for the best taste. For a delicious treat, check the Full Recipe for more tips! You should cook chicken wings in an air fryer for 25 to 30 minutes. This timing gives you crispy wings. Be sure to check them halfway through and shake the basket. This helps them cook evenly. Chicken wings should reach an internal temperature of 165°F (74°C). This temperature ensures they are safe to eat. Use a meat thermometer to check the temperature. It’s the best way to avoid undercooking. Yes, you can use frozen chicken wings. Just add a few extra minutes to the cooking time. Make sure they are not stuck together. It’s best to separate them before cooking. This helps them cook evenly and get crispy. For the best results, follow the full recipe. In this post, we explored how to make tasty air fryer chicken wings. We covered ingredients like chicken, seasonings, and garnishes. Then, we went through each step, from prep to air frying. I shared tips for crispy wings and common mistakes to avoid. We also looked at fun flavor variations and how to store leftovers. With these ideas and steps, you can create delicious wings at home. Try different flavors and enjoy!

Air Fryer Chicken Wings Crispy and Flavorful Recipe

Are you ready to make the best Air Fryer Chicken Wings you’ve ever tasted? This quick and easy recipe will

To make Buffalo Cauliflower Bites, you need: - 1 medium head of cauliflower, cut into bite-sized florets - 1 cup all-purpose flour - 1 cup water - 1 teaspoon garlic powder - 1 teaspoon onion powder - 1 teaspoon smoked paprika - 1/2 teaspoon salt - 1/4 teaspoon black pepper - 1 cup buffalo sauce - 2 tablespoons olive oil - 1 tablespoon fresh parsley, chopped (for garnish) These ingredients work together to create a crispy, flavorful snack that packs a punch. If you don’t have some ingredients, here are good substitutes: - Cauliflower: You can replace it with broccoli for a similar crunch. - All-purpose flour: Use chickpea flour or gluten-free flour for a different twist. - Buffalo sauce: Try hot sauce mixed with melted butter for a quick fix. - Olive oil: Any neutral oil, like canola or vegetable oil, will work well. These alternatives maintain the taste and texture of the bites, so you won't miss a thing. Buffalo Cauliflower Bites are healthy and flavorful. Here’s a quick look at their nutritional value per serving (about 4 bites): - Calories: 150 - Protein: 4g - Fat: 7g - Carbohydrates: 20g - Fiber: 3g - Sodium: 400mg These bites are not just delicious; they offer a mix of nutrients and a good amount of fiber. Enjoy these tasty treats without guilt! For the full recipe, check out the [Full Recipe]. Start with a fresh head of cauliflower. Remove the leaves and stem. Cut it into bite-sized florets. Make sure they are all similar in size. This helps them cook evenly. Rinse the florets under cold water. Pat them dry with a clean towel. A dry surface helps the batter stick better. In a large mixing bowl, combine flour, garlic powder, onion powder, smoked paprika, salt, and black pepper. Whisk them together. Gradually add the water while mixing. You want a smooth batter. If it feels too thick, add a bit more water. The batter should coat the cauliflower without dripping too much. Preheat your oven to 450°F (232°C). Line a baking sheet with parchment paper. Dip each cauliflower floret into the batter. Let any extra batter drip off. Place the florets on the baking sheet in a single layer. Bake for 25-30 minutes. Flip them halfway for even cooking. They should be golden and crispy. While the cauliflower is baking, mix buffalo sauce and olive oil in a large bowl. Once the florets are done, remove them from the oven. Toss them in the buffalo sauce mixture until well coated. Return the bites to the baking sheet. Bake for another 10 minutes for extra crispiness. Finally, garnish with fresh parsley before serving. Enjoy your Buffalo Cauliflower Bites! For the complete recipe, check the [Full Recipe]. To get your Buffalo cauliflower bites extra crispy, focus on the batter. The mix of flour and water works best when it is smooth. You want the batter to coat the florets well. Dip each piece and let the excess drip off. This step helps avoid soggy bites. Bake them at 450°F to lock in the crunch. Flip them halfway through cooking to ensure even crispiness. For even better results, bake them a bit longer for that golden finish. Enhancing flavor is key to making these bites truly special. Add spices like garlic powder and smoked paprika to the batter. This gives the cauliflower a rich taste before you even add the buffalo sauce. After baking, toss the florets in a mix of buffalo sauce and olive oil. This adds depth and moisture, making each bite juicy. You can also experiment with different hot sauces or spices to find your perfect mix. When it comes to serving, think about fun and flavor. Pair your bites with a cool dip like ranch or blue cheese. Fresh veggies like carrot sticks or celery add a nice crunch. You can also serve them on a platter with fresh parsley for a nice touch. For a fun twist, use them as a topping on a salad or in a wrap. The options are endless! If you want the full recipe, check out the [Full Recipe]. {{image_2}} You can easily make Buffalo Cauliflower Bites vegan. Just swap the all-purpose flour with chickpea flour. This change adds protein and a nice flavor. Use water to make the batter, just like in the original recipe. Chickpea flour gives the bites a great texture. You will love how well they hold the sauce. If you want to mix things up, try different flavors. Add honey or maple syrup for sweetness. This creates a sweet and spicy balance. You can also use different sauces. Try teriyaki or barbecue sauce for a fun twist. Mix and match spices like cayenne for heat or curry powder for a warm taste. Your Buffalo Cauliflower Bites can become a whole new dish! You don’t have to bake your bites. An air fryer works great! It cooks them fast and makes them super crispy. Set the air fryer to 400°F (204°C) and cook for about 15 minutes. Shake the basket halfway to ensure even cooking. Grilling is another fun method. Toss the cauliflower on the grill for a smoky flavor. Just be sure to use a grill basket or foil. This keeps small pieces from falling through. Both methods give you tasty results. You can find the full recipe to explore more ways to make these bites delicious! Store your Buffalo Cauliflower Bites in an airtight container. Make sure they cool down first. This keeps them fresh for up to three days. If you have a lot left, you can separate them into smaller portions. This way, you can grab a quick snack later. Reheat your cauliflower bites in the oven for the best crispiness. Set your oven to 350°F (175°C). Place the bites on a baking sheet and warm them for about 10-15 minutes. You can also use an air fryer if you have one. Just cook them for around 5-7 minutes for that crunchy texture. You can freeze these bites for up to three months. First, bake them as usual. Let them cool completely, then place them in a single layer on a baking sheet. Freeze them for a couple of hours until solid. After that, transfer the bites to a freezer bag. When you're ready to eat, bake them straight from frozen. This makes for an easy snack anytime you want. For the full recipe, check out the earlier section. Yes, you can prepare Buffalo Cauliflower Bites ahead of time. First, make the batter and coat the cauliflower. Place them on the baking sheet but don’t bake them yet. Cover the sheet with plastic wrap and keep it in the fridge. You can store them this way for up to 24 hours. When you're ready to eat, just bake them right from the fridge. This saves time and lets the flavors blend well. Buffalo Cauliflower Bites are perfect for many sides. Here are some ideas: - Celery sticks - Carrot sticks - Ranch dressing for dipping - Blue cheese dressing - A fresh salad - Chips and salsa These options add crunch and flavor. They also balance the spicy taste of the bites. The heat level of Buffalo Cauliflower Bites comes from the buffalo sauce. It can be spicy, but you can adjust it. If you want less heat, mix the buffalo sauce with some olive oil or butter. This will tone down the spice. You can also try a milder sauce or use a homemade version. Just keep tasting as you mix until you find the right level for you. In this blog post, we explored making delicious Buffalo Cauliflower Bites. We discussed the important ingredients, including substitutes, and shared key nutritional details. I outlined step-by-step instructions for preparing, battering, and baking the bites. We also talked about tips for crispiness and serving. You can create variations, like vegan options or different flavor profiles. Finally, we covered storage tips for leftovers. Remember, you can adjust spice levels to fit your taste. Enjoy making this tasty dish!

Buffalo Cauliflower Bites Crunchy and Flavorful Snack

Are you ready to try a snack that’s crunchy, flavorful, and delightfully healthy? Buffalo Cauliflower Bites are the perfect treat

- 2 ripe avocados - 1 medium garlic clove, minced - 2 tablespoons lemon juice - 1/4 cup fresh basil leaves, plus more for garnish - 1/4 cup grated Parmesan cheese (or nutritional yeast for a vegan option) - 2 tablespoons extra virgin olive oil - Salt and pepper to taste - 12 ounces spaghetti or your pasta of choice - Cherry tomatoes, halved (for garnish) - Crushed red pepper flakes (optional, for garnish) To make creamy avocado pasta, you need fresh and simple ingredients. Start with ripe avocados. They should feel soft but not mushy. Garlic adds a nice kick. Lemon juice gives a zesty touch and keeps the avocado from browning. Fresh basil brings a burst of flavor. Parmesan cheese adds richness, but if you want it vegan, use nutritional yeast. Extra virgin olive oil helps blend everything smoothly. Don’t forget salt and pepper; they enhance all the flavors. Choose spaghetti or your favorite pasta type. For a pretty finish, add halved cherry tomatoes and crushed red pepper flakes if you like heat. This recipe is quick and perfect for busy days. You can find the full recipe above. Enjoy cooking this easy and healthy dish! To start, boil a large pot of salted water. Add the spaghetti to the boiling water. Cook it according to the package instructions until it is al dente. This means it should be firm to the bite, not mushy. Once cooked, reserve about 1 cup of pasta water before draining the rest. This water helps to make the sauce creamy later. Grab a blender or food processor. You will use this to make the sauce. Add the ripe avocados, minced garlic, lemon juice, basil leaves, and Parmesan cheese (or nutritional yeast) to the blender. Blend these ingredients until the mixture is smooth and creamy. While blending, slowly drizzle in the olive oil. This helps to mix everything well and makes the sauce rich. Now it’s time to mix the pasta with the sauce. In a large mixing bowl, toss the cooked spaghetti with the creamy avocado sauce. Make sure every strand of pasta is well coated. For serving, divide the pasta into bowls. Top each bowl with halved cherry tomatoes and extra basil leaves for a fresh look. If you like a little heat, add some crushed red pepper flakes on top. Enjoy your delicious meal! For the complete recipe, check out the [Full Recipe]. To pick the best avocados, look for a few key signs. First, check the color. Ripe avocados usually have a dark green to almost black hue. Next, gently squeeze the avocado. It should feel firm but yield slightly to gentle pressure. If it feels mushy, it is overripe. Finally, look at the stem. If it comes off easily and is green underneath, the avocado is ripe. If it is brown, the avocado is likely bad. Sometimes the sauce may be too thick. You can fix this easily. After blending, save some pasta water. Slowly add this water to the sauce while mixing. Add a little at a time until you reach your desired creaminess. This will help you get the perfect texture for your creamy avocado pasta. To make the dish even tastier, try adding extra seasonings. A pinch of garlic powder or onion powder can boost the flavor. Fresh herbs like cilantro or parsley can offer different tastes. You can also add toppings like crumbled feta cheese or toasted pine nuts for a nice crunch. If you like spice, sprinkle some crushed red pepper flakes on top. These simple changes will make your creamy avocado pasta shine. For the complete recipe, check out the Full Recipe. {{image_2}} For a vegan twist on creamy avocado pasta, you can skip the Parmesan cheese. Use nutritional yeast instead. It gives a cheesy flavor without any dairy. Just add 1/4 cup of nutritional yeast to your sauce. This keeps your dish tasty and plant-based. If you need a gluten-free option, choose pasta made from rice or chickpeas. These types cook well and pair nicely with the creamy sauce. Look for brands like gluten-free spaghetti or penne. They will work perfectly in this dish. You can make this pasta even more fun by adding veggies or proteins. Try mixing in spinach, peas, or broccoli for extra nutrition. You can also add grilled chicken or shrimp for a protein boost. This makes the meal hearty and satisfying. To keep your creamy avocado pasta fresh, store leftovers in an airtight container. Make sure to cover the top with plastic wrap to limit air exposure. This helps slow down oxidation, keeping your pasta from turning brown. You can store it in the fridge for up to two days. When you’re ready to eat it again, give it a quick stir. Can you freeze avocado pasta? Yes, but with caution. Freezing can change the texture of the avocado. If you want to freeze it, do so without the pasta. Instead, freeze just the avocado sauce in a freezer-safe container. This will keep it fresh. You can freeze the sauce for up to three months. When you want to use it, thaw it overnight in the fridge. To reheat your creamy avocado pasta, you have a few great options. You can use the stove or the microwave. If using the stove, heat it on low in a pan. Stir it gently and add a splash of water or olive oil to keep it creamy. If you choose the microwave, place it in a bowl and cover it. Heat in short bursts of 30 seconds, stirring in between. This way, it warms evenly. To tell if an avocado is ripe, look for these signs: - The skin should be dark green or black. - Gently squeeze the avocado; it should feel soft but not mushy. - Check the stem; if it comes off easily and is green underneath, it’s ripe. Ripe avocados taste the best in creamy avocado pasta. If they are hard, let them sit at room temperature for a few days. Yes, you can prepare creamy avocado pasta ahead of time. Here are some meal prep tips: - Make the avocado sauce and store it in an airtight container. Add a bit of lemon juice to help prevent browning. - Cook the pasta and let it cool before storing it in the fridge. - When ready to eat, mix the pasta and sauce together for a fresh taste. This dish tastes best when served fresh, but prepped ingredients save time. Serve creamy avocado pasta with these tasty side dishes for a complete meal: - A fresh green salad with a light vinaigrette. - Garlic bread or toasted ciabatta for a crunchy texture. - Grilled vegetables like zucchini or bell peppers add color and flavor. These sides complement the creamy avocado pasta nicely, making for a well-rounded dinner. This blog post guides you through making a delicious creamy avocado pasta. You learned about the key ingredients, step-by-step instructions, tips for success, variations, storage methods, and answers to common questions. This dish is simple, tasty, and great for various diets. Enjoy customizing it to fit your needs. Now, you’re ready to impress friends and family with your new cooking skill. Pasta night will never be the same!

Creamy Avocado Pasta Simple and Healthy Recipe

Looking for a quick, delicious meal that’s also healthy? Creamy Avocado Pasta is the answer! In just a few easy

To make Cajun Chicken Alfredo Pasta, gather these fresh and tasty ingredients: - 2 boneless, skinless chicken breasts - 2 tablespoons Cajun seasoning - 8 ounces fettuccine pasta - 2 tablespoons olive oil - 3 cloves garlic, minced - 1 cup heavy cream - 1 cup grated Parmesan cheese - Salt and pepper to taste - 1 bell pepper (red or green), sliced - 1 cup spinach leaves - Fresh parsley, chopped (for garnish) Each ingredient plays a key role. The fettuccine provides a good base. The chicken, seasoned with Cajun spices, gives flavor. Garlic adds depth, while the cream and cheese create that rich Alfredo sauce we all love. For the vegetables, bell peppers add sweetness, and spinach brings a nice color and health boost. Finally, parsley adds a fresh touch on top. When you combine these, you get a dish that is savory, creamy, and quick to make. If you want to see the full recipe, check out the Full Recipe for detailed steps and tips. Enjoy your cooking! - Bring salted water to a boil in a large pot. - Add the fettuccine and cook until al dente. - Drain the pasta and set aside for later. - Rub Cajun seasoning evenly over the chicken breasts. - Heat olive oil in a large skillet over medium-high heat. - Sear the chicken for about 6-7 minutes on each side until golden brown. - Remove the chicken and let it rest for 5 minutes. - Slice the chicken into strips. - In the same skillet, sauté minced garlic and sliced bell pepper for 2-3 minutes. - Pour in the heavy cream, stirring to mix well. - Gradually add the grated Parmesan cheese while stirring until melted and thick. - Season the sauce with salt and pepper to taste. - Toss the cooked fettuccine and spinach with the Alfredo sauce in the skillet. - Gently fold in the sliced Cajun chicken. - Heat everything through for about 2 minutes. - Garnish with fresh parsley before serving. For the complete cooking process, check the Full Recipe. - Ensure chicken is cooked evenly. Use a meat thermometer to check for 165°F. - Don’t overcook the pasta. Cook until al dente for the best texture. - Use freshly grated Parmesan for the best flavor. Pre-grated cheese lacks freshness. - Adjust seasoning as needed. Taste the sauce and add salt or pepper if needed. - Use freshly chopped parsley for garnish. It adds color and flavor. - Serve immediately for the best texture. The sauce thickens as it cools, so enjoy it hot. {{image_2}} You can swap the chicken for shrimp or sausage. Shrimp cooks quickly and adds a nice flavor. Sausage gives a smoky touch that pairs well with Cajun spices. For a vegetarian option, try adding tofu. Tofu absorbs flavors well and adds protein. To lighten the dish, use half-and-half instead of heavy cream. This change keeps it creamy but cuts the fat. Additionally, feel free to add more spices for extra heat. Cajun seasoning or red pepper flakes can kick it up a notch. Incorporate mushrooms, zucchini, or broccoli for more nutrients. These veggies add color and texture. Sun-dried tomatoes also bring a burst of flavor. They add a sweet and tangy note that complements the creamy sauce. Store leftovers in an airtight container. This keeps the pasta fresh. You can keep it in the refrigerator for up to 3 days. After that, the taste and texture may not be as good. You can freeze Alfredo pasta in meal prep containers. This is a great way to save some for later. When you're ready to eat it, thaw it in the refrigerator before reheating. This helps maintain its flavor and texture. For best texture, warm up the pasta on the stovetop. This method keeps it creamy and delicious. To maintain consistency, add a splash of cream while reheating. This will bring back that rich, creamy sauce you love. To kick up the heat, add more Cajun seasoning. You can also use hot sauce. Try brands like Tabasco or Frank's RedHot for a zesty kick. If you want a deeper flavor, add crushed red pepper flakes as you cook. Remember, start small and taste as you go. This way, you can control the spice level for your perfect dish. Yes, you can prepare Cajun Chicken Alfredo Pasta ahead of time. Cook the chicken and pasta in advance. Store them separately in airtight containers. You can make the sauce a day before, too. Just reheat it on low heat when you are ready to serve. If you plan to keep leftovers, store them in the fridge for up to three days. This dish pairs well with a fresh green salad. A simple Caesar salad works nicely, too. For a more hearty option, serve it with garlic bread. For drinks, try a chilled white wine like Sauvignon Blanc. A refreshing lemonade also complements this dish well. Absolutely! You can swap chicken for shrimp or sausage to change it up. If you want a vegetarian option, try adding tofu. You can also change the veggies in the dish. Spinach can be replaced with kale or broccoli for more crunch. Experiment with what you have on hand for a fun twist. For detailed preparation steps and measurements, check out the Full Recipe. It has everything you need to create this tasty dish! In this post, I shared a tasty Cajun Chicken Alfredo recipe. You learned about the key ingredients and step-by-step cooking instructions. I also included tips for cooking, sauce, and presentation, plus fun variations and storage advice. Remember, you can swap proteins and adjust spices to fit your taste. Cooking should be fun and creative! Enjoy making this dish and share your results with friends and family.

Cajun Chicken Alfredo Pasta Savory and Quick Delight

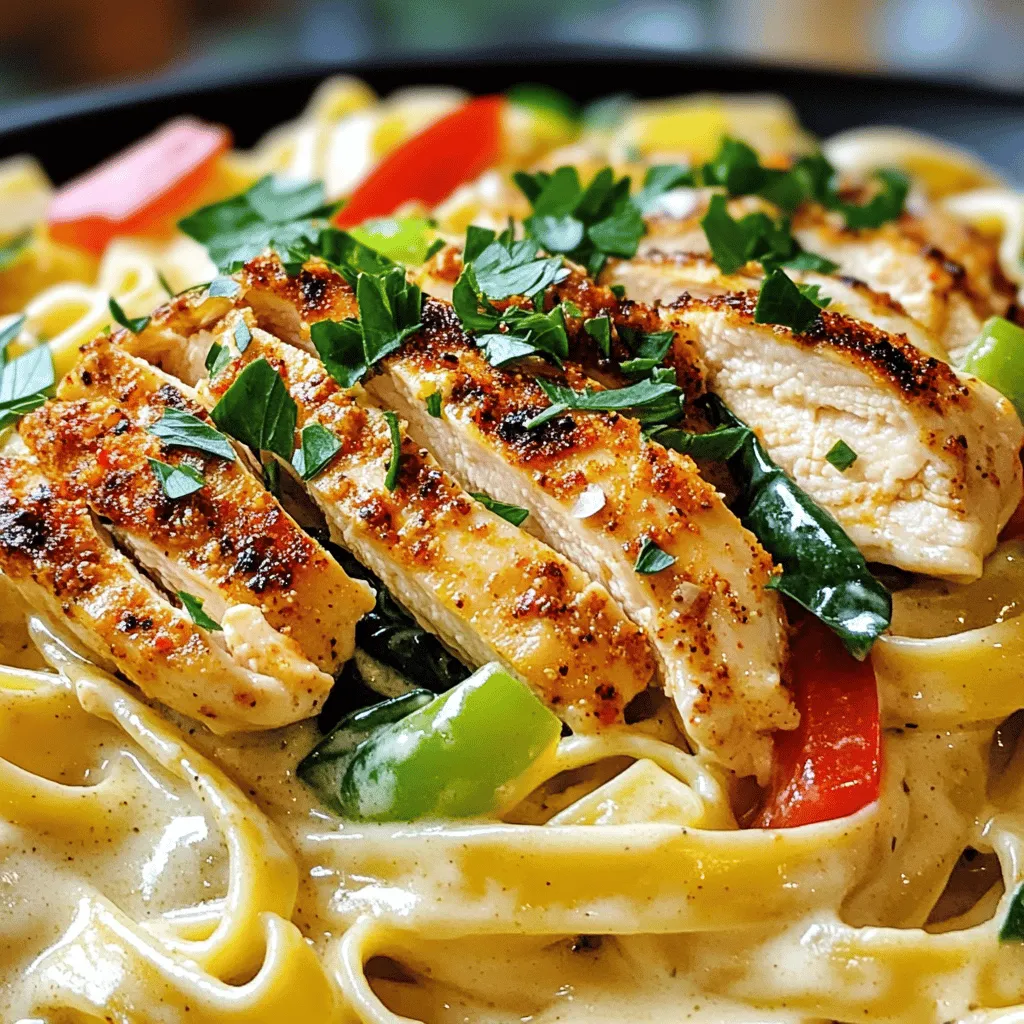
If you’re looking for a meal that’s both savory and quick, Cajun Chicken Alfredo Pasta is the answer! This dish

- 2 cups elbow macaroni - 4 cups chicken or vegetable broth - 1 teaspoon garlic powder - 1 teaspoon onion powder - 1 teaspoon mustard powder - 2 tablespoons unsalted butter - 2 cups shredded cheddar cheese - 1 cup shredded mozzarella cheese - ½ cup cream cheese - Salt and pepper to taste - Chopped chives for garnish (optional) When I make Instant Pot mac and cheese, I focus on quality ingredients. Using fresh, good cheese makes a big difference. The macaroni should be standard elbow shape. It cooks well and holds the cheese nicely. I like using broth instead of plain water. Chicken or vegetable broth adds more flavor. The spices, like garlic, onion, and mustard powder, boost the taste. They mix well with the cheese. Unsalted butter gives a rich taste. It helps the cheese melt smoothly. I choose shredded cheese to save time. Cheddar is classic, while mozzarella gives that creamy stretch. The cream cheese is key for richness. It adds a creamy texture that makes the dish special. Salt and pepper help balance the flavors. Lastly, I often sprinkle chopped chives on top for color. They add a nice look and a slight onion flavor. You can find the full recipe for more details. Add the elbow macaroni to the Instant Pot. Pour in the chicken or vegetable broth. Then, season with garlic powder, onion powder, and mustard powder. Stir it all together to mix well. Close the lid and set it to the sealing position. Select the Manual or Pressure Cook setting. Set the timer for 4 minutes. When cooking is done, you need a quick pressure release. Turn the valve to venting. Once the pressure drops, open the lid. The macaroni may look a bit saucy, but this is okay. It will thicken as you add cheese. Now, add the butter, shredded cheddar cheese, shredded mozzarella cheese, and cream cheese. Stir it all together until the cheese melts. Adjust seasoning by adding salt and pepper to taste. If you want it creamier, add a splash more broth or a bit of milk. Check out the Full Recipe for more details! To make your mac and cheese extra creamy, consider adding more liquid. If you want a richer feel, splash in a bit of milk. Milk brings a smooth texture that broth may not give. Using broth still works well, but milk can be a game changer for creaminess. When mixing in the cheeses, you can also add a little more broth. This will help thin it out if needed. Just remember, add liquids slowly to avoid making it too runny. To boost the flavor of your mac and cheese, think about spices. Garlic powder and onion powder add great taste. You can also try adding a pinch of paprika or cayenne for some heat. These spices bring warmth and depth to your dish. Cheese choice matters too. While cheddar is classic, mixing in mozzarella gives it a stretchy texture. For a twist, use gouda or pepper jack. Each cheese adds its unique flavor. Experiment to find the combo you love best. For a full guide, check out the Full Recipe. {{image_2}} You can boost your Instant Pot mac and cheese by adding proteins. Cooked chicken, bacon, or ham work well. Just stir them in after your cheese melts. This adds flavor and makes your meal heartier. For a vegetarian option, mix in some colorful vegetables. Peas, broccoli, or spinach will add nutrients and taste. You can steam the veggies first or toss them in raw. They will cook in the pot while your pasta is done. Cheese is the star of mac and cheese. To mix it up, try different cheese combos. Gouda, pepper jack, or even blue cheese can add unique flavors. Blend them with the cheddar for a richer taste. If you need a vegan option, look for plant-based cheese. Brands offer good substitutes that melt well. Nutritional yeast is also a great choice. It adds a cheesy flavor without dairy. Experiment with these to find your favorite mix. For the Full Recipe, you can refer back to the ingredients and steps outlined above. To store your leftover Instant Pot mac and cheese, let it cool first. This helps prevent moisture buildup. Use airtight containers for storage. Glass or plastic containers work well. Make sure the lid seals tightly. You can keep it in the fridge for up to three days. When reheating mac and cheese, the best method is on the stove. Place it in a pan over low heat. Add a splash of broth or milk. Stir often to keep it creamy. You can also use a microwave. Heat it in short bursts, stirring in between. This helps keep the texture smooth. If it gets too thick, just add more liquid. Enjoy your creamy dish again! Yes, you can make mac and cheese without cream cheese. Here are some great alternatives: - Greek yogurt: It adds creaminess and a slight tang. - Sour cream: Use this for a rich flavor and smooth texture. - Heavy cream: This makes the dish very creamy but is richer. - Cashew cream: A great vegan option if you want a nutty flavor. These options can keep your mac and cheese creamy and tasty. You can experiment with them based on what you have at home. If your mac and cheese is too thick, don’t worry! Here are some quick fixes: - Add more liquid: Pour in a little broth or milk. Stir it well. - Reheat with liquid: When warming leftovers, add a splash of broth or milk. - Mix in more cheese: Adding cheese can help balance the texture. These steps can help you find the right creaminess for your dish. To keep your pasta from sticking, follow these tips: - Stir before cooking: Make sure to stir the pasta and broth well before sealing the pot. - Use enough liquid: Always add enough broth or water to cover the pasta. - Quick release: After cooking, do a quick pressure release. This helps steam escape fast. These methods will help you enjoy perfectly cooked pasta in your mac and cheese. This blog post guides you through making creamy mac and cheese. We covered the ingredients, detailed cooking steps, and helpful tips to get it just right. I shared ways to customize the dish with proteins and cheese options. Proper storage and reheating tips help keep your mac and cheese fresh and delicious. Don't hesitate to experiment with flavors and textures. Enjoy your creamy creation, and share it with others!

Instant Pot Mac and Cheese Simple and Creamy Meal

Ready to make the creamiest Instant Pot Mac and Cheese? This simple meal is a game-changer for busy nights. With

Older posts
Newer posts
← Previous Page1 … Page38 Page39 Page40 … Page77 Next →

dsad

© 2025 My Saved Recipe • Built with GeneratePress

Our Policies

  • Copyright Policy
  • Cookie Policy
  • GDPR Policy
  • Privacy Policy
  • Disclaimer
  • Terms Of Use

More Information

  • Home
  • About
  • Contact
  • Appetizers
  • Dessert
  • Dinner
  • Drinks
©2025, My Saved Recipe About Back To Top