Skip to content
DisclaimerTerms Of UseGDPR PolicyCookie Policy

My Saved Recipe

  • Home
  • Drinks
  • Appetizers
  • Dinner
  • Dessert
  • About
  • Contact
  • Privacy Policy
DisclaimerTerms Of UseGDPR PolicyCookie Policy

Savannah

For crispy and tasty Buffalo Cauliflower Bites, gather these ingredients: - 1 head of cauliflower, cut into bite-sized florets - 1 cup all-purpose flour - 1 teaspoon garlic powder - 1 teaspoon onion powder - 1/2 teaspoon smoked paprika - 1/2 teaspoon salt - 1/4 teaspoon black pepper - 1 cup water (or non-dairy milk for creaminess) - 1 cup buffalo sauce (store-bought or homemade) - 2 tablespoons olive oil - Fresh parsley, chopped (for garnish) When choosing cauliflower, look for these signs of freshness: - Bright, white florets with no brown spots - Firm and compact head - Green, healthy leaves still attached - No soft or mushy areas Fresh cauliflower holds more flavor and crunch, which makes your bites taste better. You can easily adapt this recipe to fit your needs: - Gluten-free: Use gluten-free flour instead of all-purpose flour. - Vegan: Substitute non-dairy milk for water to keep it plant-based. - Low-carb: Replace flour with almond flour or crushed pork rinds. These substitutions keep the taste great while meeting your dietary needs. For the full recipe, check the detailed cooking instructions later in this article. To make Buffalo Cauliflower Bites, start by gathering your ingredients. Preheat your oven to 450°F (230°C). Line a baking sheet with parchment paper. This helps keep the bites from sticking. In a large bowl, mix one cup of all-purpose flour with one teaspoon each of garlic powder and onion powder. Add half a teaspoon of smoked paprika, half a teaspoon of salt, and a quarter teaspoon of black pepper. Whisk these dry ingredients together. Next, slowly add one cup of water or non-dairy milk to the bowl. This creates a smooth batter. Dip each cauliflower floret into the batter. Make sure each piece is well coated. Place the florets on the baking sheet. Bake them for 25 minutes. Remember to flip them halfway through for even cooking. While the cauliflower bakes, combine one cup of buffalo sauce with two tablespoons of olive oil in a bowl. Stir well. After 25 minutes, take the baking sheet out. Toss the baked cauliflower in the buffalo sauce mixture. Coat each piece well. Return them to the baking sheet and bake for another 10 minutes. This step helps the sauce stick better. Let the bites cool for a few minutes, then garnish with chopped parsley before serving. Watching a video can help you see each step clearly. Look for videos that show how to batter and bake the cauliflower. You can find many on cooking sites or platforms like YouTube. These videos often show tips on achieving the perfect crispiness. They also provide visual cues that can make cooking easier. To ensure your Buffalo Cauliflower Bites are crispy, follow these tips: - Use fresh cauliflower for best results. - Make sure the batter is thick enough to coat the florets. - Flip the florets halfway through baking for even browning. - Bake at a high temperature for crunch. - Toss in sauce right after baking for a crispier texture. These points will help you enjoy a tasty and crispy snack. For the complete recipe, check the section above. To get the best batter for your Buffalo Cauliflower Bites, use cold water or non-dairy milk. This helps keep the batter light and crispy. Mix your dry ingredients well before adding the liquid. This ensures an even coating on each floret. If the batter is too thick, add a bit more water. If it’s too thin, sprinkle in more flour. Make sure each cauliflower piece is well-coated for maximum flavor. Serve your Buffalo Cauliflower Bites with creamy ranch or blue cheese dressing. The cool dips balance the heat from the buffalo sauce. For extra zest, add sliced celery and carrots on the side. You can also sprinkle fresh herbs like cilantro or green onions on top for color and taste. Pair these bites with a crisp salad or some crunchy veggies for a complete snack. One common mistake is not preheating the oven. A hot oven helps the bites become crispy. Another mistake is overcrowding the baking sheet. Give each floret space to cook evenly. Avoid using too much batter; a thin layer works best. Lastly, don’t skip the final bake after tossing in the buffalo sauce. This step locks in the flavors and adds a nice finish. Follow these tips, and you will enjoy a tasty snack! {{image_2}} You can easily adapt Buffalo cauliflower bites to fit your taste. For a spicier kick, add cayenne pepper to the batter. If you want them vegan, swap the all-purpose flour with a gluten-free blend. Use almond milk instead of water for a creamy touch. You can even add nutritional yeast for a cheesy flavor without dairy. Dipping sauces can make your bites even better. Try a cool ranch made with vegan mayo and herbs. A creamy blue cheese dip pairs well with the spice of the buffalo sauce. You can also mix Greek yogurt with lemon juice and garlic for a tangy twist. A sweet chili sauce can balance the heat too. Leftover Buffalo cauliflower bites can be used in many ways. Chop them up and mix them into salads for extra flavor. You can add them to wraps with fresh veggies and a sauce. They also make a great topping for pizzas or grain bowls. Don’t let them go to waste; get creative with those bites! For the full recipe, refer to the earlier section. To keep your Buffalo Cauliflower Bites fresh, let them cool first. Place them in an airtight container. You can store them in the fridge for up to four days. If you want to keep them longer, consider freezing them. This method helps preserve their flavor and crunch. When it's time to enjoy leftovers, reheating is key. Preheat your oven to 400°F (200°C). Spread the cauliflower bites on a baking sheet. Heat them for about 10-15 minutes or until they are warm and crispy. Avoid microwaving, as this can make them soggy. If you want to freeze your Buffalo Cauliflower Bites, make sure they are fully cooled. Arrange them in a single layer on a baking sheet and freeze for an hour. Then, transfer them to a freezer-safe bag or container. They can last for up to three months. When ready to eat, you can bake them straight from the freezer without thawing. Just add a few extra minutes to the cooking time. Enjoy your flavorful snack! For the full recipe, check out the cooking instructions. Buffalo Cauliflower Bites can last about 3 to 5 days in the fridge. Store them in an airtight container to keep them fresh. They may lose some crispiness over time, but they still taste great. Yes, you can prepare Buffalo Cauliflower Bites ahead of time. You can coat the florets in batter and store them in the fridge for a few hours. Just bake them right before serving for the best results. You can also bake them fully and reheat them later, but they may not be as crispy. Buffalo Cauliflower Bites pair well with many sides. Here are some ideas: - Fresh veggie sticks like carrots and celery - A cool ranch or blue cheese dip - Hummus for a healthier option - A light salad for balance - Rice or quinoa for a heartier meal You can use the Full Recipe to whip up these tasty bites and impress your friends! Buffalo Cauliflower Bites are simple and fun to make. We covered ingredients, cooking steps, and storage tips. I shared ways to customize this dish for your needs and preferences. These bites are tasty and perfect for gatherings. Remember to avoid common mistakes for crispy bites. Enjoy experimenting with different flavors, dips, and uses for leftovers. Dive into making your own savory Buffalo Cauliflower Bites today. Happy cooking!

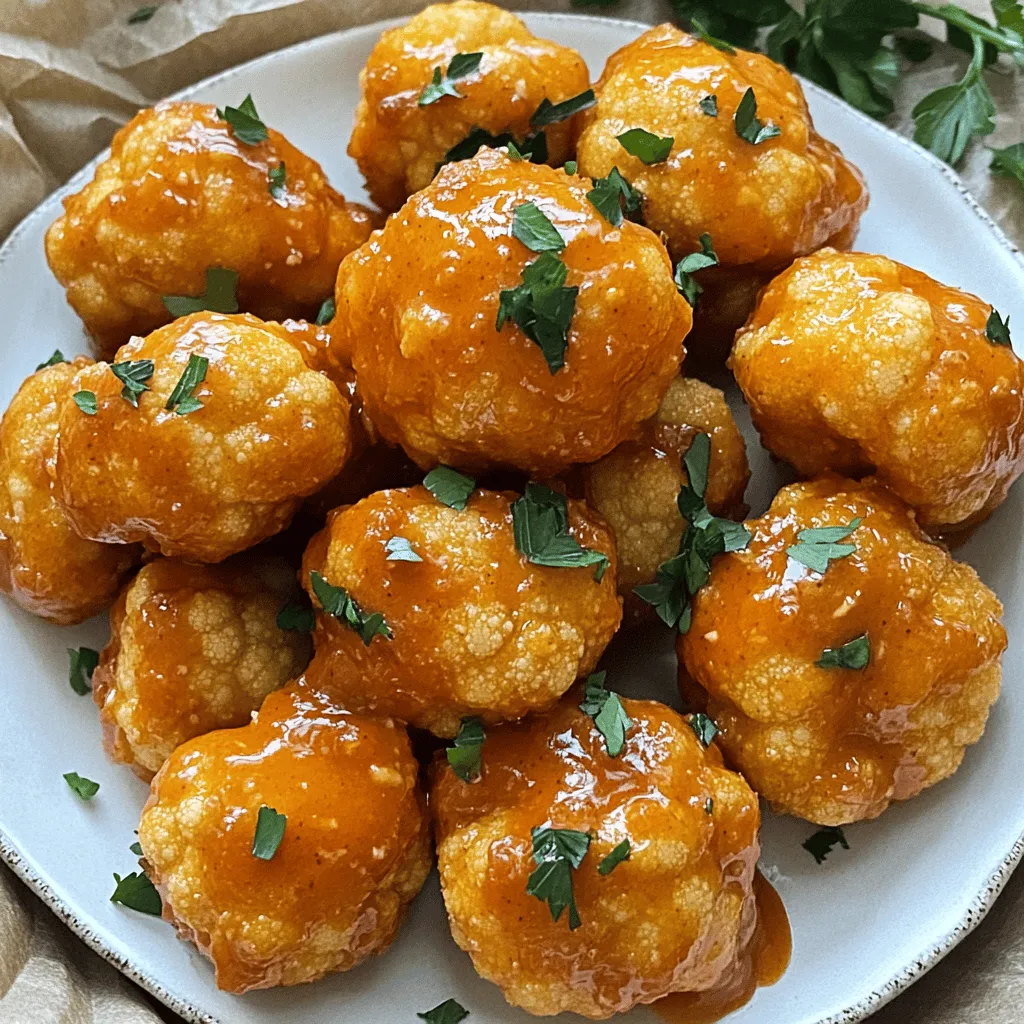
Buffalo Cauliflower Bites Crispy and Flavorful Snack

If you’re craving a crispy and flavorful snack, look no further than Buffalo Cauliflower Bites! These bites are easy to

To make perfect pan-seared scallops, you need just a few key items: - 1 pound sea scallops, patted dry - 2 tablespoons olive oil - Salt and black pepper to taste - 2 tablespoons unsalted butter - Zest of 1 lemon - Zest of 1 orange - 2 tablespoons freshly squeezed lemon juice - 2 tablespoons freshly squeezed orange juice - Fresh parsley, chopped (for garnish) These ingredients create a bright and fresh flavor, perfect for scallops. For extra flair, consider these options: - Microgreens for a fresh touch - Lemon wedges for added zing - Toasted bread to soak up the sauce - Risotto or quinoa as a hearty base These garnishes enhance the dish and make it more appealing. Adding more flavor can be fun. Here are some ideas: - A pinch of red pepper flakes for heat - Garlic, minced for depth of flavor - Fresh herbs like thyme or dill for earthiness - A splash of white wine for richness With these seasonings, you can personalize your scallops. For the full recipe, check out the Golden Seared Scallops with Citrus Butter. Start with fresh sea scallops. Pat them dry with paper towels. This step is key for a great sear. After drying, season both sides with salt and black pepper. Make sure to coat them well. You want every bite to have flavor. This simple prep sets the stage for a delicious dish. Use a large skillet for this. Heat olive oil over medium-high heat. Wait until the oil shimmers but does not smoke. Carefully add the scallops in a single layer. Avoid crowding the pan; this helps them cook evenly. Sear the scallops for about 2-3 minutes without moving them. You will see a beautiful golden crust form. Then, flip them gently with tongs. Cook the other side for another 2-3 minutes. They should be opaque in the center when done. Once the scallops are cooked, reduce the heat to medium. Add unsalted butter to the pan. Let it melt and swirl it around. Then add the lemon and orange zest. Pour in both lemon and orange juices. Stir to mix the flavors well. Let it simmer for about a minute. The sauce adds brightness and a rich taste to the scallops. Return the scallops to the pan, coating them in the citrus butter. Let them sit in the sauce for an extra minute. This enhances their flavor. For a complete cooking experience, check out the Full Recipe. When picking scallops, look for ones that smell like the ocean. They should not have a strong fishy scent. Fresh scallops are moist and plump, with a slight sheen. Avoid any that feel slimy or dry. If you can, buy them from a trusted fishmonger. Ask questions about their source and freshness. A good pan is key for searing scallops. I recommend using a heavy skillet. Cast iron or stainless steel pans work best. They hold heat well and create a great crust. Avoid non-stick pans, as they don't get hot enough. Make sure your pan is clean and dry before adding oil. A few simple mistakes can ruin your scallops. First, don't overcrowd the pan. This causes steaming instead of searing. Second, avoid moving the scallops too soon. Let them form a crust before flipping. Finally, cook them just until opaque. Overcooked scallops become rubbery and tough. Remember these tips when following the Full Recipe for perfect results! {{image_2}} For this tasty twist, you start with the same scallops. Sear them as before. In a pan, add 1 cup of heavy cream, 2 minced garlic cloves, and salt. Cook this mix until it thickens. Pour the garlic cream over your scallops. This adds a rich flavor that pairs perfectly with the scallops. If you like heat, this version is for you. After searing the scallops, melt 2 tablespoons of butter in the pan. Add 1 teaspoon of red chili flakes and mix well. Pour this spicy butter over the scallops. It gives a nice kick and a warm finish that is hard to resist. For a fresh and herbal taste, try this option. After cooking the scallops, remove them from the pan. In the same pan, add 1/2 cup of basil pesto. Stir it until it warms up. Then, return the scallops to the pan and coat them in the pesto. This adds a bright and vibrant flavor that enhances the dish. For the full recipe, check out the Golden Seared Scallops with Citrus Butter. After cooking, let the scallops cool down. Place them in an airtight container. Make sure to store them in the fridge. They will stay fresh for up to two days. If they smell off or change color, it's best to toss them. To reheat scallops, use a skillet on medium heat. Add a little olive oil for moisture. Place the scallops in the pan for about one minute on each side. This helps bring back their crispy texture. Avoid using the microwave as it can make them rubbery. To freeze scallops, first, pat them dry. Place them in a single layer on a baking sheet. Freeze until solid, then transfer them to a freezer bag. Remove as much air as possible. Scallops can last up to three months in the freezer. When ready to use, thaw them overnight in the fridge. This storage info helps you keep your scallops fresh and tasty. For a great dish, check the Full Recipe for pan-seared scallops! The best way to cook pan-seared scallops is by using high heat. Start with a hot, dry pan. This helps create a golden crust. Use olive oil to avoid sticking. Make sure to pat the scallops dry before cooking. Season them well with salt and pepper. Sear them for about 2-3 minutes on each side. Flip them carefully with tongs to keep them intact. Scallops should cook for around 4 to 6 minutes in total. Sear them for 2-3 minutes on one side, then flip and cook for another 2-3 minutes. They are done when they turn opaque and firm to the touch. Overcooking can make them chewy, so keep an eye on the time. You can prepare some parts ahead of time. However, it is best to cook scallops fresh. They taste best when served right after cooking. If you must prepare, cook the citrus butter sauce ahead. Store it in the fridge and warm it before serving. Reheat the sauce gently to keep the flavors intact. For the freshest taste, pan-sear the scallops just before serving. For the full recipe, check out the Golden Seared Scallops with Citrus Butter section. In this article, we explored how to create perfect pan-seared scallops. You learned about the main ingredients and optional garnishes. The step-by-step instructions guide you through preparation and cooking. Tips helped you choose fresh scallops and avoid mistakes. Variations, like garlic cream sauce, add unique flavors. Proper storage ensures you enjoy leftovers. Remember, practice makes perfect with cooking scallops. Enjoy the delightful taste and impress your guests with this impressive dish.

Pan-Seared Scallops Simple and Flavorful Recipe

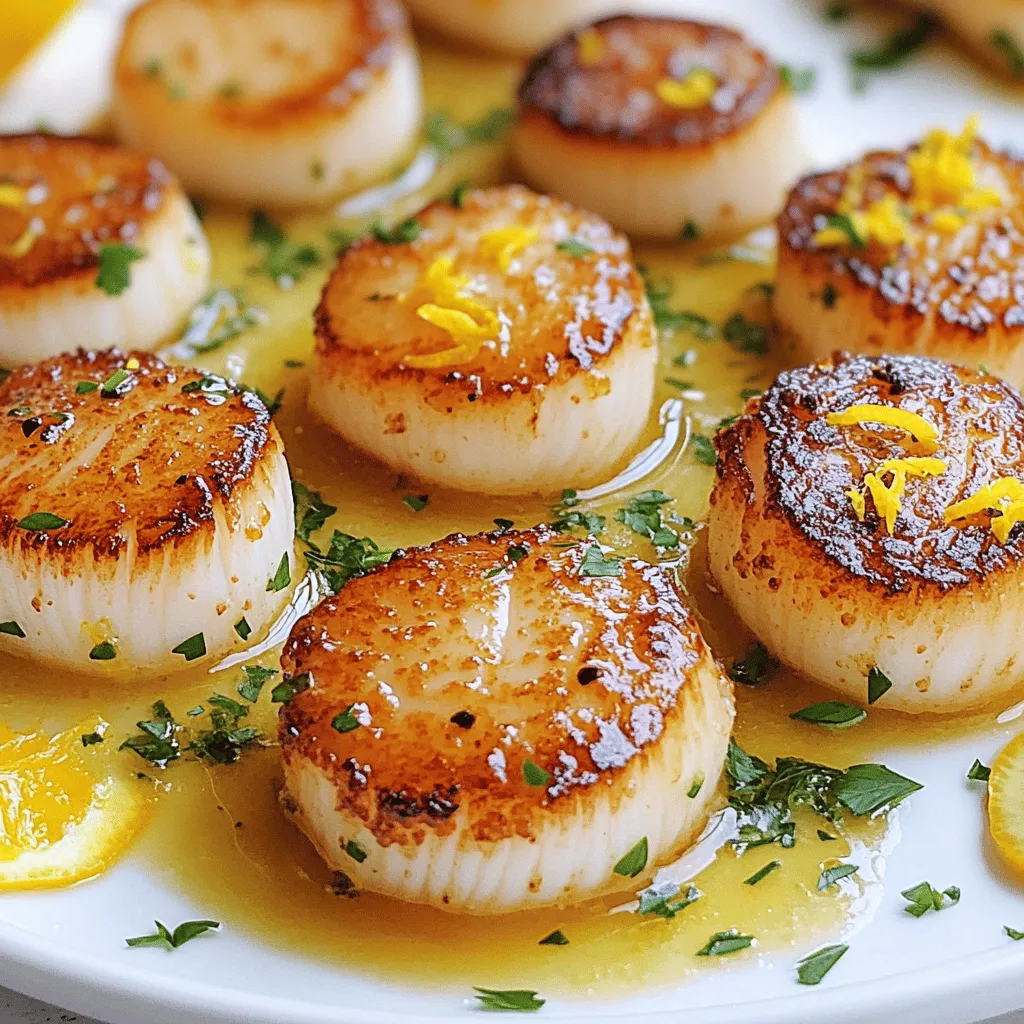
If you’ve ever wished to impress family and friends with a fancy dish, this pan-seared scallops recipe is for you.

- 4 boneless, skinless chicken thighs - 1 cup fresh pineapple, diced - 1/4 cup honey - 2 tablespoons soy sauce (or coconut aminos for gluten-free option) - 1 tablespoon olive oil - 1 teaspoon garlic powder - 1 teaspoon ginger powder - 1/2 teaspoon salt - 1/4 teaspoon black pepper - 1/4 cup green onions, chopped - Toasted sesame seeds The main ingredients shine in this dish. The chicken thighs provide a juicy base. Fresh pineapple adds sweetness and acidity. Honey gives a lovely glaze that makes every bite special. For a savory touch, soy sauce ties the flavors together. You can use coconut aminos if you prefer a gluten-free option. The seasoning mix is simple yet powerful. Olive oil helps the spices cling to the chicken. Garlic and ginger powders give the dish warmth. Salt and pepper balance the sweetness from the honey and pineapple. When it comes to garnishes, green onions add a nice crunch. Toasted sesame seeds bring a nutty flavor. These small touches elevate your meal. For the full recipe, check the complete steps to create this flavorful delight. - Preheat the oven to 400°F (200°C). - Coat chicken thighs with seasoning mixture. First, you need to get your oven ready. Preheating it to 400°F (200°C) gives the chicken a nice, even cook. Next, take a big bowl and mix olive oil, garlic powder, ginger powder, salt, and black pepper. This mixture adds great flavor. Toss the chicken thighs in this mix until they are fully coated. This step makes sure every bite is tasty. - Combine diced pineapple, honey, soy sauce, and lime juice. Now, let’s make the sauce. In a separate bowl, combine diced pineapple, honey, soy sauce, and lime juice. Stir them well until they mix together. This sauce adds sweetness and tang, making your chicken shine. The pineapple gives it a fruity twist that everyone loves. - Arrange ingredients in the skillet and roast until chicken is cooked through. Time to cook! Grab a large oven-safe skillet. Place the coated chicken thighs in a single layer. Pour half of your pineapple sauce over the chicken. Then, add sliced red and green bell peppers around the chicken. Pour the rest of the sauce on top. Put the skillet in your preheated oven. Roast it for about 25 to 30 minutes. You want the chicken to reach an internal temperature of 165°F (74°C). This way, it is safe to eat. The bell peppers should be tender too. Once done, let the skillet sit for 5 minutes before serving. This helps the flavors mix better. For the final touch, garnish with green onions and sesame seeds if you like. Enjoy your One-Pan Honey Pineapple Chicken! For the complete recipe, check [Full Recipe]. To cook the best chicken, make sure the internal temperature hits 165°F (74°C). You can check this with a meat thermometer. Once done, let the dish rest for five minutes. This helps the juices settle, making the chicken moist and tasty. Want even more taste? Marinate the chicken in your favorite sauce for at least an hour. Using the pineapple mixture as a marinade adds sweetness and tang. This simple step takes the flavor to a whole new level. Not a fan of chicken? You can use pork, shrimp, or tofu instead. Each protein brings its own flavor. If you want to add more veggies, bell peppers, snap peas, or broccoli work great. Just adjust the cooking time based on what you choose. Enjoy experimenting with your One-Pan Honey Pineapple Chicken! For the complete method, check the Full Recipe. {{image_2}} You can easily adapt this dish to fit different diets. For gluten-free needs, swap soy sauce with coconut aminos. This keeps the flavors rich and adds a hint of sweetness. If you follow a low-carb diet, replace honey with a sugar substitute like erythritol. This allows you to enjoy the taste without the extra carbs. To take your One-Pan Honey Pineapple Chicken to the next level, try adding spices or herbs. A pinch of chili flakes boosts the heat, while fresh cilantro adds a nice touch. You can also mix in different fruits. Mango and peach work beautifully and bring a tropical twist. The natural sugars in these fruits caramelize when cooked, enhancing the dish's sweetness. While the oven method is simple, you can grill this dish for a smoky flavor. Just marinate the chicken in the sauce and grill until fully cooked. A slow cooker is another great option. Simply layer the chicken and sauce in the pot and cook on low. This method tenderizes the chicken and lets the flavors meld together beautifully. For the full recipe, check out the detailed instructions above. To keep your One-Pan Honey Pineapple Chicken fresh, store leftovers in an airtight container. Place the chicken and vegetables together. This helps maintain flavor and moisture. Make sure it cools down first before sealing. The chicken will stay good in the fridge for up to four days. If you want to freeze the dish, let it cool completely. Then, portion it into freezer bags or containers. Squeeze out any air to avoid freezer burn. To reheat, thaw it in the fridge overnight. You can then warm it in the oven at 350°F (175°C) until heated through. This will help keep the chicken tender. In the fridge, your One-Pan Honey Pineapple Chicken lasts about four days. If frozen, it can last up to three months. Always check for signs of spoilage before eating. If it looks or smells off, it’s best to throw it away. Yes, you can use chicken breasts. They will work well in this recipe. Chicken breasts cook faster than thighs. Keep an eye on the time. They may need only 20-25 minutes in the oven. If you want to swap honey, use maple syrup or agave nectar. Both will add a nice sweetness. You can also use brown sugar mixed with a little water for a similar effect. Check the chicken's internal temperature. It should reach 165°F (74°C). You can use a meat thermometer for accuracy. If you don’t have one, cut a piece open. The meat should be white, not pink. For the full recipe, check the details above. This blog covers a tasty recipe for Honey Pineapple Chicken. You learned about the key ingredients, cooking steps, and options to customize the dish. I shared tips for perfect chicken and ways to store leftovers. Try different flavors and cooking methods to keep meals exciting. Use these ideas to make your cooking fun and easy. Enjoy your time in the kitchen, and remember that simple ingredients can create great meals!

One-Pan Honey Pineapple Chicken Flavorful Delight

Looking for a simple yet tasty dinner idea? One-Pan Honey Pineapple Chicken brings sweet and savory together in one dish!

To make these tasty mini cheesecakes, you need simple items. Here’s the list: - 1 cup graham cracker crumbs - 1/4 cup sugar - 1/2 cup unsalted butter, melted - 16 ounces cream cheese, softened - 1 cup powdered sugar - 1 teaspoon vanilla extract - 2 large eggs - 1/4 cup sour cream - Fresh berries or fruit compote for topping (optional) These ingredients create a creamy, rich filling with a crunchy crust. You can change a few items to fit different diets. For a gluten-free option, use gluten-free graham crackers. If you're vegan, swap cream cheese for a plant-based version and use flax eggs instead of regular eggs. You can replace sour cream with coconut yogurt for a dairy-free choice. These swaps keep your dessert delicious while meeting dietary needs. For the perfect finishing touch, add toppings to your mini cheesecakes. Fresh berries are a great choice. You can use strawberries, raspberries, or blueberries. A fruit compote adds sweetness and flavor. Consider drizzling chocolate sauce or caramel for a decadent twist. These additions make your dessert look pretty and taste even better. To start, gather your crust ingredients. You need graham cracker crumbs, sugar, and melted butter. In a medium bowl, mix the crumbs, sugar, and butter well. Make sure every crumb gets coated. This helps the crust hold together. Next, take about 1 tablespoon of the crumb mixture. Press it into the bottom of each muffin liner. This will create a solid base for your mini cheesecakes. Bake them at 325°F (160°C) for about 5-7 minutes. They should look slightly golden. Once baked, remove them from the oven and let them cool. Now, let’s make the filling. In a large mixing bowl, beat the softened cream cheese with an electric mixer. Mix it on medium speed until it’s smooth and creamy. This should take about 2-3 minutes. Gradually add the powdered sugar and vanilla extract. Keep mixing until everything is blended well. Next, add the eggs one at a time. Mix each egg in just until it’s combined. Be careful not to overmix; this can cause cracks later. Finally, add in the sour cream and mix until it’s smooth and creamy. Pour the cheesecake batter over the cooled crusts. Fill each muffin liner about 3/4 full. Bake in the oven for 15-18 minutes. The centers should be set but still jiggle a bit when done. After baking, turn off the oven and crack the door open. This lets the cheesecakes cool slowly for about an hour. Once cooled, transfer them to a wire rack. Let them cool completely, then refrigerate for at least 2 hours. This chilling time helps the flavors develop. When ready, you can serve them with fresh berries or fruit compote. Enjoy your delicious mini cheesecakes! To get a smooth cheesecake filling, start with room temperature cream cheese. Cold cream cheese can cause lumps. Beat the cream cheese until it is creamy, about 2-3 minutes. Add the powdered sugar slowly while mixing. This helps blend it evenly and keeps the filling smooth. Cracking happens when cheesecakes cook too fast or dry out. Here are some tips: - Do not overmix the batter. Mix just until ingredients blend. - Bake at a low temperature of 325°F (160°C). - Let the cheesecakes cool slowly in the oven with the door cracked for about an hour. This helps them set gently. Serve your mini cheesecakes chilled. Top them with fresh berries or a fruit compote for color and taste. Use a spoon or spatula to lift them from the muffin liners carefully. This keeps the crust intact and makes for a pretty presentation. For a fun touch, try drizzling chocolate sauce over the top! You can find the full recipe above for more details. {{image_2}} You can add different flavors to your mini cheesecakes easily. Use extracts like almond or lemon for a twist. You can also mix in some cocoa powder for a chocolatey taste. Try adding some citrus zest for a fresh kick. Each flavor brings its own joy. Fresh fruits make your mini cheesecakes pop. Berries like strawberries, blueberries, or raspberries work great. In summer, peaches or cherries shine brightly. In fall, think about apples or pumpkin puree. Top your cheesecakes with fruit compote for a sweet touch. Seasonal fruits make each bite special. Chocolate lovers can mix melted chocolate into the filling. You can use white, dark, or milk chocolate. Try adding crushed cookies, like Oreos, to the crust for fun. You can even layer caramel or peanut butter for a rich treat. These additions make every cheesecake unique. For the full recipe, check out the Mini Cheesecake Desserts! To keep your mini cheesecakes fresh, place them in an airtight container. You can store them in the fridge for up to five days. Make sure to separate layers with parchment paper to avoid sticking. If you use toppings, add them just before serving. This keeps the crust crisp and the toppings fresh. You can also freeze mini cheesecakes for longer storage. First, let them cool completely. Then, wrap each cheesecake in plastic wrap. Place the wrapped cheesecakes in a freezer-safe bag or container. They can last in the freezer for up to three months. This way, you can enjoy a treat anytime! To thaw frozen mini cheesecakes, place them in the fridge overnight. This method keeps them creamy. If you're in a hurry, you can leave them at room temperature for about an hour. Avoid using a microwave, as it can change the texture. Once thawed, enjoy your mini cheesecakes cold or at room temperature! For more detailed preparation, check the Full Recipe. Yes, you can make Mini Cheesecake Desserts a day or two ahead. This saves time for your event. Just store them in the fridge. They chill well and taste even better the next day. Be sure to cover them with plastic wrap. This keeps them fresh and prevents drying. There are many fun flavors for mini cheesecakes. Here are a few favorites: - Chocolate: Add melted chocolate to the batter. - Lemon: Mix in lemon juice and zest for a fresh taste. - Pumpkin: Use pumpkin puree and spices for a fall twist. - Berry: Top with strawberry or blueberry sauce for sweetness. You can mix and match flavors to create your unique dessert. Mini cheesecakes last about 5 to 7 days in the fridge. Store them in a sealed container. This keeps them safe and tasty. If you notice any change in texture or smell, it is best to toss them. For longer storage, consider freezing them. Mini cheesecakes are fun to make and enjoy. We covered key ingredients, toppings, and step-by-step instructions. I shared tips to avoid cracks and keep your filling smooth. You learned about variations, storage, and answers to common questions. Making these treats is simple and rewarding. With practice, you can create a treat that everyone loves. Enjoy the process and share your delicious results!

Mini Cheesecake Desserts Delightful and Easy Recipe

If you love cheesecakes but want a bite-sized treat, you’re in the right place! I’ll show you how to make

To make a great Louisiana gumbo with sausage and shrimp, gather the following ingredients: - 1/2 cup vegetable oil - 1/2 cup all-purpose flour - 1 large onion, diced - 1 green bell pepper, diced - 2 celery stalks, diced - 4 cloves garlic, minced - 1 pound andouille sausage, sliced - 1 pound shrimp, peeled and deveined - 6 cups chicken broth - 2 cups okra, sliced (fresh or frozen) - 1 can (14.5 oz) diced tomatoes, undrained - 2 tablespoons Cajun seasoning - 2 bay leaves - Salt and pepper to taste - 4 green onions, chopped (for garnish) - 1/4 cup fresh parsley, chopped (for garnish) - Cooked rice, for serving These ingredients create a rich and hearty dish full of flavor. The roux, made from flour and oil, forms the base. The holy trinity of onion, bell pepper, and celery adds depth. Andouille sausage brings spice, while shrimp adds a sweet touch. Okra thickens the gumbo and gives it a unique texture. Diced tomatoes add acidity to balance the dish. This gumbo is simple yet packed with taste. For the full recipe, check the details in the section above. To start, I heat the vegetable oil in a large pot over medium heat. Once the oil shimmers, I gradually whisk in the flour. This creates a mixture called roux. I stir constantly for about 15 to 20 minutes. I want to achieve a rich brown color. This step is crucial, as it adds depth to my gumbo. When my roux reaches the right color, I add the holy trinity of Cajun cooking: diced onion, green bell pepper, and celery. I sauté these vegetables for 5 to 7 minutes. They should soften and become fragrant. Next, I stir in minced garlic and sliced andouille sausage. I let this cook for another 2 to 3 minutes, allowing the flavors to meld. Now, I pour in the chicken broth, stirring well to mix everything. I want to avoid lumps in my gumbo. Then, I add sliced okra, undrained diced tomatoes, Cajun seasoning, bay leaves, and salt and pepper to taste. I bring the mixture to a boil before reducing the heat to low. I let it simmer for 30 to 45 minutes. This slow cooking really enhances the flavors. About 5 to 7 minutes before serving, I add the peeled and deveined shrimp. I cook them until they turn opaque. Finally, I discard the bay leaves and adjust the seasoning if needed. My gumbo is now ready to serve over a bowl of cooked rice. I like to garnish each bowl with chopped green onions and fresh parsley for a pop of color. For the full recipe, check the earlier section! To make a great roux, you need patience and constant stirring. Start by heating the oil in a heavy pot. Slowly whisk in the flour. Keep stirring so it doesn't burn. The color is key. Aim for a rich, dark brown, like chocolate. This can take 15 to 20 minutes. A perfect roux adds deep flavor to your gumbo. Seasoning is vital for a tasty gumbo. I suggest adding more Cajun seasoning for a spicier kick. Taste as you go. You can also add a splash of hot sauce for extra heat. For deeper flavor, consider adding smoked paprika or Worcestershire sauce. These little tweaks can make a big difference. Presentation matters! Serve your gumbo in deep bowls. Place a scoop of rice in the center. Top it with chopped green onions and fresh parsley for color. A slice of lemon on the side adds a nice touch. This not only looks good but also enhances the taste with a bit of brightness. For the full recipe, check out the link! {{image_2}} You can switch up the proteins in gumbo for a new taste. Instead of andouille sausage, try chorizo or kielbasa. Both add a nice kick. For shrimp, consider using chicken or crab. They bring their own flavors to the pot. If you want a meatless gumbo, simply use more vegetables. Try mushrooms or chickpeas for extra texture and protein. Okra and tomatoes are classic, but you can mix it up. Zucchini and bell peppers work well too. In the fall, use butternut squash or sweet potatoes for sweetness. In spring, snap peas or asparagus add a fresh crunch. Always choose what is in season for the best flavors. Spicy or mild, you control the heat. Start with less Cajun seasoning if you want it mild. You can always add more later. For extra spice, use hot sauces like Tabasco or a pinch of cayenne pepper. Just remember, a little goes a long way. Taste as you go to find your perfect level of heat. To keep your gumbo fresh, use airtight containers. Glass or plastic containers work well. Make sure to let the gumbo cool before sealing it. This helps prevent moisture build-up. You can refrigerate gumbo for up to three days. If you want to keep it longer, freeze it. Just pour the cooled gumbo into freezer-safe bags or containers. Remove as much air as possible to avoid freezer burn. When reheating gumbo, use a pot on the stove. Heat it over low to medium heat. Stir often to avoid sticking. You can also microwave it in a bowl. Cover the bowl with a paper towel to prevent splatters. To maintain flavor and texture, add a splash of chicken broth while reheating. This will help keep it moist and tasty. Gumbo lasts about three days in the fridge. After that, it may spoil. Look for signs like off smells or changes in color. If you see any of these signs, throw it away. If frozen, gumbo can last up to three months. Always label your containers with the date. This way, you’ll know when to use it. The best sausage for gumbo is andouille. This smoked sausage adds a rich, spicy flavor. It has a coarse texture and is often found in Cajun dishes. You can also use other types, like kielbasa or smoked sausage. If you want less spice, choose a milder sausage. Yes, you can make gumbo ahead of time. In fact, it tastes better the next day as flavors meld. Cool the gumbo and store it in an airtight container. Place it in the fridge for up to three days. You can also freeze it for up to three months. Just thaw it in the fridge before reheating. Gumbo pairs well with several side dishes. Cornbread is a classic choice, adding sweetness. Rice is another staple, soaking up the savory broth. You might also enjoy a simple salad or some crusty bread on the side. These options balance the rich flavors of the gumbo. There are a few ways to thicken gumbo without more roux. You can add pureed okra or a small amount of cornmeal. Another method is to mash some of the beans or vegetables in the pot. These options provide thickness while enhancing the flavors. In this article, we explored how to make a delicious gumbo from scratch. We covered essential ingredients like the roux, proteins, and vegetables. The step-by-step guide ensures you cook each element perfectly. We also discussed tips for enhancing flavors and serving. Don't forget the variations to make gumbo your own. Making gumbo is both fun and rewarding. With practice, you'll perfect your recipe. Enjoy your cooking journey!

Savory Louisiana Gumbo with Sausage & Shrimp Recipe

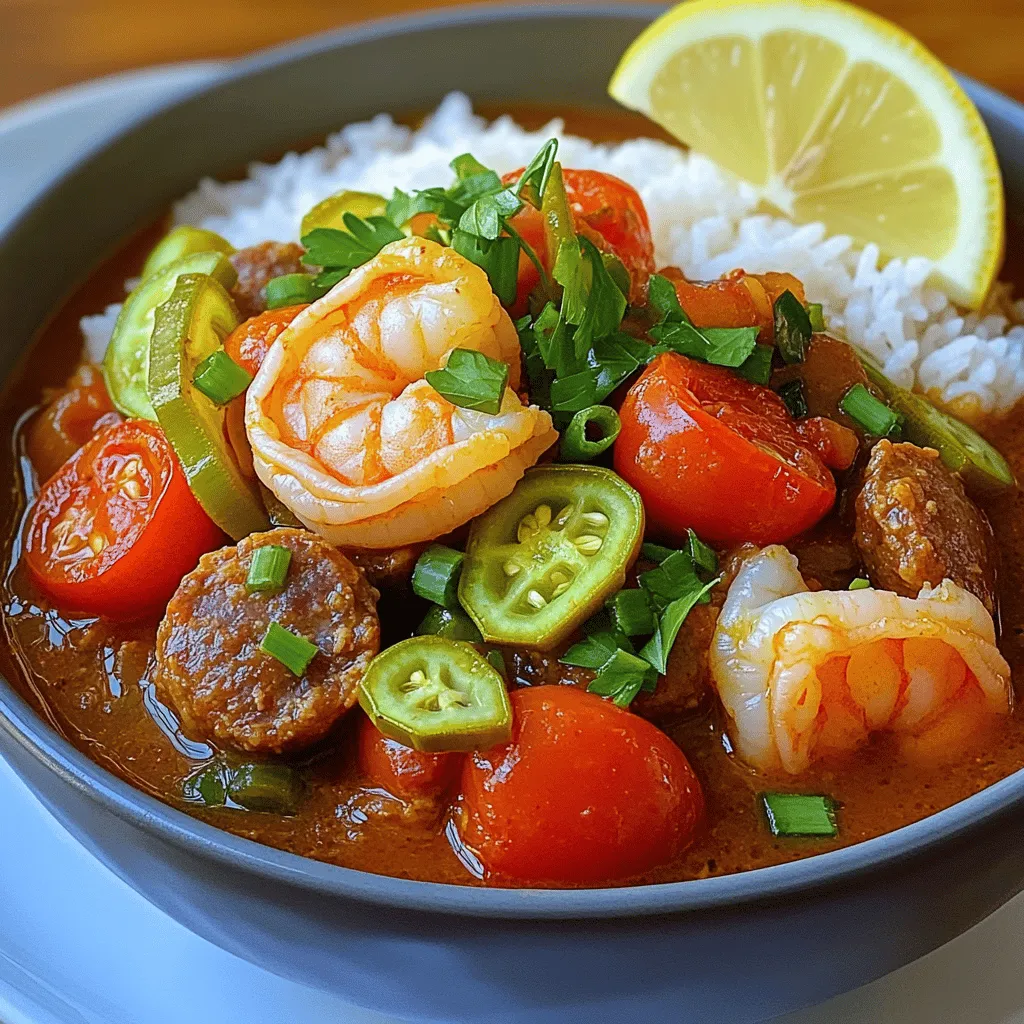
Welcome to a taste of Louisiana! In this blog post, you’ll discover how to make a spicy and savory gumbo

To make this tasty quinoa bowl, gather these fresh ingredients: - 1 cup quinoa, rinsed - 2 cups vegetable broth - 1 cup cherry tomatoes, halved - 1 cucumber, diced - 1 bell pepper (yellow or red), diced - ¼ cup red onion, finely chopped - 1 avocado, sliced - 2 tablespoons olive oil - 2 tablespoons fresh lemon juice - 1 tablespoon fresh parsley, chopped - 1 tablespoon fresh basil, chopped - Salt and pepper to taste - Optional: Feta cheese for topping You can swap some ingredients to fit what you have. Here are some ideas: - Quinoa: Try brown rice or farro for a different base. - Vegetable broth: Use water or chicken broth if you prefer. - Cherry tomatoes: Diced regular tomatoes work well too. - Cucumber: Zucchini or bell pepper can replace it. - Bell pepper: Any color works, or use shredded carrots. - Avocado: You can skip it or use diced mango for sweetness. - Fresh herbs: Dried herbs can work in a pinch but adjust amounts. Each serving of this quinoa bowl is not just tasty but healthy. Here’s what you get: - Calories: About 300 - Protein: 8g - Carbohydrates: 40g - Fat: 12g - Fiber: 7g - Sugars: 3g This dish packs a punch of flavor and nutrition, making it a great choice for dinner. For the full recipe, check out the detailed instructions. 1. Start by rinsing 1 cup of quinoa under cold water. This step helps remove any bitterness. 2. In a medium pot, mix the rinsed quinoa with 2 cups of vegetable broth. Bring this to a boil. 3. Once boiling, lower the heat. Cover the pot and let it simmer for about 15 minutes. The liquid should absorb fully. 4. After 15 minutes, take the pot off the heat. Let it sit covered for 5 more minutes. Then, use a fork to fluff the quinoa. 5. While the quinoa cooks, make the dressing. In a small bowl, whisk together 2 tablespoons of olive oil, 2 tablespoons of fresh lemon juice, salt, and pepper. 6. In a large bowl, mix 1 cup of halved cherry tomatoes, 1 diced cucumber, 1 diced bell pepper, and ¼ cup of finely chopped red onion. Add 1 tablespoon each of fresh parsley and basil. 7. Gently add the cooked quinoa to the vegetable mix. Pour the dressing over and toss everything together. 8. Finally, top your bowl with sliced avocado and sprinkle optional feta cheese on top. - Use vegetable broth for flavor. It makes the quinoa tastier. - Always rinse the quinoa. This step removes any bitter taste. - Keep the lid on while cooking. It helps the quinoa cook evenly. - Fluff the quinoa with a fork. This keeps it light and airy. - Serve this bowl warm or chilled. It tastes great either way! - Pair it with grilled chicken or shrimp for added protein. - Add a side of crusty bread for a complete meal. - Garnish with extra lemon juice and herbs for a fresh touch. For the full recipe, click [Full Recipe]. Many people make a few common mistakes when cooking quinoa. First, not rinsing quinoa can lead to a bitter taste. Always rinse it well before cooking. Second, overcooking quinoa makes it mushy. Cook it just until all the water is absorbed. Lastly, skipping the fluffing step can lead to clumpy quinoa. Fluff it gently with a fork for the best texture. You can easily boost the flavors in your Zesty Lemon Herb Quinoa Bowl. Add more herbs like dill or cilantro for a fresh taste. A splash of balsamic vinegar can also add depth. If you love spice, try adding red pepper flakes for heat. You can also add nuts or seeds for crunch and extra flavor. To save time, prep your ingredients before cooking. Chop vegetables while the quinoa cooks. Use one bowl for mixing to limit the dishes you use. To clean up faster, soak pots and pans immediately after use. This makes washing them easier when you're done eating. {{image_2}} Adding protein options to your quinoa bowl makes it heartier. You can use cooked chicken, shrimp, or even canned beans. If you want a plant-based option, try black beans or chickpeas. These add flavor and nutrition. Next, let’s talk about vegan and gluten-free options. This recipe is naturally gluten-free since quinoa is gluten-free. For a vegan meal, skip any cheese and focus on fresh veggies and healthy fats like avocado. You can replace feta with a vegan cheese option if you like. Flavor variations can also spice up your dish. Try adding spices like cumin or paprika for warmth. Fresh herbs like dill or cilantro can give it a new twist. You can even add a pinch of red pepper flakes for heat. Experiment with these flavors for a unique taste each time you make the bowl. For the full recipe, check out the first section. To keep your Zesty Lemon Herb Quinoa Bowl fresh, store it in an airtight container. This helps lock in flavor and moisture. Make sure the bowl is completely cool before sealing it. If you have leftover dressing, store it separately to keep the veggies crisp. Your quinoa bowl stays tasty in the fridge for about 3 to 5 days. If you notice any off smells or changes in color, it’s best to toss it. Always check before eating to ensure it’s still good. You can freeze this dish if you want to save some for later. Place it in a freezer-safe container. This way, it can last up to 3 months. When you’re ready to eat, thaw it overnight in the fridge. Reheat it gently on the stove or in the microwave. This method keeps the flavors intact. For the best taste, add fresh herbs after reheating. You can add protein to this bowl. Grilled chicken, chickpeas, or black beans work well. These options boost the protein and fiber content. You can also add more grains. Try brown rice or farro for extra texture. Don't forget to include nuts or seeds for crunch. Almonds or sunflower seeds are great choices. Yes, you can make this meal ahead. Cook the quinoa and store it in the fridge. This keeps well for about five days. Chop your veggies and store them in a separate container. You can mix everything just before serving. This helps keep the vegetables fresh and crisp. You can use many vegetables in this bowl. Try zucchini, carrots, or spinach for variety. Roasted sweet potatoes add great flavor too. Bell peppers come in many colors, so mix it up! Just make sure to chop them small for easy eating. This blog post covers how to make a Zesty Lemon Herb Quinoa Bowl. We looked at ingredients, cooking steps, and tips to make it perfect. You can swap ingredients for what you have on hand and still enjoy great flavors. I shared ways to store leftovers, so nothing goes to waste. Remember, cooking can be fun and simple. With a few tips, you can make this dish your own. Enjoy your healthy meal and happy cooking!

Easy Dinner Recipe Zesty Lemon Herb Quinoa Bowl

Tired of the same old dinner routine? I have a fresh and vibrant solution for you: the Zesty Lemon Herb

For flavorful BBQ grilled chicken thighs, you need just a few key ingredients. Here’s what you’ll need: - Bone-in, skin-on chicken thighs - 1/4 cup olive oil - 1/4 cup apple cider vinegar - 1/4 cup honey - 2 tablespoons Dijon mustard - 4 cloves garlic, minced - 2 teaspoons smoked paprika - 1 teaspoon salt - 1 teaspoon black pepper - 1 teaspoon cayenne pepper (optional, for heat) These ingredients come together to create a tasty marinade that makes the chicken juicy and full of flavor. The key here is the chicken thighs. They have more fat than breasts, which keeps them moist. The skin adds crispness and flavor, especially when grilled. The marinade works its magic by tenderizing the meat and infusing it with taste. I love using olive oil for its rich flavor and health benefits. Apple cider vinegar adds a tangy kick, while honey balances it with sweetness. Dijon mustard brings depth and a slight tang. Garlic and smoked paprika add layers of flavor. The salt and black pepper enhance everything, and cayenne gives it a spicy edge if you like heat. You can find the full recipe above to make sure you get everything just right. Enjoy the process and the delicious results! To make the marinade, start by mixing the following ingredients in a medium bowl: - 1/4 cup olive oil - 1/4 cup apple cider vinegar - 1/4 cup honey - 2 tablespoons Dijon mustard - 4 cloves garlic, minced - 2 teaspoons smoked paprika - 1 teaspoon salt - 1 teaspoon black pepper - 1 teaspoon cayenne pepper (optional) Whisk these ingredients until they blend well. This marinade gives your chicken its rich flavor. Marinating time is key. I recommend marinating for at least 2 hours. If you can wait overnight, the taste improves even more. Next, preheat your grill to medium-high heat, around 375°F to 400°F. This heat gives the chicken a nice sear. After marinating, take the chicken thighs out. Let any excess marinade drip off. Discard the leftover marinade to keep things safe. Place the chicken thighs skin-side down on the grill. Cook for about 6-8 minutes. Look for crispy skin and nice grill marks. After that, flip the chicken thighs. Grill them for another 6-8 minutes. You want the internal temperature to reach 165°F. The juices should run clear. To check for doneness, use a meat thermometer. The safe internal temperature for chicken is 165°F. You can also tell the chicken is ready when the juices run clear. If the chicken is still pink, give it more time on the grill. Once done, let the chicken rest for about 5 minutes before serving. This helps keep it juicy. You can find the full recipe above for more details. Enjoy your flavorful and juicy BBQ grilled chicken thighs! To set up your grill, start with a clean grate. A clean grill helps prevent sticking. Preheat the grill to medium-high heat, around 375°F to 400°F. This heat level cooks chicken thighs evenly and creates a nice crust. To avoid sticking, oil the grill grates before placing the chicken on them. You can use a paper towel soaked in oil. Just hold it with tongs and wipe the grates. This small step makes a big difference. You can enhance the flavor of your BBQ grilled chicken thighs with a few optional ingredients. For a zesty kick, try adding lemon juice or zest to your marinade. Fresh herbs like thyme or rosemary can also add depth. A splash of soy sauce might give it a unique twist. Resting the meat is vital. After grilling, let the chicken thighs sit for about 5 minutes. This step allows the juices to redistribute. If you skip this, the juices will run out when you cut into the meat. The result? Dry chicken, and nobody wants that. For the full recipe, check out the detailed instructions provided earlier. {{image_2}} For BBQ grilled chicken thighs, marinades make all the difference. You can create many flavors to match your taste. Citrus-based marinade options: - Lemon and lime: Use juice from two lemons and two limes. Add a bit of zest for extra flavor. - Orange and ginger: Mix juice from two oranges with a teaspoon of minced ginger. It gives a sweet touch. Citrus marinades help tenderize the meat. They also add a bright flavor that pairs well with chicken. Spicy marinade variations: - Chipotle lime: Blend chipotle peppers in adobo sauce, lime juice, and olive oil. This adds a smoky and spicy kick. - Sriracha and honey: Mix Sriracha sauce with honey for sweet heat. A tablespoon of soy sauce can deepen the flavor. Spicy marinades bring excitement to your chicken. They work well if you enjoy bold flavors. When it comes to BBQ, sauces and rubs can elevate your grilled chicken. Popular BBQ sauces to use: - Kansas City style: This sauce is thick and sweet, made with molasses and brown sugar. - Carolina vinegar sauce: This sauce is tangy and thin, made with vinegar and spices. It adds a nice kick. BBQ sauces can be brushed on during the last few minutes of grilling. This helps create a sticky glaze. Dry rub combinations for extra flavor: - Classic BBQ rub: Combine brown sugar, smoked paprika, garlic powder, and black pepper. This mix brings a sweet and smoky flavor. - Herb blend: Use dried thyme, oregano, and rosemary for a fresh taste. This adds a nice depth to the chicken. Dry rubs can be applied before marinating or grilling. They create a flavorful crust on the chicken. Experiment with these options for your BBQ grilled chicken thighs. You’ll find a mix that suits your taste. For a full recipe, check out the detailed steps above. After enjoying your BBQ grilled chicken thighs, store any leftovers in the fridge. First, let the chicken cool to room temperature. Then, place it in an airtight container. This helps keep moisture in and prevents odors from mixing. Use a container with a tight lid or a resealable plastic bag. Remove as much air as possible. Store the chicken for up to four days. To freeze grilled chicken thighs, start by letting them cool fully. Wrap each piece tightly in plastic wrap. Then, place the wrapped chicken in a heavy-duty freezer bag. Write the date on the bag. This helps you keep track of how long it's been frozen. You can freeze the chicken for up to three months. When you’re ready to eat, thaw the chicken in the fridge overnight. To reheat, place the chicken in a preheated oven at 350°F (175°C). Heat it for about 20-25 minutes. This keeps it juicy. You can also use a microwave, but be careful. Microwaving can dry the chicken out if you’re not careful. Enjoy your flavorful and juicy meal again! For more details, check the full recipe. Marinate chicken thighs for at least 2 hours. For the best flavor, I suggest marinating overnight. This allows the chicken to soak up all the tasty goodness from the marinade. The longer you marinate, the more flavor you get in each bite. Just remember, you should not exceed 24 hours. Too long can make the meat mushy. Yes, you can cook BBQ chicken thighs in the oven. Preheat your oven to 400°F. Place the marinated chicken thighs on a baking sheet. Bake for about 35-40 minutes. Use a meat thermometer to check for 165°F internal temperature. You can also broil for the last few minutes to get crispy skin. It’s a great way to enjoy BBQ chicken when you can't grill outside. BBQ grilled chicken thighs pair well with many sides. Here are some popular choices: - Coleslaw - Corn on the cob - Baked beans - Grilled vegetables - Potato salad These dishes balance the rich flavors of the chicken. They also add color and variety to your meal. To reheat grilled chicken thighs, you can use the oven or microwave. For the oven, set it to 350°F. Place the chicken on a baking dish and cover it with foil. Heat for about 15-20 minutes. This keeps the chicken moist. If using a microwave, heat on medium power for about 2-3 minutes. Always check that the chicken is heated through to 165°F. This way, you can enjoy juicy chicken again. For more tips and the full recipe, check out the [Full Recipe]. Grilling bone-in chicken thighs can be simple and fun. You learned about the perfect marinade and cooking steps. I shared tips to enhance flavors and avoid sticking on the grill. Remember, marinating time makes a big difference. You can try different marinades and sauces to mix things up. Store leftovers properly to enjoy later. Whether you grill outside or cook inside, these tips will help you serve tasty chicken. Enjoy your cooking and happy grilling!

BBQ Grilled Chicken Thighs Flavorful and Juicy Meal

If you want a meal that bursts with flavor, BBQ grilled chicken thighs are the way to go! With their

To make quick curry noodles, you need a few key items. Here’s the list: - 200g rice noodles - 1 tablespoon coconut oil - 1 onion, finely chopped - 2 garlic cloves, minced - 1 tablespoon curry powder - 1 teaspoon turmeric - 400ml coconut milk - 1 cup mixed vegetables (bell peppers, broccoli, peas) - 2 tablespoons soy sauce (or tamari for gluten-free) - Fresh cilantro for garnish - Lime wedges for serving - Salt and pepper to taste These ingredients create a rich flavor and creamy texture. Rice noodles cook quickly and soak up the curry well. Coconut oil adds a nice depth. Use fresh veggies for crunch. You can make these noodles even better with fun extras. Try adding: - Chopped green onions - Sliced chili peppers - Crushed peanuts - Sesame seeds These garnishes add color and flavor. They also give a nice crunch and freshness. Add them based on your taste. If you don’t have some ingredients, don’t worry! Here are swaps you can use: - Use vegetable oil instead of coconut oil. - Swap rice noodles for egg noodles or whole wheat. - Almond milk or soy milk can replace coconut milk. - Any vegetables you have on hand will work. These substitutions keep the dish tasty. You can create your own version of quick curry noodles. For the full recipe, check out the cooking instructions! Start by cooking the rice noodles. Follow the package directions carefully. This usually takes about 5-7 minutes. After they are soft, drain and rinse them under cold water. This stops the cooking process. Set them aside while you make the curry base. In a large pan, heat 1 tablespoon of coconut oil. Use medium heat to avoid burning. Add the finely chopped onion and sauté for about 3-4 minutes. You want the onions to turn clear. Next, add 2 minced garlic cloves, 1 tablespoon of curry powder, and 1 teaspoon of turmeric. Stir these in and cook for 1-2 minutes. This will release all the amazing smells. Now pour in 400ml of coconut milk and let it simmer gently. This creates a creamy base for your noodles. After the coconut milk simmers, add in 1 cup of mixed vegetables. I like to use bell peppers, broccoli, and peas. Cook these for about 5-7 minutes. You want them to be tender but still bright. Now, add the cooked rice noodles to the pan. Toss them gently to coat with the curry sauce. Stir in 2 tablespoons of soy sauce. Season with salt and pepper to your liking. Heat everything through for about 1-2 minutes. Serve hot, garnished with fresh cilantro and lime wedges. Enjoy this quick and tasty meal! For the full recipe, check out the details provided. To cook rice noodles just right, follow the package guide. Start by boiling water. Add the noodles and stir them gently. After about 3-5 minutes, check for doneness. They should be soft but still firm. Drain the noodles and rinse them under cold water. This step stops the cooking process and keeps them from sticking. For added flavor, toss them with a bit of oil. To make your Quick Curry Noodles special, focus on the spices. Use fresh garlic and onion for a strong base flavor. Adding ginger can bring warmth and zest. A squeeze of lime juice brightens the dish and balances the richness of coconut milk. You can also try a dash of chili flakes for heat. Serve with fresh cilantro to add a pop of color and freshness. To save time while cooking, prep all ingredients before starting. Chop veggies and measure spices ahead of time. This way, you won’t waste time searching for items. Use a large pan to cook everything at once. Stir things quickly to cook evenly. Cooking on medium heat helps keep everything moving without burning. You can have your meal ready in just 20 minutes with these tricks. For the full recipe, refer to the earlier section. {{image_2}} You can easily make Quick Curry Noodles vegan. Just swap the coconut milk for almond or cashew milk. Use gluten-free rice noodles to keep it gluten-free. Make sure your soy sauce is gluten-free too. This way, everyone can enjoy this dish without worry. Adding protein can make your meal even better. For a vegan option, try cubed tofu. Pan-fry it until golden and add it when you mix the noodles. If you prefer meat, chicken or shrimp works great too. Cook the chicken until it's no longer pink or the shrimp until they turn pink and curl. This will add flavor and make the dish more filling. You can use many types of vegetables in this dish. Try carrots, snap peas, or zucchini. Just cut them into bite-sized pieces. Cook them with the onions and garlic for full flavor. The more colorful your veggies, the prettier your dish will look. This also adds more nutrients, making your meal healthy and tasty. For the full recipe, check the section above! To store leftover curry noodles, first let them cool down. Place them in an airtight container. Make sure the container seals well to keep the noodles fresh. You can store them in the fridge for up to three days. This keeps them safe and tasty for your next meal. When you are ready to eat, take the noodles out. You can reheat them in a pan or microwave. If using a pan, add a splash of water or coconut milk. This helps keep them moist. Heat over low to medium heat until warm. If using a microwave, cover the bowl and heat for one to two minutes. Stir halfway through for even heating. If you want to save the curry noodles for later, freezing is a great option. Place the cooled noodles in freezer-safe bags. Remove as much air as possible before sealing. You can freeze them for up to two months. When you are ready to eat, thaw them in the fridge overnight. Then reheat as described above. This method keeps your meal prep easy and quick! For the complete recipe, check out the Full Recipe section. Quick Curry Noodles can last in the fridge for about 3 days. Store them in an airtight container. Before eating, check for any signs of spoilage. If they smell off or look strange, it’s best to throw them away. To keep them fresh, try to eat them sooner rather than later. Yes, you can use other types of noodles. While rice noodles are great, you might try egg noodles, udon, or even whole wheat pasta. Just remember to adjust the cooking time based on the type you choose. Each noodle brings its own taste and texture, making your dish unique. To spice up your curry noodles, add fresh chili peppers or chili flakes. You can also use a spicier curry powder. If you like heat, try adding a dash of hot sauce at the end. Taste as you go, so you get the flavor just right. Quick Curry Noodles offer a simple and tasty meal. We covered key ingredients, step-by-step instructions, and helpful tips. Variations make it easy to fit your diet, too. Remember to store leftovers well to enjoy later. With just a few swaps and tricks, you can create a dish that suits your taste. Whether you need a quick lunch or dinner, Quick Curry Noodles can save the day. Give it a try and enjoy the flavors!

Quick Curry Noodles Tasty and Easy Weeknight Meal

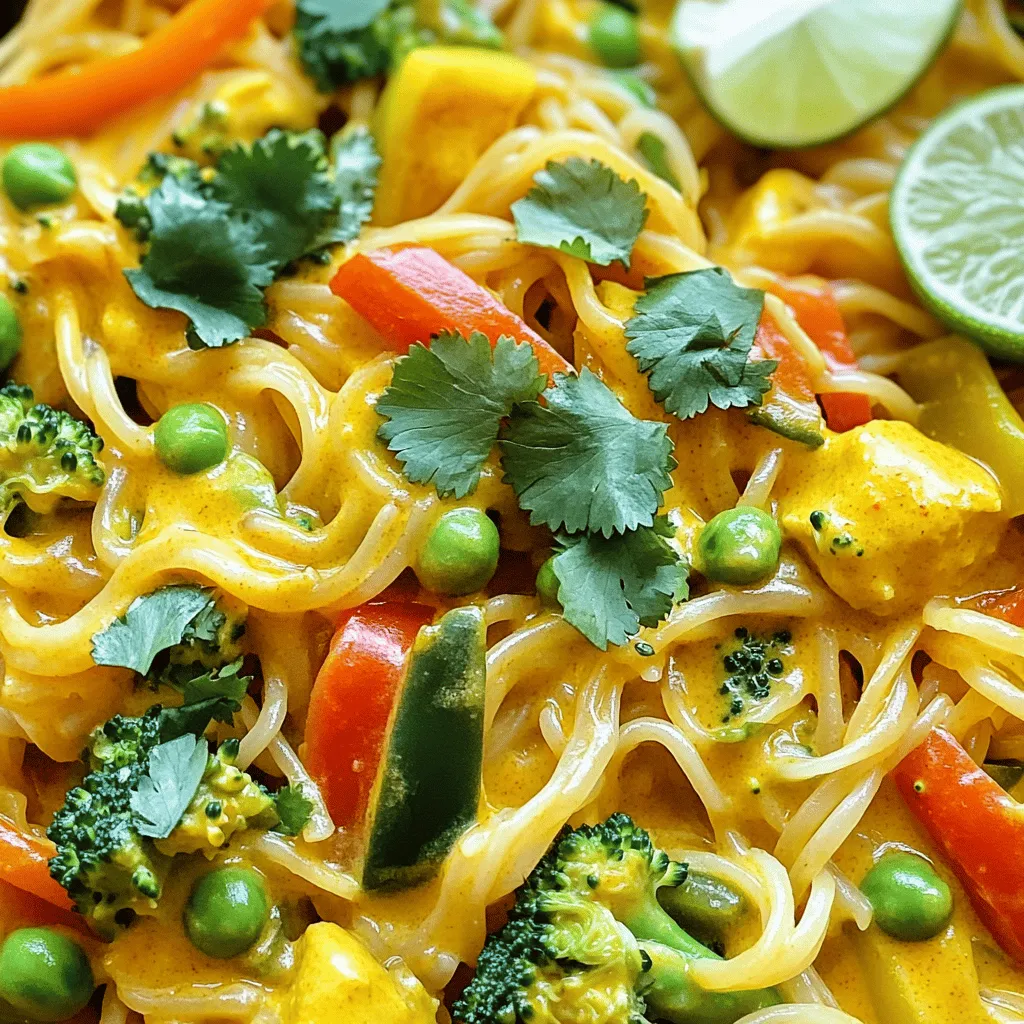
Craving a fast and tasty dinner? My Quick Curry Noodles are here to save your weeknight! You’ll whip up this

- 1 cup fresh pineapple chunks - 1 medium ripe banana When making a pineapple coconut smoothie, fresh ingredients shine. Pineapple brings sweetness and tartness. Choose ripe fruit for the best flavor. Bananas add creaminess and natural sweetness. - 1/2 cup coconut milk - 1/2 cup Greek yogurt (or coconut yogurt for a dairy-free option) Coconut milk gives a rich, tropical taste. It blends well with pineapple. Greek yogurt adds protein and thickness. For a dairy-free option, use coconut yogurt. This keeps your smoothie smooth and creamy. - 1 tablespoon honey or agave syrup - 1/2 teaspoon vanilla extract - Toasted coconut flakes for garnish - Ice cubes You can sweeten your smoothie with honey or agave syrup. This is great if you want extra sweetness. Vanilla extract enhances the flavors. Toasted coconut flakes make a lovely garnish. They add a crunchy texture. Ice cubes make the smoothie cold and refreshing. For the full recipe, check out the Tropical Paradise Pineapple Coconut Smoothie 🥥. - First, combine all fresh ingredients in the blender. - Next, add the liquid ingredients and any optional sweeteners. Getting the right mix is key to a great smoothie. I love using fresh pineapple chunks, ripe bananas, and creamy Greek yogurt to create a delicious base. The coconut milk adds a rich flavor. For sweetness, I sometimes include honey or agave syrup, but this is up to your taste. - Blend on high until smooth. - Scrape down the sides if needed. When blending, I like to start on a lower speed to mix the ingredients. After that, I increase to high speed. If you notice some bits stuck to the sides, just pause and scrape them down. This ensures everything blends perfectly. - Taste and adjust sweetness if desired. - Pour into glasses and garnish. After blending, I always taste the smoothie. If it needs more sweetness, I add a bit more honey. Once you’re happy, pour the smoothie into glasses. For a fun touch, sprinkle some toasted coconut flakes on top. This gives a nice crunch and looks pretty too. Enjoy your Tropical Paradise Pineapple Coconut Smoothie! To make the best pineapple coconut smoothie, use ripe pineapple. Ripe pineapple tastes sweet and juicy. Look for pineapples with a sweet smell and a golden color. If fresh pineapple is not available, frozen pineapple is a great option. Frozen pineapple gives the smoothie a nice chill and thick texture. Coconut milk has many nutritional advantages. It contains healthy fats that can give you energy. It also adds a creamy texture to your smoothie. Greek yogurt is another great choice. It is rich in protein, which helps build muscles. You can also use coconut yogurt for a dairy-free option. Both options add creaminess and flavor. For the best creaminess, blend all ingredients well. Start on low speed and then increase to high. This helps mix everything smoothly. If your smoothie is too thick, adjust the consistency. Add more coconut milk or water little by little. Blend until you reach your desired texture. {{image_2}} You can make your smoothie even better by adding protein. Try using protein powder or nut butter. These options give you energy and help you feel full. Adding a scoop of protein powder boosts your smoothie in flavor and nutrition. If you want a nutty taste, mix in almond or peanut butter. You can also sprinkle in chia or flaxseeds. They add a nice crunch and are full of fiber and omega-3s. Want to add some greens? Toss in spinach or kale. This gives your smoothie a vibrant color and extra nutrition. The taste remains light and fresh. You won't even notice the greens, but your body will love the added vitamins. Just be careful with the amount. Start small, then blend until you find your perfect balance. Don’t have pineapple? No problem! You can use mango or berries instead. Each fruit brings its own flavor and sweetness. Mango adds a tropical twist, while berries can give a tart kick. Feel free to mix and match your fruits. The best part of smoothies is their versatility. You can create a new favorite every time. Check out the Full Recipe for more variations! To keep your pineapple coconut smoothie fresh, store it in the fridge. Use an airtight container to limit air exposure. This helps maintain flavor and texture. Smoothies can stay good for up to 24 hours in the fridge. If you want to save it longer, consider freezing. Pour the smoothie into ice cube trays for easy portioning. Once frozen, transfer them into a freezer bag. This way, you can enjoy your smoothie whenever you want! A fresh smoothie can last about one day in the fridge. After that, it may start to separate. Look for changes in color or texture. If it smells sour or off, it's best to toss it. Always trust your senses. A good rule is to drink your smoothie soon after making it. This ensures you enjoy the best taste and nutrients. If you have leftover smoothie, don’t waste it! You can mix it into oatmeal or yogurt for breakfast. It also works great in smoothie bowls. Just pour it into a bowl and top with fruits, nuts, and seeds. Another fun idea is to make popsicles. Fill molds with the leftover smoothie and freeze. You’ll have a refreshing treat for later! If you don't have coconut milk, don't worry! You can use other types of milk. Almond milk adds a nice nutty flavor. Oat milk gives a creamy texture. Soy milk is rich and smooth. You could even use regular cow's milk if you prefer. Just remember, these options may change the taste a bit. Yes, you can make this smoothie ahead of time. Just blend all the ingredients as usual. After blending, store it in a sealed jar. It will stay fresh in the fridge for one day. If you want to keep it longer, freeze it in ice cube trays. Later, you can blend the frozen cubes for a quick treat. This smoothie can be a great choice for weight loss. It has healthy ingredients like pineapple and Greek yogurt. Pineapple is low in calories and high in fiber. Greek yogurt adds protein, which helps you feel full. Just be mindful of the honey or agave syrup. You can skip it if you want to reduce sugar. Enjoy this smoothie as part of a balanced diet! For the full recipe, check out the Tropical Paradise Pineapple Coconut Smoothie. This blog post explored how to create a delicious smoothie rich in flavor and nutrition. You learned about fresh and liquid ingredients, as well as tips to make it perfect. Remember to choose ripe ingredients and feel free to adjust flavors as you like. Experimenting with variations can keep your smoothies fun and exciting. Store leftovers wisely for later enjoyment. Smoothies can be healthy and tasty, helping you on your wellness journey. Enjoy blending and sipping your way to better health!

Pineapple Coconut Smoothie Refreshing and Creamy Treat

Are you ready to dive into a tropical escape with just one sip? My Pineapple Coconut Smoothie is both refreshing

To make cheesy spinach stuffed shells, you need these key ingredients: - 20 jumbo pasta shells - 2 cups fresh spinach, chopped - 1 cup ricotta cheese - 1 cup mozzarella cheese, shredded - ½ cup grated Parmesan cheese - 1 egg, beaten - 1 teaspoon garlic powder - 1 teaspoon onion powder - Salt and pepper, to taste - 2 cups marinara sauce - Fresh basil leaves for garnish These ingredients work together to create a rich and creamy filling. The spinach adds color and nutrients. The cheeses provide that gooey, cheesy goodness we all love. You can boost the flavor of your stuffed shells with these optional ingredients: - Crushed red pepper flakes for heat - Fresh herbs like parsley or oregano - A squeeze of lemon juice for brightness - Sun-dried tomatoes for a tangy twist These optional ingredients can add layers of flavor. Feel free to mix and match to suit your taste. To prepare your cheesy spinach stuffed shells, gather these tools: - Large pot for boiling pasta - Mixing bowl for the filling - Spoon or piping bag for stuffing shells - 9x13 inch baking dish for assembly - Aluminum foil for covering the dish Having the right tools makes cooking easier. It helps you stay organized and efficient in the kitchen. You can find the full recipe [here](#). Start by cooking the jumbo pasta shells. Boil a large pot of salted water. Add the shells and cook until they are al dente, which takes about 8-10 minutes. Drain the pasta and let it cool for a bit. Make sure the shells do not stick together. You want them soft, but firm enough to hold the filling later. In a mixing bowl, combine the chopped spinach, ricotta cheese, half of the mozzarella cheese, and grated Parmesan. Add the beaten egg, garlic powder, onion powder, and salt and pepper. Mix everything well until it forms a creamy filling. The spinach adds a fresh taste, while the cheeses give a rich flavor. Now it's time to stuff those shells. Use a spoon or a piping bag to fill each shell with the spinach and cheese mixture. Be generous, but don’t overfill. Place the filled shells seam-side up in a baking dish. Spread 1 cup of marinara sauce on the bottom of the dish first. This keeps the shells from sticking and adds flavor. Cover the stuffed shells with aluminum foil and bake them in a preheated oven at 375°F (190°C) for 25 minutes. This helps them heat up evenly. After 25 minutes, remove the foil and sprinkle the rest of the mozzarella on top. Bake for an additional 10-15 minutes until the cheese is bubbly and golden. Let the shells cool for a few minutes before serving. Garnish with fresh basil leaves for a nice touch. For the complete recipe, check the Full Recipe section. To cook pasta shells perfectly, start by using a large pot. Fill it with water and add salt. The salt helps flavor the pasta. Bring the water to a rolling boil. Then, add the jumbo shells gently. Stir them to prevent sticking. Cook the shells for 8 to 10 minutes until they are al dente. This means they should be firm but not hard. After cooking, drain the shells and let them cool. This step helps with stuffing later. A great cheese blend makes your dish stand out. For Cheesy Spinach Stuffed Shells, mix ricotta, mozzarella, and Parmesan. Ricotta adds creaminess. Mozzarella gives that stretchy texture, while Parmesan adds a sharp taste. Use fresh cheeses for the best flavor. I recommend using shredded mozzarella and freshly grated Parmesan. Combine these cheeses with spinach and seasonings for a tasty filling. This mix ensures every bite is cheesy and delightful. When serving Cheesy Spinach Stuffed Shells, think about balance. A fresh salad pairs well with the rich flavors. A simple green salad with lemon vinaigrette is refreshing. If you want to add crunch, serve with garlic bread. The bread soaks up the marinara sauce beautifully. You can also top the shells with fresh basil for color and flavor. A glass of red wine complements the dish nicely. For a fun twist, try a light Italian white wine. For the full recipe, check out the details above. {{image_2}} You can change up the filling for your Cheesy Spinach Stuffed Shells. Try adding cooked ground meat, like beef or turkey, for a heartier meal. You could also use sautéed mushrooms for extra flavor. If you want a touch of spice, mix in some diced jalapeños. For a Mediterranean twist, add sun-dried tomatoes or feta cheese. These options let you customize your dish for any mood or taste. For a lighter take on this dish, swap out ricotta for cottage cheese. This change reduces calories but keeps the creamy texture. You can also use whole wheat pasta shells for added fiber. Instead of marinara sauce, try a homemade tomato sauce with fresh herbs. This option lowers sugar and adds more flavor. Using less cheese or a reduced-fat version can also help make this meal a bit healthier. You can easily make Cheesy Spinach Stuffed Shells vegan. Replace the ricotta with a blend of soaked cashews and nutritional yeast. This mix gives a creamy texture and cheesy flavor. Use vegan cheese for the mozzarella and Parmesan. For the egg, try a flaxseed meal or chia seed mixture to bind the filling. With these swaps, you can enjoy a delicious, plant-based version of this classic dish. For the full recipe, check the recipe section above. To store leftover stuffed shells, let them cool first. Place them in an airtight container. Make sure to layer them with parchment paper. This keeps them from sticking together. Keep the container in the fridge. They will stay fresh for up to three days. When you are ready to eat the leftovers, take them out of the fridge. Preheat your oven to 350°F (175°C). Place the stuffed shells in a baking dish. Pour some marinara sauce on top to keep them moist. Cover the dish with foil. Bake for about 20 minutes, or until heated through. For long-term storage, you can freeze the stuffed shells. After cooling, place them in a freezer-safe container. Use layers of parchment paper to separate them. Seal the container tightly. They will last for up to three months in the freezer. To cook, thaw them overnight in the fridge before reheating. Enjoy your cheesy spinach stuffed shells anytime! For the full recipe, check out the details above. Cheesy Spinach Stuffed Shells can last about 3 to 5 days in the fridge. Store them in an airtight container. This keeps the shells fresh and tasty. If they smell off or look dry, it's best to toss them. Yes, you can use different cheeses. Try using feta, gouda, or cheddar for a twist. Each cheese brings a new taste. Mixing cheeses can add depth and fun to your dish. Just keep the total amount the same for best results. Absolutely! You can prepare the shells and stuffing a day in advance. Just cover them tightly and store in the fridge. You can also bake them ahead of time. Reheat them in the oven for a warm meal. Many sides pair well with these stuffed shells. A fresh salad adds crunch and brightness. Garlic bread is great for soaking up sauce. Roasted vegetables offer a healthy, colorful plate. For a more filling meal, serve with a side of pasta or rice. For the full recipe, check out the details above! Cheesy spinach stuffed shells are simple and fun to make. We explored key ingredients, tools, and steps to create this dish. I shared tips to perfect your cooking and ideas for tasty variations. After mastering this recipe, you can store leftovers easily or serve them fresh. Remember, cooking should be enjoyable. Experiment with flavors and make it yours. Your kitchen can be a place of creativity and joy with these shells. Dive in and savor every bite!

Cheesy Spinach Stuffed Shells Comforting Dinner Idea

Looking for a cozy dinner that’s both simple and delicious? Cheesy Spinach Stuffed Shells are the perfect choice! This dish

Older posts
Newer posts
← Previous Page1 … Page40 Page41 Page42 … Page76 Next →

dsad

© 2025 My Saved Recipe • Built with GeneratePress

Our Policies

  • Copyright Policy
  • Cookie Policy
  • GDPR Policy
  • Privacy Policy
  • Disclaimer
  • Terms Of Use

More Information

  • Home
  • About
  • Contact
  • Appetizers
  • Dessert
  • Dinner
  • Drinks
©2025, My Saved Recipe About Back To Top