
Lemon Garlic Roasted Cauliflower Flavorful Side Dish
Are you ready to elevate your side dish game? Lemon Garlic Roasted Cauliflower is the perfect blend of tangy lemon
Are you ready to elevate your side dish game? Lemon Garlic Roasted Cauliflower is the perfect blend of tangy lemon
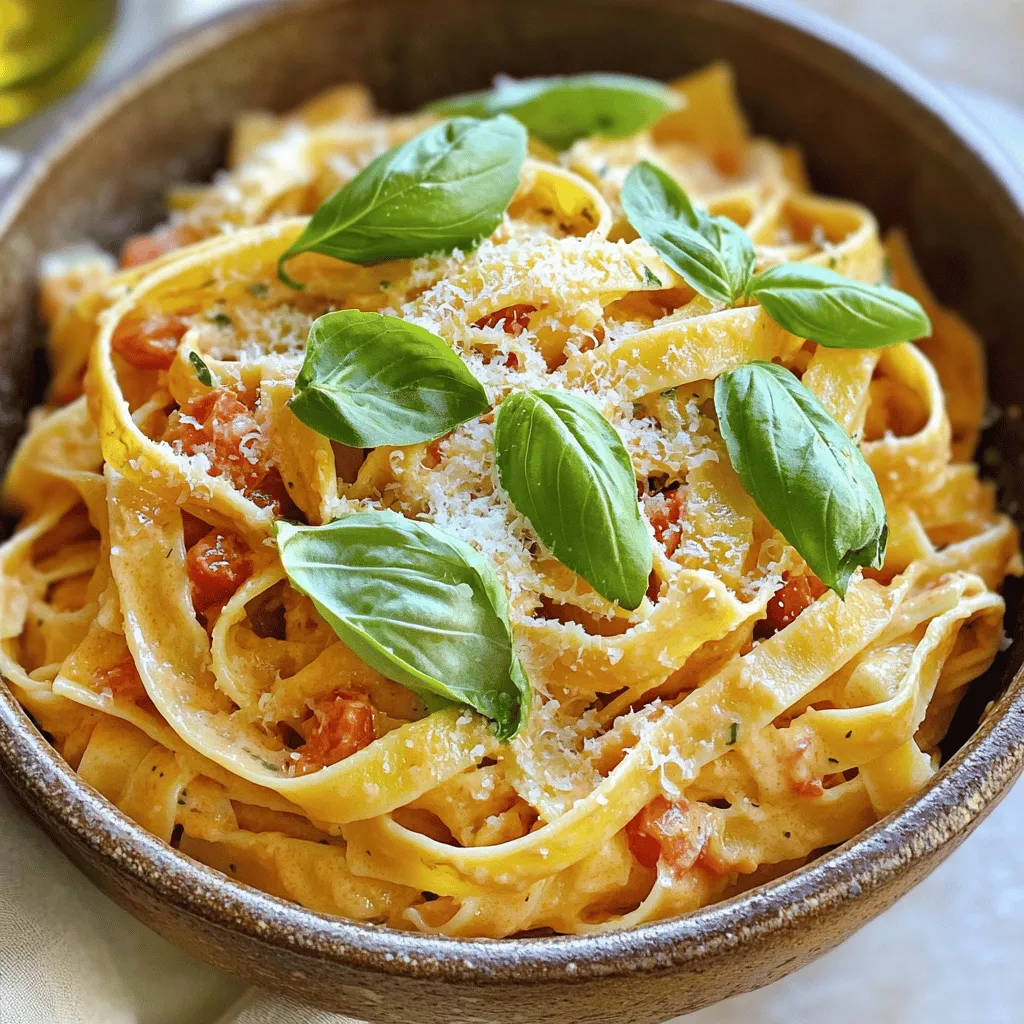
Are you ready to indulge in a rich and creamy tomato basil pasta that dances on your taste buds? This
![To make a great savory herb roasted chicken, you need some key ingredients. Here’s what you’ll need: - 1 whole chicken (about 4-5 lbs) - 2 tablespoons olive oil - 1 tablespoon Dijon mustard - 1 lemon, zested and juiced - 4 cloves garlic, minced - 2 teaspoons fresh rosemary, chopped - 2 teaspoons fresh thyme, chopped - 2 teaspoons fresh sage, chopped - Salt and pepper to taste - 1 onion, quartered - 2 carrots, chopped - 2 potatoes, cubed These ingredients work together to create a flavorful meal. The chicken is the star, while the herbs and veggies add depth. Herbs make a big difference in this dish. I love using fresh herbs for their bright taste. Here’s what I recommend: - Rosemary: It gives a pine-like flavor. - Thyme: Adds an earthy note. - Sage: Offers a warm, savory taste. These herbs blend well and elevate the chicken. You can also mix them or use your favorites. Feel free to add extra ingredients for more flavor. Here are some suggestions: - Lemon slices: They add brightness and moisture. - Garlic cloves: Whole cloves can roast and sweeten. - Bell peppers: They add color and sweetness to the dish. Using these options can make your dish even more special. Experiment with different ingredients to find what you love! To see how to cook this dish step-by-step, check out the Full Recipe. Start with a whole chicken that weighs about 4-5 lbs. First, remove any giblets inside the cavity. Pat the chicken dry with paper towels. This helps the skin crisp up later. Place the chicken in a roasting pan, ready for flavor. In a small bowl, mix together: - 2 tablespoons olive oil - 1 tablespoon Dijon mustard - 1 lemon, zested and juiced - 4 cloves garlic, minced - 2 teaspoons fresh rosemary, chopped - 2 teaspoons fresh thyme, chopped - 2 teaspoons fresh sage, chopped - Salt and pepper to taste This marinade makes the chicken taste great. Carefully lift the skin on the breast and thighs. Rub about half of the marinade underneath the skin. Use the rest to coat the outside of the chicken. Stuff the cavity with: - 1 onion, quartered - 2 carrots, chopped - 2 potatoes, cubed This will add flavor as the chicken cooks. Preheat your oven to 425°F (220°C). Roast the chicken for about 1 hour and 15 minutes. Check the internal temperature; it should reach 165°F (75°C). Halfway through cooking, baste the chicken with the pan juices. This keeps it moist and adds more flavor. After roasting, let the chicken rest for 10-15 minutes before carving. Serve it with the roasted vegetables. Enjoy your delicious meal! For the full recipe, check out the instructions I provided above. To get that crispy skin on your chicken, start by drying the skin well. Use paper towels to pat it dry. This helps remove moisture, which can make it soggy. Next, rub olive oil all over the skin. This adds flavor and helps it crisp up nicely in the oven. Make sure to season the skin with salt. Salt draws out moisture during cooking, leading to a golden, crispy result. Basting your chicken is key to keeping it moist. Halfway through cooking, open the oven and use a spoon to scoop up the juices from the pan. Drizzle these juices over the chicken. This adds flavor and keeps the meat juicy. You can baste every 20 minutes or so for the best results. Just be careful not to let too much heat escape from the oven. A meat thermometer is a must-have for perfect chicken. Insert the thermometer into the thickest part of the thigh, avoiding the bone. You want the temperature to reach 165°F (75°C) for safe eating. This tells you when the chicken is done and juicy. If it’s not there yet, put it back in the oven and check again in a few minutes. This simple tool helps ensure your chicken is cooked just right. For the full recipe and detailed steps, check the [Full Recipe]. {{image_2}} You can change the flavor of your savory herb roasted chicken by using different herbs. Try using tarragon for a hint of anise. Parsley can lighten the taste and add freshness. For a spicy kick, use oregano or basil. Each herb offers a unique twist. You can even mix herbs for a more complex flavor. Just remember, fresh herbs usually give the best taste. When it comes to side dishes, many options work well with roasted chicken. Classic choices include roasted vegetables like carrots, potatoes, and onions. You can also serve a fresh salad with a light vinaigrette. For something hearty, consider creamy mashed potatoes or fluffy rice. Adding a sauce can enhance the dish. Think about a tangy lemon sauce or a garlic butter drizzle. You can cook savory herb roasted chicken in different ways. The oven gives crispy skin and golden color. It usually takes about 1 hour and 15 minutes at 425°F. If you prefer a slow cooker, it’s easy and great for busy days. Cooking in a slow cooker takes about 4 to 6 hours on low. The chicken will be tender and juicy but won’t have the same crispy skin. Choose the method that fits your time and taste best. After enjoying your savory herb roasted chicken, store leftovers in an airtight container. Place the chicken in the fridge within two hours of cooking. This helps keep it fresh and safe to eat. It can last for about three to four days in the fridge. If you have leftover vegetables, store them in a separate container. When you’re ready to enjoy your leftovers, I recommend reheating in the oven. Preheat your oven to 350°F (175°C). Place the chicken in a baking dish and cover it with foil. Heat for about 20-25 minutes or until warmed through. This keeps the skin crispy and the meat juicy. You can also use a microwave, but it may not keep the skin crisp. Heat in short intervals, checking often. If you want to save your chicken for later, freezing is a great option. Let the chicken cool completely before wrapping. Wrap each piece tightly in plastic wrap or foil. Place the wrapped pieces in a freezer-safe bag or container. It can last for up to three months in the freezer. When you’re ready to eat, thaw it in the fridge overnight before reheating. This way, your savory herb roasted chicken will taste just as great! For the full recipe, check out the detailed instructions above. The best temperature for roasting chicken is 425°F (220°C). This heat helps the skin get crispy and brown. It cooks the meat evenly and keeps it juicy. Roasting at this temperature also reduces cooking time. Aim for about 1 hour and 15 minutes. Yes, you can use dried herbs instead of fresh. Dried herbs have a stronger flavor. Use about one-third the amount of dried herbs. For example, if a recipe calls for 2 teaspoons of fresh rosemary, use only about 1 teaspoon of dried. Make sure to crush the dried herbs before adding them. This helps release their flavor. To check if the chicken is fully cooked, use a meat thermometer. Insert it into the thickest part of the thigh without touching the bone. The temperature should reach 165°F (75°C). If you don’t have a thermometer, cut into the thickest part. The juices should run clear, not pink. After cooking, let the chicken rest for a few minutes before carving. This allows the juices to settle. For more tips and ideas, check out the Full Recipe. In this post, we explored how to make savory herb roasted chicken. We covered essential ingredients, fresh herbs, and optional flavors. You learned step-by-step instructions, tips for crispy skin, and how to store leftovers. Cooking can be fun and rewarding. Enjoy trying different herbs and side dishes. Remember, practice makes perfect. You’ll impress your family and friends with your delicious chicken.](https://mysavedrecipe.com/wp-content/uploads/2025/06/1814e9b4-3987-4302-ae63-3ba9edb997b8.webp)
Are you ready to master a dish that wows everyone? My Savory Herb Roasted Chicken recipe combines fresh herbs and
. 1. Preheat your oven to 350°F (175°C). Grease a 9x5 inch loaf pan with butter or a non-stick spray. 2. In a large bowl, mash 3 ripe bananas. Pour in 1/2 cup of melted butter. Mix until smooth. 3. Add 3/4 cup of brown sugar to the banana mix. Stir until it blends well. 4. Now, mix in 1 beaten egg and 1 teaspoon of vanilla extract. Make sure everything is combined. 5. Sprinkle 1 teaspoon of baking soda and 1/4 teaspoon of salt over the mixture. Stir well to combine. 6. Gently fold in 1 1/2 cups of all-purpose flour until just mixed. Don’t overmix. If you want, add 1/2 teaspoon of cinnamon, 1/2 cup of chocolate chips, and 1/4 cup of chopped nuts for extra flavor. 7. Pour the batter into the greased loaf pan. Smooth the top with a spatula for an even bake. 8. Bake for 60-65 minutes. Check doneness by inserting a toothpick into the center. It should come out clean. 9. Let the bread cool in the pan for about 10 minutes. Then, transfer it to a wire rack to cool completely. For the full recipe, refer back to the ingredients section. To get the best texture in your chocolate chip banana bread, avoid overmixing the batter. When you mix too much, the bread can turn out dense and tough. Stir just until the ingredients blend together. This keeps the bread light and fluffy. Using ripe bananas is key. They should be soft and brown. Ripe bananas add natural sweetness and moisture. They help to create a softer crumb in your bread. If your bananas are not ripe, the bread may taste starchy and dry. You can enhance the flavor of your banana bread by using different types of chocolate. Dark chocolate gives a rich taste, while semi-sweet chocolate is sweeter. Try mixing these types for a fun twist. Adding spices can also elevate the flavor. A pinch of cinnamon or nutmeg warms up the taste. Nuts like walnuts or pecans add crunch. They also provide a nice contrast to the soft bread. For serving, slice the bread while it is warm. It tastes best fresh from the oven. You can drizzle melted chocolate on top for a rich finish. A sprinkle of powdered sugar also adds a nice touch. Garnish with a banana slice to make it look pretty. This simple step can impress your guests. Enjoy it with a cup of tea or coffee for a delightful treat. For the complete baking experience, check the Full Recipe for all the details. {{image_2}} You can use different types of chocolate in your banana bread. Dark chocolate gives a rich, deep flavor. It pairs well with the sweetness of bananas. Semi-sweet chocolate adds a nice balance of sweet and bitter. This type is popular and easy to find. If you want something different, try white chocolate. It adds a creamy taste and a lovely sweetness. You can mix and match chocolates to find your favorite! Adding other fruits can make your banana bread even better. Berries like blueberries or raspberries work well. They add a burst of flavor and color. You can also use chopped apples or peaches for a fruity twist. For those who want a nut-free option, skip the nuts and focus on fruits. This makes the bread soft and moist. It’s a great way to experiment with different flavors! If you want a healthier version, try whole wheat flour. It adds fiber and gives a nutty taste. You can also reduce the sugar in the recipe. Using half the amount or swapping it for honey or maple syrup works well. These choices keep the bread tasty while being better for you. Remember, small changes can make a big difference in health and flavor! Check out the Full Recipe for details on how to make this delicious treat! To keep your chocolate chip banana bread fresh, wrap it well. Use plastic wrap or foil to seal it. This helps retain moisture and flavor. Store it at room temperature for a few days. If you live in a warm place, refrigerate it. This prevents mold from growing. You can freeze chocolate chip banana bread for long-term storage. First, let the bread cool completely. Then, wrap it tightly in plastic wrap. After that, place it in a freezer bag. Label it with the date. It will stay good for up to three months. When you're ready to eat it, thaw it in the fridge overnight. For a quick option, microwave slices for about 20 seconds. Chocolate chip banana bread stays fresh for about four days at room temperature. If kept in the fridge, it lasts about a week. Always check for signs of spoilage. If you see mold or if it smells off, don't eat it. Fresh bread should feel moist and smell sweet. If it’s dry or has dark spots, it’s time to toss it. Yes, you can use frozen bananas. They work well in banana bread. To thaw them, place them in the fridge overnight. If you're short on time, you can microwave them for about 30 seconds. Just make sure to drain any excess liquid before mashing. This helps keep the bread from being too wet. If you want an egg-free option, there are many substitutes. You can use 1/4 cup of unsweetened applesauce or mashed banana. A tablespoon of ground flaxseed mixed with three tablespoons of water also works well. Let it sit for a few minutes to thicken before using. These swaps keep the bread moist and tasty. To make banana bread gluten-free, you can use gluten-free flour. Almond flour or coconut flour are great options. You can also try a gluten-free all-purpose blend. Just make sure the blend has xanthan gum for better texture. This keeps your bread soft and fluffy. Dense banana bread can happen for a few reasons. If you overmix the batter, it can become tough. Using too many bananas can also weigh it down. Make sure to mix just until combined and use the right amount of flour. If it’s too heavy, try adding a bit more baking soda next time. This blog post covers how to make chocolate chip banana bread. We discussed key ingredients, step-by-step instructions, and baking tips. I shared ideas for variations, storage practices, and answers to common questions. With this knowledge, you can bake a delicious treat at home. Experiment, enjoy, and share with others. Happy baking!](https://mysavedrecipe.com/wp-content/uploads/2025/06/3245b15b-88a1-4a86-b532-af5536a0cb4b.webp)
Looking for a quick, tasty treat? This Chocolate Chip Banana Bread is your answer! It’s easy to make and filled
![- 4 large bell peppers (any color) - 1 cup quinoa, rinsed - 2 cups vegetable broth - 1 can (15 oz) black beans, rinsed and drained - 1 cup corn (fresh or frozen) - 1 medium onion, chopped - 2 cloves garlic, minced - 1 tsp cumin - 1 tsp smoked paprika - 1 tsp chili powder - Salt and pepper to taste - 1 cup diced tomatoes (canned or fresh) - 1 avocado, diced (for topping) - Fresh cilantro, chopped (for garnish) I love using fresh bell peppers for this dish. They add color and crunch. You can pick any color you like, whether it’s red, yellow, or green. Each has its own taste, but all work well! Quinoa serves as the base of our filling. It’s rich in protein and very filling. Rinsing it helps remove any bitter taste. Cooking it in vegetable broth makes it extra flavorful. Black beans add great texture and protein. They mix well with corn, which brings sweetness. Both are staples in many dishes, making them perfect for these peppers. Chopped onions and minced garlic bring a lovely aroma and depth of flavor. For seasoning, cumin, smoked paprika, and chili powder are key. They create that warm, earthy taste. Don’t forget salt and pepper to balance all the flavors. Finally, diced tomatoes add moisture and brightness to the filling. Topping with creamy avocado and fresh cilantro adds a special touch. All these ingredients come together in the full recipe, creating a savory and nutritious meal. - Preheat the oven to 375°F (190°C). - Cut the tops off the bell peppers and remove seeds and membranes. - Bring vegetable broth to a boil and cook quinoa. - Sauté onion and garlic until translucent. - Mix in black beans, corn, and seasonings. - Stir in cooked quinoa and diced tomatoes. - Stuff bell peppers and bake covered. - Remove foil and bake until tender. For the full recipe, be sure to check the details provided. Each step is simple and easy to follow, making this dish perfect for anyone wanting a hearty meal. Enjoy the bright colors and rich flavors of these vegan stuffed bell peppers! - Ensure quinoa is well-cooked for best texture. It should be light and fluffy. - Don’t overstuff the peppers to avoid spilling. Leave some room for the filling to expand. - Consider adding nutritional yeast for a cheesy flavor. It brings a nice depth to the dish. - Experiment with different spices or herbs for variety. Try adding oregano or basil for a twist. - Serve with a side salad for a complete meal. A fresh salad pairs well with the stuffed peppers. - Use a squeeze of lime juice for added freshness. It brightens the flavors and adds a nice touch. {{image_2}} You can easily swap out some ingredients in this recipe. If you don’t have quinoa, try rice or couscous instead. Both options offer a nice texture and will hold the flavors well. You can also mix up the beans. Kidney or pinto beans work great if you want a different taste. Each bean adds its unique twist to the dish. To spice things up, consider adding diced jalapeños for heat. This adds a kick that wakes up your taste buds. If you prefer a more Mediterranean vibe, use Italian herbs like oregano and basil. They add a fresh taste that pairs well with the sweet peppers. You can really play with flavors to suit your mood! For cheese lovers, there are great vegan options to explore. Try cashew cheese for a creamy texture. If you want convenience, grab some store-bought vegan cheese. It melts beautifully and adds a delicious layer of flavor. Don’t forget to top your stuffed peppers with a vegan cheese sauce before baking. It gives a rich finish that makes the dish even more delightful. For the full recipe and to get started, check out the [Full Recipe]. Store your vegan stuffed bell peppers in an airtight container for up to 4 days. This keeps them fresh and ready to eat. The flavors will deepen as they sit, making them even tastier. For convenience, freeze the stuffed peppers before baking. This way, you can enjoy a quick meal later. Just thaw them overnight in the fridge before baking. This method helps maintain their texture and flavor. To reheat, use the oven for the best texture. Simply place them in a baking dish at 350°F (175°C) until warmed through. If you need a quick meal, you can microwave them. Just be sure to cover them to keep them moist while heating. Enjoy your meal without the fuss! Peppers should be tender but still holding their shape. You can test them with a fork. If they poke easily, they are done. The skin may wrinkle a bit, but that’s fine. This texture means the peppers are soft and ready to eat. Yes, you can prepare them a day in advance and refrigerate before baking. Just cover them tightly with foil or plastic wrap. When you are ready to cook, remove the cover and bake as directed. This saves time on busy days. You can replace it with any grain such as rice or bulgur. Both options work well and will still give a nice texture. Just ensure to cook them according to their specific instructions before mixing with the other ingredients. Yes, this recipe is naturally gluten-free since it uses quinoa and rice. You can enjoy these stuffed peppers without worrying about gluten. Always check your ingredients to ensure they are gluten-free, especially canned items. Pair with a light salad or enjoy with bulgur or quinoa as a side. A crisp green salad adds freshness to the meal. You can also serve it with a drizzle of lime juice for a zesty kick. For the full recipe, check out the detailed instructions. In this article, we explored how to make delicious stuffed bell peppers. We covered the main ingredients, cooking steps, and helpful tips. You can customize these peppers with various grains, beans, or spices. Whether you are making them for a meal or freezing for later, they are simple and tasty. Enjoy mixing flavors and make this dish your own. With easy storage and reheating options, delicious meals are always within reach. Now, it’s your turn to try this recipe!](https://mysavedrecipe.com/wp-content/uploads/2025/06/94553ddc-b429-43b9-8a70-eb64ac3cc9e5.webp)
Looking for a meal that’s both savory and healthy? Try my Vegan Stuffed Bell Peppers! They’re colorful, easy to make,
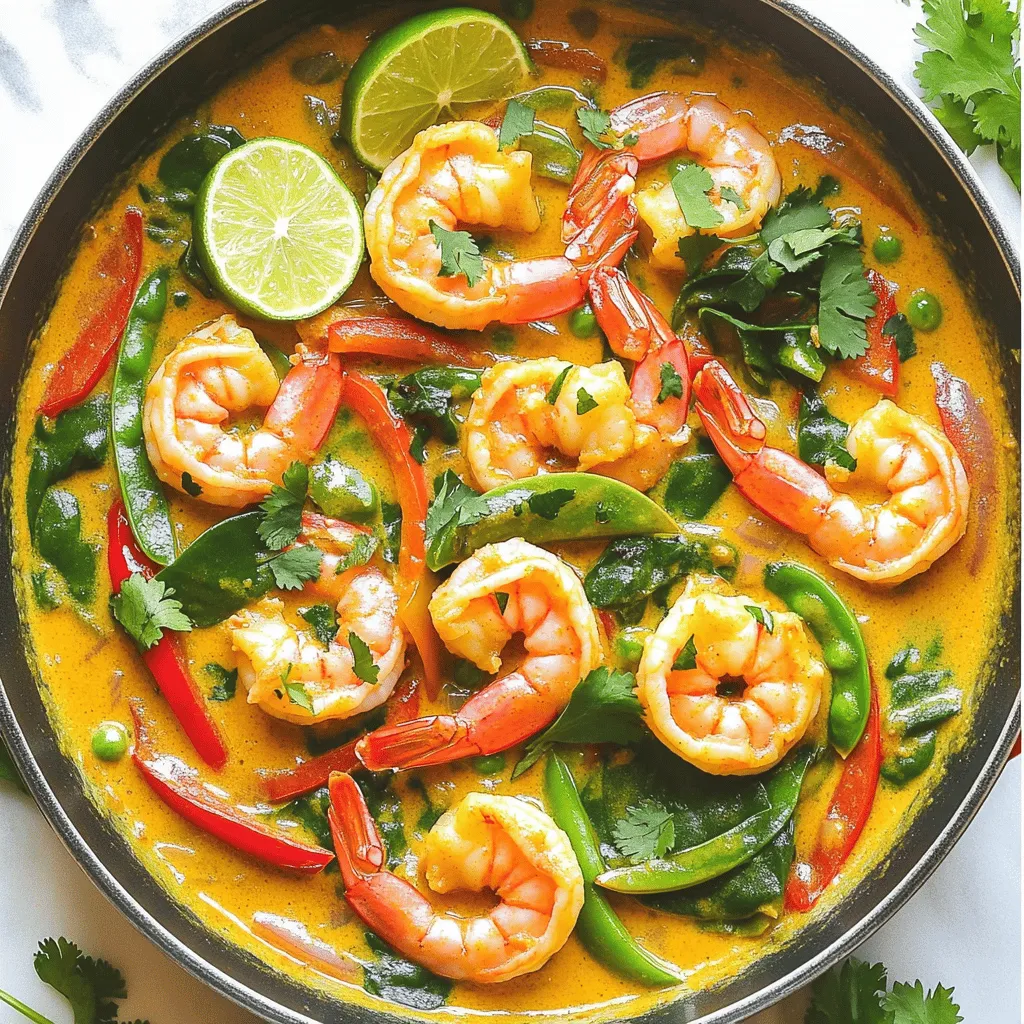
Are you ready to dive into a dish that’s bursting with flavor? In this Coconut Curry Shrimp recipe guide, I’ll
. Preheat the Oven Start by preheating your oven to 400°F (200°C). This step is very important. A hot oven helps cook the chicken and veggies just right. Prepare the Vegetables and Chicken Next, gather your fresh ingredients. Slice the chicken breast into thin strips. Cut the red, yellow, and green bell peppers into pieces. Make sure the onion is also sliced thin. This way, all the pieces cook evenly. Place everything in a large bowl. Combine Ingredients Pour 3 tablespoons of olive oil over the chicken and veggies. Then, sprinkle the spices: 2 teaspoons of chili powder, 1 teaspoon each of cumin, smoked paprika, garlic powder, onion powder, plus salt and pepper to taste. Toss everything well. You want all the pieces to be coated in the yummy seasoning. Spread on Baking Sheet Now, take a large baking sheet and line it with parchment paper or grease it lightly. Spread the chicken and veggie mixture evenly on the sheet. This helps them cook evenly and get nice and golden. Bake the Mixture Place the baking sheet in the oven. Bake for 25-30 minutes. Halfway through, give everything a good stir. This ensures even cooking. The chicken should be cooked through, and the vegetables will be tender. Warm Tortillas and Serve While the fajitas bake, you can warm the tortillas. Use a dry skillet over medium heat for about 30 seconds on each side. Alternatively, wrap them in foil and heat in the oven for the last 5 minutes of cooking. Once the fajitas are ready, squeeze fresh lime juice over them. Serve the fajitas on warm tortillas. Garnish with chopped cilantro and lime wedges. Enjoy every bite! For the full recipe, check above. Choosing the Right Chicken For the best fajitas, I recommend using boneless, skinless chicken breasts. They cook evenly and stay juicy. Aim for chicken strips about half an inch thick. This size helps them cook well and absorb all those tasty spices. How to Cut Vegetables for Even Cooking Slice your bell peppers and onion into similar sizes. I like to cut them into thin strips, about a quarter-inch thick. This ensures they cook evenly in the oven. If you want more crunch, cut them slightly thicker. Just remember to keep them uniform for the best results. Marinating Tips for Extra Flavor For an extra flavor boost, marinate your chicken. Mix olive oil, lime juice, and spices in a bowl. Let the chicken soak for at least 30 minutes. This step makes a big difference! It adds depth and richness to your fajitas. Adding Extra Toppings and Sides Don’t forget about toppings! Fresh cilantro, diced tomatoes, and avocado can elevate your dish. You can also serve your fajitas with sides like rice or beans. They add color and nutrition. Explore different options to make each meal unique. For the full recipe, check out the complete guide! {{image_2}} You can switch things up by using different proteins in your fajitas. If you prefer beef, choose flank steak or sirloin. Slice the meat thin for quick cooking. Simply follow the same steps as the chicken. Shrimp is another tasty option. It cooks faster than chicken. Add it to the mix for only 15 minutes, and you’ll have a delightful seafood fajita. For those who want a meatless meal, try using firm tofu or tempeh. Marinate them in the same spices to add flavor. Cook them until golden brown, and enjoy a veggie-packed dish. You can customize the heat level of your fajitas. For mild fajitas, stick to the recipe as is. The spices provide flavor without too much heat. If you like a medium kick, add a bit more chili powder. You could also mix in some diced bell peppers for added taste. For those who love spice, fresh jalapeños are a great choice. Chop them and toss them with the chicken and veggies before baking. You can also drizzle hot sauce on top before serving for an extra punch. Feel free to explore these variations in the full recipe for more ideas! After you enjoy those oven-baked chicken fajitas, store any leftovers properly. First, let them cool down. Then, place them in an airtight container. This keeps them fresh and tasty. You can store them in the fridge for up to three days. If you want to save them for later, consider freezing. To freeze, wrap the fajitas tightly in plastic wrap or foil. Then, place them in a freezer bag. They can last up to three months in the freezer. Just remember to label the bag with the date. When it's time to eat your leftovers, you have two good options: the microwave or the oven. Microwave Reheating: Place the fajitas on a microwave-safe plate. Cover them with a damp paper towel to keep them moist. Heat in short bursts of 30 seconds until they're warm throughout. Oven Reheating: Preheat your oven to 350°F (175°C). Spread the fajitas on a baking sheet. Heat for about 10-15 minutes, or until warm. This method helps keep the texture nice and crispy. To keep the fajitas fresh, avoid reheating them more than once. Enjoy the delicious flavors of your oven-baked chicken fajitas again! How do I know when the chicken is cooked through? You can check if the chicken is cooked by using a meat thermometer. Insert it into the thickest part of the chicken. It should read 165°F (75°C). If you don’t have a thermometer, you can also cut a piece of chicken in half. The meat should be white and no longer pink. Can I use frozen chicken for this recipe? Yes, you can use frozen chicken. However, it’s best to thaw it first. Thaw the chicken in the fridge overnight or use the defrost setting on your microwave. This way, it cooks evenly and absorbs the flavors well. What are the best sides to serve with chicken fajitas? I love serving chicken fajitas with: - Mexican rice - Black beans - Guacamole - Salsa - Corn salad These sides add color and flavor to your meal. They also balance the spices in the fajitas. How can I make this recipe dairy-free? To make chicken fajitas dairy-free, simply skip any cheese or sour cream. You can use avocado or guacamole instead. They add creaminess without dairy. Fresh lime juice adds a nice tang, too. How long do leftovers last in the fridge? Leftovers can last about 3 to 4 days in the fridge. Store them in an airtight container. This keeps the fajitas fresh and tasty. Can I prepare fajitas in advance? Yes, you can prep fajitas in advance. Slice the chicken and veggies, then store them in the fridge. Just mix and bake when you’re ready. This saves time on busy nights. For the full recipe, refer to the earlier section. To sum up, this article covered how to make tasty chicken fajitas. We discussed key ingredients like chicken, bell peppers, and spices. You learned about step-by-step preparation and cooking. I shared tips for perfecting your dish and options for different proteins and spice levels. Lastly, we addressed storage and reheating for leftovers. Enjoy making and sharing your delicious fajitas. With practice, you will master this easy and fun meal!](https://mysavedrecipe.com/wp-content/uploads/2025/06/8f12a0b8-0d21-45c5-a458-2fedd08aac6d.webp)
If you’re craving a flavorful meal that’s easy to make, try these Oven-Baked Chicken Fajitas. This recipe brings together juicy
![To make a Lemon Blueberry Shortbread Mousse Cake, gather these simple ingredients: - 1 cup all-purpose flour - 1/2 cup unsalted butter, softened - 1/4 cup powdered sugar - 1/4 teaspoon salt - 1 cup blueberries (fresh or frozen) - 1 tablespoon lemon juice - Zest of 1 lemon - 1 cup heavy cream - 1/2 cup granulated sugar - 1 teaspoon vanilla extract - 1 packet (1/4 ounce) unflavored gelatin - 2 tablespoons cold water These ingredients work together to create layers of flavor and texture. The buttery shortbread crust gives a solid base. The blueberries add a burst of sweetness and tartness. The light mousse adds creaminess, making each bite a delight. Using fresh blueberries boosts flavor. You can also use frozen ones if fresh are not available. Fresh lemon juice and zest enhance the cake's brightness. They balance the sweetness of the mousse. This recipe is easy to follow. You will enjoy making this wonderful dessert. For the full experience, check the Full Recipe. First, gather your ingredients: - 1 cup all-purpose flour - 1/2 cup unsalted butter, softened - 1/4 cup powdered sugar - 1/4 teaspoon salt Preheat your oven to 350°F (175°C). In a large bowl, cream the softened butter and powdered sugar until light and fluffy. Next, add the flour and salt. Mix until a crumbly dough forms. Press this dough into the bottom of a 9-inch springform pan evenly. Bake for 15 to 18 minutes or until it turns lightly golden. Allow it to cool completely. For the filling, you need: - 1 cup blueberries (fresh or frozen) - 1 tablespoon lemon juice - Zest of 1 lemon In a saucepan on medium heat, combine the blueberries, lemon juice, and lemon zest. Cook for about 5 to 7 minutes until the blueberries soften and release their juices. Once it cools, you can blend it briefly if you want a smoother texture. Now, let’s make the mousse. You will need: - 1 cup heavy cream - 1/2 cup granulated sugar - 1 teaspoon vanilla extract - 1 packet (1/4 ounce) unflavored gelatin - 2 tablespoons cold water Start by blooming the gelatin. In a small bowl, sprinkle the gelatin over the cold water. Let it sit for 5 minutes. While waiting, whip the heavy cream with the granulated sugar and vanilla extract in a medium bowl until it forms stiff peaks. Gently heat the bloomed gelatin in the microwave for about 10 seconds until it dissolves. Take a small amount of whipped cream and mix it with the gelatin to temper it. Now, fold the gelatin mixture into the rest of the whipped cream until no streaks remain. To layer your cake, spread half of the blueberry filling over the cooled shortbread crust. Spoon the mousse mixture carefully on top of the blueberries and smooth the surface. Then, finish with the remaining blueberry filling, spreading it evenly over the mousse layer. Cover the cake with plastic wrap and refrigerate for at least 4 hours, or until it sets. When ready to serve, release the springform pan and slice the cake into portions. For a nice touch, garnish each slice with a few fresh blueberries and a sprig of mint. For the full recipe, click [Full Recipe]. To make a great shortbread crust, you need the right texture. Here are some tips: - Avoiding sogginess: Use cold butter when mixing. This keeps the crust firm. - Ensuring the right texture: Mix until just combined. Overmixing can make it tough. Aim for a crumbly dough that holds shape when pressed. You can enhance the blueberry filling with simple tweaks: - Flavor adjustments with spices: Try adding a pinch of cinnamon or nutmeg. This adds warmth and depth. - Using alternative sweeteners: If you want less sugar, consider honey or maple syrup. Both add unique flavors while sweetening. Mousse can be tricky, but here’s how to fix common issues: - Problems with mousse thickness: If too thin, whip the cream longer until stiff peaks form. This adds volume. - Achieving proper folding technique: Always fold gently. This keeps air in the mousse and makes it light. Use a spatula and turn the bowl as you mix. These tips will help you create a perfect Lemon Blueberry Shortbread Mousse Cake. For the full guide, check the Full Recipe. {{image_2}} You can change the fruit in this cake. Try strawberries for a sweeter taste. Raspberries add a nice tartness. You can also mix fruits for fun flavors. Adjust the lemon juice to taste. More lemon gives a brighter flavor. Less lemon makes it milder. Play around until you find your perfect mix. If you need gluten-free options, use gluten-free flour. It works well in the crust. For vegan substitutions, swap the butter with coconut oil. Use plant-based cream for the mousse. You can even use aquafaba as a whipped cream substitute. These swaps keep the cake tasty while meeting your needs. Pair the cake with a berry sauce for extra flavor. A drizzle of lemon sauce brightens each bite. For garnishes, fresh mint adds a pop of color. You can also sprinkle some crushed nuts on top. They add a nice crunch and flavor. Each slice can become a work of art! Check out the Full Recipe for more details and tips. To store leftovers, cover the cake with plastic wrap. This helps keep it fresh. Place it in the fridge. The mousse can last up to three days this way. Make sure to keep it away from strong-smelling foods. This prevents any strange flavors from mixing in. To keep the mousse fresh, always scoop from the center. Avoid touching the edges with your serving spoon. This helps maintain its lovely look and texture. If you notice any topping starting to lose its shape, gently smooth it out with a spatula. Can you freeze the cake? Yes, you can! Freezing is a good option if you have extra cake. Wrap it tightly in plastic wrap and then in foil. This helps protect it from freezer burn. It can stay frozen for up to two months. For thawing, move the cake to the fridge for several hours or overnight. This method keeps the mousse texture smooth. Avoid quick thawing in the microwave. It can ruin the creamy feel of the mousse. Enjoy your Lemon Blueberry Shortbread Mousse Cake whenever you like! For the complete process, check out the Full Recipe. You can use agar-agar or cornstarch. Agar-agar is a plant-based gelling agent. It sets well when heated. You need to dissolve it in boiling water first. Cornstarch can also work but will yield a different texture. Mix it with water, then heat until thickened. Dried blueberries can work, but they change the flavor and texture. They are sweeter and chewier. If you choose dried, soak them in warm water to soften. This helps mimic the juiciness of fresh blueberries. The Lemon Blueberry Shortbread Mousse Cake lasts up to five days in the fridge. Make sure to cover it well with plastic wrap. This keeps it fresh and prevents it from absorbing other smells. Yes, you can make this cake a day or two ahead. It actually tastes better after sitting in the fridge. Just be sure to allow ample time for it to chill and set properly. You can use coconut cream, whipped topping, or even Greek yogurt. Coconut cream gives a rich taste, while whipped topping is lighter. Greek yogurt adds tanginess but may change the mousse's texture. Yes, you can use lemon extract, but adjust the amount. Extract is stronger than fresh zest and juice. Start with half a teaspoon and taste as you mix. This way, you can find the right balance of flavor. For the complete recipe, check out the Full Recipe. This blog post covered how to make a delicious Lemon Blueberry Shortbread Mousse Cake. We explored essential ingredients, step-by-step instructions, and helpful tips. You can create variations and adjust for dietary needs too. Remember, practice will help you master this recipe. Enjoy experimenting with flavors and serving styles. With a bit of patience, you'll impress your friends and family. Get ready to relish each bite of your sweet creation!](https://mysavedrecipe.com/wp-content/uploads/2025/06/cca0620b-34cd-4be4-a65e-f549c2490a09.webp)
Are you ready to indulge in a delightful dessert? Lemon Blueberry Shortbread Mousse Cake is a treat that combines creamy
![- 1 pound large shrimp, peeled and deveined - 4 tablespoons unsalted butter - 4 cloves garlic, minced - 1/2 cup pineapple chunks (fresh or canned) - 1 red bell pepper, diced - 1/4 cup green onions, chopped - 1 tablespoon soy sauce - 1 teaspoon sesame oil - 1/2 teaspoon red pepper flakes (adjust for spice preference) - Salt and pepper to taste Gather these fresh ingredients to make a tasty dish. The shrimp should be large and fresh for the best flavor. I love using unsalted butter, as it allows me to control the saltiness. Garlic brings a lovely aroma, and I always use fresh cloves. The pineapple adds a sweet touch that balances the garlic. Red bell pepper adds color and crunch. Green onions give a fresh finish. For flavor, soy sauce and sesame oil blend well. Adjust red pepper flakes to match your spice level. Add salt and pepper to enhance all the flavors. This mix creates a dish you will want to savor. For the full experience, check the Full Recipe. Enjoy cooking! First, rinse the shrimp under cold water. Pat them dry with paper towels. Then, season the shrimp with salt and pepper to taste. Next, melt the butter in a large skillet over medium heat. This will create a rich base for our dish. Now, add the minced garlic to the melted butter. Sauté it for one to two minutes until it smells great. Be careful not to burn the garlic; it can turn bitter. Increase the heat to medium-high. Add the seasoned shrimp to the skillet. Cook the shrimp for two to three minutes on each side. They should turn pink and opaque when done. Next, toss in the diced red bell pepper and pineapple chunks. Cook these for an additional two to three minutes. This will soften the peppers and add sweetness. Then, drizzle in the soy sauce and sesame oil. Stir the mixture well to combine everything. Finally, sprinkle the red pepper flakes over the dish. Mix it all together and remove it from heat. Stir in the chopped green onions. Now the dish is ready to serve! For the full recipe, check the section above. To make the best garlic butter shrimp, start by deveining and peeling the shrimp. Use a sharp knife to cut along the back and remove the dark vein. This step is key for a clean bite. Rinse them well to wash away any grit. Timing is crucial to avoid overcooking. Cook the shrimp for just 2-3 minutes on each side. They should turn pink and opaque. Overcooked shrimp become tough and rubbery, which nobody enjoys. Fresh herbs can take your dish up a notch. Try adding cilantro or basil for a burst of flavor. These herbs add brightness and a fresh taste that pairs well with the shrimp. If you want alternatives to soy sauce, consider coconut aminos or tamari. Each brings a unique flavor that still complements the dish. For butter, you can use olive oil or ghee for a different twist. Serve your garlic butter shrimp over jasmine rice or quinoa for a hearty meal. Both options soak up the sauce well and add a nice texture. For a true Hawaiian touch, garnish your dish with lime wedges and sesame seeds. You can also add slices of fresh pineapple. This not only looks pretty but enhances the tropical vibe of the meal. For the full recipe, refer to the [Full Recipe]. {{image_2}} You can change up this dish with fun ingredient swaps. Try using different vegetables like bell peppers or snap peas. These will add color and crunch. For protein, scallops or chicken work well too. They cook fast and soak up the flavors. Adjusting the sweetness can make a big difference. You can add fruits like mango or kiwi for a new twist. For sauces, try different spices. Lime juice or ginger can give a bright flavor. Experiment to find your favorite taste. If you need gluten-free options, use tamari instead of soy sauce. It gives the same great taste without gluten. For low-carb diets, switch to cauliflower rice instead of jasmine rice. It keeps the meal light and delicious. These variations make garlic butter shrimp Hawaiian style fun and flexible. You can enjoy it in many ways. For the full recipe, check out the earlier section. To store leftovers, place them in an airtight container. This keeps the garlic butter shrimp fresh. I recommend using glass containers for best results. They do not absorb odors and are easy to clean. Let the shrimp cool first before sealing. Store in the fridge for up to three days. For longer shelf life, you can freeze the shrimp. Place it in a freezer-safe bag or container. Remove as much air as possible before sealing. This helps prevent freezer burn. Garlic butter shrimp can last in the freezer for up to three months. When you’re ready to eat, thaw in the fridge overnight. This keeps the shrimp tender and juicy. When reheating, use gentle heat to keep the shrimp tender. You can warm it in a skillet over low heat. Add a splash of water or broth to help steam it. Another option is to use the microwave. Heat in short bursts to avoid overcooking. Always check the temperature. It should be at least 165°F for safe eating. Hawaiian-style garlic butter shrimp stands out due to its bright, tropical flavors. The addition of pineapple gives it a sweet twist. Other shrimp recipes might focus on spices or creamy sauces. This dish is light, fresh, and full of life. You get the rich taste of garlic butter, combined with juicy shrimp and fruity notes. Yes, you can easily spice it up! Start with the red pepper flakes. Add more for extra heat. You can also use fresh jalapeños or a dash of hot sauce. For a smoky flavor, consider adding chipotle powder. Adjust the spice level to match your taste. Make it as spicy as you like! Perfectly cooked shrimp turns pink and opaque. You should not see any gray. When you cook it, it should curl up slightly. If it forms a tight "C" shape, it’s done. Avoid overcooking, as shrimp can become rubbery. Keep an eye on the time; it usually takes only a few minutes. This blog post gives you all the details to make Hawaiian-style garlic butter shrimp. You learned which ingredients are key and how to cook them perfectly. I shared tips for flavor and serving to impress guests. Stored properly, you can enjoy leftovers later. Remember to adjust spices to suit your taste. With this recipe, you can easily share a taste of the tropics with friends and family. Enjoy creating a delightful meal that brings a burst of flavor to your table. Happy cooking!](https://mysavedrecipe.com/wp-content/uploads/2025/06/18387631-e931-4356-9a08-94a818666e91.webp)
Looking to impress your family with a taste of Hawaii? This Garlic Butter Shrimp Hawaiian Style is both simple and
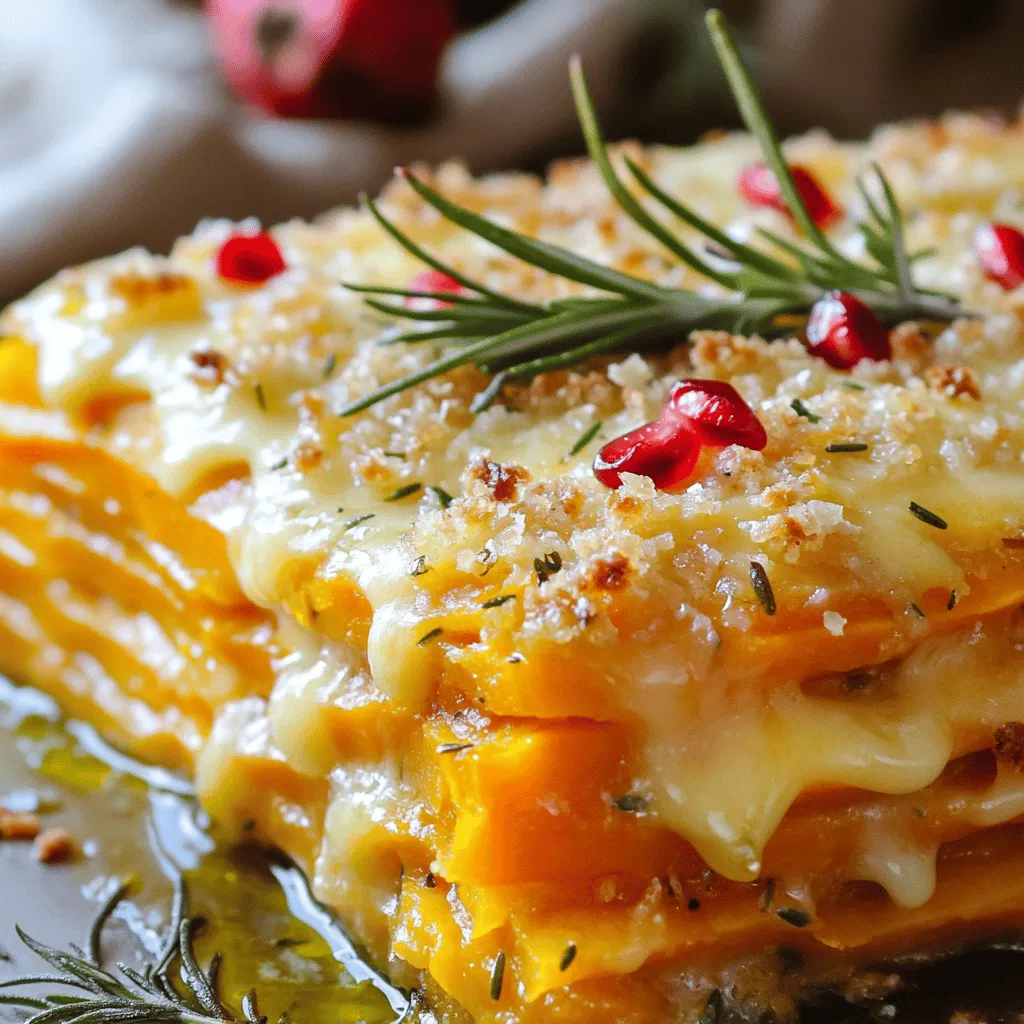
Indulging in a rich, creamy Sweet Potato Gratin with a rosemary crust is a delight for any meal. In this
