Skip to content
DisclaimerTerms Of UseGDPR PolicyCookie Policy

My Saved Recipe

  • Home
  • Drinks
  • Appetizers
  • Dinner
  • Dessert
  • About
  • Contact
  • Privacy Policy
DisclaimerTerms Of UseGDPR PolicyCookie Policy

Savannah

- Fully cooked mini sausages (cocktail franks or lil' smokies) - Refrigerated crescent roll dough - Cream cheese (softened) - Shredded cheddar cheese - Fresh jalapeños (seeds removed and diced) - Garlic powder - Onion powder - Fresh cilantro (optional for garnish) Cooking spray is a key step. It helps the dough not stick to the pan. This way, your Jalapeño Popper Pigs in a Blanket come out easily and stay intact. You can also add a pinch of salt or pepper to enhance the flavor. Feel free to experiment with other spices like paprika or cayenne for an extra kick! These ingredients mix together to create a fun and tasty snack. If you’d like to see the full recipe, check out the detailed instructions. Enjoy your cooking! First, I preheat the oven to 375°F (190°C). This helps the dough cook evenly. I line a baking sheet with parchment paper and spray it lightly with cooking spray. This way, the pigs in a blanket won’t stick. Next, I grab a mixing bowl. I combine 4 oz of softened cream cheese, 1 cup of shredded cheddar cheese, and 1-2 diced jalapeños. I add 1 teaspoon each of garlic powder and onion powder. A pinch of salt and pepper completes the mix. I stir until everything blends well. Now, I open the can of crescent roll dough. I carefully unroll it on my counter and press the seams together to form one sheet. Using a pizza cutter, I slice the dough into triangles. Each triangle should be wide at one end and narrow at the other. For the filling, I place a spoonful of the cheese mixture on the wide end of each triangle. I then position a mini sausage on top of the filling. This adds a meaty flavor to the dish. I roll the dough around each mini sausage, starting from the wide end. I tuck in the edges as I go, making sure the filling stays inside. I then lay the rolled pigs in a blanket on the prepared baking sheet, seam-side down. I bake them in the preheated oven for 15-20 minutes. I watch for the dough to turn golden brown and puffed up. Once done, I take them out and let them cool for a few minutes. If I want, I can garnish with fresh cilantro. For the full recipe, check out the linked details. To ensure the dough rises well, start with a preheated oven. Set it to 375°F (190°C) and keep the temperature steady. Use fresh crescent roll dough, as older dough may not rise as well. Press the seams of the dough together, making a single sheet. This helps it puff up evenly. To avoid sogginess, do not overfill each wrap. A small spoonful of filling is enough. Also, place them seam-side down on the baking sheet. This keeps the filling inside and helps the bottom crisp. For extra kick, consider adding spices. A pinch of cayenne pepper or smoked paprika can give a nice boost. You can also mix in some ranch seasoning for a tasty twist. If you like heat, use more jalapeños or even a dash of hot sauce in the filling. For dips, ranch dressing is a classic choice. If you want something spicier, try a chipotle mayo or a zesty salsa. These sauces complement the flavors nicely and add a fun touch. Garnishing makes your dish look stunning. Chopped cilantro adds a fresh touch. You can also drizzle with ranch or hot sauce for a colorful effect. Arrange the pigs in a blanket on a nice platter to impress your guests. Serve warm for the best taste. Pair with a selection of dips so guests can choose their favorites. This makes for a fun and interactive snack experience! {{image_2}} You can change the cheese in your filling to switch up the flavor. Try using pepper jack cheese for a spicy kick. For a milder option, mozzarella works well too. You can also use cream cheese mixed with feta for a tangy twist. If you want to explore different peppers, use poblano for a smoky flavor or sweet bell peppers for a gentle taste. Each swap gives your dish a unique spin. Instead of mini sausages, use bacon-wrapped sausages for extra flavor. The crispy bacon pairs nicely with the creamy filling. If you want a vegetarian option, use veggie sausages or mushrooms for the filling. You can mix cream cheese with spinach for a tasty plant-based choice. These swaps keep the dish exciting and cater to all tastes. Get creative when serving these poppers at your next party. Arrange them on a colorful platter with dipping sauces like ranch or spicy mustard. You can also serve them with a side of fresh veggies for a fun crunch. For a twist, place them on a bed of lettuce or in mini taco shells. These ideas make your dish pop and delight your guests. To keep your Jalapeño Popper Pigs in a Blanket fresh, place them in an airtight container. Store them in the fridge for up to three days. When ready to eat, reheat them in the oven at 350°F (175°C) for about 10 minutes. This keeps the dough crisp and the filling warm. If you want to freeze these tasty bites, you can do it before or after baking. For unbaked pigs in a blanket, roll them up, place them on a baking sheet, and freeze until firm. Then, transfer them to a freezer-safe bag. For baked versions, let them cool completely before freezing. Thaw them in the fridge overnight, then reheat in the oven until warm. Use leftover ingredients creatively. You can make a cheese dip using extra cream cheese and jalapeños. If you have leftover crescent roll dough, try making cinnamon rolls! Plan your portions ahead, so you don't have too many leftovers. This helps reduce waste and keeps your meals fresh and fun. Jalapeño Popper Pigs in a Blanket are tasty snacks. They combine mini sausages with a creamy, spicy filling. The filling includes cream cheese, cheddar, and diced jalapeños. Wrapped in crescent dough, they become golden and crispy. This dish is loved for its crunchy outside and spicy, cheesy inside. It's perfect for parties or game nights. Yes, you can prepare these ahead! Mix the filling and roll the sausages in the dough. Place them on a baking sheet and cover tightly. Store in the fridge for up to 24 hours. When ready, bake straight from the fridge. This keeps the flavors fresh and delicious. Serve Jalapeño Popper Pigs in a Blanket warm. Pair them with ranch dressing or a spicy sauce. Arrange them on a platter for a fun display. You can also garnish with fresh cilantro for color. This adds a nice touch and enhances the taste. Absolutely! You can swap cheddar for pepper jack for extra heat. Mozzarella adds a milder, gooey texture. Mixing different cheeses can create a unique flavor. Try cream cheese with feta for a tangy twist. Experiment and find your favorite cheese combo for this dish! Jalapeño Popper Pigs in a Blanket are delicious and easy to make. You learned about the key ingredients, step-by-step instructions, and helpful tips. Variations allow you to customize flavors to fit your taste. Remember, using cooking spray helps get a perfect crunch. Enjoy your tasty creations at parties or cozy nights at home! By storing leftovers properly, you can enjoy them later without waste. Happy cooking!

Jalapeño Popper Pigs in a Blanket Tasty Appetizer

If you crave a spicy twist on a classic favorite, you’re in for a treat! Jalapeño Popper Pigs in a

To make Cajun shrimp pasta, you need fresh and simple ingredients that pack a punch. Here's what you'll need: - 8 oz fettuccine pasta - 1 lb large shrimp, peeled and deveined - 2 tablespoons Cajun seasoning - 2 tablespoons olive oil - 1 medium onion, diced - 3 cloves garlic, minced - 1 red bell pepper, sliced - 1 cup heavy cream - 1 cup cherry tomatoes, halved - 1/2 cup grated Parmesan cheese - Fresh parsley, chopped (for garnish) - Salt and pepper to taste Using quality ingredients makes all the difference in flavor. The Cajun seasoning gives the dish its signature kick. The shrimp adds a tasty protein. Fettuccine pasta holds the creamy sauce well. Each ingredient plays a role in making this meal delightful. When gathering your ingredients, ensure the shrimp are fresh. Look for shrimp that smell like the ocean, not fishy. Fresh vegetables and herbs enhance the taste. For the full recipe, you can check out the [Full Recipe]. Enjoy cooking! To cook the fettuccine pasta, bring a large pot of salted water to a boil. Add 8 oz of fettuccine and cook according to the package instructions, usually around 8-10 minutes. Stir occasionally. Once the pasta is al dente, drain it well but reserve 1/2 cup of the pasta water. This step is key! The starchy water helps the sauce stick to the pasta and adds creaminess. For the shrimp, take 1 lb of large shrimp, peeled and deveined. In a bowl, toss the shrimp with 2 tablespoons of Cajun seasoning until they are evenly coated. This seasoning gives the shrimp a bold flavor. Heat 2 tablespoons of olive oil in a large skillet over medium-high heat. Add the seasoned shrimp and cook for about 2-3 minutes on each side. They should turn pink and opaque. Once done, remove the shrimp from the skillet and set them aside. In the same skillet, add 1 medium diced onion and 1 sliced red bell pepper. Sauté them until the onion becomes soft and translucent, about 4-5 minutes. Then, add 3 minced garlic cloves and sauté for another minute. Be careful not to burn the garlic. Next, stir in 1 cup of cherry tomatoes and cook for about 3 minutes until they soften. Pour in 1 cup of heavy cream and let it simmer gently for 2-3 minutes. This will thicken the sauce. Now, stir in the cooked pasta, 1/2 cup of grated Parmesan cheese, and the reserved pasta water. Adjust the consistency as needed. Finally, add the cooked shrimp back to the skillet and toss everything together. Season with salt and pepper as needed. Your dish is now ready for a beautiful presentation! For the full recipe, refer to the details provided earlier. To get tender, juicy shrimp, cook them for just 2-3 minutes on each side. They turn pink and opaque when done. Overcooking makes them rubbery. Always keep a close eye on them. Balancing flavors is key. Cajun seasoning can be spicy. Taste as you go. Adjust salt and spice to suit your palate. This extra care makes a big difference. Cajun shrimp pasta pairs well with garlic bread or a fresh salad. These sides bring great texture and flavor. For garnish, sprinkle fresh parsley over the top. A squeeze of lemon adds brightness. Serve in a large bowl to show off the colorful dish. Add extra Parmesan on top for a delicious finish. Avoid overcooking shrimp. This mistake can ruin your dish. Always check them carefully. Don’t skip reserving pasta water. This starchy water helps the sauce stick to the pasta. It also makes the sauce creamy and rich. Use about half a cup for best results. For the full recipe, check out the Cajun Shrimp Pasta Delight. {{image_2}} You can switch up the fettuccine if you want. Try using penne or spaghetti for a fun twist. Both will hold the sauce well and add a new look to your dish. For shrimp, you have options too. You can use medium shrimp if you can’t find large ones. You can also try scallops or chicken for a different flavor. Adjusting the spice is easy. If you want a milder dish, use less Cajun seasoning. Start with one tablespoon, then taste and add more if needed. You can also balance heat by adding cream or cheese. Want it hotter? Sprinkle in chili flakes or a few drops of hot sauce. Just remember, a little goes a long way! If you need a gluten-free meal, swap fettuccine for gluten-free pasta. Look for brands made from rice or chickpeas. These options taste great and work well with sauces. Looking for a lighter version? Use half-and-half instead of heavy cream. You can also cut back on cheese. This way, you can enjoy your meal without the extra calories. For more details, check out the Full Recipe. To keep your Cajun shrimp pasta fresh, store it in the fridge. Place the pasta in an airtight container. Make sure to let it cool down first. This helps prevent moisture build-up. The best containers are glass or BPA-free plastic. They help keep flavors locked in and prevent spills. When you’re ready to eat again, you have a few good options. The best way to reheat is on the stovetop. Add a splash of water or broth to keep it moist. Heat it slowly over medium-low. If the pasta dries out, mix in a little olive oil or more cream. This will bring back its creamy texture. Yes, you can freeze Cajun shrimp pasta! It’s easy to make it last longer. Start by letting the pasta cool completely. Then, portion it into freezer-safe bags or containers. Make sure to remove as much air as possible. Label the bags with the date. This way, you can enjoy your meal later without worry. Cajun seasoning is a mix of spices that gives dishes a bold flavor. It often includes: - Paprika - Cayenne pepper - Onion powder - Garlic powder - Oregano - Thyme - Black pepper - Salt This blend adds warmth and depth to any meal, making it perfect for Cajun shrimp pasta. Cajun shrimp pasta can last about 3 to 4 days in the fridge. Make sure to store it in an airtight container. This helps keep it fresh and tasty. Yes, you can use other pasta types! Here are some great options: - Penne - Linguine - Spaghetti - Whole wheat pasta Each pasta will bring a unique texture to the dish while still pairing well with the flavors. Here are some delicious side dishes and drinks to enjoy: - Garlic bread - Caesar salad - Roasted vegetables - A crisp white wine, like Sauvignon Blanc These pairings enhance the meal and create a lovely dining experience. Cajun shrimp pasta can be a healthy choice. Shrimp are low in calories and high in protein. The dish can contain healthy fats from olive oil. To make it even healthier, you can: - Use whole grain pasta - Add more vegetables - Reduce the amount of cream These changes boost nutrition without losing flavor. For the full recipe, check out the link. Cajun shrimp pasta is a simple and tasty dish. We covered the key ingredients, cooking steps, and helpful tips to make it perfect. Remember to avoid common mistakes and adjust spice levels to your taste. You can also modify this dish based on dietary needs and preferences. Store leftovers properly, and don’t forget to enjoy every bite. This pasta is not just about flavor; it brings warmth and comfort to your meal. Make it, share it, and savor the joy it brings!

Cajun Shrimp Pasta Flavorful and Quick Weeknight Meal

Looking for a quick weeknight meal that packs a punch? Cajun Shrimp Pasta is your answer! With tender shrimp, creamy

To make your Sugar Cookie Dip truly delightful, gather these main ingredients: - 1 cup cream cheese, softened - 1 cup powdered sugar - 1/2 cup unsalted butter, softened - 1 teaspoon vanilla extract - 1/2 teaspoon almond extract These ingredients create a rich and creamy base for your dip. The cream cheese adds a smooth texture while the butter brings a rich flavor. The powdered sugar sweetens it just right, and the extracts add that classic cookie taste. You can make your dip even more fun with these optional ingredients: - 1 cup mini chocolate chips - 1/4 cup rainbow sprinkles These add-ins really brighten up the dip. The chocolate chips provide a nice crunch, while the sprinkles make it look festive. You can mix and match to find your favorite combo! Now, let’s talk about what to dip! Here are some great options: - Graham crackers - Pretzels - Fresh fruit, like strawberries or apple slices These dippables give you many flavors and textures. The sweet dip pairs well with the crunch of crackers and pretzels. Fresh fruit adds a juicy contrast that makes every bite exciting. For the full recipe, check the details above! To make Sugar Cookie Dip, start by gathering your ingredients. You need cream cheese, butter, powdered sugar, and extracts. First, take one cup of softened cream cheese and one cup of unsalted butter. Place them in a large mixing bowl. Beat them together with an electric mixer on medium speed until the mixture is smooth and creamy. This step is key for a great texture. Next, add in one cup of powdered sugar slowly. Keep beating until the dip is fluffy and well mixed. It’s important to mix well so there are no lumps. Now, pour in one teaspoon of vanilla extract and half a teaspoon of almond extract. These will add rich flavors to your dip. Mix again until everything is combined. For the best creamy texture, use room temperature ingredients. Cold cream cheese can cause lumps. When you mix in the powdered sugar, do it slowly. This helps prevent a sugar cloud and keeps your dip smooth. When you have a fluffy base, gently fold in one cup of mini chocolate chips and a quarter cup of rainbow sprinkles. Use a spatula for this part. Folding helps keep the air in the mixture, making it light and yummy. Once your dip is ready, transfer it to a colorful serving bowl. Smooth the top with a spatula for a nice finish. You can add extra sprinkles and chocolate chips on top for a fun touch. Arrange assorted dippables around the bowl for a beautiful spread. Great options include graham crackers, pretzels, and fresh fruit. This not only looks appealing but also invites everyone to dig in. For a cooler treat, chill the dip in the fridge for 30 minutes before serving. Enjoy your sweet and creamy delight at any gathering! To make the best sugar cookie dip, start with softened cream cheese and butter. This helps create a smooth base. Beat them together until they are creamy. Gradually add powdered sugar to avoid a cloud of sugar dust. Mix in vanilla and almond extracts for a sweet, warm flavor. Finally, fold in mini chocolate chips and sprinkles. This adds fun and texture. Serve it in a bright bowl with colorful dippables. You can find the full recipe above. One common mistake is not softening the cream cheese. Cold cream cheese will not mix well. Another mistake is rushing the mixing process. If you don’t mix well, the dip may be lumpy. Also, don’t skip the sprinkles! They add a festive touch. Lastly, avoid using too many add-ins; balance is key for a smooth dip. You can boost the flavor of your dip by adding different ingredients. Try mixing in crushed cookies for a crunch. You can also use flavored extracts like maple or coconut for a twist. Fresh fruit, like mashed strawberries, can add a fruity zing. Each add-in can make your dip special. Experiment with what you love! {{image_2}} You can take your sugar cookie dip to the next level with chocolate. To make this, simply add 1/2 cup of cocoa powder to the mix. This gives it a rich, chocolate flavor. You can also swap mini chocolate chips for crushed Oreos. Both options create a fun twist. Your guests will love this chocolatey treat. Change up the dip for different seasons. For Halloween, add orange food dye and sprinkle in some candy corn. At Christmas, mix in crushed peppermint and green food coloring for a festive look. For spring, use pastel colors and fresh fruits. Try adding lemon zest for a fresh taste. Each season brings a new flavor adventure. If you're looking for a healthier dip, swap cream cheese for Greek yogurt. This makes the dip lighter but still creamy. You can also use honey instead of powdered sugar for sweetness. Another great option is to use almond butter instead of unsalted butter. These swaps keep the flavor but reduce calories. Enjoy guilt-free dipping! To store your sugar cookie dip, place it in an airtight container. This keeps it fresh and tasty. Make sure to seal the lid tightly. You can store it in the fridge for up to five days. If you want to enjoy it later, follow the freezing tips below. You can freeze sugar cookie dip for up to three months. To freeze, scoop the dip into a freezer-safe container. Leave some space at the top, as the dip may expand. When you’re ready to eat it, let it thaw in the fridge overnight. Stir it well before serving. The shelf life of sugar cookie dip is about five days in the fridge. After that, it may lose its creamy texture. If you see any change in color or smell, toss it out. For the best taste, try to eat it within the first few days. Enjoy it fresh for a delightful treat! You can find the Full Recipe online for more details. You can dip many fun treats in Sugar Cookie Dip. Some tasty options include: - Graham crackers - Pretzels - Fresh fruit like strawberries or apple slices - Vanilla wafers - Animal crackers - Marshmallows Each of these pairs well with the creamy sweetness of the dip. You can mix and match to keep things exciting. Try different dippables for fun flavors and textures! Yes, you can make Sugar Cookie Dip ahead of time. It stays fresh when stored in the fridge. I recommend making it a day before your event. This way, the flavors can blend well. Just cover the dip tightly with plastic wrap or a lid. When you’re ready to serve, give it a quick stir to make it creamy again. Yes, you can make a vegan version of Sugar Cookie Dip. To do this, replace cream cheese with a vegan cream cheese. Use vegan butter instead of regular butter. For the powdered sugar, ensure it is vegan-friendly. This way, you can enjoy the same great taste while keeping it plant-based. Sugar cookie dip is a fun treat for any occasion. We explored key ingredients and useful variations. I shared tips for the best creamy texture and tasty dippables. You learned how to store leftovers and even freeze your dip. Don't be afraid to experiment with flavors! Make your dip your own by trying new add-ins. With these ideas, you're ready to impress friends and family with a delightful dessert. Enjoy your sweet creation!

Sugar Cookie Dip Creamy Delight for Every Occasion

Looking for a sweet treat everyone will love? This Sugar Cookie Dip is a creamy delight perfect for any occasion.

- 2 cups shredded cooked chicken - 1/2 cup cream cheese - 1/2 cup buffalo sauce - 1/2 cup shredded cheddar cheese - 1/4 cup finely chopped green onions Buffalo Chicken Pinwheels are all about great flavors. The key is using tender, shredded cooked chicken. You can make this easily by boiling or roasting chicken breasts. Cream cheese adds a rich, smooth texture. It binds all the ingredients and makes them creamy. Buffalo sauce brings the heat and tang. Adjust the amount based on your spice level. Shredded cheddar cheese adds a nice sharp flavor and extra creaminess. Green onions give a fresh, mild bite. They also add a pop of color to your pinwheels. - 4 large flour tortillas - 1/4 cup ranch dressing (for dipping) - Salt and pepper to taste Using large flour tortillas is essential. They hold the filling well and roll easily. You can choose whole wheat tortillas for a healthier option. Ranch dressing is the perfect dip for these pinwheels. It cools down the heat from the buffalo sauce. Don't forget to season with salt and pepper. This brings out all the flavors in your filling. - Alternative proteins - Dairy-free options - Different sauces You can swap out the chicken for turkey or even shredded pork. For a vegetarian version, use chickpeas or black beans. If you're looking for dairy-free options, use vegan cream cheese. You can also try different sauces like BBQ or sriracha. This gives your pinwheels a unique twist. Feel free to get creative with your ingredients! For the full recipe, check the details above. - Combining the ingredients In a mixing bowl, combine 2 cups of shredded cooked chicken, 1/2 cup of softened cream cheese, 1/2 cup of buffalo sauce, 1/2 cup of shredded cheddar cheese, and 1/4 cup of finely chopped green onions. Stir this mixture until everything blends well. Add salt and pepper to taste. - Spreading the mixture on tortillas Take a large flour tortilla and lay it flat on a clean surface. Spread a quarter of the buffalo chicken mixture on the tortilla. Leave a small border around the edges to prevent spills. - Rolling the tortillas Carefully roll the tortilla tightly from one end to the other. Make sure the filling stays inside as you roll. Repeat this with the other tortillas and filling until you finish. - Slicing the pinwheels Once all the tortillas are rolled, lay them seam-side down on a cutting board. Use a sharp knife to slice each rolled tortilla into pinwheels that are about 1 inch thick. - Arranging on a platter Place the sliced pinwheels on a serving platter. They look best when arranged in a circle or in rows. Serve them with ranch dressing for dipping. This recipe is quick and easy. You combine ingredients, spread them on tortillas, roll them, slice, and serve. Prep time is only 15 minutes, and the total time is 30 minutes. Perfect for parties or a fun snack! Check the Full Recipe for all details. To get the best pinwheels, focus on the texture. Use soft cream cheese; it helps to blend well with the chicken. Mixing until smooth is key. This keeps the filling creamy and easy to spread. Make sure to roll the tortillas tightly. A loose roll may cause the filling to spill out. Start from one end and roll carefully to keep everything inside. Want to spice things up? Add a dash of cayenne pepper or garlic powder to the mix. This boosts the flavor without overwhelming the dish. You can also try different hot sauces if you want more heat. Using fresh ingredients makes a big difference. Fresh green onions add crunch and a bright taste. Choose high-quality chicken for the best flavor. Fresh ingredients equal tasty pinwheels! Pair your pinwheels with crunchy veggies like carrots or celery sticks. They add a nice contrast and are healthy too. You can also serve them with chips for a fun crunch. For presentation, arrange the pinwheels in a circle on a large platter. Add a small bowl of ranch dressing in the center for easy dipping. This makes your dish look inviting and fun. For the complete recipe, check the Full Recipe. {{image_2}} You can change the flavor of your Buffalo Chicken Pinwheels easily. For spicy versions, add more buffalo sauce. This gives it a real kick. If you want a milder taste, use less sauce or choose a mild sauce. You can also mix in some BBQ sauce for a sweet twist. You do not have to stick to just one type of cheese. Cheddar is great, but you can use mozzarella or pepper jack for a fun change. Adding veggies can also enhance your pinwheels. Consider mixing in bell peppers, spinach, or even shredded carrots. They add color and crunch. For game day, you can make these pinwheels a crowd-pleaser. Try adding bacon bits or jalapeños for extra flavor. If you want a healthy alternative, use whole wheat tortillas and add more veggies. You can also serve them with guacamole or hummus instead of ranch dressing. To keep your Buffalo Chicken Pinwheels fresh, refrigerate them right away. Place the pinwheels in an airtight container. This will help prevent them from drying out. They will last for up to three days in the fridge. If you want to enjoy them later, make sure to check for any signs of spoilage. You can freeze these pinwheels, too. I suggest freezing them before slicing. Wrap each rolled tortilla tightly in plastic wrap. Then place them in a freezer bag. They will keep well for about two months. When you're ready to eat them, take them out and thaw them in the fridge overnight. For a quicker thaw, leave them at room temperature for about an hour. You can reheat your pinwheels in two ways: the microwave or the oven. For the microwave, place a few pinwheels on a plate and microwave for about 30 seconds. If you prefer the oven, preheat it to 350°F. Place the pinwheels on a baking sheet and heat for about 10 minutes. This will help maintain their texture. Enjoy your tasty treat! You can easily prepare Buffalo Chicken Pinwheels in advance. First, make the filling as usual. After mixing the ingredients, spread it on the tortillas. Instead of cutting them, wrap the rolled tortillas tightly in plastic wrap. Store them in the fridge for up to 24 hours. When you are ready to serve, slice them into pinwheels. This method keeps them fresh and tasty. If buffalo sauce is too spicy, consider using barbecue sauce. It gives a sweet and smoky flavor. You could also try ranch dressing or a mild hot sauce. For a unique twist, use teriyaki sauce for a sweet glaze. Each sauce changes the taste, so pick what you enjoy most. Yes, you can make Buffalo Chicken Pinwheels vegetarian. Swap the chicken for shredded carrots or cooked quinoa. For cream cheese, use a dairy-free version if needed. This keeps the creamy texture while being plant-based. You can still enjoy all the great flavors in a vegetarian way. Buffalo chicken pinwheels are fun, tasty, and easy to make. We covered the best ingredients, like chicken, cheese, and tortillas. You learned how to prepare, cut, and serve these delicious treats. I shared tips for perfecting the flavors and ensuring a great texture. Remember, feel free to switch up the ingredients to fit your taste. These pinwheels are perfect for any gathering. Whether for game day or just a snack, enjoy making them your own!

Buffalo Chicken Pinwheels Tasty and Easy Treat

Looking for a crowd-pleasing snack that’s simple to make? Buffalo chicken pinwheels are the answer! This tasty treat combines shredded

- 4 (8 oz) packages cream cheese, softened - 1 ½ cups graham cracker crumbs - 1 ½ cups fresh blueberries Cream cheese gives the cheesecake its creamy texture. Use full-fat for the best taste. Graham cracker crumbs form the crust. They add crunch and sweetness. Fresh blueberries create the delightful swirl. Their flavor shines in every bite. - ½ cup unsalted butter, melted - 1 cup granulated sugar, divided - 1 cup sour cream Unsalted butter helps the crust hold together. It adds richness to the cheesecake. Granulated sugar sweetens the cream cheese mixture. It balances the tartness of the blueberries. Sour cream makes the filling smooth and tangy. It adds depth to the flavor. - Dairy-Free Options - Sugar Substitutes - Alternative Crusts For a dairy-free version, use cream cheese alternatives. Look for those made from nuts or soy. You can swap granulated sugar for coconut sugar or stevia. This can lower calories. If you want a different crust, try crushed nuts or oats. They can add a unique texture and taste. For the full recipe, check out the details above. Enjoy making your cheesecake! Mixing Ingredients To start, gather your ingredients for the crust. You need: - 1 ½ cups graham cracker crumbs - ½ cup unsalted butter, melted - ¼ cup granulated sugar In a medium bowl, mix the graham cracker crumbs with the melted butter and sugar. Stir well until it looks like wet sand. This mixture is your crust. Baking the Crust Now, press this mixture firmly into the bottom of a 9-inch springform pan. Make sure it’s even and compact. Bake the crust at 325°F (160°C) for about 8 to 10 minutes. It should be set but not brown. Once done, take it out and let it cool. Beating Cream Cheese In a large mixing bowl, take four packages of softened cream cheese. Use an electric mixer and beat it until it’s smooth and creamy. This takes about 2 to 3 minutes. Incorporating Other Ingredients Gradually add in ¾ cup of granulated sugar while mixing. Next, add one teaspoon of vanilla extract. Then, add the eggs one at a time, mixing on low speed. Be careful not to overmix. Finally, mix in one cup of sour cream until smooth. Layering Techniques First, spoon about half of your cream cheese mixture into the cooled crust. Spread it evenly. Then, take half of your fresh blueberries and sprinkle them on top. Creating the Blueberry Swirl Add the rest of the cream cheese mixture on top. Now, take a knife or spatula and gently swirl in the remaining blueberries. This will create a lovely marbled effect. Now you are ready to bake your cheesecake. For the full recipe, refer to the detailed instructions provided earlier. Enjoy your baking! Avoiding Cracks To avoid cracks, bake your cheesecake slowly. Keep the oven door slightly open when done. This helps cool it down slowly. Achieving the Right Texture For a creamy texture, ensure all ingredients are at room temperature. Mix gently to keep air bubbles out. Overmixing can lead to a dense cake. Presentation Ideas For a beautiful presentation, place your cheesecake on a colorful plate. Add a few fresh blueberries around the edge for color. A sprig of mint also adds charm. Toppings to Enhance Flavor Top your cheesecake with whipped cream for a light touch. You can also drizzle a berry sauce over it for extra flavor and elegance. Overmixing Batter Overmixing can make your cheesecake too fluffy. Mix just until smooth. This keeps the texture dense and creamy. Using Cold Ingredients Using cold ingredients can cause lumps. Always let cream cheese and eggs sit out before you start. This helps them blend well into the batter. {{image_2}} You can switch up the fruit in your cheesecake. Try using raspberries or strawberries for a fresh twist. These fruits have their own unique flavors and colors. You can also make a chocolate swirl version. Just melt some dark chocolate and fold it into the cream cheese mix. This adds richness and depth to your cheesecake. If you need a gluten-free option, use gluten-free graham crackers for the crust. This way, everyone can enjoy your cheesecake! For vegan options, replace cream cheese with a plant-based cream cheese. Use silken tofu blended with a bit of lemon juice for a creamy texture. These swaps let you enjoy cheesecake without dairy. Making mini cheesecakes is easy and fun! Use a muffin tin lined with paper cups. Fill each cup with the cheesecake batter. This way, you have perfect little servings. You can also use different pan sizes. A 9-inch springform pan is great, but an 8-inch pan or even a square dish works well, too. Just adjust the baking time as needed. For more tips, check out the Full Recipe. How Long Does It Last? Blueberry swirl cheesecake lasts up to five days in the fridge. Store it in an airtight container. This keeps it fresh and tasty. Best Practices for Storing Always let the cheesecake cool completely. Once cool, cover it well with plastic wrap or foil. This prevents drying out and keeps the flavors intact. How to Freeze Cheesecake You can freeze blueberry swirl cheesecake for up to three months. First, slice it into pieces. Wrap each slice in plastic wrap. Then, place the slices in a freezer-safe bag. Thawing Tips To thaw, put the cheesecake in the fridge overnight. This keeps it moist. Avoid thawing at room temperature as it can change the texture. Tips for Serving from the Fridge Serve cheesecake straight from the fridge for the best taste. It offers a nice, cool contrast to the rich filling. How to Warm Up if Desired If you prefer warm cheesecake, place a slice in the microwave for 10 to 15 seconds. This gives a soft, creamy texture without making it too hot. Enjoy the delightful flavor! Yes, you can make this cheesecake a day in advance. It tastes even better after chilling overnight. Just cover it well in the fridge. This helps the flavors blend and makes serving easy. If you need a substitute for sour cream, use Greek yogurt. It has a similar texture and tangy flavor. You can also try cream cheese mixed with a bit of lemon juice. Both will work well in this recipe. The cheesecake is done when the edges are set. The center should still jiggle lightly. This slight jiggle means it will firm up as it cools. Keep an eye on it during the last few minutes of baking. Cracks can happen for a few reasons. Overmixing the batter can add too much air. Also, if the temperature changes too fast, cracks may form. To avoid this, leave the cheesecake in the oven with the door slightly open for an hour after baking. Serve your cheesecake with a dollop of whipped cream. Add some fresh blueberries on top for color. You can also drizzle a blueberry sauce over each slice for extra flavor. This makes the dessert even more appealing. For the full recipe, be sure to check the details above! In this post, I explored the key ingredients for blueberry swirl cheesecake. You learned how cream cheese and fresh blueberries blend to create a delicious treat. I provided step-by-step instructions to guide you through the process. There are tips to avoid common mistakes, variations for different diets, and storage tips to keep your dessert fresh. Enjoy creating your cheesecake and experimenting with flavors. Remember, practice makes perfect, so don’t hesitate to try new things!

Blueberry Swirl Cheesecake Delightful and Simple Recipe

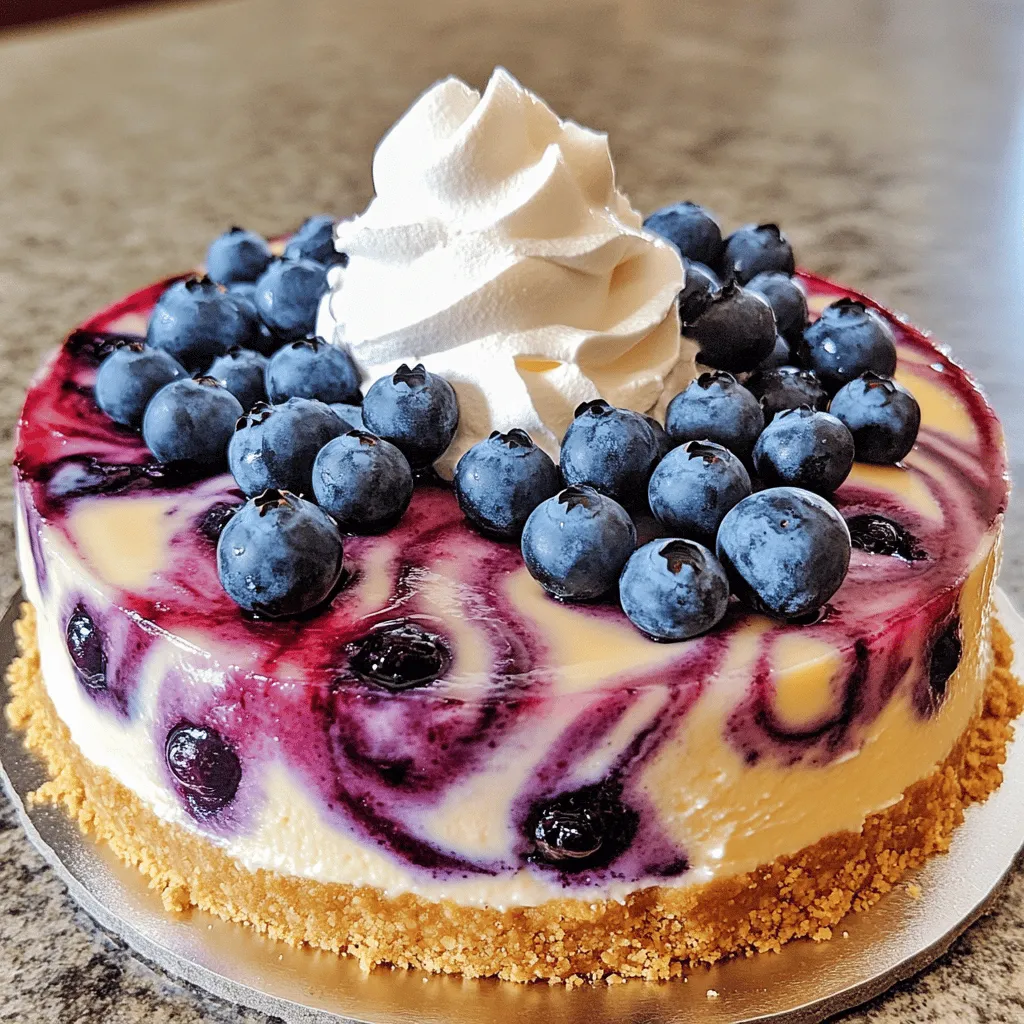
If you love dessert, you need to try my Blueberry Swirl Cheesecake. It’s creamy, tangy, and loaded with fresh blueberries.

- 8 ounces linguine or spaghetti - 1 pound large shrimp, peeled and deveined - 1 pound sea scallops, cleaned - 4 tablespoons olive oil, divided - 4 cloves garlic, minced - 1 teaspoon red pepper flakes (adjust to taste) - 1 lemon, zested and juiced - Salt and pepper to taste - 1/4 cup fresh parsley, chopped - 1/4 cup grated Parmesan cheese (optional) - Zest of 1 lemon for garnish You can use any pasta shape you like. I prefer linguine for this dish. For a lighter meal, try zucchini noodles. If you can't find sea scallops, use shrimp only. You can also adjust the amount of red pepper flakes based on your spice level. If you want a dairy-free option, skip the Parmesan cheese or use a vegan substitute. - Large pot for boiling pasta - Large skillet for cooking shrimp and scallops - Measuring cups and spoons - Tongs or a pasta fork for tossing - A zester for lemon zest Using the right tools makes cooking easier and more fun. You will find that a good skillet will help you sear scallops perfectly. If you follow the full recipe, you will create a dish that impresses everyone! Start by boiling water in a large pot. Add salt to the water for taste. Once it boils, add 8 ounces of linguine or spaghetti. Cook it until it is al dente, as per the package instructions, usually about 8-10 minutes. Drain the pasta in a colander, but save about 1/2 cup of the pasta water. Set the pasta aside while you prepare the seafood. In a large skillet, heat 2 tablespoons of olive oil over medium-high heat. While the oil warms, season 1 pound of cleaned sea scallops with salt and pepper. Once the oil is hot, add the scallops to the skillet. Sear them for about 2-3 minutes on each side. You want a nice golden brown color. After cooking, remove the scallops from the skillet and set them aside. In the same skillet, add the remaining 2 tablespoons of olive oil. Toss in 1 pound of large shrimp, peeled and deveined. Cook the shrimp for 2-3 minutes until they turn pink. Season with salt, pepper, and 1 teaspoon of red pepper flakes. Stir often to keep them from sticking. Next, add 4 cloves of minced garlic to the skillet. Cook for another 30 seconds until it smells great. Lower the heat and return the scallops to the skillet. Add the cooked pasta along with the juice and zest of 1 lemon. Toss everything together, adding the reserved pasta water as needed. This creates a light, flavorful sauce. Finally, mix in 1/4 cup of chopped fresh parsley. Taste and adjust seasoning if needed. With this, you have a delicious Lemon Garlic Shrimp & Scallop Pasta ready to serve. For the complete recipe, refer to the Full Recipe section. To sear scallops, start with dry scallops. Pat them with a paper towel. This helps them brown better. Heat your skillet on medium-high heat. Add olive oil and let it heat. Place scallops in the skillet without crowding. Sear each side for 2-3 minutes. Look for a golden brown color. This shows they are done. Remove them from the skillet once cooked. You can change the flavor of your pasta dish easily. Want it spicier? Add more red pepper flakes. If you like a citrus kick, squeeze more lemon juice. Fresh herbs like basil or thyme can add depth too. Mixing in grated cheese can make it creamy. Always taste as you go. This helps you find the perfect balance. Avoid these common mistakes for the best dish. Do not overcrowd the pan when cooking scallops. This leads to steaming instead of searing. Also, don’t skip the garlic. It adds great flavor. Overcooking shrimp makes them rubbery. Cook just until they turn pink. Finally, remember to reserve pasta water. This helps create a light sauce that binds everything together. For the full recipe, check out the Lemon Garlic Shrimp & Scallop Pasta 🦐. {{image_2}} You can use many types of pasta for this dish. While I love linguine, spaghetti works just as well. You can even try fettuccine or penne if you want a change. Each pasta brings a unique texture and flavor to the meal. Thin pasta clings to the sauce, while thicker pasta offers a hearty bite. Feel free to pick your favorite! Adding veggies boosts flavor and nutrition. Try spinach or kale for a healthy twist. These greens wilt nicely into the warm pasta. You can also add bell peppers or zucchini for added crunch. Just sauté them briefly in the pan before adding the shrimp and scallops. This will keep their color bright and taste fresh. Seasonings can change the whole dish. If you want less heat, skip the red pepper flakes. Instead, add some Italian herbs like basil or oregano. You can also use a splash of white wine for extra depth. A pinch of smoked paprika can give it a lovely warmth. Don’t hesitate to experiment until you find your perfect flavor! For the full recipe, check out the details above. Store your leftover Lemon Garlic Shrimp & Scallop Pasta in an airtight container. Let it cool first to prevent steaming. Place it in the fridge for up to three days. For best taste, enjoy it soon after cooking. To reheat, place your pasta in a skillet over medium heat. Add a splash of water or olive oil. Stir gently until heated through. You can also use a microwave. Heat in short bursts, stirring in between. Ensure it warms evenly. If you want to freeze this dish, do so without the pasta. Freeze the shrimp and scallops with sauce in a freezer-safe bag. It lasts for up to three months. When ready to eat, thaw in the fridge overnight. Cook fresh pasta before serving. For more detailed steps, check the Full Recipe. If you can't find scallops, try using shrimp. Shrimp has a similar texture and flavor. You can also use fish like cod or halibut. Cook them the same way as scallops. This keeps your dish delicious and satisfying. To make Lemon Garlic Shrimp & Scallop Pasta gluten-free, use gluten-free pasta. Many brands offer great options that taste just as good. Check the labels to ensure they fit your needs. You can also serve it over zucchini noodles for a veggie twist. Yes, you can prepare the sauce ahead of time. Cook the shrimp and scallops, then mix in the garlic and lemon juice. Store it in the fridge for up to 2 days. When ready to serve, just reheat and combine with fresh pasta. Pair this pasta with a fresh salad or steamed vegetables. A simple arugula salad with lemon vinaigrette works well. Garlic bread is also a great choice to soak up all that tasty sauce. For a lighter option, try roasted asparagus or broccoli. For the full recipe, check out the detailed instructions above. This article covered key steps for making Lemon Garlic Shrimp and Scallop Pasta. You learned about the ingredients, their measurements, and tools you'll need. Each stage, from cooking the pasta to searing seafood, is important for great flavor. I shared tips for perfect searing and common mistakes to watch out for. Explore variations to fit your taste, and don't forget about smart storage. Enjoy creating this dish, knowing you can always adapt it. Happy cooking!

Lemon Garlic Shrimp & Scallop Pasta Flavorful Delight

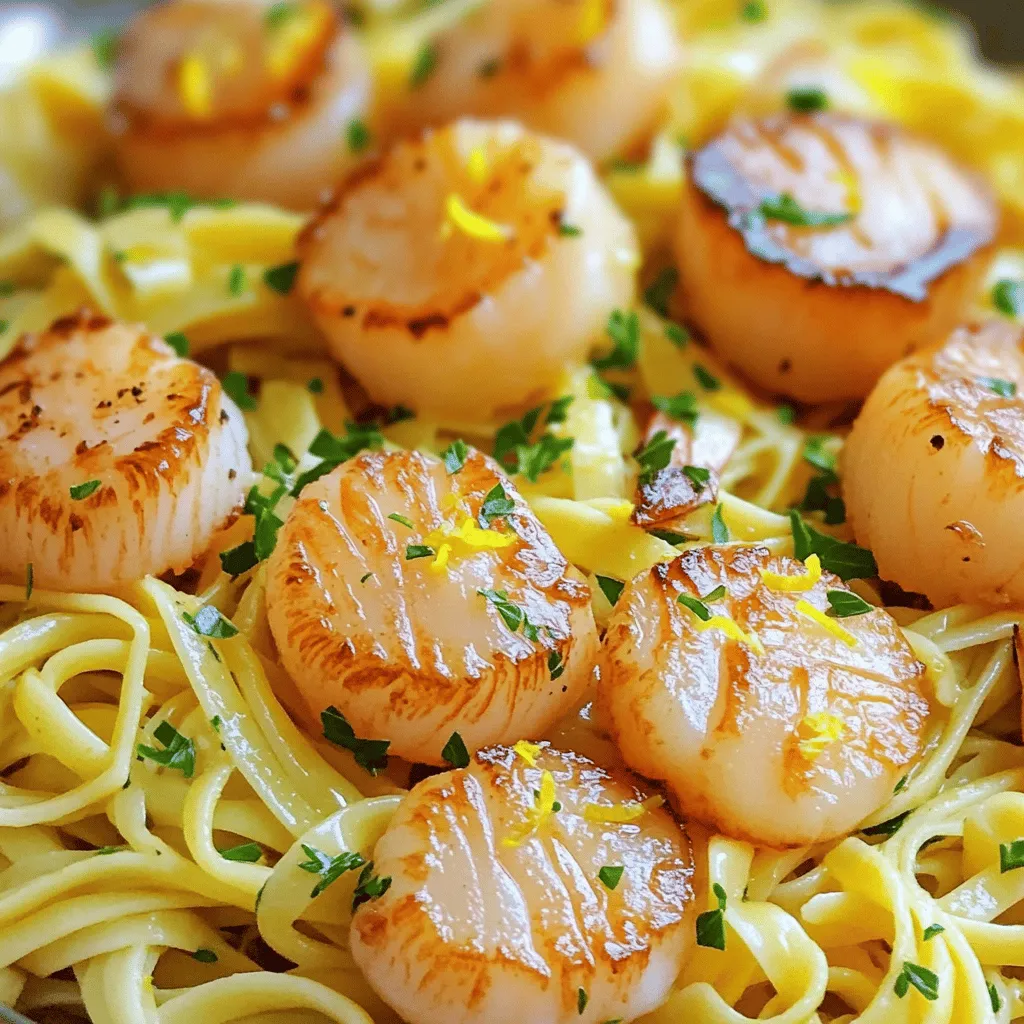
Are you ready to make a dish that bursts with flavor? My Lemon Garlic Shrimp & Scallop Pasta is the

To make this creamy delight, you need a few key ingredients: - 1 cup pearl barley - 4 cups vegetable broth - 1 medium onion, finely chopped - 2 cloves garlic, minced - 1 cup mushrooms, sliced - 1 cup spinach, chopped - 1/2 cup grated Parmesan cheese - 2 tablespoons olive oil - 1 teaspoon dried thyme - 1 teaspoon dried oregano - Salt and pepper to taste - Fresh parsley, chopped for garnish These ingredients work together to create a rich, creamy texture. Pearl barley is the star, giving this dish its unique flavor and heartiness. You can switch things up based on what you like. For a richer taste, try adding more mushrooms or use a mix of wild mushrooms. If you want a pop of color and flavor, add sun-dried tomatoes or roasted red peppers. You can also swap in different greens like kale or Swiss chard for added nutrients. If you are vegan, use nutritional yeast instead of Parmesan cheese. For a gluten-free option, try using quinoa or rice instead of pearl barley. If you have a nut or dairy allergy, check the broth and cheese for any hidden ingredients. These simple swaps help you enjoy this dish while meeting your dietary needs. For the complete recipe, check out the [Full Recipe]. To start, grab your slow cooker. Add 1 cup of pearl barley and 4 cups of vegetable broth. Next, add 1 finely chopped onion and 2 minced garlic cloves. Then, toss in 1 cup of sliced mushrooms. I love using cremini for extra flavor. Sprinkle in 1 teaspoon of dried thyme and 1 teaspoon of dried oregano. Give it all a good stir to mix. Drizzle 2 tablespoons of olive oil on top. Season with salt and pepper to taste. This adds depth to your dish. Now it’s time to cook! Cover the slow cooker and set it on low for 6-7 hours. If you’re in a hurry, you can cook it on high for 3-4 hours. You’ll know it’s done when the barley is tender and creamy. This patience really pays off. In the last 30 minutes, stir in 1 cup of chopped spinach and 1/2 cup of grated Parmesan cheese. If you want a vegan option, use nutritional yeast instead. This adds richness and helps the spinach wilt perfectly. Once cooked, taste it and adjust the seasonings as needed. Serve it hot, garnished with fresh parsley. This makes your dish look great and adds a fresh flavor. For the full recipe, check out the complete guide. To get that creamy texture in your risotto, soak the pearl barley before cooking. Soaking helps the grains absorb water better. This step makes the risotto smooth and rich. Once cooked, stir in cheese and spinach. This adds creaminess and flavor. For extra creaminess, add a splash of broth while stirring. You can boost the flavor with herbs. Fresh herbs like thyme and oregano work well. You can also try adding bay leaves during cooking for a subtle flavor. Don’t forget to taste as you go. Adjust salt and pepper to suit your taste. For a kick, add a pinch of red pepper flakes. Reheating is easy and safe if done right. Use a saucepan over low heat. Add a bit of broth or water to keep it moist. Stir often to prevent sticking. If you prefer, you can use the microwave. Just cover the dish and heat in short bursts. This way, your risotto stays creamy and delicious. For the best taste, enjoy within three days. If you want to explore the full recipe, check out the [Full Recipe]. {{image_2}} You can swap out the mushrooms for other veggies. Try zucchini, asparagus, or bell peppers. Each brings a different flavor and texture. You can mix and match as you like. Just remember, the cooking times may change. Check your veggies for doneness if you make a swap. Always add a little extra seasoning to match your new choices. For a vegan twist, skip the Parmesan cheese. Use nutritional yeast instead for a cheesy taste. This makes the dish creamy and rich without dairy. You can also add more vegetables, like carrots or peas, for extra color and nutrients. The broth should be vegetable-based to keep it plant-friendly. This way, everyone can enjoy the meal. Want to add some protein? You can use chicken or tofu. If you use chicken, add diced pieces at the start. They will cook throughout the day and stay juicy. For tofu, use firm or extra-firm tofu. Cube it and add it halfway through the cooking time. This keeps the tofu from getting too soft. Both options make the dish more filling and balanced. Check out the Full Recipe for more details on how to include these proteins. After enjoying your slow cooker pearl barley risotto, store leftovers in an airtight container. Let it cool first. You can keep it in the fridge for up to three days. Label the container with the date to track freshness. You can freeze this risotto if you want to save some for later. Place cooled risotto in a freezer-safe container. It will last for about three months in the freezer. For best results, divide it into single servings. This makes reheating easier and quicker. To reheat your risotto, you can use the microwave or stovetop. If using the microwave, heat in short bursts, stirring often. This helps keep it creamy. If using the stovetop, add a splash of broth or water. Stir it gently over low heat until warm. Enjoy your creamy delight again! For the full recipe, check out the link. Pearl barley has a polished look. It cooks faster than regular barley. Regular barley, often called hulled barley, keeps its outer layer. This gives it a chewy texture and more nutrients. Pearl barley is softer and creamier, making it great for risotto. If you want a quick cook, choose pearl barley. Yes, you can! Use a pot on the stove. Start by sautéing onions and garlic in olive oil. Then, add pearl barley and broth, stirring often. Cook on low heat for about 30 to 40 minutes. Keep an eye on the liquid level. Stir until it becomes creamy. You will know when it is done by its texture. It should be soft but still slightly chewy. Taste a few grains to check. If they are tender, it’s ready. If not, let it cook a bit longer. The key is to achieve that creamy consistency. For the full recipe, check out the Slow Cooker Pearl Barley Risotto. In this article, we explored how to make delicious slow cooker pearl barley risotto. We covered essential ingredients, cooking steps, and tips for the best texture. You learned about variations and substitutes to fit your tastes and diet. Remember, achieving creamy risotto is all about technique. Use fresh herbs for flavor and store leftovers safely. With these tips, you can enjoy risotto anytime. Try new flavors and enjoy the process!

Slow Cooker Pearl Barley Risotto Creamy Delight

If you’re looking for a creamy, comforting dish, you’re in the right place! My Slow Cooker Pearl Barley Risotto will

- 1 medium cauliflower, cut into florets - 1 cup all-purpose flour - ½ cup cornflour - 1 teaspoon ginger-garlic paste - 1 teaspoon red chili powder - ½ teaspoon turmeric powder - Salt to taste - Water as needed - Oil for frying - 1 tablespoon vegetable oil (for sauce) - 1 onion, finely chopped - 1 bell pepper (any color), finely chopped - 2-3 green chilies, slit - 3 tablespoons soy sauce - 1 tablespoon ketchup - 1 tablespoon vinegar - 1 teaspoon sugar - 2 green onions, finely chopped - 1 teaspoon sesame seeds (optional, for garnish) To make Gobi Manchurian, you need a good cauliflower. This veggie is the star of the dish. You will also need flour, cornflour, and some spices for the batter. The sauce is important too, as it brings all the flavors together. For the best experience, make sure you have fresh ingredients. Fresh cauliflower will give you a nice crunch. The spices add a kick, and the sauce ties it all together. I love using soy sauce for its deep flavor. Ketchup adds sweetness, while vinegar gives a tangy twist. When you serve Gobi Manchurian, it looks amazing with green onions and sesame seeds on top. These garnishes not only look good but add more flavor too. If you want to impress, don't skip these! For the complete cooking process, check the Full Recipe. It will guide you step by step to create this delicious dish. First, cut the medium cauliflower into small florets. Make sure all pieces are even. This helps them cook well and stay crispy. Next, let’s make the batter. In a big bowl, mix together the all-purpose flour, cornflour, ginger-garlic paste, red chili powder, turmeric powder, and salt. Slowly add water until it’s smooth. The batter should coat the florets well, not too thick or thin. Now, heat oil in a deep frying pan over medium heat. You want the oil hot, but not smoking. Dip each cauliflower floret into the batter, letting the extra batter drip off. Fry them in batches until they turn golden brown. This takes about 4-5 minutes. Once done, take them out and drain on paper towels to remove excess oil. In another pan, heat 1 tablespoon of vegetable oil over medium heat. Add the chopped onions and bell peppers. Sauté for about 3-4 minutes until they soften. Then, add the slit green chilies and cook for one more minute. Pour in the soy sauce, ketchup, vinegar, and sugar. Mix well so everything combines. It’s time to toss the fried cauliflower in the sauce. Add them to the pan and mix gently. Make sure each floret is coated with the sauce. Cook for another 2-3 minutes. This helps the flavors blend together. For the full recipe, you can check the details above. Now, enjoy your delicious Gobi Manchurian! To get that perfect crunch, let the batter rest for at least 15 minutes. This rest time helps the flour absorb moisture, creating a better coating. The frying temperature is key as well. Heat oil until it's hot but not smoking. If the oil is too cold, the cauliflower will soak up too much oil. If it's too hot, the batter may burn before cooking through. Aim for around 350°F (175°C) for the best results. One common mistake is not seasoning the batter. Add salt and spices to enhance flavor. If you skip this step, your dish may taste bland. Another mistake is overcrowding the frying pan. Fry the cauliflower in small batches. This allows them to cook evenly and stay crispy. If you put in too many at once, they will steam instead of fry. Gobi Manchurian pairs well with various side dishes. Serve it with steamed rice or fried rice for a complete meal. You can also enjoy it with naan or parathas. For sauces, a small bowl of soy sauce or chili sauce works great for dipping. You can also consider a tangy coriander chutney for added flavor. {{image_2}} For dry Gobi Manchurian, we focus on bold flavors without the sauce. - Ingredients: - 1 medium cauliflower, cut into florets - 1 cup all-purpose flour - ½ cup cornflour - 1 teaspoon ginger-garlic paste - 1 teaspoon red chili powder - ½ teaspoon turmeric powder - Salt to taste - Water as needed - Oil for frying - 1 tablespoon vegetable oil - 1 onion, finely chopped - 1 bell pepper, finely chopped - 2-3 green chilies, slit - 1 teaspoon soy sauce - 1 teaspoon vinegar - 2 green onions, finely chopped (for garnish) Preparation Steps: 1. Mix flour, cornflour, ginger-garlic paste, chili powder, turmeric, and salt in a bowl. 2. Add water to make a thick batter. 3. Coat the cauliflower florets in the batter. 4. Heat oil in a pan and fry the florets until golden brown. 5. In another pan, heat oil and sauté onions and bell peppers. 6. Add green chilies, soy sauce, and vinegar. Stir well. 7. Toss the fried cauliflower in the pan and mix until coated. 8. Garnish with green onions and serve hot. For gravy Gobi Manchurian, we add a luscious sauce to the dish. Adjustments for the Sauce: - Use the same ingredients but increase the sauce components. - Add 3 tablespoons of soy sauce, 2 tablespoons of ketchup, and 2 tablespoons of water. - After sautéing vegetables, add the sauce mix and bring it to a simmer. - Toss the fried cauliflower in the sauce until it thickens and coats them well. You can make Gobi Manchurian healthier with a few easy swaps. - Baking Instead of Frying: Instead of frying, you can bake the cauliflower. Just coat it in the batter and place it on a baking sheet. Bake at 400°F (200°C) for about 25 minutes or until golden and crispy. - Using Gluten-Free Flour Options: If you need a gluten-free dish, swap all-purpose flour with almond flour or a gluten-free blend. This keeps the flavor while making it safe for gluten-sensitive eaters. These variations keep Gobi Manchurian exciting and cater to different tastes and diets. Enjoy exploring these options! To keep Gobi Manchurian fresh, store leftovers in the fridge. First, let it cool down to room temperature. Then, place it in an airtight container. This keeps moisture in and prevents odors from mixing. Ideally, use it within 2-3 days for the best taste. When you want to enjoy your leftovers, reheating is key. The best method is to use an oven or an air fryer. Preheat your oven to 350°F (175°C). Spread the Gobi Manchurian on a baking sheet. Heat for about 10-15 minutes until crispy again. If using an air fryer, set it to 350°F and cook for 5-7 minutes. This way, you keep that delicious crunchy texture. Freezing Gobi Manchurian is simple. Start by allowing the dish to cool completely. Then, place it in a freezer-safe bag or container. Remove as much air as possible to avoid freezer burn. For best results, consume it within 1-2 months. When you’re ready to eat, take it out and thaw it in the fridge overnight. Reheat in the oven or air fryer to restore crispiness. This way, you can enjoy your savory cauliflower delight even later! For the full recipe, check the details above. You can serve Gobi Manchurian with many tasty sides. Here are some ideas: - Steamed basmati rice - Fried rice or noodles - Raita (yogurt sauce) - Pickles for added zing - A cold drink like lemonade or soda These pairings enhance the meal and balance the flavors. Yes, you can prepare Gobi Manchurian ahead of time. Here’s how: - Prep the cauliflower: Cut and soak florets in water. Drain before frying. - Make the batter: Mix flour and spices, and store in the fridge. - Fry the cauliflower: Do this just before serving for the best texture. Making it ahead saves time and keeps your kitchen clean. Yes, Gobi Manchurian is vegan. Check these ingredients: - Cauliflower, flour, and spices are all plant-based. - Use vegan-friendly sauces like soy sauce and ketchup. If you want to adjust any ingredients, ensure they are also vegan. You can control the heat easily. Here are some tips: - Milder: Reduce the red chili powder or omit green chilies. - Spicier: Add more chili powder or use spicy sauces. Taste as you go to get your desired flavor. For the complete Gobi Manchurian recipe steps, check the Full Recipe. Gobi Manchurian is a tasty dish packed with flavor. We covered key ingredients, from the cauliflower to spices. You now know how to prepare and fry it, plus how to make a rich sauce. Remember to avoid common mistakes for the best texture. Whether you choose dry or gravy styles, variations abound for your taste. Store leftovers well for later enjoyment. Enjoy making this dish and sharing it with others!

Gobi Manchurian Savory Cauliflower Delight Recipe

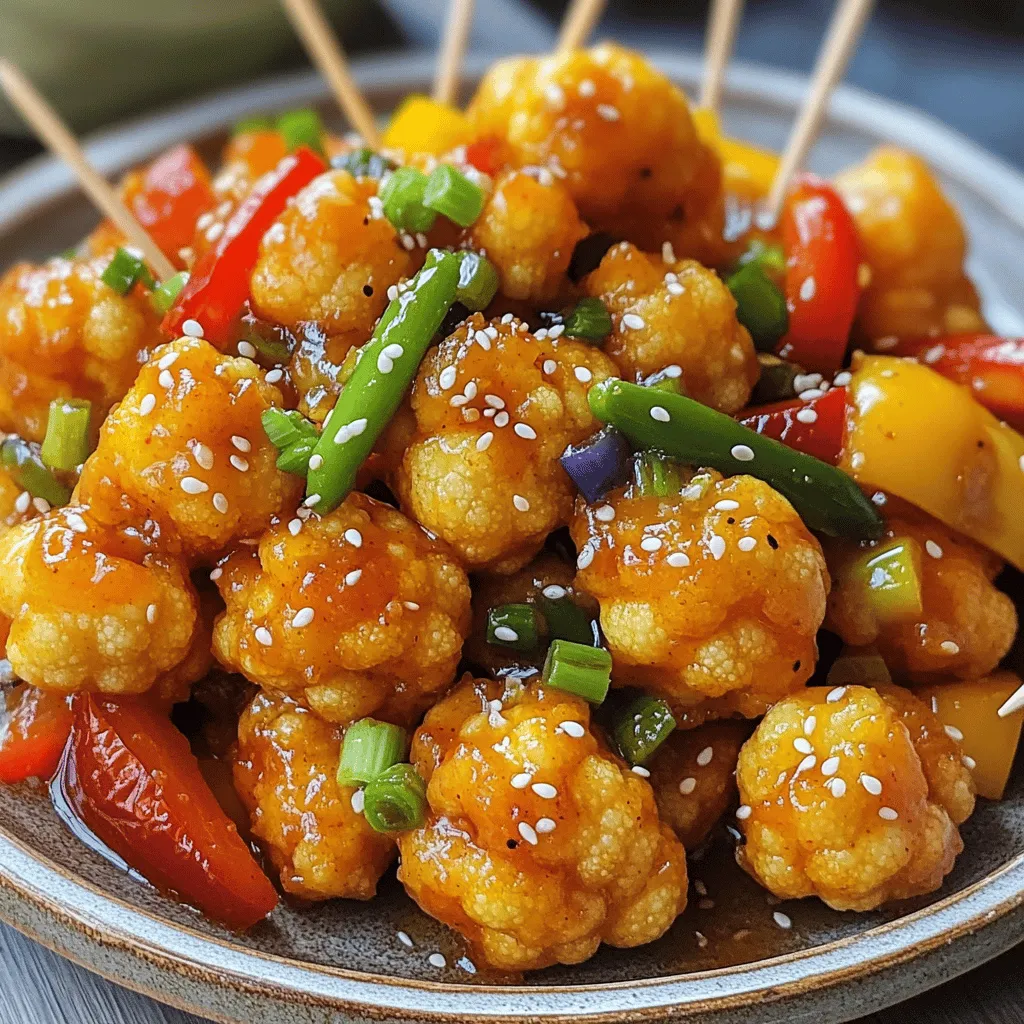
Craving a flavorful treat? Gobi Manchurian is a must-try! This savory cauliflower delight combines crispy bites with a rich sauce.

For the perfect Philly cheesesteak stromboli, gather these key items: - 1 pound pizza dough (store-bought or homemade) - 1/2 pound ribeye steak, thinly sliced - 1 medium onion, thinly sliced - 1 green bell pepper, thinly sliced - 2 cups provolone cheese, shredded - 2 tablespoons olive oil - 2 cloves garlic, minced - 1 teaspoon Worcestershire sauce - Salt and pepper to taste - 1 egg, beaten (for egg wash) - 1 tablespoon Italian seasoning (optional) When choosing your cheese, I recommend using good-quality provolone. It melts nicely and adds a rich flavor. Ribeye steak offers great taste and tenderness, making it the best choice for this dish. You can add extra flavor with these optional items: - Mushrooms, sliced - Hot peppers for a spicy kick - Different cheeses like mozzarella or cheddar for variety If you want to swap out the ribeye, consider using chicken or a plant-based meat substitute. These options still deliver a hearty filling. Have fun with it! Adjust based on what you enjoy. First, gather all your ingredients. You will need ribeye steak, onion, green bell pepper, and provolone cheese. Slice the onion and bell pepper thinly. Thin slices help them cook evenly. For the steak, use a sharp knife for thin slices. This makes the filling tender and easy to bite into. Next, roll out your pizza dough. Dust your work surface with flour. Take your dough and shape it into a rectangle, about 14x10 inches. Make sure it is even. This will help in rolling it later. Now, let’s cook the steak and vegetables. Heat one tablespoon of olive oil in a large skillet over medium-high heat. Add the thinly sliced ribeye steak. Season it with salt, pepper, and Worcestershire sauce. Stir-fry this for about 2-3 minutes. You want it browned but not fully cooked. Once done, take the steak out and set it aside. In the same skillet, add the other tablespoon of olive oil. Add the sliced onions and bell peppers, plus the minced garlic. Sauté these for 5-7 minutes. You want them soft and slightly caramelized. Now it's time to mix everything. Return the partially cooked steak to the skillet with the veggies. Mix well and cook for another 2 minutes. Remove from heat and add the shredded provolone cheese. Stir until the cheese melts and combines with the mixture. Preheat your oven to 400°F (200°C). Line a baking sheet with parchment paper. Now, get your rolled-out pizza dough. Spoon the steak and cheese mixture down the center. Leave about an inch of space on the sides. Fold the sides over the filling, then roll it up like a burrito. Pinch the ends to seal. Place the stromboli seam-side down on the baking sheet. Brush the top with the beaten egg. This gives it a nice golden color. If you like, sprinkle Italian seasoning on top. Bake the stromboli in the oven for 25-30 minutes. You want it golden brown and cooked through. To check for doneness, press lightly on the top. It should feel firm. Once baked, let it cool for a few minutes before slicing. Enjoy your delicious Philly cheesesteak stromboli! For the complete details, refer to the Full Recipe. To make your stromboli shine, focus on flavor and texture. Here are key tips: - Cook the steak right: Sear the ribeye quickly. This keeps it juicy. Season well with salt and pepper. Use Worcestershire sauce for depth. - Don’t skip the cheese: Provolone cheese melts beautifully. It gives that creamy texture we love. Mix it with the steak and veggies right after cooking. - Avoid soggy dough: Make sure your filling is not too wet. Drain any excess liquid from your veggies. This keeps the dough crisp. - Use the right dough: Store-bought pizza dough works great. You can also make your own for a personal touch. Roll it thin but not too thin. Even seasoned cooks can slip up. Watch for these common issues: - Overfilling: It’s tempting to add too much filling. This can cause the dough to break. Stick to a moderate amount for best results. - Not sealing the dough: Ensure you pinch the seams tightly. This keeps the filling from leaking out during baking. - Ignoring baking time: Keep an eye on your stromboli in the oven. It should be golden brown. If it’s too light, it may not be cooked through. - Skipping the egg wash: Brushing the top with egg gives a nice color and shine. Don’t skip this step for a beautiful finish. By following these tips, you can enhance your stromboli. For more detailed guidance, check the Full Recipe for all the steps. {{image_2}} You can easily switch ingredients in your stromboli. If you prefer chicken, use thinly sliced chicken breast instead of steak. This makes a lighter version. For a vegetarian option, try mushrooms or roasted veggies. They add a lot of flavor without meat. Cheese is key in a cheesesteak. While provolone is classic, you can use other cheeses. Cheddar adds a sharp taste. Mozzarella gives a nice stretch. Mix and match to find your favorite. Adding spices or herbs can change the flavor of your stromboli. Try crushed red pepper for heat. Fresh herbs like parsley or basil brighten the taste. You can also add garlic powder for extra depth. Seasonal variations can inspire new recipes. In spring, add fresh spinach or arugula for a pop of green. In fall, try adding sautéed mushrooms or roasted red peppers. These changes keep your stromboli exciting and fresh. For the full recipe, refer to the Perfect Philly Cheesesteak Stromboli Easy Recipe Guide. To keep your stromboli fresh, wrap it tightly in plastic wrap. You can also use aluminum foil. Store it in the fridge if you plan to eat it within three days. For longer storage, freeze it. The stromboli will stay good for up to three months in the freezer. Just make sure to label the wrap with the date. This way, you’ll remember when you made it. When you are ready to reheat, use the oven. Preheat it to 350°F (175°C). Place the stromboli on a baking sheet. Heat for about 15-20 minutes. This gives the dough a nice crisp. If you want to keep it moist, cover it with foil after 10 minutes. You can also use a microwave, but it may make the dough soggy. To avoid this, heat in short bursts and check often. Enjoy your tasty creation! What can I serve with stromboli? Stromboli pairs well with many sides. You can serve it with a fresh salad. Try a Caesar or garden salad for crunch. You could also add some crispy fries for a heartier meal. Dipping sauces like marinara or ranch enhance the flavors too. Can I make stromboli ahead of time? Yes, you can prep stromboli ahead. Assemble the stromboli and wrap it tightly. Store it in the fridge for up to a day. You can also freeze it for longer storage. Just thaw before baking and enjoy fresh! How do I know when my stromboli is done? Your stromboli is done when it turns golden brown. The filling should be hot and bubbly. A thermometer can help too. The inside should reach 165°F (74°C) for safe eating. Can I use different types of dough for stromboli? Absolutely! You can use any dough you like. Pizza dough works great, but bread dough is also tasty. If you want a lighter option, try using puff pastry for a flaky crust. What if I can’t find ribeye steak? No problem! You can use other cuts of beef, like sirloin or flank steak. If you prefer chicken, grilled chicken works well too. Just slice it thinly to keep the texture. Can I use store-bought sauce or condiments? Yes, store-bought sauces are fine to use. A creamy cheese sauce or barbecue sauce can add flavor. Just be sure to balance the flavors so they fit well in your stromboli! In this post, we explored making delicious Philly cheesesteak stromboli. We discussed key ingredients and their quality. I shared steps for preparing and cooking, along with baking tips for perfect results. You learned how to store leftovers and reheat them without losing flavor. Remember these tips to avoid common mistakes and add your personal touch with variations. Enjoy creating this tasty dish, and share it with friends and family! Your stromboli journey starts now.

Perfect Philly Cheesesteak Stromboli Easy Recipe Guide

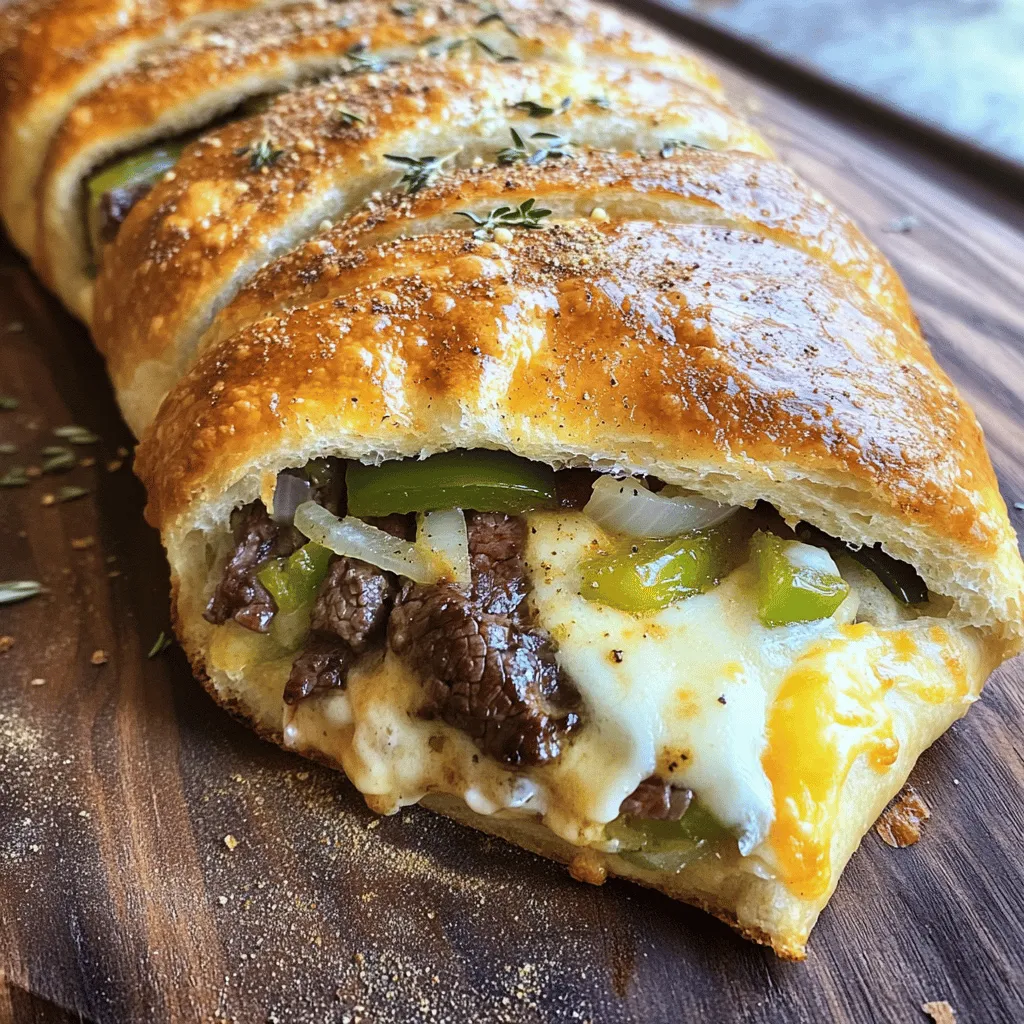
Looking for an easy way to enjoy a classic Philly cheesesteak? My Perfect Philly Cheesesteak Stromboli recipe has you covered!

- 1 pound beef steak (ribeye or sirloin), thinly sliced - 1 medium onion, thinly sliced - 1 green bell pepper, thinly sliced - 2 cups shredded provolone cheese - 1 package egg roll wrappers - 2 tablespoons olive oil - Salt and pepper to taste - 1 teaspoon garlic powder - 1 teaspoon Italian seasoning - Oil for frying (vegetable or canola) When you gather these ingredients, you set the stage for a delicious treat. The beef steak brings flavor and richness. The onion and green bell pepper add sweetness and crunch. Provolone cheese melts beautifully, binding everything together. Egg roll wrappers create a crispy, golden shell that holds the filling. Each serving of Cheesy Philly Cheesesteak Egg Rolls contains approximately: - Calories: 250 - Fat: 15g - Protein: 10g - Carbohydrates: 20g This breakdown helps you understand the nutrition in each bite. If you want to switch things up, consider these alternatives: - Instead of beef, try chicken or turkey for a lighter option. - Swap provolone for mozzarella or cheddar for a different taste. - For gluten-free needs, use gluten-free egg roll wrappers. These substitutes keep the spirit of the dish while catering to your tastes or dietary needs. Start by cooking the onions and bell peppers. Heat a large skillet over medium heat and add two tablespoons of olive oil. Once the oil is hot, toss in one medium onion and one green bell pepper, both thinly sliced. Sauté these for about 5-7 minutes. You want them to soften and become slightly caramelized. This step adds great flavor! Next, season the beef with spices. After the veggies are ready, add one pound of thinly sliced beef steak to the skillet. I like to use ribeye or sirloin for the best taste. Season with salt, pepper, one teaspoon of garlic powder, and one teaspoon of Italian seasoning. Stir everything well. Cook the beef until it turns brown, which takes about 3-4 minutes. To ensure the beef cooks evenly, keep stirring. This keeps it from sticking and burning. You want every piece to get that nice brown color. After the beef is browned, check for doneness. The beef should be tender and flavorful. If it tastes good, it’s ready for the next step. Now, let’s add the cheese! Take the skillet off the heat and stir in two cups of shredded provolone cheese. Mix well until the cheese melts and combines with the beef and veggies. Let the mixture cool down a bit before you wrap the egg rolls. To assemble the egg rolls, lay one egg roll wrapper on a clean surface, with a corner facing you. Place about 2-3 tablespoons of the beef and cheese filling in the center. Fold the bottom corner over the filling, then fold in the sides. Roll it up tightly, making sure the filling stays inside. Use a little water to seal the top corner. This helps prevent leaks. Repeat this process with the remaining wrappers and filling. It’s like a little gift wrapped in crispy goodness! Now for the best part: frying! Heat oil in a deep skillet or frying pan over medium-high heat. The oil needs to be hot enough to fry the egg rolls. Aim for about 350°F (175°C). If you drop a small piece of bread in and it bubbles, you are ready! Carefully add the egg rolls in batches, making sure not to overcrowd the pan. Fry until they are golden brown and crispy, which takes about 3-4 minutes on each side. Keep an eye on them. Use a slotted spoon to remove the egg rolls and place them on paper towels. This will help drain any excess oil. For the full recipe, follow the steps and enjoy this tasty treat! To get the crispiest egg rolls, use the right oil and temperature. Heat your oil to 350°F. This helps the egg rolls fry fast, creating a crunchy outside. If the oil is too cool, your egg rolls can turn soggy. Frying in batches is key. If you crowd the pan, the oil cools down. This means less crunch. I usually fry 3-4 egg rolls at a time. This keeps the heat steady. You can also air fry or bake your egg rolls. Air frying gives them a nice crisp without all the oil. Set your air fryer to 400°F. Bake them at 425°F for a healthier twist. Just remember, the texture may be a bit different. When frying, I recommend vegetable or canola oil. These oils have a mild flavor that won’t overpower your filling. Olive oil can be used, too, but its taste is stronger. Pair your egg rolls with tasty dipping sauces. I suggest marinara, ranch, or spicy aioli. Each adds a different kick to your bites. For side dishes, think light and fresh. A simple salad or crispy fries works well. You can also serve them with pickles for a zesty crunch. Enjoy your Cheesy Philly Cheesesteak Egg Rolls with these tasty sides! {{image_2}} You can switch up the meat in your egg rolls. Try chicken, pork, or even turkey. Each meat brings a unique taste to the dish. If you want a veggie twist, use mushrooms, zucchini, or spinach. For a vegetarian or vegan option, swap the meat for beans or tofu. Use vegan cheese to keep it plant-based. This way, you can enjoy a cheesy flavor without the dairy. Want to spice things up? Add hot sauce or Worcestershire sauce to the filling. A dash of these sauces can really kick up the flavor. You can also try mixing in different cheeses. Cheddar, Monterey Jack, or even pepper jack can add a fun twist. Each cheese melts differently and brings its own taste. Experiment with what you like best! If you are looking for something different, consider gluten-free wrappers. They are easy to find and work just as well. You can also make your own wrappers at home. If you want a lighter option, use spring roll wrappers instead. They are thinner and give a nice crunch. No matter what wrapper you choose, the filling will shine through! For the full recipe, check out the details provided earlier! To keep your Cheesy Philly Cheesesteak Egg Rolls fresh, store them in an airtight container. Place parchment paper between layers to avoid sticking. They last in the fridge for about 3 to 4 days. Make sure to cool them to room temperature first. This step prevents condensation, which can make them soggy. You can freeze egg rolls before or after frying. To freeze before frying, wrap them tightly in plastic wrap. Then, place them in a freezer bag. They can stay frozen for up to 3 months. If you freeze them after frying, let them cool first. Then, follow the same wrapping method. To reheat, bake in the oven at 375°F for 15-20 minutes, until crispy. You can also use an air fryer at 350°F for about 10 minutes. Food safety is key for storing your egg rolls. Always refrigerate leftovers within two hours of cooking. Check for signs of spoilage before eating. If they smell off or look discolored, toss them out. Trust your senses! Keeping egg rolls safe to eat helps you enjoy their bold and tasty flavor longer. Yes, you can prep these egg rolls in advance. Make the filling and wrap the egg rolls. Place them on a tray and cover with plastic wrap. Store them in the fridge for up to 24 hours. When ready to eat, simply fry them as usual. If you freeze them, they can last up to a month. Just make sure to thaw them in the fridge before frying for best results. Egg rolls taste great with many dips. Some popular options include: - Marinara sauce - Ranch dressing - Spicy aioli - Sweet chili sauce You can also make a simple soy sauce mix. Just add a splash of vinegar and a pinch of sugar. Leftovers will stay good in the fridge for about 3 days. Keep them in an airtight container to keep them fresh. When you want to eat them, reheat in an oven to keep them crispy. Egg roll wrappers can break for a few reasons: - They may be too dry. Keep them covered until you roll. - You may overfill them. Use just enough filling to close them well. - The oil may be too hot when frying. This can cause them to crack. Be gentle when wrapping and frying to avoid breaks. Yes, you can bake these egg rolls! Preheat your oven to 375°F (190°C). Place the egg rolls on a baking sheet. Brush them lightly with oil. Bake for 20-25 minutes or until golden brown. They will not be as crispy as fried ones, but they will still be tasty. You now have all the steps to make tasty Cheesy Philly Cheesesteak Egg Rolls. We covered the needed ingredients, cooking methods, and storage tips. Remember to try different fillings and cooking methods for a fun twist. Whether frying or baking, these egg rolls can fit any meal. Enjoy the process and share your results with friends. Trust me, they will love these crispy treats!

Cheesy Philly Cheesesteak Egg Rolls Bold and Tasty Treat

Are you ready for a bold bite that packs serious flavor? Let’s dive into making Cheesy Philly Cheesesteak Egg Rolls—an

Older posts
Newer posts
← Previous Page1 … Page43 Page44 Page45 … Page75 Next →

dsad

© 2025 My Saved Recipe • Built with GeneratePress

Our Policies

  • Copyright Policy
  • Cookie Policy
  • GDPR Policy
  • Privacy Policy
  • Disclaimer
  • Terms Of Use

More Information

  • Home
  • About
  • Contact
  • Appetizers
  • Dessert
  • Dinner
  • Drinks
©2025, My Saved Recipe About Back To Top