Skip to content
DisclaimerTerms Of UseGDPR PolicyCookie Policy

My Saved Recipe

  • Home
  • Drinks
  • Appetizers
  • Dinner
  • Dessert
  • About
  • Contact
  • Privacy Policy
DisclaimerTerms Of UseGDPR PolicyCookie Policy

Savannah

- 8 oz rotini pasta - 1 cup cooked crab meat (lump crab preferred) - 1/2 cup cherry tomatoes, halved - 1/2 cup cucumber, diced - 1/4 cup red onion, finely chopped - 1/4 cup bell pepper, diced (preferably red or yellow) - 1/4 cup fresh parsley, chopped For a great crab pasta salad, the main ingredients are key. I love using rotini pasta because its twists hold the dressing well. You can choose lump crab meat for the best flavor and texture. Fresh veggies like cherry tomatoes and cucumbers add crunch and color. Red onion gives a nice bite, while bell peppers add sweetness. Fresh parsley brings a burst of flavor and brightens the dish. - 1/4 cup mayonnaise - 2 tablespoons Greek yogurt - 1 tablespoon Dijon mustard - 1 tablespoon lemon juice - Salt and pepper to taste - Optional: 1/2 teaspoon Old Bay seasoning The dressing is where the magic happens. I mix mayonnaise and Greek yogurt for creaminess. Dijon mustard adds a bit of tang, while lemon juice brightens it all up. Salt and pepper round out the flavor. If you want a classic touch, add Old Bay seasoning. This will give your salad a hint of coastal charm. For the full recipe, you can check out the details above. Start by boiling a large pot of salted water. The salt adds flavor to the pasta. Once the water boils, add 8 oz of rotini pasta. Cook it for about 8-10 minutes. You want the pasta to be al dente, which means it should be firm when bitten. Drain the pasta and let it cool. This is key so it doesn’t wilt the other ingredients later. While the pasta cools, prepare the dressing. In a small bowl, whisk together the mayonnaise, Greek yogurt, Dijon mustard, and lemon juice. If you like, add 1/2 teaspoon of Old Bay seasoning for a kick. Whisk until the mix is smooth and creamy. Then, add salt and pepper to taste. This dressing gives the salad a rich and zesty flavor. In a big mixing bowl, combine the cooled pasta and 1 cup of cooked crab meat. Next, toss in 1/2 cup of halved cherry tomatoes, 1/2 cup of diced cucumber, 1/4 cup of finely chopped red onion, 1/4 cup of diced bell pepper, and 1/4 cup of chopped fresh parsley. Pour the dressing over the mix. Gently toss everything together until the pasta and crab are well coated. For the best taste, cover the bowl with plastic wrap and chill it in the fridge for at least 30 minutes. This helps all the flavors blend perfectly. For the full recipe and more details, check out the [Full Recipe]. To ensure your pasta is perfectly cooked, start with plenty of salted water. Boil the water before adding the rotini pasta. Cook it for 8-10 minutes until it is al dente. This means the pasta should be firm but not hard. Drain the pasta in a colander and rinse it under cold water. This stops the cooking process and helps cool it down. When handling crab meat, you want to be gentle. Use your fingers or a fork to flake the crab. Avoid breaking it into tiny pieces. Lump crab meat has the best texture and flavor, so try to find that if you can. Make sure there are no shells left in the meat before adding it to your salad. Presentation is key. Serve your crab pasta salad in a large glass bowl. This shows off the bright colors of the ingredients. Garnish it with extra parsley leaves and lemon wedges. This not only looks nice but adds a fresh touch. You can serve the salad chilled or at room temperature. Chilling it for at least 30 minutes helps the flavors mix well. If you prefer a warm dish, let it sit out for a bit before serving. To add more flavor, think about using spices or herbs. Fresh dill or basil works well in this dish. You can also sprinkle a bit of Old Bay seasoning for a nice kick. Just remember, less is more. You want the crab's taste to shine. Using different types of pasta can also change the dish. Try bowtie or fusilli for fun shapes. Each type can give your salad a unique look and texture. Don't be afraid to experiment! {{image_2}} You can swap the crab for other seafood. Shrimp or lobster work well. You can also use canned tuna in a pinch. For a plant-based option, try marinated artichoke hearts or tofu. Vegetables are easy to change too. Instead of cucumbers, use bell peppers or radishes. You can add peas or corn for extra color and crunch. You can choose between creamy or vinaigrette dressings. A creamy dressing works well with mayonnaise and yogurt. For a lighter taste, use olive oil and vinegar. Add fresh herbs for a flavor boost. Basil, dill, or cilantro can make your dish pop. You can also mix in spices like paprika or garlic powder for variety. To make the salad gluten-free, use gluten-free pasta. Many brands offer great options that taste just as good. If you're vegan, substitute dairy ingredients with plant-based options. Use vegan mayo and yogurt to keep it creamy. You can also add avocado for a rich texture. For storing crab pasta salad, choose airtight containers. Glass or plastic containers work well. They keep moisture in and air out. Make sure to let the salad cool before sealing it. This step prevents condensation, which can make your salad soggy. If you have leftovers, use smaller containers to keep portions fresh. You can store crab pasta salad in the fridge for up to three days. After this time, the flavors may fade, and the texture can change. Look for signs that your salad has spoiled. If it smells off or has a slimy texture, it’s time to toss it out. Always trust your senses when it comes to food safety. When serving leftovers, serve them cold for the best taste. If you prefer warm pasta salad, reheat it gently. To avoid sogginess, heat it in a pan over low heat. Stir slowly and add a splash of olive oil if it seems dry. This method keeps the pasta from clumping. Enjoy a delicious crab pasta salad with every bite! For the full recipe, check out the [Full Recipe]. You can make crab pasta salad up to a day ahead. Just follow these steps: - Cook the pasta and let it cool. - Prepare the dressing separately. - Mix everything except the dressing. - Store the salad in the fridge. - Add the dressing right before serving. This helps keep it fresh and tasty. Freezing crab pasta salad is not the best idea. Crab and veggies lose texture when frozen. If you must freeze it, follow these steps: - Use an airtight container. - Freeze it for no more than a month. - Thaw in the fridge overnight before eating. Be aware that the texture may change. Crab pasta salad pairs well with many sides. Here are some ideas: - Garlic bread for a crunchy bite. - A light green salad for freshness. - Fruit salad for a sweet touch. - Grilled shrimp for extra protein. These sides enhance your meal and create a balanced plate. To avoid sogginess, follow these tips: - Use al dente pasta, as it holds up better. - Make sure to cool the pasta before mixing. - Add dressing just before serving. - Store in an airtight container to keep moisture out. By following these steps, you'll have a fresh and crunchy salad every time. In this blog post, we explored how to make a tasty crab pasta salad. We covered the ingredients, step-by-step instructions, tips and tricks, and variations. You learned how to cook the pasta just right and whip up a delicious dressing. The salad can be customized with different flavors and swapped ingredients. Proper storage tips ensure it stays fresh, and we answered common questions. Enjoy making this dish that can impress anyone at your table! Keep it fun and fresh, and share it with friends!

Crab Pasta Salad Delicious and Easy Summer Dish

Summer is here, and it’s the perfect time to whip up a Crab Pasta Salad! This dish is not only

- 12 oz frozen pierogi (potato and cheese filling) - 8 oz turkey sausage, sliced - 1 medium onion, finely chopped - 2 cloves garlic, minced - 1 cup heavy cream - 1 cup vegetable broth - 1 tablespoon mustard (Dijon or yellow) - 1 teaspoon smoked paprika - Salt and pepper to taste - 2 tablespoons olive oil - 1 cup fresh spinach - Chopped fresh parsley for garnish To make this creamy pierogi and turkey sausage skillet, you start with the right ingredients. Frozen pierogi are easy to find and save time. Turkey sausage offers lean protein and great flavor. Fresh onions and garlic give a nice base to the dish. Heavy cream helps create that rich sauce you want. Vegetable broth adds depth without overpowering the taste. Mustard and smoked paprika give a nice kick. You can also adjust the salt and pepper to match your taste. Olive oil is perfect for cooking the sausage and sautéing the onions. Fresh spinach adds color and nutrients. Finally, chopped parsley makes a nice garnish. These ingredients work together to deliver a comforting, satisfying meal. - Calories per serving: Approximately 450 - Macronutrient breakdown: - Fats: 25g - Proteins: 20g - Carbs: 35g Understanding the nutrition helps you enjoy this dish guilt-free. Each serving is about 450 calories, making it filling yet balanced. The fats mostly come from cream and sausage, providing richness. The protein from turkey sausage supports muscle health. Carbohydrates from pierogi give you energy for the day. This meal is not only tasty, but it also offers good nutrition for you and your family. For the full recipe, check out the details in the main article. Cooking the turkey sausage Start by heating 2 tablespoons of olive oil in a large skillet over medium heat. Add the sliced turkey sausage to the skillet. Cook the sausage for about 5-7 minutes. Look for a nice brown color and ensure it is cooked through. This adds great flavor to your dish. Once done, take it out of the skillet and set it aside. Sautéing the onion and garlic In the same skillet, add 1 medium onion that you chopped finely. Sauté the onion for 4-5 minutes until it turns translucent. This step builds a sweet, rich base. Then, add 2 cloves of minced garlic and stir for 1 minute. You want the garlic to become fragrant but not burnt. Combining sauce ingredients Now it’s time to make the sauce. Pour in 1 cup of heavy cream and 1 cup of vegetable broth into the skillet. Stir everything together and bring it to a gentle simmer. This mix creates a creamy and rich sauce for your pierogi. Adding frozen pierogi Next, stir in 1 tablespoon of mustard, 1 teaspoon of smoked paprika, and season with salt and pepper. Allow the sauce to thicken for about 3-4 minutes. When the sauce is ready, add 12 oz of frozen pierogi to the skillet. Make sure they are submerged in the sauce. Cook them for 8-10 minutes, stirring occasionally. You want them heated through and the sauce creamy. Incorporating turkey sausage and spinach Once the pierogi are ready, add the cooked turkey sausage back into the skillet. Toss in 1 cup of fresh spinach as well. Stir gently until the spinach wilts and everything is well mixed in the sauce. This adds color and nutrition to your dish. Adjusting seasonings Finally, taste your dish and adjust the seasonings. Add more salt or pepper if needed. This last step helps you get the perfect flavor. Serve hot and enjoy your creamy pierogi and turkey sausage skillet delight! For the full recipe, check out the details above. - Best practices for cooking turkey sausage: Start by heating olive oil in your skillet. Add the turkey sausage slices and cook them for 5-7 minutes. Look for a nice brown crust. This adds flavor and texture. Make sure to turn the sausage pieces for even cooking. Always check if they are cooked through. Use a meat thermometer if needed; the internal temperature should be 165°F. - Ensuring pierogi are heated correctly: When you add frozen pierogi to the sauce, gently stir them to coat. Cook them for about 8-10 minutes. You want them heated through and soft. Make sure to stir occasionally to prevent sticking. The sauce should become creamy and coat the pierogi nicely. - Presentation tips for appealing plating: Use bowls to serve the dish. Start by placing a generous amount of pierogi and sausage in each bowl. Drizzle with extra cream sauce for a glossy finish. Top with chopped fresh parsley for a pop of color. A sprinkle of smoked paprika can add visual appeal as well. - Suggested side dishes and beverages: Pair this dish with a simple green salad for a fresh crunch. Roasted vegetables also work well to balance the creaminess. For drinks, consider a light white wine, like a Pinot Grigio, or a refreshing sparkling water with lemon. These choices complement the flavors without overpowering them. {{image_2}} You can switch up the turkey sausage if you want. Try chicken, pork, or even vegetarian sausages. Each will bring a different taste. Each option works well with the creamy sauce. Pierogi also come in many fillings. You can use ones stuffed with mushrooms, sauerkraut, or even sweet cheese. Each filling adds its own twist to the dish. Adding spices can boost the flavor of your skillet. Try a pinch of red pepper flakes for heat. You can also use herbs like dill or thyme for a fresh kick. For toppings, think outside the box. Grate some cheese on top for creaminess. Crispy onions also add a nice crunch. They give a tasty contrast to the creamy pierogi. You can find the Full Recipe to explore these variations further and get the best out of your creamy pierogi and turkey sausage skillet. You can store leftovers of the creamy pierogi and turkey sausage skillet in an airtight container. Make sure to cool the dish before sealing it. It will last for about 3-4 days in the fridge. For freezing, let it cool completely. Then, use a freezer-safe container or a heavy-duty freezer bag. This dish can last up to three months in the freezer. When you're ready to eat it, just thaw it in the fridge overnight. To reheat your dish, you can use the microwave or a skillet. If using the microwave, place your serving in a bowl and heat for 1-2 minutes. Stir halfway through to ensure even heating. If you choose a skillet, add a splash of broth or cream to help keep it moist. Heat over low to medium heat, stirring often. You may need to add a bit more seasoning when reheating, especially if the flavors have dulled. Enjoy your creamy pierogi and turkey sausage skillet whenever you like! Can I use fresh pierogi instead of frozen? Yes, you can use fresh pierogi. Fresh pierogi may cook faster. Just reduce cooking time by a few minutes. Check for doneness before serving. How do I make this dish spicier? To add spice, use crushed red pepper flakes. Stir in a teaspoon or more, depending on your heat preference. You can also add diced jalapeños for an extra kick. What can I substitute for heavy cream? If you want a lighter option, use half-and-half. You can also use coconut milk for a dairy-free choice. This will change the flavor slightly but still yield a creamy texture. How long does it take to cook sausage? Cook turkey sausage for about 5-7 minutes. Ensure it is browned and cooked through. Always check that it reaches an internal temperature of 165°F for safety. Can I meal prep this dish? Yes, you can meal prep it. Cook the dish and store it in the fridge for up to three days. Reheat it in a skillet for best results. Add a splash of broth to keep it creamy. For longer storage, freeze the dish for up to three months. This blog post shows how to make a tasty dish with pierogi and turkey sausage. I shared the key ingredients and easy steps to cook. You learned tips for the best results and how to store leftovers. Don't forget, you can switch ingredients for more fun flavors. Whether you're a new cook or a pro, this recipe is perfect for everyone. Enjoy your cooking and the great taste!

Creamy Pierogi and Turkey Sausage Skillet Delight

If you’re looking for a quick, tasty meal that feels like a hug in a bowl, this Creamy Pierogi and

To make this sweet treat, you need the following main ingredients: - 4 cups watermelon rind, peeled and cut into 1-inch pieces - 2 cups granulated sugar - 1 cup water - 1 teaspoon vanilla extract - 1/2 teaspoon cinnamon - 1/4 teaspoon ginger (optional) - 1/4 teaspoon salt These simple ingredients combine to create a delightful flavor. The watermelon rind is often discarded, but it adds a unique twist when candied. You can enhance the taste with these optional ingredients: - 1/4 teaspoon ginger - Powdered sugar for dusting Adding ginger gives a nice kick. Dusting with powdered sugar makes it look lovely and adds extra sweetness. Gather these tools for an easy cooking process: - Sharp knife - Large saucepan - Slotted spoon - Wire rack These tools help you prepare the watermelon rind and make the candy. The sharp knife is key for cutting, while the wire rack helps the rind dry properly. To follow the complete process, check the Full Recipe. First, choose a ripe watermelon. You want one that feels heavy for its size. Slice off the green skin with a sharp knife. Make sure to leave the white inner rind. Cut the rind into 1-inch pieces. Discard any red flesh left on the rind. This step sets you up for the candy process. Next, bring 4 cups of water to a boil in a large saucepan. Add the watermelon rind pieces carefully. Let them boil for about 10 minutes. This softens the rind and makes it easier to candy. After boiling, drain the pieces and set them aside. In the same saucepan, mix 1 cup of water with 2 cups of granulated sugar. Heat it over medium heat. Stir until the sugar dissolves completely. This syrup creates the sweet base for your candy. Now, add the boiled watermelon rind to the syrup. Lower the heat to low. Let it simmer gently for about 45 minutes to 1 hour. Stir occasionally. You want the rind to become translucent and the syrup to thicken. Watch for that beautiful shine! After simmering, remove the saucepan from heat. Let the rind cool in the syrup for one hour. This step helps the flavors absorb better. Once cooled, use a slotted spoon to take out the candied pieces. Place them on a wire rack. Let them dry for several hours or overnight. If you want, dust them with powdered sugar for extra sweetness. With these steps, you turn simple watermelon rind into a delightful treat. For a complete guide, check out the Full Recipe. To make great candied watermelon rind, start by picking the right watermelon. Look for one that feels heavy for its size. The skin should be smooth and firm. Check for a yellow spot on the rind. This spot shows where the watermelon rested on the ground. A creamy yellow spot means it is ripe and sweet. Many people make mistakes when preparing watermelon rind. One common error is not removing all the red flesh. This can make the rind too sweet and messy. Another mistake is boiling the rind for too long. You want it tender, but not mushy. Keep a close eye on it while boiling. Also, don’t rush the cooling process. Letting it cool in the syrup helps the flavors blend well. To get that perfect texture, follow these steps. First, peel the green skin carefully. Then, cut the rind into even pieces. This will help them cook evenly. When boiling, don’t skip the simmering in syrup stage. It’s key for making the rind soft and sweet. After simmering, let the pieces dry on a wire rack. This step makes them chewy and delicious. For a fun twist, dust them lightly with powdered sugar before serving. For the full recipe, check the full recipe section. Enjoy your sweet treat! {{image_2}} You can change the taste of your candied watermelon rind by adding spices. Try adding cardamom for a warm flavor. You can also use nutmeg for a sweet and spicy kick. A pinch of cayenne pepper can add a fun heat. Each spice gives a new twist to this classic treat. Watermelon rind is just the start. You can candy other rinds too! Try using cantaloupe or pumpkin rinds. Each one has its own taste and texture. Experiment with different fruits to find your favorite. This way, you can enjoy a variety of sweet treats. When serving your candied watermelon rind, think outside the box. You can mix it into trail mix for a sweet touch. It also works well as a topping for ice cream or yogurt. Use it as a garnish on cakes for a pop of color. You can even serve it with cheese for a sweet and savory combo. The options are endless with this delightful treat! For the full recipe, check out the details above. To keep your candied watermelon rind fresh, store it in an airtight container. Make sure it is completely cool before sealing. This helps retain its sweet flavor and chewy texture. When stored correctly, candied watermelon rind lasts about 2 weeks at room temperature. You can extend its life by placing it in the fridge. However, the texture may change slightly. Always check for any signs of spoilage, like off smells or mold. You can also freeze candied watermelon rind for later use. It keeps well for up to 6 months in the freezer. To freeze, spread the pieces on a baking sheet and freeze until solid. Then, transfer them to a freezer-safe bag or container. This way, you can enjoy your sweet treat anytime! For the full recipe, check out the earlier sections. The best way to prepare watermelon rind is to first pick a ripe watermelon. Use a sharp knife to cut off the green skin. Then, slice the remaining white rind into 1-inch pieces. Make sure to remove any red flesh. This gives you clean, ready-to-candy pieces. I do not recommend using overripe watermelon. The rind may be too soft and mushy. For the best results, choose a firm, fresh watermelon. This ensures your candied rind has the right texture and holds up when cooked. You can use candied watermelon rind in many ways. Chop it up and mix it into fruit salads or yogurt. It also makes a great topping for cakes and cupcakes. You can even use it as a fun garnish for ice cream or pudding. Candied watermelon rind is not the healthiest treat. It contains lots of sugar due to the candying process. However, it does have some fiber and nutrients from the rind itself. Enjoy it as an occasional sweet treat rather than a daily snack. Yes, you can make this recipe vegan! The ingredients in candied watermelon rind are already plant-based. Just make sure your sugar is vegan-friendly. Some sugars are processed with bone char, so look for organic or raw sugar to keep it vegan. For the full recipe, check out the recipe details provided earlier. You can now enjoy candied watermelon rind at home. We covered the main steps, from selecting the right ingredients to storing your treat. Use spices for fun new flavors. Avoid common mistakes for the best texture. Remember to store it well for lasting enjoyment. Candied watermelon rind is tasty and reduces food waste. Dive in and have fun creating this simple yet delicious treat. Your kitchen will love this sweet addition!

Candied Watermelon Rind Delightful and Sweet Treat

Are you ready to transform a humble watermelon rind into a sweet, crunchy delight? Candied watermelon rind is not just

Here’s what you need to make this tasty apple coffee cake. Gather these simple items for a delightful treat. - 2 cups all-purpose flour - 1 ½ teaspoons baking powder - ½ teaspoon baking soda - 1 teaspoon ground cinnamon - ½ teaspoon salt - ½ cup unsalted butter, softened - 1 cup granulated sugar - 2 large eggs - 1 teaspoon vanilla extract - 1 cup buttermilk - 2 medium apples, peeled, cored, and diced - 8 ounces cream cheese, softened - ¼ cup powdered sugar - 1 teaspoon vanilla extract (for filling) - ½ cup chopped nuts (optional) - Additional cinnamon sugar for dusting Using fresh apples like Granny Smith or Honeycrisp makes a big difference. They add a nice tartness. The cream cheese filling gives this cake its unique twist. It creates a smooth, creamy layer that pairs perfectly with the apples. For the best results, measure your ingredients accurately. This ensures your cake rises perfectly and bakes evenly. When mixing, be sure to not overmix the batter. Overmixing can make the cake tough. You can find the full recipe for this apple coffee cake with cream cheese filling below. Enjoy baking! 1. Preheat the oven & grease the pan: Start by setting your oven to 350°F (175°C). Next, grease a 9x13-inch baking pan or line it with parchment paper. This helps the cake come out easily. 2. Mix dry ingredients: In a mixing bowl, whisk together the following dry ingredients: - 2 cups all-purpose flour - 1 ½ teaspoons baking powder - ½ teaspoon baking soda - 1 teaspoon ground cinnamon - ½ teaspoon salt Set this mixture aside for later. 3. Cream the butter and sugar: In a large bowl, use an electric mixer to beat: - ½ cup unsalted butter, softened - 1 cup granulated sugar Mix until the mixture is light and creamy. This should take about 3-4 minutes. 4. Add eggs and vanilla: Now, add 2 large eggs one at a time. Mix well after each egg. Then, stir in 1 teaspoon of vanilla extract. 5. Mix wet and dry ingredients: Alternately add the prepared dry ingredients and 1 cup of buttermilk to the butter mixture. Start and end with the flour mix. Mix until just combined. 6. Fold in diced apples: Gently fold in 2 medium apples, peeled, cored, and diced. This adds great flavor and texture to your cake. 7. Prepare cream cheese filling: In a separate bowl, mix: - 8 ounces cream cheese, softened - ¼ cup powdered sugar - 1 teaspoon vanilla extract (for the filling) Blend until smooth and creamy. 8. Layer the batter and filling: Pour half of the batter into the prepared pan. Spread it evenly. Spoon the cream cheese filling over the batter, leaving some space around the edges. Top with the remaining batter and smooth it out gently. 9. Add topping and bake: If you want, sprinkle ½ cup chopped nuts and some cinnamon sugar on top. Bake in the oven for about 40-45 minutes. You know it’s done when a toothpick comes out clean. 10. Cooling instructions: Let the cake cool in the pan for 15 minutes. After that, transfer it to a wire rack to cool completely. Serve warm or at room temperature. Enjoy your delicious apple coffee cake with cream cheese filling! For the complete recipe, check out the [Full Recipe]. - To get the perfect texture, follow the recipe closely. Use room temperature ingredients. This helps the batter mix well. - For even baking, rotate your pan halfway through. Ovens can have hot spots. Check the cake with a toothpick. It should come out clean. - Serve the cake warm or at room temperature. It tastes great either way. - Pair it with coffee or tea. The flavors of the cake mix well with these drinks. - Dust the top with powdered sugar before serving. This adds a nice touch. - For a rustic look, serve slices on a wooden board. It makes your table feel warm and inviting. This cake is not just a treat; it's a delight to share with friends and family. For the full recipe, check out the link above. Enjoy your baking! {{image_2}} You can switch up the apples in this recipe. Try using pears for a sweet twist. Berries like blueberries or raspberries also work well. You can mix and match fruits based on the season. In fall, use apples and pears together. In summer, fresh berries can bring a nice touch to the cake. If you need a gluten-free option, use a gluten-free flour blend. This will help keep the cake light and fluffy. For a dairy-free version, swap the buttermilk with almond milk or coconut milk. You can also use dairy-free cream cheese for the filling. These changes let everyone enjoy this tasty treat. Adding spices can really enhance the flavors. Nutmeg and cloves pair well with apples. Just a dash of each can elevate your cake. You can also play with toppings. Try adding a crumble made of oats and brown sugar. This adds texture and a crunchy layer. Don't be afraid to experiment and find your favorite combination. To store your apple coffee cake at room temperature, wrap it in plastic wrap. This keeps it moist and fresh. You can also place it in an airtight container. If your kitchen is warm, you should refrigerate the cake. Refrigerating helps it last longer and prevents spoilage. For long-term storage, freezing is a great option. Wrap slices in plastic wrap and then in foil. This keeps the cake safe from freezer burn. You can store it in the freezer for up to three months. When you are ready to enjoy it, thaw the cake in the fridge overnight. To rewarm, place slices in a microwave for about 15-20 seconds. You can also heat it in a toaster oven at a low setting. This cake stays fresh for about three days at room temperature. If you store it in the fridge, it lasts about a week. Always check for signs of spoilage. Look for mold or an off smell. If the cake feels dry or hard, it’s time to toss it. Enjoy your delicious apple coffee cake with cream cheese filling while it’s fresh! For the full recipe, check the link above. Can I use different types of apples? Yes, you can use any apple you like. I love Granny Smith for tartness. Honeycrisp adds sweetness and crunch. Mix different apples for added flavor. How can I make this cake in advance? You can prepare the batter and filling a day ahead. Store them in the fridge in airtight containers. Bake the cake when you're ready. What can I substitute for buttermilk? If you don't have buttermilk, mix one cup of milk with one tablespoon of vinegar or lemon juice. Let it sit for five minutes before using. Is it possible to make this recipe without eggs? Yes! You can use applesauce or a flaxseed mixture as an egg substitute. Use 1/4 cup applesauce for each egg. For flaxseed, mix one tablespoon of flaxseed meal with three tablespoons of water. Can I make the cream cheese filling ahead of time? Absolutely! You can make the cream cheese filling a day in advance. Store it in the fridge until you're ready to use it. What's the best way to cut and serve the cake? Use a sharp knife to cut the cake into squares. Clean the knife between cuts for neat slices. Serve warm with a dusting of powdered sugar or cinnamon sugar on top. For the complete recipe, check out the [Full Recipe]. You can find the full recipe for the delicious Apple Coffee Cake with Cream Cheese Filling [here](#). This cake is a blend of sweet apples and rich cream cheese. Here are the key ingredients and steps to help you get started: - 2 cups all-purpose flour - 1 ½ teaspoons baking powder - ½ teaspoon baking soda - 1 teaspoon ground cinnamon - ½ teaspoon salt - ½ cup unsalted butter, softened - 1 cup granulated sugar - 2 large eggs - 1 teaspoon vanilla extract - 1 cup buttermilk - 2 medium apples, peeled, cored, and diced - 8 ounces cream cheese, softened - ¼ cup powdered sugar - 1 teaspoon vanilla extract (for filling) - ½ cup chopped nuts (optional) - Additional cinnamon sugar for dusting 1. Preheat your oven to 350°F (175°C). 2. Grease a 9x13-inch baking pan. 3. Mix dry ingredients in a bowl. 4. Cream butter and sugar until light and fluffy. 5. Add eggs and vanilla, mixing well. 6. Combine wet and dry ingredients with buttermilk. 7. Fold in diced apples. 8. Mix cream cheese with powdered sugar and vanilla for the filling. 9. Layer batter and filling in the pan. 10. Top with nuts and cinnamon sugar if you wish. 11. Bake for 40-45 minutes until golden brown. This recipe is simple yet rewarding. Your kitchen will smell amazing, and everyone will love the warm, spiced flavors. Enjoy your baking! This blog post walks you through making a tasty apple coffee cake. You learned about the key ingredients, easy steps, and helpful tips. Baking can be simple and fun with this recipe. Remember to try different fruits or flavors for variety. You can also adjust the cake for dietary needs. Store it properly to keep it fresh longer. Enjoy your delicious coffee cake with a warm drink. Happy baking!

Delicious Apple Coffee Cake with Cream Cheese Filling

Are you ready to whip up a treat that impresses? This Delicious Apple Coffee Cake with Cream Cheese Filling is

To make a tasty Parmesan Chicken Pasta Bake, you'll need: - 2 cups rotini or penne pasta - 2 cups cooked chicken, shredded - 1 cup marinara sauce - 1 cup ricotta cheese - 1 ½ cups mozzarella cheese, shredded - ¾ cup Parmesan cheese, grated - 1 teaspoon garlic powder - 1 teaspoon Italian seasoning - Salt and pepper to taste - Fresh basil for garnish (optional) These ingredients work together to create a creamy, cheesy dish that your family will love. The pasta serves as a great base, while the chicken adds protein and flavor. You can make this dish your own by adding: - Spinach or kale for extra veggies - Bell peppers or mushrooms for more flavor - Different cheeses like gouda or cheddar - A splash of heavy cream for creamier sauce Feel free to swap out or add any of these ingredients. They can enhance the taste and nutrition of your meal. Each serving of the Parmesan Chicken Pasta Bake has about: - Calories: 450 - Protein: 30g - Carbohydrates: 40g - Fat: 20g This dish packs a punch of nutrients while still being comforting and satisfying. Enjoy it as a hearty family meal that balances taste and health nicely. For the complete cooking details, check out the Full Recipe. To start, gather all your ingredients. You need: - 2 cups rotini or penne pasta - 2 cups cooked chicken, shredded - 1 cup marinara sauce - 1 cup ricotta cheese - 1 ½ cups mozzarella cheese, shredded - ¾ cup Parmesan cheese, grated - 1 teaspoon garlic powder - 1 teaspoon Italian seasoning - Salt and pepper to taste - Fresh basil for garnish (optional) First, preheat your oven to 375°F (190°C). This step helps cook your dish evenly. Next, boil water in a pot. Add the pasta and cook it until it is al dente. This usually takes around 8-10 minutes. Drain the pasta and set it aside. In a large bowl, combine the shredded chicken, marinara sauce, ricotta cheese, garlic powder, Italian seasoning, and half of the mozzarella cheese. Mix everything well. This mix gives a rich flavor to your dish. Then, add the cooked pasta. Stir until the pasta is coated in that tasty mixture. Don’t forget to season with salt and pepper to taste. Next, transfer the pasta mix into a greased 9x13 inch baking dish. Make sure it spreads evenly. Finally, sprinkle the remaining mozzarella and Parmesan cheese on top. This will create a lovely, cheesy crust. Now, it’s time to bake. Place the dish in the oven and bake for 25-30 minutes. Keep an eye on it. You want the cheese to become bubbly and golden brown. To check if it’s done, look for that golden color on the cheese. If it looks perfect, take it out. After baking, let it sit for 5 minutes before serving. This helps everything set up nicely. When serving, try to plate it in a way that shows off the melted cheese. A sprinkle of fresh basil can add a nice touch and color. You can pair this dish with a crisp green salad or some garlic bread. These sides balance the meal and add freshness. Enjoy your tasty family dinner! To make this dish shine, avoid some common mistakes. First, do not overcook the pasta. Cook it just until al dente. This keeps it firm during baking. Second, be careful with the spices. Too much garlic or Italian seasoning can overpower the dish. Taste as you mix! You can customize flavors easily. Want it spicy? Add crushed red pepper flakes to the sauce. For a fresh twist, mix in some lemon zest. You can also swap marinara sauce for a creamy alfredo. This gives a new flavor profile. Preparing ingredients ahead saves time. Cook and shred the chicken a day before. You can also cook the pasta and store it in the fridge. Just toss it with a bit of oil to prevent sticking. For freezing, assemble the dish in a freezer-safe container. Cover it tightly before freezing. You can bake it directly from frozen. Just increase the baking time to about 40-45 minutes. You can switch up proteins easily. Use turkey or beef instead of chicken. For a lighter option, try shrimp. If you prefer cheese, use feta or goat cheese instead of ricotta. For vegetarian options, add more veggies like spinach or bell peppers. You can use lentils for protein. This way, you keep all the flavors without meat. {{image_2}} To keep leftovers fresh, let the dish cool first. Place it in an airtight container. Glass or plastic containers work great. If you have a lot, use smaller containers. This helps with portion control and quick access. To reheat without losing texture, use an oven. Preheat it to 350°F (175°C). Place the pasta bake in a safe dish and cover it with foil. Bake for about 20 minutes. This keeps the cheese nice and melty. You can also use a microwave, but the oven is best for crispiness. In the fridge, this dish lasts about 3 to 4 days. If you freeze it, it can last up to 3 months. Just make sure to wrap it well to avoid freezer burn. When you're ready, thaw it in the fridge overnight before reheating. What can I substitute for chicken in Parmesan Chicken Pasta Bake? You can use turkey, tofu, or chickpeas. These options provide great flavor. They also add protein to your dish. How do I make this recipe gluten-free? Use gluten-free pasta in the recipe. Many types are available in stores. Also, ensure your sauces and cheeses are gluten-free. Can I prepare this dish ahead of time? Yes! You can mix the ingredients and store them in the fridge. Bake it when you're ready to eat. Can I use different types of pasta for this recipe? Absolutely! You can try farfalle, fusilli, or even whole wheat pasta. Just cook it al dente for the best texture. How do I know when the dish is done baking? Look for bubbly cheese and a golden top. A knife should slide in easily. This means your dish is ready. What is the best way to shred chicken? Using two forks works well. You can also use a stand mixer on low speed. This saves time and gives you perfect shreds. How to prevent the cheese from burning while baking? Cover the dish with foil for the first 15 minutes. This keeps the cheese from burning. Remove the foil later for a golden finish. This dish takes about 15 minutes to prep and 30 minutes to bake. You can serve six people with this tasty meal. It is perfect for family dinners or a cozy night in. To get the full details, you can check out the Full Recipe. I encourage you to try making Parmesan Chicken Pasta Bake. It is simple and fun to cook! You will love how cheesy and satisfying it tastes. Enjoy your cooking adventure! In this blog, we covered the tasty Parmesan Chicken Pasta Bake. We discussed essential and optional ingredients, along with their measurements. I shared nutritional info and detailed step-by-step instructions for preparation and cooking. You learned useful tips for perfecting the dish and meal prep suggestions to make it easier. Finally, I provided storage and reheating details. Now, it's time to make this flavorful meal for yourself. Enjoy cooking and sharing this dish with your loved ones!

Parmesan Chicken Pasta Bake Tasty Family Dinner

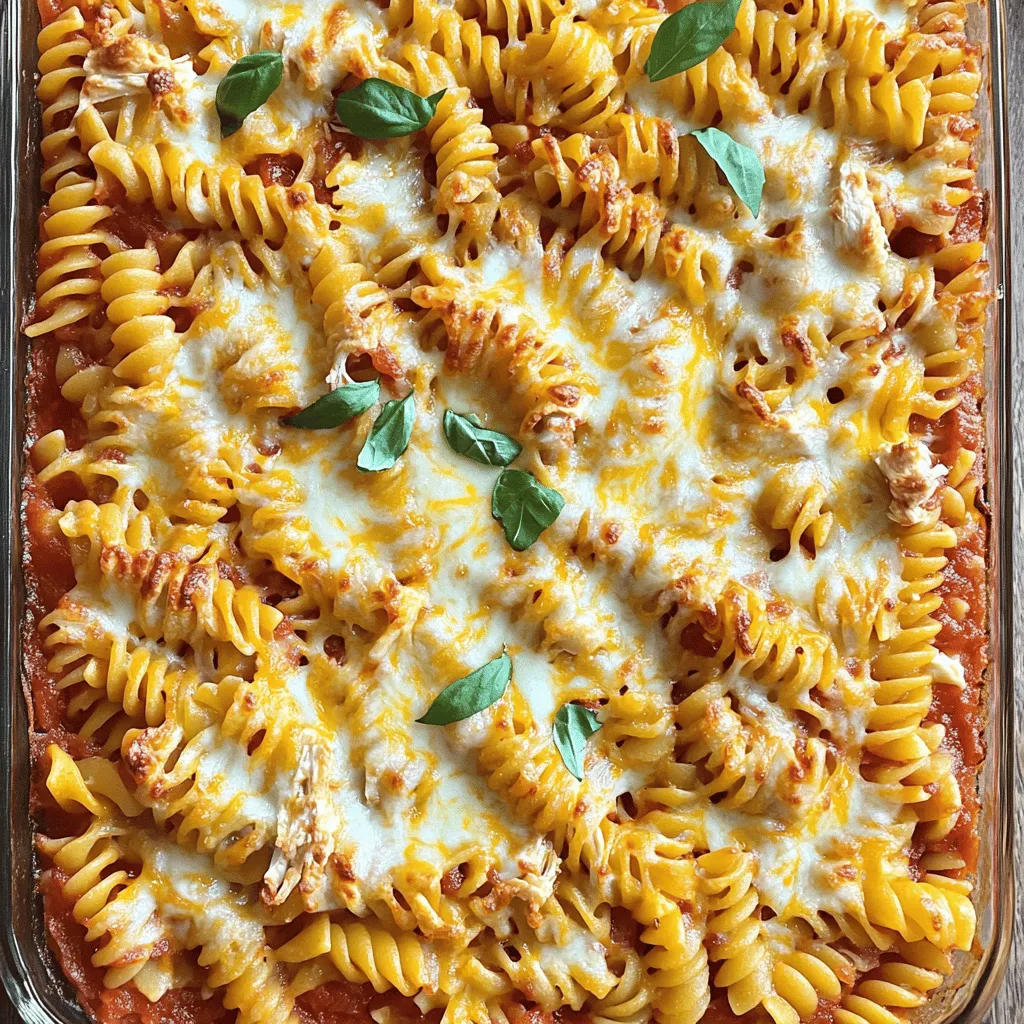
Are you looking for a quick, tasty dinner that the whole family will love? This Parmesan Chicken Pasta Bake is

To make Hawaiian rice pudding, gather these simple ingredients: - 1 cup jasmine rice, rinsed - 2 cups coconut milk - 1 cup whole milk - ½ cup sugar - 1 teaspoon vanilla extract - 1 teaspoon ground cinnamon - ½ teaspoon salt - 1 cup crushed pineapple, drained - ½ cup shredded coconut (unsweetened) - Fresh mango slices and mint for garnish These ingredients create a sweet and creamy dessert that brings a taste of Hawaii to your kitchen. You can easily swap some ingredients if you need to. Here are some ideas: - Rice: Use Arborio or sushi rice for a creamier texture. - Coconut milk: Almond or soy milk works if you want a lighter flavor. - Sugar: Try honey or maple syrup for a natural sweetener. - Pineapple: Fresh fruit or mango puree can replace crushed pineapple. - Shredded coconut: Use sweetened coconut if you prefer a sweeter touch. Feel free to mix and match based on what you have at home! Each serving of Hawaiian rice pudding is not just tasty but also has some good nutrition. Here’s a rough breakdown: - Calories: 320 - Protein: 4g - Fat: 14g - Carbohydrates: 44g - Fiber: 2g - Sugars: 20g This dessert is rich in flavor and can be a fun treat. Enjoy the creamy goodness while knowing what you’re eating! To make Hawaiian rice pudding, follow these simple steps. First, gather your ingredients. You will need jasmine rice, coconut milk, whole milk, sugar, vanilla extract, ground cinnamon, salt, crushed pineapple, and shredded coconut. 1. In a medium saucepan, combine the rinsed jasmine rice, coconut milk, whole milk, sugar, vanilla extract, ground cinnamon, and salt. 2. Place the saucepan over medium heat. Bring the mixture to a gentle boil, stirring occasionally. 3. Once it boils, reduce the heat to low. Cover the saucepan and let it simmer for about 20-25 minutes. Stir now and then to prevent sticking. The rice should be tender, and the pudding will thicken. 4. After cooking, remove the saucepan from heat. Stir in the crushed pineapple and shredded coconut until everything is well mixed. 5. Let the pudding cool for about 10 minutes. It will thicken a bit more as it cools. 6. Serve your pudding warm or chilled. Top with fresh mango slices and a mint sprig for extra color and taste. You will need a few items to make this dish. Here is what you should gather: - Medium saucepan - Wooden spoon or spatula for stirring - Measuring cups and spoons - Serving bowls or dishes Here is the time you need for each step: - Prep Time: 10 minutes to gather and measure your ingredients. - Cooking Time: 25 minutes to cook the rice pudding. - Cooling Time: 10 minutes before serving. Overall, you will spend about 35 minutes making this delightful dish. For the full recipe, refer to the earlier section. To make the best Hawaiian rice pudding, start with high-quality jasmine rice. Rinsing the rice removes extra starch and keeps your pudding creamy. Here are some helpful tips: - Use fresh coconut milk for a rich flavor. - Stir gently to avoid breaking the rice grains. - Keep an eye on the heat. Too high can burn the rice. - Taste as you go to adjust sweetness to your liking. Many home cooks make a few common mistakes when making rice pudding. Here’s what to watch out for: - Don't skip rinsing the rice. It can lead to a gummy texture. - Avoid cooking on high heat. This can cause uneven cooking. - Don’t forget to stir occasionally. This prevents sticking and burning. - If your pudding is too thick, add a splash of milk to loosen it. To elevate your Hawaiian rice pudding, consider these simple enhancements: - Add a pinch of nutmeg for warmth. - Mix in a splash of rum or coconut extract for extra depth. - Top with toasted coconut for a crunchy texture. - Fresh fruits like mango or banana add a tropical twist. For more on making this delightful dish, check out the Full Recipe. {{image_2}} You can make Hawaiian rice pudding even more special by adding fruits. Pineapple brings a sweet and tangy flavor. I love using fresh mango or banana slices too. These fruits add color and nutrition to your dish. You can mix in shredded papaya or even guava for a unique twist. Feel free to experiment with your favorite tropical fruits. Each fruit gives a new taste and texture. This makes each bowl a little adventure. If you want a dairy-free version, use coconut milk only. You can replace whole milk with more coconut milk or an almond milk blend. This keeps the creamy texture while being dairy-free. You might also try oat milk for a different flavor. Always check your brands to make sure they are dairy-free. With these options, everyone can enjoy this dish. Hawaiian rice pudding can change depending on where you are. Some regions may add local flavors like macadamia nuts. Others might include taro or sweet potato. These ingredients bring in different textures and tastes. Each region has its own way of making this dish special. I find it fun to try different styles from various islands. You can mix and match to create your own version. This makes the dish truly yours. For the complete recipe, check the Full Recipe above. To keep your Hawaiian rice pudding fresh, place it in an airtight container. This helps prevent it from drying out. Make sure it cools to room temperature before sealing. Store it in the fridge for best results. When you're ready to enjoy leftovers, take out the pudding. You can reheat it on the stove or in the microwave. If using the stove, stir it gently over low heat until warm. If using the microwave, heat in short bursts, stirring in between. This helps it heat evenly. Properly stored, Hawaiian rice pudding can last about 3 to 5 days in the fridge. Always check for signs of spoilage before eating. If it has an off smell or strange texture, it’s best to throw it away. Enjoy your Tropical Paradise Hawaiian Rice Pudding! For the full recipe, check out the earlier section. Hawaiian rice pudding is a creamy dessert made with rice, coconut milk, and pineapple. It has a sweet and tropical flavor. I love how the jasmine rice gives it a nice aroma. The pudding is thick, rich, and perfect for warm days. You can serve it warm or chilled, and it always tastes great. Yes, you can use other types of rice. But jasmine rice is best for this dish. It cooks well and adds a lovely flavor. You can try Arborio rice for a creamier texture. However, avoid using long-grain rice, as it won’t give the same results. Always rinse your rice to remove extra starch. This helps achieve a better texture in your pudding. To make Hawaiian rice pudding vegan, simply replace the whole milk with more coconut milk. You can also use a plant-based milk like almond or oat milk. Make sure to check the sugar you use, as some sugars are not vegan. This way, you can enjoy the same tropical taste without any animal products. For the best flavor, stick to the original ingredients in the Full Recipe. Hawaiian rice pudding is a tasty and unique dish. We covered its key ingredients, helpful tips, and cooking steps. You can use substitutions to suit your taste or diet. Remember to store leftovers properly for later enjoyment. Don't forget to try different flavors and textures. You can make this dish your own with simple tweaks. Enjoy the sweet, creamy delight of Hawaiian rice pudding!

Hawaiian Rice Pudding Delightful and Simple Recipe

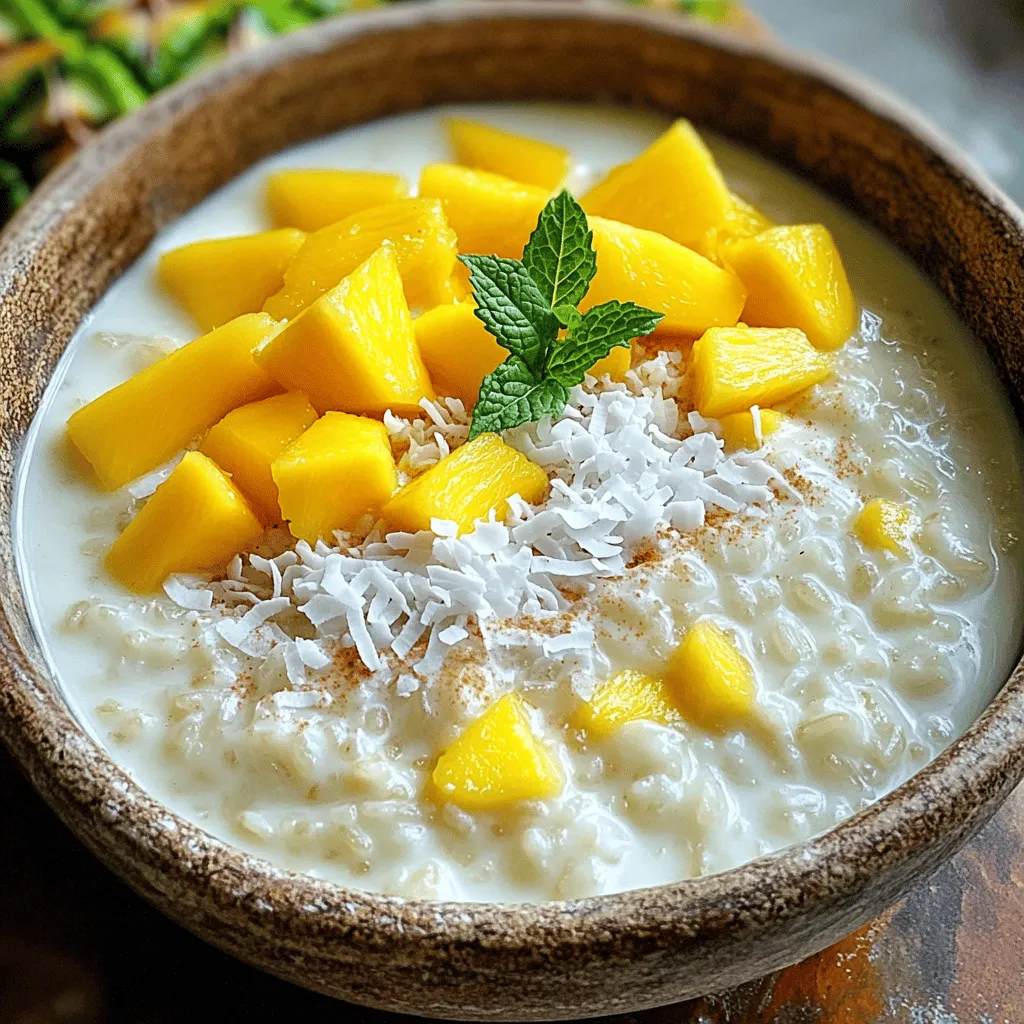
If you’re craving a sweet treat that captures the essence of Hawaii, look no further than Hawaiian rice pudding. This

For a tasty veggie stir fry, you need the following vegetables: - 1 cup broccoli florets - 1 red bell pepper, sliced - 1 cup snap peas - 1 carrot, julienned - 1 cup baby corn, halved These veggies bring color and crunch to your dish. You can mix and match based on what you like or have on hand. The sauces and oils add great flavor. Use these: - 3 tablespoons soy sauce - 1 tablespoon sesame oil - 1 tablespoon olive oil Soy sauce gives a salty kick. Sesame oil adds a nutty taste. Olive oil helps cook the veggies evenly. Seasoning is key for a great stir fry. Grab these: - 3 cloves garlic, minced - 1 tablespoon ginger, grated - Salt and pepper to taste - 1 tablespoon sesame seeds (optional) Garlic and ginger add warmth and depth. Salt and pepper enhance the flavors. Sesame seeds add a nice crunch on top. For the full recipe, check the section above. First, wash all your vegetables. Make sure they are clean. Next, chop them to your liking. I like to slice the red bell pepper and julienne the carrot. Cut the broccoli into small florets. Halve the baby corn and leave the snap peas whole. Prepare 3 cloves of garlic by mincing them. Grate 1 tablespoon of ginger. This prep takes about 10 minutes. Now, heat 1 tablespoon of olive oil in a large skillet or wok. Use medium-high heat for the best results. Add the minced garlic and grated ginger. Sauté them for about 30 seconds until they smell great. Toss in your chopped veggies: broccoli, red bell pepper, snap peas, carrot, and baby corn. Stir-fry these for 5 to 7 minutes. You want them tender but still crisp. Next, pour in 3 tablespoons of soy sauce and 1 tablespoon of sesame oil. Mix well to coat all the veggies. Cook for another 2 to 3 minutes. This helps the sauce thicken a bit and blend the flavors. Finally, season with salt and pepper to taste. If you like, sprinkle sesame seeds on top before serving. Enjoy your quick and healthy meal! For the complete recipe, check out the Full Recipe. To get that perfect stir-fry texture, start with a hot pan. Heat your skillet or wok until it feels hot. Use olive oil to help cook the veggies fast. This method gives them a nice crispness. Cut your vegetables into similar sizes for even cooking. Thin slices cook faster and stay crunchy. Keep the veggies moving in the pan. Stir them constantly to avoid burning. Each vegetable has a different cooking time. Broccoli and carrots take longer to cook. They need about 5-7 minutes in the pan. Snap peas and bell peppers cook faster, only needing 3-4 minutes. Add the harder veggies first, then the softer ones. This way, everything cooks just right. Timing is key to keeping the veggies fresh and bright. One common mistake is overcrowding the pan. If you add too many veggies at once, they steam instead of fry. Cook in batches if necessary. Another mistake is not seasoning at the right time. Add soy sauce at the end for the best flavor. Lastly, don’t forget to prep all your ingredients first. This makes the cooking process smooth and fun. For more details, check out the Full Recipe. {{image_2}} Adding protein to your veggie stir fry makes it more filling. Tofu is soft and soaks up flavors well. You can use firm or extra-firm tofu. First, press the tofu to remove excess water. Then, cut it into cubes. Tempeh is another great option. It has a nutty taste and a firm texture. Slice it thinly and sauté it with your veggies. Both options give you a boost of protein and add a great taste to your dish. You can swap in other veggies based on your taste or what you have. Here are some great choices: - Zucchini - Cauliflower - Green beans - Mushrooms - Spinach Mix and match to keep it fun and fresh. The key is to use colorful veggies. They not only look good but also add different flavors and nutrients. Changing the sauce can change everything. You can try teriyaki sauce for a sweet kick. Hoisin sauce adds a rich taste. For spice lovers, chili garlic sauce is a must-try. You can also make your own sauce. Mix soy sauce, honey, and a splash of rice vinegar. This mix adds a nice balance of sweet and tangy. No matter what you choose, experiment to find your favorite flavor. Check the Full Recipe for more ideas on how to build your perfect stir fry! To store your veggie stir fry, let it cool first. Place it in an airtight container. This keeps the flavors fresh. Store it in the fridge for up to three days. When you want to eat it, check for any off smells or changes in color. If you want to freeze your stir fry, use a freezer-safe container. Make sure to leave some space at the top. This allows for expansion as it freezes. Label the container with the date. You can freeze it for up to three months. When you're ready to eat, let it thaw in the fridge overnight. To reheat, you can use a microwave or a skillet. If using a microwave, place the stir fry in a safe bowl. Heat it for about 2-3 minutes. Stir halfway to ensure even heating. If using a skillet, heat it on medium heat for about 5 minutes. Add a splash of water or oil to keep it moist. Enjoy your quick meal again! For the full recipe, check out the Vivid Veggie Stir Fry above. To make a simple veggie stir fry, start by washing and chopping your veggies. Use broccoli, bell pepper, snap peas, and baby corn for color and crunch. Heat olive oil in a skillet over medium-high heat. Add garlic and ginger, cooking for 30 seconds. Toss in your veggies and stir-fry for about 5-7 minutes. When they feel tender but still crisp, add soy sauce and sesame oil. Cook for another 2-3 minutes. Add salt and pepper to taste. You can find the full recipe above. The best vegetables for stir fry are those that cook quickly. I recommend broccoli, bell peppers, carrots, and snap peas. You can also try mushrooms, zucchini, or bok choy. Mixing colors and textures makes your dish more fun and tasty. Remember to cut them into similar sizes for even cooking. Yes, you can make your veggie stir fry ahead of time. Cook it and let it cool down. Then, store it in an airtight container in the fridge. It will stay fresh for up to three days. To reheat, just warm it in a skillet or microwave. This makes it a great meal prep option! You now know how to make a tasty and healthy veggie stir fry. We covered the key ingredients, like fresh vegetables and sauces, for perfect flavor. You learned step-by-step instructions to prepare and cook your dish. Tips helped us avoid common mistakes and achieve the best texture. You can also explore variations, like adding proteins or using different vegetables. Try this simple recipe at home to impress your friends. Enjoy creating your own delicious stir fry!

Simple Veggie Stir Fry Quick and Healthy Meal Idea

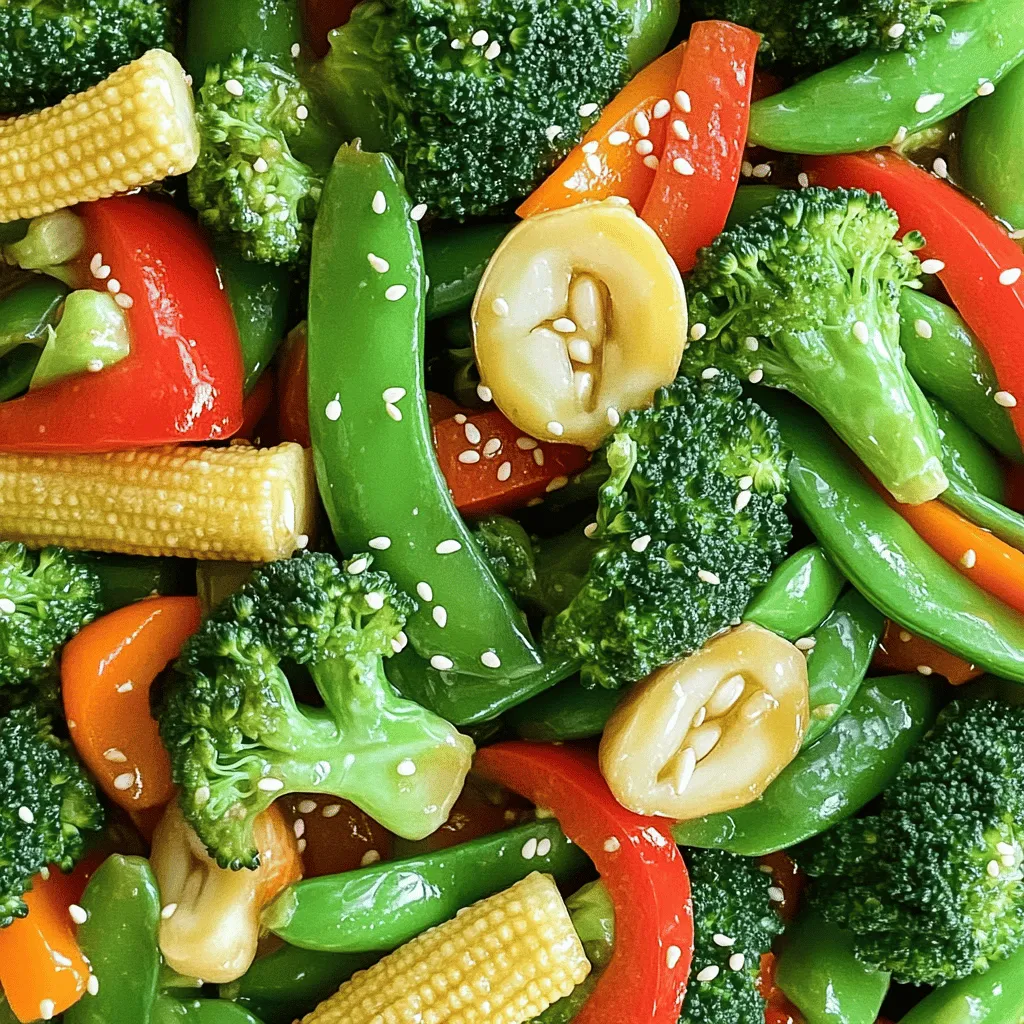
Looking for a quick and healthy meal? You’ve come to the right place! This Simple Veggie Stir Fry is not

- 2 lbs chicken wings - 1/2 cup honey - 1/4 cup soy sauce - 4 cloves garlic, minced - 1 tablespoon fresh ginger, grated - 1 teaspoon sesame oil - 1/2 teaspoon black pepper - 1/4 teaspoon red pepper flakes (optional) - 2 green onions, thinly sliced - Sesame seeds To make honey garlic chicken wings, you need a few simple ingredients. Start with fresh chicken wings. They are the star of this dish. The honey and soy sauce create a tasty glaze. You will also need garlic and ginger for a punch of flavor. Aromatics like minced garlic and grated ginger add depth. Sesame oil brings a nutty taste. Black pepper adds warmth, while red pepper flakes give a little heat. You can skip them if you prefer mild wings. For garnishing, green onions and sesame seeds add color and crunch. These simple toppings make the dish pop. Remember, the quality of your ingredients matters. Using fresh products will enhance your flavor. To explore the full recipe, check the details provided. To make the marinade, you need to mix a few simple ingredients. In a medium bowl, whisk together: - 1/2 cup honey - 1/4 cup soy sauce - 4 cloves garlic, minced - 1 tablespoon fresh ginger, grated - 1 teaspoon sesame oil - 1/2 teaspoon black pepper - 1/4 teaspoon red pepper flakes (optional for heat) This mix gives a sweet and savory flavor. Marinating time is key. Allow the wings to soak in the marinade for at least an hour. This time helps the flavors blend and makes the wings taste amazing. When marinating, use a large resealable bag or a shallow dish. Place the chicken wings inside. Pour the marinade over the wings, making sure they are well coated. Seal the bag or cover the dish tightly. Refrigerate the wings for at least one hour. For the best taste, you can marinate them overnight. This extra time allows the flavors to soak in more deeply. Before baking, preheat your oven to 400°F (200°C). This step is important for even cooking. While the oven heats, line a baking sheet with aluminum foil. This makes cleanup easy. Place a wire rack on top of the baking sheet. Arrange the marinated wings in a single layer on the rack. This position helps them cook evenly and get crispy. Now, you’re ready to bake! Cook the wings for 25 to 30 minutes. Flip them halfway through to ensure they brown nicely. For more details, check out the Full Recipe. To make your chicken wings crispy, here are some great tips. First, dry your wings with paper towels. Removing moisture helps them crisp up better. Next, use a wire rack. This lets air circulate around the wings while they bake. You can also toss them in a bit of cornstarch. This adds a nice crunch! If you want more options, try frying wings. Frying gives a super crispy texture. You can also use an air fryer for fast and crispy wings. You can change the sweetness or spice of your honey garlic chicken wings easily. If you want it sweeter, add more honey. If you like spice, add more red pepper flakes. You can also try different sauces. For a tangy twist, add some lime juice or vinegar. For a richer flavor, consider teriyaki sauce. Mixing flavors can create a dish that suits your taste. Cooking times can vary based on your oven. If you have a convection oven, your wings might cook faster. Check them at 20 minutes. If they are not golden brown, bake them a bit longer. If you are cooking in batches, keep the first batch warm in an oven set to low. This way, all your wings stay hot when serving. Adjust your timing based on how many wings you cook at once. {{image_2}} You can cook honey garlic chicken wings in different ways. Grilling adds a smoky flavor. Just marinate the wings, then place them on the grill. Grill for about 15-20 minutes, turning often. This method gives a nice char and flavor. The oven is another great choice. Preheat to 400°F (200°C). Bake the wings for 25-30 minutes, flipping halfway. This method keeps them juicy and crispy. You can also use an air fryer. It cooks wings quickly and makes them extra crispy. Set the air fryer to 375°F (190°C) and cook for 25 minutes. Shake the basket halfway for even cooking. Spices and sauces can change the taste of your wings. Try adding cayenne pepper for heat. You can also mix in some barbecue sauce for a sweet twist. Different regions have their own takes on honey garlic wings. In Asian cuisine, you might add sesame oil and scallions. In the South, a dash of hot sauce brings a unique kick. Want a healthier version of honey garlic wings? Use skinless chicken wings. This cuts down on fat. You can also swap honey for agave nectar for a lower-calorie sweetener. Serve these wings with fresh veggies or a salad. Carrot and celery sticks pair well with the sweet sauce. This adds crunch and fresh flavor to the meal. For the full recipe, check out the [Full Recipe]. To keep your honey garlic chicken wings fresh, cool them quickly. Place the wings in a shallow dish to help them cool faster. Once they are at room temperature, transfer them to an airtight container. This helps keep the wings moist and flavorful. If you have a lot of wings, you can layer them with parchment paper. This prevents them from sticking together in the container. When you want to enjoy leftovers, reheating is key. The best way to reheat wings is in the oven. Preheat your oven to 350°F (175°C). Spread the wings on a baking sheet in a single layer. Heat for about 10-15 minutes, until they are hot. This method keeps the wings crispy. If you prefer using a microwave, cover the wings with a damp paper towel. Heat in short bursts to prevent drying out. Check often to avoid sogginess. If you have extra wings, freezing is a great option. First, let the wings cool completely. Place them in a freezer-safe bag or container. Squeeze out as much air as possible before sealing. Label the bag with the date. For best taste, use them within three months. When you want to eat them, thaw in the fridge overnight. You can also reheat them straight from the freezer, but it may take longer to cook. Yes, you can make honey garlic chicken wings ahead of time. To prep them, follow these best practices: - Marinate in Advance: Marinate the wings the night before. This helps the flavors soak in well. - Refrigerate: Store the marinated wings in the fridge until you’re ready to bake. - Bake Later: You can bake them fresh when you need them, which keeps them crispy. You can serve honey garlic chicken wings with many tasty side dishes and drinks. Here are some great options: - Sides: - Celery sticks - Carrot sticks - Garlic bread - Rice or quinoa - Coleslaw - Beverages: - Beer - Lemonade - Sweet tea - A light, fruity wine These options will balance the sweet and savory flavors of the wings. To adjust the spice level in your honey garlic chicken wings, follow these tips: - Add More Heat: Include more red pepper flakes for extra spice. - Use Hot Sauce: Mix in your favorite hot sauce in the marinade for a different heat level. - Reduce Heat: If you want milder wings, skip the red pepper flakes entirely. Feel free to experiment to find your perfect balance. For the full recipe, check out the complete instructions. Honey garlic chicken wings are a simple and tasty treat. Remember to marinate the wings well for great flavor. Baking techniques can help make them crispy. Don't be afraid to play with spices and sauces to find your favorite twist. Store leftovers correctly to enjoy later and avoid waste. With these tips and ideas, you can make wings for any occasion. Enjoy experimenting with flavors and cooking methods to wow your guests!

Honey Garlic Chicken Wings Flavorful and Easy Recipe

If you’re craving a dish that’s both sweet and savory, look no further. Honey garlic chicken wings offer bold flavors

- 1 cup Arborio rice - 4 cups vegetable broth - 1 cup mushrooms, sliced (such as cremini or shiitake) - 1 small onion, finely chopped - 2 cloves garlic, minced - 1 cup spinach, chopped - 1/2 cup Parmesan cheese, grated - 3 tablespoons olive oil - 2 tablespoons butter - Salt and pepper to taste - Fresh parsley, chopped (for garnish) To make a creamy mushroom risotto, you need a few key ingredients. The main star is Arborio rice. This rice has a high starch content, which helps create that creamy texture we love. Vegetable broth adds depth to the flavor. Using homemade broth is best, but store-bought works too. Mushrooms are essential for that earthy flavor. I often choose cremini or shiitake for their rich taste. Onions and garlic add a nice base. They give the dish a warm, savory kick. Spinach adds color and nutrients, while Parmesan cheese brings in a salty, savory punch. Using olive oil and butter helps sauté the onions and garlic, adding richness. Lastly, don’t forget salt and pepper to taste. Fresh parsley not only looks good but also adds a fresh note. This combination creates a risotto that is both savory and satisfying. Follow the Full Recipe for detailed steps on how to combine these ingredients perfectly! 1. Preheat vegetable broth: Start by heating 4 cups of vegetable broth in a medium saucepan. Keep it warm on low heat. This step keeps the cooking process smooth and helps the rice cook evenly. 2. Cook onion and garlic: In a large skillet, heat 2 tablespoons of olive oil over medium heat. Add 1 small chopped onion. Cook until it turns clear, which takes about 3-4 minutes. Then, stir in 2 minced garlic cloves. Cook for an extra minute. 3. Sauté mushrooms: Now, add 1 cup of sliced mushrooms, like cremini or shiitake. Cook them for 5-7 minutes. You want them to soften and release their juices. 4. Toast rice: Add 1 cup of Arborio rice to the skillet. Stir it well to coat it in the oil. Toast the rice for about 2 minutes. This step adds flavor and helps the rice stay firm. 5. Add broth gradually: Begin adding the warm broth one ladle at a time. Stir constantly. Let the rice absorb most of the broth before adding more. This process takes about 18-20 minutes. The rice should be creamy and just tender. 1. Stir in spinach and cheese: Once the last broth is absorbed, stir in 1 cup of chopped spinach and 1/2 cup of grated Parmesan cheese. Add 2 tablespoons of butter for extra creaminess. 2. Season with salt and pepper: Taste your risotto and add salt and pepper as needed. This is the time to adjust the flavors. - Presentation tips: Serve the risotto in wide bowls for a nice look. Drizzle a bit of extra olive oil on top before serving. - Garnishing ideas: Finish with freshly chopped parsley and extra Parmesan cheese. These small touches make your dish pop visually and taste even better. For the full recipe, you can refer to the earlier sections. Enjoy your creamy mushroom risotto! To make your risotto creamy, add broth slowly. This lets the rice soak up the liquid. Stir often while adding broth. This helps release starch, which gives risotto its rich texture. Always use warm broth to keep the cooking steady. Cold broth can shock the rice and ruin the dish. Use medium heat to cook your risotto. Too high a heat can burn the rice. A wide, heavy-bottomed pan is best. It spreads heat evenly and helps the rice cook without sticking. This makes stirring easier. If you have a non-stick pan, it can make clean-up simple too. If you want to try different grains, use farro or barley. They add unique flavors and textures. For a dairy-free option, use nutritional yeast instead of cheese. It gives a cheesy taste without dairy. Coconut milk can replace butter for creaminess. These swaps can also make the dish fun and new. For the full recipe, click here. {{image_2}} You can change your risotto by adding seasonal ingredients. For spring, try adding peas or asparagus. Their fresh flavors brighten the dish. Peas add a sweet crunch, while asparagus gives a nice bite. You can also use seasonal herbs. Fresh basil or thyme can add a lovely aroma and taste. Change the flavor of your risotto with different cheeses. While Parmesan is great, try using goat cheese or Gruyère. These cheeses bring richness and depth. You can also add white wine for a touch of acidity. A splash of lemon zest boosts the flavor, making it bright and refreshing. You can turn your mushroom risotto into a hearty meal by adding protein. Cooked chicken or shrimp can make it more filling. Just sauté them before adding the rice. For a vegetarian option, consider adding chickpeas or lentils. They add protein and texture without meat. For the complete recipe, check out the Full Recipe section. To store leftover risotto, let it cool first. Place it in an airtight container. This keeps moisture in and air out. Risotto is best eaten within three days. If you wait too long, the flavor fades. I always recommend checking for any strange smells before eating. When reheating risotto, use a skillet or saucepan. Add a splash of broth or water. Heat it on low. Stir often to keep it creamy. Avoid the microwave if you can. It tends to dry out the risotto and changes the texture. Can you freeze risotto? Yes, but with caution. Risotto can lose its creamy texture when frozen. If you must freeze it, use a freezer-safe container. When thawing, do this in the fridge overnight. Reheat gently, adding some broth to restore creaminess. This way, you can still enjoy that rich flavor later. For the full recipe, check the main article. The best rice for risotto is Arborio rice. This rice has a high starch content. This starch gives risotto its creamy texture. You can also use Carnaroli or Vialone Nano rice. Both types work well for risotto too. They absorb flavors and remain firm while cooking. Making risotto vegetarian is simple. Use vegetable broth instead of chicken broth. You can also add more vegetables. Spinach, peas, or asparagus work great. If you want a richer taste, add more cheese. This way, you keep all the flavors without any meat. Yes, you can make risotto in advance. However, it’s best fresh. If you prepare it ahead, cool it quickly. Store it in an airtight container in the fridge. When ready to eat, reheat it slowly. Add a bit of broth to bring back the creaminess. Mushroom risotto pairs well with many side dishes. A simple green salad adds freshness. Grilled vegetables create a nice contrast. You can also serve it with garlic bread. For a protein boost, try roasted chicken or shrimp. Each choice enhances the dish and makes it more filling. This blog post covered how to make a delicious mushroom risotto. You learned about key ingredients, step-by-step instructions, and cooking tips. We also explored variations like adding seasonal ingredients or proteins. Remember to store leftovers properly to enjoy later. Risotto may seem tricky, but with practice, you can make it creamy every time. Enjoy your cooking journey and feel free to experiment with flavors. With these tips, you'll impress your family and friends!

Creamy Mushroom Risotto Savory and Satisfying Dish

Are you ready to dive into a bowl of pure comfort? Creamy mushroom risotto is a dish that warms the

To make spicy garlic shrimp tacos, you need fresh ingredients. Here’s what you should gather: - 1 pound (450g) shrimp, peeled and deveined - 4 cloves garlic, minced - 1 tablespoon olive oil - 8 small corn tortillas These main ingredients create a delicious base for your tacos. Fresh shrimp brings great flavor, while garlic adds a nice kick. Corn tortillas hold everything together nicely. The magic of these tacos comes from the seasonings. You'll need: - 1 teaspoon smoked paprika - 1 teaspoon cumin - 1 teaspoon chili powder - Salt and pepper to taste - 1 tablespoon lime juice Combine these spices with the shrimp and garlic. The lime juice brightens the dish. Let the shrimp marinate for 15-20 minutes. This step helps the shrimp soak up all those tasty flavors. Toppings make these tacos even better. Here are some great choices: - 1 avocado, sliced - 1 cup shredded cabbage - Fresh cilantro leaves, for garnish - Lime wedges, for serving Start by adding shredded cabbage to each tortilla. Then, place the cooked shrimp on top. Add avocado slices and garnish with fresh cilantro. Serve with lime wedges for an extra burst of flavor. For the complete cooking process, check the Full Recipe. Start with fresh shrimp. Use one pound of shrimp, peeled and deveined. This makes the shrimp easy to cook and eat. Next, chop four cloves of garlic finely. This garlic adds a bold flavor. In a mixing bowl, combine the shrimp and garlic. Add one teaspoon of smoked paprika, one teaspoon of cumin, and one teaspoon of chili powder. These spices give the shrimp a nice kick. Drizzle in one tablespoon of olive oil and one tablespoon of lime juice. This helps the spices stick to the shrimp. Sprinkle in salt and pepper to taste. Mix everything well until the shrimp is coated with the spices. Let the shrimp marinate for about 15 to 20 minutes. This time allows the shrimp to soak up all the flavors. If you can, cover the bowl with plastic wrap. This keeps the shrimp fresh while it marinates. You can use this time to prepare your toppings, like slicing the avocado or shredding the cabbage. Heat a large skillet over medium-high heat. Once hot, carefully add the marinated shrimp. Spread them out in a single layer. Cook for about 2 to 3 minutes on each side. The shrimp should turn pink and opaque when done. While the shrimp cooks, warm eight small corn tortillas in another skillet. You can also heat them over a gas flame. Warm them until they are soft and a bit toasted. To assemble the tacos, place shredded cabbage on each tortilla. Top with the cooked shrimp and add slices of avocado. Garnish with fresh cilantro leaves. A squeeze of lime juice adds even more flavor. Serve with lime wedges on the side. For the full recipe, check out the details above. When choosing shrimp, look for a few key signs. Fresh shrimp should smell like the ocean, not fishy. The shells should be shiny and firm. Avoid any shrimp with black spots. Size matters too; larger shrimp give a better bite. Always check for a slight curve in the shrimp; this means they are fresh. The marinade is the heart of these tacos. I mix garlic, smoked paprika, cumin, and chili powder for a bold flavor. The key is to let the shrimp soak for 15-20 minutes. This time helps the shrimp absorb all the spices. Use lime juice for a zesty kick and olive oil for richness. Balance the salt and pepper to bring everything together. Wrapping tacos can be an art. Warm your tortillas to make them soft and pliable. I prefer to heat them in a skillet or over a flame. Once warmed, place your filling in the center. Fold the sides over first, then roll from the bottom up. This keeps everything snug inside. Practice makes perfect, and soon you’ll wrap tacos like a pro. {{image_2}} If you want to switch things up, use fish or chicken instead of shrimp. White fish like tilapia or cod works well. You can season it the same way as the shrimp. For chicken, use boneless thighs or breasts. Cut the chicken into small pieces and follow the same cooking steps. Both options will give you tasty tacos. For a vegan twist, try plant-based shrimp substitutes. These are made from ingredients like soy or pea protein. They mimic the texture of shrimp and absorb flavors well. Season them just like you would with real shrimp. Cook them in the same way, and you’ll have delicious vegan tacos. Toppings can change the whole taco experience. Try adding mango salsa for sweetness. Pickled red onions add a tangy crunch. If you like heat, add jalapeños or hot sauce. You can also mix in different greens like spinach or arugula for extra nutrition. Experiment with toppings to find your perfect combination. Check out the Full Recipe for more ideas! You can store leftover shrimp tacos in an airtight container. Keep them in the fridge for up to two days. To keep the tortillas from getting soggy, store them separately. You want to enjoy their crunch later. When you're ready to eat the leftovers, reheat the shrimp first. Place them in a skillet over medium heat. Cook for about three minutes until they’re hot. For the tortillas, warm them in a pan or microwave for a few seconds. This will help them stay soft. If you want to freeze ingredients, it's best to freeze the shrimp alone. Place the marinated shrimp in a freezer bag and remove the air. They can stay fresh for up to three months. When you're ready to use them, thaw in the fridge overnight. Then, cook as normal. You can also freeze the shredded cabbage, but not the avocado. Avocado does not freeze well. For the full recipe, check the main article. You can add more chili powder to the shrimp mix. For extra heat, try cayenne pepper. This spice gives a nice kick. You can also use hot sauce. Just mix it into the marinade. Adjust the amount based on your taste. If you love spice, don’t hold back! Yes, you can prep many parts ahead of time. Cook the shrimp first, then cool it down. Place it in the fridge for later. You can also warm the tortillas before serving. Just don’t fill the tacos until you are ready to eat. This keeps them fresh and tasty. If you can’t find corn tortillas, try flour tortillas. They work well and are soft. You can also use lettuce wraps for a low-carb option. These add a nice crunch. Another choice is whole wheat tortillas for a healthier bite. Each option brings its own flavor and texture. You can now make tasty spicy garlic shrimp tacos with ease. We covered all you need, from choosing fresh shrimp to tasty toppings. I shared simple steps for marinating and cooking. Don't forget the tips to wrap and store your tacos. Try different variations for more flavor. This dish is fun to make and share. Enjoy your cooking and impress your friends with your skills!

Spicy Garlic Shrimp Tacos Flavorful and Easy Meal

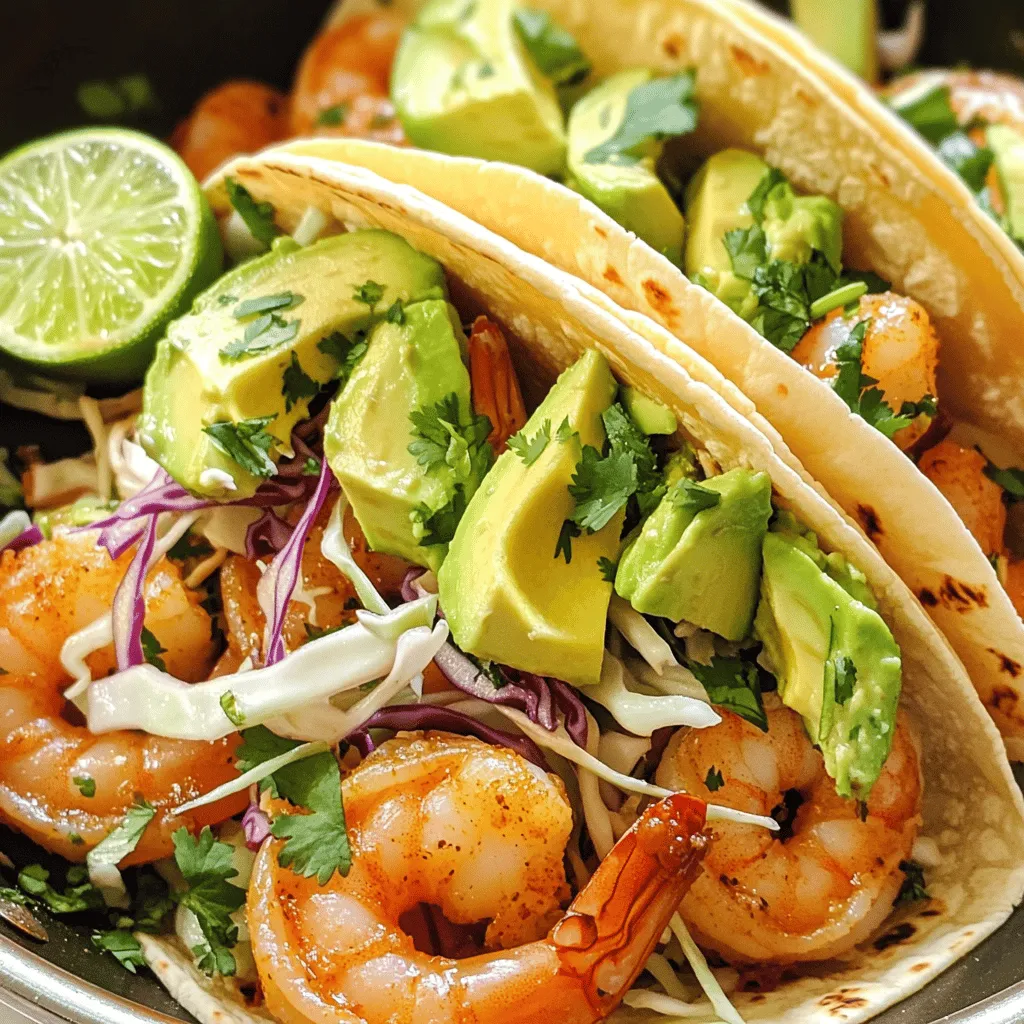
Are you ready for a tasty treat that’s quick and fun to make? Spicy Garlic Shrimp Tacos pack a punch

Older posts
Newer posts
← Previous Page1 … Page44 Page45 Page46 … Page75 Next →

dsad

© 2025 My Saved Recipe • Built with GeneratePress

Our Policies

  • Copyright Policy
  • Cookie Policy
  • GDPR Policy
  • Privacy Policy
  • Disclaimer
  • Terms Of Use

More Information

  • Home
  • About
  • Contact
  • Appetizers
  • Dessert
  • Dinner
  • Drinks
©2025, My Saved Recipe About Back To Top