Skip to content
DisclaimerTerms Of UseGDPR PolicyCookie Policy

My Saved Recipe

  • Home
  • Drinks
  • Appetizers
  • Dinner
  • Dessert
  • About
  • Contact
  • Privacy Policy
DisclaimerTerms Of UseGDPR PolicyCookie Policy

Savannah

To make a tasty crispy chickpea salad, gather these simple ingredients: - 1 can (15 oz) chickpeas, drained and rinsed - 2 tablespoons olive oil - 1 teaspoon smoked paprika - 1 teaspoon garlic powder - 1/2 teaspoon cayenne pepper (adjust to taste) - Salt and pepper to taste - 1 cup mixed greens (such as spinach and arugula) - 1/2 cucumber, diced - 1 bell pepper (any color), diced - 1/4 red onion, thinly sliced - 1/4 cup cherry tomatoes, halved - 2 tablespoons tahini - 1 tablespoon lemon juice - 1-2 tablespoons water (to thin tahini, if necessary) You can make this salad even more exciting with these optional seasonings and additions: - 1 teaspoon cumin for warmth - Fresh herbs like parsley or cilantro for freshness - Avocado slices for creaminess - Feta cheese for a salty kick - Nuts or seeds for extra crunch When serving your crispy chickpea salad, consider these tasty toppings: - A sprinkle of sesame seeds for texture - A drizzle of balsamic glaze for sweetness - Croutons for added crunch - Extra lemon wedges for a zesty finish You can find the full recipe to make this dish by following the link provided. Enjoy creating a fresh and flavorful meal! First, preheat your oven to 400°F (200°C). This step is key for crispy chickpeas. Drain and rinse one can of chickpeas. Spread them on a baking sheet in a single layer. Drizzle two tablespoons of olive oil over the chickpeas. Then sprinkle on one teaspoon of smoked paprika, one teaspoon of garlic powder, and half a teaspoon of cayenne pepper. Add salt and pepper to taste. Toss everything together so each chickpea gets coated well. Roast them in the oven for 25 to 30 minutes. Shake the pan halfway through to help them crisp evenly. While the chickpeas roast, it's time to build the salad base. Grab a large bowl. Add one cup of mixed greens like spinach and arugula. Then, dice half a cucumber and one bell pepper. Toss these into the bowl along with one-quarter of a red onion, thinly sliced. Lastly, add a quarter cup of halved cherry tomatoes. This mix gives your salad a fresh crunch and vibrant colors. Now, let’s make the tahini dressing. In a small bowl, combine two tablespoons of tahini and one tablespoon of lemon juice. Whisk them together until smooth. If it’s too thick, add one to two tablespoons of water. Adjust the amount to reach your desired consistency. Don’t forget to add a pinch of salt for flavor. This dressing brings a rich taste that pairs perfectly with the salad. Once the chickpeas are golden and crispy, take them out of the oven. Let them cool for a few minutes before adding them to the salad bowl. Drizzle the tahini dressing over the salad. Toss gently to make sure everything gets coated. Serve the salad right away for the best crunch. You can also chill it for up to 30 minutes if you prefer a cooler dish. Enjoy your crispy chickpea salad! For the full recipe, check out the details above. To get crispy chickpeas, start with a dry can. Drain and rinse them well. Pat them dry with a towel. The drier they are, the crunchier they will get. Use olive oil and seasonings to coat them. Bake in a hot oven at 400°F. Shake the pan halfway through. This helps them cook evenly. You want them golden and crunchy, so keep an eye on them. This salad pairs well with many dishes. You can serve it with grilled chicken or fish. It also goes great with a warm pita. Try adding some feta for a salty bite. You can also enjoy it as a light lunch or snack. For a fun twist, serve it in a wrap. The crispy chickpeas add great texture and flavor. You can make this salad ahead of time. Roast the chickpeas and store them in an airtight container. They stay crispy for a few days. Prepare the salad base and dressing separately. This keeps everything fresh. Combine them just before eating. This way, you have a quick meal ready to go. You can enjoy it for lunch or dinner during the week. Check out the Full Recipe for step-by-step details. {{image_2}} You can change the flavor of your crispy chickpea salad by adding other veggies. Try adding carrots for a sweet crunch, or zucchini for a fresh taste. Radishes give a nice bite, while avocado adds creaminess. Use your favorite veggies or what you have at home. Mix and match for a colorful salad! Want to make your salad more filling? Add some protein. Grilled chicken or shrimp works well. You could also try tofu for a plant-based option. Feta cheese or hard-boiled eggs can provide extra flavor. Each protein choice will add a unique twist to the dish. While the tahini dressing is great, you can explore other options too. A simple lemon vinaigrette made with olive oil and lemon juice can brighten the salad. Greek yogurt mixed with herbs gives a creamy texture. Try a balsamic reduction for sweetness. These dressings can change the whole vibe of your salad! For the full recipe, check out the crispy chickpea salad section. Store leftover salad in an airtight container. This keeps it fresh and crisp. If you have dressing left over, store it separately. This prevents the greens from wilting. Use the salad within two days for the best taste. To keep chickpeas crispy, store them in a cool, dry place. Avoid adding them to the salad until you are ready to eat. If you have leftover roasted chickpeas, place them in a paper bag. This helps them stay crunchy. Do not seal them in a plastic container, as moisture can make them soggy. The chickpeas can last up to three days in the fridge. Mixed greens stay fresh for about three to five days. Fresh veggies like cucumber and bell pepper are best within three days. The tahini dressing can last for about one week. Always check for signs of spoilage before using any ingredients. For the full recipe, check out the section above. Yes, you can use dried chickpeas. You need to soak them overnight. After soaking, cook them until soft before roasting. This process takes more time than using canned chickpeas. You can use peanut butter, sunflower seed butter, or Greek yogurt. Each option gives a different flavor. Choose one that fits your taste. This salad is already gluten-free if you use gluten-free tahini. Ensure all ingredients are gluten-free. Most veggies and chickpeas fit this need perfectly. Yes, this salad is vegan-friendly as is. Use only plant-based products for the dressing. This ensures all ingredients fit a vegan diet. Common mistakes include overcooking chickpeas or under-seasoning them. Make sure to roast chickpeas until crispy. Don’t forget to season the salad well. Always taste as you go. For the full recipe, check the full recipe section. This blog post guides you through making a tasty crispy chickpea salad. You learned about essential ingredients and optional toppings to boost flavor. I provided step-by-step instructions for perfect chickpeas and salad assembly. Tips for meal prep help you keep it fresh. We explored fun variations for extra crunch and protein. Storage info ensures your salad stays crisp. In conclusion, this salad is easy to make and customize. Enjoy creating your ideal version!

Crispy Chickpea Salad Fresh and Flavorful Dish

Looking for a fresh and tasty dish? This Crispy Chickpea Salad is perfect! I’ll show you how to turn simple

- Sweet potatoes (4 medium) - Black beans (1 can, 15 oz) - Corn kernels (1 cup) - Red bell pepper (1, diced) - Ground cumin (1 teaspoon) - Chili powder (1 teaspoon) - Smoked paprika (1/2 teaspoon) - Salt and pepper to taste - Feta cheese (1/4 cup, crumbled) - Avocado (1, diced) - Fresh cilantro (2 tablespoons, chopped) - Greek yogurt or sour cream for serving Sweet potatoes are the star of this dish. They are sweet, healthy, and filling. I use four medium sweet potatoes for this recipe. You can find them at any grocery store. They should feel firm and have no soft spots. Next, black beans bring protein and texture. One can is enough for this recipe. Rinse and drain them before using. Corn kernels add sweetness and color. Fresh or frozen works great here. I love adding diced red bell pepper for crunch. One pepper adds a nice flavor boost. For spices, ground cumin is a must. It adds warmth and earthiness. Chili powder gives it a little kick. Smoked paprika adds a nice smoky flavor. Don't forget salt and pepper to taste! Toppings can make this dish even better. Crumbled feta cheese adds creaminess. Avocado adds healthy fats and a nice touch. Chopped cilantro gives it a fresh look. You can serve Greek yogurt or sour cream on the side for creaminess. Check out the Full Recipe to get all the details on how to make this delicious dish! - Preheat your oven to 400°F (200°C). This heat makes the sweet potatoes soft and sweet. - Wash the sweet potatoes under running water. Remove any dirt. Then, poke several holes in each potato with a fork. This helps them cook evenly. Place them on a baking sheet lined with parchment paper for easy cleanup. - In a skillet, drizzle some olive oil and heat it over medium. Add the diced red bell pepper. Sauté it for 4-5 minutes until it softens. - Next, add the rinsed black beans and corn to the skillet. Mix in the ground cumin, chili powder, smoked paprika, salt, and pepper. Stir well, and cook for about 5 more minutes until everything is hot. - Once the sweet potatoes are baked, let them cool for a few minutes. Then, slice each potato lengthwise down the middle. - Use a fork to fluff the insides gently. Scoop generous portions of the filling into each sweet potato. - Top them with crumbled feta cheese, diced avocado, and fresh cilantro. Drizzle a bit more olive oil if you like. Serve with a dollop of Greek yogurt or sour cream on the side for extra creaminess. To know when sweet potatoes are done, poke them with a fork. If it goes in easily, they are ready. Bake them until they feel soft all around. For even baking, choose sweet potatoes that are similar in size. This helps them cook at the same rate. Place them on a baking sheet lined with parchment paper. This makes for easy cleanup. You can add more spices for deeper flavor. Try adding garlic powder or onion powder to the filling. A pinch of cayenne pepper can add heat if you like spice. You might also test different toppings. Try Greek yogurt, avocado, or even salsa. Each topping gives a new taste. Have a fun taste test with friends or family to find your favorite! If you want a healthier option, swap sour cream for low-fat yogurt. This gives a creamy texture with fewer calories. You can also replace feta cheese with a dairy-free option. Nutritional yeast adds a cheesy flavor without the dairy. Both swaps keep your stuffed sweet potatoes tasty and healthy. Check out the Full Recipe for more ideas! {{image_2}} For those who crave meat, you can enhance your stuffed sweet potatoes. Start by adding ground turkey or beef to the filling mix. Cook the meat in the skillet before adding the beans and corn. This adds a hearty touch. You can also sprinkle in some crispy bacon bits for extra flavor. Just cook the bacon until crispy, chop it, and mix it in. This makes each bite even more satisfying. If you prefer vegetarian meals, you have great options. Use quinoa or lentils as a protein source. Cook them separately and mix them into the filling. They add texture and flavor. You can also toss in some sautéed spinach or kale. These greens give a fresh taste and boost the nutrients in your dish. You can switch up the flavors to keep things exciting. For a Southwestern-style, add chopped jalapeños to the filling. This gives your dish a nice kick. If you want a Mediterranean twist, use olives and herbs like oregano or thyme. This adds a unique taste and aroma that pairs well with sweet potatoes. After enjoying your savory stuffed sweet potatoes, let them cool down. This will help keep them fresh. Store them in the fridge. Use airtight containers for best results. Glass or plastic containers work well. Make sure the lid seals tightly. This keeps moisture in and air out. You can reheat stuffed sweet potatoes in the microwave or the oven. The microwave is quicker. Place the sweet potato on a plate. Heat it for about 1-2 minutes. Check if it’s warm enough. If not, heat in 30-second bursts. The oven reheats slowly but keeps them crispy. Preheat your oven to 350°F (175°C). Wrap them in foil to keep the filling moist. Bake for about 15 minutes until warmed through. To freeze, first cool the stuffed sweet potatoes completely. Wrap each one in plastic wrap. Then, place them in a freezer bag. Remove as much air as possible. This prevents freezer burn. When you want to eat them, take them out of the freezer. Thaw in the fridge overnight. Reheat using the oven or microwave. Enjoy a tasty meal anytime! For the full recipe, check out the instructions above. Yes, you can use regular potatoes instead of sweet potatoes. However, sweet potatoes add a natural sweetness and rich flavor. Regular potatoes are more starchy and less sweet. This change will alter the taste and texture of your dish. I recommend sticking with sweet potatoes for the best results. Stuffed sweet potatoes can last for about 3 to 5 days in the fridge. Make sure you store them in an airtight container. This helps keep them fresh. If you see any signs of spoilage, it’s best to throw them away. Absolutely! You can make the filling a day in advance. Just store it in the fridge. When you're ready, reheat the filling before stuffing the sweet potatoes. This saves time on busy days. Keep in mind to let it cool before putting it in the fridge. Stuffed sweet potatoes pair great with many sides. Here are some ideas: - A fresh green salad - Grilled vegetables - Quinoa or rice - A light soup These sides balance the meal and add more flavor and texture. Stuffed sweet potatoes are simple and full of flavor. We covered key ingredients, step-by-step preparation, and tips to make them perfect. You can even customize the recipe to fit your taste. Whether you prefer a savory filling or a meaty variant, the options are endless. Remember to enjoy them fresh or store leftovers properly. Try these ideas to impress your family and friends. Happy cooking!

Savory Stuffed Sweet Potatoes Flavorful and Easy Meal

Looking for a fun and easy meal? Try my Savory Stuffed Sweet Potatoes! They’re packed with flavor and nutrition, making

To make delicious sheet pan fajitas, gather these key ingredients. They create the perfect blend of flavors. - 1 lb chicken breast, thinly sliced - 1 red bell pepper, sliced - 1 yellow bell pepper, sliced - 1 green bell pepper, sliced - 1 red onion, sliced - 3 tablespoons olive oil - 2 teaspoons chili powder - 1 teaspoon cumin - 1 teaspoon garlic powder - 1 teaspoon onion powder - 1 teaspoon paprika - Salt and pepper to taste - Fresh cilantro, chopped (for garnish) - Tortillas (for serving) You need chicken breast and colorful veggies to start. The bell peppers add crunch and sweetness. The red onion gives a nice flavor too. Next, we need spices and seasonings. Chili powder and cumin add a warm kick. Garlic and onion powder bring depth to the dish. Paprika adds a hint of smokiness. Finally, we have tortillas and garnish. These wrap up your fajitas and make them fun to eat. Fresh cilantro brightens the meal. You can find the full recipe with all these details to help you cook this dish perfectly. Start by preheating your oven to 425°F (220°C). This step warms the oven for even cooking. Next, grab a large bowl. In this bowl, combine the sliced chicken breast, red bell pepper, yellow bell pepper, green bell pepper, and red onion. These colorful veggies add great taste. In a small bowl, whisk together the olive oil, chili powder, cumin, garlic powder, onion powder, paprika, salt, and pepper. This spice mix boosts flavor. Pour this mix over the chicken and vegetables. Toss everything until they are well coated. This helps the spices stick. Now, spread the chicken and veggie mixture evenly on a large sheet pan. Make sure it is in a single layer. This layout allows for even cooking. Bake in the preheated oven for about 20 to 25 minutes. Stir the mixture halfway through to ensure even cooking. The chicken should be cooked through, and the veggies should be tender. Once you take the sheet pan out of the oven, let it cool for a couple of minutes. Warm tortillas are great for serving. Scoop the fajita mixture into the tortillas. You can add fresh cilantro on top for a burst of flavor. For extra fun, try adding toppings like sour cream or salsa. This makes every bite tasty! For the full recipe, check out the detailed instructions. To make the best sheet pan fajitas, pay attention to cooking times. Bake your fajitas for 20-25 minutes at 425°F (220°C). This helps the chicken cook through while keeping the veggies tender. Halfway through baking, stir the mixture. This ensures all ingredients cook evenly and get that nice caramelization. Using fresh herbs can elevate your dish. I love adding chopped cilantro after baking. It adds a burst of flavor and color. Feel free to experiment with other herbs too, like oregano or parsley. Choosing the right sheet pan is key. A large, rimmed sheet pan works best. It gives enough space for the chicken and veggies to roast without crowding. This helps them get nice and crispy. You will need some essential utensils for preparation. A sharp knife makes slicing the chicken and veggies easy. A large mixing bowl is great for tossing everything together. Lastly, a spatula or wooden spoon is perfect for spreading the mixture on the pan. For the full recipe, see the section above. {{image_2}} You can switch up the protein in your fajitas. Chicken is great, but beef or shrimp also works well. For beef, use thin slices of flank steak. Season it the same way as the chicken. Shrimp cooks quickly, so adjust your baking time. Bake them for just 10-15 minutes. If you're looking for a vegetarian or vegan option, try using portobello mushrooms or tofu. Slice them into strips and marinate them in the same spice mix. This change keeps the flavors bold and satisfying. These options let everyone enjoy this meal. You can easily change the spice level in your fajitas. If you love heat, add more chili powder or some cayenne pepper. For a milder taste, reduce the spices. This makes the dish more fun for everyone. Adding different vegetables can also change the flavor. Try zucchini, corn, or even sweet potatoes. These veggies add sweetness and texture. Mix and match to find your favorite combo. The colorful mix makes your fajitas more appealing and tasty. For the full recipe, check out the detailed instructions above. To store your fajitas, let them cool first. Place the leftovers in an airtight container. This keeps them fresh and tasty. You can also use a resealable plastic bag. Make sure to squeeze out the air. The recommended shelf life is about three to four days in the fridge. For the best taste, reheat your fajitas in the oven. Preheat the oven to 350°F (175°C). Spread the fajitas on a baking sheet and cover with foil. Heat for about 10-15 minutes. This keeps them warm and juicy. You can also use a microwave for quick reheating. Place the fajitas in a microwave-safe dish. Cover with a damp paper towel to keep them moist. Heat for one to two minutes, checking halfway through. Enjoy your meal again! How long does it take to cook Sheet Pan Fajitas? It takes about 20-25 minutes to cook Sheet Pan Fajitas. Preheat your oven to 425°F (220°C) first. Then, bake until the chicken is cooked through and the veggies are tender. Remember to stir halfway for even cooking. Can I use frozen chicken for this recipe? Using frozen chicken is not ideal for this recipe. Frozen chicken takes longer to cook and may not get the right texture. It’s best to use fresh or thawed chicken for the best results. What sides pair well with Sheet Pan Fajitas? You can serve Sheet Pan Fajitas with a variety of sides. Some great choices are: - Mexican rice - Black beans - Corn salad - Guacamole - Salsa Are Sheet Pan Fajitas healthy? Yes, Sheet Pan Fajitas can be healthy! They include lean chicken and lots of colorful veggies. You control the oil and spices, making this dish a good choice for a balanced meal. Can the recipe be doubled? Yes, you can double the recipe! Just make sure your sheet pan has enough space. If not, use two pans to ensure even cooking. More fajitas mean more flavor and fun at dinner! You learned about making tasty Sheet Pan Fajitas using simple ingredients like chicken, spices, and veggies. I shared step-by-step instructions for prep, cooking, and serving. You now know tips to perfect your dish and some fun variations if you want to mix things up. Plus, I covered how to store leftovers and answer common questions. Enjoy exploring this easy recipe. You’ll impress your family and friends with your new skills!

Sheet Pan Fajitas Simple and Flavorful Dinner

Looking for an easy and tasty dinner? You’ll love these Sheet Pan Fajitas! With tender chicken, colorful veggies, and zesty

- 1 pound large shrimp, peeled and deveined - 4 tablespoons unsalted butter - 2 tablespoons honey - 4 cloves garlic, minced - 2 tablespoons low sodium soy sauce - 1 tablespoon lemon juice - 1 teaspoon red pepper flakes (optional) - Salt and pepper to taste - Chopped fresh parsley for garnish - Calories per serving: About 250 - Macronutrient breakdown: - Carbohydrates: 10g - Fats: 16g - Proteins: 21g - Possible allergens: Shellfish, soy sauce This meal is simple, tasty, and quick to make. You can whip it up in just 15 minutes! The shrimp becomes sweet and savory from honey and soy sauce. Garlic adds a lovely aroma. Each bite is a burst of flavor. You get protein and healthy fats too. The dish is not only delicious but also easy to adjust for your taste. Use less honey if you want it less sweet. Add more red pepper flakes for extra heat. To start, you need to prep your shrimp. Rinse the shrimp under cold water. Remove the shell and the tail. Next, use a small knife to make a shallow cut along the back. This helps you see and remove the dark vein inside. Rinse the shrimp again to get rid of any debris. For measuring your ingredients, use measuring spoons for liquids like honey and soy sauce. For solid ingredients, like butter, use a kitchen scale if you have one. This helps you get the right amounts and keeps your dish balanced. First, melt the butter in a large skillet over medium heat. Wait until it starts to bubble. Then, add the minced garlic and stir it for 1-2 minutes. You want the garlic to smell good but not brown. Next, make the honey garlic sauce. Stir in the honey, soy sauce, and lemon juice. Mix it well until smooth. Now, add the shrimp to the skillet. Make sure they are all coated with the sauce. Cook the shrimp for 2-3 minutes on one side. Flip them over and cook for another 2-3 minutes. They are done when they turn pink and opaque. Season with salt, pepper, and red pepper flakes if you like heat. Honey Garlic Butter Shrimp pairs well with rice or steamed vegetables. You can also serve it with a fresh salad for a light meal. For plating, use a large, shallow bowl. Place the shrimp in the center and drizzle some sauce on top. Garnish with chopped parsley for a pop of color. This makes your dish look fancy and inviting. For the complete instructions, check out the Full Recipe. To perfect the sweetness, add more honey bit by bit. If you want more salt, use soy sauce. For a thicker sauce, let it cook longer on low heat. This allows the sauce to reduce and become rich. Stir well to mix all flavors together. Use a non-stick or cast-iron skillet for best results. These types help the shrimp cook evenly. Set your heat to medium. This ensures the butter melts but doesn't burn. A steady heat cooks shrimp just right without drying them out. Do not overcook shrimp. They can become tough and rubbery if cooked too long. Cook them until they are pink and opaque, about 4-6 minutes total. Also, always measure your sauce ingredients. Skipping this can lead to an unbalanced flavor in your dish. {{image_2}} You can swap honey for maple syrup or agave. These options work well in the sauce. If you want to try something different, use chicken or tofu instead of shrimp. Both cook nicely in the honey garlic sauce. For a zesty twist, add lime or orange juice. The citrus brightens the dish. You can also mix in ginger or sesame oil for extra depth. These spices will add layers of flavor that make each bite exciting. You can serve this dish over rice or noodles. This adds heartiness and helps soak up the sauce. If you want to include veggies, try adding bell peppers or snap peas. They add color and nutrition, making the meal even better. For the complete recipe, check out the Full Recipe. To keep your Honey Garlic Butter Shrimp fresh, store it in an airtight container. This helps lock in flavors and moisture. Place the container in the fridge within two hours of cooking. The dish stays good for up to three days. If you want to enjoy it later, make sure to label the container with the date. Reheat shrimp gently to prevent overcooking. The best method is using a skillet on low heat. Add a splash of water or broth to keep it moist. Stir occasionally until heated through. Aim for a serving temperature of 145°F for safety and taste. Yes, you can freeze Honey Garlic Butter Shrimp! Place it in a freezer-safe bag or container. Remove as much air as possible to prevent freezer burn. It can last for up to three months. When you're ready to eat, thaw it overnight in the fridge. Reheat using a skillet for the best results. Cooking shrimp takes about 4 to 6 minutes. The time depends on their size. For large shrimp, cook them for 2 to 3 minutes on each side. They turn pink and opaque when done. Overcooking makes shrimp tough, so keep an eye on them! Yes, you can prep this dish a bit early! Peel and devein the shrimp in advance. You can also mix the sauce and store it in the fridge. Just cook the shrimp and sauce together when you're ready to eat. This makes dinner quick and easy. Several sides pair well with this dish. Here are some popular options: - Steamed rice - Garlic bread - Roasted vegetables - Salad with fresh greens These sides balance the sweet and savory flavors of the shrimp. For a detailed guide, check out the [Full Recipe] for Honey Garlic Butter Shrimp. This recipe will help you create a tasty meal with ease! In this post, we explored making Honey Garlic Butter Shrimp with easy steps and tips. We covered main and additional ingredients, cooking techniques, and helpful variations. Remember, perfect shrimp should be tender, not overcooked. Feel free to swap ingredients to match your taste. Store any leftovers properly, and enjoy the meal later. Cooking shrimp can be simple and fun. I hope this guide inspires you to try this dish and impress yourself or your guests. Happy cooking!

Honey Garlic Butter Shrimp Tasty and Quick Meal

Craving a dinner that’s both tasty and quick to make? Honey Garlic Butter Shrimp is the answer! With just a

- 4 large bell peppers (any color) - 1 cup quinoa, rinsed - 2 cups vegetable broth - 1 can (15 oz) black beans, rinsed and drained - 1 cup corn kernels (fresh, frozen, or canned) - 1 small red onion, diced - 2 cloves garlic, minced - 1 teaspoon cumin - 1 teaspoon smoked paprika - 1 teaspoon chili powder - Salt and pepper to taste - 1 cup crushed tomatoes (canned or fresh) - 1 avocado, diced (for topping) - Fresh cilantro, chopped (for garnish) These ingredients make a vibrant and tasty meal. The bell peppers serve as a colorful shell. Quinoa adds protein and texture. Black beans give fiber and richness. Corn brings sweetness, while spices add warmth. The crushed tomatoes bind the filling together and add moisture. Fresh toppings like avocado and cilantro elevate the dish. This meal is packed with nutrients. Quinoa is a complete protein. Black beans are full of fiber, which keeps you full. Bell peppers are high in vitamins A and C. Corn adds antioxidants. Overall, this dish supports a balanced diet. You can whip up this meal in only 50 minutes. The prep time is 15 minutes, and cooking takes 35 minutes. This makes it a quick choice for dinner. You can enjoy a healthy, homemade meal without spending all evening in the kitchen. For the full recipe, check out the Vibrant Vegan Stuffed Bell Peppers. Start by preheating your oven to 375°F (190°C). Cut the tops off the bell peppers and remove the seeds. This step is key! You want the peppers to hold the filling well. Place them cut-side up in a baking dish, ready for stuffing. In a medium saucepan, bring 2 cups of vegetable broth to a boil. This adds great flavor! Once boiling, add 1 cup of rinsed quinoa. Lower the heat to a simmer and cover the pot. Let it cook for about 15 minutes. The quinoa is ready when it is fluffy, and all the liquid is absorbed. After cooking, remove it from heat and set aside. In a large skillet over medium heat, add a splash of water or olive oil. Sauté the diced red onion until it turns translucent, about 5 minutes. Then, add 2 cloves of minced garlic and sauté for one more minute until it smells great. Next, stir in 1 can of rinsed black beans and 1 cup of corn. Add 1 teaspoon of cumin, 1 teaspoon of smoked paprika, and 1 teaspoon of chili powder. Don’t forget to season with salt and pepper to taste. Mix everything well and let it cook for another 3-4 minutes. Now, add the cooked quinoa and 1 cup of crushed tomatoes to the skillet. Stir until all the ingredients blend well. This mixture will be the tasty filling for your peppers. Stuff the prepared bell peppers tightly with the quinoa mixture. Cover the baking dish with aluminum foil and bake for 25 minutes. After that, remove the foil and bake for an extra 10-15 minutes. The peppers should be tender and ready to serve! Let them cool slightly before topping with diced avocado and fresh cilantro. Enjoy your vibrant vegan stuffed bell peppers! For the complete recipe, check out the Full Recipe. To make stuffed peppers, pick fresh, colorful bell peppers. Cut off the tops and remove seeds. This step helps them cook evenly. Pre-cook the filling to add flavor. Mixing in spices boosts taste. Pack the filling tightly for a hearty bite. Bake until tender, but don’t overcook. The goal is a soft pepper with a warm, flavorful center. Use spices like cumin, chili powder, and smoked paprika. These add warmth and depth to your dish. Don’t be afraid to taste as you go. Adjust the salt and pepper to fit your taste. You can also mix in fresh herbs like cilantro or parsley for a fresh touch. You can add more veggies to the filling. Try diced zucchini, mushrooms, or spinach. These add texture and nutrients. Mixing in different colors makes your dish more appealing. You can also use leftover vegetables. Just chop them up and toss them in. Serve your stuffed peppers with a side salad for a fresh crunch. A dollop of vegan sour cream adds creaminess. You can also offer avocado slices on the side for healthy fats. Enjoy with crusty bread for a complete meal. For a twist, try topping with salsa or hot sauce. {{image_2}} When it comes to vegan stuffed bell peppers, the options are endless. You can switch things up to fit your taste or needs. Let's explore some variations. These stuffed peppers are great for gluten-free diets. The main filling uses quinoa, which is naturally gluten-free. Avoid any sauces or extras with gluten. This way, you keep your meal safe and tasty. If you miss cheese, try vegan cheese. It melts well and adds creaminess. You can fold it into the filling or sprinkle it on top before baking. Look for brands made from nuts or soy for a rich flavor. Want to switch up your grain? You can use farro, rice, or barley. Each grain has its own flavor and texture. This change can make your stuffed peppers unique each time. For a nutty taste, try farro. For a lighter option, use rice. Toppings can take your dish to the next level. Try adding fresh avocado on top for creaminess. Chopped cilantro adds a burst of flavor. You can also sprinkle some lime juice for a zesty kick. For extra crunch, add crushed tortilla chips or nuts. These toppings make your meal not only tasty but also beautiful. Explore these variations to find your favorite. You can mix and match until you create your perfect vegan stuffed bell peppers. For the full recipe, check the link above! After you enjoy your vegan stuffed bell peppers, let them cool down. Place any leftovers in an airtight container. They will stay fresh for up to four days in the fridge. If you want to keep them longer, freezing is a great option. To reheat, you can use the oven or microwave. For the oven, preheat it to 350°F (175°C). Place the stuffed peppers in an oven-safe dish and cover with foil. Heat for about 20 minutes, or until warm. In the microwave, place the peppers on a safe plate. Heat for 2 to 3 minutes, checking every minute to avoid overcooking. If you want to freeze your stuffed peppers, it’s best to do it before baking. After stuffing them, wrap each pepper in plastic wrap and then in foil. They can last in the freezer for up to three months. When you're ready to eat, thaw them overnight in the fridge. Bake them in the oven at 375°F (190°C) for about 30 to 35 minutes. Enjoy your meal from the freezer! For the full recipe, check out the details above. To make vegan stuffed bell peppers, you need to follow several steps. First, you prepare your bell peppers by cutting off the tops and removing the seeds. Then, cook quinoa in vegetable broth until fluffy. Next, sauté diced onion and minced garlic in a pan. Add black beans, corn, spices, and crushed tomatoes to the pan. Mix in the cooked quinoa. Stuff the bell peppers with this mixture. Bake them at 375°F until tender. For the full recipe, check above. Yes, you can use other vegetables! Zucchini, eggplant, or tomatoes work well. Just make sure they can hold the filling. Cut them in half or hollow them out. This way, you can enjoy the same tasty filling with a different veggie twist. Vegan stuffed bell peppers pair well with many sides. A simple green salad adds freshness. You can also serve quinoa or brown rice for extra carbs. Roasted vegetables or a light soup can round out the meal nicely. Choose sides that complement the flavors of the peppers. Cooked stuffed peppers can last about 3 to 5 days in the fridge. Store them in an airtight container to keep them fresh. If they start to smell or look strange, it’s best to throw them away. Absolutely! You can make the filling a day or two ahead. Just store it in the fridge until you’re ready to stuff the peppers. This saves time and makes meal prep easier. Just remember to let it cool before storing. In this blog post, we explored how to make delicious stuffed bell peppers using wholesome ingredients. We covered each step, from prepping the peppers to baking them to perfection. You learned about their nutritional benefits and tips for perfecting your dish. These stuffed peppers are versatile, tasty, and easy to customize. Enjoy making them for your next meal, and don’t forget to try different fillings and toppings. You’ll love the results and benefits they bring.

Vegan Stuffed Bell Peppers Fast and Flavorful Meal

Looking for a quick and tasty meal? You’ll love vegan stuffed bell peppers! This vibrant dish combines healthy ingredients like

- 2 boneless, skinless chicken breasts - 1 ripe mango, diced - 1 red bell pepper, finely chopped - 1/2 red onion, finely chopped - 1 jalapeño, deseeded and minced - 2 tablespoons fresh cilantro, chopped - Juice of 1 lime - 2 tablespoons olive oil - Salt and pepper to taste - 1 teaspoon garlic powder - 1 teaspoon cumin - Grilling equipment (grill or grill pan) - Mixing bowls - Knife and cutting board - Measuring spoons When I prepare Mango Salsa Chicken, I focus on fresh ingredients. The chicken is the star. I use two boneless, skinless chicken breasts. They grill up so nicely and stay juicy. The ripe mango adds sweetness. Make sure it's perfectly ripe for the best flavor. The red bell pepper brings crunch and color. I chop it finely so it blends well in the salsa. Half a red onion adds a nice bite. I love the mild flavor it gives. A jalapeño kicks up the heat. Just remove the seeds for less spice. Fresh cilantro adds a pop of flavor. I chop it finely and mix it in. Lime juice adds brightness. It balances all the flavors. I also use olive oil to help marinate the chicken. Salt, pepper, garlic powder, and cumin round out the taste. For the tools, I keep it simple. A good grill is key. I prefer a grill pan for indoor cooking. Mixing bowls help me combine ingredients easily. A sharp knife and cutting board make prep quick. Measuring spoons ensure I get the right amounts. With these ingredients and tools, you're set to make a delicious Mango Salsa Chicken dinner. If you're ready for the full recipe, let's get cooking! - First, gather your marinade ingredients. You need olive oil, lime juice, garlic powder, cumin, salt, and pepper. - Mix these in a small bowl until well combined. - Take the chicken breasts and put them in a shallow dish. Pour the marinade over the chicken. - Make sure the chicken is covered well. - Cover and refrigerate it for at least 30 minutes. You can marinate it for up to 2 hours if you want more flavor. - While the chicken marinates, let’s prepare the mango salsa. - In a medium bowl, combine diced mango, red bell pepper, red onion, jalapeño, and fresh cilantro. - Gently toss the ingredients together. - Add a pinch of salt to taste. This step helps enhance the flavors. - Set the salsa aside to let the flavors meld while the chicken absorbs the marinade. - Preheat your grill or grill pan over medium heat. - Once it’s hot, remove the chicken from the marinade. - Place the chicken on the grill. - Grill the chicken for about 6-7 minutes on each side. - Use a meat thermometer to check that the inside temperature reaches 165°F (75°C). - When done, take the chicken off the grill. Let it rest for a few minutes. - Just before serving, top the grilled chicken with the mango salsa. For the full recipe, check the section above. Enjoy your flavorful grilled dinner! To get perfect grill marks, preheat your grill well. Aim for medium-high heat. Place the chicken at a 45-degree angle on the grill. Flip the chicken after about three minutes for those beautiful crosshatch marks. To check chicken doneness, use a meat thermometer. Insert it into the thickest part of the chicken. The safe internal temperature is 165°F (75°C). If you don’t have a thermometer, cut into the chicken. Look for clear juices and no pink meat inside. For side dishes, rice or quinoa works great. They soak up the salsa juices. A simple green salad adds a fresh crunch. You might also try grilled veggies for a colorful plate. For garnishing, add extra cilantro on top of the chicken. Lime wedges give a bright look and taste. Consider serving on a colorful plate to make it pop. To streamline prep, gather all your ingredients first. Chop the mango and veggies while the chicken marinates. This way, you save time and keep your space tidy. While the chicken grills, clean up your prep area. You can also prepare the salsa during this time. It’s a great way to multitask and keep everything flowing. For the full recipe, check the section above. {{image_2}} You can switch the chicken for turkey or tofu. Both options work well. Turkey has a similar taste and can keep the dish light. Tofu absorbs flavors, making it a great choice for vegetarians. For the salsa, you can try different fruits. Pineapple adds a sweet zing. Peaches bring a juicy twist, while avocado adds creaminess. Each fruit brings a unique flavor to the table. You can boost the flavor by adding spices. Try smoked paprika for a hint of smokiness. Cumin adds warmth, while chili powder gives a kick. Fresh herbs like basil or mint can brighten the dish. Pairing with sauces can also change the taste. A drizzle of honey mustard adds sweetness. Alternatively, a spicy barbecue sauce gives a smoky flavor. These small changes can make a big impact. To make this dish low-carb, skip the rice or quinoa. Instead, serve it with a side salad. You can also use cauliflower rice for a light option. This keeps the flavors while cutting carbs. For a gluten-free meal, ensure all sauces are gluten-free. Most ingredients in the recipe are already gluten-free. If you choose to add any sauces, check their labels to be safe. Vegetarian options are easy too. Replace the chicken with grilled vegetables. Zucchini, bell peppers, and eggplant work well. Marinate them just like the chicken for great flavor. For the full recipe, check out the detailed instructions above. To keep your mango salsa chicken fresh, store it in the fridge. Place the chicken and salsa in separate airtight containers. This helps keep the chicken juicy and the salsa bright. The chicken stays good for about three days. The salsa can last for two days. Always check for any strange smells before using leftovers. When reheating the grilled chicken, use the oven or a skillet. Preheat your oven to 350°F (175°C). Place the chicken on a baking sheet and cover it with foil. Heat for about 15-20 minutes. If using a skillet, warm it on low heat for about 5-7 minutes. To keep the salsa fresh, try not to heat it. Serve it cold or at room temperature for the best taste. Yes, you can freeze mango salsa. Just place it in an airtight container, leaving some space for expansion. It lasts up to three months in the freezer. For the chicken, wrap it tightly in plastic wrap and then foil. It can also freeze for about three months. When ready to eat, thaw both in the fridge overnight before reheating. Enjoy the full flavor of your mango salsa chicken later! For the full recipe, check out the detailed instructions above. Grilling chicken depends on its thickness. Generally, it takes about 6-7 minutes per side. For thicker pieces, like those over one inch, it may take longer. Always check the internal temperature. It should reach 165°F (75°C) for safe eating. This ensures the chicken is juicy and flavorful. You can use canned mango, but fresh is best. Canned mango can be sweeter and softer. This might change the texture of your salsa. Fresh mango offers a firm bite and bright flavor. If you choose canned, drain it well to avoid excess liquid. This keeps your salsa from becoming too watery. This dish pairs well with several sides. Here are some tasty options: - Cilantro-lime rice - Quinoa salad - Grilled vegetables - Black beans - Fresh green salad These sides complement the chicken's flavor and add color to your plate. Enjoy mixing and matching for a complete meal. For the complete recipe, check out the [Full Recipe]. This blog post covered a tasty grilled chicken dish with mango salsa. We explored key ingredients, kitchen tools, and step-by-step instructions. You learned tips for perfect grilling and creative variations. I shared how to store leftovers and reheat them. Final thoughts: With this recipe, you can impress at any meal. Enjoy the fresh flavors and simple steps to create a delightful dish. Happy cooking!

Mango Salsa Chicken Flavorful Grilled Dinner Delight

Ready to spice up your dinner? Mango Salsa Chicken is a vibrant dish bursting with flavor! This grilled delight combines

- 4 medium zucchinis - 2 cups fresh basil leaves - 1/2 cup pine nuts - 1/2 cup grated Parmesan cheese - 2 cloves garlic - 1/2 cup extra-virgin olive oil - Salt and pepper - Cherry tomatoes, halved - Fresh basil leaves Creating Zucchini Noodles with Pesto starts with fresh ingredients. The zucchinis should be medium-sized and firm. I like to spiralize them for fun, noodle-like shapes. Use a spiralizer for this task. It’s easy and quick. Next, fresh basil is key for the pesto. I choose vibrant green leaves for the best taste. Pine nuts add a nice crunch. I toast them lightly for extra flavor. Grated Parmesan cheese offers a salty richness. If you want a vegan option, use nutritional yeast instead. You also need garlic. It brings a bold taste to the pesto. Finally, extra-virgin olive oil smooths out the sauce. It gives a silky texture, which makes the dish shine. For seasoning, keep it simple. Just add salt and pepper to taste. Cherry tomatoes add a pop of color. They have a sweet flavor that pairs well with the pesto. Fresh basil leaves are perfect as a garnish, adding freshness to the plate. For the full recipe, check out the section titled Zesty Zucchini Noodles with Fresh Basil Pesto. To start, you need to spiralize the zucchinis. A spiralizer makes this easy. Cut off the ends and secure them in the tool. Turn the handle to create long, noodle-like strands. You want about four medium zucchinis for this dish. After spiralizing, it's time to drain excess moisture. Place the zucchini noodles in a colander. Sprinkle some salt on top. Let them sit for about 10 minutes. This step helps remove extra water and keeps your dish from becoming soggy. Next, we will make the pesto sauce. In a food processor, add the fresh basil leaves, toasted pine nuts, grated Parmesan cheese, and garlic cloves. Blend these ingredients until they are finely chopped. You want a nice mix of flavors. Now, emulsify the pesto. Keep the food processor running, and slowly drizzle in the extra-virgin olive oil. This helps create a smooth paste. If your pesto is too thick, add a splash of water. Season with salt and pepper to taste. Now it’s time to cook the zucchini noodles. Heat a large skillet over medium heat. Add the drained zucchini noodles to the skillet. Sauté them for about 2-3 minutes. You want them slightly soft but still crunchy. Once cooked, remove the skillet from heat. Toss the warm zucchini noodles with the pesto until they are well coated. This step ensures every bite is full of flavor. For the full recipe, check out the section above. Choosing the right zucchini Pick firm zucchinis with smooth skin. Look for ones that feel heavy for their size. This means they have good moisture and flavor. Avoid large zucchinis as they can be watery and have large seeds. Adjusting sauté time for texture Sauté zucchini noodles briefly. Aim for 2 to 3 minutes in a hot skillet. This keeps them tender yet crunchy. Overcooking can turn them mushy, which we want to avoid. Adding more herbs or nuts You can boost your pesto by adding more fresh herbs. Try parsley or cilantro for a twist. If you want a richer taste, toss in more pine nuts or even walnuts. Vegan alternatives for Parmesan For a vegan option, use nutritional yeast instead of Parmesan. It gives a cheesy flavor without dairy. You can also skip the cheese and add more nuts for creaminess. Garnishing suggestions Garnish with halved cherry tomatoes for color. Fresh basil leaves on top make it look vibrant. A sprinkle of extra pine nuts adds a nice crunch. Serving options for a beautiful plate Serve the dish in a large bowl for family style. You can also plate individual portions for a fancy touch. Pair with a simple side salad to complete the meal. For the full recipe, check out the Zesty Zucchini Noodles with Fresh Basil Pesto. {{image_2}} You can easily boost this dish with protein. Grilled chicken or shrimp adds a tasty touch. Just cook them until they are golden brown. Slice them and mix them in with your noodles. For a vegetarian option, use tofu. Press the tofu to remove water, then cube it. Pan-fry the cubes until crispy, and toss them with your zucchini noodles. While classic pesto is great, you can try other sauces too. Different pesto variations can add fun flavors. You might mix in sun-dried tomatoes or arugula for a twist. Another option is a creamy avocado sauce. Just blend ripe avocados with lime juice and garlic until smooth. This gives a rich and fresh taste. You can make your dish even more colorful with extra veggies. Think bell peppers, carrots, or spinach. These add crunch and nutrients. For low-carb pasta alternatives, consider spaghetti squash or konjac noodles. These options keep your meal light and healthy while still being satisfying. Explore these variations to make your zucchini noodles with pesto new each time! For the full recipe, check out the details above. To keep your zucchini noodles and pesto fresh, store them well. If you have leftovers, put them in an airtight container. Make sure to refrigerate them right away. This keeps them safe and tasty. For fresh ingredients, like zucchini and basil, store them in separate containers. This prevents moisture from ruining their texture. You can freeze zucchini noodles, but it’s best to use them fresh. If you want to freeze them, first blanch them in hot water for a couple of minutes. Then cool them in ice water. Drain and place them in freezer bags. For pesto, pour it into ice cube trays and freeze. Once solid, pop out the cubes and store them in bags. This way, you can use just what you need later. Reheating zucchini noodles needs care. Use a skillet over low heat to warm them gently. This keeps their crunch. For pesto, you can warm it in a small pot. Stir it slowly on low heat. This helps maintain its smooth texture and bright flavor. Avoid the microwave, as it can make the noodles soggy. To spiralize zucchini, you need a spiralizer. This tool turns zucchini into long, noodle-like strands. You can also use a vegetable peeler or julienne tool for thinner noodles. Start by trimming the ends of the zucchini. Place it in the spiralizer and twist to create noodles. Yes, you can use store-bought pesto. It saves time and effort. Store-bought options often taste good, but they may lack freshness. Homemade pesto usually has brighter flavors. Plus, you control the ingredients when you make it yourself. Yes, zucchini noodles are gluten-free. They are a great alternative to traditional pasta. This makes them perfect for those with gluten sensitivities. Zucchini is low in carbs and high in vitamins. It is light and refreshing, making it a healthy choice. Zucchini noodles pair well with many dishes. You can serve them with grilled chicken or shrimp for protein. A side salad complements the meal nicely too. Roasted vegetables or crusty bread also make great sides. Explore different options to create a complete meal. Check out the Full Recipe for more ideas! Zucchini noodles are a fun and healthy twist on pasta. We explored fresh ingredients, step-by-step instructions, and tips for perfecting your dish. You can customize with proteins or alternative sauces to match your taste. Remember to store leftovers right to keep them fresh. Enjoy experimenting with this versatile meal that’s both tasty and simple. Your kitchen can be a place of creativity with these ideas.

Zucchini Noodles with Pesto Simple Fresh Delight

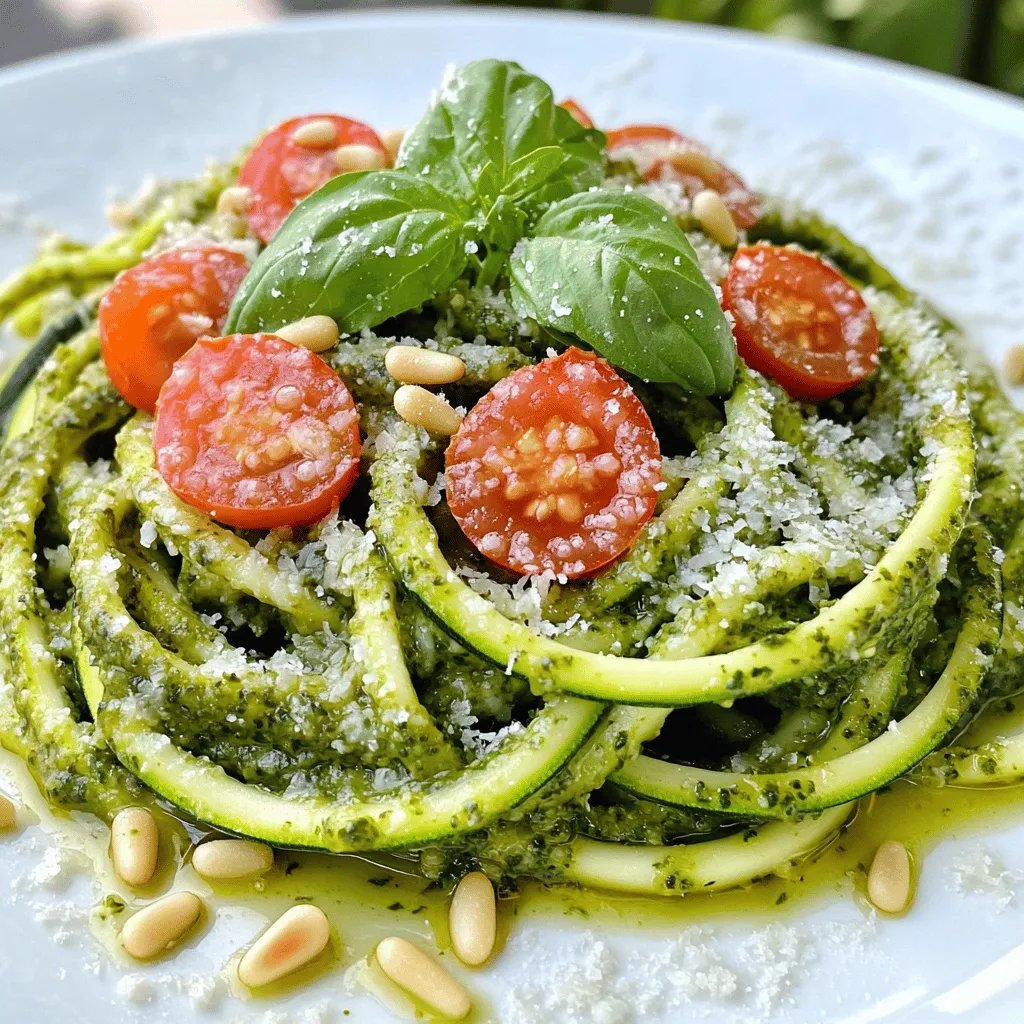
Are you ready to transform your meals with a fresh twist? Zucchini noodles, or zoodles, offer a light, healthy alternative
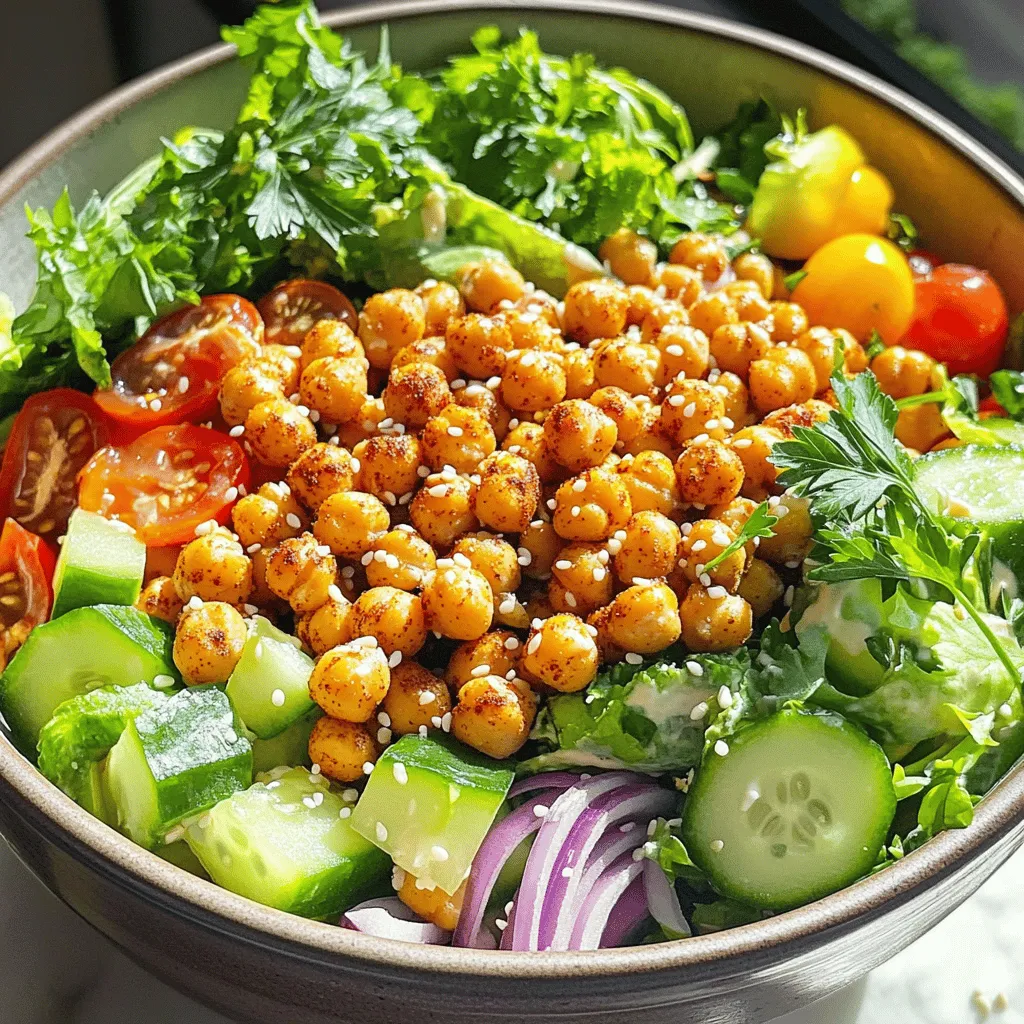
- 1 can (15 oz) chickpeas, drained and rinsed - 1 cup cherry tomatoes, halved - 1 cucumber, diced - 1 bell pepper (red or yellow), diced - 1/4 red onion, finely chopped - 1/2 cup kalamata olives, pitted and sliced - 1/4 cup fresh parsley, chopped - 1/4 cup feta cheese, crumbled (optional) - 3 tablespoons olive oil - 2 tablespoons lemon juice - 1 teaspoon dried oregano - Salt and pepper to taste I love using good ingredients to make this salad. Chickpeas are the star here. They add protein and fiber. I make sure to rinse them well to remove any extra salt. Fresh veggies bring color and crunch. I like cherry tomatoes for their sweetness. Cucumbers add a cool bite, while the bell pepper gives a nice crunch. The red onion adds a bit of zing. Kalamata olives are salty and rich, making the salad so tasty. Fresh parsley adds a bright touch. If you like cheese, feta is a great choice. It adds creaminess and flavor. For the dressing, I use olive oil and lemon juice. The oil gives richness, while the lemon brings brightness. Dried oregano adds a nice herby note. I always taste for salt and pepper. This will make sure every bite is perfect. For the full recipe, you can check the details. Enjoy making this easy and tasty Mediterranean Chickpea Salad! To start, gather all your ingredients. You want to have everything ready. This makes the process fast and easy. In a large bowl, add the chickpeas, cherry tomatoes, cucumber, bell pepper, red onion, olives, and parsley. Mix these together gently. Each bite should have a mix of flavors. In a small bowl, whisk the olive oil, lemon juice, oregano, salt, and pepper. Blend them well. This dressing brings the salad to life. Pour the dressing over the salad mix. Toss it gently so all ingredients get coated. Taste your salad and see if it needs more salt, pepper, or lemon juice. Adjust as needed. Let the salad sit for 10-15 minutes. This helps the flavors meld. For an extra touch, add crumbled feta cheese before serving. This recipe is a breeze and full of bright flavors. Check the Full Recipe for more details. Fresh ingredients make this salad shine. Start with vibrant cherry tomatoes. Look for ones that are firm and colorful. Next, choose a crisp cucumber. A good cucumber should feel firm and have smooth skin. For bell peppers, pick ones that are bright and heavy for their size. A small red onion adds crunch and a slight bite. Don’t forget kalamata olives; they add depth. Fresh parsley brings a burst of flavor too. Always wash your veggies well before use. Fresh ingredients make every bite better. The dressing is key to flavor. Use high-quality olive oil for the best taste. Combine it with fresh lemon juice for brightness. The dried oregano adds a nice herbal note. Mix salt and pepper to taste. Whisk them together until blended well. This ensures a smooth and zesty dressing. Pour it over the salad right before serving. Letting it sit for a few minutes helps flavors blend. You can always adjust the dressing based on your taste. Presentation matters in a salad. Use a large bowl to mix everything gently. This keeps your ingredients intact. To serve, scoop the salad onto plates or in bowls. If using feta cheese, sprinkle it on top for a nice touch. A few parsley leaves can add color. For an extra pop, add lemon wedges on the side. This gives guests a chance to add more zest if they like. A well-presented salad not only looks good but tastes better too. Want to try making this dish yourself? Check out the Full Recipe for step-by-step instructions! {{image_2}} You can boost the protein in this salad easily. Try adding grilled chicken, shrimp, or canned tuna. Each option adds flavor and makes the dish heartier. You can also use cooked quinoa or lentils for a plant-based twist. These choices keep the meal healthy and filling. Feel free to mix the veggies! You can use diced zucchini, shredded carrots, or even artichoke hearts. Each vegetable brings a new taste and texture. If you love a crunch, add radishes or snap peas. The more colors you add, the more fun the salad looks! Making this salad vegan is simple. Just skip the feta cheese and add more olives or avocado. You won’t miss the cheese at all! For gluten-free needs, this salad is already safe. Just make sure any added ingredients are also gluten-free. You can enjoy this dish without worry. For the full recipe, check out the [Full Recipe]. To store your Mediterranean chickpea salad, place it in an airtight container. This keeps it fresh. Make sure to cover it well to avoid odors from the fridge. You should store it in the fridge right after making it. If you plan to eat it later, do not add the feta cheese until you serve it. This keeps the cheese from getting too soft. You can enjoy Mediterranean chickpea salad cold. If you prefer it warm, heat it gently. Use a skillet over low heat. Stir it often to avoid burning. Do not microwave it, as this can make the chickpeas mushy. Heat just until warm, then serve. The salad lasts about 3 to 5 days in the fridge. After that, it may lose its taste. Always check for off smells or changes in texture before eating. If you see any signs of spoilage, it is best to discard it. Make your Mediterranean chickpea salad in small batches to enjoy it fresh. For the full recipe, check the section above. You can keep Mediterranean Chickpea Salad in the fridge for up to five days. Store it in an airtight container. This helps keep the flavors fresh and delicious. If you notice any changes in smell or texture, it's best to toss it out. Yes, you can make this salad in advance. Preparing it a few hours before serving allows flavors to blend well. If you want to keep the salad fresh, add the feta cheese just before serving. This keeps it from becoming soggy. If you don’t have chickpeas, try black beans or lentils. You can swap cherry tomatoes for diced regular tomatoes. Any crunchy vegetable works well, like zucchini or carrots. For olives, you can use green olives or skip them if preferred. If you want a dairy-free version, leave out the feta cheese. Yes, Mediterranean Chickpea Salad is healthy. It is packed with protein and fiber from chickpeas. The fresh veggies provide vitamins and minerals. Plus, olive oil is a healthy fat that supports heart health. This salad is not only tasty but also nourishing. This blog post covered how to make a delicious Mediterranean chickpea salad. You learned the key ingredients, simple steps, and tips to enhance flavors. I shared storage advice and answered common questions about the recipe. This salad is fresh, healthy, and easy to make. You can customize it to fit your needs. I encourage you to enjoy this tasty dish, whether as a side or main meal. With a little effort, you can create something satisfying that everyone will love.

Mediterranean Chickpea Salad Nourishing and Quick Dish

Looking for a quick, tasty dish? Try my Mediterranean Chickpea Salad! It’s packed with flavor and nutrition. You’ll love the

For my savory herb cornbread muffins, you will need: - 1 cup cornmeal - 1 cup all-purpose flour - 1 tablespoon baking powder - 1 teaspoon salt - 1 teaspoon sugar - ½ teaspoon black pepper - 1 teaspoon dried thyme - 1 teaspoon dried rosemary - 1 cup buttermilk (or milk with a squeeze of lemon juice) - 1 large egg - ¼ cup melted butter (or olive oil) - ½ cup shredded sharp cheddar cheese - ¼ cup chopped fresh chives (or green onions) You can easily tweak this recipe to fit your needs. Here are some options: - Gluten-Free Flour: Use a gluten-free blend for a gluten-free version. - Dairy-Free Buttermilk: Substitute with almond milk or oat milk mixed with vinegar. - Cheese Variations: Try feta or mozzarella for different flavors. To make these muffins, gather these tools: - Muffin tin - Mixing bowls - Whisk and spatula These ingredients and tools will help you create the perfect batch of savory herb cornbread muffins. For the full recipe, check the main guide above. First, you need to preheat your oven to 400°F (200°C). This step is key for even baking. While the oven heats up, prepare your muffin tin. You can line it with paper liners or grease it with cooking spray. Next, let’s mix the dry ingredients. In a large mixing bowl, combine: - 1 cup cornmeal - 1 cup all-purpose flour - 1 tablespoon baking powder - 1 teaspoon salt - 1 teaspoon sugar - ½ teaspoon black pepper - 1 teaspoon dried thyme - 1 teaspoon dried rosemary Whisk these dry ingredients together until they are well mixed. This helps ensure the muffins rise evenly. Now, let’s whisk together the wet ingredients. In a separate bowl, combine: - 1 cup buttermilk (or milk with a squeeze of lemon juice) - 1 large egg - ¼ cup melted butter (or olive oil) Whisk these until they are well combined. Pour the wet mixture into the bowl of dry ingredients. Be careful here! Use a spatula to fold the mixtures together gently. You want to combine them without overmixing. It's okay if some lumps remain. Next, gently fold in: - ½ cup shredded sharp cheddar cheese - ¼ cup chopped fresh chives (or green onions) Now, it’s time to bake! Divide the batter evenly among your muffin cups, filling each about 2/3 full. Place them in the preheated oven and bake for 15-20 minutes. To test if your muffins are done, insert a toothpick into the center of one muffin. If it comes out clean, the muffins are ready! Once baked, remove the muffins from the oven. Let them cool in the pan for 5 minutes. After that, transfer them to a wire rack to cool completely. Enjoy your Savory Herb Cornbread Muffins! For the full recipe, check the details above. To get the best muffins, avoid overmixing the batter. Mix just until you see no dry flour. Some lumps are fine. Overmixing can lead to tough muffins. To keep muffins moist, consider using buttermilk. It adds richness and flavor. You can also add melted butter or olive oil for extra moisture. You can enhance the flavor by adding more herbs. Try adding oregano, basil, or parsley. Fresh herbs can give a bright taste. For a little extra kick, add spices like cayenne pepper or smoked paprika. A pinch can elevate the flavor and make your muffins stand out. Serve your muffins warm right from the oven. Brush them with melted butter for a shiny look. For garnishing, sprinkle some fresh chives on top. This adds color and an extra burst of flavor. You can also serve them with a bowl of honey or jam on the side. Each of these tips will help you create Savory Herb Cornbread Muffins that are tasty and beautiful. For the complete recipe, check out the Full Recipe section. {{image_2}} For your savory herb cornbread muffins, you can mix up the cheese. Cheddar cheese gives a nice sharp taste. If you want more bold flavor, try blue cheese. It adds a creamy, tangy bite. For a Mediterranean twist, feta cheese works well. Feta adds a salty flavor and pairs nicely with herbs. You can even blend different cheeses for a unique taste. Herbs can change the flavor of your muffins. You can use fresh herbs instead of dried ones. Fresh chives, parsley, or basil brighten the dish. You can also customize herbs for holidays. For spring, try dill and parsley. In fall, use sage and thyme. This keeps the muffins exciting with each season. You can also change your muffins from savory to sweet. To make sweet muffins, add honey or maple syrup. Fruits like blueberries or peaches can bring sweetness. Nuts can add texture, too. Just think about what you like and mix it in. The basic recipe stays the same. You can switch flavors and enjoy a new treat. Check out the Full Recipe for more ideas! To keep your savory herb cornbread muffins fresh, store them in an airtight container. This helps retain moisture and flavor. Place a paper towel at the bottom of the container. It absorbs any excess moisture. You can also stack the muffins with parchment paper between them. This method prevents sticking. Store them at room temperature for up to three days. If you have more muffins, consider freezing them. If you want to save muffins for later, freezing is a great option. First, let them cool completely. Wrap each muffin in plastic wrap. Then, place them in a freezer-safe bag or container. Remove as much air as possible before sealing. This prevents freezer burn. You can freeze them for up to three months. When you want to enjoy a muffin, remove it from the freezer. Thaw it in the fridge overnight or at room temperature for a few hours. To reheat, place it in a microwave for about 15-30 seconds, or warm it in an oven at 350°F for about 10 minutes. Savory herb cornbread muffins stay fresh for a few days at room temperature. If stored properly, they can last up to three days. After that, they may start to lose flavor and texture. Signs of spoilage include a dry or hard texture, as well as an off smell. If you notice any mold, discard the muffins immediately. For the best taste, enjoy them fresh or freeze leftovers. Yes, you can use whole wheat flour. However, it will change the texture and flavor. Whole wheat flour makes the muffins denser and richer. If you want a lighter muffin, mix half whole wheat and half all-purpose flour. This mix keeps some lightness while adding health benefits. When using whole wheat, expect a nuttier taste that pairs well with the herbs. To help muffins rise, make sure your ingredients are at room temperature. Cold buttermilk or eggs can slow the rising process. Also, check that your baking powder is fresh. Old baking powder may not work well, and your muffins may not rise. Mix wet and dry ingredients quickly without overmixing. This keeps the batter light and airy. Absolutely! These muffins are great for meal prep. You can bake them ahead and store them in the fridge. They stay fresh for about a week. For quick reheats, wrap them in foil and heat in the oven. You can also freeze them for longer storage. Just thaw overnight in the fridge before reheating. Enjoy these muffins anytime with minimal effort. In this post, we explored how to make Savory Herb Cornbread Muffins. We covered the key ingredients, tools, and step-by-step instructions. You learned about tips for perfect texture and flavor options. I also shared how to store muffins and answered common questions. Now, you can bake delicious muffins at home! Customize them to your taste and enjoy the process. Happy baking!

Savory Herb Cornbread Muffins Irresistible Recipe Guide

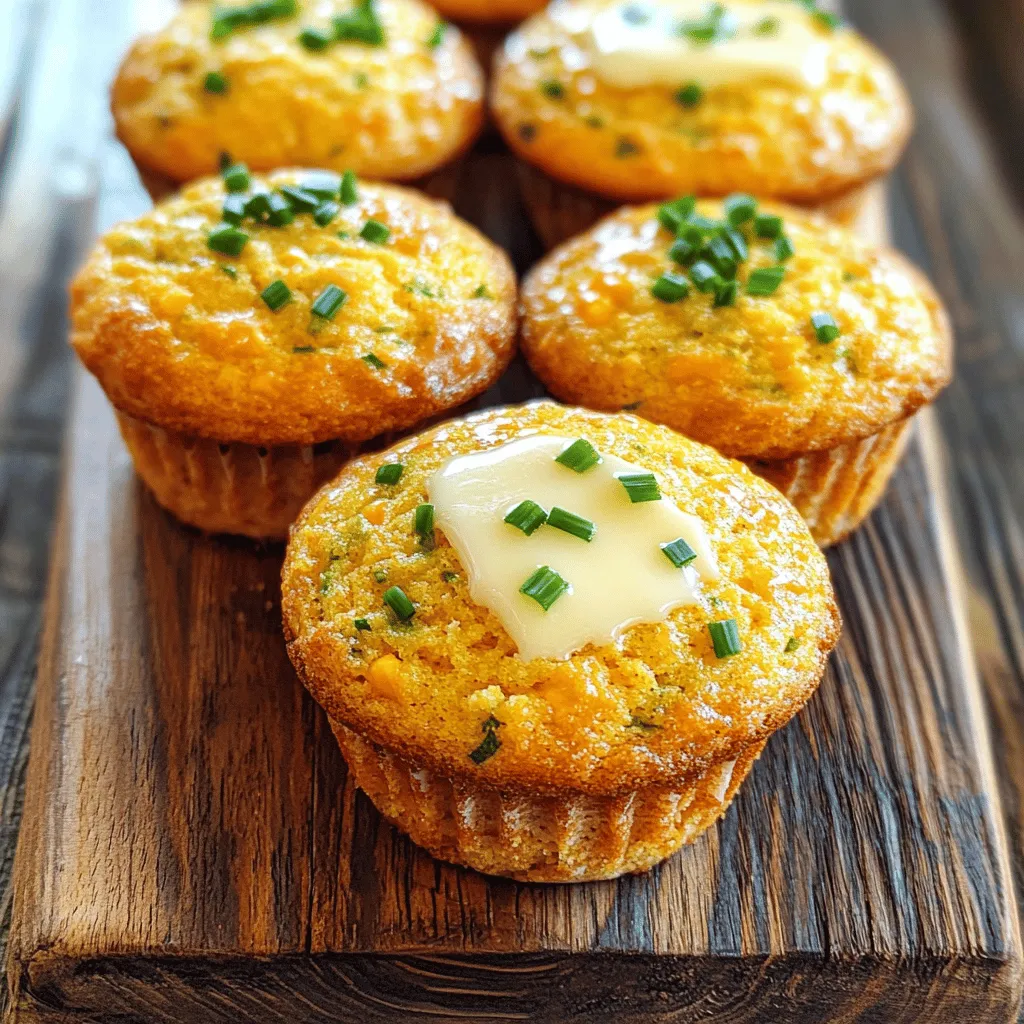
If you crave a warm, buttery bite of cornbread, then you’ll love my Savory Herb Cornbread Muffins! This simple recipe

For Mango Salsa Chicken, you need fresh and vibrant ingredients. Here’s what you'll need: - 4 boneless, skinless chicken breasts - 1 ripe mango, diced - 1/2 red onion, finely chopped - 1 red bell pepper, diced - 1 jalapeño, seeded and minced - 1/4 cup fresh cilantro, chopped - Juice of 2 limes - 1 tablespoon olive oil - Salt and pepper to taste - 1 teaspoon cumin - 1 avocado, sliced (optional, for serving) These ingredients work together to create a dish that is both tasty and refreshing. The chicken is juicy, while the mango salsa adds a sweet and spicy kick. I love how the lime juice brightens all the flavors, making every bite a delight. You can find the full recipe [here](#). When you gather these ingredients, you're on your way to a meal that's sure to impress. - Seasoning the Chicken Breasts Start by mixing salt, pepper, and cumin in a small bowl. This mix gives the chicken a nice flavor. Rub this seasoning evenly on both sides of the chicken breasts. This step helps bring out the chicken’s taste. - Preheating the Grill Preheat your grill or grill pan over medium-high heat. This heat level is perfect for cooking the chicken evenly. Once the grill is hot, brush it with olive oil to stop the chicken from sticking. - Combining Salsa Ingredients In a medium bowl, combine diced mango, chopped red onion, diced red bell pepper, minced jalapeño, and chopped cilantro. Each ingredient adds its own unique flavor. Mixing them creates a bright and fresh salsa. - Adding Lime Juice Squeeze the juice from two limes over the salsa mixture. This adds a nice zing and helps balance the sweetness of the mango. Stir gently to blend the flavors. Set the salsa aside and let it rest while you cook the chicken. - Grilling Times and Techniques Place the seasoned chicken breasts on the hot grill. Grill each side for about 6-7 minutes. This timing helps achieve a juicy interior while getting nice grill marks. - Checking Doneness Use a meat thermometer to check the chicken's internal temperature. It should reach 165°F (75°C). If you don’t have a thermometer, cut into a breast. The meat should be white and juices should run clear. Once cooked, let the chicken rest for a few minutes. Then, serve it with the mango salsa on top. This recipe makes a flavorful, fresh dish that is sure to impress. For the full recipe, check out the details above. Recommended Seasonings For mango salsa chicken, I love using simple and fresh flavors. You should season your chicken with: - Salt - Pepper - Cumin These spices give the chicken a warm, earthy taste. You can also try adding garlic powder or chili powder for more depth. Marinating Tips To really boost the flavor, marinate the chicken. Mix lime juice, olive oil, and seasonings in a bowl. Let the chicken sit in this mixture for at least 30 minutes. This step helps the chicken soak up all the tasty goodness. Grill Temperature Guidance Grill the chicken over medium-high heat. The grill should be around 375°F to 450°F for the best results. This temperature helps get those beautiful grill marks and a nice sear. Avoiding Sticking To prevent the chicken from sticking, brush your grill with olive oil. You can also oil the chicken lightly before placing it on the grill. Both steps help ensure easy flipping and clean removal. Pairing with Sides Serve your mango salsa chicken with fresh sides. I recommend: - Rice - Quinoa - Grilled veggies These sides balance the sweetness of the salsa and make your meal complete. Garnishing Ideas For a lovely presentation, add fresh cilantro on top. You can also include avocado slices for creaminess. This not only looks nice but adds even more flavor. Check out the Full Recipe for more tips! {{image_2}} You can easily swap chicken for other proteins. Tofu is a great choice for a plant-based meal. It soaks up the salsa flavors well. Cut the tofu into thick slices. Press it gently to remove extra moisture. Season it like chicken and grill until golden. Shrimp and fish also work nicely. For shrimp, peel and devein them first. Grill them quickly, just a few minutes per side. If using fish, choose a firm type like salmon or cod. Season and grill until it flakes easily with a fork. These options add new flavors and textures. Mango salsa is flexible. You can mix in different fruits for fun twists. Pineapple or peach add sweetness. If you like a tangy kick, try adding kiwi or pomegranate seeds. Adjust spice levels to suit your taste. Add more jalapeño for heat. If you want milder salsa, remove the seeds or use bell pepper instead. You can also mix in diced cucumber for crunch. Experiment until you find your favorite blend. If you don’t have a grill, you can bake or use a slow cooker. For baking, preheat the oven to 400°F (200°C). Place the seasoned chicken in a baking dish. Bake for 20-25 minutes, or until it reaches 165°F (75°C). Using a slow cooker is simple. Place the chicken in with the salsa. Cook on low for 4-6 hours. This method makes the chicken super tender. These methods keep the dish fresh and flavorful. For the full recipe, check the recipe section above. Refrigerator Guidelines After enjoying your Mango Salsa Chicken, store leftovers in an airtight container. This keeps the chicken juicy and the salsa fresh. The chicken can last up to four days in the fridge. Make sure it cools to room temperature before sealing. Freezing Capabilities You can freeze leftover chicken, but the salsa does not freeze well. Wrap the chicken tightly in plastic wrap and then in aluminum foil. It will stay good for up to three months in the freezer. When you're ready to eat, thaw it in the fridge overnight. Best Methods for Reheating To reheat chicken, use the oven or stovetop. Preheat your oven to 350°F (175°C). Place the chicken in a baking dish, cover it with foil, and heat for about 15-20 minutes. On the stovetop, heat a pan over low heat. Add a splash of water to keep it moist and cover it. Maintaining Flavor and Texture To keep the salsa fresh, do not reheat it. Instead, serve it cold on top of the chicken. Adding fresh lime juice can brighten the flavors after reheating. Enjoy your delicious Mango Salsa Chicken just like you made it! For the full recipe, check out the details above. Can I use frozen mango for the salsa? Yes, you can use frozen mango. Just thaw it first. Frozen mango works well if fresh mango is not available. It will still taste great in the salsa. How long does Mango Salsa Chicken last in the fridge? Mango Salsa Chicken lasts up to four days in the fridge. Make sure to store it in an airtight container. This keeps it fresh and safe to eat. Is this dish healthy? Yes, this dish is healthy. It includes lean chicken and fresh veggies. The mango adds vitamins and fiber. This meal is balanced and good for you. How many calories are in Mango Salsa Chicken? Mango Salsa Chicken has about 300 calories per serving. This depends on the size of the chicken breasts. The salsa adds very few extra calories. Gluten-free options This dish is naturally gluten-free. All the ingredients are gluten-free. You can enjoy it without worry if you have a gluten allergy. Dairy-free alternatives Mango Salsa Chicken is dairy-free. You do not need to change any ingredients. If you want creaminess, use avocado slices as a topping. This blog post covered a tasty mango salsa chicken recipe. We explored the best ingredients, step-by-step instructions, and helpful tips. You learned how to enhance flavor, perfect grill marks, and store leftovers. Plus, you found creative variations with different proteins and cooking methods. In my view, this dish is versatile and easy to make. It fits many diets, making it a great choice for everyone. Enjoy cooking and sharing this delightful meal!

Mango Salsa Chicken Flavorful and Fresh Grilled Dish

Are you looking for a fresh and vibrant meal that’s both easy and delicious? Mango Salsa Chicken is your answer!

Older posts
Newer posts
← Previous Page1 … Page46 Page47 Page48 … Page72 Next →

dsad

© 2025 My Saved Recipe • Built with GeneratePress

Our Policies

  • Copyright Policy
  • Cookie Policy
  • GDPR Policy
  • Privacy Policy
  • Disclaimer
  • Terms Of Use

More Information

  • Home
  • About
  • Contact
  • Appetizers
  • Dessert
  • Dinner
  • Drinks
©2025, My Saved Recipe About Back To Top