![To make a Mediterranean quinoa salad, gather these fresh ingredients: - 1 cup quinoa, rinsed - 2 cups vegetable broth or water - 1 cup cherry tomatoes, halved - 1 cucumber, diced - 1 bell pepper (red or yellow), diced - 1/2 red onion, finely chopped - 1 cup canned chickpeas, drained and rinsed - 1/2 cup Kalamata olives, pitted and sliced - 1/2 cup feta cheese, crumbled (optional) - 1/4 cup fresh parsley, chopped - 1/4 cup fresh mint, chopped - 1/4 cup olive oil - 2 tablespoons lemon juice - Salt and pepper to taste You can customize your salad with these add-ins: - Grilled chicken or shrimp for protein - Avocado for creaminess - Roasted red peppers for a smoky flavor - Spinach or arugula for extra greens - Quinoa can be swapped with farro or bulgur These options keep your meal exciting and flavorful. You can mix and match based on what you have on hand. Each ingredient packs a punch of nutrients: - Quinoa is a complete protein and full of fiber. - Chickpeas add protein and help with digestion. - Olives provide healthy fats and antioxidants. - Fresh herbs like parsley and mint boost flavor and nutrition. This salad is not only tasty but also supports a balanced diet. It's a great choice for lunch or dinner. Enjoy making your Mediterranean quinoa salad! For the full recipe, check out the details above. First, rinse 1 cup of quinoa under cold water. This removes any bitter taste. In a medium saucepan, combine the rinsed quinoa and 2 cups of vegetable broth or water. Heat this mixture over medium-high heat until it boils. Once boiling, lower the heat. Cover the saucepan and let it simmer for about 15 minutes. The quinoa will absorb all the liquid and become fluffy. After cooking, turn off the heat. Let it sit covered for 5 more minutes. Then, fluff the quinoa with a fork and let it cool to room temperature. While the quinoa cools, wash and chop your vegetables. Take 1 cup of cherry tomatoes and cut them in half. Dice 1 cucumber and 1 bell pepper (you can use red or yellow). Finely chop 1/2 of a red onion. Drain and rinse 1 cup of canned chickpeas. Slice 1/2 cup of Kalamata olives. If you like, crumble 1/2 cup of feta cheese. Gather 1/4 cup of fresh parsley and 1/4 cup of fresh mint, then chop them. This mix of veggies will add flavor and color to your salad. In a large bowl, add the halved cherry tomatoes, diced cucumber, diced bell pepper, chopped red onion, chickpeas, sliced olives, and crumbled feta cheese if you’re using it. Gently mix these ingredients together. Once the quinoa has cooled, add it to the bowl. In a small bowl, whisk together 1/4 cup of olive oil, 2 tablespoons of lemon juice, salt, and pepper to taste. Drizzle this dressing over the salad and toss everything gently until well coated. Finally, fold in the chopped parsley and mint for extra flavor. Taste your salad and adjust the seasoning as needed. Serve right away or chill it for 30 minutes to let the flavors blend. For the full recipe, refer to the earlier section. To make fluffy quinoa, start with rinsing it under cold water. This removes the bitter coating. Use a 2:1 ratio of liquid to quinoa. You can use vegetable broth for extra flavor. Bring the liquid to a boil, then lower the heat. Cover the pot and let it simmer for about 15 minutes. After this, turn off the heat and let it sit for 5 minutes. Fluff it gently with a fork. This keeps your quinoa light and airy. Seasoning is key for great flavor. Start with salt in the cooking water. This helps the quinoa absorb flavor while cooking. After mixing the salad, taste it. Adjust the seasoning with more salt, pepper, or lemon juice as needed. Fresh herbs like parsley and mint add brightness. They also bring a fresh taste that enhances the dish. Remember, seasoning is about balance. Keep tasting until it feels just right. This salad shines when served fresh. You can serve it in a large bowl or individual jars. For a beautiful presentation, garnish with extra parsley and feta. If you want to make it a full meal, add protein. Grilled chicken or shrimp work well. This salad also makes a great side dish for any meal. You can enjoy it cold or at room temperature. For an easy lunch, pack it in a container. Check the [Full Recipe] for detailed instructions. {{image_2}} You can make your Mediterranean quinoa salad even heartier by adding protein. Grilled chicken works great. Simply grill it and slice it before mixing it in. Shrimp is another tasty choice. Cook it in a pan with some olive oil and lemon juice for flavor. Both options add texture and make the dish more filling. They also pair well with the fresh veggies and flavors already in the salad. If you want to keep the salad vegetarian or vegan, there are easy swaps. Leave out the feta cheese for a vegan option. You can also add roasted nuts like almonds or walnuts for crunch. Sunflower seeds can add a nice touch too. They boost the protein and add healthy fats. This way, everyone can enjoy the salad without missing out on flavor. Seasonal vegetables can change the flavor profile of your salad. In spring, add asparagus or peas. In summer, try fresh corn or zucchini. Fall is great for roasted butternut squash or sweet potatoes. For winter, use hearty greens like kale or Brussels sprouts. These swaps keep the salad fresh and exciting through the year. You can find new tastes and colors each season, making your salad unique every time you make it. Feel free to explore the Full Recipe for more ideas and tips! To store leftovers, place the salad in an airtight container. This helps keep it fresh. Always cool the salad to room temperature first. Avoid letting it sit out for too long. You can store it in the fridge for up to five days. When preparing the salad in advance, keep dressing separate. This keeps the salad crisp. You can mix the quinoa and veggies together. Just add the dressing right before serving. This way, it stays fresh and tasty. The salad tastes best when enjoyed fresh. If stored properly, it lasts for up to five days. After that, the flavors may fade. Be sure to check for any signs of spoilage. This helps ensure you enjoy every bite. For the best taste, eat it within three days. You can find the Full Recipe for easy reference. You can boost the flavor of your salad in a few ways. First, add more herbs like dill or oregano. Fresh herbs bring a bright taste. Next, try using roasted vegetables. Roasting brings out their natural sweetness. You might also use garlic or red pepper flakes for extra zing. A splash of balsamic vinegar can add a sweet and tangy depth. Lastly, adjust the salt and lemon juice to your liking. The right balance can make all the difference. Yes, you can make this salad ahead of time! It actually tastes better after sitting for a bit. Prepare the salad and store it in the fridge for up to three days. Just keep the dressing separate until you’re ready to serve. This step keeps the salad crisp and fresh. When it’s time to eat, pour the dressing on, mix, and enjoy! Quinoa is a great source of protein and fiber. It has all nine essential amino acids, making it a complete protein. This is especially good for vegetarians and vegans. Chickpeas are also packed with protein and fiber. They help keep you full and support digestion. Together, quinoa and chickpeas make a healthy combo. They can help with weight management and provide steady energy. Eating them is a tasty way to boost your health! In this article, we explored how to create a tasty Mediterranean quinoa salad. We covered ingredients, cooking steps, tips for perfect flavor, and variations for every diet. You now have tools to make a nutritious meal that fits your needs. Remember to store leftovers properly and enjoy multiple servings throughout the week. Keep experimenting with flavors and ingredients. You'll find the combination that excites your palate the most. Enjoy your healthy cooking journey!](https://mysavedrecipe.com/wp-content/uploads/2025/05/0723198e-293e-4e4a-82da-44d0f18dc95e.webp)
Mediterranean Quinoa Salad Fresh and Flavorful Mix
Looking for a fresh and flavorful dish? This Mediterranean Quinoa Salad is your answer! Packed with vibrant veggies, protein-rich quinoa,
Looking for a fresh and flavorful dish? This Mediterranean Quinoa Salad is your answer! Packed with vibrant veggies, protein-rich quinoa,

Welcome to your new favorite dessert adventure! Maple Pecan Pie Bars combine sweet maple syrup and crunchy pecans in a

Are you ready to spice up your next game day or gathering? My Sweet and Spicy Chicken Wings are a

If you love crispy, golden-brown flavors, let’s dive into the world of Crispy Coconut Shrimp! This dish offers a perfect
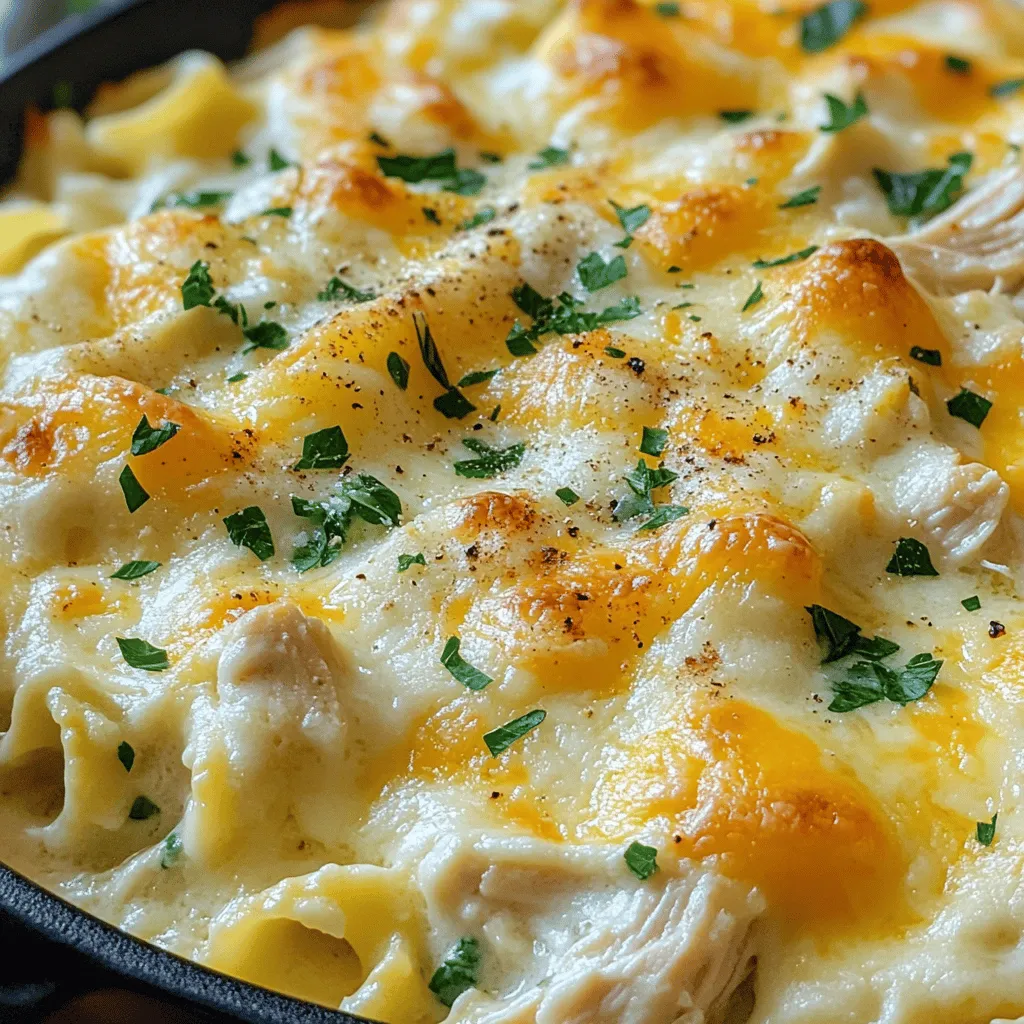
Are you craving a simple, tasty dish the whole family will love? Try my Easy Chicken Alfredo Bake! With just
![To make Vegan Chocolate Avocado Mousse, you need a few key ingredients. Each one plays an important role in creating that creamy delight. Here’s a detailed list of what you’ll need: - Ripe Avocados: You need 2 ripe avocados. They give the mousse its creamy base and healthy fats. - Unsweetened Cocoa Powder: Use 1/2 cup. This adds rich chocolate flavor without added sugar. - Maple Syrup or Agave Nectar: Choose 1/2 cup of either. This natural sweetener balances the cocoa’s bitterness. - Almond Milk or Non-Dairy Milk: Add 1/4 cup. It helps blend everything into a smooth texture. - Vanilla Extract: You need 1 teaspoon. This adds a warm, sweet note to the mousse. - Sea Salt: Just a pinch enhances the flavors and richness. - Optional Garnishes: Fresh berries and mint leaves add color and freshness on top. These ingredients combine to create a dessert that feels indulgent but is also healthy. For the full recipe details, follow along! How to Prepare the Avocados Start with two ripe avocados. Cut them in half and remove the pit. Use a spoon to scoop out the green flesh. Place the avocado in your food processor. Ripe avocados are key for a creamy mousse. They should feel soft but not mushy. Blending the Ingredients Together Next, add the unsweetened cocoa powder, maple syrup, almond milk, vanilla extract, and a pinch of sea salt. Blend everything on high speed. Keep blending until it’s smooth and creamy. You may need to scrape the sides to mix well. This step is crucial for a perfect texture. Adjusting Sweetness and Flavor After blending, taste the mousse. If it needs more sweetness, add a bit more maple syrup. Blend again briefly to mix. You want a nice balance of chocolate and sweetness. Adjusting flavors is part of making it your own. Chilling the Mousse Once the mousse is smooth and sweet, transfer it to bowls or glasses. Chill in the fridge for at least 30 minutes. This helps the flavors come together and sets the mousse. It’s worth the wait! You can enjoy it after it’s chilled and ready to serve. For the full recipe, check out the [Full Recipe]. To make the best vegan chocolate avocado mousse, focus on a few key points. First, for soothing creaminess, use ripe avocados. They should feel soft when you press them. This ensures a smooth blend. Next, check your sweetness levels. Start with half a cup of maple syrup. After blending, taste the mousse. If it is not sweet enough, add a bit more syrup. Blend again. This helps create a balanced flavor. Lastly, use high-quality cocoa powder. This makes a big difference in taste. Look for unsweetened cocoa with a rich flavor. Avoid low-quality brands for the best results. When it comes to serving, think about what pairs well with your mousse. Fresh berries add a bright touch. They bring a nice contrast to the rich chocolate flavor. Mint leaves also lend a fresh aroma. For creative serving ideas, try using small glasses or bowls. Layer the mousse with fresh fruit or granola for added texture. You can also serve it in a jar for a fun look. Consider making a chocolate sauce to drizzle on top, too. This adds extra flair and flavor. {{image_2}} You can make this mousse even better with a few fun add-ins. - Adding Nut Butter for Extra Richness A spoonful of almond butter or peanut butter brings a creamy touch. This adds flavor and richness. Just blend it in with the other ingredients. You will love the nutty twist! - Infusing with Espresso or Coffee Flavors Want a coffee kick? Add a shot of espresso or instant coffee. This gives the mousse a deep, bold flavor. Mix it in while blending for a delicious taste boost. If you have special diet needs, don't worry! You can adjust the recipe easily. - Sugar-Free Options For a sugar-free treat, use stevia or monk fruit sweetener. These options keep the mousse sweet without sugar. Just swap in place of maple syrup. - Nut-Free Variants If you have nut allergies, use oat milk instead of almond milk. This keeps the mousse creamy without nuts. Enjoy a tasty dessert without worry! Feel free to explore these variations to suit your taste. Each option adds a unique twist to the classic Vegan Chocolate Avocado Mousse. Check out the Full Recipe for the base you can customize! To keep your Vegan Chocolate Avocado Mousse fresh, store it in the fridge. Use an airtight container to prevent any odors from other foods. The mousse will stay good for about three days. If you have extra mousse, you can freeze it. Pour the mousse into a freezer-safe container. Leave some space at the top, as it may expand when frozen. You can freeze it for up to three months. When you’re ready to eat it, take it out and thaw in the fridge overnight. If you want it faster, place the container in cool water for about an hour. Once thawed, stir it gently to restore its creamy texture. Make sure to check the mousse for any changes in texture or smell before serving. Enjoy your creamy delight again! For the full recipe, check the previous section. Can I use ripe bananas instead of avocados? No, ripe bananas won't give the same creamy texture. Avocados have healthy fats that make this mousse rich and smooth. How long can I store leftover mousse? You can keep leftover mousse in the fridge for up to three days. Just cover it well to keep it fresh. Is this Vegan Chocolate Avocado Mousse gluten-free? Yes, this mousse is gluten-free. All the ingredients are naturally free from gluten. What can I use instead of maple syrup? You can use agave nectar or even date syrup. Both options add sweetness and flavor, just like maple syrup. Can I make this recipe nut-free? Yes, you can. Simply use oat milk or coconut milk instead of almond milk. These options keep it nut-free. How can I make this mousse fluffier? To make it fluffier, whip some aquafaba (chickpea brine) until stiff peaks form. Fold it into the mousse before chilling. What are the health benefits of avocados in desserts? Avocados are packed with healthy fats, vitamins, and minerals. They make desserts creamy while adding nutrients and fiber. This mousse is a tasty way to enjoy the benefits of avocados. This blog post covered how to make a tasty vegan chocolate avocado mousse. We looked at the key ingredients like ripe avocados, cocoa, and maple syrup. You learned the steps to make it creamy and flavorful, and I shared tips to perfect the texture. We discussed fun variations and how to store leftovers. For a delicious dessert, this mousse hits the mark. Now, enjoy making it your way! You've got this!](https://mysavedrecipe.com/wp-content/uploads/2025/05/83149676-adc7-4b9f-9b69-e4eb6a93ed43.webp)
Are you ready to enjoy a rich and creamy dessert that’s also healthy? This Vegan Chocolate Avocado Mousse is the
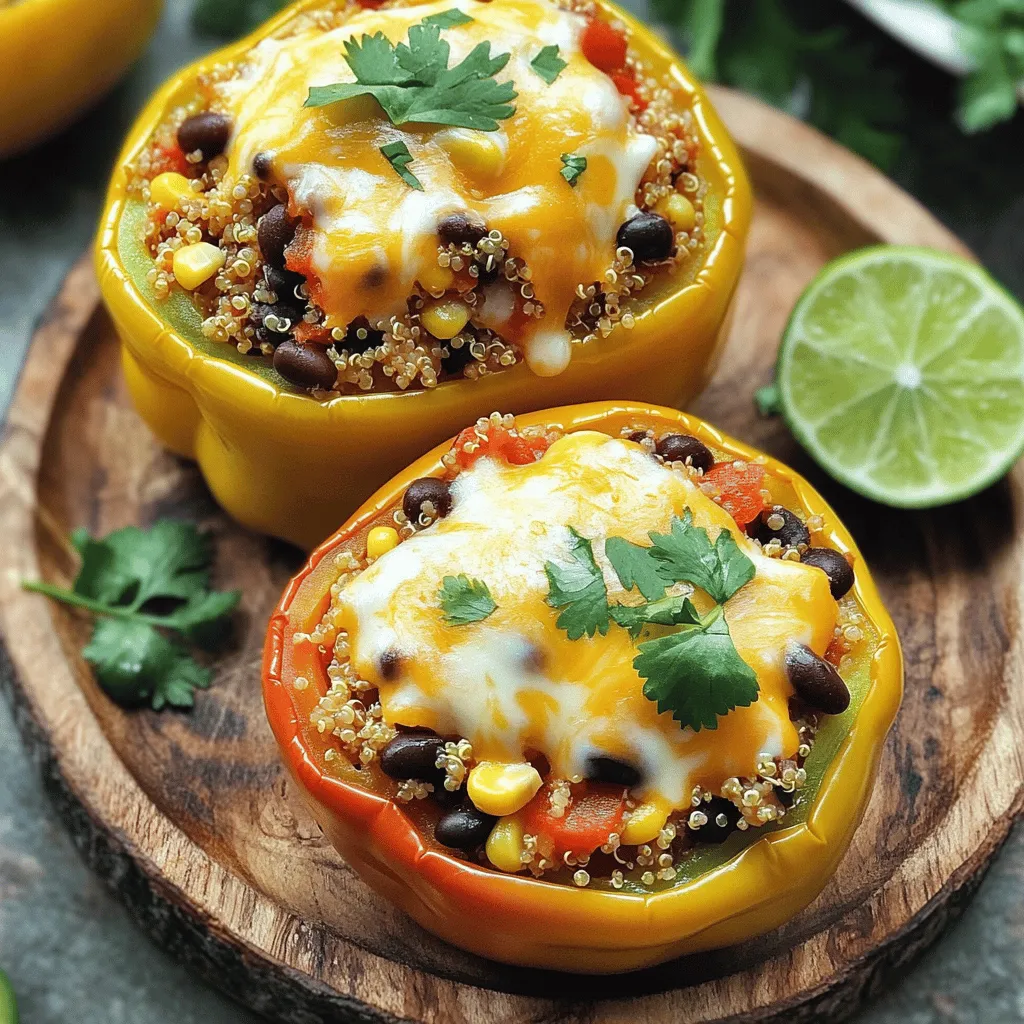
Cheesy stuffed bell peppers are the perfect meal for anyone craving comfort and flavor. This dish combines colorful veggies, protein-packed
![When I make Peanut Butter Chocolate Chip Cookies, I gather a few simple ingredients. Each one plays a key role in making these treats rich and delectable. Here’s what you’ll need: - 1 cup creamy peanut butter - 1 cup brown sugar, packed - 1 large egg - 1 teaspoon vanilla extract - 1 cup dark chocolate chips - 1/2 teaspoon baking soda - 1/4 teaspoon salt - 1/2 cup chopped roasted peanuts (optional for added crunch) These ingredients blend together to create a cookie that is both chewy and filled with flavor. The peanut butter gives a nutty richness, while the dark chocolate chips add a sweet touch. You can choose to add roasted peanuts for extra texture, but it’s not a must. To see how these ingredients come together in the baking process, check out the Full Recipe. It guides you through each step, ensuring your cookies turn out perfect every time. Start by preheating your oven to 350°F (175°C). This step is key to getting perfect cookies. While the oven heats up, grab a baking sheet and line it with parchment paper. This helps prevent sticking and makes cleanup easy. In a large bowl, add 1 cup of creamy peanut butter and 1 cup of packed brown sugar. Mix them together until smooth. The mixture should be creamy and well-blended. Next, crack in 1 large egg and pour in 1 teaspoon of vanilla extract. Stir until everything combines nicely. In a separate bowl, whisk together 1/2 teaspoon of baking soda and 1/4 teaspoon of salt. This step helps evenly distribute the baking soda. Once mixed, gradually add this dry mix into your wet mixture. Stir gently until just combined. You don’t want to overmix. Now it’s time to add some fun! Fold in 1 cup of dark chocolate chips and, if you like, 1/2 cup of chopped roasted peanuts for a nice crunch. Use a tablespoon or cookie scoop to drop rounded balls of dough onto the lined baking sheet. Leave some space between each ball, as they will spread while baking. Place the baking sheet in the oven and bake for 10-12 minutes. Keep an eye on them! They should turn lightly golden at the edges. Don’t worry if the centers look a bit undercooked; they will firm up while cooling. - Cooling Time and Best Practices: After baking, remove the cookies from the oven. Let them cool on the baking sheet for about 5 minutes. Then, transfer them to a wire rack to cool completely. This cooling step ensures they maintain the right texture. Enjoy your delicious cookies warm or at room temperature. For the complete recipe, check out the [Full Recipe]. To get the best cookie texture, aim for a mix that feels soft but not sticky. Use creamy peanut butter for a smooth blend. The brown sugar adds moisture and chewiness. Baking soda helps the cookies rise and stay soft. Remember, bake just until the edges turn golden. The centers might look underbaked, but they will firm up as they cool. A common mistake is overmixing the dough. When you add the dry ingredients, mix just until combined. Overmixing can lead to tough cookies. Another error is baking too long. Check the cookies at the lower end of the time range. If you let them sit on the baking sheet too long, they may harden. Always cool them on a wire rack for the best texture. You can adjust the sweetness in this recipe easily. If you want a less sweet cookie, reduce the brown sugar by a quarter cup. You can also use dark chocolate chips for a less sugary flavor. If you like it sweeter, add a bit more sugar. Experiment until you find the perfect balance for your taste. For the full recipe, check out the details above. {{image_2}} You can make vegan peanut butter chocolate chip cookies easily. Just swap the egg for a flax egg. To do this, mix one tablespoon of ground flaxseed with two and a half tablespoons of water. Let it sit for five minutes until it thickens. This acts as a great binder. Use the same ingredients from the full recipe, and your cookies will still be rich and tasty! If you need gluten-free cookies, it's simple. Replace brown sugar with coconut sugar, and use gluten-free flour. Almond flour works well too. Mix it with baking soda and salt as in the full recipe. This tweak keeps the cookies soft and yummy without gluten. Get creative with mix-ins! You can add nuts, dried fruit, or other chocolates. Try adding 1/2 cup of shredded coconut for a tropical twist. You can also fold in peanut butter chips for extra peanut flavor. Mix and match to find your favorite combo! Your cookies will be unique and fun to eat. To keep your peanut butter chocolate chip cookies fresh, store them in an airtight container. This prevents air from making them dry. If you stack them, place parchment paper between layers. This avoids sticking. For the best taste, enjoy them within a week of baking. You can freeze both the dough and the baked cookies. For dough, scoop rounded balls and place them on a baking sheet. Freeze them until firm, then transfer them to a freezer bag. This way, you can bake fresh cookies anytime. Baked cookies can also freeze well. Just let them cool completely before wrapping them tightly. They will last for up to three months. These cookies stay fresh for about a week at room temperature. After that, they may lose their texture. For longer storage, the freezer is your best friend. To revive cookies after freezing, thaw them at room temperature. You can also warm them in the oven for a few minutes. This brings back their soft, chewy goodness. Enjoy your homemade treats! For the full recipe, check out the details above. Yes, you can use natural peanut butter. It will give your cookies a richer taste. Natural peanut butter has oil that separates, so stir it well before measuring. This will help keep the cookies moist. However, the texture may change slightly. They may be a bit less smooth, but still very tasty. To reduce the sweetness, cut back on the brown sugar. Try using 3/4 cup instead of a full cup. You can also add a pinch of salt to balance the flavors. Another idea is to use dark chocolate chips with a higher cocoa content. This will give a nice depth without making the cookies too sweet. If you need an egg substitute, use a flax egg. Mix 1 tablespoon of ground flaxseed with 2.5 tablespoons of water. Let it sit for about 5 minutes until it gels. This works well in binding the cookies. You can also use unsweetened applesauce, about 1/4 cup per egg. This keeps the cookies moist and adds a hint of fruit flavor. For the [Full Recipe], make sure to check the ingredients and follow the steps carefully. Enjoy your baking! In this article, I covered how to make delicious cookies using simple ingredients. We went over the full recipe, step-by-step instructions, and tips for the best results. I also shared variations for different diets and how to store your cookies. Baking cookies can be fun and easy. With practice, you'll find your perfect cookie. Enjoy your homemade treats, and don’t forget to share them with friends!](https://mysavedrecipe.com/wp-content/uploads/2025/05/0fd16cee-c316-41d3-af62-b3579c82d91d.webp)
Get ready to indulge in the rich and delightful world of Peanut Butter Chocolate Chip Cookies! In this article, I’ll
![To make a rich Creamy Mushroom Risotto, you need some key ingredients. Here’s what you will need: - 1 cup Arborio rice - 4 cups vegetable broth - 1 cup mushrooms (such as cremini or shiitake), sliced - 1 small onion, finely chopped - 2 cloves garlic, minced - ½ cup grated Parmesan cheese - 2 tablespoons olive oil - 2 tablespoons unsalted butter - ½ cup heavy cream - Salt and pepper to taste - Fresh parsley, chopped (for garnish) These ingredients create a smooth and savory dish that you can enjoy. Choosing the right mushrooms enhances the flavor of your risotto. I recommend these varieties: - Cremini: These have a rich, earthy taste. They add depth to your dish. - Shiitake: Known for their unique flavor, shiitake mushrooms bring a nice umami touch. - Button: Mild and delicate, button mushrooms work well if you want a lighter taste. Feel free to mix these mushrooms for a more complex flavor profile. You don’t need a lot of fancy tools for this risotto. Here are some essential items: - A large, heavy-bottomed skillet: This helps heat evenly. - A wooden spoon: Use it to stir the risotto as it cooks. - A saucepan: You’ll keep the broth warm here. - A ladle: This makes adding broth easy and neat. Using the right equipment helps you achieve the best results. Check the [Full Recipe] for complete details! Start by heating 4 cups of vegetable broth in a saucepan. Keep it on low heat. You want it warm but not boiling. This step is key because warm broth helps the rice cook evenly. In a large skillet, heat 2 tablespoons of olive oil and 1 tablespoon of butter over medium heat. Add 1 small chopped onion. Sauté for about 5 minutes until it turns soft and clear. Next, add 2 minced garlic cloves and 1 cup of sliced mushrooms. Cook these for another 5 minutes until the mushrooms are tender and brown. Season with salt and pepper. Once the vegetables are ready, stir in 1 cup of Arborio rice. Toast the rice for 1-2 minutes. This helps it soak up the flavors. Now, it’s time to add the broth. Pour in one ladle at a time, stirring often. Wait until most of the liquid is absorbed before adding more. This process takes about 18-20 minutes. You want the rice to be creamy and al dente. After the rice is cooked, remove the skillet from heat. Stir in the remaining tablespoon of butter, ½ cup of heavy cream, and ½ cup of grated Parmesan cheese. Mix until creamy and smooth. Adjust seasoning with salt and pepper to taste. Let it sit for a couple of minutes to thicken. For the full recipe, check out the detailed instructions above. Enjoy your creamy mushroom risotto! To make the best creamy mushroom risotto, follow these simple tips: - Use fresh ingredients: Fresh mushrooms, herbs, and quality cheese matter. They boost flavor. - Stir often: Stirring helps release starch from the rice. This adds creaminess. - Add broth slowly: Pour in warm broth a little at a time. This keeps the rice creamy. - Taste as you cook: This lets you check the rice’s texture and adjust seasoning. When cooking risotto, avoid these common pitfalls: - Skipping the broth heating: Always keep your broth warm. Cold broth can ruin the texture. - Rushing the cooking: Risotto takes time. Allow it to cook slowly for the best results. - Not using Arborio rice: This rice type is key for creamy risotto. Other types won’t work well. - Overcooking or undercooking the rice: Aim for al dente. It should be tender but still firm. Enhancing the flavor of your risotto is easy with these tips: - Add herbs: Fresh thyme or rosemary can elevate the taste. Stir them in towards the end. - Try different cheeses: Besides Parmesan, consider adding a bit of Fontina or Pecorino for depth. - Incorporate wine: Adding a splash of white wine after cooking the mushrooms adds complexity. - Finish with truffle oil: A small drizzle of truffle oil before serving can add a luxurious touch. For the full recipe, check out the detailed steps provided earlier. Enjoy your cooking! {{image_2}} You can make creamy mushroom risotto even heartier by adding proteins. Chicken and shrimp work great. For chicken, use cooked, diced pieces. Stir them in at the end for warmth. Shrimp adds a nice touch too; just sauté them briefly with the mushrooms. This way, the proteins soak up the risotto's rich flavors. If you want a vegetarian or vegan twist, swap the broth for vegetable broth. Use plant-based heavy cream or coconut cream for a vegan option. Nutritional yeast can replace Parmesan cheese, giving a cheesy flavor without dairy. You can also add beans or lentils for extra protein and texture. Enhancing flavor is easy with herbs and spices. Fresh herbs like thyme, rosemary, or basil can add depth. Stir in these herbs while cooking for a burst of flavor. You could also use spices like paprika or a pinch of nutmeg for warmth. Try adding a splash of white wine during cooking for a delightful twist. For the full recipe, check out the Luxurious Creamy Mushroom Risotto section above. To store leftover risotto, let it cool first. Place it in an airtight container. Make sure to cover it well. Keep it in the fridge for up to three days. If you're using a large batch, divide it into smaller portions. This helps with quick reheating later. When reheating risotto, add a splash of broth or cream. This keeps it creamy and moist. Warm it on the stove over low heat. Stir it often to prevent sticking. You can also use the microwave, but check every minute to avoid drying it out. Freezing risotto is not the best idea. It can lose its creamy texture. If you must freeze it, do so in an airtight container. Use it within a month for the best taste. When reheating, expect a different texture. Adding fresh cream can help revive some creaminess. For the best results, enjoy it fresh. Follow the [Full Recipe] for a delightful experience. The best type of rice for risotto is Arborio rice. It has a high starch content. This starch gives risotto its creamy texture. Other good options include Carnaroli and Vialone Nano. They also absorb flavors well and cook evenly. When shopping, look for short-grain rice. It will help create the right creamy consistency. You can make risotto ahead of time, but it won’t be as good. Risotto tastes best fresh. If you must prepare it early, cook it until it's just al dente. Store it in the fridge and reheat with a bit of broth. This will help restore some creaminess. Just remember, adding cream or cheese again can help. If your risotto is too thick, add warm broth. Stir in small amounts at a time. This will loosen the rice and make it creamy again. You can also add a splash of water if you’re out of broth. Stir until the desired consistency is reached. The key is to keep it creamy and not dry. Serve the Creamy Mushroom Risotto in shallow bowls. Garnish with fresh parsley and an extra sprinkle of Parmesan cheese. This adds color and flavor. You can pair it with a light salad or garlic bread. The flavors blend well together, making your meal delightful. For the full recipe, check out the Luxurious Creamy Mushroom Risotto section. Creamy mushroom risotto is easy to make with the right ingredients and steps. We covered key ingredients, cooking methods, and tips for the best texture. Remember to choose tasty mushrooms and proper equipment for great results. Explore variations to fit your taste, whether adding proteins or herbs. Store and reheat leftovers smartly so they stay delicious. With this guide, you’ll create a risotto that impresses everyone. Enjoy your cooking adventure!](https://mysavedrecipe.com/wp-content/uploads/2025/05/a7bd5ce5-0da4-4ccd-b4fc-cc468f567392.webp)
If you crave comfort food that warms both body and soul, look no further! My Creamy Mushroom Risotto is a
![- 1 lb large shrimp, peeled and deveined - 4 cloves garlic, minced - 1 avocado, sliced - 2 tablespoons olive oil - 1 teaspoon chili powder - 1 teaspoon paprika - 1/2 teaspoon cayenne pepper (adjust to taste) - Salt and pepper to taste - 8 small corn tortillas - 1 cup shredded cabbage (green or purple) - 1/2 cup fresh cilantro, chopped - 1 lime, cut into wedges When making Spicy Garlic Shrimp Tacos, I always start with fresh ingredients. The large shrimp should be peeled and deveined for the best taste. I love using minced garlic because it adds a strong flavor. For a rich, creamy bite, slice an avocado to top off the tacos. Next, I gather my spices. Olive oil gives the shrimp a nice, smooth texture. Chili powder and paprika add warmth and depth. If you like heat, cayenne pepper is your friend! Just adjust the amount to your taste. I always season with salt and pepper to enhance the flavors. For assembly, I prefer small corn tortillas. They hold the filling well and bring a nice crunch. Shredded cabbage adds freshness, and chopped cilantro brings a burst of color. I squeeze lime over the tacos for a zesty kick. You can find the full recipe to make these delicious tacos easily! To start, grab a large bowl. Add the shrimp, minced garlic, and spices. Use 2 tablespoons of olive oil, 1 teaspoon of chili powder, 1 teaspoon of paprika, and 1/2 teaspoon of cayenne pepper. Season with salt and pepper to taste. Mix everything well. You want each shrimp to be coated evenly with the spice mix. This step adds deep flavor to your shrimp. Next, heat a non-stick skillet over medium-high heat. Once it’s hot, add the shrimp in a single layer. Cook for 2-3 minutes on one side. You want them to turn pink and get a slight char. Flip the shrimp and cook for another 1-2 minutes until they are fully cooked. This will give your shrimp a nice texture and smoky flavor. Now it's time to warm the corn tortillas. Use a separate skillet on low heat. Warm each tortilla for about 30 seconds on each side. They should be pliable but not crispy. To assemble the tacos, place a handful of shredded cabbage on each tortilla. Top with a few pieces of spicy garlic shrimp. Add a couple of slices of avocado on top. Finish by garnishing with chopped cilantro and a squeeze of fresh lime juice. Your tacos are now ready to enjoy! For the full recipe, check the detailed instructions above. To get the best shrimp, watch the cook time. Cook shrimp for about 2-3 minutes on one side. Flip them for another 1-2 minutes. The shrimp should turn pink and slightly charred. If you cook them too long, they become rubbery. To avoid this, take them off the heat as soon as they're done. While cilantro is great, you can also use green onions or radishes as toppings. These add fresh flavors and crunch. For a complete meal, pair your tacos with a side of black beans or a fresh corn salad. These sides balance the spices in the tacos. When prepping, store shrimp and toppings separately. Use airtight containers to keep everything fresh. Shrimp can last in the fridge for up to two days. To reheat, warm them in a skillet for a few minutes. Keep tortillas in a dry place. Warm them in a pan before serving for the best taste. For a full list of ingredients and instructions, check out the [Full Recipe]. {{image_2}} If you can't find shrimp, don’t worry! You can use other seafood like scallops or fish. These options will still give you a nice flavor. For a vegetarian twist, try using diced tofu or tempeh. Both will soak up the spices well. To adjust the heat, you can change the amount of cayenne pepper. If you find it too spicy, try using only half the amount. You can also add some sweet bell pepper to balance the heat. For a milder version, skip the cayenne and add more paprika for flavor without the heat. If you need gluten-free options, use corn tortillas. They are naturally gluten-free and perfect for this dish. For a dairy-free option, skip any cheese and stick to fresh toppings like avocado and cilantro. If you're watching carbs, consider using lettuce wraps instead of tortillas. They add a nice crunch while keeping it light. Check out the Full Recipe for all the details! To keep your shrimp fresh, store leftovers in an airtight container. Make sure the shrimp cool down to room temperature before sealing. This helps prevent moisture buildup, which can lead to sogginess. If you have extra tortillas, store them in a separate bag. This keeps them from getting too soft. Aim to eat leftovers within two days for the best taste. Reheating shrimp and tortillas is simple. For the shrimp, use a skillet over medium heat. Heat them for about two minutes. Stir gently to avoid overcooking. For the tortillas, warm them in a dry skillet for about 20 seconds on each side. This gives them a nice texture. You can also wrap them in a damp paper towel and microwave for 15-20 seconds. This helps keep them soft and tasty. You can freeze prepared tacos, but it’s best to freeze the shrimp and tortillas separately. Place the shrimp in a freezer-safe bag. Remove as much air as possible before sealing. For tortillas, stack them with parchment paper in between. When ready to eat, thaw the shrimp overnight in the fridge. Heat them as described above. Warm the tortillas in a skillet, and you’re ready to enjoy your Spicy Garlic Shrimp Tacos again! For the full recipe, check [Full Recipe]. Yes, you can prepare some parts ahead of time. Store the shrimp mixture in the fridge for up to 24 hours. Keep the cooked shrimp separate from the tortillas. To keep the tortillas fresh, wrap them in foil or plastic. You can warm them later before serving. For the best taste, assemble the tacos right before eating. These tacos shine with tasty sides. Here are some great options to pair: - Mexican rice: A flavorful side that complements the shrimp. - Black beans: They add protein and fiber to your meal. - Corn salad: A fresh salad with sweetness that balances the spice. - Margaritas: A refreshing drink that pairs nicely with tacos. To lower the spice level, reduce the cayenne pepper in the recipe. You can also add a dollop of sour cream or yogurt on top. This adds creaminess and cools the heat. Another option is to serve the tacos with extra lime wedges. The citrus helps balance the spice. Enjoy your tacos without the burn! You now have a full guide to making Spicy Garlic Shrimp Tacos. We covered fresh ingredients, cooking steps, and serving tips. Always remember to cook shrimp just right for the best texture. Don't hesitate to try different proteins or modify spice levels to suit your taste. Keep leftovers fresh by storing them properly. With these tips, you can create a tasty meal that impresses. Enjoy your taco-making adventure and share your delicious outcomes with others!](https://mysavedrecipe.com/wp-content/uploads/2025/05/b74041a6-3a6f-4ebe-8ebb-d312e43c7fb6.webp)
Are you ready to spice up your taco night? My Spicy Garlic Shrimp Tacos are both quick and bursting with
