Skip to content
DisclaimerTerms Of UseGDPR PolicyCookie Policy

My Saved Recipe

  • Home
  • Drinks
  • Appetizers
  • Dinner
  • Dessert
  • About
  • Contact
  • Privacy Policy
DisclaimerTerms Of UseGDPR PolicyCookie Policy

Savannah

- 2 cups fresh strawberries, hulled and sliced - 1 tablespoon sugar (to sprinkle on strawberries) - 8 ounces cream cheese, softened - 1 cup powdered sugar - 1 teaspoon vanilla extract - 2 cups whipped cream (or cool whip) - 1 package (11 oz) of graham crackers - Mint leaves for garnish (optional) To make this easy treat, you need fresh strawberries. They add bright color and flavor. The sugar helps sweeten the berries and draws out their juices. Cream cheese gives a rich taste and pairs well with the whipped cream. Whipped cream is key for a light texture. You can use store-bought cool whip or make your own. Graham crackers form the base and add crunch. For a nice touch, mint leaves can be used as a garnish. They add a pop of color and fresh flavor. This list covers everything you need for a delightful no-bake strawberry shortcake. You can find the full recipe to guide you through the steps. Enjoy making this easy dessert! First, take 2 cups of fresh strawberries. Hulling means removing the green tops and slicing them into small pieces. Place them in a medium bowl. Now, sprinkle 1 tablespoon of sugar over the strawberries. This sugar helps bring out their natural juices. Let the strawberries sit for about 15 minutes. This process is called macerating. You will see the strawberries become juicy and sweet. Next, grab a large mixing bowl. Add 8 ounces of softened cream cheese, 1 cup of powdered sugar, and 1 teaspoon of vanilla extract. Blend these together until the mixture is smooth and creamy. This will create a rich filling. Now, gently fold in 2 cups of whipped cream. Be careful not to deflate the whipped cream. This folding makes your filling light and fluffy. Now comes the fun part—assembling your shortcake! Start with a layer of graham crackers on a large platter. You may need to break some crackers to fit them nicely. Next, spread half of your cream cheese mixture over the crackers. Then, take half of your macerated strawberries and spoon them over the cream. Spread them evenly. Repeat this process. Add another layer of graham crackers, the rest of the cream mixture, and the remaining strawberries. If you want, you can top it with one more layer of graham crackers. Cover the entire dessert with plastic wrap. Refrigerate for at least 4 hours, or overnight if you can wait. This chilling time is crucial for the flavor to meld. Before you serve, add some fresh mint leaves for a pop of color. This no-bake strawberry shortcake is now ready to impress your family and friends! For the complete recipe, check out the [Full Recipe]. To get the best layers in your shortcake, follow these tips: - Layering: Start with a layer of graham crackers. Break them if needed to fit. Add cream filling, then strawberries. Repeat this to build height. - Chilling Time: Chill the cake for at least 4 hours. Overnight is best. This lets the flavors blend well. A few mistakes can spoil your dessert: - Overmixing the Filling: Mix the cream cheese and whipped cream gently. Too much mixing can make it runny. - Not Chilling Long Enough: If you serve it too soon, the layers may not hold. Give it time to set. Make your shortcake shine with these ideas: - Presentation Ideas: Serve in clear glasses for a fun look. Top with fresh strawberries and mint for color. - Recommended Pairings: Enjoy with lemonade, iced tea, or a light dessert wine. These drinks complement the strawberries nicely. For the complete recipe, check out the [Full Recipe]. {{image_2}} You can easily switch up the flavors in your no-bake strawberry shortcake. Try using different fruits like blueberries or peaches. These fruits add their own unique taste. You can also mix berries together for a fun twist. If you want a different base, consider using sponge cake. It offers a fluffy texture that brings a new feel to the dish. You can layer the sponge cake in the same way as the graham crackers. This change will keep your dessert fresh and exciting. For those needing gluten-free options, look for gluten-free graham crackers. Many brands offer these, so you can enjoy the same great taste without the gluten. Make sure to check the label for gluten-free certification. If you want a vegan version, swap out the cream cheese for a dairy-free alternative. You can use coconut cream or cashew cream in the filling. This option keeps the dessert creamy and rich while being plant-based. You can adapt this dessert for different seasons and holidays. For example, for the Fourth of July, layer strawberries and blueberries. This gives you a red, white, and blue treat that’s festive and fun. For fall, try adding pumpkin spice to the cream filling. It will bring a warm flavor to your dessert. These variations make your no-bake strawberry shortcake a year-round delight. You can enjoy it at any gathering or just for a sweet treat at home. For the full recipe, check out the No-Bake Strawberry Shortcake section. To keep your no-bake strawberry shortcake fresh, store it in the fridge. Use an airtight container to prevent it from absorbing other flavors. If you don’t have one, cover it tightly with plastic wrap. This helps keep the cake moist and prevents drying out. It’s best to eat the leftovers within three days for optimal taste. You can freeze the no-bake strawberry shortcake for later enjoyment. First, cut it into servings. Wrap each piece in plastic wrap, then place them in a freezer-safe bag. This way, you can take out just what you need. To thaw, move a piece to the fridge for several hours or overnight. Avoid using the microwave, as this can change the texture. In the fridge, the no-bake strawberry shortcake lasts about three to five days. Keep an eye out for signs of spoilage. If you see any mold or if it smells off, it's time to toss it. The strawberries may also lose their freshness and become mushy, which is another sign it's no longer good. Always trust your senses when it comes to food safety. Yes, you can make this dessert ahead of time. It tastes even better after chilling. I often prepare it the night before. This gives the flavors time to blend. Just cover it well with plastic wrap. Store it in the fridge until you are ready to serve. If you need a substitute for whipped cream, try using Greek yogurt. It adds a nice creaminess. You can also use cool whip for a similar texture. Another option is to use coconut cream for a dairy-free choice. Whichever you choose, it will still taste great! Yes, there are good substitutes for cream cheese. You can use ricotta cheese for a lighter option. Mascarpone cheese works well too, offering a rich flavor. For a dairy-free version, try using silken tofu blended until smooth. These options can still give you a creamy filling. To keep graham crackers crisp, layer them just before serving. If you want to prepare ahead, consider toasting them lightly in the oven. This adds crunch and helps them hold up better. You can also use a thicker layer of cream between the crackers. This way, they won't absorb too much moisture. No-Bake Strawberry Shortcake is easy and fun to make. You learned about key ingredients, step-by-step preparation, and useful tips. Variations add creativity, and proper storage keeps leftovers fresh. Always remember to layer carefully and chill for best results. Now, gather your friends and enjoy this delicious treat. It’s perfect for any occasion. With these simple steps, you can impress everyone at your next gathering. Happy baking!

No-Bake Strawberry Shortcake Delightful and Easy Recipe

Craving a sweet treat that’s easy to whip up? You’re in the right place! This No-Bake Strawberry Shortcake recipe combines

To make this tasty jalapeño popper dip, you will need: - 8 oz cream cheese, softened - 1 cup sour cream - 1 cup shredded cheddar cheese - 1 cup shredded mozzarella cheese - 2-3 fresh jalapeños, diced (remove seeds for less heat) - 1/2 cup cooked and crumbled turkey bacon or chicken (optional) - 1/2 teaspoon garlic powder - 1/2 teaspoon onion powder - 1/4 teaspoon smoked paprika - Salt and pepper to taste - 1/4 cup chopped green onions (for garnish) You can swap out some ingredients if you prefer. For a creamier dip, use more cream cheese or sour cream. If you want more flavor, add more spices. You can substitute turkey bacon with regular bacon or leave it out entirely. If you dislike heat, use bell peppers instead of jalapeños. When preparing fresh jalapeños, use gloves to avoid touching your eyes. Cut off the tops and slice them lengthwise. Use a spoon to scoop out the seeds and membranes for less heat. Dicing them small helps the flavor spread evenly in the dip. Always taste a tiny piece to check the spice level before adding them to your mix. To start, gather your ingredients. You need: - 8 oz cream cheese, softened - 1 cup sour cream - 1 cup shredded cheddar cheese - 1 cup shredded mozzarella cheese - 2-3 fresh jalapeños, diced (remove seeds for less heat) - 1/2 cup cooked and crumbled turkey bacon or chicken (optional) - 1/2 teaspoon garlic powder - 1/2 teaspoon onion powder - 1/4 teaspoon smoked paprika - Salt and pepper to taste - 1/4 cup chopped green onions (for garnish) In a large bowl, mix the softened cream cheese, sour cream, cheddar, and mozzarella. Stir until the mix is smooth and creamy. Next, add the diced jalapeños, turkey bacon or chicken if you want, and the spices. Mix everything well until it's fully blended. Now, preheat your oven to 375°F (190°C). Once it's ready, transfer your dip mixture to a baking dish. Spread it evenly across the dish. Bake the dip in the preheated oven for 25 to 30 minutes. Look for a bubbly surface and a lightly golden top. To check if your dip is done, look for these signs: - The dip should be bubbly around the edges. - The top should be golden brown. - If you gently shake the dish, the center should jiggle slightly. Let the dip cool for a few minutes after baking. Garnish with chopped green onions before serving. This step adds a pop of color and freshness to your dish. For the full recipe, refer back to the main ingredients list. Enjoy your delicious Jalapeño Popper Dip! You can change the heat of your jalapeño popper dip easily. For a milder dip, remove the seeds and membranes from the jalapeños. This part holds most of the heat. For extra spice, leave some seeds in. You can also use different peppers. Try diced poblano or banana peppers for a sweet twist. If you want more heat, add a dash of cayenne pepper or hot sauce to the mix. To boost flavor, think beyond the basics. You can add more spices like cumin or chili powder for depth. Fresh herbs like cilantro or parsley can brighten the dip. Want a smoky taste? Increase the smoked paprika. Adding cooked and crumbled bacon brings a savory crunch. For creaminess, mix in additional cream cheese or a splash of heavy cream. These little changes can make a big difference! Presentation makes your dip even more fun. Serve it warm in a colorful bowl. Arrange tortilla chips, fresh veggies, or toasted baguette slices around it. This invites people to dig in. For a pop of color, sprinkle chopped green onions on top. You can also serve it with a side of salsa or guacamole for extra flavor. These ideas will impress your guests and make your dip the star of the show! {{image_2}} You can make a tasty vegetarian version of this dip. Start with the same base of cream cheese and sour cream. Use extra veggies like bell peppers or corn for added flavor and crunch. You can also swap the bacon for cooked black beans. This will add protein without meat, making the dip healthy and hearty. If you want a low-carb dip, consider using cauliflower instead of cream cheese. Cooked and mashed cauliflower works well as a base. You can also use Greek yogurt instead of sour cream for a lighter taste. For cheese, try using less mozzarella and more cheddar to keep the carbs down. These changes keep the dip creamy while cutting down on carbs. Get creative with your dip by adding different cheeses or proteins. Try using pepper jack cheese for a spicy kick. You can also mix in some crumbled feta for a tangy flavor. If you want more protein, add shredded chicken or even crab meat. These options create a unique twist on the classic dip. Check out the Full Recipe for more ideas and tips. After you enjoy your Jalapeño Popper Dip, store any leftovers in a sealed container. Let the dip cool before sealing it. Keep it in the fridge for up to three days. This dip tastes best when fresh, but you can still enjoy it later. To reheat your dip, place it in an oven-safe dish. Preheat your oven to 350°F (175°C). Cover the dish with foil to keep moisture in. Heat for about 15-20 minutes, or until it's warm throughout. Stir it halfway to ensure even heating. You can also microwave it on medium power for 1-2 minutes. Just watch it closely so it doesn’t dry out. You can freeze Jalapeño Popper Dip for longer storage. Use a freezer-safe container, leaving some space at the top for expansion. It can last up to two months in the freezer. To thaw, place it in the fridge overnight. Reheat as mentioned above. This way, you’ll have a tasty snack ready whenever you need one! You can serve Jalapeño Popper Dip with many tasty options. Here are some ideas: - Tortilla chips - Sliced veggies like carrots and celery - Toasted baguette slices - Crackers - Pita chips These choices add crunch and flavor. Each one pairs well with the creamy dip. You can even mix and match for fun! Yes, you can make this dip ahead of time. Prepare the dip mixture and store it in the fridge. Cover it tightly to keep it fresh. You can bake it later when you need it. Just remember to bake it for about 35 to 40 minutes if it’s cold from the fridge. This way, your dip will still taste great and be warm when you serve it! To feed a larger group, just double the recipe. Use a bigger baking dish for the dip. You may need to bake it a bit longer. Keep an eye on it while it cooks. You want it to be bubbly and golden. This adjustment makes it easy for everyone to enjoy the dip at your gathering. If you want to see the complete process, check out the Full Recipe! In this post, we covered how to make a tasty Jalapeño Popper Dip. We looked at ingredients, step-by-step instructions, and useful tips. I shared ways to spice it up, customize it, and serve it well. You can also explore variations for different diets and learn how to store leftovers. Whether you're preparing for a party or a casual night, this dip can impress anyone. Now, get in the kitchen and enjoy your dip adventure!

Jalapeño Popper Dip Flavorful and Easy to Make

Are you ready to spice up your next gathering? This Jalapeño Popper Dip is flavorful and super easy to make.

To make this tasty lentil soup, gather these fresh ingredients: - 1 cup green or brown lentils, rinsed - 1 tablespoon olive oil - 1 medium onion, chopped - 2 garlic cloves, minced - 2 medium carrots, diced - 1 celery stalk, diced - 6 cups vegetable broth - 1 teaspoon ground cumin - 1 teaspoon smoked paprika - 1/2 teaspoon salt (adjust to taste) - 1/4 teaspoon black pepper - 4 cups fresh spinach leaves - Juice of 1 lemon - Fresh parsley, chopped (for garnish) These ingredients bring rich flavors and colors to your soup. You can swap some ingredients for what you have. Here are some ideas: - Use chicken broth instead of vegetable broth for more depth. - Swap lentils with split peas if you want a different texture. - Use any green leafy vegetable, like kale, if you don't have spinach. - Change olive oil to butter for a richer taste. These substitutions keep the soup fun and flexible! Each serving of this lentil soup has great nutrients. Here’s a quick look: - Calories: ~200 - Protein: 10g - Carbohydrates: 30g - Fiber: 8g - Fat: 5g This soup is not only tasty but also packed with protein and fiber to keep you full. For the full recipe, check out the detailed steps. Start by washing your vegetables. Rinse 1 cup of lentils in cold water. Chop one medium onion and dice two carrots and one celery stalk. Mince two garlic cloves. This mix gives your soup a great base. Heat 1 tablespoon of olive oil in a large pot over medium heat. Add the onion and sauté it for about 5 minutes. You want the onion to turn soft and clear. Then, add the minced garlic, carrots, and celery. Cook this for another 3 to 4 minutes. The veggies should be slightly soft. Next, add the rinsed lentils to your pot. Pour in 6 cups of vegetable broth, and sprinkle in 1 teaspoon of ground cumin and 1 teaspoon of smoked paprika. Add 1/2 teaspoon of salt and 1/4 teaspoon of black pepper. Bring everything to a boil. Once it boils, lower the heat to a simmer. Cover the pot and let it cook for about 30 to 35 minutes. The lentils should be tender when done. After the lentils are soft, add 4 cups of fresh spinach leaves to the pot. Cook for an additional 5 minutes. This will wilt the spinach nicely. Remove the pot from heat and squeeze in the juice of one lemon. This adds a nice brightness to your soup. Taste it and adjust the seasoning if needed. Your lentil soup with spinach is ready to serve! Enjoy it hot and garnish with fresh parsley if you like. For the full recipe, check out the earlier section. To get the most flavor in your lentil soup, start with fresh ingredients. Use ripe vegetables and good-quality broth. Sauté the onion and garlic well; this builds a strong flavor base. Adding spices like cumin and smoked paprika enhances the taste. For a bright finish, always squeeze in fresh lemon juice at the end. It makes a big difference! One common mistake is not rinsing the lentils. This can lead to grit in your soup. Another mistake is overcooking the lentils. They should be tender but not mushy. Also, don’t skip the spinach; it adds nutrition and color. Lastly, remember to taste and adjust seasoning. Too little salt can dull the flavors. Using the right tools makes cooking easier. A large pot is essential for this recipe. A good cutting board and sharp knife help with chopping vegetables. A wooden spoon is perfect for stirring. A measuring cup is handy for the broth and lentils. Lastly, a citrus juicer makes squeezing lemons a breeze. With these tools, you will save time and effort. For the full recipe, you can refer to the earlier section. {{image_2}} You can boost the protein in your lentil soup with chicken or tofu. If you choose chicken, use cooked, shredded pieces. Stir them in during the last few minutes of cooking. For tofu, use firm or extra-firm blocks. Cut them into cubes and sauté them until golden before adding them to the soup. Both options will make your meal heartier and more filling. Feel free to mix in different vegetables to make this soup your own. Zucchini, bell peppers, or sweet potatoes work well. You can also add frozen peas or corn for a pop of color. Just chop them to a similar size as your carrots and celery, so they cook evenly. This way, you can enjoy new flavors and textures each time you make the soup. Adding spices can completely change your soup's flavor profile. Try curry powder or turmeric for a warm, earthy taste. You can also add red pepper flakes for some heat. If you like herbs, fresh thyme or rosemary can offer a fragrant twist. Just remember to add spices gradually and taste as you go. This ensures you find the perfect balance for your palate. For the full recipe, check out the Hearty Lentil Spinach Delight. After you enjoy your lentil soup, let it cool down. Pour the soup into an airtight container. This helps keep it fresh. Store it in the fridge for up to four days. Make sure it’s sealed well to avoid any bad smells. When you're ready to eat the leftover soup, you can reheat it easily. Pour the soup into a pot. Heat it on low to medium heat. Stir often so it warms evenly. You can also use a microwave. Place the soup in a microwave-safe bowl. Heat it in short bursts, stirring in between. This keeps the soup creamy and tasty. If you want to save some soup for later, freezing is a great option. Let the soup cool completely before freezing. Then, pour it into freezer-safe containers. Leave some space at the top for expansion. You can also use freezer bags. Just remember to label them with the date. The soup can stay fresh for about three months in the freezer. When you’re ready to eat it, thaw it in the fridge overnight before reheating. This way, you can enjoy a warm bowl of lentil soup anytime you like! Yes, you can make lentil soup in a slow cooker! Just follow these steps: - Sauté the onion, garlic, carrots, and celery in a pan. - Add the sautéed veggies to your slow cooker. - Stir in the lentils, broth, spices, and seasonings. - Cook on low for 6-8 hours or on high for 3-4 hours. This method gives the flavors time to blend nicely. You can serve lentil soup with many tasty sides. Here are some ideas: - Crusty bread or rolls for dipping. - A fresh green salad to add crunch. - Rice or quinoa for extra texture. - A dollop of yogurt for creaminess. These sides enhance the meal and make it feel special. This lentil soup is nearly vegan! To ensure it's fully vegan: - Use vegetable broth instead of chicken broth. - Skip any dairy toppings like cheese or sour cream. With just these few tweaks, you can enjoy a hearty vegan meal! For the full recipe, check out the Hearty Lentil Spinach Delight. This blog post covered how to make lentil soup with spinach. You learned about key ingredients, healthy substitutes, and important nutrition facts. I provided simple steps for cooking, plus tips to avoid common mistakes. You also found ideas for variations and storage methods. In conclusion, lentil soup is easy, healthy, and versatile. You can enjoy it many ways and share it with friends. Try making this soup today; it’s sure to please!

Lentil Soup with Spinach Nutritious and Easy Recipe

Looking for a warm and nutritious meal? My Lentil Soup with Spinach is perfect for you! This easy recipe is

To make this tasty salad, gather these items: - 1 can (15 oz) chickpeas, drained and rinsed - 1 tablespoon olive oil - 1 teaspoon smoked paprika - 1/2 teaspoon garlic powder - Salt and pepper to taste - 4 cups fresh spinach, washed and dried - 1/2 cup cherry tomatoes, halved - 1/4 red onion, thinly sliced - 1 avocado, diced - 1/4 cup feta cheese, crumbled (optional) - 2 tablespoons balsamic vinegar - 1 tablespoon lemon juice - 1 teaspoon honey (or maple syrup for a vegan option) You can add your personal touch to this salad. Try these: - Cucumber slices for crunch - Bell peppers for color - Nuts like almonds or walnuts for a protein boost - Fresh herbs like basil or parsley for extra flavor The right flavors make this salad shine. Here are some ideas: - Try chili powder for heat - Use Italian seasoning for a herby mix - A splash of lime juice can brighten the dish - Swap balsamic vinegar with apple cider vinegar for a different taste For the full recipe, check the details above. Enjoy mixing flavors and colors to make this salad your own! Start by preheating your oven to 400°F (200°C). Grab a can of chickpeas, drain, and rinse them. On a baking sheet, spread the chickpeas out evenly. Drizzle one tablespoon of olive oil over them. Next, add one teaspoon of smoked paprika and half a teaspoon of garlic powder. Season with salt and pepper to your taste. Toss everything well, making sure all the chickpeas get nice and coated. Roast them in the oven for 20-25 minutes. Shake the pan halfway through to help them cook evenly. You want them to be golden and crispy. While the chickpeas roast, it’s time to prepare the salad. Take a large bowl and add four cups of fresh spinach. Make sure you wash and dry the spinach first. Then, cut half a cup of cherry tomatoes in half and slice a quarter of a red onion thinly. Also, dice one avocado into bite-sized pieces. All these colorful ingredients make the salad fresh and vibrant. Once the chickpeas are crispy and slightly cooled, add them to your salad bowl. In a small bowl, mix two tablespoons of balsamic vinegar, one tablespoon of lemon juice, and one teaspoon of honey. Whisk until they blend well. Drizzle this dressing over the salad and toss everything gently. If you like, sprinkle a quarter cup of crumbled feta cheese on top. This adds a nice creamy flavor. Now your crispy chickpeas and spinach salad is ready to enjoy! For the complete recipe, check out the Full Recipe. To get crispy chickpeas, start with dry ones. Drain and rinse them well. Pat them dry with a towel. Moisture will make them soggy. Use olive oil and seasonings for flavor. I love smoked paprika and garlic powder. Bake them at 400°F (200°C) for 20-25 minutes. Shake the pan halfway through for even cooking. Keep an eye on them. They should be golden and crunchy. When making this salad, choose fresh ingredients. In spring, use fresh peas or radishes. Summer brings ripe tomatoes and cucumbers. Fall is great for roasted squash. In winter, add hearty greens like kale or collards. Always pick what is in season. It makes your salad taste better and helps the planet. Serve this salad in a big bowl. You can add more toppings if you like. Try nuts for crunch or fruits for sweetness. Pair it with grilled chicken or fish for a filling meal. You can also add a side of whole-grain bread. For a special touch, sprinkle feta cheese on top. Drizzle extra balsamic vinegar for more flavor. For the full recipe, check the earlier section. {{image_2}} To make this salad vegan, simply skip the feta cheese. You can also replace honey with maple syrup in the dressing. This small change keeps the salad sweet and plant-based. It still tastes amazing with the crunchy chickpeas and fresh veggies. This salad is already gluten-free! The chickpeas and veggies are safe for anyone avoiding gluten. Just ensure your dressings do not contain gluten. Most balsamic vinegar and lemon juice are gluten-free, but double-check the labels to be sure. You can add many fun flavors to this salad. Try adding nuts like walnuts or almonds for crunch. Seeds, like pumpkin or sunflower seeds, also work great. Fresh herbs, like basil or parsley, can brighten up the dish. If you want more spice, a sprinkle of red pepper flakes adds heat. For a creamy touch, swap avocado for a dollop of tahini. The options are endless, and they make the dish your own! For the full recipe, check out the detailed instructions. You can store leftover salad in an airtight container. Add a paper towel inside the lid. This helps absorb excess moisture. Keep the salad in the fridge. It stays fresh for up to two days. However, the chickpeas may lose some crunch. If you have leftover chickpeas, you can reheat them. Spread them on a baking sheet. Bake at 400°F (200°C) for about 10 minutes. This helps restore their crispiness. You can also use the stovetop. Just heat them in a pan until warm. To keep your ingredients fresh, store them properly. Keep spinach in a damp paper towel in a bag. This helps it stay crisp. For cherry tomatoes, store them at room temperature. Do not refrigerate as it changes their taste. Use ripe avocados quickly, as they bruise easily. For feta cheese, keep it in its brine or use a sealed container. Following these tips helps maintain the salad's flavor and texture. For the full recipe, check out the section above. To make chickpeas crispy, start with canned chickpeas. Drain and rinse them well. Dry them with a towel to remove excess moisture. Next, toss them in olive oil and spices. I like to use smoked paprika and garlic powder for flavor. Spread them on a baking sheet in a single layer. Bake at 400°F for 20-25 minutes. Shake the pan halfway through to cook evenly. They should be golden and crunchy when done. Yes, you can prepare the salad in advance! However, keep the dressing separate until you are ready to serve. This keeps the spinach fresh and crisp. You can mix the spinach, tomatoes, onion, and avocado a few hours ahead of time. Just store it in the fridge. When you’re ready, add the chickpeas and dressing. This will make a delicious meal that stays fresh. If you want a substitute for feta cheese, try goat cheese or mozzarella. Both add creaminess and taste. For a vegan option, use tofu or a nut-based cheese. Another good choice is nutritional yeast for a cheesy flavor without dairy. Each of these options will change the taste slightly but will still be tasty in your salad. Crispy chickpeas and spinach salad offers a tasty mix of flavors and textures. We explored key ingredients, step-by-step prep, and helpful tips. With variations and storage info, you'll keep it fresh and exciting. Cooking is about fun, so feel free to try new flavors. Enjoy your healthy meals!

Crispy Chickpeas and Spinach Salad Tasty and Healthy

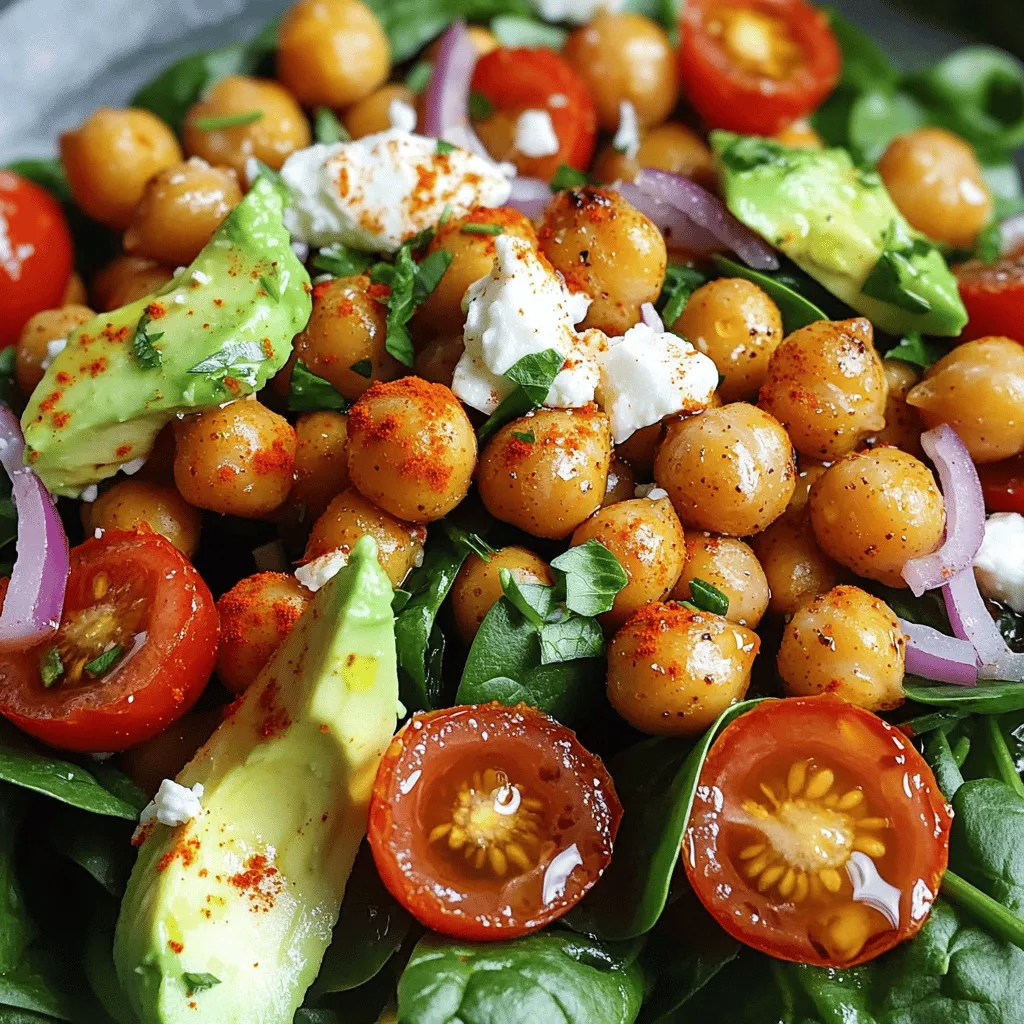
Looking for a tasty and healthy meal option? Let’s dive into a delightful Crispy Chickpeas and Spinach Salad that you

- 2 cups cooked jasmine rice (preferably chilled) - 1 cup mixed bell peppers (red, yellow, green), diced - 1 cup green peas (fresh or frozen) - 1 carrot, finely chopped - ½ cup corn kernels (fresh or frozen) - 3 green onions, thinly sliced - 3 cloves garlic, minced - 1 teaspoon ginger, grated - 2 tablespoons soy sauce - 1 tablespoon sesame oil - 2 tablespoons vegetable oil - Salt and pepper to taste - Fresh cilantro or parsley for garnish When making vegetable fried rice, pick fresh veggies. They make your dish vibrant and tasty. I love using jasmine rice. It has a nice aroma and fluffy texture. Chilling the rice helps it fry better. Leftover rice works great, too! I often choose colorful bell peppers. They add sweetness and crunch. Green peas bring a nice pop of color and sweetness. Carrots give a lovely crunch and bright orange color. Corn adds a sweet burst of flavor. Garlic and ginger create a fragrant base. They boost the dish's overall flavor. Green onions add freshness and a mild onion taste. Use soy sauce for saltiness and umami. Sesame oil adds a rich, nutty flavor. Garnish with fresh herbs like cilantro or parsley. They add a fresh touch and brighten the plate. For the full recipe, check out the linked section. This mix of ingredients makes your vegetable fried rice flavorful and satisfying! 1. Heat 2 tablespoons of vegetable oil in a large skillet or wok over medium-high heat. 2. Add 3 cloves of minced garlic and 1 teaspoon of grated ginger. Sauté for about 30 seconds until the smell fills your kitchen. This step wakes up the flavors. 1. Toss in 1 cup of diced bell peppers, 1 finely chopped carrot, and ½ cup of corn kernels. Stir these for about 3 to 4 minutes. You want them to soften but not lose their crunch. 2. Next, incorporate 1 cup of green peas. Cook for another 2 minutes. This adds a nice pop of color and sweetness. 1. Push the cooked veggies to the side of the skillet, making room in the center. 2. Add 2 cups of chilled jasmine rice to the center. Break up any clumps with a spatula. Let it cook for 2 to 3 minutes without stirring. This lets the rice get a bit crispy. 3. Pour in 2 tablespoons of soy sauce and 1 tablespoon of sesame oil over the rice. Mix thoroughly with the vegetables. 4. Fold in 3 thinly sliced green onions, along with salt and pepper to taste. Cook for another 2 to 3 minutes, stirring occasionally. You now have a colorful dish ready to serve! For the complete recipe, check out the [Full Recipe]. Choosing jasmine rice makes a big difference. Jasmine rice is fragrant and sticky. This rice holds together well, giving you great texture. Using chilled rice is key too. Cold rice helps each grain stay separate. It prevents mushiness in your dish. You can mix up the flavors in your fried rice. Try adding spices like cumin or coriander. Fresh herbs such as basil or cilantro can brighten the dish. Balancing salty and umami flavors is important. Use soy sauce for saltiness, and try adding a splash of mushroom sauce for depth. To get that crispy rice, let it sit in the pan. After adding the chilled rice, avoid stirring it for a few minutes. This helps create a nice crust. When cooking vegetables, time matters. Add softer veggies like peas last. This keeps them bright and tender without overcooking. For a full guide, check the Full Recipe. {{image_2}} You can add protein to your vegetable fried rice for a heartier meal. Tofu is a great option. It soaks up flavors well. Chicken adds a nice texture and taste. Shrimp cooks quickly and brings a sweet flavor. Beef can also work, giving a savory punch. - Cooking Times: - Tofu: Cook for 5-7 minutes until golden. - Chicken: Cook for 6-8 minutes until no longer pink. - Shrimp: Cook for 3-5 minutes until they turn pink. - Beef: Cook for 4-6 minutes until browned. Using seasonal vegetables makes your fried rice fresh and tasty. In spring, try asparagus and snap peas. Summer works well with zucchini and tomatoes. Fall is great for squash and carrots. Winter means root veggies like parsnips and carrots. - Adjusting Cooking Methods: - Quick-cooking veggies like zucchini need less time. - Harder veggies like carrots should cook longer. You can easily make this dish vegan or gluten-free. For vegan, skip any animal protein. Use tofu or just veggies. For gluten-free, swap soy sauce for tamari or coconut aminos. - Substitutions for Common Allergens: - If you're allergic to soy, use chickpea flour for flavor. - For nut allergies, avoid sesame oil and use a different oil. For the full recipe, check out the details above! To store leftover vegetable fried rice, let it cool first. Cooling helps keep it fresh. Place the rice in an airtight container. Make sure the lid is on tight to keep out air. You can also use a resealable plastic bag. Squeeze out any extra air before sealing it. This step helps prevent freezer burn. When reheating your fried rice, use a skillet or microwave. If you use a skillet, add a bit of oil. Heat it over medium heat to keep the texture nice. If using a microwave, place the rice in a bowl. Add a splash of water to keep it moist. Cover the bowl with a lid or a plate. Heat it for one to two minutes, then stir. This method keeps the rice fluffy and warm. You can keep vegetable fried rice in the fridge for about three to four days. If you want to store it longer, freeze it. In the freezer, it lasts for up to three months. Always check for signs of spoilage. If you see any off smells, strange colors, or mold, throw it out. Always prioritize your health and safety when eating leftovers. Yes, you can use other rice types. While jasmine rice is my favorite, here are some good options: - Basmati rice: This rice has a nutty flavor and stays fluffy. - Brown rice: It adds a chewy texture and more nutrients. - Sushi rice: This type is sticky, making it easy to mix. - Long-grain rice: It keeps grains separate and adds a light taste. Each rice type offers a unique taste and texture, so feel free to experiment! To add heat, try these ideas: - Chili flakes: Just a pinch adds nice warmth. - Sriracha sauce: This popular hot sauce gives a sweet and spicy kick. - Chili paste: It adds depth and good heat. - Fresh jalapeños: Diced jalapeños mixed in brings fresh spice. Start with a small amount and adjust to your heat preference. Pairing side dishes can make your meal even better. Here are a few suggestions: - Spring rolls: These crispy treats complement the rice nicely. - Miso soup: A warm bowl of miso adds a soothing touch. - Tofu stir-fry: The protein balances the meal well. - Steamed broccoli: This adds color and nutrients to your plate. Each side enhances the flavor and texture of vegetable fried rice. Using leftover rice is easy and smart. Here's how: - Use chilled rice: Freshly cooked rice can be too sticky; chill it first. - Break up clumps: Before cooking, ensure no rice clumps remain. - Adjust flavors: Add a bit more soy sauce if the rice is plain. Leftover rice makes a quick and tasty meal, so don’t throw it away! For more details, check out the Full Recipe. In this blog post, we explored how to make delicious vegetable fried rice. I shared key ingredients, including jasmine rice and fresh vegetables, plus seasonings that enhance flavor. You learned step-by-step instructions for cooking and some helpful tips for perfecting texture. Remember, this dish is versatile. You can add protein or adjust it for dietary needs. With the right storage, your leftovers can last too. Enjoy making this meal for yourself and others. Happy cooking!

Vegetable Fried Rice Flavorful and Easy Meal Guide

Looking for a quick, tasty meal? Vegetable fried rice is your answer! It’s simple to make and uses fresh ingredients

When making mushroom risotto, some key ingredients make it shine: - 1 ½ cups Arborio rice - 4 cups vegetable broth (low sodium) - 1 cup fresh mushrooms (cremini, shiitake, or your choice), sliced - 1 small onion, finely chopped - 2 cloves garlic, minced - 1 cup fresh spinach, chopped - ½ cup grated Parmesan cheese (or nutritional yeast for a vegan option) - 2 tablespoons olive oil - 1 tablespoon butter (or vegan butter for a dairy-free option) - Salt and pepper to taste - Fresh parsley, chopped (for garnish) Arborio rice is special because it holds its shape and absorbs flavors well. Vegetable broth adds depth and warmth to the dish. Fresh mushrooms bring earthiness, while onion and garlic give that classic flavor base. Spinach adds a pop of color and nutrients, and cheese gives it a rich, creamy finish. You can add some optional ingredients to boost flavor: - Fresh herbs like thyme or rosemary - A splash of white wine for acidity - Cheese alternatives for vegan options - Accompaniments like toasted nuts or seeds for crunch Herbs and spices can brighten your risotto. A splash of white wine adds a nice tang. If you want a vegan dish, use nutritional yeast instead of cheese. Lastly, consider adding toasted nuts for texture and flavor. For a complete guide, check the Full Recipe. 1. In a saucepan, heat the vegetable broth over medium heat. 2. Stir until just simmering. 3. Reduce the heat to low to keep the broth warm while cooking the risotto. 1. In a large pan, heat 2 tablespoons of olive oil and 1 tablespoon of butter over medium heat. 2. Add the finely chopped onion and minced garlic. Sauté until the onion turns translucent, which takes about 3-4 minutes. 3. Next, add 1 cup of sliced mushrooms to the pan. Stir often, cooking until they turn golden and tender, about 5-7 minutes. 4. Now, stir in 1 ½ cups of Arborio rice. Cook for 1-2 minutes until the rice is lightly toasted and coated with oil. 5. Start adding broth gradually. Use one ladle at a time, stirring frequently. Let the rice absorb most of the broth before adding more. Continue until the rice is creamy and al dente, which takes about 18-20 minutes. 1. Once cooked, fold in 1 cup of chopped spinach and ½ cup of grated Parmesan cheese (or nutritional yeast for a vegan option). Stir until the spinach wilts and the cheese melts. 2. Season with salt and pepper to taste. Remove from heat and let it sit for a minute to thicken. 3. Serve the risotto right away, garnishing with fresh parsley. This method creates a rich, creamy mushroom risotto that brings warmth and comfort. For the full recipe, check the details above. To make your mushroom risotto creamy, you need to stir often. This helps release starch from the rice. The rice you choose matters too. Arborio rice is best because it is starchy. Also, keep your broth warm but not boiling. This helps the rice absorb the liquid evenly. Many people overcook the rice, making it mushy. Aim for al dente, where it has a slight bite. Another mistake is not using enough broth. This can lead to dry risotto. Lastly, don’t skip the resting phase. Letting it sit for a minute helps thicken the dish. Pair your risotto with a light salad or garlic bread. A crisp white wine can enhance the flavors. You can also serve it in a bowl or on a plate, topped with fresh parsley. For a twist, try adding a drizzle of truffle oil for extra richness. For the full recipe, check the section above. {{image_2}} Mushroom risotto is a fun dish to adapt. You can use many types of mushrooms. Cremini and shiitake work well, but feel free to try others. Each type gives its own taste. For more protein, you can add chicken or shrimp. Just cook them before adding the rice. If you want a vegan option, use nutritional yeast instead of cheese. This keeps the dish creamy and adds a nice flavor. Risotto has many styles around the world. Classic Italian risotto uses simple, fresh ingredients. Try adding seasonal veggies for a twist. For example, in fall, you can use pumpkin or squash. Local flavors can also inspire your dish. If you live near the coast, try adding seafood for a fresh take. You don’t always need a stove. An Instant Pot can speed things up. Just follow the same steps but in your pot. For a hands-off method, bake it in the oven. Mix everything in a baking dish and cover it. Lastly, a slow cooker lets you set it and forget it. Just stir occasionally and you'll have a delicious meal. For a complete guide, check out the Full Recipe. To store your mushroom risotto, let it cool down first. Place it in an airtight container. This keeps the risotto fresh and tasty. You can store it in the fridge for up to three days. If you want to enjoy it later, remember to check for any signs of spoilage. You can freeze mushroom risotto for a longer shelf life. First, cool it completely. Then, portion it into airtight containers or freezer bags. Make sure to remove as much air as possible to avoid freezer burn. When you're ready to eat, thaw the risotto in the fridge overnight. To reheat, add a splash of broth and warm it gently on the stove. Stir often to keep it creamy. Choose sturdy, airtight containers for storing your risotto. Glass or BPA-free plastic containers work well. Label each container with the date before you freeze them. This helps you keep track of how long they’ve been in the freezer. Enjoy your mushroom risotto delight anytime with these easy storage tips! For the complete recipe, check the Full Recipe section. The best rice for risotto is Arborio rice. This rice has a high starch content. It makes the risotto creamy. Other good options include Carnaroli and Vialone Nano. These types absorb liquid well and stay firm. You can make risotto ahead of time, but it may lose its creaminess. Cook the risotto until it is just al dente. Then, let it cool and store it in the fridge. When ready to serve, reheat with a bit of broth. Stir it often to bring back the creamy texture. Yes, you can make risotto without broth. Use water instead, but the flavor may be less rich. To boost taste, add herbs or spices. You can also use vegetable or chicken stock for more depth. Yes, you can use frozen mushrooms. They are convenient and save time. Just remember to thaw them first. Drain excess water before adding them to the risotto. This helps maintain the dish’s texture. To make risotto creamier without cheese, try adding pureed vegetables. Cauliflower or butternut squash works well. You can also use coconut cream or cashew cream for richness. Another option is to stir in nutritional yeast for a cheesy flavor. For the full recipe, check out the [Full Recipe]. Mushroom risotto is a simple yet refined dish that brings joy to any meal. We covered key ingredients, like Arborio rice and fresh mushrooms, essential for flavor. Cooking steps included warming the broth and perfecting the creamy texture. Plus, we shared tips to avoid common mistakes. You can customize the dish with regional variations and alternative cooking methods. Whether you enjoy it today or save leftovers, this dish is a winner. Now, you’re ready to create a delicious mushroom risotto that tastes amazing every time.

Mushroom Risotto Delightful Creamy Comfort Dish

Welcome to the world of Mushroom Risotto, a dish that brings comfort to your table! With its creamy texture and

To make the stuffed bell peppers with quinoa, you will need: - 4 large bell peppers (any color) - 1 cup quinoa, rinsed - 2 cups vegetable broth - 1 can (15 oz) black beans, drained and rinsed - 1 cup corn kernels (fresh or frozen) - 1 medium onion, diced - 2 cloves garlic, minced - 1 tablespoon olive oil - 1 teaspoon cumin - 1 teaspoon smoked paprika - Salt and pepper to taste - 1 cup diced tomatoes (fresh or canned) - 1/2 cup shredded cheese (cheddar or Monterey Jack) - Fresh cilantro, for garnish These stuffed peppers are not just tasty; they are healthy too! Each serving offers a good amount of protein and fiber. Quinoa is a great source of complete protein, which means it has all nine essential amino acids. Black beans add even more protein and fiber. Here’s a quick look at the nutrition per serving: - Calories: 350 - Protein: 15g - Carbohydrates: 55g - Fiber: 10g - Fat: 10g If you want to change things up, there are many options: - Quinoa: Try brown rice or farro for a different grain. - Black beans: You can use kidney beans or chickpeas instead. - Corn: If you don't like corn, you can skip it or add peas. - Cheese: For a dairy-free option, leave out the cheese or use a vegan cheese. These substitutes can help you customize the dish. You will still enjoy a filling and flavorful meal. For the complete recipe, check out the Full Recipe. First, gather your ingredients. You will need: - 4 large bell peppers (any color) - 1 cup quinoa, rinsed - 2 cups vegetable broth - 1 can (15 oz) black beans, drained and rinsed - 1 cup corn kernels (fresh or frozen) - 1 medium onion, diced - 2 cloves garlic, minced - 1 tablespoon olive oil - 1 teaspoon cumin - 1 teaspoon smoked paprika - Salt and pepper to taste - 1 cup diced tomatoes (fresh or canned) - 1/2 cup shredded cheese (cheddar or Monterey Jack) - Fresh cilantro, for garnish Next, preheat your oven to 375°F (190°C). This heat will help cook your peppers perfectly. Now, rinse your quinoa under cold water. This step removes any bitter taste. In a medium saucepan, bring the vegetable broth to a boil. Add the rinsed quinoa. Lower the heat and cover the pot. Let it simmer for about 15 minutes. The quinoa will be fluffy and the liquid will be absorbed. While the quinoa cooks, heat olive oil in a large skillet over medium heat. Add the diced onion and minced garlic. Sauté for about 3-4 minutes. You want the onion to look clear. Next, stir in the black beans, corn, diced tomatoes, cumin, smoked paprika, salt, and pepper. Cook for another 5 minutes. This step lets the flavors mix well. Once the quinoa is ready, fluff it with a fork. Add it to the skillet with the vegetable mix. Stir everything until it is well mixed. Now, take your bell peppers. Carefully cut the tops off and remove the seeds. Stand the peppers upright in a baking dish. Stuff each one generously with the quinoa mix. Press down gently to pack it in well. Top each pepper with shredded cheese. Cover the baking dish with foil. Bake for 25 minutes. After that, remove the foil. Bake for another 10-15 minutes. You want the cheese to melt and bubble. When done, let the peppers cool a bit before serving. Garnish with fresh cilantro. For the full recipe, check the section above. Enjoy your colorful and tasty meal! To make the best stuffed peppers, choose firm bell peppers. Look for ones with bright colors and smooth skin. When you cut the tops, do it carefully. A sharp knife helps keep the edges neat. Make sure to remove all seeds. This way, your filling gets packed tight. Pre-cook your quinoa in vegetable broth for extra flavor. This step adds depth to the dish. Mix in your veggies while the quinoa cooks. This saves time and keeps the flavors fresh. Always taste your filling before stuffing. Adjust spices to your liking for a burst of flavor. You only need a few tools to make this dish. A medium saucepan is key for cooking quinoa. A large skillet helps you sauté the veggies well. Use a baking dish to hold your stuffed peppers. If you have a sharp knife, it will make cutting easier. An oven mitt is a must for handling hot dishes. For a fun twist, serve your stuffed peppers on a colorful platter. Add fresh cilantro on top for a pop of color. A wedge of lime gives a zesty touch when squeezed over the peppers. Pair them with a light salad or some crusty bread for a full meal. You can also serve with a side of salsa for an extra kick. For the full recipe, check out the Quinoa Delight Stuffed Bell Peppers . {{image_2}} You can easily make these stuffed bell peppers vegetarian or vegan. To go vegan, skip the cheese or use a plant-based cheese. You can also add more veggies. Try zucchini, mushrooms, or spinach. This makes the dish colorful and healthy. You still get lots of flavors and texture without meat or cheese. Want more protein? You can add cooked chicken, turkey, or beef to the quinoa mix. Just brown the meat in the skillet before you add the veggies. For a plant-based option, try adding lentils or chickpeas. Both are great sources of protein. They will fill you up and add richness to the dish. If you like spice, add chopped jalapeños or a pinch of cayenne pepper. These will give the dish a nice kick. For a milder version, stick with sweet spices like smoked paprika or cumin. Adjust the spices to fit your taste. Each level of spice can change the whole flavor. Enjoy experimenting with different heat levels! To keep your stuffed bell peppers fresh, store them in an airtight container. Make sure to let them cool completely before sealing. Place the peppers in the fridge if you plan to eat them within three days. For longer storage, consider freezing them. To reheat stuffed bell peppers, preheat your oven to 350°F (175°C). Place the peppers in a baking dish and cover with foil. Bake for about 20 minutes. If you prefer a microwave, heat on high for 2-3 minutes. Make sure they are hot throughout before serving. To freeze stuffed bell peppers, wrap each one in plastic wrap. Then place them in a freezer-safe bag or container. They can last up to three months in the freezer. When ready to eat, thaw in the fridge overnight before reheating. This keeps the flavor and texture just right. For the full recipe, check the details above. You can skip the cheese easily. Just follow the recipe as is, but leave out the cheese. You still get a great flavor from the spices and veggies. To add creaminess, try adding avocado on top after baking. You can also mix in some nutritional yeast for a cheesy taste. This way, you keep it healthy and still delicious. Yes, you can prepare stuffed bell peppers ahead of time. You can stuff the peppers and store them in the fridge for one day. Make sure to cover them tightly with plastic wrap or foil. When ready, just pop them in the oven. If you freeze them, wrap each pepper well. They can last up to three months in the freezer. Just thaw overnight in the fridge before baking. Stuffed bell peppers are tasty on their own, but you can add sides for more fun. A fresh salad works well, maybe with a light vinaigrette. You can also serve rice or quinoa on the side for more texture. For a crunchy touch, try tortilla chips or garlic bread. If you want a dip, salsa or guacamole is a great choice. This adds a nice kick to your meal. Stuffed peppers are a tasty dish you can easily make at home. We covered the right ingredients, nutrient facts, and good substitutes. The step-by-step guide helped you understand how to prepare, cook, and bake them. I shared tips to perfect your dish and different ways to serve it. Remember, you can try veggie options or adjust spice levels for variety. Finally, good storage and reheating tips ensure you enjoy leftovers. Now it's time to explore your own ideas and enjoy this delicious meal!

Stuffed Bell Peppers with Quinoa Healthy and Easy Meal

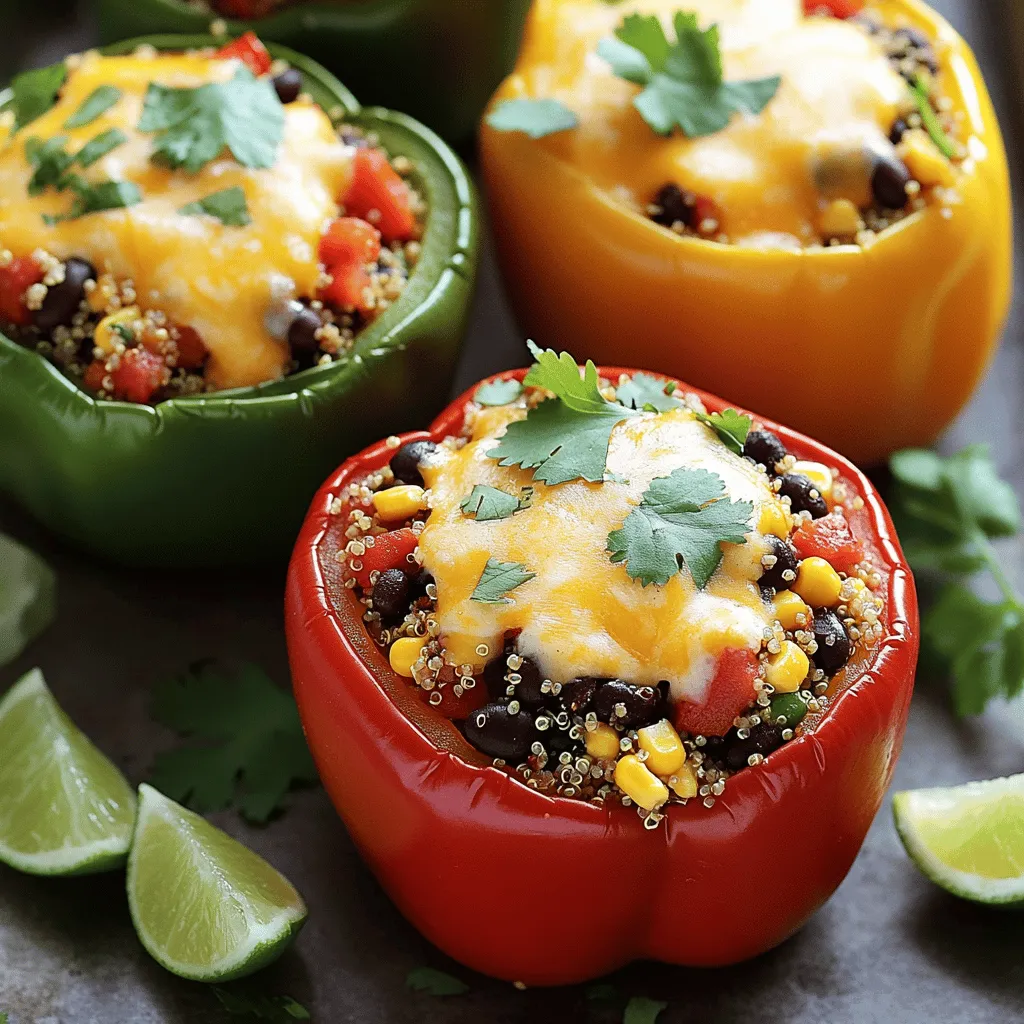
Looking for a nutritious meal that’s simple to make? Stuffed bell peppers with quinoa are your answer! This dish packs

To make a tasty cauliflower rice stir-fry, gather these items: - 1 medium head of cauliflower, grated or processed into rice-sized pieces - 1 cup of mixed bell peppers, diced (red, yellow, green) - 1 cup of snap peas, trimmed - 1 medium carrot, julienned - 3 green onions, sliced - 2 cloves of garlic, minced - 1 tablespoon fresh ginger, grated - 3 tablespoons soy sauce (or tamari for gluten-free) - 1 tablespoon sesame oil - 1 tablespoon olive oil - Salt and pepper to taste - Sesame seeds for garnish - Fresh cilantro or parsley for garnish You can add more flavors with these optional ingredients: - 1 cup of cooked protein (chicken, shrimp, or tofu) - ½ cup of corn or peas for sweetness - 1 tablespoon of chili paste for heat - Lime juice for tang This recipe is great for many diets. It is: - Gluten-free if you use tamari - Vegan as it has no animal products - Low in carbs, making it friendly for low-carb diets This meal can fit many dietary needs. Enjoy it while staying healthy! First, you need to make the cauliflower rice. Take a medium head of cauliflower. Grate it or pulse the florets in a food processor. You want it to look like rice grains. This step is quick and easy. Set the cauliflower rice aside after you finish. In a large skillet or wok, heat olive oil over medium-high heat. Once the oil is hot, add minced garlic and grated ginger. Sauté these for about 30 seconds to release their aroma. Next, toss in the diced bell peppers, julienned carrots, and snap peas. Stir-fry these for about 3-4 minutes. You want them soft but still crisp. Now, add the prepared cauliflower rice to the skillet. Stir-fry everything together for another 5-7 minutes. This helps the cauliflower absorb all the tasty flavors. After that, pour in the soy sauce and sesame oil. Mix everything well and cook for another 2 minutes. Finally, season with salt and pepper to taste. For this dish, the total cooking time is about 12-15 minutes. The oil should be heated to medium-high, around 350°F (175°C). The goal is to keep the veggies crisp and colorful. Follow these times for the best results. For the full recipe, refer to the complete instructions provided. To get the best flavor from cauliflower rice, start with a fresh head. Grate or process it right before cooking. This keeps it moist and tasty. Use a large skillet or wok for even cooking. Keep the heat high to help it fry well without becoming soggy. Always stir frequently. This helps avoid burning and ensures even cooking. You can boost the taste of your stir-fry with simple additions. Try adding a splash of lime juice for a zesty kick. A pinch of red pepper flakes adds heat for spice lovers. For a richer flavor, use coconut aminos instead of soy sauce. Fresh herbs like cilantro or parsley can brighten up your dish. Finally, top with sesame seeds for crunch and flavor. One common mistake is overcooking the cauliflower rice. It should remain slightly firm. Another error is not seasoning it enough. Always taste and adjust salt and pepper at the end. Avoid using too much oil, as this can make it greasy. Lastly, don’t forget to prep your veggies first. This keeps the cooking process smooth and quick. For the full recipe and step-by-step instructions, check out the Full Recipe. {{image_2}} You can boost your stir-fry with protein. Chicken is an easy choice. Just cook diced chicken breast before adding veggies. Shrimp adds a nice touch too. Sauté shrimp until pink and tender. For a plant-based option, use tofu. Firm tofu works best. Just cube it and brown it in the skillet first. This adds great texture and flavor. Feel free to mix up your veggies. Zucchini or broccoli are excellent choices. You can also use mushrooms for an earthy taste. Carrots can be swapped with shredded cabbage. These changes keep the dish fresh and exciting. Use what you have on hand to create your own twist. Different sauces can change the whole flavor. Swap soy sauce for teriyaki for a sweet kick. Sweet and sour sauce gives a tangy taste that's fun. You can even make your own sauce with simple ingredients. Just mix vinegar, sugar, and ketchup for a quick sweet and sour option. Each sauce adds a new layer of flavor to your dish. For the complete recipe, check out the Full Recipe section. Store your leftover cauliflower rice stir-fry in an airtight container. Make sure it cools down first. Refrigerate it within two hours to keep it fresh. It will stay good for about three to four days. Label the container with the date for easy tracking. Reheat your cauliflower rice stir-fry on the stove for the best taste. Use a skillet over medium heat. Add a splash of water or oil to keep it moist. Stir often until it’s warmed through. You can also microwave it in short bursts, stirring in between. Aim for one to two minutes, checking to avoid overcooking. If you want to freeze your stir-fry, use a freezer-safe container. Let it cool completely before packing it. It can last for up to three months in the freezer. When ready to eat, thaw it in the fridge overnight. Reheat it on the stove for best flavor. Cauliflower rice is simply grated or processed cauliflower that looks like rice. It’s low in carbs and full of nutrients. You can use it as a base for many dishes. It’s a great swap for regular rice in any recipe. The flavor is mild and works well with many spices. Yes, you can prep this dish in advance. Make the cauliflower rice and chop the veggies ahead. Store them in the fridge to keep them fresh. You can stir-fry them when you’re ready to eat. This saves time on busy days. To add spice, you can use chili sauce or add red pepper flakes. Another option is to include sliced jalapeños or serrano peppers. Adjust the amount to match your heat preference. This will give your stir-fry a nice kick! For more details, check the Full Recipe for inspiration. In this post, we explored making delicious cauliflower rice stir-fry. We discussed key ingredients, cooking steps, and helpful tips for success. You can customize this dish with proteins, sauces, and vegetables to suit your taste. Remember to store leftovers properly to enjoy later. Keep experimenting with flavors to find your favorite twist. With these insights, you’ll create a dish that delights everyone. Enjoy your cooking adventure!

Cauliflower Rice Stir-Fry Flavorful and Quick Meal

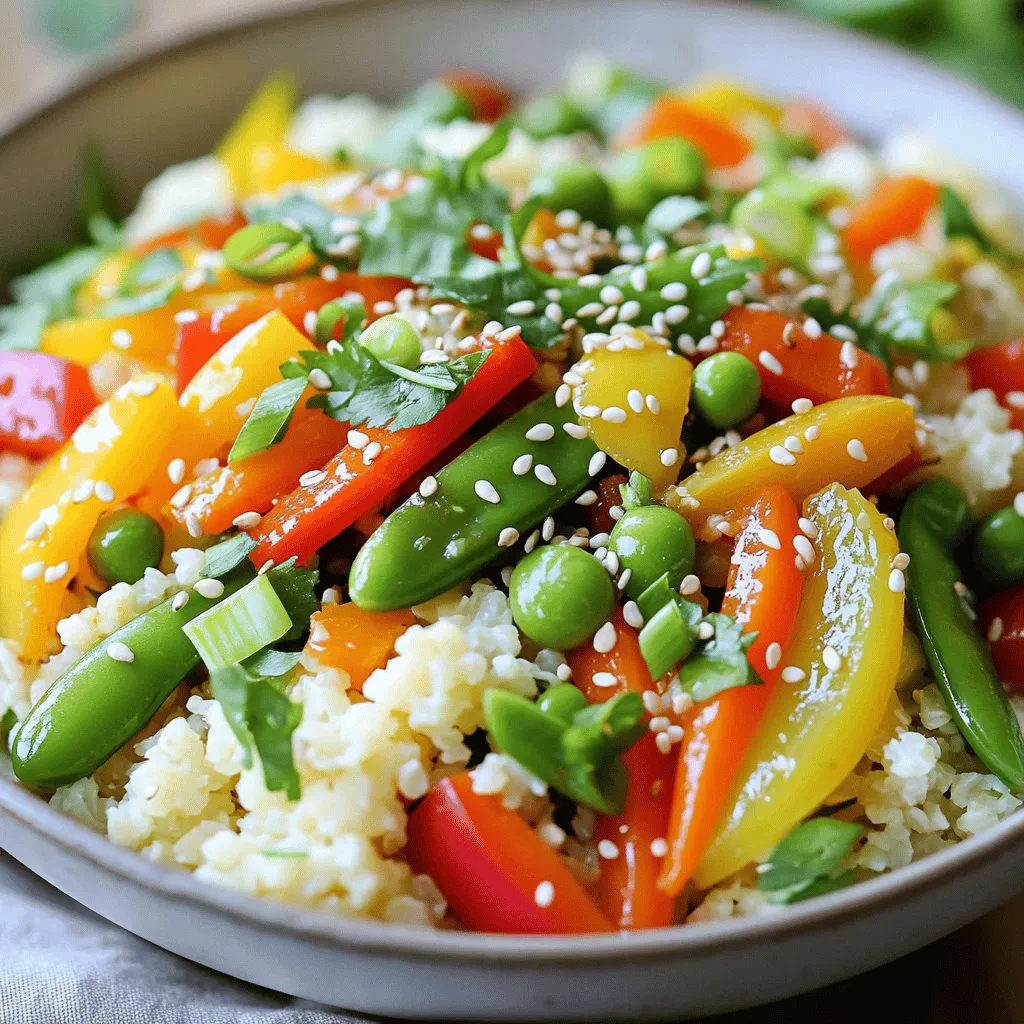
Looking for a quick, tasty meal? I’ve got you covered with my Cauliflower Rice Stir-Fry! This dish combines fresh ingredients

To make Broccoli Cheddar Stuffed Potatoes, gather the following items: - 4 large russet potatoes - 2 cups broccoli florets, chopped - 1 cup sharp cheddar cheese, grated - 1/2 cup sour cream - 1/4 cup milk (or plant-based alternative) - 2 tablespoons unsalted butter - 1 teaspoon garlic powder - 1/2 teaspoon onion powder - Salt and pepper to taste - Fresh chives or green onions for garnish You can swap some ingredients to fit your taste. For instance: - Use sweet potatoes instead of russets for a sweet twist. - Try a different cheese like mozzarella or gouda for varied flavor. - Replace sour cream with Greek yogurt for a tangy kick. - Opt for almond milk or oat milk if you need a dairy-free option. Each serving of these stuffed potatoes offers a good balance of nutrients. Here’s a quick look: - Calories: About 350 - Protein: 12 grams - Carbohydrates: 45 grams - Fat: 15 grams - Fiber: 5 grams These values can vary based on ingredient choices and portion sizes. Always check labels for specific numbers. For a full recipe, you can refer to the detailed instructions included above. Start by preheating your oven to 400°F (200°C). While it heats, scrub the russet potatoes under cold water. Dry them off well. Use a fork to prick each potato several times. This helps steam escape as they bake. Place the potatoes directly on the oven rack. Bake them for 45-60 minutes. You want the skin to be crispy and the inside to be soft. While the potatoes bake, it’s time to cook the broccoli. Bring a pot of salted water to a boil. Add the chopped broccoli florets and cook for about 3-4 minutes. You want them bright green and tender. Once done, drain the broccoli and cool it down with cold water. In a mixing bowl, combine the cooked broccoli with grated cheddar cheese, sour cream, milk, butter, garlic powder, onion powder, salt, and pepper. Stir until everything mixes well. After baking, remove the potatoes from the oven. Let them cool for a few minutes. Slice each potato lengthwise, but don’t cut all the way through. Carefully scoop out some of the inside, leaving room for the filling. Add the scooped potato flesh to the bowl with the broccoli mix. Stir everything together. Now, stuff each potato skin with the broccoli-cheddar mix. Pack it in well. If you like, sprinkle more cheese on top. Return the stuffed potatoes to the oven and bake for an extra 10-15 minutes. Look for the cheese to be melted and bubbly. Once done, take them out and let them cool slightly. Garnish with chopped chives or green onions. Enjoy your delicious Broccoli Cheddar Stuffed Potatoes! For the complete process, check the Full Recipe. To bake perfect potatoes, choose large russet potatoes. They have a fluffy inside. Scrub them well to remove dirt. Prick each potato with a fork to avoid bursting. Bake them at 400°F (200°C) for 45-60 minutes. The skin should be crispy, and the inside should feel soft. Check doneness by inserting a fork. If it goes in easily, they’re ready. For a creamy filling, use sour cream and butter. These ingredients add richness. Mix the cooked broccoli with grated sharp cheddar cheese. The cheese melts well and adds flavor. If you want extra creaminess, add more milk. Stir until everything is well combined. This step is key for that smooth texture. To get that perfect crispy skin, bake the potatoes directly on the oven rack. This helps circulate heat. After baking, let them cool for a few minutes. When you scoop out the flesh, leave some behind. This helps keep the skin sturdy. If you want extra crispiness, return the stuffed potatoes to the oven for 10-15 minutes. This browns the cheese and makes the skin delightful. For the full recipe, check out the detailed steps earlier. {{image_2}} You can change the cheese for a new taste. Try using gouda for a smoky flavor. Mozzarella gives a nice stretch. For a sharp kick, use pepper jack. If you like creaminess, go for cream cheese. These choices make your stuffed potatoes unique. Adding protein boosts the meal. Cooked chicken or turkey blends well with the filling. You could mix in crispy bacon for extra flavor. For a meat-free option, try chickpeas or lentils. These additions make your potatoes heartier and more filling. If you want a vegetarian twist, use ricotta instead of cheddar. For a vegan version, swap the cheese for a plant-based option. Use cashew cream for richness and a dairy-free sour cream. With these swaps, you keep the taste while making it friendly for all diets. After enjoying your Broccoli Cheddar Stuffed Potatoes, let any leftovers cool. Place them in an airtight container. Keep the container in the fridge. They should stay fresh for up to three days. Make sure you don't leave them out for too long. Bacteria can grow if food sits at room temperature. To reheat, use the oven for the best results. Preheat your oven to 350°F (175°C). Place the stuffed potatoes on a baking sheet. Cover them with foil to keep moisture in. Heat for about 15-20 minutes, or until warm. You can also use a microwave. Heat on medium for 2-3 minutes, but the potatoes may not be as crispy. If you want to save some for later, freezing is a great option. Wrap each stuffed potato in plastic wrap. Then, place them in a freezer-safe bag. They can last for up to three months in the freezer. When you're ready to eat, thaw them in the fridge overnight. Reheat as described above for a tasty meal. For the full recipe, visit the link provided. Broccoli Cheddar Stuffed Potatoes can last about 3 to 5 days in the fridge. Make sure to store them in an airtight container. This keeps them fresh and tasty. Always check for any signs of spoilage before eating. If they smell off or look strange, it's best to throw them away. Yes, you can make these stuffed potatoes in advance. Prepare the filling and stuff the potatoes. Then, cover them well and store in the fridge. You can bake them later when you are ready to eat. This saves time and is great for busy days. You can use many vegetables in your stuffing. Here are some tasty options: - Spinach - Cauliflower - Carrots - Peppers - Mushrooms Feel free to mix and match based on your taste. Just remember to chop them small so they blend well with the cheese. Each veggie adds a new flavor and texture to the dish. In this blog post, I covered how to make broccoli-cheddar stuffed potatoes. You learned the key ingredients, easy steps to prepare, and tips for perfect results. I shared ideas for different cheeses and proteins to customize your dish. Plus, you now know how to store leftovers and reheat them. These stuffed potatoes are tasty and filling. Enjoy your cooking and make this dish your own!

Broccoli Cheddar Stuffed Potatoes Flavorful and Fast

Are you looking for a quick, tasty meal? Broccoli Cheddar Stuffed Potatoes are your answer! They are simple to make,

- 1 pound large shrimp, peeled and deveined - 4 tablespoons unsalted butter - 4 cloves garlic, minced - 1 tablespoon lemon zest - 2 tablespoons freshly squeezed lemon juice - 1 teaspoon red pepper flakes (optional) - Salt and pepper, to taste - Fresh parsley, chopped (for garnish) How to choose the best shrimp When buying shrimp, look for shrimp that feel firm and look bright. The shells should be shiny and not sticky. Fresh shrimp smell like the ocean, not fishy. If you can, buy shrimp that you see on ice. This shows they are fresh. Importance of using fresh lemons Fresh lemons give the best flavor. Choose lemons that feel heavy for their size. Their skin should be bright and smooth. Avoid lemons with soft spots or wrinkles. Fresh lemon juice adds a zest that makes the dish pop. Required pots and pans You will need a large skillet for this recipe. A non-stick skillet works best for cooking shrimp. It helps prevent sticking and makes cleanup easy. Recommended utensils for preparation Gather a sharp knife for mincing garlic and zesting lemons. Use a cutting board for safe chopping. A spatula will help you stir and flip the shrimp evenly. 1. Melting the butter and sautéing garlic Start by melting 4 tablespoons of unsalted butter in a large skillet. Use medium heat. Once the butter is fully melted, add 4 cloves of minced garlic. Sauté this for about 1-2 minutes. Stop when the garlic smells fragrant but has not browned. 2. Cooking shrimp to perfection Raise the heat to medium-high. Add 1 pound of large, peeled, and deveined shrimp to the skillet. Season them with salt, pepper, and red pepper flakes if you like some heat. Cook the shrimp for 2-3 minutes on one side. You will see them turn pink. Then, flip the shrimp over to cook the other side. 3. Incorporating lemon flavor After flipping the shrimp, add 1 tablespoon of lemon zest and 2 tablespoons of freshly squeezed lemon juice to the skillet. Stir to coat the shrimp evenly. Keep cooking for another 2-3 minutes until the shrimp are fully cooked and soaked with flavor. - Optimal heat levels for cooking shrimp Start with medium heat to melt the butter and sauté the garlic. Then, switch to medium-high heat for cooking the shrimp. This range keeps the shrimp tender and juicy. - Recommended cooking times for each step - Sauté garlic: 1-2 minutes - Cook shrimp (first side): 2-3 minutes - Cook shrimp (second side): 2-3 minutes - Total time: About 10-12 minutes for shrimp to reach perfection. - How to garnish for presentation Once the shrimp is cooked, remove it from heat. Sprinkle freshly chopped parsley on top. This adds a pop of color and freshness to your dish. - Suggested plating ideas Serve the shrimp on a nice plate. You can also add a side of rice or pasta to soak up the lemon garlic butter sauce. This makes your meal look fancy and delicious. For the full recipe, check out the complete instructions above. Enjoy your cooking! To get the best flavor from your Lemon Garlic Butter Shrimp, focus on seasoning. Start with fresh garlic and high-quality butter. These two ingredients are key to a rich taste. - Salt and pepper: These basics enhance all the flavors. Use them generously but taste as you go. - Red pepper flakes: Add these for a touch of heat. Adjust the amount based on your spice preference. You can also mix in extra ingredients to elevate your dish. Fresh herbs like basil or cilantro add a nice touch. A splash of white wine can deepen the flavor too. Avoid overcooking your shrimp. They cook quickly and should only take about 5-6 minutes total. If you cook them too long, they become rubbery. Also, don’t skip the resting time. Let the shrimp sit for a minute off the heat. This allows the flavors to meld together, making each bite delicious. To store Lemon Garlic Butter Shrimp, place it in an airtight container. Keep it in the fridge and eat it within two days. When it’s time to reheat, do it gently. Use a skillet over low heat. Add a splash of water or broth to keep it moist. This way, your shrimp stays tender and tasty. For more details on preparing this dish, check the Full Recipe. {{image_2}} You can swap shrimp for chicken or scallops. Both options work well in this dish. Chicken should be cut into bite-sized pieces and cooked until no longer pink. Scallops also cook fast and have a sweet taste. If you need a non-meat choice, use firm tofu or mushrooms instead. Both options soak up flavors well. To give your dish an Italian twist, add fresh herbs like basil or oregano. Chopped parsley also adds a nice touch. For spice lovers, increase the red pepper flakes or add a dash of hot sauce. You can even mix in lemon pepper seasoning for a zesty kick. This lets you adjust the taste to your liking. Lemon Garlic Butter Shrimp pairs well with simple sides. Try serving it over rice or pasta. A fresh salad adds a nice crunch too. For drinks, a crisp white wine like Sauvignon Blanc works great. If you prefer cocktails, a light gin and tonic complements the flavors. These choices enhance the meal and make it even more enjoyable. To keep your Lemon Garlic Butter Shrimp fresh, store any leftovers in the fridge. Place the shrimp in an airtight container. This helps to lock in the flavor and moisture. It’s best to eat refrigerated shrimp within three days. If you want to save it for longer, freezing is the way to go. Put the shrimp in a freezer-safe bag. Squeeze out the air and seal it tight. Frozen shrimp can last for up to three months. When you store shrimp, be aware of its shelf life. Cooked shrimp is safe to eat for three days in the fridge. If left out at room temperature, it should not sit longer than two hours. Signs of spoilage include a sour smell or a slimy texture. If your shrimp smells off or feels sticky, it’s best to throw it away. You can use leftover Lemon Garlic Butter Shrimp in many meals. Toss it in pasta for a quick dinner. Mix it into a salad for a healthy lunch option. You can also wrap it in tortillas for tasty shrimp tacos. Preparing shrimp ahead of time makes weeknight meals easier. Simply reheat in a pan over low heat for a few minutes. This way, you save time while enjoying delicious meals. For the full recipe, click here: [Full Recipe]. To tell if shrimp is cooked, look for these signs: - The shrimp turns pink and opaque. - It curls into a C shape. - The flesh feels firm to the touch. Cooking shrimp takes about 4-6 minutes, depending on size. Overcooking will make shrimp tough. If you follow the cooking time in the Full Recipe, you should have perfect shrimp! Yes, you can use frozen shrimp! Just follow these simple steps: - Thaw shrimp overnight in the fridge. - For faster thawing, place shrimp in a bowl of cold water for 15-20 minutes. - Pat the shrimp dry before cooking. This will help them sear nicely in the pan. You have many tasty options for side dishes: - Steamed rice or quinoa pairs well. - A fresh green salad adds crunch. - Roasted vegetables bring color and flavor. - Garlic bread is great for soaking up sauce. Choose what you love best! To add some heat, try these ideas: - Mix in more red pepper flakes. - Add sliced fresh jalapeños or serrano peppers. - Use a dash of hot sauce. Start with a little, and taste as you go. This way, you can keep the garlic and lemon flavors shining through. To sum up, you can create a delicious Lemon Garlic Butter Shrimp. Start with fresh shrimp and lemons. Follow the steps to achieve perfect flavor and don’t skip the tips. Avoid common mistakes like overcooking the shrimp. Try variations and serve with great sides. With proper storage, enjoy leftovers later. This dish is sure to impress, whether for a dinner or meal prep. Dive into cooking, and enjoy every bite!

Lemon Garlic Butter Shrimp Flavorful and Easy Recipe

Looking for a quick and tasty dish that will impress? Try my Lemon Garlic Butter Shrimp recipe! This meal is

Older posts
Newer posts
← Previous Page1 … Page50 Page51 Page52 … Page72 Next →

dsad

© 2025 My Saved Recipe • Built with GeneratePress

Our Policies

  • Copyright Policy
  • Cookie Policy
  • GDPR Policy
  • Privacy Policy
  • Disclaimer
  • Terms Of Use

More Information

  • Home
  • About
  • Contact
  • Appetizers
  • Dessert
  • Dinner
  • Drinks
©2025, My Saved Recipe About Back To Top