Skip to content
DisclaimerTerms Of UseGDPR PolicyCookie Policy

My Saved Recipe

  • Home
  • Drinks
  • Appetizers
  • Dinner
  • Dessert
  • About
  • Contact
  • Privacy Policy
DisclaimerTerms Of UseGDPR PolicyCookie Policy

Savannah

- 1 lb Brussels sprouts, trimmed and halved - 4 cloves garlic, minced - 3 tablespoons olive oil - 1/2 cup grated Parmesan cheese - 1 teaspoon garlic powder - 1/2 teaspoon red pepper flakes (optional) - Salt and pepper to taste - Fresh parsley for garnish (optional) Garlic Parmesan Roasted Brussels Sprouts is a simple yet tasty dish. Each ingredient plays a special role. The Brussels sprouts bring a slight bitterness that balances well with the garlic and cheese. The garlic adds a nice punch, while the olive oil helps everything roast perfectly. Parmesan cheese gives the dish its cheesy goodness. Garlic powder enhances the garlic flavor, while red pepper flakes can add a spicy kick. Salt and pepper help bring out all the flavors. Fresh parsley adds a pop of color and fresh taste at the end. Using fresh ingredients makes a big difference. Fresh Brussels sprouts are crisp and vibrant. They should be firm and bright green. Try to select the best ones for the best flavor. For the full recipe, you can check the section above. This delightful dish is easy to make and perfect for any meal. - Preheat the oven to 400°F (200°C). - In a large bowl, combine the trimmed and halved Brussels sprouts with minced garlic, olive oil, garlic powder, red pepper flakes, salt, and pepper. Toss until the sprouts are well coated. To start, getting the oven hot is key. This helps the sprouts roast perfectly. Next, you mix the Brussels sprouts and spices in a big bowl. Make sure every sprout gets a nice coat of flavor. This step is fun and easy! - Spread sprouts on a baking sheet and roast for 20 minutes. - After 20 minutes, remove the baking sheet and sprinkle the grated Parmesan cheese evenly over the Brussels sprouts. Return to the oven and roast until golden brown. Once your sprouts are well coated, lay them flat on a baking sheet. This gives them room to roast evenly. Set a timer for 20 minutes. When time is up, the sprouts will be tender. Then, sprinkle the Parmesan cheese on top. Put them back in the oven so the cheese can melt and turn crispy. - Cool slightly before garnishing with parsley. When the sprouts are golden and crispy, take them out. Let them cool for a couple of minutes. This helps keep them crunchy. If you want to add color, sprinkle fresh parsley on top. It makes a lovely finish! For the full recipe, check out the details above! To get the best crispy Brussels sprouts, start by preheating your oven to 400°F (200°C). The high heat works wonders for crisping. Cut your Brussels sprouts in half. This helps them cook evenly and get that nice, crispy edge. When you mix them with the garlic and olive oil, make sure they are coated well. This helps them brown nicely. Spread the sprouts on a baking sheet in a single layer. Avoid stacking them; this way, they roast, not steam. For extra flavor, consider mixing different types of cheese. You can use Pecorino Romano for a sharper taste. If you want something milder, go for mozzarella. Add fresh herbs like thyme or rosemary for a tasty twist. You can also play with spices. Try cumin or smoked paprika to bring a new flavor profile. A pinch of lemon zest adds brightness and freshness. These simple changes can make your Garlic Parmesan Roasted Brussels Sprouts even more delightful. For the full recipe, check out the instructions provided. {{image_2}} You can switch up the cheese in this dish. Feta adds a tangy twist. Cheddar gives a rich flavor. Both make great choices. You can also change the oil. Instead of olive oil, use avocado oil. It has a light taste and is good for roasting. For a lighter meal, try low-fat cheese. It cuts calories but keeps flavor. You can also make a low-carb version. Use cauliflower instead of Brussels sprouts. It roasts well and tastes good with garlic. Want to add more texture? Toss in some nuts or seeds. Almonds or sunflower seeds work well. They give a nice crunch. You can also mix in other roasted veggies. Carrots or bell peppers pair nicely with Brussels sprouts. They add color and flavor to your dish. For the complete recipe, check out the [Full Recipe]. To keep your Garlic Parmesan roasted Brussels sprouts fresh, use an airtight container. Store them in the fridge right after they cool. They stay good for about three days. If you want to keep them longer, consider freezing them. They can last up to three months in the freezer. Just remember to let them cool completely before freezing. When it comes to reheating, the oven is your best friend. Preheat it to 350°F (175°C). Spread the sprouts on a baking sheet and heat for about 10-15 minutes. This keeps them crispy. You can also use the microwave, but it may make them a bit soggy. If you use the microwave, heat in short bursts to avoid overcooking. Enjoy your tasty leftovers! Can I make Garlic Parmesan Roasted Brussels Sprouts ahead of time? Yes, you can prepare them in advance. Just roast the sprouts and let them cool. Then, store them in an airtight container. When you're ready to serve, reheat in the oven for a few minutes. What can I serve with Garlic Parmesan Roasted Brussels Sprouts? These sprouts pair well with many dishes. Try them with grilled chicken, steak, or fish. They also complement pasta and grain bowls nicely. How can I adjust the recipe for dietary restrictions? To make it dairy-free, use nutritional yeast instead of Parmesan cheese. For a lower-fat option, reduce the olive oil. Always check for allergies related to any ingredients. What are the nutritional benefits of Brussels sprouts? Brussels sprouts are packed with vitamins. They are high in vitamin K and C. They also provide fiber, which is good for digestion. Plus, they have antioxidants that help fight disease. What is the best way to prepare Brussels sprouts? The best way is to roast them. Roasting brings out their natural sweetness and creates a crispy texture. Make sure to trim and halve them for even cooking. Are Brussels sprouts healthy? Yes, they are very healthy! They are low in calories and high in nutrients. Eating them can boost your immune system and support heart health. How to choose fresh Brussels sprouts at the store? Look for sprouts that are firm and vibrant green. Avoid those with yellowing leaves or soft spots. Fresh sprouts should feel heavy for their size. This blog post showed you how to make Garlic Parmesan Roasted Brussels Sprouts. I covered ingredients, step-by-step instructions, and helpful tips for perfect roasting. You learned about variations and healthy options too. Keep these ideas in mind to enjoy a tasty vegetable dish. With these easy steps, you can impress anyone with your cooking skills!

Garlic Parmesan Roasted Brussels Sprouts Delightful Dish

If you’re looking for a tasty and healthy side dish, Garlic Parmesan Roasted Brussels Sprouts are a winner! These sprouts

- 1.5 lbs boneless chicken thighs - 1 medium onion - 3 cloves garlic - 1 tablespoon ginger The main ingredients form the heart of your Chicken Tikka Masala. The chicken thighs give great flavor and tenderness. Onions, garlic, and ginger add depth. Together, they create a rich base for the dish. - 2 tablespoons garam masala - 1 tablespoon ground cumin - 1 tablespoon ground coriander - 1 teaspoon turmeric powder Spices are key to this recipe. Garam masala brings warmth and depth. Ground cumin and coriander add earthiness. Turmeric gives a nice color and health benefits. Adjust the spices to suit your taste. - 1 can crushed tomatoes - 1 cup coconut milk - Fresh cilantro for garnish Crushed tomatoes give the sauce its body and tang. Coconut milk adds creaminess and balances spice. Fresh cilantro brightens the dish. For the full recipe, follow the steps to make this delightful meal. First, turn the Instant Pot to the Sauté mode. Add 2 tablespoons of vegetable oil. Then, add 1 medium onion, finely chopped. Sauté the onion for about 3-4 minutes. You want it to become soft and translucent. Next, stir in 3 cloves of minced garlic and 1 tablespoon of grated ginger. Cook them for 1-2 minutes. You should smell the wonderful aroma filling your kitchen. Now, it's time to add the star of the dish: the chicken! Take 1.5 lbs of boneless chicken thighs, cut into bite-sized pieces. Combine the chicken with spices. Sprinkle 2 tablespoons of garam masala, 1 tablespoon of ground cumin, 1 tablespoon of ground coriander, 1 teaspoon of turmeric powder, 1 teaspoon of cayenne pepper, and salt to taste over the chicken. Stir well to coat each piece evenly. Next, pour in 1 can of crushed tomatoes and 1 cup of coconut milk. Stir everything together until well mixed. Close the lid of the Instant Pot. Set it to Manual high pressure for 10 minutes. Once the cooking cycle ends, do not rush! Allow the pot to naturally release pressure for 5 minutes. After that, do a quick release for any remaining pressure. Open the lid and stir the chicken tikka masala well. Taste and adjust the seasoning if needed. Enjoy serving this flavorful dish over cooked basmati rice, garnished with fresh cilantro. To make your Chicken Tikka Masala just right, you can adjust the spice levels. If you like more heat, add extra cayenne pepper. For a milder dish, reduce the cayenne. Taste as you go to find your perfect balance. For the sauce consistency, you may want it thicker or thinner. If it’s too thin, let it simmer longer with the lid off. If it’s too thick, add a splash of water or coconut milk. Stir until you reach your desired texture. Sautéing in the Instant Pot is key to building flavor. Start by heating the vegetable oil. Add the onion and cook until it’s soft. This step adds depth to your dish. When cooking is done, let the pressure release naturally. This step allows the flavors to meld together and keeps the chicken juicy. It takes patience but is well worth the wait. Pair your Chicken Tikka Masala with basmati rice. The rice soaks up all the delicious sauce. For a pretty presentation, serve in a deep bowl. Add extra cilantro on top for color. You can also include lime wedges on the side. They add a fresh kick. Warm naan or pita bread is great for dipping, too. Find the Full Recipe to create this delightful dish! {{image_2}} If you want a vegetarian version of Chicken Tikka Masala, try tofu or chickpeas. Tofu works well because it soaks up the sauce. Use firm tofu, cut into cubes. If you like chickpeas, drain and rinse a can of them. They add protein and texture. You can follow the same steps in the recipe. Just replace the chicken with your choice. To change the spice level, adjust the cayenne and garam masala. If you want it milder, cut back on both. Start with half a teaspoon of cayenne. You can always add more later if you want extra heat. Taste as you go, and find the right balance for your palate. Incorporating vegetables makes the dish even better. Spinach is a great option because it wilts down nicely. You can add it during the last few minutes of cooking. Bell peppers also work well. Chop them into bite-sized pieces and add them when you mix in the chicken. This will add color and nutrition to your meal. Store leftover Chicken Tikka Masala in an airtight container. Let the dish cool down first. It stays fresh for up to three days. Always label the container with the date. This helps you track how long it has been in the fridge. To freeze Chicken Tikka Masala, use a freezer-safe container. Portion it into smaller servings. This makes it easier to thaw just what you need. You can freeze it for up to three months. Make sure to leave space at the top of the container. The dish will expand as it freezes. Reheat Chicken Tikka Masala on the stovetop for the best flavor. Use low heat and stir often to prevent sticking. You can also use the microwave. Heat it in 30-second intervals, stirring in between. Add a splash of water or coconut milk if it seems dry. This keeps the dish creamy and tasty. Yes, you can! If you don’t have an Instant Pot, use a stove or slow cooker. For the stove, follow these steps: - Sauté the onions, garlic, and ginger in a pot. - Add chicken and spices, then cook until chicken is browned. - Stir in tomatoes and coconut milk. - Simmer for 20-30 minutes until chicken is cooked through. For a slow cooker, combine all ingredients and cook on low for 6 hours or high for 3 hours. Both methods will yield tasty Chicken Tikka Masala. Chicken Tikka Masala pairs well with several sides. Here are some great options: - Basmati rice: This classic pairing soaks up the sauce. - Naan or pita bread: Use these to scoop up the dish. - Fresh salad: A light salad can balance the rich flavors. - Roasted vegetables: Adds color and extra nutrition. You can mix and match these sides for a perfect meal. The total time to cook Chicken Tikka Masala is about 35 minutes. Here’s the breakdown: - Prep time: 15 minutes to chop and measure. - Cook time: 10 minutes in the Instant Pot. - Natural release: 5 minutes for pressure to drop. This quick cooking time makes it a great weeknight dish! You can find the full recipe for Instant Pot Chicken Tikka Masala in the detailed cooking instructions provided earlier. This will guide you step-by-step through the cooking process. This article covered Chicken Tikka Masala from ingredients to cooking methods. You learned about the key ingredients, spices, and steps to create a delicious dish. Plus, I shared tips for perfecting flavor and offered variations for different diets. Remember to store leftovers properly for later enjoyment. With this knowledge, you can impress anyone at your table. Enjoy cooking and experimenting with this classic dish!

Instant Pot Chicken Tikka Masala Flavorful Dish

Are you ready to dive into a world of flavor? This Instant Pot Chicken Tikka Masala is a quick, delicious

- 4 ears of fresh corn, husked and cleaned - 1 small red onion, finely diced - 1 cup cherry tomatoes, halved - 1 avocado, diced - 1/2 cup fresh cilantro, chopped - 1/2 cup crumbled cotija cheese (or feta) - 2 tablespoons mayonnaise - 2 tablespoons Greek yogurt - 1 tablespoon lime juice - 1 teaspoon chili powder - Salt and pepper to taste You need fresh corn for this dish. It brings a sweet crunch. The red onion adds a nice bite. Cherry tomatoes bring color and a tangy flavor. Avocado gives it creaminess. Cilantro adds freshness, while cotija cheese gives a salty kick. For the dressing, we use mayonnaise and Greek yogurt. This mix gives a creamy texture. Lime juice adds brightness. Chili powder gives that signature smoky heat. Salt and pepper round out the flavors. - Additional lime wedges - Extra cilantro for garnish - Sprinkle of paprika or chili powder Garnishes make your dish pop. Lime wedges add zest. Extra cilantro enhances freshness. A sprinkle of paprika or chili powder adds flair. You can find the full recipe below. Enjoy building your Mexican street corn salad! Grilling the Corn: How to Achieve Perfect Grill Marks Grilling corn is easy. Start by husking and cleaning four ears of fresh corn. Heat your grill to medium-high. Place the corn on the grill for about 8-10 minutes. Turn it every few minutes for even cooking. You want those nice char marks. They add flavor and visual appeal. Once cooked, take it off and let it cool. Cutting Corn Kernels Off the Cob After cooling, it's time to cut the kernels. Hold the cob upright in a large bowl. Use a sharp knife to slice down the sides. The kernels will fall right into the bowl. This method keeps your workspace clean and makes it easy to grab the corn for the salad. Combining Ingredients in a Mixing Bowl Now, let’s bring the salad together. Add the diced red onion, halved cherry tomatoes, diced avocado, and chopped cilantro to the bowl of corn. Mix these ingredients well. The colors will brighten your dish and the flavors will blend beautifully. Creating the Dressing: Balancing Creaminess with Tang For the dressing, mix together two tablespoons of mayonnaise, two tablespoons of Greek yogurt, one tablespoon of lime juice, and one teaspoon of chili powder in a small bowl. Add salt and pepper to taste. Stir until it is smooth and creamy. This dressing offers the perfect balance of tangy and rich flavors. How to Gently Toss the Salad Pour the dressing over the corn and veggies. Use a spatula to gently fold everything together. Be careful not to mash the avocado. You want the salad to look fresh and bright, not mushy. Best Serving Suggestions Serve the salad in a large, colorful bowl. Sprinkle crumbled cotija cheese on top. You can also add extra cilantro and a sprinkle of chili powder for flair. For individual servings, use small cups and add a lime wedge on the side for a pop of color. Enjoy this fresh dish with friends and family. For the full recipe, check the complete instructions above. - Ensuring the Corn is Fresh and Sweet Always pick corn that feels firm. Look for bright green husks. When you peel back the husk, the kernels should be plump and shiny. Fresh corn tastes best and gives your salad that sweet crunch. - Adjusting Seasoning to Taste After mixing your salad, taste it! You might want more lime juice for tang. If you like heat, add more chili powder. Don’t be shy about tweaking the flavors until it sings. - Presentation Ideas for Special Occasions Use a large, colorful bowl to show off the salad. Sprinkle extra cilantro on top for a fresh look. For parties, serve in small cups with a lime wedge. It makes for a fun, easy grab-and-go option. - Best Pairings for a Side Dish This salad goes great with grilled meats or tacos. It balances spicy dishes very well. You can also serve it with chips for a crunchy bite. - Proper Storage Techniques Store leftovers in an airtight container. This keeps the flavors fresh. Place it in the fridge right after serving to keep it safe. - How to Refresh Leftovers Leftovers can lose some crunch. Add a splash of lime juice and a bit more cilantro before serving again. This will bring back some of the freshness and flavor. For the full recipe, check out the Zesty Mexican Street Corn Salad. {{image_2}} You can easily swap some ingredients to fit your taste or needs. - Alternative Cheeses: If you can't find cotija cheese, try feta or parmesan. Both add a nice salty flavor. Feta gives a creamier touch, while parmesan adds a nutty taste. - Dairy-Free Versions: For a dairy-free salad, replace mayonnaise and yogurt. Use avocado or cashew cream. These options keep the salad creamy without dairy. Adding more spices or veggies can make this salad even better. - Adding Spices for Extra Kick: Want some heat? Add cayenne pepper or paprika. These spices boost flavor and add warmth. Start with a small amount and taste as you go. - Incorporating Other Vegetables or Proteins: You can mix in other veggies, like bell peppers or corn salsa. Adding black beans or grilled chicken gives your salad a protein boost. Try these fun twists to change things up. - Gluten-Free Mexican Street Corn Salad: This salad is already gluten-free. Just ensure all your ingredients are certified gluten-free, like sauces and cheeses. - Spicy Version with Jalapeños: For a spicy kick, add diced jalapeños. These peppers bring a fresh burst of heat. Adjust the amount based on your spice tolerance. For the full recipe, check out the details above. To store leftover salad, put it in an airtight container. This keeps the salad fresh. Make sure to cool it before storing. I prefer glass containers, as they do not retain odors. You can also use plastic containers, but ensure they are BPA-free. The salad lasts up to three days in the fridge. Always check for signs of spoilage. If the salad smells off or looks slimy, it’s best to toss it. Freshness is key for both taste and safety. You can freeze Mexican street corn salad, but it changes the texture. To avoid this, freeze ingredients separately. For example, freeze the corn and dressing in different bags. This way, your salad tastes fresh when you thaw it. What is Mexican Street Corn Salad? Mexican Street Corn Salad is a fresh and vibrant dish. It combines grilled corn with rich flavors. You mix in ingredients like cherry tomatoes, avocado, and cotija cheese. This salad has a creamy dressing made from mayonnaise and Greek yogurt. A sprinkle of chili powder adds a nice kick. It’s perfect for parties or as a side dish. Can I make this salad ahead of time? Yes, you can make this salad ahead of time. Prepare it a few hours before serving. Store it in the fridge in an airtight container. This allows the flavors to blend nicely. Just add the dressing before serving for the best taste. How many calories are in Mexican Street Corn Salad? One serving of Mexican Street Corn Salad has about 200-250 calories. This varies based on the ingredients you use. The corn and vegetables add fiber and vitamins. The cheese and dressing add creaminess and flavor. Is this salad healthy? Yes, this salad is healthy. It features fresh veggies and wholesome ingredients. Corn provides fiber and essential nutrients. Avocado adds healthy fats. Using Greek yogurt instead of sour cream keeps it lighter. Gluten-Free Options This salad is naturally gluten-free. All the ingredients, like corn and vegetables, are safe for gluten-free diets. Just ensure any store-bought mayonnaise or yogurt is also gluten-free. Vegetarian and Vegan Adaptations To make this salad vegan, swap out the mayonnaise and Greek yogurt for a plant-based version. You can use cashew cream or a vegan mayo. For the cheese, replace cotija with a vegan alternative or simply skip it. This way, everyone can enjoy the salad! This blog post covered the key ingredients and steps to make a fresh Mexican Street Corn Salad. We explored preparation methods, tips for storing leftovers, and variations to fit your taste. Remember, fresh ingredients are vital for great flavor. Feel free to mix in your favorite spices or toppings to make it your own. Enjoy sharing this delicious, colorful dish with friends and family. It’s a perfect side for any meal. Now, grab your ingredients and get cooking!

Mexican Street Corn Salad Bold and Flavorful Dish

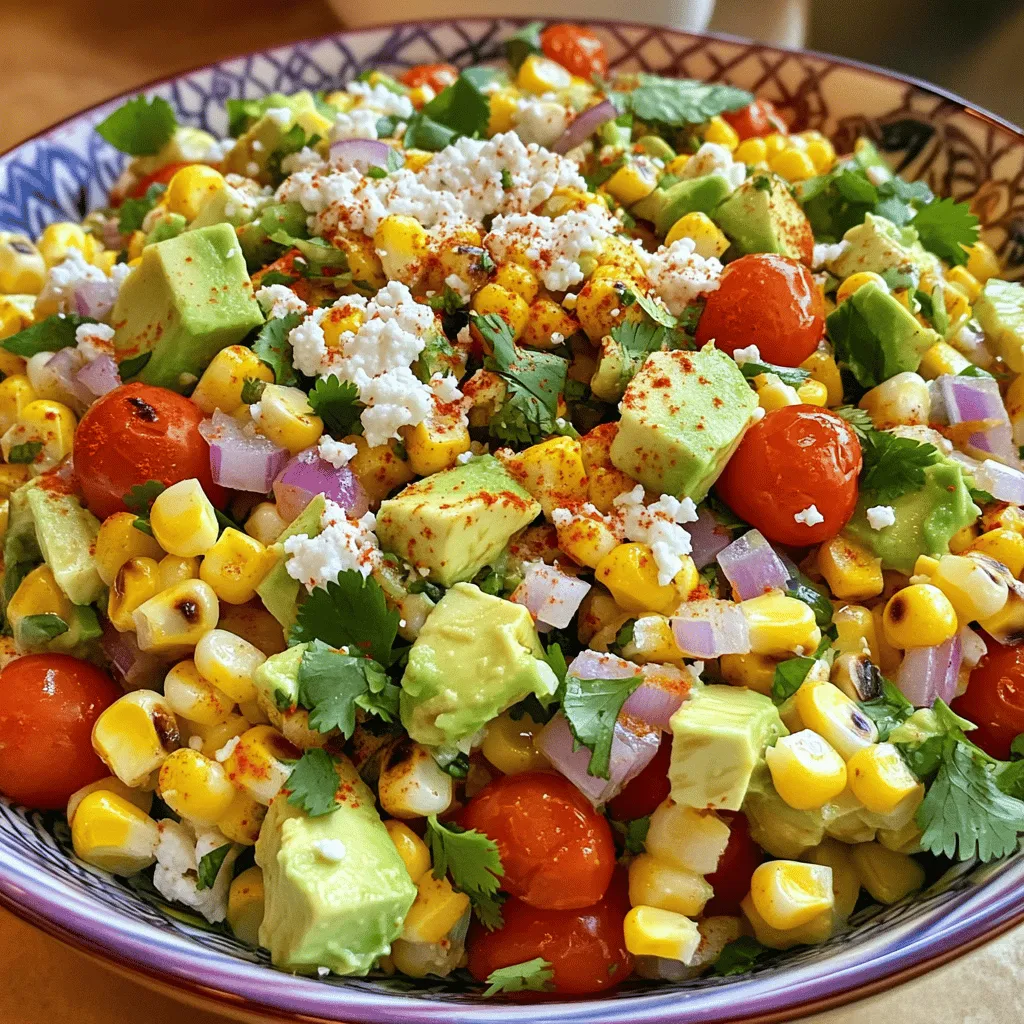
Are you ready to spice up your meal plan? Mexican Street Corn Salad is a vibrant dish bursting with bold

To make Lemon Basil Chicken Skewers, you will need: - 1 lb (450g) boneless chicken thighs, cut into 1-inch pieces - 1/4 cup fresh basil leaves, finely chopped - Zest and juice of 1 lemon - 3 tablespoons olive oil - 2 cloves garlic, minced - 1 teaspoon honey - Salt and pepper to taste - Skewers (metal or soaked wooden) These ingredients combine to create a bright, fresh flavor that makes each bite delightful. If you cannot find fresh basil, try using dried basil. Use about one tablespoon of dried basil per 1/4 cup of fresh. For lemon, bottled lemon juice works in a pinch, but fresh is best for flavor. You can also swap chicken thighs for chicken breasts if you prefer leaner meat. Just remember, thighs stay juicier. You will need a few tools for this recipe: - A large mixing bowl for marinating - A cutting board and knife for chopping - Metal skewers or soaked wooden skewers to hold the chicken - A grill or grill pan for cooking - A meat thermometer to ensure the chicken is fully cooked Having these tools ready will help you cook the skewers easily and efficiently. For the full recipe, check out the details. Start by mixing the marinade. In a large bowl, combine chopped basil, lemon zest, lemon juice, olive oil, minced garlic, honey, salt, and pepper. Stir until well mixed. This mix brings bright flavors to the chicken. Cut the chicken thighs into 1-inch pieces. Add them to the bowl, making sure each piece is well-coated. Cover the bowl with plastic wrap and place it in the fridge. Let it marinate for at least 30 minutes. For more flavor, you can marinate it for up to 2 hours. If you are using wooden skewers, soak them in water for at least 30 minutes. Soaking prevents them from burning. If you use metal skewers, you can skip this step. While the skewers soak, remove the chicken from the fridge. This is a good time to preheat your grill or grill pan over medium-high heat. Once your grill is hot, it’s time to skewer the chicken. Thread the marinated chicken pieces onto the skewers. Leave some space between each piece. This helps them cook evenly. Place the skewers on the grill. Cook for about 8-10 minutes, turning them occasionally. The chicken should get nice grill marks. Use a meat thermometer to check the internal temperature. It should reach 165°F (75°C). Once cooked, remove the skewers from the grill. Let them rest for a few minutes before serving. Enjoy your Lemon Basil Chicken Skewers warm, garnished with more fresh basil and lemon wedges. For the full recipe, check the section above. To get the best flavor, focus on fresh ingredients. Use fresh basil for a bright taste. The zest and juice of the lemon really make a difference. They add a tangy kick that brightens the chicken. Marinate your chicken for at least 30 minutes. For more flavor, go for up to 2 hours. This lets the spices soak in fully. One common mistake is not soaking wooden skewers. If you skip this step, they may catch fire. Another error is overcrowding the skewers. Leave some space between the pieces. This helps them cook evenly. Lastly, don’t skip resting the skewers after cooking. This lets the juices settle, making each bite juicy. To ensure even cooking, cut your chicken into similar-sized pieces. Aim for 1-inch cubes. When grilling, turn the skewers every few minutes. This helps them cook on all sides. Use a meat thermometer to check for doneness. The chicken should reach an internal temperature of 165°F (75°C). This way, you get perfectly cooked skewers every time! For the complete recipe, check out the Full Recipe section. {{image_2}} You can switch up the chicken for other meats. Try shrimp or pork for a new taste. Both cook quickly and soak up the lemon-basil flavor well. If you use shrimp, just marinate for 15-20 minutes. Pork works best with tender cuts like tenderloin. Keep the marinade time similar to chicken for best results. If you want a meatless meal, use firm tofu or veggies. Extra-firm tofu absorbs flavors great. Cut it into cubes and marinate just like the chicken. For veggies, try bell peppers, zucchini, or mushrooms. Cut them big enough to stay on the skewers. You can even add some cherry tomatoes for color and sweetness. Add more flavors to your skewers with spices or herbs. Try a pinch of red pepper flakes for heat. For a smoky taste, add smoked paprika. You can also use fresh herbs like thyme or oregano alongside basil. Experiment with citrus, too—lime juice or orange zest can give a fresh twist. Just remember to balance flavors, so they work well together. For the full recipe of Lemon Basil Chicken Skewers, check out the link! After you enjoy your lemon basil chicken skewers, store any leftovers properly. Place the skewers in an airtight container. You can keep them in the fridge for up to three days. Make sure they cool down before sealing the container. This keeps the chicken moist and tasty. When you want to eat the leftover skewers, reheating is simple. You can use a microwave or an oven. If using a microwave, place the skewers on a plate and cover them with a damp paper towel. Heat in short bursts until warm. If using an oven, preheat it to 350°F (175°C). Lay the skewers on a baking sheet and heat for about 10 minutes. This method helps keep the chicken juicy. You can freeze the skewers for future meals. First, let the cooked skewers cool completely. Then, wrap them tightly in plastic wrap, and place them in a freezer bag. They can stay in the freezer for up to three months. When you're ready to eat, thaw them in the fridge overnight before reheating. This way, you always have a quick and tasty meal on hand. For the full recipe, check out the details above. Yes, you can use chicken breasts instead of thighs. Chicken breasts are leaner but can be just as tasty. Thighs have more fat, which keeps them juicy. If you use breasts, be careful not to overcook them. You can marinate the chicken for 30 minutes to 2 hours. The longer you marinate, the more flavor it will soak up. Just don’t go over 2 hours, or the chicken may become mushy. These skewers pair well with many sides. Consider serving them with a fresh salad, rice, or grilled veggies. You can also add some crusty bread to soak up the juices. Yes, it is important to soak wooden skewers. Soaking them in water for at least 30 minutes helps prevent burning on the grill. This small step can make a big difference in your cooking. To add heat, you can mix in some red pepper flakes or hot sauce. You could also add diced jalapeños to the marinade. Adjust the spice level to match your taste. Enjoy experimenting with flavors! For the full recipe, check out the earlier section. In this blog post, we explored how to create delicious Lemon Basil Chicken Skewers. We covered all the essential ingredients, necessary tools, and detailed steps for marinating and cooking. I shared tips to enhance flavor and avoid common mistakes. We also looked at variations for proteins and vegetarian options, plus how to store leftovers. With these recipes and tips, you can enjoy tasty skewers at home. Don't hesitate to experiment and make it your own!

Lemon Basil Chicken Skewers Flavorful and Easy Recipe

If you’re looking for a quick and tasty dinner idea, you’ve come to the right place! My Lemon Basil Chicken

- 3 ripe bananas, mashed - 1/2 cup Nutella - 1/2 cup sugar or honey - 1/3 cup unsalted butter, melted - 1 teaspoon vanilla extract - 1 teaspoon baking soda - Pinch of salt - 1 1/2 cups all-purpose flour - 1/2 cup chopped walnuts - 1/4 cup chocolate chips This recipe for Nutella Banana Bread is simple and fun. Each ingredient plays a big role in making it moist and delicious. Ripe bananas give the bread a sweet taste. They add moisture and make it soft. I always use bananas that are brown and speckled. They taste better this way. Nutella brings a rich, chocolatey flavor. I love how it swirls through the bread. You can mix it in or leave some on top for an extra treat. Sugar or honey adds sweetness. Honey can make it a bit healthier. Unsalted butter gives a nice texture. It helps to bind the mix and keeps it moist. The vanilla extract adds warmth. It enhances the overall flavor. Baking soda helps the bread rise. It makes the texture light and fluffy. A pinch of salt balances the sweetness. It brings out all the flavors. Finally, all-purpose flour gives structure. It holds everything together. If you want to add more flavor or texture, consider the optional add-ins. Chopped walnuts add crunch. Chocolate chips make it even more decadent. For the full recipe, check out the cooking guide. Each step will help you make this tasty treat. - Preheat the oven to 350°F (175°C). - Grease a 9x5-inch loaf pan. Start by preparing your oven and pan. Preheating ensures your bread bakes evenly. Greasing the pan helps the bread slide out easily once it's done. - Combine bananas and melted butter. - Stir in sugar or honey, Nutella, and vanilla. Next, you will mix your batter. In a large bowl, mash the ripe bananas. Then mix in the melted butter until it's smooth. Add sugar or honey, Nutella, and vanilla extract. Stir until everything blends into a nice, creamy mixture. - Incorporate baking soda and salt. - Gradually mix in flour without overmixing. Now it’s time for the dry ingredients. Sprinkle the baking soda and salt over the wet mix. Stir to combine. Gradually add the all-purpose flour. Mix gently, as overmixing can make your bread tough. - Fold in optional add-ins. - Pour batter into prepared pan and smooth the top. - Bake for 60-70 minutes and check for doneness. If you like, fold in chopped walnuts or chocolate chips for extra flavor. Pour the batter into the greased pan and smooth the top with a spatula. Bake in your preheated oven for 60 to 70 minutes. Check for doneness by inserting a toothpick in the center. If it comes out clean, your bread is ready! Using ripe bananas is key for great flavor. They should be soft and brown. This ripeness adds natural sweetness and moisture. For the perfect texture, mix the batter just until combined. Overmixing can make it tough. Serve Nutella Banana Bread warm for the best taste. Slice it thick and drizzle extra Nutella on top. Add a dollop of whipped cream for an extra treat. You can also serve it with fresh fruit or a scoop of ice cream for a fun twist. Common issues include bread being too dry or too wet. If it’s dry, check your oven temp. It might be too high. If too wet, bake a bit longer. Adjust baking time based on your oven. Every oven is different, so keep an eye on your bread! {{image_2}} You can make Nutella banana bread even more exciting. One way is to add spices like cinnamon or nutmeg. These spices add warmth and depth to the flavor. Just a teaspoon of cinnamon can change the whole taste. You can also try using different types of chocolate. Dark chocolate gives a rich taste, while milk chocolate adds sweetness. Mix and match to find your favorite flavors. If you want a healthier version, consider using whole wheat flour instead of all-purpose flour. This swap boosts fiber and nutrients. You can also make a vegan option. Replace the butter with coconut oil and the eggs with applesauce or flaxseed meal. This way, everyone can enjoy this tasty treat without worry. Not a fan of Nutella? You can replace it with peanut butter. This swap gives a nutty flavor and a creamy texture. If you need a nut-free version, try sunflower seed butter. This option keeps the bread moist and delicious. You can easily switch ingredients to fit your taste and needs. For the complete recipe, check out the [Full Recipe]. After you bake your Nutella banana bread, let it cool in the pan for about 10 minutes. This step helps it set and makes it easier to remove. Then, transfer the bread to a wire rack. Cooling it completely ensures the best texture. Once cool, wrap the bread tightly in plastic wrap or aluminum foil. You can also place it in an airtight container. This keeps it fresh and moist. To freeze Nutella banana bread, first cool it fully. Then, slice the bread into pieces for easy serving later. Wrap each slice in plastic wrap, then place them in a freezer-safe bag. This way, you can grab a slice whenever you want a treat. When you're ready to enjoy a slice, just take it out of the freezer. Let it thaw at room temperature for about 30 minutes. If you want it warm, pop it in the microwave for about 10-15 seconds. Nutella banana bread lasts about 3-4 days at room temperature. Store it in a cool, dry place to keep it fresh. If you see any mold or smell something off, it’s best to toss it. Always trust your senses! Keeping an eye out for any changes helps you enjoy your bread at its best. Yes, you can make this recipe gluten-free. Use a gluten-free flour blend instead of all-purpose flour. Brands like Bob's Red Mill or King Arthur Flour work well. Make sure to check the blend for equal measurements. This keeps the texture light and moist. To check if your banana bread is done, insert a toothpick into the center. If it comes out clean or with a few crumbs, it’s ready. You can also gently press the top. If it springs back, it is done. Make sure to avoid undercooking to keep it moist. Absolutely! You can add more Nutella for a richer flavor. Swirl in an extra 1/4 cup before baking. This gives you gooey pockets of chocolate-hazelnut goodness. You can also spread some on top after baking for extra indulgence. Enjoy the extra chocolatey goodness! In this post, we explored how to make delightful Nutella Banana Bread. We covered the key ingredients and outlined the step-by-step process. You learned helpful tips for baking and how to store your creation. Variations and adjustments make this recipe flexible for all diets. Now, it's your turn to bake and enjoy this tasty treat! Remember, the right ingredients lead to great results. Happy baking!

Nutella Banana Bread Irresistibly Moist and Easy

Get ready to indulge in a treat that balances rich Nutella with sweet, ripe bananas! This Nutella Banana Bread is

To make Creamy Cajun Chicken Pasta, you need a few simple ingredients. Here is the list: - Chicken: 2 boneless, skinless chicken breasts, sliced - Pasta: 8 oz fettuccine or penne pasta - Seasoning: 1 tablespoon Cajun seasoning - Cooking Oil: 2 tablespoons olive oil - Vegetables: 1 small onion (diced), 1 red bell pepper (sliced), 3 cloves garlic (minced) - Sauce Components: 1 cup heavy cream, 1 cup chicken broth, ½ cup grated Parmesan cheese - Seasoning: Salt and pepper to taste - Garnish: Fresh parsley (chopped) These ingredients come together to create a dish full of flavor. The Cajun seasoning adds a nice kick. The heavy cream makes the sauce rich and smooth. Fresh parsley on top gives it a bright finish. For the full recipe, check out the details in the recipe section. Start by boiling water in a large pot. Add a pinch of salt to the water. Once it boils, add the pasta. Stir it to keep it from sticking. Cook the pasta until it's al dente. This means it should be firm but not hard when bitten. Check the package for the exact time. When it's ready, drain the pasta in a colander. Remember to save about half a cup of pasta water. This water helps the sauce stick later. Take your sliced chicken breasts and coat them with Cajun seasoning. Make sure every piece is covered well. This gives the chicken that bold flavor. Heat olive oil in a large skillet over medium-high heat. Add the chicken to the pan. Cook it for about 5 to 7 minutes. You want it to turn golden brown and be fully cooked. Once done, remove the chicken from the skillet and set it aside. In the same skillet, add the diced onion and sliced red bell pepper. Sauté them for 3 to 4 minutes, until they soften. Then, add the minced garlic and cook for another minute. The garlic should smell great. Next, pour in the chicken broth. Bring it to a gentle simmer. Scrape the brown bits from the skillet to add flavor. Reduce the heat to low and stir in the heavy cream. Let it simmer for 2 to 3 minutes. The sauce will thicken a bit. Add the cooked chicken back to the skillet, along with the pasta. Toss everything together. If the sauce seems too thick, add some of the reserved pasta water. Finally, mix in the grated Parmesan cheese. Season with salt and pepper to taste. This creamy Cajun chicken pasta is now ready to serve! For the full recipe, check out the details above. To make your chicken tender, avoid cooking it too long. Aim for a golden brown color, about 5–7 minutes. Let it rest after cooking to keep it juicy. For perfect pasta and sauce, cook the pasta until it’s al dente. This means it should still have a slight bite. As you mix in the sauce, use the reserved pasta water to adjust the thickness. This simple trick makes your dish creamy and delicious. Pair your creamy Cajun chicken pasta with a fresh salad. A simple green salad with vinaigrette works well. You can also serve it with garlic bread for a tasty side. When it comes to drinks, a chilled white wine is a great match. Look for a Sauvignon Blanc or a light Chardonnay. These wines complement the spices in the dish. One common mistake is overcooking the chicken. This can make it dry and tough. Keep an eye on the time and check for doneness. Another mistake is skipping the reserved pasta water. This water helps to bring the sauce together. Adding it makes your dish creamy and helps everything stick together nicely. {{image_2}} You can switch up the protein in this dish. Try shrimp, sausage, or even tofu. Each option brings its own flavor. Shrimp cook quickly, while sausage adds a hearty bite. Tofu makes it plant-based. For pasta, use gluten-free options if needed. There are many types to choose from. Rice or chickpea pasta works great. These alternatives keep the dish tasty and satisfying. Adding vegetables is an easy way to boost flavor and nutrition. Spinach adds a fresh taste, while mushrooms provide umami. You can mix and match based on what you have. Adjust the spice level to suit your taste. Want more heat? Add extra Cajun seasoning or red pepper flakes. Prefer milder flavors? Use less seasoning and add herbs instead. You can change the creaminess of your sauce. If you like it rich, keep the heavy cream as is. For a lighter dish, reduce the cream amount. Lighter milk or cream alternatives can work too. Try using half-and-half or even coconut milk. These options can still give you a creamy texture while cutting fat. To keep your creamy Cajun chicken pasta fresh, store it in an airtight container. Place it in the fridge as soon as it cools. This dish lasts for about 3 to 4 days. Always check for any off smells or signs of spoilage before eating. For the best texture, reheat your pasta in a skillet over medium heat. Add a splash of chicken broth or heavy cream to keep it creamy. Stir often to prevent sticking. You can also use a microwave, but cover it to keep moisture in. Before serving, add a little fresh parsley for a pop of flavor. If you want to freeze your creamy Cajun chicken pasta, follow these steps: First, let it cool completely. Then, place it in a freezer-safe container or bag. This dish can be frozen for up to 2 months. To thaw, place it in the fridge overnight. Reheat slowly on the stove to maintain the texture. Avoid freezing if possible, as the cream may change texture when thawed. Cajun cuisine comes from the Acadian people in Louisiana. They mixed French cooking with local ingredients. Cajun food is known for its bold flavors and spices. Cajun Chicken Pasta blends this style with creamy pasta dishes. This dish reflects the heart of Cajun culture, using fresh, hearty ingredients. Yes, you can prepare this dish ahead. Cook the chicken and pasta, then store separately. This keeps the pasta from getting mushy. When ready to eat, simply combine and heat. You can also make the sauce in advance. Just store it in the fridge and warm it up when needed. To add more heat, use more Cajun seasoning. You can also try adding cayenne pepper. For an extra kick, toss in some chopped jalapeños. Red pepper flakes are another good option. Adjust the spice to your taste for a zesty experience. Absolutely! Creamy Cajun Chicken Pasta is great for meal prep. Divide the dish into containers for easy meals. It keeps well in the fridge for about 3 days. Reheat in the microwave or on the stove. This makes busy weeknights easier and tastier. This dish pairs well with several sides. A fresh green salad brightens up the meal. Garlic bread is also a popular choice. You might enjoy serving it with steamed veggies. Corn on the cob adds a fun twist too. Yes, you can easily make this recipe vegetarian. Swap the chicken for sautéed mushrooms or tofu. You can also use chickpeas for added protein. Use vegetable broth instead of chicken broth. This keeps all the creamy goodness while being meat-free. For the full recipe, check out the earlier sections. Cajun chicken pasta blends flavor and comfort, making it a favorite dish. We explored the ingredients, cooking steps, and tips to ensure perfection. Pay attention to chicken cooking times and pasta textures for the best results. Don't forget to experiment with variations and flavors based on your taste. If you follow these guidelines, your meal will impress everyone. Remember, this recipe is not just a dish—it's an experience. Enjoy every bite of your tasty creation!

Creamy Cajun Chicken Pasta Delightful and Easy Meal

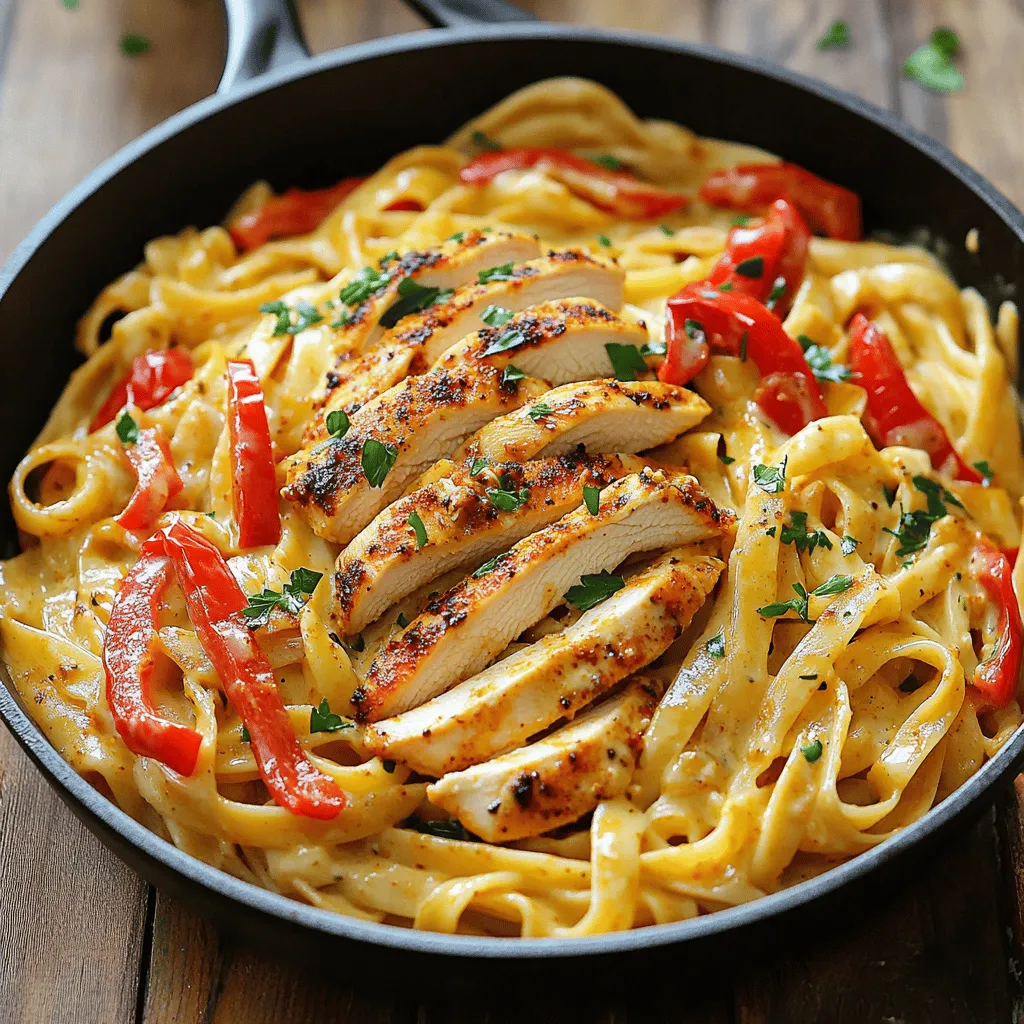
Are you ready to spice up your dinner routine? My Creamy Cajun Chicken Pasta combines rich flavors and easy prep

- 10 tomatillos, husked and rinsed - 1 jalapeño, stemmed and halved (or adjust to taste) - 1 small onion, quartered - 2 cloves garlic, peeled - 1/2 cup fresh cilantro, chopped - 1 tablespoon lime juice - Salt to taste - 1 tablespoon olive oil (optional, for smoother texture) To make a fresh and zesty salsa verde, use quality ingredients. Tomatillos are the star of this dish. They give salsa verde its bright green color and tangy flavor. Choose firm tomatillos with a vibrant green hue. Jalapeños add heat. You can adjust the amount based on your spice preference. If you want a milder salsa, you can use a green bell pepper instead. Onions bring sweetness and depth. A small onion works well here. Garlic adds a rich aroma and flavor. Always use fresh cloves for the best results. Fresh cilantro brings brightness and enhances the taste. Lime juice adds acidity and balances the flavors. Olive oil is optional but adds a nice smoothness. - Alternative ingredients for milder salsa: Use green bell peppers instead of jalapeños. This will keep the flavor fresh but reduce the heat. - Tips for selecting the freshest produce: Look for bright colors and firm textures. Check for blemishes or soft spots, as these can affect taste. - Seasoning variations: salt and beyond: Besides salt, you can experiment with cumin or black pepper for extra flavor. Using these tips will ensure your salsa verde is not only fresh but also tailored to your taste. For a complete guide on making this delicious dish, check out the Full Recipe. First, preheat your oven to 425°F (220°C). This step warms the oven and gets it ready for roasting. Next, take your tomatillos, jalapeño, onion, and garlic. Place them on a baking sheet. Make sure they are in a single layer. This helps them roast evenly. Roast the vegetables for about 15-20 minutes. Look for the tomatillos to turn slightly brown and feel soft. Once they look good, take them out and let them cool. Now, it’s blending time! In a blender, combine the roasted tomatillos, jalapeño, onion, and garlic. Add your chopped cilantro. Pour in the lime juice and sprinkle in salt to taste. If you like a smoother salsa, add a tablespoon of olive oil. Blend the mixture until you reach your desired texture. Do you want it smooth or chunky? You decide! Taste your salsa verde. If it needs more flavor, you can add extra lime juice or salt. Once it tastes just right, transfer it to a bowl. Let the salsa rest for at least 30 minutes. This waiting time allows the flavors to blend and get stronger. Enjoy your fresh and flavorful salsa verde! For the complete recipe, check out the Full Recipe section. To adjust the heat of your salsa, start with one jalapeño. If you want more heat, add another. For a milder salsa, remove the seeds from the jalapeño. This step reduces the spice. You can also use different peppers. For a fruity kick, try a poblano. If you prefer spice, use serrano peppers. Taste as you go to find your perfect balance. Making salsa verde ahead of time is easy and smart. After blending, let it sit for at least 30 minutes. This resting time helps the flavors mix well. If you prepare salsa a day early, it often tastes better. The ingredients marry and create a deeper flavor. Store it in an airtight container in the fridge. Salsa verde pairs well with many foods. Serve it with tortilla chips for a tasty snack. It also adds zing to tacos or grilled meats. You can drizzle it over eggs or use it in salads. For an exciting twist, mix it into pasta or grain bowls. Be creative; the options are endless! For the full recipe, check out [Full Recipe]. {{image_2}} You can add depth to your salsa verde by roasting extra ingredients. Try roasting bell peppers or even some corn. This gives a sweet and smoky taste. Just toss them on the baking sheet with your tomatillos and jalapeño. Roast them until they soften and get a bit of color. Then blend them with the other ingredients. The result? A rich and flavorful salsa that stands out. If tomatillos are hard to find, green tomatoes work well. They provide a similar tangy taste. Just chop them and use them in place of tomatillos. The process remains the same. Roast, blend, and season. This variation adds a unique twist, keeping the taste fresh and exciting. For a creamy texture, blend in ripe avocado. Just add half of an avocado to the blender when mixing your salsa. This makes the salsa smooth and rich. It also adds healthy fats, making it more filling. This variation is great for those who love a creamy dip. Plus, it pairs well with chips or as a topping on tacos. Check out the Full Recipe for more details and tips to make your salsa verde shine! To keep your salsa verde fresh, use an airtight container. Glass jars work best. They seal tightly and let you see the bright green color. Plastic containers are fine too, but ensure they are food-safe. After you make the salsa, let it cool to room temperature. This step avoids condensation in your container. Once cool, transfer it to your chosen container. Store it in the fridge. Homemade salsa verde lasts about one week in the fridge. It should stay fresh if stored properly. For longer storage, consider freezing it. Pour your salsa verde into freezer-safe bags or containers. Leave some space at the top, as it will expand when frozen. Salsa verde can last up to six months in the freezer. When you want to use it, thaw it overnight in the fridge. You can also run warm water over the bag if you need it faster. Avoid refreezing, as it may change the texture and taste. For the full recipe, check out the provided link. Salsa verde is a green sauce made from tomatillos. It has a bright, tangy taste. You can use it in many ways. Serve it with tortilla chips, tacos, or grilled meats. It adds a fresh kick to any dish. You can also use it as a marinade or dressing. Yes, you can make salsa verde without a blender. Use a mortar and pestle to mash the ingredients. You can also chop everything finely by hand. This method gives a rustic texture. It may take a bit longer, but it works well. Just be sure to mix the ingredients thoroughly for even flavor. If your salsa verde tastes too acidic, try adding a pinch of sugar. This will help balance the acidity. Another option is to add more salt. You can also mix in extra cilantro or diced avocado. These added ingredients will mellow the sharpness. Taste and adjust until you love it! Homemade salsa verde is simple and fun to make. With key ingredients like tomatillos, jalapeños, and cilantro, you can create a fresh, vibrant dish. Adjust the spice to your taste and experiment with different ingredients for unique flavors. Remember, a little resting time enhances the taste. Store any extras properly for later enjoyment. I hope these tips help you whip up your own salsa verde successfully. Enjoy it as a dip or a flavorful sauce in your meals!

Homemade Salsa Verde Fresh and Flavorful Recipe

Are you ready to elevate your meals with a burst of fresh flavor? In this guide, I’ll show you how

- 1 pound fresh asparagus, trimmed - 3 tablespoons olive oil - 4 cloves garlic, minced - Zest of 1 lemon - Juice of 1 lemon - 1 teaspoon sea salt - ½ teaspoon black pepper - ¼ teaspoon red pepper flakes (optional for heat) - 2 tablespoons grated Parmesan cheese (optional) When choosing asparagus, look for bright green stalks. They should feel firm and crisp. Avoid any that appear limp or have dark spots. For this recipe, the asparagus should be trimmed well. This means cutting off the tough ends, usually about 4-5 inches from the bottom. You want only the tender part. The flavorings are where this dish shines. Olive oil brings richness, while garlic adds a strong aroma. The lemon zest and juice offer a refreshing zing. This combination makes the dish bright and lively. For seasoning, sea salt enhances the natural flavors. Black pepper gives a mild heat, while red pepper flakes can add more spice if you like. If you want to elevate the dish, sprinkle grated Parmesan on top. It melts beautifully and adds a savory touch. For more details, check the Full Recipe. 1. Preheat the oven to 425°F (220°C). 2. Rinse and trim the asparagus. Start by washing it under cool water. Cut off the tough ends, leaving about 4-5 inches of the tender stalk. 3. Whisk together the lemon garlic mixture. In a bowl, combine 3 tablespoons of olive oil, 4 minced garlic cloves, the zest and juice of 1 lemon, 1 teaspoon of sea salt, ½ teaspoon of black pepper, and red pepper flakes if you like heat. 4. Toss the asparagus with the mixture. Add the trimmed asparagus to the bowl. Make sure every spear gets a nice coat of that zesty mixture. 5. Spread asparagus on a baking sheet. Lay the coated asparagus in a single layer on a parchment-lined baking sheet. 6. Roast asparagus for 12-15 minutes. Check for that vibrant color and tender-crisp texture. 7. Add cheese during the last minutes of roasting. If you're using Parmesan cheese, sprinkle it over the asparagus in the last 2 minutes for a melty finish. Enjoy your Lemon Garlic Roasted Asparagus as a delightful side dish with any meal. For the full recipe, check the details mentioned above. When choosing asparagus, look for bright green stalks. The tips should be firm and closed. If the stalks bend but do not break, they are fresh. Avoid any that are wilted or yellow. Fresh asparagus makes all the difference in taste and texture. Roasting asparagus is simple. Preheat your oven to 425°F (220°C). Spread the asparagus evenly on the baking sheet. Roast for about 12 to 15 minutes. Keep an eye on it. You want the asparagus to be vibrant in color and tender-crisp. You can test it by piercing a stalk with a fork. If it goes in easily, it's done! Lemon garlic roasted asparagus shines as a side dish. It pairs well with grilled meats like chicken or fish. You can also serve it alongside pasta or rice. For a great twist, add it to salads or grain bowls for a fresh crunch. {{image_2}} You can easily change the flavor of your Lemon Garlic Roasted Asparagus. Try adding herbs like thyme or rosemary. These herbs bring a fresh twist. Just sprinkle a little on before roasting. You’ll be amazed at how a small change makes a big difference. If you want to switch up the cheese, go for feta or goat cheese. These cheeses offer a creamy, tangy flavor that pairs well with asparagus. Sprinkle them on just before serving. This will add a rich taste that everyone will love. For a little kick, use cayenne pepper instead of red pepper flakes. A pinch can change the heat level. Adjust it to your taste. This small swap can turn your dish into a spicy delight. Store your Lemon Garlic Roasted Asparagus in an airtight container. It stays fresh in the fridge for up to 3 days. Just remember to cool it down before sealing. This way, it keeps its great flavor and texture. If you want to freeze it, first blanch the asparagus. Dunk it in boiling water for a minute, then transfer it to ice water. This helps preserve the color and taste. Once cooled, drain and pack it into freezer bags. You can store it for up to three months. Reheating is easy! The best way to bring back its crispness is to use the oven. Preheat it to 350°F (175°C) and heat the asparagus for about 10 minutes. This keeps it tasty and fresh. If you're in a hurry, you can use the microwave, but it might lose some crunch. For the full recipe, check out the recipe section. Fresh asparagus is recommended for optimal texture. Frozen asparagus may become mushy. Fresh spears hold their shape and crunch better. If you can find fresh, choose it for this dish. It should be vibrant in color and tender-crisp. Look for a bright green hue. You can test it by poking a spear with a fork. It should give a little but not be soft. Asparagus is rich in vitamins A, C, E, and K, as well as fiber and antioxidants. These nutrients support your immune system and promote healthy skin. Eating asparagus can aid digestion and boost overall health. Perfect alongside grilled chicken, fish, or as a topping for salads. This dish adds a fresh flavor to any meal. The lemon and garlic pair well with many proteins. Enjoy this asparagus as a vibrant side that enhances your dining experience. In this post, I shared a simple recipe for Lemon Garlic Roasted Asparagus. We covered choosing fresh asparagus, mixing key ingredients, and roasting techniques. I also discussed storage tips and serving ideas. Remember, fresh asparagus shines best with lemon and garlic. Try different herbs and cheeses to make it your own. Enjoy this healthy side dish and explore how it complements various meals. Happy cooking!

Lemon Garlic Roasted Asparagus Savory Side Dish

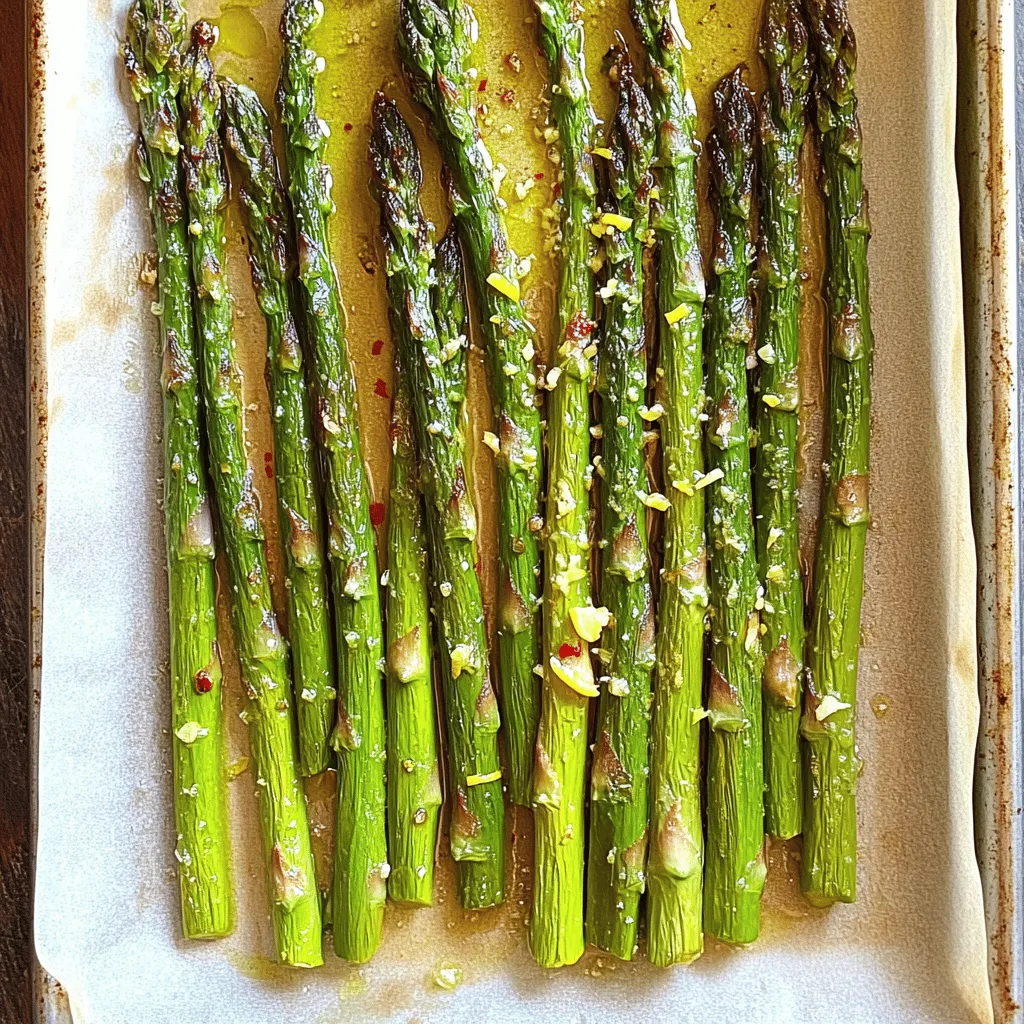
Looking for a delicious side dish that adds zing to your meals? Try my Lemon Garlic Roasted Asparagus! This recipe

To make this spicy Thai noodle salad, you need the following items: - 200g rice noodles - 1 cup shredded carrots - 1 red bell pepper, julienned - 1 cucumber, thinly sliced - 1 cup bean sprouts - 1/4 cup fresh cilantro, chopped - 2 green onions, sliced - 1 red chili, finely chopped (adjust to taste) - 2 tablespoons sesame oil - 2 tablespoons soy sauce (low sodium) - 1 tablespoon lime juice - 1 tablespoon sugar or honey - 1 tablespoon crushed peanuts (for garnish) - Salt and pepper to taste You can swap some ingredients if you need. Here are a few ideas: - Rice noodles: You can use soba or udon noodles instead. - Red bell pepper: Try yellow or orange peppers for a sweeter taste. - Cucumber: Zucchini or yellow squash also work well. - Bean sprouts: You can use shredded cabbage for a crunch. - Peanuts: Sunflower seeds can replace peanuts if allergies are a concern. Fresh ingredients make the salad taste great. Here’s how to select the best: - Noodles: Choose rice noodles that feel firm and are not broken. - Vegetables: Look for bright colors and firm textures. Avoid soft spots. - Herbs: Use fresh cilantro with vibrant green leaves and no wilting. - Chili: Select chilies that are smooth and have a shiny skin. - Lime: Choose limes that feel heavy for their size and have a smooth skin. For the full recipe, refer to the detailed instructions provided earlier. Enjoy crafting this delicious salad! To start, you need to cook the rice noodles. First, bring a large pot of water to a boil. Once boiling, add the rice noodles. Cook them based on the package instructions, usually about 4 to 6 minutes. You want them to be tender, but still firm. When they are done, drain the noodles. Rinse them under cold water. This stops the cooking and keeps them from sticking. Set them aside for later. While the noodles cook, prepare your vegetables. Take the red bell pepper and slice it into thin strips, called julienne. Next, thinly slice the cucumber. For the carrots, use a grater or knife to shred them. Place all the cut vegetables into a large mixing bowl. This colorful mix will add great taste and crunch to your salad. Now, let’s make the dressing. In a small bowl, whisk together the sesame oil, soy sauce, lime juice, and sugar or honey. Add the finely chopped red chili to the mix. This will give your dressing a nice kick. Taste it, and if needed, add salt and pepper for more flavor. This dressing ties all the flavors together. With the noodles and vegetables ready, it’s time to combine them. In your mixing bowl, add the drained noodles to the vegetables. Pour the dressing over the top. Gently toss everything together. You want all the noodles and veggies to be well-coated with the dressing. This ensures every bite is full of flavor. For the final touch, transfer the salad to a serving platter or individual bowls. Top your spicy Thai noodle salad with fresh cilantro, sliced green onions, and crushed peanuts. The peanuts add a nice crunch. Serve this salad fresh for the best taste. Enjoy every spicy, crunchy bite! For the full recipe, check the details above. To enhance the flavor of your Spicy Thai Noodle Salad, use fresh ingredients. Fresh herbs like cilantro add a bright taste. Adding more lime juice can bring in a zesty kick. You can also mix in a splash of fish sauce for depth. If you love garlic, finely chop a clove and toss it in. Remember, balance is key. Adjust salt and sugar to suit your taste. You can make this salad ahead of time. Prepare the noodles and veggies, but keep the dressing separate. This way, the noodles don’t get soggy. When you’re ready to eat, mix everything together. The flavors will deepen as it sits. Store it in the fridge for up to two days. Just remember to add the toppings before serving. To adjust the spice levels, start with less chili. You can always add more if you want extra heat. If it’s too spicy, add more sugar or lime juice to balance it out. For a milder taste, consider using sweet chili sauce. This gives a nice flavor without too much heat. Always taste as you go. This helps you find your perfect spice level. For the full recipe, check out the detailed instructions provided above. {{image_2}} You can easily make this salad vegetarian or vegan. Just skip the fish sauce, which is not in the original recipe, and use more soy sauce instead. Add tofu for protein. Tofu absorbs flavor well. Use firm tofu, and grill or pan-fry it for a nice texture. Want to add protein? You have options! Grilled chicken is a great choice. Cook it with some spices for extra flavor. Shrimp is another tasty addition. Sauté shrimp until they turn pink. Tofu is perfect for a vegetarian meal. It adds protein and keeps the dish light. If you need a gluten-free option, use rice noodles made from brown rice. It's a healthy swap. Check labels for soy sauce that is gluten-free. You can also use tamari. This keeps your salad safe for gluten allergies while still being delicious. Store your spicy Thai noodle salad in an airtight container. This keeps it fresh and tasty. Make sure it cools down first if it’s warm. Place it in the fridge right away. The salad can last for about 2 to 3 days. If you have dressing left, store it separately. This keeps the noodles and veggies crisp. When reheating, I suggest using a pan on low heat. Add a splash of water or oil to help. This keeps the noodles from sticking together. Stir gently and heat until warm. Avoid using the microwave, as it can make the noodles mushy. Enjoy your salad warm, but cold is great too! The fresh veggies will last 3 to 5 days in the fridge. Store them in a cool place. Rice noodles can last months if kept dry. Check the package for best-by dates. After opening, use them within a few weeks. Peanut toppings should be fine for months when sealed well. If you can't find rice noodles, try using soba noodles, udon noodles, or even zoodles (zucchini noodles). Each will give a different taste and texture. Soba noodles have a nutty flavor, while udon noodles are chewy. Zoodles are a great low-carb option. Just make sure to cook or prepare them as needed. Yes, you can prepare this salad ahead. I recommend making the dressing and cutting the veggies a few hours before serving. Keep the noodles and dressing separate until you're ready to eat. This way, the noodles stay fresh and won’t get soggy. To reduce the heat, simply cut back on the red chili in the dressing. You can also replace it with a milder pepper, like a green bell pepper. Adding more sugar or honey can help balance the spice too. If you want extra crunch, add more veggies instead. Serve this salad chilled or at room temperature. It looks great in a big bowl or on individual plates. Top each serving with fresh cilantro, sliced green onions, and crushed peanuts for added flavor. This makes it fun and tasty for everyone! Yes, Spicy Thai Noodle Salad is quite healthy! It features fresh vegetables, which are full of vitamins. The rice noodles provide carbs for energy, while the dressing adds flavor without too many calories. You can make it even healthier by using less sugar and adding more veggies. For the full recipe, check out the link to create your own delicious version. We covered key ingredients for your Spicy Thai Noodle Salad, plus tasty substitutions. I shared tips for selecting fresh items and made your prep easy with step-by-step instructions. You can enhance the flavors and adjust spice levels to suit your taste. Whether you want veggie options or protein, there’s a version for everyone. Store leftovers properly to keep them fresh. Making this salad is simple and fun. Enjoy your delicious creation!

Spicy Thai Noodle Salad Fresh and Flavorful Recipe

Are you ready to excite your taste buds? This Spicy Thai Noodle Salad is fresh, flavorful, and packed with vibrant

To make the best chocolate chip banana bread, you need a few simple items. Here’s what you’ll need: - 3 ripe bananas, mashed - 1/3 cup melted coconut oil - 1 teaspoon vanilla extract - 1/2 cup brown sugar - 1 large egg, beaten - 1 teaspoon baking soda - Pinch of salt - 1 teaspoon ground cinnamon - 1 1/2 cups all-purpose flour - 1/2 cup chocolate chips (semi-sweet or dark) - 1/4 cup chopped walnuts (optional) Using ripe bananas is key. Their natural sweetness makes the bread moist and tasty. Coconut oil adds a lovely flavor and keeps the bread soft. The brown sugar gives a rich taste, while the chocolate chips bring joy in every bite. If you like crunch, add walnuts for texture. For the full recipe, you can check out the Choco-Banana Bliss Bread . It’s a perfect treat for breakfast or dessert! First, set your oven to 350°F (175°C). This helps the bread bake evenly. Next, grab a 9x5 inch loaf pan. Grease it well with some oil or butter. This step stops the bread from sticking. In a large bowl, mash your ripe bananas until smooth. I like to use a fork for this. Then, pour in the melted coconut oil. Stir them together well. Add one teaspoon of vanilla extract next. Mix in half a cup of brown sugar, making sure it blends nicely. Then, add in one beaten egg. Keep mixing until everything is smooth and combined. In another bowl, whisk together one teaspoon of baking soda, a pinch of salt, and one teaspoon of ground cinnamon. These ingredients add great flavor and help the bread rise. - Adding Dry to Wet Mixture Now, slowly add the dry mix into the banana mixture. Stir gently until just combined. Try not to overmix; this helps keep the bread soft. - Folding in Mix-Ins (Chocolate Chips & Walnuts) Next, fold in half a cup of chocolate chips. If you like nuts, add in a quarter cup of chopped walnuts too. Gently mix until they are spread evenly throughout the batter. - Baking the Banana Bread Pour the batter into your prepared loaf pan. Use a spatula to smooth the top. Place it in the oven and bake for about 60 minutes. To check for doneness, insert a toothpick into the center. If it comes out clean, your bread is ready. After baking, let it cool in the pan for 10 minutes. Then, move it to a wire rack to cool completely. For the full recipe, you can check the detailed instructions above. To get the best banana bread, focus on the texture. Use ripe bananas; they should be dark and spotty. These bananas add moisture and sweetness. When mixing, be careful not to overmix the batter. This can make the bread tough. Mix just until you see no dry flour. This keeps your bread light and fluffy. You can change the taste by using various chocolate chips. Semi-sweet chips are the classic choice, but dark chocolate adds a rich flavor. Milk chocolate gives a sweeter taste. You could even try white chocolate for a fun twist. Each type adds a new layer to the banana bread. Adding nuts or dried fruits boosts flavor and texture. Chopped walnuts add a nice crunch. If you like more sweetness, try dried cranberries or raisins. These fruits pair well with the bananas. They also add extra moisture. Mix them in gently with the chocolate chips for a delightful treat. For the full recipe, check the earlier section. Enjoy your baking! {{image_2}} You can make this banana bread gluten-free. Use a gluten-free flour blend instead of all-purpose flour. Look for a blend that includes xanthan gum. This gum helps the bread rise and stay together. You can find gluten-free flour at most stores. Your banana bread will still taste great! If you want a vegan version, I have great tips for you. Replace the egg with flaxseed meal. Mix 1 tablespoon of flaxseed meal with 3 tablespoons of water. Let it sit for about five minutes. This mixture acts like an egg and binds the ingredients well. Use coconut sugar instead of brown sugar. Coconut sugar has a lower glycemic index. It gives a nice caramel flavor to the bread. This swap makes the recipe healthier without losing taste. You can find the full recipe of chocolate chip banana bread in this article. Enjoy experimenting with these variations! To keep your banana bread fresh, store it properly. First, let it cool completely. Then, wrap it in plastic wrap or foil. This step helps keep the moisture inside. You can also place it in an airtight container. Store it at room temperature for up to three days. If you want to keep it longer, the fridge is a good option. Just remember that cold can dry it out a bit. When you want to enjoy your banana bread again, reheating is easy. You can use the microwave for a quick fix. Heat a slice for about 10 to 15 seconds. If you prefer it warm and a bit crispy, use the oven. Preheat it to 350°F (175°C) and warm the bread for about 5 to 10 minutes. This method brings back the fresh-baked taste. If you have extra banana bread, freezing works well. Wrap each slice or the whole loaf tightly in plastic wrap. Then, place it in a freezer-safe bag or container. This way, it can last for about three months. When you’re ready to eat it, let it thaw in the fridge overnight. Then, reheat as needed to enjoy that delightful taste again. For the full recipe, check out the main section of this article. Ripe bananas have more natural sugar and flavor. They mash easily and blend well. This gives your bread a richer taste. If bananas are green, they are starchy and not sweet. For the best banana bread, use bananas that are brown and soft. They will add moisture and make your bread fluffy. Yes, you can substitute some ingredients. For example, you can use butter instead of coconut oil. You can also swap brown sugar for white sugar. If you need a gluten-free option, you can use almond flour. If you want a vegan recipe, use flaxseed meal instead of the egg. Just remember, changes can slightly alter the taste and texture. You can test your banana bread with a toothpick. Insert it into the center of the loaf. If it comes out clean, your bread is ready. If it has wet batter on it, bake for a few more minutes. The top should look golden brown and feel firm to the touch. Trust your senses; they will guide you! You've learned how to make delicious banana bread using simple ingredients. We covered everything from the ingredients list to baking tips and variations for dietary needs. With a little practice, your banana bread can be soft and flavorful. Don't forget to store it properly so it stays fresh. Enjoy trying out different flavors and making it your own. Happy baking!

Chocolate Chip Banana Bread Simple and Tasty Recipe

If you love sweet treats that are easy to make, you’ll adore this Chocolate Chip Banana Bread recipe. With just

Older posts
Newer posts
← Previous Page1 … Page52 Page53 Page54 … Page72 Next →

dsad

© 2025 My Saved Recipe • Built with GeneratePress

Our Policies

  • Copyright Policy
  • Cookie Policy
  • GDPR Policy
  • Privacy Policy
  • Disclaimer
  • Terms Of Use

More Information

  • Home
  • About
  • Contact
  • Appetizers
  • Dessert
  • Dinner
  • Drinks
©2025, My Saved Recipe About Back To Top