Skip to content
DisclaimerTerms Of UseGDPR PolicyCookie Policy

My Saved Recipe

  • Home
  • Drinks
  • Appetizers
  • Dinner
  • Dessert
  • About
  • Contact
  • Privacy Policy
DisclaimerTerms Of UseGDPR PolicyCookie Policy

Savannah

- Cauliflower florets - Cheddar cheese (shredded) - Parmesan cheese (grated) - Cream cheese - Sour cream - Garlic (minced) - Onion powder - Smoked paprika - Salt and pepper The star of this dish is the cauliflower. It gives a light and fluffy texture. The cheese adds the creamy and cheesy taste. Both cheddar and Parmesan cheese work great together. Cream cheese and sour cream make the dish rich and smooth. The seasonings are key. Garlic adds a punch of flavor. Onion powder gives depth, while smoked paprika adds a hint of smokiness. Salt and pepper balance everything out. - Breadcrumbs for topping - Fresh chives for garnish - Other cheese varieties or vegetables You can add breadcrumbs for a crunchy topping. This gives a nice texture contrast. Fresh chives make the dish look bright and fresh. You can also swap in other cheese types. Mozzarella or gouda can bring a new twist. Adding veggies, like spinach or broccoli, can boost nutrition. For the full recipe, check the section above. - First, preheat your oven to 375°F (190°C). This heat will help the dish cook evenly. - While the oven heats, cut your large head of cauliflower into florets. You want them to be bite-sized. - Bring a large pot of salted water to a boil. Add the cauliflower florets and cook for about 5-7 minutes. This step makes the cauliflower tender but not mushy. Drain the florets and set them aside. - In a mixing bowl, combine the cream cheese, sour cream, 3/4 cup of the shredded cheddar cheese, and grated Parmesan cheese. Add minced garlic, onion powder, smoked paprika, and salt and pepper. Mix until smooth and creamy. - Gently fold the drained cauliflower into the cheese mixture. Make sure the cauliflower is well-coated. This ensures every bite is cheesy. - Next, transfer the cheesy cauliflower mixture into a greased baking dish. Spread it evenly so it cooks nicely. - If you like a crunchy topping, sprinkle breadcrumbs over the top. If not, add the remaining shredded cheddar cheese for extra gooeyness. - Now, place the dish in the preheated oven. Bake for 20-25 minutes, or until the cheese is bubbly and slightly golden. You want to see that nice golden brown on top. - Once done, take the dish out of the oven and let it cool for a few minutes. This helps the cheese set. - Before serving, garnish with fresh chives for a pop of color and flavor. They add a nice touch to the dish. For the complete recipe, you can refer to the [Full Recipe]. To cook cauliflower perfectly, start with fresh florets. Cut them into even pieces for uniform cooking. Boil salted water in a large pot. Add the florets and cook for 5-7 minutes. You want them tender but still firm. Drain them well to avoid a watery bake. For a smooth texture, mix the cheeses in a bowl first. Use a fork or spatula to blend them well. This ensures the blend is creamy and easy to coat the cauliflower. When you add the cooked florets, fold gently to keep their shape. There are many ways to serve cheesy cauliflower bake. It pairs great with grilled chicken or fish. You can also enjoy it as a side with steak or pork. For a fun presentation, try using individual ramekins. This makes each serving feel special. You can also serve it in the baking dish. Just sprinkle fresh chives on top for a pop of color. If you want a lower-calorie dish, consider using reduced-fat cream cheese. You can also swap sour cream for Greek yogurt. This keeps the creaminess while cutting calories. For dietary restrictions, use dairy-free cheese alternatives. There are many available now that melt well. You can also add other veggies, like spinach or mushrooms, to boost nutrition. {{image_2}} You can spice up your cheesy cauliflower bake by adding jalapeños. Just chop them finely and mix them in. This gives a nice kick to the dish. If you prefer fresh tastes, try adding herbs like thyme or rosemary. They add a bright flavor that pairs well with the cheese. Feel free to swap cheeses based on what you have. Mozzarella gives a stretchy texture, while gouda adds a smoky flavor. You can also pump up the nutrition by adding vegetables. Broccoli and spinach mix well and bring more color to the bake. If you want to make this dish faster, try the Instant Pot. Just cook the cauliflower on high for 3-5 minutes. You can also use the stovetop with a large pot. For outdoor cooking, grilling adds a unique flavor. Just wrap the mixture in foil and grill it for about 20-25 minutes. This method gives a nice char and smoky taste. To keep your cheesy cauliflower bake fresh, put it in an airtight container. This helps keep moisture in and air out. Make sure to cool the dish first. If you want to freeze it, let it cool completely. Then, wrap it tightly in plastic wrap. Place it in a freezer-safe bag or container. This way, the bake can last for a long time. When you are ready to eat the leftovers, you can reheat them in several ways. The best method is to use an oven. Preheat the oven to 350°F (175°C). Then, place the cheesy bake in an oven-safe dish. Cover it with foil to keep it moist and heat for about 20 minutes. You can also use a microwave. Just put it in a microwave-safe dish, cover it, and heat in short bursts. This keeps the texture nice. To maintain flavor, add a pinch of salt or fresh herbs when reheating. In the fridge, your cheesy cauliflower bake stays good for about 3 to 5 days. If you freeze it, it can last for 2 to 3 months. However, always watch for signs of spoilage. If you see mold or it smells strange, it's best to throw it away. Checking your leftovers often can help you enjoy them at their best! The best way to cook cauliflower is by boiling it. Start by bringing a pot of salted water to a boil. Add the cauliflower florets and cook for 5-7 minutes. You want the cauliflower to be tender but still firm. Drain it well before mixing it with the cheese. This method keeps the cauliflower bright and flavorful. Yes, you can make cheesy cauliflower bake ahead of time. Prepare the dish up to the baking step. Cover it tightly with plastic wrap or foil and store it in the fridge. When ready to bake, remove the cover and bake it directly from the fridge. This dish can save time on busy days. To make this dish gluten-free, skip the breadcrumbs on top. You can still achieve a crunchy texture by using gluten-free breadcrumbs or simply leave it off. The cheesy cauliflower will still be rich and tasty without them. It’s perfect for anyone who needs to avoid gluten. Yes, you can use frozen cauliflower instead of fresh. Just make sure to thaw it and drain any excess water. You may need to adjust the cooking time slightly since frozen cauliflower is often pre-cooked. This substitution can save time and still taste great. Cheesy cauliflower bake goes well with many side dishes. Here are some ideas: - Grilled chicken or fish for protein. - A fresh garden salad for crunch. - Roasted vegetables for added flavor. - Quinoa or rice for a hearty meal. These options complement the rich flavors of the bake and create a balanced plate. Cheesy cauliflower bake is a simple, tasty dish. We covered the key ingredients, like cauliflower and cheeses. I shared clear steps for preparation, cooking, and baking. You also learned helpful tips for serving and storing leftovers. Consider trying different flavors and methods for a fun twist. With these ideas, you can easily customize this dish to fit your taste. Enjoy cooking and let your creativity shine in the kitchen!

Cheesy Cauliflower Bake Delightful and Easy Recipe

Get ready to elevate your veggie game with my Cheesy Cauliflower Bake! This creamy, cheesy dish is easy to make

To make a creamy and flavorful mushroom risotto, you'll need: - 1 ½ cups Arborio rice - 5 cups vegetable broth (homemade or low-sodium) - 1 cup wild mushrooms (such as chanterelles, morels, or shiitake), cleaned and sliced - 1 medium onion, finely chopped - 2 cloves garlic, minced - ½ cup grated Parmesan cheese (plus extra for serving) - 3 tablespoons olive oil - 2 tablespoons unsalted butter - 1 cup fresh spinach, chopped - 1 teaspoon fresh thyme leaves - Salt and pepper to taste - Fresh parsley, chopped (for garnish) You can swap ingredients based on your diet or availability. Here are some ideas: - Instead of Arborio rice, use Carnaroli or Vialone Nano rice for a similar result. - Swap vegetable broth for chicken broth if you prefer a non-vegetarian option. - Use any fresh mushrooms you find, like button mushrooms or portobellos. - For a vegan version, replace Parmesan with nutritional yeast or a vegan cheese substitute. - You can use olive oil and skip the butter if you want a dairy-free dish. Mushrooms bring a rich flavor to your risotto. Here’s how to pick the best: - Look for firm, smooth caps without blemishes or dark spots. - Choose mushrooms that are dry, not slimy or wet. - Smell the mushrooms; they should have a fresh, earthy scent. - If buying wild mushrooms, ensure they are from a trusted source to avoid any unsafe varieties. - Store mushrooms in a paper bag in the fridge. This keeps them fresh and dry. These tips will help you create a risotto that’s not only tasty but also visually appealing. For the full recipe, check the section above! Start by heating 5 cups of vegetable broth in a medium saucepan. Keep this broth warm over low heat. This step helps the rice cook evenly. A warm broth makes for a creamy risotto. In a large skillet, heat 2 tablespoons of olive oil and 1 tablespoon of butter on medium heat. Add 1 finely chopped onion and cook until it turns soft, which takes about 5 minutes. Next, throw in 2 minced garlic cloves and 1 cup of sliced wild mushrooms. Cook until the mushrooms are soft, about 5 to 7 minutes. Season with salt, pepper, and 1 teaspoon of fresh thyme. This mix brings wonderful flavor. Now, add 1 ½ cups of Arborio rice to the skillet. Stir the rice for about 2 minutes. You want the edges of the rice to look translucent. This step adds depth to the dish. Start adding the warm vegetable broth one ladle at a time to the rice. Stir often. Wait until most of the liquid is absorbed before adding more. Continue this process for about 20 to 25 minutes. When the rice is creamy and tender, stir in 1 cup of chopped spinach, the rest of the butter, and ½ cup of grated Parmesan cheese. Adjust seasoning with salt and pepper as needed. Let the risotto sit for a couple of minutes. This resting time helps the flavors blend. For the Full Recipe, you can check the main article for precise details. To get that creamy texture in your risotto, use Arborio rice. This rice has high starch, which helps create a rich, smooth dish. Start with warm broth; this makes it easier for the rice to absorb the liquid. Add broth slowly, one ladle at a time. Stir often to release the starch. When the rice is tender yet firm, that’s the perfect time to add cheese and butter. This last step boosts the creaminess. Avoid using cold broth. Cold broth shocks the rice and slows cooking. Don’t rush the process. Risotto takes time, and patience is key. Skipping the toasting step can also lead to a less flavorful dish. Always toast the rice for a couple of minutes before adding broth. Lastly, don’t forget to taste as you cook. Adjusting seasonings early prevents a bland risotto. Start with salt when cooking the onions. This draws out their moisture and enhances flavor. As you add broth, taste often. This helps you achieve the right seasoning level. Finish with Parmesan cheese, which adds saltiness and depth. Fresh herbs like thyme or parsley elevate the dish. Remember, seasoning is personal, so adjust to your taste. For the full recipe, check the provided link. {{image_2}} You can use many types of mushrooms in your risotto. Each type adds its own flavor. For example, shiitake mushrooms give a rich taste. They are meaty and earthy. Chanterelles have a sweet, fruity flavor. Morels are delicate and nutty. Mix different mushrooms for a more complex taste. Using a blend can make your risotto extra special. Want to make your risotto heartier? Add protein or vegetables! You can include cooked chicken, shrimp, or even tofu for a meatless option. If you prefer veggies, try adding peas, asparagus, or roasted bell peppers. These add color and nutrition. Just toss them in during the last few minutes of cooking. This helps keep their texture and taste fresh. You can easily make a vegan version of this risotto. Simply skip the cheese and use vegetable broth. Replace butter with olive oil or vegan butter. For gluten-free risotto, stick with Arborio rice, as it is naturally gluten-free. Always check your broth and other ingredients to ensure they are gluten-free. This way, everyone can enjoy your creamy wild mushroom risotto. For the complete recipe, refer to the Full Recipe section. Store leftover risotto in an airtight container. Let it cool down first. Place it in the fridge and eat it within three days. If you want to keep it longer, freezing is a good option. When reheating, add a splash of broth or water. This helps restore the creamy texture. Heat it slowly over low heat. Stir often to avoid sticking. You want it warm, not dry. Yes, you can freeze risotto. However, the texture may change. To freeze, let it cool completely. Portion it into freezer bags. Remove as much air as possible. It can last up to three months. When ready to eat, thaw overnight in the fridge. Reheat gently, adding liquid as needed. For the full recipe, follow the steps to create this delicious dish. The best rice for risotto is Arborio rice. This rice has a high starch content. It helps create a creamy texture. Arborio rice absorbs liquid well and becomes tender. You can also use Carnaroli or Vialone Nano rice. Both options work great in risotto dishes. You can keep leftover risotto in the fridge for about three days. Store it in an airtight container. When you want to eat it again, check for any changes in smell or texture. Yes, you can make mushroom risotto ahead of time. But, it’s best when served fresh. If you make it early, store it in the fridge. Reheat it gently with a splash of broth to revive its creaminess. Mushroom risotto pairs well with many dishes. Try it with roasted vegetables or a fresh salad. Grilled chicken or fish also complement the flavors nicely. A glass of white wine can elevate your meal too. Mushroom risotto can be suitable for meal prep. However, it may lose some creaminess when stored. To keep it fresh, add cheese and butter when reheating. This restores its rich texture and flavor. For the full recipe, check out the Creamy Wild Mushroom Risotto section. It includes all the ingredients and steps you need for the perfect dish. Enjoy cooking! This blog post covered all you need for stellar mushroom risotto. We listed key ingredients and gave swaps for each. You'll cook to creamy perfection with our step-by-step guide. We shared tips to avoid mistakes and ways to personalize your dish. Plus, we discussed storage and reheating for leftovers. Enjoy your risotto journey and impress your guests with each bite!

Mushroom Risotto Creamy and Flavorful Delight

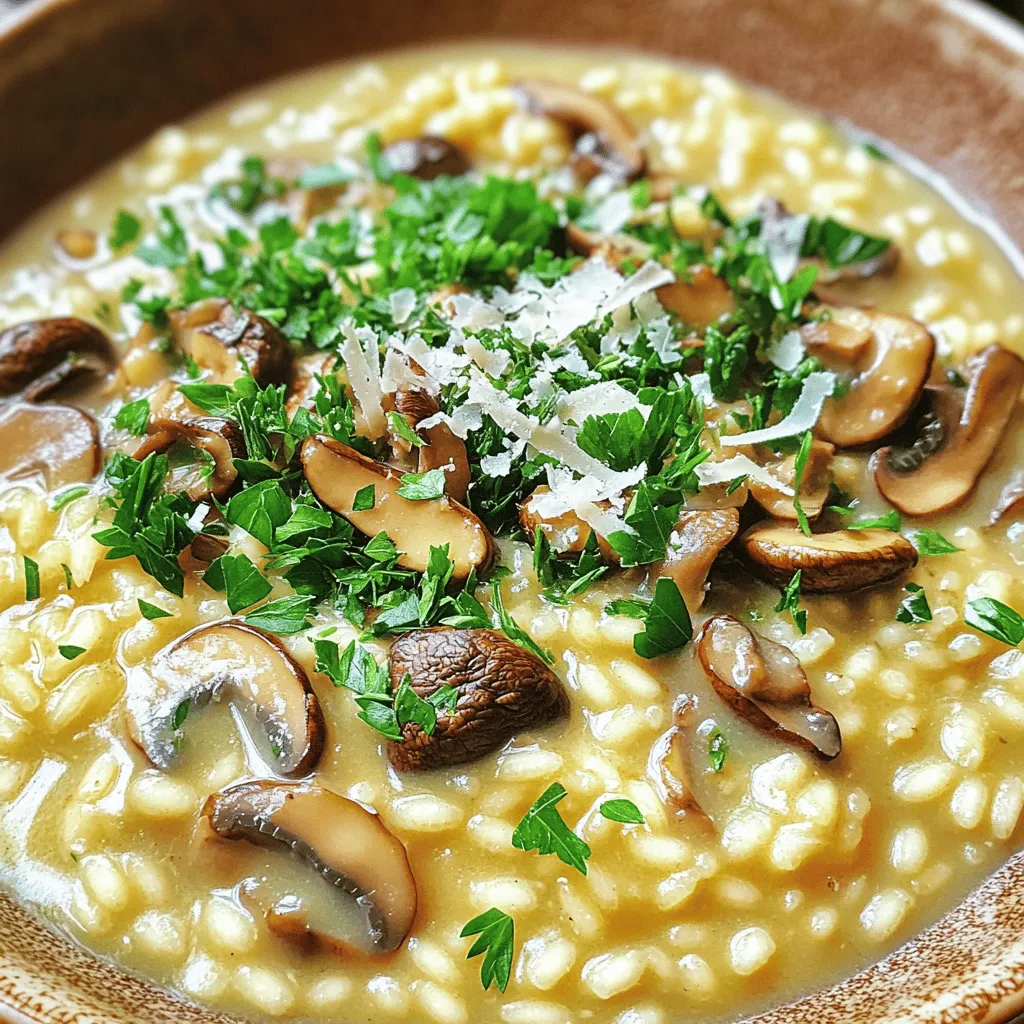
Mushroom risotto is a creamy and flavorful dish that warms the soul. You’ll find the perfect blend of rich flavors

- 1 can (15 oz) chickpeas, drained and rinsed - 2 tablespoons olive oil - 1 tablespoon honey or maple syrup - 1 teaspoon smoked paprika - 1/2 teaspoon cayenne pepper (adjust to taste) - 1 teaspoon garlic powder - 1/2 teaspoon ground cumin - Salt and pepper to taste - Additional spices for customization (e.g., chili powder, turmeric) - Fresh herbs for garnish (e.g., parsley or cilantro) - Nutritional yeast for a cheesy flavor Sweet and spicy roasted chickpeas are fun to make and eat. You will need a few simple ingredients. First, grab a can of chickpeas. Drain and rinse them well to remove any residue. This step is key for achieving a crispy texture. Next, you will need olive oil to help the spices stick. Honey or maple syrup adds a touch of sweetness. Smoked paprika gives a rich flavor, while cayenne pepper adds heat. Adjust the amount of cayenne to fit your taste. Garlic powder and ground cumin round out the flavor profile. Don’t forget salt and pepper! You can tweak these amounts based on what you like. For extra creativity, think about adding optional spices. Chili powder or turmeric can change the flavor completely. Fresh herbs can also add a nice touch. Some people enjoy a sprinkle of nutritional yeast for a cheesy twist. This is a great recipe to share with friends and family. The full recipe is easy to follow, and everyone can enjoy the delicious crunch of these roasted chickpeas! - Preheat oven to 400°F (200°C). - Pat chickpeas dry with a kitchen towel. This helps them get nice and crispy. - Combine spices and oil in a bowl. - Mix until fully incorporated. You want each chickpea to be well-coated. - Toss chickpeas in the spice mixture. Make sure they are evenly covered. - Spread evenly on a baking sheet. This allows them to roast well. - Roast for 25-30 minutes, stirring halfway. Watch them turn golden brown and crunchy. Follow the Full Recipe for exact measurements and tips. Enjoy the process and the tasty results! To get the best crunch, start by making sure your chickpeas are fully dried. After rinsing, spread them on a clean towel and pat them dry. This step is key to getting that desirable crunch. Also, avoid overcrowding the baking sheet. Give those chickpeas space to breathe. If they are too close together, they will steam instead of roast, leading to a soggy snack. You can customize the spice levels to match your taste. If you love heat, add more cayenne pepper. For a milder flavor, cut back on it. You can also experiment with different sweeteners, such as agave syrup. This allows you to find the perfect balance between sweet and spicy for your palate. Pair your roasted chickpeas with dips like tzatziki or hummus. The coolness of the dip complements the heat of the chickpeas nicely. You can also serve them as a salad topping for a crunchy texture. They make a great snack on their own, too. Enjoy them any way you like! For the full recipe, check out the details above. {{image_2}} You can play with flavors for your roasted chickpeas. Here are two fun ideas: - Sweet Cinnamon Variation: Mix some cinnamon and sugar into your spice mix. This brings a warm and sweet twist to the dish. It’s like dessert in a crunchy form! - Savory Herb Variation: Instead of the sweet mix, go for Italian seasoning or fresh rosemary. This gives a nice herbal taste that pairs well with the chickpeas. You can easily adjust this recipe to fit different diets: - Vegan modifications: Use maple syrup instead of honey. This keeps it sweet and vegan-friendly. - Gluten-free options: This recipe is already gluten-free, so it’s perfect for anyone avoiding gluten. These roasted chickpeas make great additions to many meals: - Using as a protein boost in grain bowls: Toss these crunchy chickpeas into your grain bowls. They add protein and crunch. - Snacking option for movie nights: Serve them as a fun snack while watching a movie. They are healthier than chips and just as tasty! For the full recipe, check out the Sweet and Spicy Roasted Chickpeas section. To keep your sweet and spicy roasted chickpeas fresh, store them in an airtight container. This helps maintain their crunch. They are best consumed within 3-5 days. After this time, they may lose their crispiness and flavor. If you want to enjoy them again, you can reheat chickpeas. Place them in the oven for a few minutes. This helps them regain their crunch. Avoid using the microwave. It may make them soggy, and that's not fun. You can freeze chickpeas before roasting for later use. Make sure to package them properly to prevent freezer burn. Use freezer bags or containers. When you’re ready to eat, just thaw and roast according to the [Full Recipe]. This way, you can enjoy a tasty snack anytime! Sweet and spicy roasted chickpeas can last about 3 to 5 days when stored properly. To keep them fresh, place them in an airtight container at room temperature. They may lose some crunch over time, but they will still taste great. Yes, you can make these chickpeas in advance! Prepare them ahead of time and store them in an airtight container. If you want to enjoy them fresh, roast them just before serving. This way, you keep that delightful crunch. There are many fun ways to serve these chickpeas! Here are some ideas: - Pair them with tzatziki or hummus for a tasty dip. - Sprinkle them on top of salads for added crunch. - Mix them into grain bowls for extra protein. - Enjoy them as a stand-alone snack while watching a movie. The options are endless! For the full recipe, check out the Sweet and Spicy Roasted Chickpeas section. Sweet and spicy roasted chickpeas are simple to make and very tasty. You learned about the main ingredients, how to prepare and roast them, and tips for the best results. Experiment with flavors and serving ideas to enjoy these chickpeas in various ways. They are great for snacking or as meal toppings. Store leftovers well and reheat correctly for a crispy treat. Enjoy making your own versions, and remember, the fun is in the cooking!

Sweet and Spicy Roasted Chickpeas Crunchy Snack Treat

Looking for a snack that’s both tasty and healthy? Let’s make Sweet and Spicy Roasted Chickpeas! This crunchy treat packs

To make crispy veggie spring rolls, you need these main ingredients: - 1 cup cabbage, finely shredded - 1 carrot, julienned - 1 bell pepper (any color), sliced thin - 1 cup bean sprouts - 1 green onion, chopped - 2 cloves garlic, minced - 1 teaspoon ginger, grated - 2 tablespoons soy sauce - 1 teaspoon sesame oil - 20 spring roll wrappers - Oil for frying - Salt and pepper to taste These ingredients create a balanced mix of flavors and textures. The crunchy veggies add freshness, while garlic and ginger bring warmth. You can adjust the soy sauce for more or less saltiness, depending on your taste. Garnishes can elevate your spring rolls. Here are some options: - Sesame seeds for crunch - Fresh cilantro for color - Lime wedges for a zesty kick - Sweet chili sauce for dipping These garnishes add extra flavor and make your dish look beautiful. You can mix and match them based on what you like. If you need gluten-free options, look for rice paper wrappers instead of traditional spring roll wrappers. For vegan substitutes, ensure your soy sauce is labeled vegan. You can also swap out the sesame oil for a different oil, like canola or vegetable oil. These simple changes keep your spring rolls tasty and suitable for everyone! Remember, cooking should be fun and easy, so feel free to adapt the ingredients to suit your needs. For the full recipe, check out the details above. Start by getting your veggies ready. In a big bowl, mix these ingredients: - 1 cup cabbage, finely shredded - 1 carrot, julienned - 1 bell pepper, sliced thin - 1 cup bean sprouts - 1 green onion, chopped This mix gives a nice crunch and flavor. Heat a skillet over medium heat. Add a splash of oil. When the oil is hot, throw in: - 2 cloves garlic, minced - 1 teaspoon ginger, grated Sauté for about 1 minute. The smell will be amazing! Now add your mixed veggies to the skillet. Stir-fry for 3-4 minutes. You want them to soften but still stay crunchy. Drizzle in: - 2 tablespoons soy sauce - 1 teaspoon sesame oil Mix well and season with salt and pepper. Take the skillet off the heat and let the filling cool a bit. Now, it’s time to fill the spring rolls. Grab a spring roll wrapper. Place it on a clean, dry surface. Make sure one corner points towards you. Add about 2-3 tablespoons of the veggie mix near that corner. Fold the bottom corner over the filling. Then, fold in the sides. Roll tightly away from you. Use a little water to seal the top edge. Repeat this with the rest of the wrappers and filling. Heat oil in a deep frying pan to 350°F (175°C). Carefully add the spring rolls in batches. Fry them for about 4-5 minutes. They should turn golden brown and crispy. Turn them occasionally for even cooking. When done, use a slotted spoon to take them out. Place the spring rolls on paper towels to drain extra oil. Enjoy your crispy veggie spring rolls! For the full recipe, check out the details above. To get your spring rolls perfectly crispy, follow these steps. First, ensure your oil is hot enough. Heat it to 350°F (175°C) before frying. If the oil isn’t hot, the rolls will soak up too much oil and become soggy. Fry them in small batches. This helps maintain the oil temperature and gives each roll enough room to cook evenly. Finally, let them rest on paper towels to absorb excess oil, keeping that delightful crunch. Watch out for a few common mistakes. Don't overfill your spring rolls. This can make them hard to seal and fry. Also, avoid using wet or soggy vegetables. Excess moisture can lead to a mushy texture. Make sure to cool the filling before wrapping. If you skip this step, the heat can steam the wrappers and ruin the crispiness. Serve your crispy veggie spring rolls hot. Pair them with sweet chili sauce or soy sauce for a tasty dip. You can also add a sprinkle of sesame seeds and fresh cilantro for a pop of color and flavor. For a fun twist, try serving them with a side of peanut sauce or a zesty lime wedge. Enjoy these delightful bites at parties or as a snack! For the full recipe, check out the Full Recipe section. {{image_2}} You can change the filling to add your favorite veggies. Try spinach, mushrooms, or zucchini. You can also add cooked tofu or tempeh for protein. If you like heat, add some sliced jalapeños or chili peppers. Mixing in fresh herbs like cilantro or mint can brighten the flavors too. To make your spring rolls pop, try adding fun flavors. For a hint of sweetness, mix in some shredded coconut or a bit of brown sugar. You can use different sauces as well, like hoisin sauce or chili garlic sauce. A splash of lime juice adds a nice zing and balances the flavors. You can serve spring rolls in many fun ways. Try cutting them into bite-sized pieces for easy sharing. You can also stack them on a plate and drizzle sauce on top for a beautiful look. For a fun twist, serve them in lettuce leaves instead of wrappers. This adds crunch and freshness to each bite. You can find the full recipe [here]. If you have leftover spring rolls, store them in an airtight container. Place parchment paper between layers to keep them crispy. They stay fresh in the fridge for up to three days. Make sure to cool them completely before storing. This prevents sogginess. To reheat, avoid the microwave. It makes them soft. Instead, use a skillet or oven. Heat a small amount of oil in a skillet over medium heat. Add the spring rolls and cook for 2-3 minutes on each side. For the oven, preheat to 375°F (190°C). Place spring rolls on a baking sheet for 10-15 minutes until hot and crispy. You can freeze prepped spring rolls before frying. Lay them in a single layer on a baking sheet. Once they are frozen, transfer them to a freezer bag. They can last for up to three months. When ready to eat, fry them straight from the freezer. Just add an extra minute or two to the frying time for the best results. For the full recipe, check the previous section. The best way to seal spring rolls is to use water. After you fill the wrapper, fold it securely. Use a little water on the edge to stick it closed. This helps keep the filling inside while frying. Make sure to roll tightly but not too tight, or the wrapper may burst. Yes, you can bake crispy veggie spring rolls. Preheat your oven to 425°F (220°C). Place the spring rolls on a baking sheet lined with parchment paper. Brush them lightly with oil for a crispier texture. Bake for about 20-25 minutes, turning halfway through. They will be less oily but still delicious. You can store homemade spring rolls in the fridge for up to 3 days. Keep them in an airtight container to maintain freshness. If you want to store them longer, freeze un-fried rolls for up to a month. Just remember to separate them with parchment paper to prevent sticking. Spring rolls taste great with several dipping sauces. Popular choices include sweet chili sauce, soy sauce, or peanut sauce. You can also try a mix of soy sauce and vinegar for a tangy kick. For a fresh twist, pair with a zesty lime dipping sauce. Yes, spring rolls have a rich history in Asian cuisine. They originated in China over a thousand years ago, during the Spring Festival. People filled thin wrappers with fresh vegetables to celebrate the new season. Today, spring rolls are popular in many Asian countries, each with unique twists and fillings. In this article, we covered the key ingredients for spring rolls, from main components to optional garnishes and substitutes. We outlined easy step-by-step instructions for making delicious rolls and shared tips for achieving crispiness while avoiding common mistakes. We even explored tasty variations and provided storage info to keep your rolls fresh. With these skills and knowledge, you can enjoy making spring rolls at home. Dive in, be creative, and savor your tasty results!

Crispy Veggie Spring Rolls Easy Homemade Delight

Are you ready to create a crunchy, mouth-watering delight in your kitchen? In this blog post, I’ll guide you through

To make homemade granola bars, you need these key ingredients: - 2 cups rolled oats - 1 cup mixed nuts (almonds, walnuts, pecans), roughly chopped - 1/2 cup sunflower seeds - 1/2 cup honey or maple syrup - 1/4 cup peanut butter (or almond butter) - 1/2 teaspoon vanilla extract - 1/2 teaspoon cinnamon - 1/4 teaspoon salt - 1/2 cup dried fruits (raisins, cranberries, or apricots), chopped These ingredients work together to create a tasty and healthy snack. The oats give a strong base, while the nuts add crunch. Honey or maple syrup adds sweetness, and peanut butter gives a rich flavor. You can customize your granola bars by adding some fun extras. Here are a few ideas: - Chocolate chips or chunks - Seeds like chia or flaxseed - Coconut flakes - Spices like nutmeg or ginger - Fresh fruit like mashed bananas or applesauce Feel free to mix and match. These add-ins make your bars unique and even more enjoyable. Homemade granola bars can be a smart choice for snacks. They are packed with nutrients. Here’s a brief breakdown: - Calories: About 200-250 per bar, depending on add-ins - Protein: Around 6-8 grams, thanks to nuts and seeds - Fiber: High in fiber from oats and dried fruits - Healthy Fats: Nuts and seeds provide good fats These bars deliver energy for your day and keep you feeling full. They are great for breakfast or a quick snack. You can find the full recipe above to get started! Start by gathering your ingredients. You will need: - 2 cups rolled oats - 1 cup mixed nuts (almonds, walnuts, pecans), roughly chopped - 1/2 cup sunflower seeds - 1/2 cup honey or maple syrup - 1/4 cup peanut butter (or almond butter) - 1/2 teaspoon vanilla extract - 1/2 teaspoon cinnamon - 1/4 teaspoon salt - 1/2 cup dried fruits (raisins, cranberries, or apricots), chopped Next, preheat your oven to 350°F (175°C). This step is vital for getting that perfect crunch. Now, line an 8x8 inch baking pan with parchment paper. Leave some paper hanging over the sides. This makes it easy to lift out the bars later. In a large mixing bowl, combine the rolled oats, chopped nuts, and sunflower seeds. Stir until mixed. This mix is the base of your bars. Now, in a small saucepan, combine honey and peanut butter. Heat it on low. Stir until it melts and becomes smooth. This sweet mixture is key to binding everything together. Remove it from heat. Add the vanilla extract, cinnamon, and salt. Stir until well combined. Pour this honey-peanut butter mix over the dry ingredients in the bowl. Mix thoroughly to coat all the oats and nuts. This is where the magic happens! Fold in the chopped dried fruits. Make sure they spread evenly in the mixture. Transfer this mixture to the lined baking pan. Use the back of a spatula to press it down firmly into an even layer. This helps the bars hold together. Bake in the preheated oven for about 20-25 minutes. Look for a golden brown edge. This means they are done! Once baked, remove the pan from the oven. Let it cool in the pan for about 15 minutes. After that, use the parchment paper to lift the bars out. Place them on a wire rack to cool completely. Once cool, cut the mixture into bars or squares. You can make them as big or small as you like. Store the granola bars in an airtight container for up to a week. Enjoy your homemade treat! Check the Full Recipe for more tips and details. Sometimes, your granola bars may crumble. This often happens when the mixture is too dry. To fix this, add a bit more honey or nut butter. If your bars feel too sticky, try baking them a little longer. Another common issue is uneven baking. Make sure to spread the mixture evenly in the pan. This helps them cook at the same rate. You can change these bars to fit your taste. Want chocolate? Add mini chocolate chips. For a tropical twist, toss in dried coconut or mango. You can also swap nuts based on your favorites. Use cashews, pecans, or even pumpkin seeds. The options are endless! Just keep the main ingredients the same for the best results. For crunchy bars, bake until golden brown. This gives a nice crisp. If you like chewy bars, reduce the baking time. Aim for a lighter color, just set and not too brown. Press the mixture firmly into the pan. This helps the bars hold together better. Lastly, let them cool completely before cutting. This step is key to getting nice, clean edges. Follow the Full Recipe for a delicious treat you can enjoy anytime! {{image_2}} You can easily add chocolate chips to your bars for a sweet twist. Use 1/2 cup of mini chocolate chips. Mix them in after you combine the dry ingredients. This adds a rich flavor and a fun texture. Kids love these bars for snacks or lunch. You can also use dark chocolate for a healthier option. If you need nut-free bars, simply skip the mixed nuts. Replace them with seeds like pumpkin or hemp. You can also use extra sunflower seeds. This keeps the bars crunchy and filling. Check for nut-free butters too, like sunbutter. It gives a nice taste, similar to peanut butter. For an energy boost, add protein powder or chia seeds. Use 1/4 cup of your favorite protein powder. Chia seeds can add omega-3 and fiber, helping you feel full. You can also mix in some dark chocolate for extra energy. Just remember, balance is key. These tweaks will keep you fueled for your day. I recommend checking the Full Recipe for detailed steps to create your own delicious bars. To keep your homemade granola bars fresh, store them in an airtight container. This helps prevent them from drying out. Place parchment paper between layers to avoid sticking. You can store them at room temperature for about a week. If you want to keep them longer, consider freezing. Freezing is a great way to save your granola bars for later. First, cut them into bars or squares. Wrap each bar in plastic wrap. Then, place the wrapped bars in a freezer bag. This method will keep them fresh for up to three months. When you're ready to eat, simply thaw and enjoy. To extend the life of your granola bars, avoid exposing them to heat and moisture. Store them in a cool, dry place. If you notice any signs of spoilage, such as a strange smell or texture, discard them. Keeping them in the fridge can also help, but it may change their texture. For the best taste, I recommend eating them within a week or two of making them. For the full recipe, check out the Crunchy Nutty Granola Bars. To make chewy granola bars, you need to adjust the wet and dry ratios. Use more nut butter or sweetener, like honey. This adds moisture, which keeps the bars soft. You can also bake them for a shorter time. Remove them from the oven when they are still a bit soft in the center. This way, they will firm up as they cool. Yes, you can use other sweeteners in your granola bars. Maple syrup works well as a replacement. Agave nectar or brown rice syrup are also good options. Each sweetener will change the flavor slightly. Make sure to use the same amount as honey for the best results. These swaps keep the bars sweet and tasty. After baking, let the granola bars cool for about 15 minutes. This helps them set but keeps them soft. Use a sharp knife to cut them into bars. A ruler can help you measure even sizes. If you want cleaner cuts, chill the bars in the fridge for a bit before cutting. This method makes it easier and gives a nice look to your bars. You learned essential ingredients and easy steps to make granola bars. We explored tips for great texture and tasty variations. Storage methods keep your bars fresh and ready to eat. In closing, making granola bars is fun and satisfying. Customize recipes to fit your taste. Try different add-ins and enjoy the process. You'll create a healthy snack that everyone loves.

Homemade Granola Bars Simple and Healthy Snack

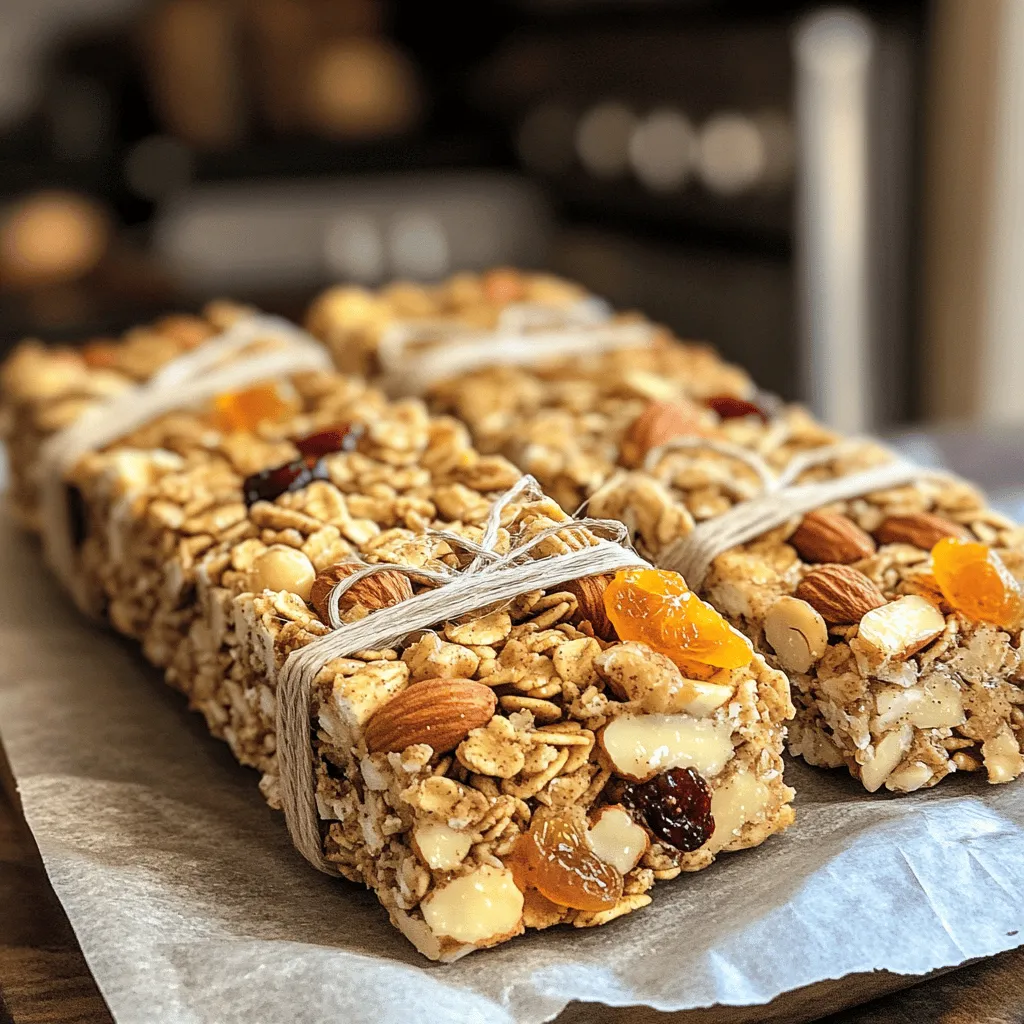
Are you craving a quick, tasty snack that’s also good for you? Look no further! Homemade granola bars are simple

- 1 (8 oz) package cream cheese, softened - 1/2 cup powdered sugar - 1/4 cup brown sugar - 1 teaspoon vanilla extract - 1/2 cup caramel sauce - 1/2 teaspoon cinnamon - 2-3 apples (such as Granny Smith or Honeycrisp) - Chopped nuts (for garnish) You can change up this recipe with fun extras. Try adding mini chocolate chips for a sweet touch. You can also use different nuts, like almonds or pecans. If you want a twist, add a splash of maple syrup for flavor. For sweeteners, feel free to swap the sugars with alternatives like honey or agave syrup. You can also use a sugar-free caramel sauce if preferred. These options can make the dip fit your taste or dietary needs. Enjoy creating your perfect caramel apple dip! For the full recipe, check out the detailed instructions. Start by grabbing your mixing bowl. Take the softened cream cheese and beat it well. Use an electric mixer for this step. You want it to become smooth and creamy. This is the base of your dip. Next, add in the powdered sugar, brown sugar, and vanilla extract. Mix everything together until it’s fluffy. This sweet mixture will make the dip rich and tasty. Now, it’s time to layer. Take your creamy mix and spread it evenly into a serving dish. This will be the first layer people see. It should look nice and inviting. Now comes the fun part! Drizzle the caramel sauce over your cream cheese layer. Make sure to cover it well. This adds a sweet touch that everyone loves. Then, sprinkle cinnamon over the caramel. This will give it a warm flavor. If you like nuts, add chopped nuts on top. They add a great crunch! After adding the toppings, it’s time to chill. Place the dip in the refrigerator for about 30 minutes. This step is key because it lets the flavors mix. Chilling makes it taste even better! After it’s chilled, serve it with sliced apples. The fresh apples make a great pair with the dip. Enjoy your delicious Caramel Apple Dip with Cream Cheese! To get the best dip, use softened cream cheese. Softened cream cheese blends well and gives a smooth texture. Cold cream cheese can make your dip lumpy. Leave it out for about 30 minutes before mixing. When you beat the cream cheese, use a hand mixer or a stand mixer. Mix at medium speed for about two minutes. This helps to make the dip fluffy and light. You can add fun mix-ins to your dip. Try adding mini chocolate chips for a sweet twist. Chopped nuts also add crunch and flavor. If you like spice, add a pinch of nutmeg or ginger. Adjust the sweetness by adding more or less brown sugar. Taste as you go to find your perfect balance. The right apples can make your dip shine. I recommend Granny Smith apples for their tartness. Honeycrisp apples are sweet and crunchy, too. Slice your apples just before serving to keep them fresh. For a fun serving idea, use a cute bowl for the dip and place the apple slices around it. You can even add a few caramel candies on top for decoration. {{image_2}} You can mix up the flavors of your caramel apple dip. One tasty option is to add chocolate. You can swirl in some melted chocolate or sprinkle chocolate chips on top. The rich taste of chocolate pairs well with the sweetness of caramel. You can also add nuts or fruits to your dip. Chopped pecans or walnuts give a nice crunch. For a fruity twist, try adding dried cranberries or raisins. These add color and a bit of tang. Each bite can surprise you with new flavors. Seasonal changes can inspire new dips. For the holidays, you might want to sprinkle festive spices like nutmeg or ginger. A layer of crushed candy canes on top can make it even more special. You can also use seasonal fruits in your dip. In fall, crisp apples work great. In summer, try fresh peaches or strawberries. Each season brings a new chance to explore flavors. You can make this dip fit different diets easily. For a gluten-free option, just check that your caramel sauce is gluten-free. Many brands offer sauces that fit this need. If you want a vegan dip, you can swap cream cheese for a plant-based version. Use coconut or almond cream and vegan caramel sauce. This way, everyone can enjoy this tasty treat. For the full recipe, check out the [Full Recipe]. To keep your leftover dip fresh, store it in an airtight container. This will help prevent it from absorbing other smells in your fridge. If you want to keep it safe, use glass or plastic containers with tight-fitting lids. These containers keep moisture in and air out. The dip lasts about 3 to 5 days in the fridge. Make sure to check for any changes in smell or texture before eating it. If it looks or smells off, it’s best to throw it away. Yes, you can freeze the dip! To freeze it, place it in a freezer-safe container. Leave some space at the top for expansion. To thaw the dip, place it in the fridge overnight. This keeps the texture smooth. Before serving again, stir it gently to mix any separated ingredients. For the full recipe, check the link provided. Enjoy your caramel apple dip! Can I use low-fat cream cheese? Yes, you can use low-fat cream cheese. It will still taste good. Just remember, it may be a bit less creamy. How can I make caramel sauce from scratch? Making caramel sauce is simple! You need sugar, butter, and cream. Cook sugar until it melts and turns golden. Stir in butter, then add cream slowly. Cook until smooth. What kind of fruits can I dip? You can dip many fruits! Try apples, pears, bananas, or strawberries. These fruits pair well with the sweet dip. Why is my dip too runny? Your dip may be too runny if the cream cheese is not firm enough. Make sure to use softened cream cheese, not melted. What to do if the flavors are too strong? If the flavors are too strong, add more cream cheese. Mix it in to balance the taste. For the complete recipe details, check out the [Full Recipe](#). This blog post covered a tasty cream cheese dip recipe. You learned about the main ingredients, optional add-ins, and step-by-step instructions. I also shared tips for the best texture and flavor. You can even find variations and storage info. Creating this dip can be fun and easy. It’s a perfect treat for sharing. You can customize it to fit any occasion or flavor you like. Enjoy your dip and happy cooking!

Caramel Apple Dip with Cream Cheese Delight

Do you want a simple yet delicious snack for your next gathering? Look no further than my Caramel Apple Dip

To make peanut butter banana overnight oats, you will need: - 1 cup rolled oats - 2 cups almond milk (or any milk of choice) - 2 ripe bananas, mashed - 1/4 cup peanut butter (smooth or crunchy) - 2 tablespoons maple syrup (or honey) - 1/2 teaspoon vanilla extract - 1/2 teaspoon cinnamon - A pinch of salt - Optional toppings: sliced bananas, chopped nuts, chia seeds, or dark chocolate chips Using accurate measurements is key for great taste. Here’s how to measure: - Rolled oats: Use a dry measuring cup. - Almond milk: Use a liquid measuring cup for accuracy. - Bananas: Mash them well with a fork. - Peanut butter: For easier measuring, warm it slightly. - Maple syrup: Pour it carefully for the right amount. - Spices: Use measuring spoons for precision. Toppings can add fun and flavor. Here are some ideas: - Sliced bananas for extra sweetness. - Chopped nuts for crunch. - Chia seeds for added nutrition. - Dark chocolate chips for a treat. Feel free to mix and match these toppings to make your oats unique! Start by gathering your ingredients. You will need rolled oats, almond milk, and ripe bananas. In a large mixing bowl, combine 1 cup of rolled oats with 2 cups of almond milk. Then, mash 2 ripe bananas and add them to the bowl. Stir until everything mixes well. This base sets the stage for creamy, tasty oats. Next, it’s time to add the fun stuff! Add 1/4 cup of peanut butter to the bowl. You can choose smooth or crunchy based on your taste. Then, pour in 2 tablespoons of maple syrup or honey for sweetness. Don’t forget the 1/2 teaspoon of vanilla extract and cinnamon. Lastly, add a pinch of salt. Mix all these ingredients until they blend perfectly. This step creates a rich, nutty flavor. Now, divide the mixture evenly into two mason jars or airtight containers. Make sure each jar has the same amount of oats and liquid. Seal the jars tightly and place them in the fridge. Let them soak overnight or at least for 4 hours. This soaking softens the oats and lets the flavors mingle. You’ll wake up to a delicious breakfast waiting for you! In the morning, take the jars out and give the oats a good stir. If the mixture is too thick, add a splash of almond milk. For toppings, get creative! You can add sliced bananas, chopped nuts, chia seeds, or dark chocolate chips. For a rustic look, serve the oats in the same jars. Drizzle some peanut butter on top and enjoy your tasty delight! You can make your overnight oats your own. Add your favorite nuts or seeds. Try sunflower seeds for a nut-free option. You can also mix in berries for a fruity twist. If you like it sweeter, add a bit more maple syrup or honey. You can even swap bananas for apples or peaches. The key is to play with flavors and textures until you find your favorite combo. For creamy oats, use rolled oats. They soak up liquid well and stay soft. Make sure to use enough liquid when mixing. I recommend two cups of almond milk for one cup of oats. If your oats seem too thick in the morning, just stir in a splash of milk. This helps achieve that perfect creamy texture. Want to amp up the taste? Consider adding a spoonful of cocoa powder for chocolatey goodness. A dash of nutmeg can add warmth and spice. For a fun crunch, sprinkle in some chopped nuts or seeds before serving. You can also add a drizzle of honey or maple syrup on top. Each extra touch makes your oats more exciting and delicious. Check out the Full Recipe for more ideas! {{image_2}} You can switch peanut butter for other nut butters. Almond butter adds a nice twist. Cashew butter offers a creamy texture. Sunflower seed butter is great for nut-free diets. Each nut butter brings unique flavors to the dish. Try them out to find your favorite! Use almond milk or coconut milk for a dairy-free option. Both milks keep the oats creamy and delicious. You can also use oat milk for a nut-free choice. Choose maple syrup instead of honey for a vegan-friendly sweetener. These swaps allow everyone to enjoy this tasty meal. You can mix in different fruits for more flavor. Berries like strawberries or blueberries add a fresh taste. Chopped apples or pears work well, too. For a tropical twist, add pineapple or mango. Experiment with spices like nutmeg or ginger for extra warmth. Each combination opens new taste experiences! Store your peanut butter banana overnight oats in airtight jars. Mason jars work well. You can also use plastic containers. Make sure they are sealed tightly to keep the oats fresh. Your oats can last in the fridge for up to five days. Keep an eye on the bananas. They may brown and change the taste. If you plan to eat them later, consider adding bananas just before serving. You can eat your overnight oats cold or warm them up. To reheat, place the oats in a bowl. Heat them in the microwave for about 30 seconds. Stir and check the temperature. If you want a creamier texture, add a splash of almond milk while heating. Some people love the cold, creamy taste right from the fridge. It's all about your preference! Yes, you can make these oats ahead of time. I often prepare them the night before. This way, they are ready to eat in the morning. You can store them in the fridge for up to five days. Each jar stays fresh and tasty. Just grab one when you need a quick breakfast! The oats need to soak for at least four hours. However, soaking them overnight gives the best results. This time allows the oats to absorb the liquid well. They become soft and creamy. The flavors also blend nicely during this time. If you want a change, try almond butter or cashew butter. Both give a nutty taste and work well. You can also use sunflower seed butter if you need a nut-free option. Each choice adds its own unique flavor to the oats. To lower the sugar, you can cut back on maple syrup. Use just one tablespoon instead of two. You can also skip the syrup and rely on ripe bananas for sweetness. They add natural sugar and great flavor without extra sweeteners. For the complete recipe, check out Nutty Banana Bliss Overnight Oats 🥜. This recipe lets you whip up a delicious breakfast with ease! To wrap up, we've covered key details about making peanut butter banana overnight oats. You learned the right ingredients, measurements, and optional toppings. I shared how to prepare, mix, and refrigerate your oats for the best flavor and texture. We discussed tips for customizing your dish, alternative ingredients, and storage methods. These oats can be a healthy start to your day. Enjoy experimenting with different flavors and toppings. With the right methods, you can create a perfect breakfast every time.

Peanut Butter Banana Overnight Oats Easy and Tasty Delight

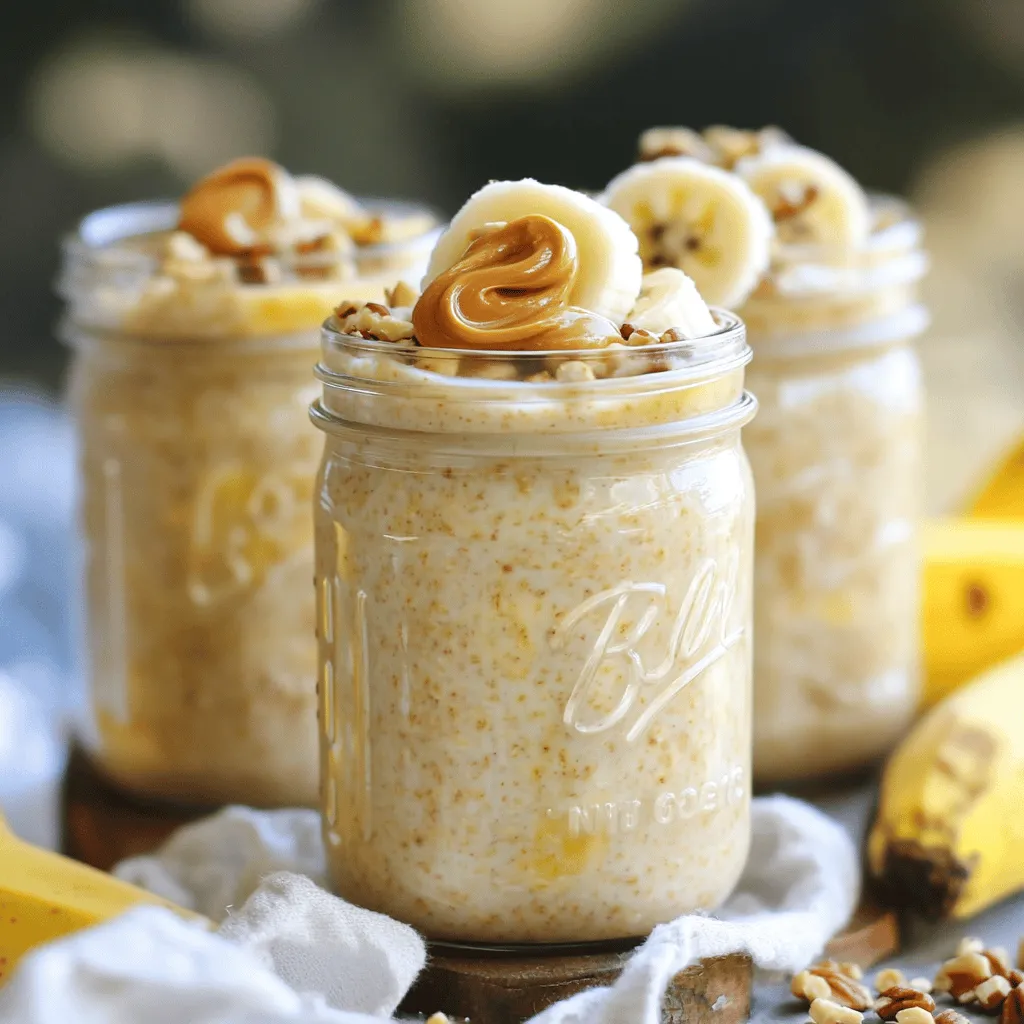
If you’re looking for a quick, yummy breakfast that makes your morning easier, you’ve found it! Peanut Butter Banana Overnight

In this section, I’ll share the essential ingredients for making chocolate-dipped almonds. Each item plays a key role in bringing out the best flavors. Let's dive into what you need. - Raw almonds - Dark chocolate chips (at least 70% cocoa) - Optional: Coconut oil (for smoother chocolate) - Optional: Sea salt - Optional: Vanilla extract - Optional: Cinnamon Using raw almonds gives you a nice crunch. Dark chocolate chips add rich flavor and depth. Coconut oil makes the chocolate smooth and easy to dip. Adding sea salt enhances the sweet taste. Vanilla extract and cinnamon can bring warmth to your snack. These ingredients make chocolate-dipped almonds a simple yet delicious treat. For the complete recipe, check out the Full Recipe. Enjoy creating this delightful snack! 1. First, preheat your oven to 350°F (175°C). 2. Next, spread 1 cup of raw almonds on a baking sheet. Place them in a single layer. 3. Roast the almonds for 10-12 minutes. They should smell nice and look slightly golden. 4. Once done, remove them from the oven and let them cool. 1. To melt the chocolate, grab a heatproof bowl. 2. Add 1 cup of dark chocolate chips and 1 tablespoon of coconut oil if you want. 3. You can use a double boiler or a microwave. If using a microwave, heat it in 30-second intervals. Stir after each time until smooth. 1. For extra flavor, consider adding 1 teaspoon of vanilla extract and ½ teaspoon of cinnamon to the melted chocolate. 2. Now, using a fork, dip each cooled almond into the chocolate. Make sure it's fully coated. 3. Let any extra chocolate drip off before placing it on a parchment-lined baking sheet. 1. While the chocolate is still wet, sprinkle a tiny pinch of sea salt on each almond. This boosts the flavor. 2. Next, place the baking sheet in the fridge for about 30 minutes. This helps the chocolate harden. 3. Enjoy your chocolate-dipped almonds as a snack or treat! You can store them in an airtight container in the fridge for up to 2 weeks. For the full recipe, refer to the earlier sections. To achieve the perfect roast, I recommend preheating your oven to 350°F (175°C). Spread the raw almonds on a baking sheet in a single layer. Roast them for 10 to 12 minutes. Keep an eye on them. You want them fragrant and slightly golden. Over-roasting creates a bitter taste. So, check them often. When melting chocolate, ensure you use a heatproof bowl. You can use a double boiler or a microwave. If you opt for the microwave, heat in 30-second intervals. Stir after each interval until the chocolate is smooth. Adding coconut oil helps create a silky texture. Prevent chocolate from seizing by avoiding water contact. Even a small drop of water can ruin your chocolate. Make sure all your tools are dry before you start melting. You can get creative when serving chocolate-dipped almonds. Try placing them in small bowls or on a decorative plate. They look lovely alongside fresh fruits like strawberries or slices of apple. Pair them with other snacks like cheese or popcorn for a fun mix. For a special touch, drizzle extra melted chocolate over the finished almonds. This adds a nice design and extra flavor. Enjoy your chocolate-dipped almonds as a snack or a treat! If you want the full details, check out the Full Recipe. {{image_2}} You can easily mix up the flavors of your chocolate-dipped almonds. Try adding spices like pumpkin spice or a hint of cayenne for a kick. These spices will add warmth and depth to your snack. You can also switch up the type of chocolate. Use milk chocolate for a sweeter treat or white chocolate for a creamy twist. Each option gives a different taste that can surprise your taste buds. If you want to change the nuts, consider using cashews or pecans. Both add their unique flavors and textures. For those who need vegan or gluten-free options, you can use dairy-free chocolate and ensure your nuts are certified gluten-free. This way, everyone can enjoy this tasty snack. To make your chocolate-dipped almonds even more special, add different toppings. Try toasted coconut for a tropical flair or crushed nuts for extra crunch. You can also drizzle more chocolate on top for a fun design. This adds both beauty and more chocolatey goodness. These small touches make your snack look fancy and taste incredible. To keep your chocolate-dipped almonds fresh, store them in an airtight container. This will help protect them from moisture and air. A glass jar or a plastic container with a tight lid works well. Make sure the container is clean and dry before placing the almonds inside. Chocolate-dipped almonds last about two weeks in the refrigerator. After this time, they may start to lose their crunch and flavor. Look for signs of spoilage like a dull appearance or a strange smell. If they seem off, it's best to toss them out. Enjoy your chocolate-dipped almonds while they're fresh! For the full recipe, check out the detailed instructions earlier. Chocolate-dipped almonds last about two weeks when stored in an airtight container. Keep them in the fridge to stay fresh. After two weeks, they may lose their crunch and flavor. Yes, you can use other nuts like cashews or pecans. Each nut brings a unique taste and texture to the treat. Just follow the same steps in the Full Recipe for dipping. Dark chocolate with at least 70% cocoa is best for melting. It has a rich flavor and balances well with the almonds. You can also use milk or white chocolate if you prefer a sweeter taste. Yes, chocolate-dipped almonds can be healthy in moderation. Almonds are a good source of protein and healthy fats. Dark chocolate has antioxidants, too. Just watch your serving size. You can find pre-made chocolate-dipped almonds in many grocery stores or online. Look in the snack aisle or specialty sections. Check brands that focus on natural or organic snacks. You can skip coconut oil and melt the chocolate alone. It will still coat the almonds well, but it may be slightly thicker. Just make sure to stir it often while melting for smoothness. You have learned how to make tasty chocolate-dipped almonds using simple steps. First, you roast almonds and melt dark chocolate. Then, dip each almond and add flavors like vanilla or cinnamon. I also shared tips for perfecting your roast and avoiding common chocolate melting issues. Feel free to explore variations with different chocolates and spice blends. Proper storage keeps them fresh, and following the FAQs eases any doubts. Enjoy your delicious treat as a snack or gift. Happy dipping!

Chocolate-Dipped Almonds Scrumptious and Easy Snack

Are you craving a sweet treat that’s both tasty and simple? Look no further! Chocolate-dipped almonds are your perfect snack.

To make S'mores Brownie Bars, you need key ingredients. Here’s what you must have: - 1 cup unsalted butter, melted - 1 cup granulated sugar - 1 cup brown sugar, packed - 4 large eggs - 2 teaspoons vanilla extract - 1 cup all-purpose flour - 1 cup unsweetened cocoa powder - 1 teaspoon baking powder - 1/2 teaspoon salt - 1 cup mini marshmallows - 1 cup graham cracker crumbs - 1 cup chocolate chips (semi-sweet or milk chocolate) - Extra mini marshmallows and graham cracker crumbs for topping These ingredients create a rich and gooey brownie base. The combination of chocolate, marshmallows, and graham crackers gives you that classic s'mores flavor. You can add ingredients to make your bars even better. Try these options: - Nuts like walnuts or pecans for crunch - Peanut butter chips for a nutty twist - Different types of chocolate, like dark chocolate or white chocolate Adding these items can change the taste and texture. They can make your S'mores Brownie Bars unique and fun. You can modify the recipe for dietary needs. Here are some good swaps: - For gluten-free options, use gluten-free flour instead of all-purpose flour. - To make it vegan, use flax eggs instead of regular eggs and plant-based butter. - Replace regular chocolate chips with dairy-free chocolate chips for a vegan version. These substitutions let everyone enjoy S'mores Brownie Bars, no matter their diet. You can still keep that delicious flavor while being mindful of different preferences. For the full recipe, check out the details above. Start by preheating your oven to 350°F (175°C). This helps the brownies bake evenly. Grease a 9x13 inch baking pan with butter or line it with parchment paper. Lining makes it easy to lift the brownies out later. In a large bowl, mix the melted butter with granulated and brown sugar. Stir until the mix looks creamy. Then, add the eggs, one at a time, and mix well. Pour in the vanilla extract for flavor. In another bowl, whisk the flour, cocoa powder, baking powder, and salt. Slowly add this dry blend to the wet mix. Stir just until you don't see any flour. Now, fold in the graham cracker crumbs and chocolate chips. Finally, add mini marshmallows gently. Pour the brownie mix into your prepared pan. Spread it out evenly. Bake for 25-30 minutes. To check, insert a toothpick into the center. It should come out with a few moist crumbs. Once baked, take the pan out and sprinkle extra mini marshmallows and graham cracker crumbs on top. Turn on the broiler and return the pan to the oven. Watch closely! Broil for 1-2 minutes until the marshmallows are golden. After that, let the bars cool for ten minutes before cutting. Enjoy your gooey treat! For the full recipe, check the previous section. For the best texture, mix your batter well but don’t overmix. Overmixing can make brownies tough. When you fold in the mini marshmallows and chocolate chips, do it gently. This keeps them whole and adds nice pockets of gooeyness. Bake until a toothpick comes out with a few moist crumbs, not clean. This ensures a fudgy center. Once cooled, store your bars in an airtight container. This keeps them fresh and soft. If you want to keep them longer, wrap the bars tightly in plastic wrap, then foil. This will help prevent freezer burn. They can last up to three months in the freezer. Just thaw them in the fridge overnight before enjoying. Serve your S'mores Brownie Bars warm for the best taste. They pair well with vanilla ice cream or whipped cream. You can also drizzle with chocolate syrup for extra sweetness. For a fun twist, add some crushed graham crackers on top before serving. This gives a nice crunch and enhances the s'mores flavor. {{image_2}} To make gluten-free s'mores brownie bars, swap all-purpose flour with a gluten-free blend. Look for a blend that works well for baking. This will keep the texture light and chewy. You can also use gluten-free graham cracker crumbs. Many brands offer these, making it easy to stay gluten-free. For a vegan version, replace eggs with flax eggs. Mix one tablespoon of ground flaxseed with three tablespoons of water. Let it sit until it thickens. Use a plant-based butter instead of regular butter. Choose vegan chocolate chips and make sure your graham crackers are vegan-friendly. These small changes keep the bars delicious and cruelty-free. You can customize your s'mores brownie bars with different flavors. Add chopped nuts like walnuts or pecans for a crunchy texture. Experiment with different types of chocolate chips, such as dark chocolate or white chocolate. This adds a new layer of flavor. Try swapping some graham cracker crumbs for crushed cookies, like Oreos, for a fun twist. Each variation makes the bars unique and special. For the full recipe, check out the details above! To keep your S'mores Brownie Bars fresh, store them in an airtight container. This helps retain moisture. Place a piece of parchment paper between layers to avoid sticking. They last up to five days at room temperature. If you want them to last longer, refrigeration is a good option. Just remember to seal them tightly. Freezing is a great way to save your S'mores Brownie Bars for later. Let them cool completely before freezing. Cut them into squares and wrap each one in plastic wrap. Then, place all the wrapped bars in a freezer-safe bag. They can last up to three months in the freezer. Label the bag with the date to track freshness. When you’re ready to enjoy your frozen S'mores Brownie Bars, take them out of the freezer. Let them thaw in the fridge overnight for the best results. If you want a warm treat, pop them in the microwave for 10-15 seconds. This will make them soft and gooey again. Enjoy your delicious bars as if they were fresh out of the oven! S'mores Brownie Bars are a fun treat that mix brownies and s'mores flavors. They have a rich brownie base topped with gooey marshmallows, chocolate chips, and crunchy graham cracker crumbs. You can enjoy the taste of a campfire treat in a convenient bar form. This recipe combines the best of both worlds for a delicious dessert. Yes, you can use a different pan size. If you use a smaller pan, the bars may take longer to bake. A larger pan will make the bars thinner and bake faster. Just keep an eye on them while they bake to avoid overcooking. S'mores Brownie Bars can last up to five days when stored in an airtight container. They taste best when fresh, but you can still enjoy them even after a few days. If you store them in the fridge, they might last a bit longer. You can serve S'mores Brownie Bars with a scoop of vanilla ice cream or a drizzle of chocolate sauce. Fresh fruit, like strawberries or raspberries, adds a nice touch too. Try pairing them with a glass of cold milk for a classic combo. To reheat S'mores Brownie Bars, place them in the microwave for about 10-15 seconds. This warms them up and makes the chocolate a bit gooey again. If you prefer a crispy edge, you can warm them in the oven at 350°F for 5-10 minutes. Just keep an eye on them! S'mores brownie bars are fun and tasty treats. We covered essential and optional ingredients, plus substitutions for diets. You'll find step-by-step instructions for baking and tips for perfecting texture. Don't forget the variations and storage info for freshness. These simple changes can elevate your treats and keep them delicious. Now, go ahead and enjoy your s'mores brownie bars with family and friends!

S’mores Brownie Bars Irresistible and Easy Treat

Looking for a sweet treat that’s both easy and delicious? These S’mores Brownie Bars pack all the fun of classic

For a great chicken stir-fry, gather these items: - 1 pound boneless, skinless chicken breast, sliced thinly - 2 tablespoons soy sauce - 1 tablespoon cornstarch - 1 tablespoon vegetable oil - 1 cup broccoli florets - 1 red bell pepper, sliced - 1 cup snap peas - 3 cloves garlic, minced - 1-inch piece fresh ginger, grated - 2 tablespoons chicken broth - 1 tablespoon sesame oil - Salt and pepper to taste - 2 green onions, chopped (for garnish) - Sesame seeds (for garnish) You need some basic tools to cook this dish: - A large skillet or wok for even cooking - A medium bowl for marinating chicken - A sharp knife for slicing - A cutting board for prep work - A spatula for stirring ingredients Choosing fresh ingredients makes your stir-fry tasty and healthy. Here are some tips: - Chicken: Look for bright pink meat with no smell. Fresh chicken should feel firm. - Vegetables: Pick vibrant colors and crisp textures. Avoid wilted or brown spots. - Garlic and Ginger: Choose firm, dry pieces for the best flavor. Fresh garlic should not be sprouted. - Soy Sauce: Opt for low-sodium soy sauce for a lighter taste. - Herbs and Garnishes: Use fresh green onions and sesame seeds for a pop of flavor. For the full recipe, please check the [Full Recipe]. First, you need to cut the chicken breast. Slice it thinly to help it cook fast. Then, take a medium bowl and mix the sliced chicken with soy sauce and cornstarch. This mix will add flavor and help the chicken brown nicely. Let it sit for about 15 minutes. This step is key; it helps the chicken absorb the flavors. Next, heat vegetable oil in a large skillet or wok over medium-high heat. Once the oil is hot, add the marinated chicken. Cook it for about 5 to 7 minutes. You want it browned and cooked through. Then, remove the chicken from the skillet and set it aside. In the same skillet, toss in the broccoli florets, sliced red bell pepper, and snap peas. Stir-fry these for about 3 to 4 minutes. You want them to be tender but still crisp. Then, add minced garlic and grated ginger. Stir for about 30 seconds. This will make your kitchen smell amazing! Now, return the cooked chicken to the skillet. Pour in the chicken broth and sesame oil, stirring well. Heat everything for another 2 to 3 minutes, mixing all the flavors together. Season with salt and pepper to taste. You can adjust the seasoning to your liking. For a great presentation, serve the stir-fry over a bed of steamed rice or quinoa. Garnish with chopped green onions and sesame seeds. This adds color and crunch to your dish. For the full recipe, refer to the section above. Enjoy your delicious chicken stir-fry! The best method for stir-fry is high heat. A wok is great for this. It heats fast and cooks evenly. You can also use a large skillet if you don’t have a wok. Preheat your pan before adding oil. This helps your chicken brown well. Stir-frying cooks food quickly, so keep it moving. This way, nothing burns. One common mistake is overcrowding the pan. If you add too much food, it steams instead of fries. Cook in batches if needed. Another mistake is not cutting chicken evenly. Thin slices cook faster and stay tender. Lastly, don’t forget to prep all your ingredients first. Stir-frying is quick, and you need everything ready to go. To get great flavor, marinate your chicken first. Use soy sauce, cornstarch, and a bit of garlic. This adds depth to the dish. Don’t skip the fresh ginger either; it brightens the taste. Use a mix of vegetables for color and crunch. And remember, a splash of sesame oil at the end boosts flavor. For more details, check the Full Recipe. {{image_2}} You can swap chicken for other proteins. Try sliced beef, shrimp, or tofu. Each option offers its own flavor. Beef adds richness. Shrimp cooks quickly and tastes great. Tofu is perfect for a plant-based meal. Just remember to adjust cooking times for each protein. To make a vegetarian stir-fry, skip the chicken. Use tofu or tempeh instead. Both options soak up flavors well. For a vegan choice, replace chicken broth with vegetable broth. This keeps the dish light and fresh. You can also add more veggies like mushrooms or bell peppers to enhance texture. Seasonal vegetables make your stir-fry vibrant. In spring, use asparagus and snap peas. Summer brings zucchini and bell peppers. Fall is great for carrots and Brussels sprouts. In winter, try broccoli and kale. These choices keep your meals fresh and exciting. Experiment with whatever is in season to maximize flavor. For the full recipe, check out the [Full Recipe]. After you make your chicken stir-fry, let it cool down. Place the leftovers in an airtight container. This keeps the food fresh longer. Store the container in the fridge. Use the leftovers within three days for the best taste. If you want to save the stir-fry for later, you can freeze it. First, cool the dish completely. Then, pack it in a freezer-safe container. You can also use freezer bags. Make sure to remove as much air as you can. Label the bag with the date. Your stir-fry will keep well for up to three months. Thaw it in the fridge before reheating. When you're ready to eat the leftovers, reheat them carefully. For best results, use a skillet over medium heat. Add a splash of water or broth to keep it moist. Stir often to heat evenly. You can also use a microwave. Heat it in short bursts, stirring in between. This way, the stir-fry stays tasty and fresh. Enjoy your meal! For the full recipe, check out the Flavorful Chicken Stir-Fry! The best way to cut chicken for stir-fry is to slice it thin. Start with a cold chicken breast. It’s easier to cut when firm. Use a sharp knife and cut against the grain. This keeps the chicken tender. Aim for strips about ¼ inch thick. Thinner strips cook faster and soak up more flavor. Yes, you can use frozen vegetables for this recipe. They save time and are handy. Frozen veggies are often flash-frozen to keep their nutrients. Just add them to the pan directly. No need to thaw first. They may need a minute more to cook, so watch for tenderness. To make a gluten-free version, swap soy sauce for a gluten-free alternative. You can use tamari or coconut aminos. Check the labels to ensure they're gluten-free. Also, ensure cornstarch is certified gluten-free. This way, you enjoy the same great taste without gluten. For more details, check the Full Recipe for guidance. To make a great chicken stir-fry, you need fresh ingredients and the right tools. We covered step-by-step instructions to prepare and cook it perfectly. I shared tips to avoid common mistakes and achieve the best flavor. You can also try variations for different diets and seasonal veggies. Finally, I provided storage tips to keep your leftovers fresh. Stir-fry is fun and easy, so get cooking and enjoy your meal!

Simple Chicken Stir-Fry Quick and Tasty Recipe Guide

Are you ready to whip up a meal that’s quick, tasty, and healthy? My Simple Chicken Stir-Fry recipe is just

Older posts
Newer posts
← Previous Page1 … Page55 Page56 Page57 … Page69 Next →

dsad

© 2025 My Saved Recipe • Built with GeneratePress

Our Policies

  • Copyright Policy
  • Cookie Policy
  • GDPR Policy
  • Privacy Policy
  • Disclaimer
  • Terms Of Use

More Information

  • Home
  • About
  • Contact
  • Appetizers
  • Dessert
  • Dinner
  • Drinks
©2025, My Saved Recipe About Back To Top