Skip to content
DisclaimerTerms Of UseGDPR PolicyCookie Policy

My Saved Recipe

  • Home
  • Drinks
  • Appetizers
  • Dinner
  • Dessert
  • About
  • Contact
  • Privacy Policy
DisclaimerTerms Of UseGDPR PolicyCookie Policy

Savannah

- Ripe Peaches - Fresh Mozzarella Cheese - Fresh Basil Leaves To make a Peach Caprese Salad, you need fresh ingredients. Start with ripe peaches. Look for peaches that feel slightly soft. They should smell sweet and fragrant. Next, get fresh mozzarella cheese. This cheese adds a creamy texture and mild flavor. Finally, add fresh basil leaves for that aromatic touch. - Balsamic Glaze - Extra Virgin Olive Oil - Salt and Pepper You will also need a few pantry staples. Balsamic glaze gives a sweet and tangy kick. Extra virgin olive oil adds richness and depth. Don't forget salt and pepper. These simple seasonings can make a huge difference. - Ideal Serving Size - Presentation Ideas For serving, this salad works well for four people. You can arrange it on a large white platter. The white background makes the colors pop! Layer the peaches, mozzarella, and basil nicely. Drizzle olive oil and balsamic glaze over it all. This makes for a stunning dish. If you want to impress, add extra basil leaves and a few drops of balsamic glaze on top. This Peach Caprese Salad is not only tasty but also a feast for the eyes! For the full recipe, check the link. - Washing and Slicing Peaches Start by washing the peaches under cold water. Make sure to clean them well. Cut each peach in half and remove the pit. Slice each half into wedges. Aim for nice, even slices to show off the color. - Layering Ingredients Take the fresh mozzarella cheese and slice it into rounds. Each slice should match the size of your peach wedges. This helps balance the flavors. - Arranging on the Platter Grab a large serving platter. Begin by arranging the peach slices first. Place them slightly overlapping each other for a lovely look. Next, layer the mozzarella slices next to the peaches. - Drizzling and Finishing Touches Tuck fresh basil leaves in between the peach and mozzarella. This adds color and flavor. Now, drizzle the extra virgin olive oil and balsamic glaze over the entire salad. Finish by sprinkling salt and freshly cracked black pepper to taste. - Resting Time for Flavor Meld Let the salad rest for about 5 minutes before serving. This short wait allows all the flavors to meld together beautifully. Enjoy a fresh and vibrant Peach Caprese Salad that looks as good as it tastes! For the complete recipe, you can find it [here](Full Recipe). To make a great Peach Caprese Salad, start with ripe peaches. Look for peaches that feel soft but not too mushy. The skin should be smooth and fragrant. You want that sweet, juicy flavor in every bite. If you find peaches that are not ripe yet, let them sit on your counter for a few days. They will ripen nicely, and you can enjoy the taste later. For mozzarella, fresh is best. Look for mozzarella that is packed in water. This keeps it soft and creamy. You can find it in balls or logs. I prefer the balls for this salad as they are easy to slice. Use whole milk mozzarella for a richer taste. If you want a lighter option, try part-skim mozzarella. Both will work well in your dish. To boost flavor, sprinkle salt and freshly cracked black pepper on your salad. This simple step lifts the natural tastes of the peaches and cheese. You can also add some red pepper flakes for a hint of heat. If you love herbs, add some fresh oregano or thyme for a different twist. Want to mix things up? Swap peaches for nectarines or plums. Both add a nice touch. You can also try different oils, like lemon-infused olive oil, for extra zest. For a dairy-free option, use a vegan mozzarella. It may change the taste, but it’s a fun way to explore new flavors. The look of your salad matters! Use a large white platter to really make those colors pop. Layer the peach slices and mozzarella in a circular pattern. It’s simple, but it looks stunning. Don’t be afraid to overlap them for a lush look. Garnishing can take your salad to the next level. Add fresh basil leaves on top for a fragrant touch. A drizzle of balsamic glaze can add flavor and beauty. Just a few drops can transform the dish. You may also sprinkle some toasted nuts for a crunchy finish. These little touches make your salad stand out. For more details, check the Full Recipe. {{image_2}} You can swap in other fruits for a twist. Try using ripe nectarines or juicy plums. These fruits add flavor and color. You can also use strawberries for a sweet touch. Each fruit brings its unique taste to the salad. Mixing fruits keeps it fresh and fun! Fresh mozzarella is classic, but feel free to experiment. Burrata cheese is creamy and rich. It adds a nice texture to the salad. Feta cheese brings a salty kick. Goat cheese also works well if you like tangy flavors. Each cheese option changes the taste and feel. To make this salad vegan, skip the cheese. You can use avocado instead for creaminess. Cashew cheese is another great alternative. It gives you that rich texture without dairy. You still get a delicious and fresh salad! This salad is naturally gluten-free. All the ingredients are safe to enjoy. So, you can serve it to everyone without worry. Just ensure your balsamic glaze and olive oil are pure. This way, you keep it healthy and gluten-free. If you like spice, add red pepper flakes. A pinch goes a long way in adding heat. You can also drizzle with spicy olive oil. This will give the salad a fiery twist that excites your palate. To make the salad sweeter, try honey or maple syrup. Drizzle it over the top for a touch of sweetness. This balance of sweet and savory creates a delightful flavor dance. You can also add a sprinkle of brown sugar for extra sweetness. Each option enhances the freshness of peaches. For the full recipe, refer to the section above. To keep your Peach Caprese Salad fresh, store leftovers in an airtight container. Place a paper towel in the container to absorb extra moisture. This helps keep the peaches and mozzarella from becoming soggy. Aim to eat the salad within two days for the best taste. You should not reheat this salad. It tastes best fresh. If you do need to warm it up, use a microwave on low power. Just warm it slightly, but avoid cooking it. Prep ingredients ahead of time for easy assembly. Slice your peaches and mozzarella, and store them separately in the fridge. This keeps everything fresh and ready to go. For the basil, keep the leaves whole until you are ready to serve. This way, they'll stay vibrant and flavorful. Enjoy your Peach Caprese Salad as a quick meal or a stunning side dish. For the full recipe, see the section above. A Peach Caprese Salad is a twist on the classic Caprese salad. It combines fresh peaches, mozzarella, and basil. The sweet taste of peaches shines through the creamy cheese. This salad is colorful and refreshing, perfect for summer days. Yes, you can prepare this salad ahead of time, but not too early. Make it up to two hours before serving. Store it in the fridge until you’re ready to serve. This keeps the peaches fresh and the flavors bright. This salad offers many nutrients. Peaches are high in vitamins A and C. Mozzarella gives you protein and calcium. Basil adds antioxidants and flavor. The olive oil provides healthy fats, making this dish nutritious and tasty. You can easily modify this salad for various diets. For vegan options, use vegan cheese or skip it. For gluten-free needs, this recipe is already safe. Just ensure that all ingredients are gluten-free, including the balsamic glaze. Pair this salad with a light drink. A crisp white wine, like Sauvignon Blanc, works well. If you prefer non-alcoholic, try sparkling water with lemon. Both options enhance the fresh flavors of the salad. For the full recipe, check out the detailed steps above! In this blog, we explored how to make a delicious Peach Caprese Salad. We discussed fresh ingredients like ripe peaches, mozzarella, and basil, plus pantry staples like balsamic glaze. I shared step-by-step instructions and tips for serving and storage. Now, you have the tools to create this dish. Feel free to mix ingredients or change flavors. Enjoy making this salad your own! It’s tasty, healthy, and fun to prepare.

Peach Caprese Salad Fresh and Flavorful Delight

Are you ready to brighten up your plate? A Peach Caprese Salad is fresh, flavorful, and perfect for any meal.

For this lovely dish, you will need: - 1 lb (450g) shrimp, peeled and deveined - 1 bunch of asparagus, trimmed and cut into 2-inch pieces - 4 tablespoons unsalted butter - 4 cloves garlic, minced - 1 lemon (zest and juice) These main ingredients create a simple yet tasty base for your meal. The shrimp brings a sweet flavor, while asparagus adds a nice crunch. Butter and garlic blend together to make everything rich and savory. To make your dish pop, use: - 1 teaspoon red pepper flakes - Salt and pepper to taste Red pepper flakes bring a gentle heat that pairs well with the shrimp. Salt and pepper will help enhance the natural flavors of your ingredients. You can add a few fun touches to finish your dish: - Fresh parsley, chopped (for garnish) - Cooked rice or quinoa (for serving) Chopped parsley gives a fresh look and taste. Serving the shrimp and asparagus on a bed of rice or quinoa makes it a complete meal. For the full recipe, check out the detailed instructions. To start, we need to prepare the shrimp. Take 1 pound of shrimp, peel and devein them. Pat them dry with paper towels. Drying helps the shrimp sear nicely. Season the shrimp with salt and pepper. Add half of the lemon juice for extra flavor. Set the shrimp aside while you get the skillet ready. Next, let's cook the asparagus. Grab one bunch of asparagus and trim off the tough ends. Cut the asparagus into 2-inch pieces. In a large skillet, melt 2 tablespoons of butter over medium heat. Once the butter is melted, add 4 minced garlic cloves and 1 teaspoon of red pepper flakes. Sauté this mix for about 1 minute until the garlic smells great. Now, toss in the asparagus pieces. Cook for 3-4 minutes, stirring often. You want them tender but still crisp. Now, it’s time to combine everything. Push the asparagus to one side of the skillet. Add the seasoned shrimp to the empty side. Cook the shrimp for about 2-3 minutes on each side. They will turn opaque when done. Once cooked, squeeze the rest of the lemon juice over the shrimp and asparagus. Add the lemon zest and the remaining 2 tablespoons of butter. Toss everything together until well mixed and the butter melts. Taste and adjust the seasoning if needed. For a complete meal, serve the garlic butter shrimp and asparagus over a bed of rice or quinoa. This dish is quick, easy, and packed with flavor. You can find the Full Recipe for detailed steps and tips. To get shrimp just right, start with fresh or thawed shrimp. They should be pink and firm. Don't overcook them; they need only 2-3 minutes per side. When they turn opaque, they are done. Overcooking makes them tough. Keep an eye on the time. It's easy to get distracted when cooking. Garlic and lemon make this dish shine! Use fresh garlic for the best taste. Mince it well to release all its flavor. Lemon adds brightness and zest. Use both juice and zest for a punch. The zest brings a fragrant aroma. The juice adds a tangy kick. Combine them for a balanced flavor. Don't worry if you lack fresh ingredients! You can use frozen shrimp if fresh ones aren't available. They work well and save time. For asparagus, you can swap in green beans or broccoli. Both add crunch and taste. If you have garlic powder, it’s a good backup. Use one teaspoon for every clove. Adjust based on your taste. Check out the Full Recipe for more details. {{image_2}} You can mix in other veggies to make this dish even better. Bell peppers, snap peas, or broccoli add color and taste. Just chop them to similar sizes as the asparagus. Sauté them with the garlic for a few minutes before adding the shrimp. This keeps everything fresh and crunchy. If you like spice, try adding fresh chili peppers. They add heat and flavor. Slice them thin and toss them in with the garlic. Adjust the amount to your taste. You can also add more red pepper flakes, if you want extra kick. Switch up the base for your shrimp and asparagus. Instead of rice or quinoa, use couscous or farro. Each grain has a unique texture and flavor. This change can make your meal feel new. Try different grains to find the one you love most. For the full recipe, check out the complete guide. After enjoying your garlic butter shrimp and asparagus, store leftovers in an airtight container. Make sure the dish is cool before sealing it. This helps keep the shrimp and asparagus fresh. You can store it in the fridge for up to three days. When you are ready to eat again, reheat the shrimp and asparagus in a skillet. Use low heat to warm them slowly. Adding a little butter can help keep the dish moist. Stir often to avoid burning. You can also use a microwave. Place the food in a microwave-safe bowl, cover, and heat for 1-2 minutes. Check it every 30 seconds to ensure it warms evenly. If you have more leftovers than you can eat, freezing is an option. Place the shrimp and asparagus in a freezer-safe container. Label it with the date. You can freeze it for up to two months. When you are ready to eat, thaw it in the fridge overnight. Reheat as mentioned above. Freezing may change the texture, so it’s best to enjoy it fresh. For the full recipe of garlic butter shrimp and asparagus, check out the earlier section. It takes about 20 minutes to make Garlic Butter Shrimp and Asparagus. You will spend 10 minutes prepping and 10 minutes cooking. This quick dish is perfect for busy nights. It gives you a tasty meal in no time. Yes, you can use frozen shrimp. Just make sure to thaw them first. Place the frozen shrimp in a bowl of cold water for about 15-20 minutes. This helps them cook evenly. Then, pat them dry before seasoning. This dish pairs well with rice or quinoa. Both options soak up the garlic butter sauce nicely. You can also serve it with a fresh salad or crusty bread. These sides make the meal feel complete. You can find the full recipe above for more cooking tips! Garlic butter shrimp and asparagus is a simple, tasty dish. You learned about the key ingredients, including spices and garnishes. I shared steps for preparing shrimp and cooking asparagus together. Tips for perfect cooking and flavor boosts help make it great. You can mix in other veggies, add spice, or serve with grains. For storage, proper practices let you enjoy leftovers later. Keep these ideas in mind as you cook. Enjoy making this delicious meal!

Garlic Butter Shrimp and Asparagus Tasty Quick Dish

If you’re looking for a quick and tasty meal, this Garlic Butter Shrimp and Asparagus dish is for you. In

To make Lemon Herb Grilled Salmon, gather these key ingredients: - 4 salmon fillets (about 6 ounces each) - 1 lemon (zested and juiced) - 3 tablespoons olive oil - 2 cloves garlic, minced - 1 teaspoon dried oregano - 1 teaspoon dried thyme - 1 teaspoon dried parsley - Salt and black pepper to taste These ingredients create a bright and fresh flavor. Salmon is the star here, while lemon adds a nice zing. Garlic and herbs bring depth to each bite. You can enhance this dish with these optional ingredients: - Fresh herbs for garnish (like dill or basil) - A pinch of red pepper flakes for heat - Honey for a touch of sweetness Adding fresh herbs as a garnish can make your dish pop. A bit of red pepper can give it a kick, and honey balances the tartness if you prefer. Salmon is not just tasty; it is also good for you. Here are some health benefits: - Rich in omega-3 fatty acids, which support heart health - High in protein, helping to build and repair tissues - Loaded with vitamins like B12 and D, important for energy and bones Eating salmon regularly can improve your well-being. It supports your heart, brain, and overall health. Plus, it pairs well with the bright flavors in this dish. For the full recipe, check out the instructions above. To start, gather your ingredients. You need lemon juice, lemon zest, olive oil, garlic, and herbs. Combine these in a bowl. Mix well to blend all the flavors. This marinade adds a bright taste to the salmon. The lemon gives it a fresh kick. The herbs bring depth and aroma. This step is key to making your salmon flavorful. Next, take your salmon fillets. Place them in a shallow dish. Pour the marinade over the fish, making sure it covers each piece. Cover the dish with plastic wrap. Now, let the salmon rest in the fridge. Aim for at least 30 minutes. If you have time, go for 2 hours. A longer marinate time deepens the flavor. When it’s time to grill, preheat your grill to medium-high heat. If you use a grill pan, place it on medium heat. Remove the salmon from the marinade. Let any extra marinade drip off. Place the salmon skin-side down on the grill. Grill for about 5-7 minutes on each side. The exact time will depend on the thickness of your fillets. You want the salmon to be cooked through and flaky. Use a fork to check. It should easily break apart. For the full recipe, refer to the earlier section. Enjoy your delicious Lemon Herb Grilled Salmon! To get great grill marks, start with a hot grill. Preheat it to medium-high. Make sure to oil the grill grates lightly. This helps prevent sticking. Place the salmon skin-side down on the grill. Do not move it for the first few minutes. This allows the fish to sear and form marks. After about five minutes, you can check for grill marks. If they look good, flip the salmon. Cook it for another five minutes to finish. One common mistake is not marinating long enough. For the best flavor, marinate for at least 30 minutes. Another mistake is flipping the salmon too often. This can cause it to break apart. Also, do not overcook your salmon. It should be moist and flake easily. A quick check with a fork can help you see if it’s done. Lastly, avoid using a cold grill. Starting with a cold grill can lead to uneven cooking. To know if your salmon is cooked, use a fork. Gently press the top; it should flake easily. If it still feels tough, give it more time. Another way is to check the color. Cooked salmon will change from a bright pink to a lighter shade. The center should still be slightly translucent. If you have a thermometer, aim for an internal temperature of 145°F. This ensures it is safe to eat. For more details on making this dish, check the Full Recipe. {{image_2}} You can switch up the flavors of your lemon herb grilled salmon with different seasonings. Try using fresh dill or basil for a bright taste. You can also add a splash of soy sauce or honey for a sweet twist. If you like heat, add red pepper flakes to the marinade. Each of these options brings a new layer of flavor to the dish. Choosing the right side dish can enhance your meal. Fresh, crunchy salads go well with the salmon. Consider a simple cucumber and tomato salad. You can also serve it with roasted vegetables like asparagus or zucchini. Quinoa or rice can add a hearty touch. These sides balance the light, zesty flavors of the fish. Grilling is fun, but you can cook salmon in other ways too. Baking in the oven is easy. Simply place the marinated salmon on a baking sheet and cook at 400°F (200°C) for about 12-15 minutes. The air fryer is another great option. Cook the salmon at 375°F (190°C) for about 8-10 minutes. Each method gives you a delicious meal while keeping it simple. For the full recipe, check out the details above. After you enjoy your Lemon Herb Grilled Salmon, store any leftovers right. Place the salmon in an airtight container. This helps keep it fresh. You can store it in the fridge for up to three days. Make sure to let it cool completely before you seal the container. This keeps moisture from building up inside. When you're ready to eat the leftovers, reheat them gently. The best way to do this is in the oven. Preheat your oven to 275°F (135°C). Place the salmon on a baking sheet. Cover it with foil to keep it moist. Heat it for about 10-15 minutes, or until warm. This method helps keep the salmon tender and tasty. You can also use a microwave, but it may dry out the fish. If you use the microwave, cover the salmon with a damp paper towel to keep it moist. If you have more salmon than you can eat, freezing is a good option. Wrap each salmon fillet tightly in plastic wrap. Then, place the wrapped fillets in a freezer bag. Make sure to remove as much air as possible. You can freeze the salmon for up to three months. To use frozen salmon, thaw it in the fridge overnight before cooking. This helps it maintain its flavor and texture. For quick thawing, you can also place it in a sealed bag under cold running water for about an hour. You should marinate the salmon for at least 30 minutes. This time allows the flavors to sink in. If you have more time, marinate it for up to 2 hours. This longer time gives the salmon an even richer taste. Yes, you can use frozen salmon. Just make sure to thaw it before cooking. You can thaw it in the fridge overnight or place it in cold water. Using thawed salmon gives better flavor and texture for grilling. Lemon Herb Grilled Salmon pairs well with many sides. Here are some ideas: - Steamed asparagus - Roasted potatoes - Quinoa salad - Mixed greens with vinaigrette These sides balance the flavors and add nutrients to your meal. To prevent sticking, follow these tips: - Preheat the grill before placing the salmon on it. - Oil the grill grates lightly. You can use a paper towel soaked in oil. - Make sure the salmon skin is down first. This method helps it release easily and keeps it intact. If you want a more detailed guide, check the Full Recipe. Lemon herb grilled salmon is simple and tasty. We explored key ingredients, including optional ones for extra flavor and their health benefits. You learned step-by-step instructions for marinade, grilling, and cooking tips. We also shared variations and storage methods for leftovers. In the end, grilling salmon can be easy and fun. With practice, you'll perfect your dish and impress your friends. Enjoy your cooking journey!

Lemon Herb Grilled Salmon Flavorful and Simple Meal

Are you ready to impress your family with a dish that’s full of flavor and easy to make? Lemon Herb

Balsamic glazed Brussels sprouts are a tasty side dish. They mix sweet and tangy flavors. This dish is great for any meal. It takes just 35 minutes to make. You can impress your guests or family with this easy recipe. To make this dish, you’ll need: - 1 lb Brussels sprouts, trimmed and halved - 3 tablespoons balsamic vinegar - 2 tablespoons honey or maple syrup - 2 tablespoons olive oil - 2 garlic cloves, minced - Salt and pepper to taste - 1/4 cup grated Parmesan cheese (optional) - 1/4 teaspoon red pepper flakes (for a bit of heat) - Fresh parsley, chopped (for garnish) These ingredients come together to create a rich flavor. The balsamic vinegar adds a nice tang. Honey or maple syrup gives it sweetness. For this recipe, you will need: - A baking sheet - Parchment paper - A mixing bowl - A whisk - A sharp knife - A cutting board These tools help you prepare and cook the dish easily. The baking sheet ensures even roasting. The mixing bowl lets you combine all the flavors well. You’ll enjoy making this dish as much as eating it! Start by gathering your ingredients. You will need: - 1 lb Brussels sprouts, trimmed and halved - 3 tablespoons balsamic vinegar - 2 tablespoons honey or maple syrup - 2 tablespoons olive oil - 2 garlic cloves, minced - Salt and pepper to taste - 1/4 cup grated Parmesan cheese (optional) - 1/4 teaspoon red pepper flakes (for a bit of heat) - Fresh parsley, chopped (for garnish) Next, preheat your oven to 400°F (200°C). This temperature helps the Brussels sprouts cook evenly. Line a baking sheet with parchment paper for easy cleanup. In a large mixing bowl, whisk together the balsamic vinegar, honey or maple syrup, olive oil, minced garlic, salt, pepper, and red pepper flakes. Mix well until everything combines. Add the halved Brussels sprouts to the bowl. Pour the balsamic mixture over them. Toss the sprouts gently until they are fully coated. Spread the Brussels sprouts on the prepared baking sheet. Place them cut sides down. This helps with caramelization as they roast. Roast in the preheated oven for 20-25 minutes. Be sure to toss them once halfway through cooking. You want the sprouts to be tender and caramelized. Once they are done, take them out of the oven. If you like, sprinkle grated Parmesan cheese over the warm sprouts. This adds a rich flavor. Let the Brussels sprouts cool slightly. Transfer them to a serving platter. Garnish with freshly chopped parsley for a touch of color. For an extra flavor boost, drizzle any remaining balsamic glaze from the baking sheet over the top. This dish is ready to impress! Enjoy your Balsamic Glazed Brussels Sprouts as a tasty side. For the complete recipe, check out the Full Recipe section. To get that lovely caramelized look, you must start with dry Brussels sprouts. After trimming and halving them, pat them with a kitchen towel. This step helps the outside crisp up. When you place them cut side down on the baking sheet, this part gets nice and brown. Roasting at 400°F makes a big difference. Toss them halfway through cooking. This ensures they brown evenly on all sides. If you want to swap honey or maple syrup, you have options. You can use agave nectar or brown sugar. Both add sweetness without changing the taste too much. If you prefer less sweetness, try balsamic glaze. This will enhance the flavor while keeping it rich and tangy. Seasoning can take your Brussels sprouts to the next level. Adding garlic gives a nice savory touch. You can also sprinkle in herbs like thyme or rosemary. A squeeze of lemon juice at the end brightens the dish. For a bit of heat, add more red pepper flakes. Each of these choices helps create depth in flavor and keeps things interesting. {{image_2}} You can mix in other veggies with Brussels sprouts. Carrots, sweet potatoes, or bell peppers work great. They add color and flavor. Just cut them to match the size of the sprouts. Toss them all in the balsamic mix. Roast everything together. This way, you get a colorful and tasty dish. To make this dish vegan, swap honey for maple syrup. This keeps the sweetness but meets vegan needs. Also, skip the Parmesan cheese or use a plant-based cheese. The balsamic glaze still shines, giving you all the flavor without any animal products. Nuts add crunch and richness. Try walnuts or pecans for a nice texture. Just sprinkle them on before roasting. If you want cheese, go for goat cheese or feta. They give a creamy contrast to the sprouts. Both options elevate the dish’s taste and make it even more enjoyable. For the full recipe, check the section above. To keep your balsamic glazed Brussels sprouts fresh, store them in an airtight container. Place them in the fridge within two hours of cooking. They will stay good for about 3 to 4 days. Make sure the sprouts are cool before sealing. This helps maintain their texture and flavor. Reheating is simple and quick. You can use the oven or a skillet. Preheat your oven to 350°F (175°C). Spread the sprouts on a baking tray and heat for about 10-15 minutes. If using a skillet, add a splash of olive oil and heat on medium until warm. This keeps them crispy and tasty. If you have extra sprouts, freezing is a great option. First, blanch them in boiling water for 2-3 minutes. Then, cool them in ice water. Once cool, drain and dry them well. Place the Brussels sprouts in a freezer bag or container. They will last for about 3 months in the freezer. When ready to eat, thaw them overnight in the fridge before reheating. Enjoy your delicious meal any time! For the full recipe, check my earlier section. Yes, you can prepare Balsamic Glazed Brussels Sprouts in advance. Cook them fully, then cool them down. Store them in an airtight container in the fridge. They will stay fresh for up to three days. When you're ready to serve, just reheat them in the oven or a pan. This makes it easier to enjoy a tasty side dish during busy days. Balsamic Glazed Brussels Sprouts pair well with many dishes. They go great with roasted chicken, steak, or fish. You can also serve them with quinoa or rice for a healthy meal. Try them alongside a fresh salad for added crunch. This side dish adds a rich flavor that enhances any meal. To store leftovers, let them cool completely first. Place the Brussels sprouts in an airtight container. This helps keep them fresh and tasty. Store them in the fridge for up to three days. You can also freeze them if you want to save them longer. Just remember that freezing may change their texture a bit. When you want to eat them, reheat in the oven or on the stovetop. Enjoy the flavors again! This blog post covered the full recipe for Balsamic Glazed Brussels Sprouts. We explored key ingredients, kitchen tools, and step-by-step prep and cooking instructions. We shared tips for perfect caramelization and variations for different diets. Plus, we discussed storage and leftovers. Now you have everything you need to make this dish shine in your kitchen. Try it out, and enjoy the unique flavors!

Balsamic Glazed Brussels Sprouts Flavorful Side Dish

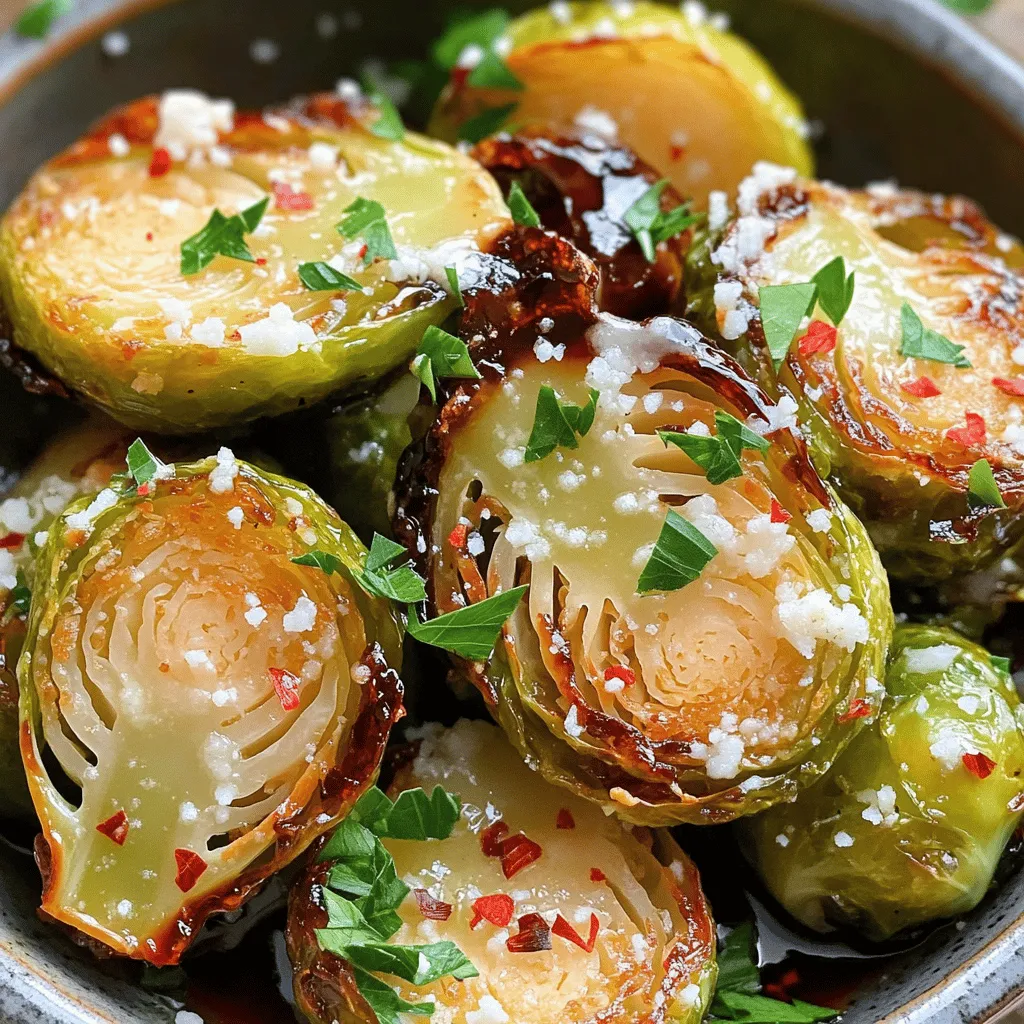
Looking for a delicious side dish that pairs perfectly with any meal? Balsamic Glazed Brussels Sprouts are here to impress!

- 4 large bell peppers (any color) - 1 cup quinoa, rinsed - 2 cups vegetable broth or water - 1 can (15 oz) black beans, rinsed and drained - 1 cup corn kernels (fresh, frozen, or canned) - 1 medium onion, diced - 2 cloves garlic, minced - 1 teaspoon cumin - 1 teaspoon smoked paprika - 1 teaspoon chili powder - Salt and pepper to taste - 1/2 cup shredded cheese (cheddar, mozzarella, or your choice) - Fresh cilantro or parsley for garnish When I make stuffed bell peppers, I love to pick fresh ingredients. Using colorful bell peppers makes the dish pop. You can choose red, yellow, or green. Each color adds unique flavor. For the quinoa, I always rinse it well. This step ensures it tastes great. Boiling it in vegetable broth or water makes it fluffy and full of flavor. Black beans add protein and texture. They also give a nice contrast to the quinoa. Corn kernels bring sweetness to the mix. You can use fresh, frozen, or canned corn, depending on what you have. Diced onion and minced garlic add depth. They become fragrant when sautéed. Spices are key in this recipe. Cumin provides warmth, while smoked paprika adds a hint of smokiness. Chili powder gives a nice kick. Adjust salt and pepper to your taste for the best flavor. For toppings, I enjoy adding shredded cheese. It melts beautifully and adds richness. Fresh herbs like cilantro or parsley brighten the dish. They make each bite fresh and inviting. You can find the full recipe to guide you through every step. Enjoy creating this colorful, tasty meal! - Preheat oven to 375°F (190°C). - Cut tops off bell peppers and remove seeds. - Boil vegetable broth or water, add rinsed quinoa. - Simmer until fluffy (about 15 minutes). - Sauté onion and garlic in olive oil until softened. - Mix in black beans, corn, spices, and cooked quinoa. - Fill the hollowed bell peppers with the quinoa mixture. - Top with shredded cheese and cover with foil. - Bake for 25 minutes covered, then uncover and bake for an additional 10-15 minutes. This simple process leads to a tasty, colorful dish that's sure to please anyone. For a full recipe, check out the complete details above. - Ensure quinoa is well-rinsed for better flavor. Rinsing removes bitter saponins. - Don’t overstuff the peppers to prevent spilling. A little space helps them cook evenly. - Add fresh cilantro or parsley for a burst of flavor. Fresh herbs brighten the dish. - Drizzle olive oil or a squeeze of lime before serving. This adds richness and zest. - Pair with a simple side salad. A light salad balances the meal nicely. - Serve alongside crusty bread for a complete meal. Bread is great for scooping up leftovers. These tips make your stuffed bell peppers even more amazing! For the full recipe, check out the details above. {{image_2}} You can easily change the protein in your stuffed bell peppers. Try these ideas: - Swap black beans for chickpeas. They add a nice texture. - Use lentils instead for a hearty option. They are packed with protein. - For meat lovers, add cooked ground turkey or beef. This adds a rich flavor. Boost the flavor of your stuffed peppers with some fun additions: - Mix in chili flakes for a spicy kick. It gives a nice heat. - Add diced zucchini or mushrooms for more veggies. They blend well with the quinoa. - Try different herbs like oregano or basil for fresh notes. Cheese can really elevate your dish. Consider these choices: - Feta or goat cheese can add a tangy flavor. They pair well with the peppers. - Use vegan cheese if you want a dairy-free option. It melts nicely too. - Top your peppers with avocado instead of cheese. This gives a creamy texture without dairy. These variations let you customize your meal. You can switch it up based on what you have at home or your taste buds. Store leftovers in an airtight container for up to 3 days. This keeps them fresh. If you have assembled but uncooked peppers, wrap them in plastic. They stay good for 1 day. You can freeze stuffed peppers before baking for up to 3 months. This is a great way to meal prep. When you’re ready to cook them, thaw overnight in the fridge. This makes cooking easy and quick. To reheat, use the oven at 350°F (175°C) until warmed through. This keeps the peppers tasty. If you prefer, you can microwave them on medium power. This is faster but may not give the same texture. Enjoy your meal! Typically, they bake for 35-40 minutes at 375°F. This time allows the peppers to become tender. The cheese on top will melt and brown nicely during this time. Yes, you can assemble them a day in advance. Just keep them in the fridge until you are ready to bake. You can also freeze them for later use. Just make sure to thaw them before cooking. Rice, couscous, or farro are great alternatives. Each option brings a new texture and flavor. You can choose what you like best or what you have on hand. Yes, they are nutrient-dense. Stuffed peppers can fit various diets, including vegetarian and gluten-free. They are packed with veggies, protein, and flavor. Sour cream, avocado, or additional cheese are popular choices. You can also add hot sauce for some kick or fresh herbs for a bright flavor. Serve them hot with a side salad for a balanced meal. A drizzle of olive oil or a squeeze of lime adds extra zest. This dish is bright, tasty, and healthy. Here’s how to make it. Ingredients: - 4 large bell peppers (any color) - 1 cup quinoa, rinsed - 2 cups vegetable broth or water - 1 can (15 oz) black beans, rinsed and drained - 1 cup corn kernels (fresh, frozen, or canned) - 1 medium onion, diced - 2 cloves garlic, minced - 1 teaspoon cumin - 1 teaspoon smoked paprika - 1 teaspoon chili powder - 1 cup diced tomatoes (canned or fresh) - 1/2 cup shredded cheese (cheddar, mozzarella, or your choice) - Salt and pepper to taste - Fresh cilantro or parsley for garnish Instructions: 1. Preheat your oven to 375°F (190°C). 2. Cut the tops off the bell peppers and remove the seeds and membranes. Place the peppers upright in a baking dish. 3. In a medium saucepan, bring the vegetable broth or water to a boil. Add the rinsed quinoa, reduce heat to low, cover, and simmer for about 15 minutes or until the quinoa is fluffy and the liquid is absorbed. 4. In a large skillet, heat a drizzle of olive oil over medium heat. Add diced onion and garlic, cooking until softened (about 5 minutes). 5. Stir in the black beans, corn, cumin, smoked paprika, chili powder, diced tomatoes, and cooked quinoa. Mix well and cook for an additional 2-3 minutes to heat through. Season with salt and pepper to taste. 6. Spoon the quinoa mixture evenly into the hollowed bell peppers, packing it down gently. 7. Sprinkle shredded cheese on top of each stuffed pepper. Cover the baking dish with foil to keep moisture in. 8. Bake in the preheated oven for about 25 minutes, then remove the foil and bake for an additional 10-15 minutes, or until the peppers are tender and the cheese is bubbly and golden. 9. Once done, remove from the oven and let cool slightly. Garnish with fresh cilantro or parsley before serving. Prep Time: 15 minutes | Total Time: 50 minutes | Servings: 4 Presentation Tips: Serve each stuffed pepper on a plate with a side salad. Drizzle a bit of olive oil or a squeeze of lime over the top before serving for extra zest! In this blog post, I've outlined a simple and tasty recipe for quinoa-stuffed bell peppers. You learned about the key ingredients, step-by-step instructions, and helpful tips to make this dish perfect. Quinoa and vegetables come together for a healthy meal that's easy to customize. Whether you enjoy them fresh or with a twist, stuffed peppers are a delightful option. Remember, cooking should be fun. Enjoy exploring different flavors and making this dish your own!

Stuffed Bell Peppers with Quinoa Flavorful Meal Idea

Looking for a tasty and healthy meal idea? Stuffed bell peppers with quinoa are a crowd-pleaser! They are colorful, filling,

- 1 lb (450g) boneless, skinless chicken breasts - 1/4 cup honey - 1/4 cup Dijon mustard - 2 tablespoons olive oil - 2 cloves garlic, minced - 1 teaspoon smoked paprika - 1/2 teaspoon salt - 1/4 teaspoon black pepper - 1 tablespoon fresh parsley, chopped - Skewers (soaked in water if wooden) The main ingredients for honey mustard chicken skewers are simple and easy to find. Start with one pound of boneless, skinless chicken breasts. This cut is great for skewers because it cooks evenly and stays juicy. Next, you need a quarter cup of honey and a quarter cup of Dijon mustard. These give the skewers a sweet and tangy flavor that everyone loves. Two tablespoons of olive oil add richness and help keep the chicken moist. For seasoning, use two cloves of minced garlic. This adds a wonderful aroma and depth to the dish. One teaspoon of smoked paprika gives a subtle smokiness, which enhances the overall taste. Don’t forget the salt and black pepper! These simple seasonings make a big difference. Lastly, a tablespoon of fresh parsley adds a nice pop of color and freshness when serving. If you’re using wooden skewers, remember to soak them in water for at least 30 minutes. This step keeps them from burning on the grill. If you want to dive deeper into this recipe, check the Full Recipe for more details on preparation and cooking times! First, gather your marinade ingredients. You need honey, Dijon mustard, olive oil, minced garlic, smoked paprika, salt, and black pepper. In a medium bowl, whisk these together until smooth. This mixture will give your chicken a sweet and tangy taste. Next, add your chicken cubes into the bowl. Stir well so each piece gets coated. Cover the bowl and put it in the fridge for at least 30 minutes. For extra flavor, you can marinate it for up to 2 hours. While the chicken marinates, it’s time to prepare the grill. Preheat your grill to medium-high heat. If you are using wooden skewers, soak them in water for about 30 minutes. This step prevents them from burning while grilling. You can skip this if you use metal skewers. Now, it’s time to thread the chicken onto the skewers. Take the marinated chicken cubes and slide them onto the skewers. Leave a little space between each piece for even cooking. Place the skewers on the hot grill. Grill the chicken for about 10 to 12 minutes, turning them occasionally. Look for a golden brown color and ensure the internal temperature reaches 165°F or 75°C. This is when your chicken is safe to eat and perfect! You can find the full recipe to enjoy more deliciousness. The right marination time makes a big difference. I recommend marinating the chicken for at least 30 minutes. This gives the flavors time to soak in. If you want a stronger taste, marinate it for up to 2 hours. You can adjust the honey and mustard amounts to fit your taste. More honey makes it sweeter. More mustard gives a tangy kick. Experiment to find what you love best. Grilling the chicken correctly ensures juicy skewers. Preheat your grill to medium-high heat, around 375°F to 450°F. This helps to sear the chicken nicely. Cook the skewers for about 10 to 12 minutes. Turn them occasionally for even cooking. Keep an eye on the chicken's internal temperature. It should reach 165°F (75°C) for safety. Once your skewers are ready, think about what to serve with them. Fresh veggies or a light salad pair well with the sweet and tangy flavor. You can also serve them with rice or quinoa for a filling meal. For presentation, place the skewers on a large platter. Garnish with parsley for a pop of color. Serve with extra dipping sauce on the side for fun! Check out the Full Recipe for more details. {{image_2}} You can switch up the main protein in this dish. Shrimp makes a great option. It cooks fast and absorbs flavors well. Tofu is another choice for a tasty vegetarian meal. Just make sure to press it first to remove extra moisture. This helps the marinade stick better. Want to change the taste? Add spices like cayenne pepper for heat or garlic powder for more depth. You can also squeeze some lemon or lime juice into the marinade. This adds a fresh twist. Different mustards can change the flavor too. Try whole grain mustard for a grainy texture or spicy brown mustard for an extra kick. Mix in vegetables with your chicken for added nutrition. Bell peppers, zucchini, and cherry tomatoes can work well. They add color and taste to your meal. If you don’t have a grill, you can cook these skewers on a stovetop grill pan. Just watch the heat to avoid burning. This dish is flexible, and you can enjoy it any way you like. For the full recipe, check out the Honey Mustard Chicken Skewers section above. To store leftover honey mustard chicken skewers, place them in an airtight container. Make sure they are cool before sealing. Leftovers will stay fresh for up to three days in the fridge. Always label your container with the date, so you know when to eat them. To freeze the skewers, wrap them tightly in plastic wrap, then place them in a freezer bag. This helps prevent freezer burn. The skewers can be stored for up to three months. When you are ready to eat, thaw them in the fridge overnight. To reheat, grill them on a low setting until heated through. These honey mustard chicken skewers are great for meal prep! You can make a big batch and enjoy them throughout the week. Pair them with rice, salad, or veggies for easy meals. They also work well in wraps or sandwiches. Just pack the sides in separate containers to keep everything fresh. For a tasty lunch, try mixing cold skewers with a grain salad. This adds flavor and makes your meal easy to grab. For the full recipe, visit the earlier section. To check if your chicken skewers are done, look at the internal temperature. Use a meat thermometer. The chicken should reach 165°F (75°C). This ensures it is safe to eat. You can also use visual cues. The chicken should be golden brown on the outside. The juices should run clear, not pink. If you see any pink, it needs more cooking. Yes, you can use other mustards! Different mustards bring unique flavors. Yellow mustard is milder and tangy. Spicy brown mustard adds heat. Honey mustard gives a sweet kick. Each type changes the taste of the dish. If you want a twist, try whole grain mustard. It adds texture and a nutty flavor. Experiment and find your favorite! Several side dishes pair well with honey mustard chicken skewers. Try a fresh green salad for crunch and color. Roasted vegetables add warmth and flavor. Rice or quinoa are great for a hearty bite. For drinks, consider a light white wine or iced tea. These beverages balance the sweetness of the chicken. Enjoy with friends and family for a fun meal! You can make tasty honey mustard chicken skewers in a few easy steps. Start by marinating your chicken with honey, Dijon mustard, and spices. Grill it to golden perfection and serve it with your favorite sides. Remember, you can swap chicken for shrimp or tofu too. This recipe is fun to customize and perfect for meal prep. So, gather your ingredients, fire up the grill, and enjoy a delicious meal that you made yourself!

Honey Mustard Chicken Skewers Flavorful and Easy Meal

Looking for a tasty and easy meal? You’re in the right place! Honey Mustard Chicken Skewers are not only simple

To make Banana Bread Overnight Oats, gather these simple ingredients: - 1 cup rolled oats - 1 ripe banana, mashed - 1 cup almond milk (or any milk of choice) - 1 tablespoon chia seeds - 1 teaspoon vanilla extract - 1 teaspoon ground cinnamon - 1 tablespoon maple syrup (optional for added sweetness) - 2 tablespoons chopped walnuts (or pecans) - A pinch of salt Each ingredient plays a key role. The rolled oats provide the base and bulk. The mashed banana adds natural sweetness and flavor. Almond milk makes it creamy and rich. Chia seeds thicken the mix and boost nutrition. Vanilla and cinnamon enhance the taste, while walnuts give a nice crunch. If you like it sweeter, add maple syrup. Lastly, a pinch of salt balances the flavors. You can find the complete recipe [Full Recipe]. Enjoy preparing this easy and delicious breakfast! - Combine rolled oats, mashed banana, and almond milk in a bowl. - Add chia seeds, vanilla extract, ground cinnamon, maple syrup, and a pinch of salt. - Fold in chopped walnuts for extra crunch. Making these oats is simple. Start by mixing the rolled oats with the mashed banana and almond milk in a medium bowl. Stir until everything blends well. Next, add the chia seeds, vanilla, cinnamon, maple syrup, and a pinch of salt. These flavors all work together to recreate that yummy banana bread taste. Finally, fold in the chopped walnuts. They add a nice texture and nutty flavor! - Divide into jars or containers with lids. - Seal and refrigerate overnight. Once the mixture is ready, divide it into two jars or containers. Be sure they have tight-fitting lids. This keeps the oats fresh. Seal the jars and place them in the fridge overnight. The oats will soak up the flavors and get nice and creamy. - Stir well before serving. - Optional toppings suggestions. When you wake up, take the jars out of the fridge. Stir the oats well before you eat. If you like a creamier texture, add a splash of almond milk. For extra fun, top with banana slices, a sprinkle of cinnamon, or more walnuts. Enjoy your banana bread overnight oats as a quick and tasty breakfast! You can find the Full Recipe for more details. You can adjust the sweetness of your Banana Bread Overnight Oats. Use maple syrup or honey to suit your taste. If you want more texture, try adding toppings like fresh fruits, coconut flakes, or nut butter. These will add flavor and make your meal more fun. Using ripe bananas is key. Ripe bananas are sweeter and add a natural flavor. They help make your oats taste like banana bread. Soaking oats overnight is important, too. It makes the oats soft and creamy. This lets the flavors blend well, giving you a tasty breakfast. Each ingredient in this recipe offers health benefits. Rolled oats are great for energy and digestion. Chia seeds provide fiber and omega-3 fats. Bananas give you potassium, which is good for your heart. The total calories per serving will be around 300 to 350, depending on your toppings. This makes it a filling option to start your day right. For the full recipe, check out the earlier section. {{image_2}} Banana bread overnight oats can be fun and creative. You can easily change the taste to keep things fresh. Here are some great ideas for you. - Chocolate Banana Bread Overnight Oats: Add 2 tablespoons of cocoa powder to the base recipe. This gives a rich, chocolatey twist. You can also add chocolate chips for extra sweetness. - Nutty Banana Bread Overnight Oats: Mix in 2 tablespoons of almond butter or peanut butter. This adds a creamy texture and nutty flavor. You can also swap walnuts for pecans to change it up. - Gluten-free options: Use certified gluten-free oats. This way, you can enjoy the recipe without worry. - Vegan alternatives: Replace almond milk with any plant-based milk. This keeps the recipe vegan and delicious. - Adding pumpkin spice: For a fall treat, mix in 1 teaspoon of pumpkin spice. This adds warmth and flavor to your oats. - Fresh berries: In summer, top your oats with fresh berries. Strawberries, blueberries, or raspberries add a bright, fruity note. These variations can help you enjoy banana bread overnight oats in many different ways! You can store Banana Bread Overnight Oats in the fridge for up to five days. Use an airtight container to keep them fresh. Glass jars work great for this. They let you see the yummy layers and keep the oats safe. Yes, you can freeze Banana Bread Overnight Oats! This is a good way to save extra servings. To freeze, place them in freezer-safe containers. Leave some space at the top for expansion. When you're ready to eat, take them out of the freezer. Let them thaw in the fridge overnight. To serve, stir the oats well before enjoying. You may want to add a splash of almond milk for a creamier texture. If you stored your oats in the fridge, you can easily reheat them. Just warm them in the microwave for about 30-60 seconds. Stir halfway through to heat evenly. If you like hot oatmeal, this works well! Serve your reheated oats with extra toppings. Try sliced bananas or a sprinkle of cinnamon for added flavor. These small touches make your meal even better. To make Banana Bread Overnight Oats gluten-free, you can use certified gluten-free oats. Regular oats may contain gluten due to cross-contamination. The rest of the ingredients, like almond milk and chia seeds, are naturally gluten-free. Always check labels to be sure! Yes, you can substitute almond milk with any milk you prefer. Options include cow's milk, soy milk, or oat milk. Each type of milk will change the flavor slightly, but all will work well in this recipe. Banana Bread Overnight Oats can last up to five days in the fridge. Make sure to use an airtight container to keep them fresh. The oats will continue to soften over time, so enjoy them within a few days for the best texture. To boost the protein in your oats, add Greek yogurt or protein powder. A scoop of nut butter, like almond or peanut butter, also works well. These additions will keep you feeling full longer. Yes, you can use quick oats instead of rolled oats. Quick oats will soak up the liquid faster, giving you a softer texture. Just remember that the oats may not hold their shape as well as rolled oats do. In this article, we explored how to make Banana Bread Overnight Oats. We covered key ingredients, step-by-step instructions, and tips for customization. You learned about nutrition and storage too. This recipe is simple and tasty, making mornings easier. Remember, you can change the toppings to fit your taste. Enjoy this healthy breakfast that fuels your day. Try different flavors and variations to make it your own. Enjoy experimenting with this easy meal!

Banana Bread Overnight Oats Simple and Nourishing Recipe

Are you looking for a quick and tasty breakfast? Try my Banana Bread Overnight Oats! This simple recipe combines rolled

- 1 cup frozen spinach, thawed and drained - 1 cup canned artichoke hearts, chopped - 1/2 cup cream cheese, softened - 1/2 cup sour cream - 1 cup shredded mozzarella cheese - 1/2 cup grated Parmesan cheese - 2 cloves garlic, minced - 1 teaspoon lemon juice - 1/2 teaspoon onion powder - 1/2 teaspoon salt - 1/4 teaspoon black pepper - 1/4 teaspoon crushed red pepper flakes (optional for heat) When making Cheesy Spinach Artichoke Dip, you can adjust the ingredients based on your needs. If you want a healthier version, try using Greek yogurt instead of sour cream. For a vegan option, substitute cream cheese and mozzarella with plant-based versions. You can also use fresh spinach instead of frozen. Just make sure to cook it down first and drain any excess water. Gluten-free options can work too. Use gluten-free crackers or veggie sticks for dipping. You can enjoy this dip while sticking to your diet. Each ingredient adds flavor and texture, making it a delight to share. For the full experience, check out the Full Recipe. 1. Preheat your oven to 375°F (190°C). This step warms the oven for even cooking. 2. In a mixing bowl, add softened cream cheese, sour cream, and lemon juice. Use a hand mixer to blend until smooth. This creates a creamy dip base. 1. Add the chopped spinach and artichokes to the bowl. Mix them in well with the creamy base. 2. Next, incorporate minced garlic, mozzarella cheese, Parmesan cheese, onion powder, salt, black pepper, and crushed red pepper flakes if you like heat. Stir until everything is evenly blended. 1. Transfer the mixture to a baking dish. Spread it out evenly for uniform cooking. 2. Bake in the preheated oven for 20-25 minutes. Look for a hot, bubbly dip that is lightly golden on top. This means it's ready to enjoy! Follow the [Full Recipe] to ensure you don't miss any steps or details. To make your dip creamy, use softened cream cheese. Blend it well with sour cream. This step ensures a smooth base. A hand mixer or whisk works great. Mix until it feels fluffy. To avoid a watery dip, drain the spinach well. Squeeze out excess moisture using a clean towel. Also, do not skip the cheese. It adds both flavor and thickness. When serving, warm dip pairs best with crunchy chips. Try crispy tortilla chips or toasted baguette slices. Fresh veggie sticks add a nice crunch, too. For a beautiful display, garnish with extra Parmesan. Add fresh herbs like parsley or cilantro. A sprinkle of red pepper flakes gives it a pop of color. One mistake is overbaking the dip. Keep an eye on it as it cooks. Aim for a bubbly, golden top without burning. Another error is using the wrong cheese. Stick with mozzarella for stretchiness. Parmesan adds a sharp bite. Avoid soft cheeses that may not hold up. {{image_2}} You can boost the flavor of your Cheesy Spinach Artichoke Dip in several fun ways. One popular option is to add crispy bacon. The salty crunch brings a nice contrast to the creamy dip. You can also try adding diced jalapeños for a spicy kick. If you want to explore different cheeses, swap mozzarella for cheddar or gouda. Each cheese adds its unique twist. Using fresh spinach instead of frozen is another great change. Fresh spinach has a brighter flavor and a nice texture. Just make sure to sauté it first to reduce moisture. This prevents your dip from getting watery. If you want a vegan version, replace cream cheese and sour cream with cashew cream or a store-bought vegan alternative. Nutritional yeast can add a cheesy flavor without using dairy. You can also use almond or coconut yogurt as a creamy base. For low-carb adaptations, skip the sour cream and use cream cheese and Greek yogurt instead. This keeps the dip rich while reducing carbs. Serving it with fresh veggies or low-carb chips makes it perfect for a keto diet. You can take your dip on a global journey too! For a Mediterranean twist, try adding crumbled feta cheese or chopped olives. This gives the dip a savory, salty flavor. You can also mix in sun-dried tomatoes or artichokes marinated in herbs. Consider adding spices from other cultures as well. A sprinkle of curry powder or smoked paprika can transform the dip into a new experience. Each variation can bring a world of flavor to your table. For the complete recipe, check out the [Full Recipe]. Store any leftover Cheesy Spinach Artichoke Dip in an airtight container. Place it in the refrigerator right after it cools. This dip stays fresh for about three to four days. Just remember to check for any changes in smell or texture before eating. You can freeze this dip if you want to save some for later. To freeze, scoop the dip into a freezer-safe container. Leave some space at the top for expansion. It can stay in the freezer for up to three months. When you’re ready to eat it, thaw it in the fridge overnight. To reheat, follow the steps below to keep the texture right. You can use either the microwave or the oven to reheat your dip. In the microwave, heat it in short bursts, stirring in between. This method is quick but can dry out the dip. The oven is better if you have more time. Preheat it to 350°F (175°C) and heat the dip for about 15-20 minutes. Cover it with foil to keep it moist. Either way, stir it well before serving for the best flavor. To make your dip spicier, consider these options: - Add more crushed red pepper flakes. - Mix in diced jalapeños. - Use pepper jack cheese instead of mozzarella. You can adjust the heat level to your liking. Start slow and taste as you go. This way, you’ll find the right balance for your palate. Yes, you can prepare this dip ahead of time. Mix all the ingredients and store them in the fridge. Cover it tightly to keep it fresh. When you’re ready to bake, pop it in the oven. Just remember to let it sit at room temp for about 15 minutes before baking. This helps it cook evenly. Here are some great options to serve: - Crispy tortilla chips - Toasted baguette slices - Fresh vegetable sticks like carrots and celery - Pita chips These choices add crunch and flavor. You can also try adding some fun garnishes like extra cheese or fresh herbs. Yes, you can use fresh spinach! Here’s what to do: - Use about 2 cups of fresh spinach. - Sauté it in a pan until wilted. - Drain any excess water to avoid a soggy dip. Using fresh gives a great taste, but it’s essential to remove the water for the best texture. This blog post covers all you need for Cheesy Spinach Artichoke Dip. We shared ingredients, step-by-step instructions, and tips to avoid common mistakes. You learned about variations and how to store leftovers, too. In the end, this dip is simple and fun to make. Enjoy it with friends and family at your next gathering. Let your creativity shine through with flavor and presentation! You won’t regret trying this tasty treat.

Cheesy Spinach Artichoke Dip Irresistible Flavor Guide

Craving something cheesy and delicious? Look no further! My Cheesy Spinach Artichoke Dip is the ultimate blend of savory goodness.

To make savory oatmeal with fried egg, you'll need a few simple ingredients. Here’s the list: - 1 cup rolled oats - 2 cups vegetable broth - 1 tablespoon olive oil - 1 clove garlic, minced - 1 small onion, finely chopped - 1 cup spinach or kale, chopped - 1 large egg - 1 teaspoon soy sauce (or tamari for gluten-free) - 1 tablespoon nutritional yeast (optional) - Salt and pepper to taste - Sliced avocado and red pepper flakes for topping These ingredients come together to create a hearty meal. The rolled oats form the base, while the vegetable broth adds depth. Olive oil brings richness, and garlic and onion provide flavor. Spinach or kale gives a healthy touch. The fried egg on top adds protein and a creamy texture. Don't forget the nutritional yeast for a cheesy note, if you like. You can finish with avocado and red pepper flakes for extra flavor. For the full recipe, check out the detailed instructions to bring this dish to life! 1. In a saucepan, bring 2 cups of vegetable broth to a boil. 2. Stir in 1 cup of rolled oats. 3. Reduce the heat to low and cook for about 5 minutes. 4. Stir occasionally until the oats are creamy and tender. 1. While the oats cook, heat 1 tablespoon of olive oil in a skillet over medium heat. 2. Add 1 small, finely chopped onion and 1 clove of minced garlic. 3. Sauté for 3 to 4 minutes, until the onion is translucent. 4. Add 1 cup of chopped spinach or kale and cook for another 2 to 3 minutes. 5. Season with salt and pepper to taste. 1. In a separate small pan, fry 1 large egg to your liking. 2. For a runny yolk, cook over easy or sunny-side up. 3. A tip for perfect frying: use medium heat and a non-stick pan. 4. This helps prevent sticking and gives a nice, even cook. For creamy oatmeal, cook the oats just right. Start with the right amount of broth. Use two cups for one cup of oats. If you want it creamier, let it simmer a bit longer. Stir the oats often. This helps them absorb the broth better. To boost the flavor, try different sauces. Instead of soy sauce, use tamari or even miso. You can also add a splash of hot sauce for heat. Toppings matter too! Sliced avocado adds creaminess. Red pepper flakes give it a nice kick. You can try nuts or seeds for crunch. Use a heavy-bottomed pot for even cooking. This prevents the oats from sticking. A non-stick skillet works best for frying eggs. A spatula helps in flipping the eggs easily. Make sure you have a good knife for chopping. A cutting board is also a must. For the full step-by-step recipe, check out the Full Recipe provided earlier. {{image_2}} You can make savory oatmeal even heartier by adding protein. Here are some tasty options: - Adding bacon or sausage: Crispy bacon or savory sausage brings a rich flavor. Just cook them in the skillet before the egg, then mix them into the oats. - Vegan protein options: Try adding chickpeas or lentils for a plant-based boost. Tofu, crumbled and sautéed, works great too. You can change up the flavor of your savory oatmeal easily. Here are some ideas: - Different spices to try: Add a pinch of smoked paprika for warmth. Cumin or chili powder can also spice things up. Fresh herbs like cilantro or parsley brighten the dish. - Ingredient swaps for dietary needs: Swap vegetable broth for chicken broth if you like. Use gluten-free oats for gluten sensitivity. You can also replace soy sauce with coconut aminos for a soy-free option. Savory oatmeal is great for any meal of the day. Here’s how to enjoy it: - Breakfast vs. lunch options: Serve it in the morning for a filling start. For lunch, add more veggies and a protein boost for a complete meal. - Pairing with sides or beverages: A fresh fruit salad or a smoothie can complement the dish. A cup of herbal tea or coffee works well too. For a full recipe, check out the details above. To store leftovers, let the savory oatmeal cool down. Then, place it in an airtight container. This will keep it fresh. You can keep it in the fridge for up to three days. The flavors will meld together, making it even tastier. You can reheat savory oatmeal in the microwave or on the stovetop. For the microwave, place it in a bowl and cover it. Heat it for about one to two minutes. Stir halfway through to heat evenly. On the stovetop, add a splash of vegetable broth to a saucepan. Warm it over low heat, stirring often. This keeps the texture creamy and prevents it from drying out. Yes, you can freeze this recipe! To do this, let the oatmeal cool fully. Then, portion it into freezer-safe containers. It can stay frozen for up to three months. When you’re ready to eat, thaw it overnight in the fridge. Reheat it as described above. This way, you can enjoy a quick, healthy meal. Yes, savory oatmeal is very healthy. It is packed with nutrients. The rolled oats provide fiber, which helps digestion. They also give you energy. Spinach or kale adds vitamins A, C, and K. Garlic and onion boost your immune system, too. This meal has fewer sugars than sweet oatmeal. Sweet oatmeal often uses syrups or sugar. Savory oatmeal uses natural flavors and healthy fats, like olive oil. It’s filling and keeps you satisfied longer. Yes, you can make this recipe gluten-free. Use gluten-free rolled oats instead of regular oats. You can also swap soy sauce for tamari sauce. Tamari is a gluten-free option. Always check labels when buying ingredients. Some vegetable broths may have gluten. Make sure yours is safe to use. You can add many toppings to savory oatmeal. Sliced avocado gives creaminess. Red pepper flakes add heat. You can also use fresh herbs, like cilantro or parsley. A sprinkle of cheese can add flavor, too. For seasonal variations, try sautéed mushrooms in the fall or fresh tomatoes in summer. Experiment with your favorites to make it your own! This blog post explored a tasty savory oatmeal recipe. We discussed ingredients like oats, broth, and veggies. I also shared steps on how to cook them perfectly. Tips for enhancing flavor and storage options were covered too. Finally, we looked at various ways to customize the dish to fit your taste. Savory oatmeal is a healthy, versatile meal. I hope you enjoy trying this recipe. Cook with joy and explore your flavors!

Savory Oatmeal with Fried Egg Flavorful Breakfast Idea

Start your day right with a savory twist on oatmeal! This recipe combines rolled oats, fresh greens, and a perfectly

- 4 boneless, skinless chicken breasts - 1 bunch of fresh asparagus, trimmed - 4 cloves of garlic, minced - 1 lemon, zested and juiced - 2 tablespoons olive oil - 1 teaspoon dried thyme - 1 teaspoon paprika - Salt and pepper to taste - Fresh parsley, chopped (for garnish) - Additional lemon slices The One-Pan Lemon Garlic Chicken and Asparagus brings bright flavors and easy prep to your kitchen. You start with juicy chicken breasts and fresh asparagus, both staples in my cooking. The garlic adds a strong kick, while the lemon brings a zesty twist. When you mix olive oil, dried thyme, and paprika, you create a simple yet tasty marinade. This marinade is the key to making the chicken flavorful and moist. Don’t forget salt and pepper; they enhance every bite. For a lovely touch, fresh parsley and lemon slices are the perfect garnishes. They brighten up the dish and make it look beautiful. This recipe is not just about taste; it’s about creating a lovely meal that you can share with family or friends. You can find the full recipe linked above. Enjoy the ease and flavor of this dish! - Preheat the Oven Start by setting your oven to 400°F (200°C). This step is key for even cooking. - Prepare the Marinade In a big bowl, mix together olive oil, minced garlic, lemon juice, lemon zest, dried thyme, paprika, salt, and pepper. Whisk it well until all ingredients blend. - Coating the Chicken Breasts Take your chicken breasts and place them in the bowl. Make sure to coat them fully with the marinade. This adds great flavor to the chicken. - Suggested Marination Time Let the chicken marinate for at least 10 minutes. For deeper flavor, refrigerate for up to 2 hours. - Arranging in Skillet Use a large oven-safe skillet to arrange your marinated chicken breasts. Keep them in a single layer for even cooking. - Baking Instructions Add the trimmed asparagus around the chicken. Pour any leftover marinade over the asparagus. Bake for 20-25 minutes. Check that the chicken reaches an internal temperature of 165°F (75°C). If you like, broil for the last 2-3 minutes to get a nice golden finish. Enjoy cooking this One-Pan Lemon Garlic Chicken and Asparagus dish for a tasty meal! For the complete steps and details, refer to the Full Recipe. For the best taste, marinate the chicken for at least 10 minutes. If you have time, let it sit for up to 2 hours in the fridge. This allows the chicken to soak up all the lemon and garlic goodness. Preheat your oven to 400°F (200°C) to ensure proper cooking and flavor development. Cook the chicken for 20-25 minutes. To check for doneness, use a meat thermometer. The chicken should reach an internal temperature of 165°F (75°C). For extra crispiness, switch to broil for the last 2-3 minutes. This gives your chicken a beautiful golden top. Pair this dish with quinoa or rice. These sides soak up the tasty juices. For presentation, serve directly from the skillet for a rustic look. Add extra lemon slices and parsley on top for color and flair. This makes your meal not only tasty but also visually appealing. {{image_2}} You can switch out the asparagus for other veggies. Broccoli, green beans, or bell peppers work great. Each adds a different taste and look to your dish. You can also swap chicken for shrimp or tofu. Both options cook fast and absorb flavors well. To spice things up, try adding red pepper flakes or cayenne pepper. This will give a nice kick to the meal. You can also use fresh herbs like basil or dill instead of thyme. These herbs bring a fresh taste that pairs well with lemon. If you need a gluten-free dish, this recipe is already safe. Just make sure your ingredients are gluten-free. For a low-carb option, you can skip the marinade's olive oil and serve with a side salad instead. This keeps it light and healthy while still being tasty. For the full recipe, check out the details above. For best results, store leftover One-Pan Lemon Garlic Chicken and Asparagus in an airtight container. This keeps the dish fresh and prevents strong odors from mixing with other foods in the fridge. Always let it cool to room temperature before sealing. This helps avoid condensation that can make your meal soggy. If you want to save some for later, freezing is a great option. Place the cooled dish in a freezer-safe container or a heavy-duty freezer bag. Remove as much air as possible to prevent freezer burn. For best taste, eat it within three months. When you’re ready to eat, thaw it in the fridge overnight. To reheat, place it in the oven or microwave until hot. When stored properly, your dish lasts about three to four days in the fridge. After that, it may start to lose flavor or texture. Keep an eye out for changes in smell or color. If it smells sour or looks slimy, it's best to throw it away. Enjoy your delicious meal while it's fresh! How long does it take to cook One-Pan Lemon Garlic Chicken and Asparagus? It takes about 35 minutes to cook this dish. Prepare for 10 minutes and then bake for 20 to 25 minutes. Can I use frozen chicken breasts for this recipe? Yes, you can use frozen chicken. Just make sure to thaw it first for even cooking. What can I substitute for asparagus? You can use green beans, broccoli, or zucchini as great substitutes for asparagus. How do I know when the chicken is done? Check the chicken's internal temperature. It should reach 165°F (75°C) for safety. Is this recipe suitable for meal prepping? Yes, this recipe is great for meal prep. Store portions in airtight containers for quick meals. How many servings does this recipe yield? This recipe serves four people. Perfect for a family dinner or meal sharing. This blog post outlined a simple and tasty recipe for One-Pan Lemon Garlic Chicken and Asparagus. We discussed key ingredients, preparation steps, and cooking tips to make your dish perfect. I shared ideas for variations and storage info to help you enjoy this meal longer. Remember, cooking should be fun and easy. Experiment with flavors and adapt it to your taste. You can create a lovely dish that friends and family will love. Happy cooking!

One-Pan Lemon Garlic Chicken and Asparagus Delight

Looking for a simple yet delicious meal? Try my One-Pan Lemon Garlic Chicken and Asparagus Delight! This dish combines juicy

Older posts
Newer posts
← Previous Page1 … Page56 Page57 Page58 … Page69 Next →

dsad

© 2025 My Saved Recipe • Built with GeneratePress

Our Policies

  • Copyright Policy
  • Cookie Policy
  • GDPR Policy
  • Privacy Policy
  • Disclaimer
  • Terms Of Use

More Information

  • Home
  • About
  • Contact
  • Appetizers
  • Dessert
  • Dinner
  • Drinks
©2025, My Saved Recipe About Back To Top