Skip to content
DisclaimerTerms Of UseGDPR PolicyCookie Policy

My Saved Recipe

  • Home
  • Drinks
  • Appetizers
  • Dinner
  • Dessert
  • About
  • Contact
  • Privacy Policy
DisclaimerTerms Of UseGDPR PolicyCookie Policy

Savannah

To make a tasty crispy chickpea salad, you need some key ingredients: - 1 can (15 ounces) chickpeas, drained and rinsed - 2 tablespoons olive oil - 1 teaspoon smoked paprika - 1 teaspoon garlic powder - Salt and pepper to taste - 4 cups mixed salad greens (arugula, spinach, and romaine) - 1 cup cherry tomatoes, halved - 1 cucumber, diced - 1 small red onion, thinly sliced - 1 avocado, diced These ingredients create a base that is both crunchy and fresh. The chickpeas provide protein, while the veggies add vitamins. A good salad needs a great dressing. Here’s what you need: - Juice of 1 lemon - 2 tablespoons tahini - 1 tablespoon honey or maple syrup (optional) This dressing ties the salad together. The tahini gives it a nutty taste while the lemon adds a bright touch. You can switch things up with some fun add-ins: - Feta cheese for creaminess - Nuts like almonds or walnuts for extra crunch - Avocado for added creaminess and healthy fats These options let you customize the salad based on what you enjoy. Try the full recipe to explore all these flavors. To start, you want to preheat your oven to 400°F (200°C). This step is key for crispy chickpeas. Next, grab a mixing bowl and add one can of drained and rinsed chickpeas. Pour in two tablespoons of olive oil. Now, sprinkle in one teaspoon of smoked paprika and one teaspoon of garlic powder. Add salt and pepper to taste. Toss everything together until the chickpeas are well coated. This mixture will give a nice flavor to your chickpeas. Spread the chickpeas out on a baking sheet in a single layer. This helps them get crispy. Roast them in the preheated oven for 25-30 minutes. Remember to shake the pan halfway through for even roasting. When they turn golden, they are ready! While the chickpeas are roasting, it’s time to prepare the salad base. Grab a large bowl and add four cups of mixed salad greens. I like a mix of arugula, spinach, and romaine for great taste and texture. Next, chop one cucumber and add it to the greens. Slice one small red onion thinly and toss that in, too. Halve one cup of cherry tomatoes and add these colorful bites to your bowl. Lastly, dice one avocado for creaminess and richness. After the chickpeas cool slightly, it’s time to combine everything. Add the warm, crispy chickpeas to the salad. This adds a nice contrast to the cool veggies. Now, let’s whip up the dressing. In a small bowl, mix the juice of one lemon with two tablespoons of tahini. If you like a touch of sweetness, add one tablespoon of honey or maple syrup. Season with salt and pepper to taste, then whisk until smooth. Drizzle the tahini dressing over your salad and toss gently to combine. This will coat each ingredient with flavor. Serve the salad right away, garnished with fresh parsley. Enjoy this crispy chickpea salad as a delicious and nutritious dish! For the full recipe, check out the details above. To get your chickpeas crispy, start with dry ones. Drain and rinse them well. After that, pat them dry with a clean towel. This step removes extra moisture. The drier your chickpeas, the crispier they will be. Toss them with olive oil and seasonings. I love using smoked paprika and garlic powder for a great taste. Spread them out on a baking sheet. Make sure they are not touching. This allows heat to circulate around them. Roast at 400°F for 25 to 30 minutes. Shake the pan halfway to ensure even cooking. When you hear a nice crunch, you know they are ready. I enjoy serving this salad with extra crispy chickpeas on top. It adds a fun crunch. You can also serve it with a side of lemon wedges. The lemon adds a fresh burst of flavor. For a heartier meal, try adding grilled chicken or shrimp. This makes it filling and satisfying. Pairing it with whole grain bread is also a great option. It gives a nice texture contrast. This salad shines with the right flavor pairings. The creamy avocado balances the crispness of the chickpeas. Fresh herbs like parsley enhance the dish's taste. If you want more spice, add some red pepper flakes. They bring a nice kick without overpowering. You can also mix in some feta cheese for a salty touch. For a sweet note, try adding sliced strawberries or apples. They brighten the salad and create a nice contrast. For more recipe tips, check the Full Recipe for ideas on variations! {{image_2}} This salad is already vegan! The chickpeas, greens, and veggies all fit. You can also add more plant-based toppings. Try sunflower seeds or pumpkin seeds for crunch. You might enjoy adding fresh herbs, like cilantro or basil, for extra flavor. Crispy Chickpea Salad is naturally gluten-free. The main ingredients, like chickpeas and fresh veggies, are safe. Check your tahini and any dressings to ensure they are gluten-free. You can swap honey with maple syrup for a sweet touch. Change the salad with the seasons! In spring, add fresh radishes for a crisp bite. In summer, toss in sweet corn or bell peppers for color. Fall is great for roasted squash or apples. Winter greens, like kale or Swiss chard, add a hearty touch. Use what's fresh to keep your salad exciting and tasty! For the full recipe, check out the Crispy Chickpea Salad. To store your crispy chickpea salad, place it in an airtight container. This keeps flavors fresh. You can keep it in the fridge for up to three days. If you want the chickpeas to stay crispy, store them separately from the salad. If you have leftover chickpeas, you can reheat them for a warm touch. Preheat your oven to 375°F (190°C). Spread the chickpeas on a baking sheet. Bake them for about 10 minutes or until crispy again. Avoid using the microwave, as it can make them soggy. Most ingredients in this salad have a good shelf life. Here’s a quick guide: - Chickpeas: Canned chickpeas last for 2-3 years if unopened. - Mixed greens: Use within 3-5 days for freshness. - Cherry tomatoes: Best if eaten within a week. - Cucumber: Lasts about a week in the fridge. - Avocado: Best to eat within 1-2 days after cutting. - Tahini: Can last for 6 months if stored properly. For more details, check the Full Recipe. Yes, you can use canned chickpeas. They save time and are easy to use. Just drain and rinse them well before cooking. This step removes extra salt and makes them taste fresher. Using canned chickpeas helps you make this Crispy Chickpea Salad quickly. If you need a tahini substitute, try nut butter or sunflower seed butter. These options give a similar creamy texture. You can also use plain yogurt for a tangy twist. Each choice will add its own flavor, so pick what you like best. To add spice, use red pepper flakes or hot sauce. Both options bring heat and flavor to your salad. You can also mix in diced jalapeños or fresh chili peppers. Start with a little, then taste and adjust to your liking. This blog post covered how to make a tasty crispy chickpea salad. You learned about the key ingredients and step-by-step guides. I shared tips to make your chickpeas crispy and gave serving suggestions. You can also explore different variations based on your needs. Remember to store leftovers correctly for best flavor. Crispy chickpea salad is fun to make and eat. Try it with your favorite ingredients! You’ll enjoy this recipe for meals all week.

Crispy Chickpea Salad Flavorful and Nutritious Dish

Looking for a dish that is tasty and healthy? This Crispy Chickpea Salad is your answer! Packed with flavor and

- 1 lb (450 g) sirloin steak, thinly sliced against the grain - 4 cups fresh broccoli florets - 3 tablespoons soy sauce - 2 tablespoons oyster sauce - 1 cup beef broth - 1 tablespoon cornstarch - 1 tablespoon vegetable oil - 2 cloves garlic, minced - 1 teaspoon ginger, grated For this easy beef and broccoli recipe, you need fresh ingredients. The sirloin steak gives a great flavor and texture. Thin slices help the beef cook fast and stay tender. Broccoli florets add crunch and color, making the dish appealing. The sauce blends soy sauce, oyster sauce, and beef broth. This mix brings a rich taste that pairs well with the beef and broccoli. The garlic and ginger add a warm, aromatic touch. Cornstarch thickens the sauce, making it stick to the beef and broccoli. Use vegetable oil for stir-frying. It has a high smoke point, so it works well for quick cooking. Gather these ingredients to ensure a tasty meal. Check the [Full Recipe] for complete details on the preparation. To start, mix the marinade. In a medium bowl, combine: - 1 lb sirloin steak, thinly sliced - 1 tablespoon soy sauce - 1 tablespoon cornstarch - Half of the minced garlic This mix helps tenderize the beef. Let it marinate for 15 minutes. This short time enhances flavor without making it mushy. Next, it’s time to prepare the broccoli. Blanch the florets in boiling water for 2 minutes. This method keeps the color bright and the texture crisp. After blanching, quickly transfer the broccoli to an ice bath. The ice bath stops the cooking right away, keeping it fresh and bright. Now, heat a large skillet over medium-high heat. Add 1 tablespoon of vegetable oil and let it get hot. Once hot, add the marinated beef. Stir-fry for 2-3 minutes until the beef turns brown but is not fully cooked. Remove the beef and set it aside. In the same skillet, add the remaining garlic and 1 teaspoon of grated ginger. Stir for about 30 seconds until you smell the aroma. Next, pour in 1 cup of beef broth, the rest of the soy sauce, and 2 tablespoons of oyster sauce. Bring this mix to a simmer for 2 minutes. Finally, add the beef back into the skillet along with the blanched broccoli. Stir everything together and cook for another 3-4 minutes. This step ensures the beef is cooked through and the broccoli is tender yet crisp. Drizzle 1 tablespoon of sesame oil on top and stir once more to coat everything nicely. Serve the beef and broccoli over cooked rice. Spoon the tasty sauce over the top for an extra boost of flavor. For the full recipe, check the previous sections. Enjoy your home-cooked meal! Slicing beef against the grain is key. This method keeps the meat tender. Look for the lines in the beef and cut across them. Aim for thin slices, about a quarter inch thick. For cooking time, stir-fry the beef for just 2-3 minutes. It should brown but not cook all the way. This step helps keep it juicy. You want the broccoli to stay crisp. To do this, blanch it properly. Boil the florets for only 2 minutes. Then, move them to an ice bath. This stops the cooking and keeps their bright color. Drain well before adding to the stir-fry. Adjusting the sauce can boost flavor. Add more soy sauce for saltiness or more oyster sauce for a richer taste. For a fresh touch, sprinkle sesame seeds or chopped green onions on top. These garnishes add color and extra flavor to your dish. {{image_2}} You can swap beef for chicken or tofu. Chicken gives a lighter taste, while tofu is great for a plant-based meal. If using chicken, slice it thinly like the beef. Cook it the same way, but check that it's cooked through. For tofu, use firm varieties, and press it to remove excess water. Then, cut it into cubes and stir-fry until golden. Adjust cooking times if needed, as chicken cooks faster than beef. Feel free to add more veggies to your dish. Carrots, bell peppers, and snap peas work well. You can also include mushrooms for extra umami. Think about the season, too! In spring, try asparagus or fresh peas. In winter, add hearty greens like kale or spinach. Just make sure to blanch or stir-fry them briefly to keep them crisp and bright. If you're cutting carbs, serve your beef and broccoli over cauliflower rice. It’s simple to make! Just pulse cauliflower florets in a food processor until they are rice-sized. Sauté the cauliflower in a pan for a few minutes until tender. You can also modify the sauce by using less sugar or switching to a low-sodium soy sauce. This keeps the dish tasty without the extra carbs. For the best flavor, add more ginger and garlic to the sauce. For the full recipe, check the [Full Recipe]. To keep your beef and broccoli fresh, use airtight containers. Glass or plastic containers work well. Store the dish in the fridge. It stays good for 3 to 4 days. Make sure the dish cools down before sealing. This helps keep moisture in check. When reheating, use a skillet or microwave. A skillet is best for keeping the beef tender. Heat it on medium. Add a splash of water to help steam the dish. If using the microwave, cover it with a lid. Heat in short bursts, stirring in between. This helps keep the texture just right. To freeze beef and broccoli, let it cool. Then, transfer it to a freezer-safe container. It can stay in the freezer for up to 3 months. For best results, separate the rice from the beef and broccoli before freezing. When ready to eat, thaw it in the fridge overnight. Reheat in a skillet or microwave as mentioned above. Enjoy your meal just like when it was fresh! To make Easy Beef and Broccoli, start with fresh ingredients. First, slice the sirloin steak thinly against the grain. This helps it stay tender. Next, marinate the beef with soy sauce, cornstarch, and minced garlic for 15 minutes. While it marinates, blanch the broccoli in boiling water for just 2 minutes. Then, cool it in an ice bath to keep it bright green and crisp. Now, heat vegetable oil in a skillet and stir-fry the beef until browned. Remove it and cook garlic and ginger until fragrant. Pour in beef broth, soy sauce, and oyster sauce, then simmer. Add back the beef and broccoli, stirring until everything is cooked through. Finally, drizzle sesame oil and serve it over rice. You will find this recipe easy and fast. For the full recipe, check above. Yes, you can use frozen broccoli. Frozen broccoli is convenient, but it may change the dish's texture. It usually cooks faster than fresh broccoli. You might want to reduce the cooking time. Just add it to the skillet after the beef and sauce simmer. Cook until it's heated through. Be careful not to overcook it, or it may become mushy. Beef and broccoli pairs well with several side dishes. Rice is a classic choice and soaks up the sauce nicely. You can also serve it with noodles for a fun twist. For a lighter option, try a fresh salad or steamed vegetables. These sides complement the rich flavors of the dish. This easy and tasty beef and broccoli dish starts with marinating sirloin steak and fresh broccoli florets. You then create a flavorful sauce from soy sauce, oyster sauce, and beef broth. Cooking tips, variations, and storage advice help you get the best results. You can switch proteins or add seasonal veggies to keep things fresh. Enjoy your stir-fry dish! It’s simple, quick, and can change each time you make it. Don't hesitate to experiment and find your favorite version. Happy cooking!

Easy Beef and Broccoli Quick and Simple Recipe

Do you want a quick meal that tastes amazing? My Easy Beef and Broccoli recipe is just what you need!

- 2 cups rotini pasta - 2 cups cooked chicken, shredded - 2 cups broccoli florets - 1 cup heavy cream - 1 cup Alfredo sauce - 1 cup shredded mozzarella cheese - 1/2 cup grated Parmesan cheese - 1 teaspoon garlic powder - 1 teaspoon onion powder - 1/2 teaspoon black pepper - 1/4 teaspoon salt - 1 tablespoon fresh parsley, chopped To make a great Creamy Chicken Alfredo Bake, you need fresh ingredients. Each one plays a key role in flavor and texture. The rotini pasta holds the sauce well, while the chicken adds protein. Broccoli gives a nice crunch and color. Heavy cream and Alfredo sauce create a rich base. The mozzarella and Parmesan cheeses melt beautifully, making the dish extra creamy. - Alternatives for broccoli: You can use spinach or green beans instead of broccoli. Both add great taste and nutrition. - Options for gluten-free pasta: Look for gluten-free rotini or penne. Many pasta brands offer great gluten-free choices. - Homemade Alfredo sauce tips: To make a simple Alfredo sauce, use butter, heavy cream, and cheese. Melt butter, add cream, and stir in cheese until smooth. This can be a tasty option if you prefer homemade sauce. These substitutions allow you to customize the dish. You can make it fit your taste or dietary needs. Enjoy experimenting with different flavors! For the full recipe, check out the [Full Recipe]. - Preheat the oven to 350°F (175°C). - In a large pot, boil salted water. Add the rotini pasta. Cook until al dente. Drain it and put it back in the pot. - In a separate pot, steam the broccoli florets for 3-4 minutes. They should be bright green and tender. Add the broccoli to the pot with the pasta. - Shred the cooked chicken into bite-sized pieces. This makes it easy to mix with the pasta and broccoli. - In a medium bowl, mix heavy cream and Alfredo sauce. Add garlic powder, onion powder, black pepper, and salt. Stir until smooth. - This rich sauce adds flavor and creaminess to the dish. - Pour the sauce over the pasta and broccoli. Add the shredded chicken. Toss everything together until the pasta and chicken are covered in sauce. - Transfer this mixture into a greased 9x13 inch baking dish. Spread it out evenly. - Place the baking dish in the preheated oven. Bake for 25-30 minutes. The cheese should be bubbly and golden brown. - You’ll know it’s done when the cheese looks delicious and melted. - After baking, let it sit for 5 minutes. Garnish with fresh parsley for color. - Serve the creamy chicken Alfredo bake directly from the dish. Add extra Parmesan for a tasty finish. For a complete meal, pair it with a simple green salad. For the full recipe, check out [Full Recipe]. - Achieving perfect pasta texture: Cook the rotini pasta until it is al dente. This means it should be firm but not hard. Overcooking will make it mushy. Always use plenty of salted water for boiling. Drain it well before mixing with other ingredients. - Cheese melting tips: For a creamy melt, use freshly shredded mozzarella and Parmesan cheese. Pre-packaged cheese often has anti-caking agents that can affect melting. Sprinkle the cheese evenly on top of your dish. This helps it melt nicely and form a golden crust. - Serving suggestions: Serve the creamy chicken Alfredo bake hot from the oven. Use a large spoon for easy serving. Add a sprinkle of extra Parmesan and parsley on top for color. This makes the dish look more inviting and fresh. - Pairing with side dishes: A simple green salad pairs well with this dish. The crisp greens balance the creamy pasta. Garlic bread is another great option. It adds crunch and complements the flavors. - Fixing dry pasta: If your pasta comes out dry, try adding a splash of heavy cream. Mix it in gently to keep the texture smooth. This adds moisture without making it soggy. - Adjusting seasoning: Taste your dish before serving. If it lacks flavor, add a pinch of salt or pepper. Fresh herbs like parsley or basil can also enhance the taste. They add a burst of freshness that elevates the creamy sauce. For the full recipe, check out the Creamy Chicken Alfredo Bake recipe. {{image_2}} You can change up the vegetables in this dish. Try adding spinach, bell peppers, or zucchini. These colorful veggies not only taste great but also add more nutrients. You can also mix in some peas or carrots for a pop of color and flavor. Using different proteins can also make this meal exciting. Swap chicken for turkey, shrimp, or even sausage. Each protein adds a unique taste. If you want a meat-free option, use chickpeas or tofu for protein instead. To keep things fresh, try a creamy pesto Alfredo. Blend pesto sauce into your Alfredo for a zesty twist. This will give your dish a lovely green hue and a burst of flavor. You can also play with different cheese combinations. Mix mozzarella with gouda or fontina for a richer taste. Experimenting with cheese can change the whole vibe of the dish. If you have vegetarians in your family, you can easily make a vegetarian version. Just leave out the chicken and add more veggies. You can also use a plant-based Alfredo sauce for a creamy touch. For those who need dairy-free options, use coconut milk instead of heavy cream. There are also great dairy-free cheese choices available now. These swaps let everyone enjoy this tasty dish without missing out! To keep your creamy chicken Alfredo bake fresh, store leftovers in the fridge. Use an airtight container for best results. Let it cool down first before sealing. This method helps keep flavors intact. If you want to freeze it, portion it into smaller containers. This way, you can take out only what you need later. Reheat your creamy chicken Alfredo bake in the oven. Preheat your oven to 350°F (175°C). Place the dish covered with foil to keep it moist. Heat for about 20 minutes or until hot. You can also use the microwave. Place a portion on a microwave-safe plate. Heat for 1-2 minutes, stirring halfway through. To avoid sogginess, do not overheat. In the fridge, the creamy chicken Alfredo bake lasts about 3 to 4 days. Make sure it stays sealed tight. When frozen, it can last up to 3 months. Just remember to label the containers with dates. This helps you keep track of how long it's been stored. For best taste, enjoy it sooner rather than later. To make homemade Alfredo sauce, you need: - 1 cup heavy cream - 1/2 cup grated Parmesan cheese - 1/2 teaspoon garlic powder - 1/4 teaspoon salt - 1/4 teaspoon black pepper Steps involved: 1. In a saucepan, heat the heavy cream over medium heat. 2. Stir in the grated Parmesan cheese until melted. 3. Add garlic powder, salt, and black pepper. 4. Mix until smooth and creamy. Yes, you can use leftover chicken. Shredded rotisserie chicken works great. Best practices for using leftover chicken: - Ensure the chicken is fully cooked. - Shred or chop it into bite-sized pieces. - Add it directly to the pasta and sauce mixture. Yes, this recipe is perfect for meal prep. It stores well and reheats nicely. Tips for making in advance: - Cook the pasta and mix everything together. - Store it in an airtight container. - Keep it in the refrigerator for up to three days. Storage and reheating suggestions: - To reheat, use the microwave or oven. - Add a splash of cream or milk to keep it moist. Yes, you can make this recipe gluten-free. Use gluten-free pasta to replace regular pasta. Gluten-free pasta options: - Brown rice pasta - Quinoa pasta - Chickpea pasta Adjustments to ingredients: - Check that your Alfredo sauce is gluten-free. - Use gluten-free broth if you add any liquid. This dish combines rotini pasta, chicken, and broccoli for a tasty meal. We covered the main ingredients, cooking steps, and some helpful tips. You learned how to make a creamy Alfredo sauce and how to store leftovers. Try variations to fit your taste, like using different veggies or proteins. In the end, this recipe is fun and easy. You can impress family and friends while enjoying a delicious dinner. Happy cooking!

Creamy Chicken Alfredo Bake Flavorful Family Dinner

Looking for a tasty family dinner that’s easy to make? You’ve found it! My Creamy Chicken Alfredo Bake combines rich

- 1 lb boneless, skinless chicken thighs, cut into bite-sized pieces - 1 can coconut milk - 2 tbsp red curry paste - 1 onion, finely chopped - 2 cloves garlic, minced - 1-inch piece ginger, grated - 1 bell pepper, sliced - 1 cup green beans, trimmed and halved - 1 tbsp fish sauce (optional) - 1 tbsp brown sugar - Juice of 1 lime - Fresh cilantro - Salt and pepper to taste Gather these ingredients before you start cooking. The chicken thighs are my favorite because they stay juicy. Coconut milk adds a creamy touch that balances the spice. The red curry paste brings depth and warmth to the dish. Next, the aromatics and veggies are key. Onion, garlic, and ginger create a fragrant base. The bell pepper adds sweetness, while green beans give a nice crunch. Finally, don’t skip the seasoning. Fish sauce adds umami, while brown sugar balances the heat. Lime juice brightens the dish, and cilantro gives a fresh finish. You can find the full recipe to make this dish at home. To make the best coconut curry chicken, start by prepping your ingredients. Gather all the items you need. Chop the onion, mince the garlic, and grate the ginger. Slice the bell pepper, and trim the green beans. Next, consider marinating the chicken. This step is optional, but it can add great flavor. Mix the chicken with some salt, pepper, and a splash of lime juice. Let it sit for about 15 minutes. Now, let’s cook! Heat olive oil in a large skillet over medium-high heat. Add the chopped onion and sauté until it turns soft and clear, which takes about 3 to 4 minutes. Then, stir in the minced garlic and grated ginger. Cook them until they smell amazing, about 1 minute. Once the aromatics are ready, add the chicken pieces. Make sure to season them with salt and pepper. Cook the chicken until it is brown on all sides, which should take about 5 to 6 minutes. After that, stir in the red curry paste. Coat the chicken well in the paste and cook for another 2 minutes. Pour in the coconut milk and mix everything well. Bring it to a gentle simmer. Now, add the sliced bell pepper and green beans. If you choose to use fish sauce, add it now along with brown sugar. Let the mixture simmer for 10 to 15 minutes. This will cook the chicken through and soften the veggies. Finally, check the taste. Adjust the seasoning with lime juice and add extra salt and pepper if needed. Remove the skillet from heat and sprinkle fresh cilantro on top just before serving. For the full recipe, be sure to check the complete instructions. Enjoy your flavorful coconut curry chicken! To make the best Coconut Curry Chicken, start with sautéing. Heat olive oil in your skillet over medium-high heat. Add chopped onion first. Sauté until the onion is soft and clear, about 3-4 minutes. Then, stir in minced garlic and grated ginger. Cook until you smell the aroma, about 1 minute. This step builds a solid flavor base. Next, add the chicken pieces. Make sure to season with salt and pepper. Cook until the chicken turns brown on all sides, about 5-6 minutes. This browning adds depth to your curry. For the perfect curry consistency, add the coconut milk after browning the chicken. Mix it well with the curry paste. Bring the pot to a gentle simmer. The goal is a creamy sauce that clings to the chicken and veggies. If you want to switch things up, try using tofu or shrimp instead of chicken. Tofu absorbs flavors well and is a great meat alternative. Shrimp cooks faster, so add it later in the simmering stage. For veggies, you can swap the bell pepper or green beans. Try adding zucchini, cauliflower, or snap peas. These swaps will keep your dish fresh and exciting. Coconut Curry Chicken pairs well with rice or noodles. Jasmine rice is a perfect fit; it soaks up the sauce nicely. For a fun twist, serve it with rice noodles. To add a burst of flavor, use lime juice and fresh cilantro as a topping. Squeeze lime over your curry before eating. It brightens the dish and balances the richness of the coconut milk. Enjoy this delightful meal with your loved ones! For a detailed guide, check the Full Recipe. {{image_2}} To spice up your Coconut Curry Chicken, try adding chili peppers or hot sauce. You can use fresh chili peppers like jalapeños or serranos for heat. Slice them thin and toss them in with the onions. If you prefer hot sauce, a few drops can go a long way. Just be careful, as you want to keep the balance of flavors. If you want a creamy version, consider using Greek yogurt instead of coconut milk. This swap adds a tangy flavor and makes the dish rich. Just stir in the yogurt at the end, after cooking the chicken. This keeps it smooth and prevents curdling. It’s a fun twist that still gives you a creamy texture. Incorporating seasonal vegetables can enhance your Coconut Curry Chicken. Think about adding zucchini, spinach, or peas. These veggies not only add color but also boost nutrition. You can toss them in during the last few minutes of cooking. They will cook quickly and stay bright and fresh. This way, you create a dish full of flavor and texture. For the full recipe, check out the Coconut Curry Chicken section. To store your Coconut Curry Chicken, place it in an airtight container. Let it cool to room temperature first. This helps keep it fresh. It will last for about three to four days in the fridge. When you are ready to eat, check for any off smells or changes in color. If you want to keep this dish longer, freezing is a great option. Pour your cooled Coconut Curry Chicken into a freezer-safe bag or container. Make sure to remove excess air to prevent freezer burn. It can stay frozen for up to three months. When you're ready to enjoy it, just thaw it in the fridge overnight. To reheat, use a skillet over medium heat. Add a splash of water or coconut milk to keep it moist. Stir it often until hot. You can also use the microwave. Heat it in short bursts, stirring in between, to avoid hot spots. This way, you'll keep all that yummy flavor and creamy texture intact. Enjoy your meal! Coconut curry chicken is a rich and creamy dish. It blends tender chicken with coconut milk and spices. This dish comes from Southeast Asia, especially Thai cuisine. The red curry paste adds warmth and depth. Each bite offers a burst of flavor. The mix of spices and coconut creates a comforting experience. Serve it over rice for a satisfying meal. To add more heat, try adding fresh chili peppers. Sliced jalapeños or Thai bird chilies work great. You can also mix in extra red curry paste. Start with a small amount and taste as you go. Another option is to add a dash of cayenne pepper. This keeps the flavor balanced while giving you the heat you crave. Yes, you can prepare coconut curry chicken ahead of time. Make it a day or two before serving. Just store it in an airtight container in the fridge. When you’re ready to eat, reheat it on the stove. Stir it gently to avoid sticking. You can also microwave it, but check it often. It’s best to serve it fresh for the best taste. For the full recipe, check the details above. This blog post covers making Coconut Curry Chicken. You learned the key ingredients, like chicken thighs and coconut milk. I shared cooking steps, tips for perfect texture, and how to make it spicy or creamy. Proper storage and reheating are essential, too. With these skills, you can create a delicious dish. Enjoy your cooking adventure, and don’t be afraid to explore your unique flavors!

Coconut Curry Chicken Flavorful and Satisfying Meal

If you’re searching for a meal that’s both flavorful and satisfying, look no further! Coconut Curry Chicken bursts with rich

To make a Peach Caprese Salad, you need some key ingredients. These include: - 3 ripe peaches, sliced - 1 cup fresh mozzarella balls (bocconcini) - 1 cup cherry tomatoes, halved - 1 cup fresh basil leaves These ingredients create a bright and tasty salad. The peaches add sweetness, while the mozzarella provides creaminess. Cherry tomatoes give a pop of color and fresh flavor, and basil brings a lovely aroma. Seasonings are important for flavor. You will need: - 2 tablespoons balsamic glaze - 1 tablespoon olive oil - Salt and freshly cracked black pepper, to taste The balsamic glaze adds a tangy sweetness. Olive oil enriches the salad with healthy fat. Salt and pepper enhance all the flavors, making each bite delicious. You might want to enhance your salad even more. Here are some optional toppings: - Cracked black pepper - Additional fresh herbs Cracked black pepper adds a spicy kick. Fresh herbs can boost the salad's aroma and taste. Feel free to get creative and personalize your dish! For the Full Recipe, check out the details to make this delightful salad. Start by washing your peaches. This step is key for freshness. Slice the peaches into thin wedges and set them aside. Next, grab a large serving bowl or platter. In this bowl, arrange the peach slices evenly. This creates a beautiful base for your salad. Now, it’s time to add more color. Place mozzarella balls around the peaches. Then, add halved cherry tomatoes. Tuck fresh basil leaves in between the peach and cheese layers. This not only adds flavor but also looks lovely. Aim for a mix of colors. The more vibrant, the better! Once your salad looks great, it’s time for the dressings. Drizzle olive oil and balsamic glaze over the entire salad. This adds a rich taste. Season with salt and freshly cracked black pepper to enhance the flavors. Gently toss the salad. Be careful not to break the peach slices. Let the salad sit for about 5 minutes. This allows the flavors to blend together perfectly. Enjoy your Peach Caprese Salad! You can find the Full Recipe for more details. To make your Peach Caprese Salad shine, pick ripe, juicy peaches. Look for peaches that have a nice yellow hue and feel slightly soft when you press them. The scent of a ripe peach is sweet and fragrant. Avoid hard or overly soft peaches, as they may lack flavor. You can boost the flavor with a few extra ingredients. Try adding thinly sliced red onion for a bit of bite. A sprinkle of feta cheese adds a salty kick that pairs well with the sweetness of the peaches. Fresh mint leaves can give your salad a refreshing twist. For an extra crunch, toss in some chopped nuts like pistachios or walnuts. Make your salad look stunning with a few simple tricks. Use a large, white platter to let the colors pop. Arrange peach slices in a circle, with mozzarella and tomatoes in the center. Drizzle balsamic glaze in a zigzag pattern over the top. Garnish with whole basil leaves for a fresh touch. This makes your salad not just tasty but also a feast for the eyes! {{image_2}} If you want a dairy-free or vegan option, swap mozzarella for vegan cheese. You can also use tofu. Silken tofu works well and gives a creamy texture. For a tangy flavor, try using cashew cream. These substitutes keep the dish tasty and vibrant. Change up the fruits based on what is fresh. In summer, try ripe strawberries or juicy nectarines. In fall, apples or pears can add a nice crunch. Seasonal fruits make the salad exciting and different each time. You can also use heirloom tomatoes in late summer for more color. Add nuts for a crunchy texture. Toasted pine nuts or walnuts can enhance the taste. You can also try different vinegars, like apple cider or red wine. They can bring out the natural sweetness of the peaches. For a kick, sprinkle in some red pepper flakes. Each twist makes the salad unique and fun to eat. For the full recipe, check out the section above. To keep your Peach Caprese Salad fresh, use an airtight container. This method helps to trap moisture and flavor. Store the salad in the fridge as soon as possible. If you want to keep the salad crisp, avoid mixing in the dressing until serving time. This way, the peaches, tomatoes, and cheese stay fresh. You can keep the salad in the fridge for about 2 days. After that, the peaches may start to brown, and the cheese can lose its texture. If you notice any changes in color or smell, it’s best to throw it away. Always trust your senses when it comes to food safety. Peach Caprese Salad is best served cold. It enhances the flavors and keeps the ingredients fresh. If you want to serve it later, just chill it in the fridge. Reheating is not recommended, as it can affect the salad's texture and taste. Enjoy it fresh for the best experience! For the complete recipe, check out the Full Recipe. Peach Caprese Salad pairs well with many tasty options. Here are a few ideas: - Grilled chicken or fish for protein - Crusty bread to soak up the juices - A light, crisp white wine like Pinot Grigio - A fresh green salad for a full meal These choices enhance the flavors and make your meal more satisfying. You can prepare the salad in advance, but timing is key. I recommend making it no more than two hours before serving. This keeps the peaches fresh and the mozzarella creamy. If you make it too early, the salad may become soggy. Peach Caprese Salad is a healthy choice. It is low in calories and rich in vitamins. Here’s a quick breakdown: - Peaches provide vitamins A and C. - Mozzarella adds protein and calcium. - Tomatoes are full of antioxidants. - Olive oil offers healthy fats. This salad is not only delicious but also packed with nutrition. Enjoy every bite knowing it’s good for you! Peach Caprese Salad combines fresh peaches, mozzarella, and tomatoes for a summer delight. You learned how to prepare, layer, and present this dish beautifully. Remember to choose ripe peaches for the best flavor. Consider healthy variations and toppings to personalize your salad. Store leftovers properly to keep them fresh. This dish not only pleases the palate but also impresses guests with its vibrant look. Enjoy exploring the flavors and making it your own. Your Peach Caprese Salad journey begins now!

Peach Caprese Salad Fresh and Flavorful Delight

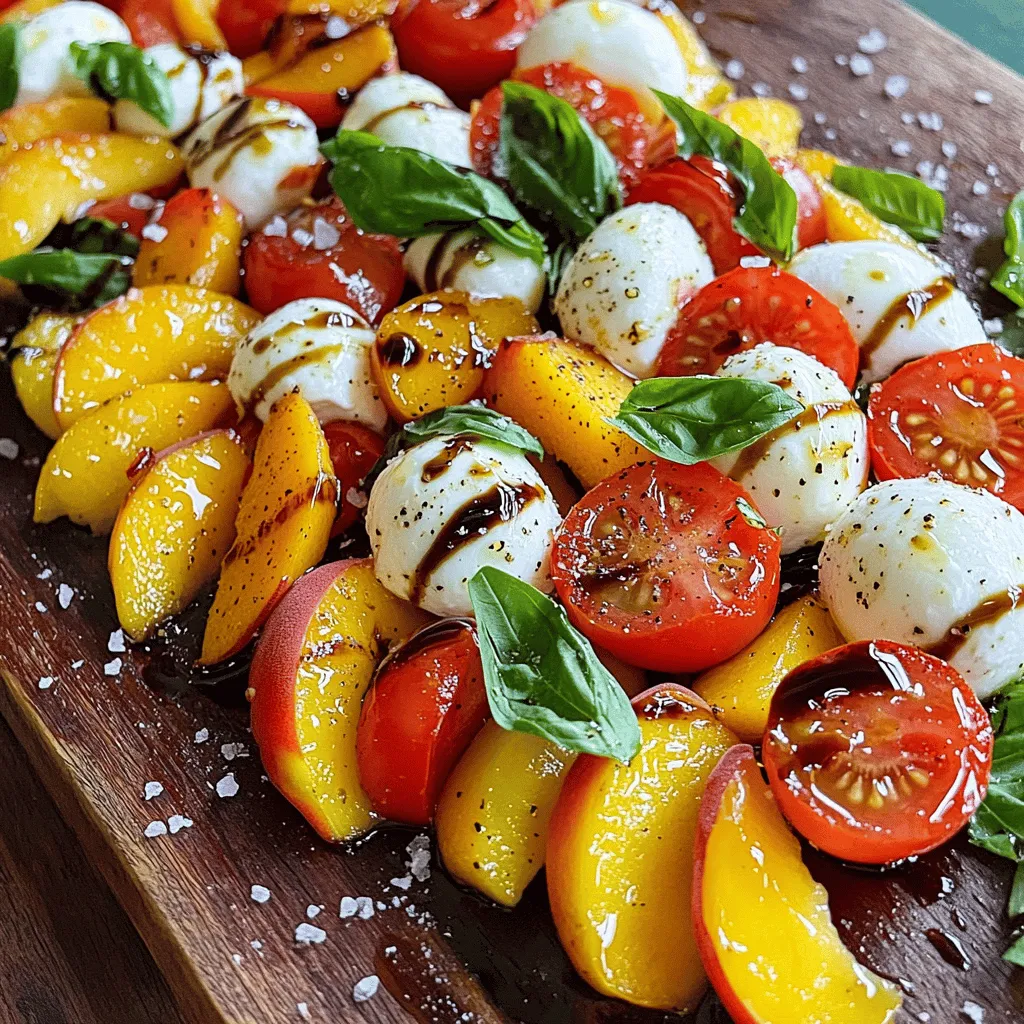
Looking for a refreshing dish to impress your guests? You’ve landed in the right spot! This Peach Caprese Salad combines

- Salmon fillets - 1/4 cup olive oil - 3 tablespoons fresh lemon juice - 2 cloves garlic, minced - 1 tablespoon fresh dill, chopped - 1 tablespoon fresh parsley, chopped - 1 teaspoon dried oregano - Salt and pepper to taste - Lemon wedges, for serving For the perfect Lemon Herb Grilled Salmon, measure your olive oil and lemon juice accurately. Use a liquid measuring cup for the olive oil. Pour it in slowly and keep an eye on the line. For the lemon juice, a citrus juicer helps get every drop. Fresh herbs make a big difference in taste. They add bright, bold flavors. Dried herbs can work, but fresh is best. If you use dried herbs, remember to use less. Dried herbs are stronger. A good rule is to use one-third the amount of dried herbs as fresh herbs. This careful measuring ensures your salmon turns out just right. For the full recipe, check the link. First, gather your ingredients for the marinade. You need olive oil, lemon juice, minced garlic, and fresh herbs like dill and parsley. I use a small bowl for mixing. Start whisking the olive oil and lemon juice together. This step is key. It blends the flavors well. After mixing, add the garlic, dill, parsley, oregano, salt, and pepper. Whisk again until everything combines. Marinating is really important. Let the salmon soak in the marinade for at least 30 minutes. If you have time, go for 2 hours. This makes the salmon taste even better. Before grilling, preheat your grill to medium-high heat. This helps cook the salmon evenly. You want a nice hot grill. While it heats, oil the grill grates. Use a paper towel soaked in oil. This keeps the salmon from sticking. Make sure to do this right before you add the salmon. A well-oiled grill helps create nice grill marks. When your grill is ready, take the salmon out of the marinade. Let the excess marinade drip off. Place the salmon fillets on the grill skin-side down. Grill them for about 5-6 minutes. Resist the urge to move them. After that, flip the salmon carefully with a spatula. Grill for another 4-5 minutes. You want to look for signs of doneness. The fish should flake easily with a fork. It should not look raw in the center. Once done, remove the salmon from the grill. Let it rest for a couple of minutes. This helps keep it juicy. For the full recipe, check the [Full Recipe]. To get great grilled salmon, you must check the internal temperature. Salmon cooks well at 145°F. Use a meat thermometer for accuracy. Insert it into the thickest part of the fillet. This simple step ensures your salmon is safe to eat and perfectly cooked. Avoid common grilling mistakes. First, don’t flip the salmon too soon. Let it grill for 5-6 minutes before turning. This helps it form a nice crust. Second, don’t overcrowd the grill. This can lower the temperature, causing uneven cooking. Give each fillet enough room to breathe. You can add more flavor to your salmon with extra spices or sauces. Try a dash of smoked paprika for a smoky twist. Or, drizzle honey for a sweet glaze. Both options will elevate the dish. Pair your grilled salmon with side dishes that complement its fresh taste. A light salad with mixed greens works well. You can also serve it with grilled veggies for a colorful plate. Another option is quinoa or rice for a hearty touch. These sides will make your meal more satisfying and delicious. For the full recipe, check out the complete instructions. Enjoy your cooking! {{image_2}} You can switch up the fish for this recipe. If you love trout or halibut, they work well. Each fish brings a different taste, but the same lemony flavor shines through. You can also try using tilapia or swordfish for a unique twist. If you can't find fresh herbs, dried herbs are a great choice. Just use about one-third the amount. For example, if the recipe calls for one tablespoon of fresh dill, use one teaspoon of dried dill. This small change keeps your dish flavorful. You can bake the salmon in the oven if grilling isn't an option. Preheat the oven to 400°F (200°C). Place the salmon on a lined baking sheet, and bake it for about 12-15 minutes. This method keeps the fish moist and tender, too. Pan-searing is another fun way to cook salmon. Heat some oil in a pan over medium-high heat. Place the salmon skin-side down and cook for about 6 minutes. Then, flip it and cook for another 4-5 minutes. This method gives the fish a crispy skin and a lovely texture. For the full recipe, check out the Lemon Herb Grilled Salmon recipe. To keep your grilled salmon fresh, store it in the fridge. First, let it cool down to room temperature. Then, wrap the salmon tightly in plastic wrap or place it in an airtight container. This keeps moisture in and prevents it from drying out. Ideally, eat the leftovers within two days for the best taste. If you have more salmon than you can eat, freezing is a great option. Place the salmon in a freezer-safe bag. Remove as much air as you can before sealing. Label the bag with the date. You can freeze it for up to three months. When ready to eat, simply thaw it in the fridge overnight. When it’s time to reheat your salmon, you want it to stay juicy. The best method is to use an oven. Preheat your oven to 275°F (135°C). Place the salmon on a baking sheet and cover it with foil. Heat it for about 15 minutes, or until warmed through. This gentle heat helps to keep the fish moist. You can also use a microwave, but be careful. Place the salmon on a microwave-safe plate. Cover it with a damp paper towel to trap steam. Heat it in short bursts of 30 seconds. Check between bursts to avoid overcooking. If you follow these tips, your Lemon Herb Grilled Salmon will taste just as good as the first time. You can enjoy Lemon Herb Grilled Salmon with many side dishes. Here are some ideas: - Grilled veggies: Try zucchini, bell peppers, or asparagus. - Rice: White rice or brown rice works well. - Quinoa: This adds a nutty flavor and is healthy. - Potatoes: Roasted or mashed potatoes are great choices. For salads, consider these options: - Cucumber salad: Refreshing and light. - Mixed greens: Toss with lemon vinaigrette for freshness. - Coleslaw: A crunchy side that adds texture. Adding a sauce can enhance the dish. A light yogurt sauce or a tangy chimichurri pairs well. Yes, you can prepare Lemon Herb Grilled Salmon ahead of time. Here’s how: - Marinating tips: Marinate the salmon for at least 30 minutes. For deeper flavor, marinate up to 2 hours. - Best practices for storing: Keep the marinated salmon in the fridge. Use a covered dish or a resealable bag. To check if your salmon is cooked, look for these signs: - Visual cues: The salmon should change from a bright pink to a lighter shade. - Textural cues: It should flake easily with a fork. The safe internal temperature for salmon is 145°F (62.8°C). Use a food thermometer for accuracy. You can find the full recipe for Lemon Herb Grilled Salmon [here](#). Grilling salmon with lemon and herbs brings a delicious result. We covered the key ingredients and how to prepare the marinade. You learned how to grill salmon perfectly by following the right techniques. Remember to check the internal temperature to avoid mistakes. For a tasty twist, try different fish or herbs. Store leftovers properly for future meals. You now have the tips to enjoy great grilled salmon anytime. Enjoy experimenting with this recipe!

Lemon Herb Grilled Salmon Flavorful and Simple Meal

Ready to elevate your dinner game? My Lemon Herb Grilled Salmon is both flavorful and simple! With just a few

Here are the key ingredients you will need for stuffed zucchini boats: - 4 medium zucchini - 1 cup quinoa, rinsed and drained - 2 cups vegetable broth - 1 can (15 oz) black beans, drained and rinsed - 1 cup diced tomatoes (fresh or canned) - 1 small red onion, finely chopped - 1 red bell pepper, diced - 2 cloves garlic, minced - 1 teaspoon cumin - 1 teaspoon chili powder - 1/2 teaspoon smoked paprika - Salt and pepper to taste - 1 cup shredded cheese (cheddar or a Mexican blend) - Fresh cilantro for garnish - 1 tablespoon olive oil Feel free to add these ingredients for extra flavor: - Jalapeños for heat - Corn for sweetness - Avocado for creaminess - Lime juice for zest Each serving of stuffed zucchini boats is packed with nutrition. Here’s a breakdown: - Calories: About 350 - Protein: 14g - Carbohydrates: 50g - Fiber: 12g - Fat: 10g These boats are not only tasty but also a healthy option. With the mix of quinoa and beans, you get a good source of protein and fiber. Enjoy them as a main dish or a hearty side! Check out the Full Recipe for more cooking tips and serving ideas. 1. First, preheat your oven to 375°F (190°C). 2. Slice each zucchini in half lengthwise. 3. Use a spoon to scoop out the center, making boats. Leave a border around the edges. 4. Set the scooped zucchini flesh aside for later. 1. In a medium saucepan, heat 1 tablespoon of olive oil over medium heat. 2. Add the chopped red onion and diced red bell pepper. Sauté for about 5 minutes until soft. 3. Stir in the reserved zucchini flesh, minced garlic, cumin, chili powder, smoked paprika, salt, and pepper. Cook for 3 more minutes while stirring. 4. Add 1 cup of quinoa and 2 cups of vegetable broth to the pan. Bring to a boil. 5. Reduce heat to low, cover, and simmer for 15 minutes until quinoa is cooked and liquid is absorbed. 6. Remove from heat and gently fold in 1 can of black beans and 1 cup of diced tomatoes. Taste and adjust the seasoning if needed. 7. Place the zucchini boats on a baking sheet lined with parchment paper. Fill each boat with the quinoa mixture, pressing it down slightly. 8. Top each filled zucchini boat with 1 cup of shredded cheese. 9. Bake in the preheated oven for 20-25 minutes. Look for tender zucchini and melted cheese. 10. Once done, let the boats cool for a few minutes. Garnish with fresh cilantro before serving. Serve these stuffed zucchini boats on a colorful plate. Pair them with a fresh salad or some crusty bread. You can also drizzle a bit of hot sauce on top for a kick. Enjoy a zesty quinoa and black bean stuffed zucchini boat for a fun and healthy meal! For the full recipe, check here. To find the best zucchini, look for firm ones. Choose those with smooth skin and no spots. The size matters too. Smaller zucchinis have a sweeter taste and better texture. A medium zucchini works well for stuffing. Adding herbs and spices boosts flavor. Fresh herbs like basil or parsley add brightness. You can also add a squeeze of lemon juice for zing. A dash of hot sauce brings heat if you like spice. For a richer taste, try sautéing the veggies longer. One mistake is overcooking the zucchini. You want a tender bite, not mushy. Don’t forget to season your filling well. Taste it before filling the boats. Lastly, make sure to pack the filling tightly. This ensures every bite is full of flavor. For a full recipe, check out Zesty Quinoa and Black Bean Stuffed Zucchini Boats. {{image_2}} Stuffed zucchini boats are a great way to enjoy veggies. For a vegetarian twist, skip the meat. You can fill the boats with a mix of grains, beans, and veggies. Use ingredients like lentils, chickpeas, or brown rice. Add some spinach or kale for extra greens. Top with cheese or a creamy sauce. This keeps your meal flavorful and filling, and you get lots of nutrients. If you love meat, you can easily add it to your stuffed zucchini boats. Ground turkey, chicken, or beef works well. Just cook the meat with your sautéed veggies. Mix in the quinoa and seasonings. This gives your dish a hearty flavor. Top with cheese and bake. You will have a satisfying meal that both meat lovers and vegetarians can enjoy. Toppings can change the whole dish. Instead of cheese, try using avocado or a dollop of sour cream. You can also add fresh herbs like basil or parsley for a bright taste. Want a spicy kick? Add some jalapeños or hot sauce on top. This allows you to customize your stuffed zucchini boats to fit your taste. Explore different toppings to find your perfect flavor. For the full recipe, check out the details above. To keep your stuffed zucchini boats fresh, let them cool first. Place them in an airtight container. Store in the fridge for up to three days. Make sure to separate layers with parchment paper to avoid sticking. This helps keep them nice and neat. Reheat your zucchini boats in the oven for the best results. Set the oven to 350°F (175°C). Place the boats on a baking sheet and cover with foil. Heat for about 15 minutes until warm. You can also microwave them for 2-3 minutes, but the oven keeps the texture better. If you want to freeze stuffed zucchini boats, prepare them first, but don’t bake. After filling the boats, wrap each one in plastic wrap. Then, place them in a freezer-safe bag. They can last for up to three months. When ready to eat, thaw in the fridge overnight before baking. For the full recipe, check out the section above. You will know the zucchini boats are cooked when they are tender. Poke them gently with a fork to check. The cheese on top should also be melted and bubbly. If the zucchini feels soft but firm, you are good to go. This usually takes about 20-25 minutes in the oven at 375°F. Yes, you can prepare stuffed zucchini boats ahead of time. Just follow the recipe up to the baking step. After filling the zucchini, cover them and store them in the fridge. You can bake them later when needed. This makes for a quick meal on busy days. Just add a few extra minutes to the baking time if they are cold from the fridge. If you want to substitute quinoa, you have several options. Brown rice works well and adds a nice texture. You can also use couscous or bulgur wheat for a different flavor. If you prefer a low-carb option, try using cauliflower rice. Each of these will give you a tasty stuffed zucchini boat. For the full recipe, check out the instructions earlier. This blog post covered how to make stuffed zucchini boats. We looked at the ingredients, preparation, and cooking steps. You learned tips for picking the best zucchini and common mistakes to avoid. We explored delicious variations and how to store leftovers properly. In my view, stuffed zucchini boats are a fun and healthy dish. They offer many options for taste and ingredients. Try making your own and enjoy every bite!

Stuffed Zucchini Boats Flavorful and Easy Meal Idea

If you’re looking for a simple, tasty meal, stuffed zucchini boats are the answer! These colorful veggies can hold a

- 2 ripe bananas - 2 tablespoons peanut butter - 1 cup almond milk - 1 tablespoon honey or maple syrup (optional) - 1/2 cup Greek yogurt - 1/4 teaspoon vanilla extract - 1 tablespoon chia seeds (optional) - Ice cubes (optional) To make the perfect Peanut Butter Banana Smoothie, you need just a few simple items. Start with ripe bananas. They should be sweet and soft. Next, grab some peanut butter. You can choose smooth or crunchy based on your taste. Almond milk adds a nice creaminess. If you want a touch of sweetness, use honey or maple syrup. Greek yogurt is key for a thick and tasty texture. A splash of vanilla extract makes it more fragrant. Chia seeds are optional, but they add healthy fiber. Finally, ice cubes are great for a refreshing chill. Overview of health benefits of bananas Bananas are rich in potassium. This helps keep your heart healthy. They also provide quick energy, making them great for breakfast or a snack. Bananas can improve digestion too. They contain fiber, which helps your tummy feel good. Benefits of peanut butter Peanut butter is a source of protein. It helps keep you full longer. It also has heart-healthy fats. These fats are good for your body. Plus, it adds a yummy flavor to your smoothie! Greek yogurt nutritional profile Greek yogurt is packed with protein and calcium. This helps build strong bones and muscles. It also contains probiotics, which are good for your gut. Adding yogurt makes the smoothie creamy and satisfying. The Peanut Butter Banana Smoothie is not only tasty but also full of nutrition. Each ingredient plays a role in making this drink healthy and delicious. For the complete recipe, check out the Full Recipe above. 1. Start by peeling and chopping the ripe bananas into chunks. This makes blending easier. 2. Next, add all your ingredients into the blender. This includes the peanut butter, almond milk, Greek yogurt, and vanilla extract. 3. If you want your smoothie sweeter, adjust the taste with honey or maple syrup. Blend again if you add any extra. - Use high speed on your blender for a smooth texture. This helps mix everything well. - To avoid lumps, ensure you blend long enough. Pause and stir if needed. This helps reach that creamy finish. - When pouring your smoothie, use tall glasses for a nice look. - Garnish with a sprinkle of chia seeds or a drizzle of peanut butter on top. - For an extra touch, place a banana slice on the rim of the glass. It makes your drink look special! By following these steps, you’ll create a Peanut Butter Banana Smoothie that is not only healthy but also delicious. For the full recipe, check out the full recipe section. To make your Peanut Butter Banana Smoothie extra creamy, use frozen bananas. Frozen bananas add a thick and smooth texture. They also chill the smoothie without needing ice. If you don’t have frozen bananas, try adding half a ripe avocado. It blends well and gives a creamy feel. You can change the sweetness of your smoothie to match your taste. Start with ripe bananas, as they are sweeter. If you want more sweetness, add honey or maple syrup. Use just a little at first. You can always add more if needed. For a natural option, consider agave syrup or dates. These give a nice sweetness without extra refined sugar. One common mistake is over-blending your smoothie. This can make it too thin. Blend just until smooth. On the flip side, under-blending can leave chunks. For best taste, avoid substituting peanut butter with other nut butters. They may change the flavor. Stick with high-quality peanut butter for the best result. {{image_2}} You can easily change the taste of your peanut butter banana smoothie. One fun option is the chocolate peanut butter banana smoothie. Just add 2 tablespoons of cocoa powder to your blend. This mix gives a rich, chocolatey flavor that pairs well with bananas. Another great twist is the green smoothie. Add a handful of spinach to the mix. Spinach adds nutrients without changing the taste much. You get the health benefits while keeping it delicious. For those who prefer non-dairy options, you can swap almond milk for oat milk or soy milk. Both of these options work great. If you want a vegan smoothie, replace Greek yogurt with coconut yogurt or silken tofu. These choices still keep the smoothie creamy and rich. They also add extra flavor and nutrients. To make your smoothie even healthier, consider adding protein powder. This helps keep you full longer. You can use whey, pea, or hemp protein based on your diet. Adding fruits like berries or mango can also enhance the taste. Berries add antioxidants, while mango gives a tropical flair. These add-ins not only boost nutrition but also create new flavor experiences. For the full recipe, check out Peanut Butter Banana Bliss Smoothie. To keep your peanut butter banana smoothie fresh, store it in an airtight container. This helps avoid spoilage and keeps the flavors intact. Place it in the fridge if you plan to drink it within a day. For longer storage, you can freeze your smoothie. Pour it into a freezer-safe container, leaving some space at the top. This extra space allows it to expand as it freezes. A fresh peanut butter banana smoothie lasts about 24 hours in the fridge. After that, it can start to lose flavor and texture. If you freeze it, the smoothie can last up to three months. Always check for signs of spoilage. If it smells sour or looks off, it’s best to toss it. When you’re ready to enjoy a frozen smoothie, let it thaw for about 10 to 15 minutes at room temperature. This makes it easier to blend again. For the best texture, put it back in the blender with a splash of almond milk. Blend until smooth. If you prefer a thicker drink, add ice cubes while blending. Enjoy the creamy goodness! If you need a substitute for Greek yogurt, here are some great options: - Regular yogurt: This works well and is easy to find. - Cottage cheese: Blend it well to make it smooth. - Silken tofu: A great vegan choice that adds creaminess. - Sour cream: Use in small amounts for tangy flavor. These options will keep your smoothie creamy and tasty. Yes, you can make this smoothie without bananas! Here are some tasty replacements: - Avocado: It adds creaminess and healthy fats. - Mango: Gives a fruity sweetness and smooth texture. - Pumpkin puree: Offers a unique taste and nutrition. - Frozen cauliflower: A surprising option that blends well. These substitutes will change the flavor but keep it delicious. This recipe makes two servings of smoothie. Each serving is about 8 ounces. If you want to make more, simply double the ingredients. You can also adjust for larger batches by using the same ratios. Just blend in batches if your blender is small. Yes, this smoothie can work well as a meal replacement! It has a good mix of protein, fats, and carbs. The peanut butter provides protein and healthy fats. The bananas add carbs and fiber. Greek yogurt boosts the protein and makes it creamy. Together, they create a balanced meal. Just make sure to drink it when you need energy. This blog post guides you through making a delicious banana smoothie. You learned about key ingredients, their health benefits, and step-by-step preparation. We talked about tips for creaminess and sweetness, as well as delightful variations. Storage tips help keep your smoothie fresh, while FAQs address common questions. Remember, smoothies can be easy, fun, and healthy. Experiment with flavors and ingredients to find your perfect mix. Enjoy every sip!

Peanut Butter Banana Smoothie Healthy and Delicious Drink

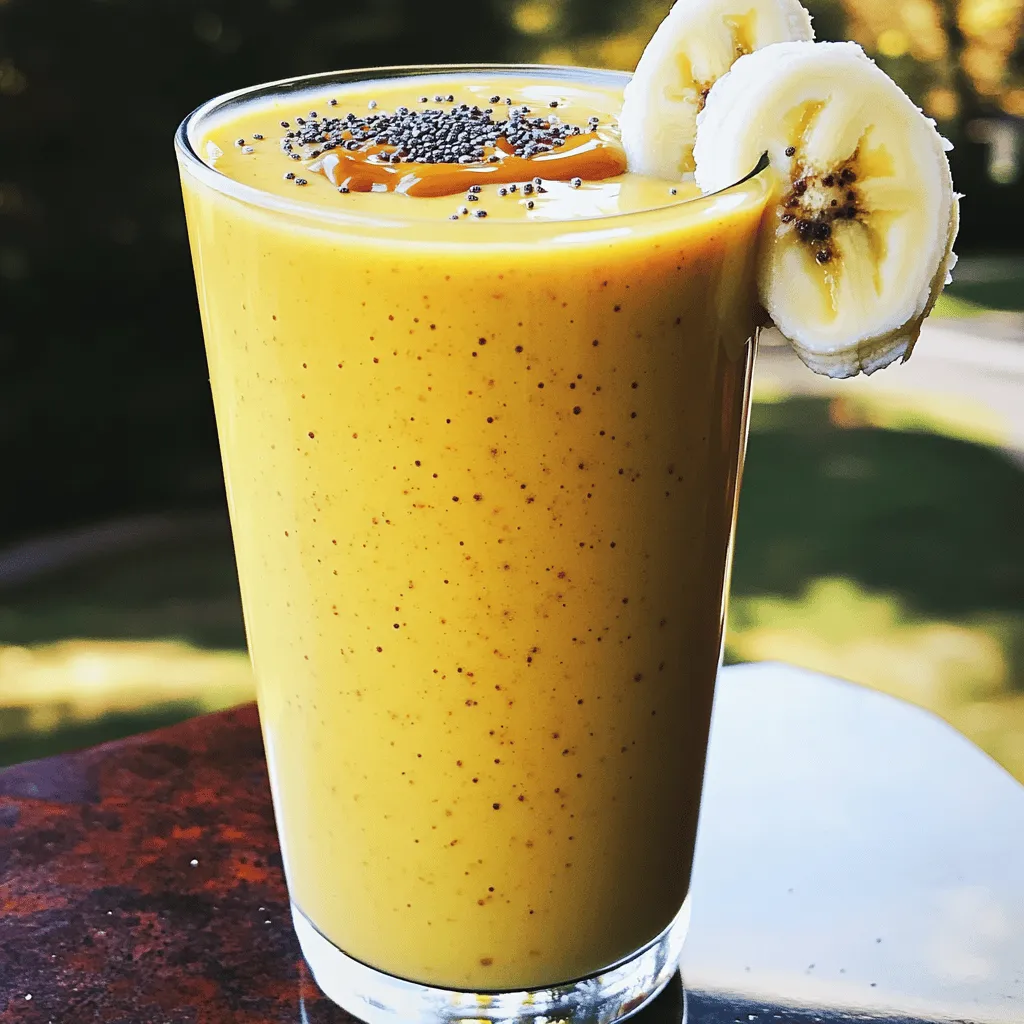
Looking for a tasty and healthy drink? The Peanut Butter Banana Smoothie is your perfect choice! It’s packed with energy-boosting

- Fresh strawberries - Dark chocolate - White chocolate (optional) - Coconut oil (for smoother chocolate) - Sea salt (for garnish) - Parchment paper (for cooling) Fresh strawberries are the star of this treat. They should be ripe and sweet. Dark chocolate adds a rich flavor that pairs well with strawberries. I suggest using chocolate with 70% cocoa for the best taste. White chocolate is optional, but it adds a nice touch. Coconut oil makes the chocolate smoother. It helps the chocolate melt evenly and glide better over the strawberries. A pinch of sea salt on top enhances the sweet and bitter flavors. The parchment paper keeps your strawberries from sticking and makes cleanup easy. This recipe uses a pound of strawberries and eight ounces of dark chocolate. You can add four ounces of white chocolate for drizzling. Make sure to have a tablespoon of coconut oil ready. This setup ensures you create a beautiful and tasty treat that everyone will love. Check out the Full Recipe for more details! Start by rinsing your strawberries under cool water. This step is key for taste. After rinsing, dry them with a towel. Make sure they are completely dry. If they have any moisture, the chocolate won't stick well. Dry strawberries help create a smooth finish. You can melt the dark chocolate in a microwave or a double boiler. For the microwave, put the chocolate in a bowl. Heat it in 30-second bursts. Stir after each burst until smooth. If you use a double boiler, place the chocolate in a bowl above simmering water. This method gives you more control over the heat. You want the chocolate to be shiny and smooth. Adding a tablespoon of coconut oil can help achieve this. To dip the strawberries, hold them by the stem. Submerge them into the melted chocolate. Cover about two-thirds of the berry. Let any excess chocolate drip back into the bowl. Place the dipped strawberries on parchment paper. This paper keeps them from sticking. After you dip all the strawberries, chill them in the fridge. Let them cool for about 15 to 30 minutes. This time allows the chocolate to set properly. To coat your strawberries well, start with room temperature chocolate. Cold chocolate can seize up and become lumpy. If your chocolate is too hot, it might not stick to the strawberries. Keep the strawberries dry to ensure the chocolate adheres properly. Any moisture can lead to a messy coating. Remember, a dry strawberry is a happy strawberry! Drizzling white chocolate adds flair to your strawberries. To create a nice drizzle, use a fork or a piping bag. For the fork method, dip it into the melted white chocolate and flick it over the dipped strawberries. This creates a fun pattern. If you prefer the piping bag, fill it with white chocolate and squeeze it gently to control the drizzle. Both methods work well and look great! Presenting your chocolate-dipped strawberries can be fun. Arrange them on a decorative platter, alternating their positions. This gives a nice visual effect. You can also place them in cupcake liners for easy serving. Adding garnishes like crushed nuts or a sprinkle of sea salt can enhance the look and taste. Enjoy being creative with your presentation! {{image_2}} You can swap dark chocolate for milk or white chocolate. Each type brings a unique flavor. Milk chocolate adds sweetness, while white chocolate offers a creamy taste. Mixing different chocolates creates a fun layered look. Imagine dark chocolate on the bottom, with white chocolate drizzled on top. This gives a beautiful contrast and extra flavor. You can dress up your strawberries with fun toppings. Try using chopped nuts, colorful sprinkles, or crushed cookies. These add a nice crunch and look great. You can also use flavored chocolates. For example, try mint or orange chocolate for a twist. This lets you customize your treat for any taste. Chocolate-dipped strawberries are perfect for many events. They shine at birthday parties, weddings, or anniversaries. You can also serve them at themed parties. They make great gifts too! Package them nicely in a box for a sweet surprise. No matter the event, these treats will impress your guests. For the full recipe and more fun ideas, check the Full Recipe section. To keep your chocolate-dipped strawberries fresh, store them in a single layer. Use an airtight container to prevent moisture from getting in. Make sure not to stack them; this can cause the chocolate to stick. Avoid placing them in the fridge if you can. The cold air can create condensation. If you must refrigerate, place a paper towel in the container. This will help absorb any extra moisture. Chocolate-covered strawberries stay fresh for about 1 to 2 days. After that, they lose their crispness and flavor. Look for signs that indicate they are no longer good. If the chocolate appears dull or the strawberries start to turn mushy, it's time to toss them. If you need to reheat chocolate for touch-ups, do so carefully. Use a microwave in short bursts of 10-15 seconds. Stir the chocolate between bursts to keep it smooth. You can also use a double boiler. This method helps control the heat and prevents the chocolate from seizing. Avoid getting water in the chocolate, as this can ruin your mix. Chocolate-covered strawberries last about 1 to 2 days in the fridge. For best taste, eat them fresh. Store them in a single layer, on parchment paper, inside an airtight container. Avoid stacking them to keep the chocolate intact. If you see any moisture or mold, throw them away. Using frozen strawberries is not a great idea. They lose their firmness when thawed. This change affects the texture and taste. The chocolate may not stick well to the wet surface. If you want to make this treat, always use fresh strawberries for the best results. I recommend dark chocolate with at least 70% cocoa for rich flavor. You can also use milk chocolate if you prefer a sweeter taste. White chocolate is great for drizzling on top. Each type adds a unique touch to your strawberries. Choose the chocolate that fits your mood and taste! In this post, we explored the art of making chocolate-dipped strawberries. We covered key ingredients, like fresh strawberries and dark chocolate. The step-by-step guide showed how to melt chocolate and dip strawberries properly. Tips helped us avoid common mistakes. We also looked at fun variations and ways to store them. Chocolate-dipped strawberries are simple yet elegant treats. They elevate any occasion and can be tailored to your taste. Enjoy creating these delicious delights and share them with everyone.

Chocolate Dipped Strawberries Easy and Delicious Treat

If you’re looking for a quick and tasty dessert, you’ve come to the right place! Chocolate dipped strawberries are not

- 1 large head of cauliflower, cut into bite-size florets - 1 cup all-purpose flour - 1 cup unsweetened almond milk (or regular milk) - 1 teaspoon garlic powder - 1 teaspoon onion powder - 1 teaspoon smoked paprika - 1/2 teaspoon salt - 1/4 teaspoon black pepper These main ingredients form the base of your Buffalo Cauliflower Bites. The cauliflower gives a great texture and absorbs flavors well. The flour and almond milk create a nice batter that sticks to the florets. The spices add a kick, making each bite tasty. - 1 cup buffalo sauce (store-bought or homemade) - 1 tablespoon melted vegan butter (optional, for extra richness) - Fresh parsley, chopped (for garnish) - Celery sticks (for serving) - Ranch or blue cheese dressing (for dipping) Buffalo sauce is key to this dish. You can choose store-bought for convenience or make your own for a personal touch. Adding vegan butter gives the sauce a rich flavor. Garnishing with fresh parsley brightens the dish. Celery sticks and a creamy dip make for a complete snack. For the full recipe, check out the [Full Recipe]. 1. First, preheat your oven to 450°F (230°C). This high heat makes the bites crispy. 2. Line a baking sheet with parchment paper. This keeps the bites from sticking. 3. In a large bowl, mix together the flour, almond milk, garlic powder, onion powder, smoked paprika, salt, and black pepper. Whisk until smooth. This batter should be thick enough to coat the cauliflower. 1. Take each cauliflower floret and dip it into the batter. Make sure it is fully coated. 2. Let any extra batter drip off before placing it on the baking sheet. This helps them bake better. 3. Arrange the florets in a single layer. Bake for about 20-25 minutes. Flip them halfway through to get an even crisp. Look for a golden brown color to know they’re ready. 1. While the florets bake, prepare your buffalo sauce mixture. If you like, mix the buffalo sauce with melted vegan butter. This adds richness and flavor. 2. Once the cauliflower is crispy, take it out of the oven. Carefully toss the hot bites in the buffalo sauce until evenly coated. 3. Return the coated florets to the baking sheet. Bake for an additional 10-15 minutes. This final baking makes them even crispier. 4. After that, let them cool for a minute. Garnish with fresh parsley for a nice touch. Enjoy your savory buffalo cauliflower bites! For the full recipe, refer to the detailed instructions above. To get that perfect crunch, you need the right baking temperature. I recommend preheating your oven to 450°F (230°C). This high heat helps the batter crisp up nicely. Another key tip is flipping the florets halfway through baking. This ensures even cooking and crispiness on all sides. You can adjust the spice levels in your buffalo sauce to suit your taste. If you love heat, add more hot sauce. For a milder flavor, use less. You can also add herbs or spices to boost the taste. Try garlic powder, smoked paprika, or even a pinch of cayenne for extra kick. The best dips to pair with Buffalo Cauliflower Bites are ranch or blue cheese dressing. These creamy dips balance the heat of the sauce well. For presentation, serve the bites on a platter with celery sticks. A sprinkle of chopped parsley adds a nice touch and fresh color. This makes your dish look even more inviting! {{image_2}} You can choose healthier ways to enjoy Buffalo cauliflower bites. One way is to bake them instead of frying. Baking uses less oil and makes them crisp and light. Just follow the full recipe, and you will get that crunchy texture without the extra fat. If you need gluten-free bites, use gluten-free flour. Almond flour or chickpea flour works well. Replace all-purpose flour with these options to keep the taste yum while catering to dietary needs. To mix things up, try different sauces. BBQ sauce adds a sweet twist, while teriyaki gives a savory touch. You can even switch the buffalo sauce for something milder if you want less heat. Adding cheese or nutritional yeast can boost flavor. Sprinkle some sharp cheddar or a vegan cheese on top before baking. The cheese melts beautifully, making each bite even tastier. Garnishing can change your dish. Fresh herbs like cilantro or chives can add a nice touch. If you want a crunch, try adding sliced radishes or green onions on top. Serving styles can enhance the experience too. For game night, place the bites on a large platter and add celery sticks for dipping. For a fancy touch, arrange them on a nice plate with sauces on the side. This way, guests can have fun dipping each bite! To keep your Buffalo Cauliflower Bites fresh, store them in an airtight container. Place a paper towel at the bottom to absorb moisture. This helps prevent sogginess. Refrigerate them for up to three days. When you’re ready to enjoy them again, use these tips to reheat: - Preheat your oven to 350°F (175°C). - Spread the bites on a baking sheet. - Bake for around 10-15 minutes until crispy. This method keeps the outside crunchy and the inside warm. Avoid using the microwave, as it can make them soft. If you have extra Buffalo Cauliflower Bites, freezing is a great choice. Here’s how to freeze them properly: - Let the bites cool completely after baking. - Place them in a single layer on a baking sheet. - Freeze until solid, then transfer to a freezer bag. This method helps them keep their shape. For thawing and reheating, follow these steps: - Take the bites out of the freezer and let them sit for 10 minutes at room temperature. - Preheat your oven to 375°F (190°C). - Bake for 15-20 minutes until heated through and crispy. This way, you can enjoy your savory snack anytime! For the full recipe, check out the recipe section. Buffalo Cauliflower Bites can last about 3-5 days in the fridge. Store them in an airtight container. This keeps them fresh and tasty for your next snack. Yes, you can make Buffalo Cauliflower Bites ahead of time! Prepare them fully, then store them in the fridge. When you are ready to eat, reheat them in the oven at 350°F. This helps keep them crispy. To make Buffalo Cauliflower Bites gluten-free, simply use gluten-free flour. This swap works well in the batter. Check your buffalo sauce too; some brands may have gluten. Buffalo Cauliflower Bites are simple and fun to make. You learned about the main and extra ingredients, along with step-by-step instructions. I shared tips for perfect crunch and flavor, plus variations to keep it exciting. Don’t forget about storage ways for leftovers! These bites are tasty for snacks or parties. You now have everything to whip up your own Buffalo Cauliflower Bites. Enjoy exploring flavors and impressing your friends!

Savory Buffalo Cauliflower Bites Easy Snack Recipe

Are you ready to spice up your snack game? These savory Buffalo Cauliflower Bites are your answer! They pack a

Older posts
Newer posts
← Previous Page1 … Page61 Page62 Page63 … Page67 Next →

dsad

© 2025 My Saved Recipe • Built with GeneratePress

Our Policies

  • Copyright Policy
  • Cookie Policy
  • GDPR Policy
  • Privacy Policy
  • Disclaimer
  • Terms Of Use

More Information

  • Home
  • About
  • Contact
  • Appetizers
  • Dessert
  • Dinner
  • Drinks
©2025, My Saved Recipe About Back To Top