Skip to content
DisclaimerTerms Of UseGDPR PolicyCookie Policy

My Saved Recipe

  • Home
  • Drinks
  • Appetizers
  • Dinner
  • Dessert
  • About
  • Contact
  • Privacy Policy
DisclaimerTerms Of UseGDPR PolicyCookie Policy

Savannah

- 1 cup frozen strawberries - 1 ripe banana, sliced - 1/2 cup Greek yogurt or plant-based yogurt - 1/2 cup almond milk or any milk of your choice - 1 tablespoon honey or maple syrup - 1 tablespoon chia seeds - Granola - Sliced fresh strawberries - Banana slices - Shredded coconut - Nuts and edible flowers for garnish The main ingredients create the base of your smoothie bowl. Frozen strawberries add a cold touch and natural sweetness. The ripe banana gives creaminess and a sweet flavor. Yogurt adds protein and a nice tang. Almond milk makes it blend easily and keeps it light. If you like a bit of sweetness, you can add honey or maple syrup. Chia seeds not only boost nutrition but also add a nice texture. For toppings, you can get creative. Granola adds crunch, while fresh fruit makes it look pretty. Coconut gives a tropical feel, and nuts add a nice bite. Edible flowers can make your dish stand out. For the full recipe, check the section above! - Combine main ingredients in a blender. - Add 1 cup of frozen strawberries, 1 sliced banana, 1/2 cup Greek yogurt, and 1/2 cup almond milk. - If you want, add 1 tablespoon of honey or maple syrup and 1 tablespoon of chia seeds. - Blend until smooth and creamy. Make sure to stop and scrape down the sides if needed. - Taste your smoothie mixture. - If it's not sweet enough, add more honey or maple syrup. Blend again to mix. - Pour your smoothie into a bowl. - Artfully arrange your toppings on top. Use granola, fresh fruit slices, and shredded coconut. - For a special touch, sprinkle chia seeds and add edible flowers. Serve with a spoon. This method gives you a tasty and beautiful Strawberry Banana Smoothie Bowl. Enjoy your creation! For more detailed steps, check the Full Recipe. When making your smoothie bowl, start with room temperature ingredients. If you use frozen fruit, you can skip this step. Room temperature items blend better and help create a smooth texture. Make sure to blend on high speed for a creamy finish. If needed, stop to scrape down the sides of the blender to mix well. For a stunning look, use a shallow bowl. This allows your toppings to shine. After pouring the smoothie into the bowl, arrange your toppings in fun patterns. You can sprinkle granola, fresh fruit slices, and nuts to add color. Drizzling honey or syrup on top gives it a nice shine. Feel free to swap out ingredients. You can use any dairy or plant-based yogurt you like. This allows you to cater to your tastes or dietary needs. For the milk, experiment with almond, oat, or coconut milk. Each will give your smoothie bowl a unique flavor. {{image_2}} You can change up your smoothie bowl by adding spinach. This makes a green smoothie bowl that is full of nutrients. You can also mix in other berries like blueberries or raspberries for extra flavor. They add a nice burst of sweetness and color. Adding spices can really change the flavor. Try including cinnamon for warmth or a bit of vanilla extract for sweetness. You can also use different nut butters like almond or peanut butter. This will add creaminess and richness to your smoothie bowl. Toppings can make your bowl more exciting. Use seasonal fruits that are fresh and tasty. For example, in summer, you can add peaches or cherries. In fall, consider nuts or dried fruits. This keeps your smoothie bowl fun and interesting throughout the year. After you enjoy your Strawberry Banana Smoothie Bowl, store any leftovers in an airtight container. This keeps it fresh for up to 24 hours in the fridge. I recommend eating it soon for the best flavor and texture. If you wait too long, it may lose its creamy goodness. Want to save some smoothie for later? You can freeze the leftovers! Pour your smoothie into popsicle molds for a fun treat. These smoothie popsicles are perfect for warm days. Just blend, pour, and freeze. When you're ready, pop them out and enjoy a tasty, healthy snack! To make your smoothie bowl thicker, adjust your ingredient ratios. Here are some tips: - Use less almond milk or any milk you choose. - Add more frozen strawberries and banana slices. - Include a bit more Greek yogurt. These changes will help create a creamy texture. You can also add chia seeds. They soak up liquid and add thickness. Yes, you can use fresh fruits. However, using frozen fruit gives a thicker and colder smoothie bowl. Fresh fruit may result in a thinner mix. If you want to use fresh fruit, add ice cubes while blending. This will keep it cold and help thicken the mixture. Here are some great nutritious toppings to consider: - Granola for crunch - Sliced fresh strawberries for extra flavor - Banana slices for sweetness - Shredded coconut for texture - Nuts for healthy fats - Edible flowers for a beautiful touch These toppings not only add flavor but also nutrients, making your bowl even better. Enjoy exploring different combinations! This post showed how to make a delicious smoothie bowl. You learned the key ingredients, like frozen strawberries and bananas, and optional add-ins like honey or chia seeds. We covered easy steps for blending and serving, plus tips on storage. Remember, you can customize your bowl with various fruits and flavors. Try different toppings to make it your own. Enjoy creating your tasty and healthy treat that suits your taste!

Strawberry Banana Smoothie Bowl Tasty and Simple Recipe

Looking for a quick and tasty breakfast? You’ll love this Strawberry Banana Smoothie Bowl! It’s simple to make and packed

- 12 oz spaghetti or linguine - 2 ripe avocados, pitted and flesh scooped out - 2 cloves garlic, minced - 2 tablespoons fresh lemon juice - 1/4 cup fresh basil leaves, plus extra for garnish - 1/4 cup extra virgin olive oil - 1/4 cup grated Parmesan cheese (or nutritional yeast for vegan option) - Salt and pepper to taste - 1/4 teaspoon red pepper flakes (optional) - Cherry tomatoes, halved, for garnish When it comes to making creamy avocado pasta, the ingredients are simple, fresh, and full of flavor. The star of this dish is the avocado. It gives the pasta a rich, creamy texture without any heavy cream. You will need ripe avocados for the best taste. They should feel soft to the touch when gently squeezed. The garlic adds a punch of flavor. I like to use fresh garlic, but you can use garlic powder if that’s what you have. Fresh lemon juice brightens the dish and balances the creaminess. Basil leaves give it a fresh, herbal note. The olive oil enhances the creamy texture and adds healthy fats. Parmesan cheese adds a savory touch. If you're vegan, nutritional yeast is a great substitute. You can adjust the salt and pepper to your liking. Red pepper flakes are optional, but they add a nice heat if you like spicy food. Cherry tomatoes make a colorful garnish and add a sweet burst of flavor. You can find the full recipe for this delicious creamy avocado pasta [here](#). - Step 1: Boil water and salt Fill a large pot with water. Add a good amount of salt. Bring it to a boil. - Step 2: Cook spaghetti or linguine to al dente Add 12 oz of spaghetti or linguine. Cook it until it's al dente, about 8 to 10 minutes. Reserve 1 cup of pasta water, then drain the pasta. - Step 3: Blend avocado, garlic, lemon juice, and basil In your food processor, add 2 ripe avocados, 2 cloves of minced garlic, 2 tablespoons of fresh lemon juice, and 1/4 cup of fresh basil leaves. Blend until smooth. - Step 4: Add olive oil and Parmesan cheese, blend until smooth Pour in 1/4 cup of extra virgin olive oil and 1/4 cup of grated Parmesan cheese. Blend again until the sauce is creamy. If needed, add some reserved pasta water to make it smoother. - Step 5: Toss pasta with sauce In a large bowl, mix the pasta with the avocado sauce. Make sure all the pasta is well coated. - Step 6: Adjust seasoning and garnish Taste the dish. Add salt and pepper to your liking. For a bit of heat, sprinkle in 1/4 teaspoon of red pepper flakes. Serve the pasta with halved cherry tomatoes and extra basil leaves on top. For the full recipe, check out the details above. Enjoy your creamy avocado pasta! To get the right sauce consistency, blend the avocados until smooth. If it feels thick, add a bit of reserved pasta water. This will help loosen the sauce. For a dairy-free option, replace Parmesan cheese with nutritional yeast. It gives a cheesy flavor without any dairy. You can also add a bit more lemon juice for extra zing. To keep your pasta al dente, cook it just until tender. Taste a piece before draining. It should have a slight bite to it. Always reserve a cup of pasta water before draining. This starchy water helps bind the sauce to the pasta later. You can use it to adjust the sauce's thickness as needed. Pair your creamy avocado pasta with grilled chicken or shrimp for added protein. You can also toss in seasonal veggies like spinach or cherry tomatoes for extra color and nutrition. For a beautiful plate, twirl the pasta with a fork and place it in the center. Garnish with extra basil leaves and halved cherry tomatoes for a fresh look. This makes the dish not only tasty but also visually appealing. {{image_2}} You can easily make creamy avocado pasta your own. Want more protein? Add grilled chicken or shrimp. Both options taste great with the creamy sauce. If you prefer veggies, try mixing in seasonal vegetables. Fresh spinach, zucchini, or cherry tomatoes work well. Boost the flavor of your dish with spices or herbs. A pinch of garlic powder or a sprinkle of paprika can add zest. Fresh herbs like parsley or cilantro can brighten the dish. You can also switch up your cheese. Try feta or goat cheese for a different taste. Feel free to get creative with sauces. A creamy Alfredo or pesto sauce can be a fun twist. You can also mix the avocado sauce with classic marinara for a unique blend. Experiment and find what you love! Check out the Full Recipe for more ideas. To store creamy avocado pasta, place it in an airtight container. This keeps moisture in and prevents the pasta from drying out. You can also cover the container with plastic wrap if you don’t have a lid. Try to eat leftovers within two days for the best taste and texture. When reheating, do so gently on the stove or in the microwave. Add a splash of olive oil or a bit of reserved pasta water. This helps restore the creamy texture. Stir well to mix the sauce back into the pasta. You can also add fresh basil or cherry tomatoes to refresh the dish. Can you freeze creamy avocado pasta? It’s best not to freeze it. The avocado may change texture when thawed. Instead, you can freeze the sauce and pasta separately. For the sauce, place it in a freezer-safe bag or container. For the pasta, let it cool, then store in a separate container. When ready to use, thaw the sauce and reheat the pasta. This way, you keep the best flavors and textures. Creamy avocado pasta can last about 2 to 3 days in the fridge. Store it in an airtight container to keep it fresh. If you notice any browning on the avocado, that's a sign it’s starting to spoil. A strong or sour smell also means you should toss it. Yes, you can make creamy avocado pasta ahead of time! For best results, make the sauce and cook the pasta separately. When you're ready to eat, mix them together. This keeps the pasta from becoming mushy. You can warm it up gently on the stove. Add a splash of water if needed to loosen the sauce. If you want to switch things up, you can use zucchini noodles or gluten-free pasta. Zucchini noodles are light and fresh. They add a nice crunch. Gluten-free pasta works well for those with dietary needs. Both options keep the dish tasty and satisfying. In this blog post, we covered how to make creamy avocado pasta. We discussed the simple ingredients, step-by-step instructions, and helpful tips. You can customize this dish with add-ins or different flavors. Don't forget the storage tips for leftovers. Making this meal is easy and fun. It’s tasty, healthy, and great for any occasion. Try it out, and enjoy your creamy avocado pasta today!

Creamy Avocado Pasta Quick and Easy Recipe Guide

If you love quick and tasty meals, this creamy avocado pasta is for you! Made with fresh avocados, garlic, and

To make no-bake chocolate oatmeal cookies, you need simple, easy-to-find ingredients. Here’s what you will need: - 1 cup rolled oats - 1/2 cup natural peanut butter - 1/2 cup honey or maple syrup - 1/4 cup unsweetened cocoa powder - 1 teaspoon vanilla extract - 1/2 teaspoon salt - 1/2 cup shredded coconut (optional) - 1/2 cup mini chocolate chips Each ingredient plays a key role in the flavor and texture of the cookies. Rolled oats give the cookies a chewy base. Natural peanut butter adds creaminess and protein. Honey or maple syrup gives them sweetness and binds everything together. Cocoa powder brings rich chocolate flavor. Vanilla extract adds warmth, while salt balances the sweetness. You can choose to add shredded coconut for extra texture and flavor. Lastly, mini chocolate chips enhance the chocolate experience in every bite. These ingredients make a delicious treat that you can whip up quickly. You can find the full recipe at the start of this article. To start, grab a medium saucepan. Add the natural peanut butter, honey (or maple syrup), unsweetened cocoa powder, and salt. Place the saucepan over low heat. Stir the mixture often. Keep stirring until it blends well and becomes smooth. This should take about 2 to 3 minutes. Next, remove the saucepan from the heat. Now, add the vanilla extract and rolled oats. Mix everything together until you see no dry oats. If you want more flavor, fold in shredded coconut and mini chocolate chips. Make sure they spread evenly in the dough. Now, take a baking sheet and line it with parchment paper. Use a tablespoon or a cookie scoop to drop the mixture onto the sheet. Shape them into cookies as you go. Once all the dough is used, place the cookies in the fridge. Let them chill for at least 30 minutes to set. After chilling, enjoy your no-bake chocolate oatmeal cookies! For a full recipe, check the earlier section. To get the perfect cookie, the mixture must not be too runny or thick. If it is too runny, your cookies will spread too much. If it is too thick, they will not hold their shape. Start by mixing the peanut butter, honey, cocoa powder, and salt well. Heat it just enough to blend smoothly. After adding the oats, check the texture. It should be sticky but formable. If it feels dry, add a touch more honey. You can change the flavor and texture of your cookies easily. Try different nut butters like almond or cashew for a unique taste. For sweeteners, maple syrup or agave can work well too. Want more crunch? Add chopped nuts or seeds. You can also mix in dried fruits or spices for added flavor. This way, every batch can be different and fun! These cookies are best enjoyed chilled after setting. Serve them on a nice plate for a special touch. Pair them with a glass of milk or your favorite plant-based drink. They also make a great snack for kids or a sweet treat for parties. You can even pack them for lunch! For the full recipe, check out the detailed steps I provided earlier. {{image_2}} You can change the flavor of your no-bake cookies by switching up the nut butter. Almond butter adds a rich, nutty taste. Sunflower seed butter gives a sweet and mild flavor. Both options work great in this recipe. Just substitute equal amounts for the peanut butter. You can also try cashew butter for a creamy twist. If you want a healthier cookie, consider using agave syrup. It has a lower glycemic index than honey. You can also use maple syrup for a different flavor. These sweeteners keep the cookies moist while adding a hint of sweetness. You can even try dates or mashed bananas for a more natural sweet treat. Spice up your cookies for the holidays. Add cinnamon or nutmeg for a warm flavor. For a festive touch, use peppermint extract instead of vanilla during the winter months. You could also mix in dried fruit, like cranberries, for a burst of color and taste. These variations make your cookies fun and perfect for any season. To keep your no-bake chocolate oatmeal cookies fresh, store them in an airtight container. This helps prevent them from drying out or absorbing other smells from the fridge. You can use a glass or plastic container with a tight lid. If you want to keep them even longer, you can freeze the cookies. Just wrap them in plastic wrap before placing them in a freezer-safe bag. These cookies stay fresh for about one week in the fridge. If you freeze them, they can last for up to three months. Make sure to label your container with the date you made them. This way, you can enjoy knowing when they were made. After refrigeration, you can serve these cookies cold or at room temperature. They taste great right from the fridge. If you want them a bit softer, let them sit out for a few minutes before eating. You can also warm them slightly in the microwave for about 10 seconds. This will make the chocolate chips melt a little, giving a nice gooey texture. No-bake chocolate oatmeal cookies can last up to one week in the fridge. The cool temperature helps keep them fresh. If you freeze them, they can last up to three months. Just make sure to store them in an airtight container. This way, they won't get freezer burn. Yes, you can substitute peanut butter with almond butter or sunflower seed butter. Both options work well in this recipe. Just keep in mind that the flavor will change a bit. If you have nut allergies, sunflower seed butter is a great choice. It has a nice taste and texture too. You can use dark chocolate, milk chocolate, or even white chocolate chips. Each type will give a different flavor. You can also melt chocolate and drizzle it on top for a fun twist. Feel free to mix and match as you like! To make these cookies vegan, use maple syrup instead of honey. Also, choose dairy-free chocolate chips. Both changes will keep your cookies tasty and plant-based. Just follow the same steps, and you will have a delicious vegan treat. For the Full Recipe, check out the ingredients and instructions listed above! Making no-bake chocolate oatmeal cookies is simple and fun. You learned about the key ingredients and how to mix them perfectly. I shared tips to customize your cookies to match your taste. You can also try different flavors or healthy swaps. Storing them right helps keep them fresh longer. Now it's your turn to try this easy recipe. Enjoy the sweet and hearty treats!

No-Bake Chocolate Oatmeal Cookies Simple Recipe

Craving a fast, tasty treat? I’m here to share my simple no-bake chocolate oatmeal cookies recipe! With just a few

To make this recipe, gather these items: - 4 bone-in, skin-on chicken thighs - 1/4 cup honey - 1/4 cup Dijon mustard - 2 tablespoons soy sauce (or tamari for gluten-free) - 1 tablespoon apple cider vinegar - 2 cloves garlic, minced - 1 teaspoon fresh thyme leaves (or 1/2 teaspoon dried) - 1 teaspoon paprika - Salt and pepper to taste - 1 tablespoon olive oil - Fresh parsley, chopped (for garnish) If you need to swap ingredients, here are some ideas: - Use maple syrup instead of honey for a different sweetness. - Switch Dijon mustard with yellow mustard for a milder taste. - If you don't have apple cider vinegar, try white wine vinegar or lemon juice. - Fresh thyme can be replaced with rosemary or oregano. - Use chicken breasts if you prefer less fat. To enhance the flavor of your chicken thighs, consider these seasonings: - Add a pinch of cayenne pepper for heat. - Try using smoked paprika for a smoky flavor. - Include some fresh lemon zest for brightness. - Garlic powder can boost the garlic flavor if you love it. This recipe is flexible, so feel free to mix and match based on what you have at home. For a full, detailed recipe, check out the Full Recipe to enjoy these savory honey mustard chicken thighs. To start, gather your chicken thighs. I prefer bone-in, skin-on thighs for the best flavor. Rinse them under cold water and pat them dry with paper towels. Drying helps the skin crisp up nicely. You want to make sure there’s no excess water. This step is key for great texture later. Next, we prepare the marinade. In a bowl, combine honey, Dijon mustard, soy sauce, apple cider vinegar, minced garlic, thyme, paprika, salt, and pepper. Whisk them until they blend well. This mixture is both sweet and tangy, giving the chicken great depth. Place the chicken in a large zip-top bag or a shallow dish. Pour the marinade over the chicken, ensuring every piece gets coated. Seal the bag or cover the dish. Let it sit in the fridge for at least 30 minutes. If you have time, marinate it for up to 2 hours. This extra time allows the flavors to infuse deeply. After marinating, it’s time to cook. Preheat your oven to 400°F (200°C). In an oven-safe skillet, heat olive oil over medium-high heat. Take the chicken out of the marinade, letting the extra drip off. Place the thighs skin-side down in the skillet. Sear them for about 5-7 minutes until the skin is golden brown and crispy. This step adds flavor and texture. Once done, flip the thighs over. Pour the leftover marinade over the chicken and place the skillet in the oven. Bake for 25-30 minutes or until the internal temperature reaches 165°F (74°C). The chicken should be juicy, and the skin should remain crispy. Once finished, let the chicken rest for about 5 minutes before serving. Garnish with fresh parsley. For the full recipe, check out the details above. To get that perfect crispy skin, you need to start with dry chicken. Pat the thighs dry with paper towels. This helps the skin crisp up nicely. When cooking, always sear the chicken skin-side down first. Use a hot skillet with olive oil. Let it cook for about 5-7 minutes without moving it. This will create a beautiful golden crust. You can also use a high oven temperature for roasting. This keeps the skin crispy while cooking through. Marinating adds flavor and moisture to your chicken. Use a mix of honey, Dijon mustard, and soy sauce to create a balanced taste. Make sure to marinate for at least 30 minutes. For more flavor, let it sit for up to 2 hours. You can use a zip-top bag for easy marinating. Just seal it tight and give it a good shake. Make sure every piece of chicken gets coated in the marinade. To ensure your chicken cooks evenly, use a meat thermometer. The internal temperature should reach 165°F (74°C). This guarantees it's safe to eat. When baking, let the chicken rest for about 5 minutes before serving. This helps the juices settle back into the meat. If you follow these tips, your chicken thighs will turn out juicy and flavorful every time. For a detailed recipe, check out the Full Recipe. {{image_2}} You can add fresh herbs to boost the flavor. Try rosemary, sage, or oregano. Simply chop the herbs and mix them into the marinade. The herbs add a nice touch and make the chicken extra tasty. I love using fresh thyme, as it pairs well with honey mustard. You can also use dried herbs if that’s what you have on hand. For a kick, add some heat to your honey mustard chicken. You can stir in red pepper flakes or cayenne pepper. Just a pinch will do! This adds a warm spice that balances the sweetness of honey. If you want more heat, add a dash of hot sauce to the marinade. This variation is perfect for those who enjoy bold flavors! You don’t have to stick with thighs. You can use drumsticks or chicken breasts instead. Drumsticks will have a great flavor, and they stay juicy. If you prefer chicken breasts, just make sure not to overcook them. They can dry out quickly. No matter the cut, the honey mustard marinade works well, so feel free to mix it up! For a complete recipe, check out the [Full Recipe]. To keep your honey mustard chicken thighs fresh, let them cool first. Place the chicken in an airtight container. You can store it in the fridge for up to three days. If you want to keep it longer, consider freezing. When it's time to enjoy your leftovers, reheat them properly. You can use the oven or the microwave. For the oven, set it to 350°F (175°C). Place the chicken in a dish and cover it with foil. Heat for about 15-20 minutes. In the microwave, place the chicken on a plate, cover it, and heat for 2-3 minutes. Check that it’s hot all the way through. Freezing is a great way to save your honey mustard chicken thighs. Wrap each thigh in plastic wrap, then place them in a freezer bag. Make sure to squeeze out as much air as possible. You can freeze them for up to three months. To thaw, place the chicken in the fridge overnight. This keeps the flavor and texture intact. For the full recipe, check out the earlier section. Enjoy your cooking! Yes, you can use boneless chicken thighs. They cook faster than bone-in thighs. Adjust the cooking time to about 20-25 minutes. Make sure to check the internal temperature reaches 165°F (74°C). This will ensure the chicken is fully cooked and safe to eat. I love serving these chicken thighs with roasted vegetables. You can use carrots, broccoli, or Brussels sprouts. A side of fluffy rice or quinoa pairs well. You can also serve a fresh salad with a light vinaigrette. These sides balance the sweet and tangy flavors of the chicken. You can store leftovers in the fridge for up to 3 days. Keep the chicken in an airtight container. Make sure it cools to room temperature before sealing. This way, the chicken stays moist and tasty for your next meal. You can also reheat it in the oven or microwave. Remember to check the temperature before eating. For the full recipe, check out the details above! In this post, we covered how to make honey mustard chicken thighs. We listed the ingredients, shared substitution tips, and suggested seasonings. You learned how to prepare, marinate, and cook the chicken perfectly. We shared tricks for crispy skin and storage tips for leftovers. Now you can enjoy delicious variations, like adding herbs or spice. Use these steps to impress at your next meal. Follow this guide for tasty results every time. Enjoy cooking!

Savory Honey Mustard Chicken Thighs Easy Recipe

Are you ready to delight your taste buds with a sweet and tangy twist? This easy Honey Mustard Chicken Thighs

To make these tasty Buffalo Cauliflower Bites, you need the following items: - 1 medium head of cauliflower, cut into bite-sized florets - 1 cup all-purpose flour - 1 teaspoon garlic powder - 1 teaspoon onion powder - 1 teaspoon smoked paprika - ½ teaspoon salt - ½ teaspoon black pepper - 1 cup water (or plant-based milk for extra creaminess) - 1 cup buffalo sauce (store-bought or homemade) - 2 tablespoons olive oil - Fresh parsley, chopped (for garnish) If you want to tweak the recipe, you can use gluten-free flour instead of all-purpose flour. This makes it safe for those with gluten issues. For a vegan version, use plant-based milk to mix the batter. Make sure your buffalo sauce is vegan, as not all brands are. These small changes let anyone enjoy the dish! Using fresh cauliflower gives you a better taste and texture. It stays crispier when baked. Fresh cauliflower also has more nutrients. Frozen cauliflower can save time, but it often contains added water. This extra moisture can lead to soggy bites. If you go with frozen, make sure to drain and dry it well before cooking. Choose fresh for the best results! To make buffalo cauliflower bites, start by preheating your oven to 450°F (230°C). Line a baking sheet with parchment paper. In a big bowl, mix the flour, garlic powder, onion powder, smoked paprika, salt, and black pepper. Gradually add water or plant-based milk. Stir until the batter is smooth. Next, cut the cauliflower into bite-sized florets. Dip each floret into the batter. Make sure each piece is well coated. Place the battered florets on the prepared baking sheet. Bake them for 20 minutes until they are golden brown and crispy. While the cauliflower bakes, mix the buffalo sauce with olive oil in another bowl. After 20 minutes, take the cauliflower out of the oven. Drizzle or toss them in the buffalo sauce mixture. Coat them evenly. Return the bites to the oven and bake for 10-15 more minutes. They should be crispy and the sauce should set. Finally, take them out of the oven and let them cool for a couple of minutes. Garnish with chopped parsley before serving. You can find the full recipe for these yummy bites above. For crispy buffalo cauliflower bites, the batter must be thick enough to cling to the florets. Use cold water or plant-based milk for the batter. This helps the bites crisp up nicely. Bake them on parchment paper. This keeps them from sticking and allows better airflow. Flip the bites halfway through baking for even cooking. Adding a little olive oil to the batter can also help with crispiness. For a crunchier texture, you can broil them for a minute after baking. You need a few items for this recipe. A mixing bowl makes it easy to combine the batter ingredients. A whisk helps mix everything well. Use a baking sheet lined with parchment paper for easy cleanup and even baking. A spatula is useful for flipping the cauliflower bites. If you want to measure ingredients accurately, grab measuring cups and spoons. An oven mitt is a must for safely handling hot pans. With these tools, you can make your buffalo cauliflower bites with ease! To make the batter just right, start with the right amount of flour. Use one cup of all-purpose flour. Add water slowly. Aim for a smooth, thick batter. It should coat the cauliflower well. If it’s too thin, add more flour. If it’s too thick, add more water. The right consistency helps create a crispy crust. You can boost the flavor with spices in the batter. Try adding a pinch of cayenne for heat. You can also mix in some Italian herbs for a fresh taste. After baking, top the bites with chopped green onions. A sprinkle of nutritional yeast adds a cheesy flavor too. For extra crunch, sprinkle some toasted sesame seeds on top. Avoid overcrowding the baking sheet. Give each cauliflower bite space to crisp up. If they touch, they will steam instead of bake. Also, don’t skip the olive oil in the buffalo sauce. It helps the sauce stick and adds flavor. Lastly, check on them while baking. Ovens can vary, and you want them golden, not burnt. For the full recipe, check out the detailed instructions above! {{image_2}} You can switch up the flavor by using different sauces. Barbecue sauce gives a sweet twist. Garlic parmesan adds a creamy, cheesy taste. Both options are easy to make. Just toss your cooked cauliflower bites in your sauce of choice. Each sauce brings its own unique flair to the dish. You can add more veggies to your Buffalo cauliflower bites. Broccoli florets work well with the sauce. Bell peppers add color and crunch. You could even mix in some carrots for a sweet touch. Just make sure to cut all vegetables to a similar size for even cooking. The more, the merrier when it comes to flavor! Buffalo cauliflower bites are great on their own, but dips enhance the fun. Try ranch or blue cheese dressing for a classic touch. Hummus adds a creamy, healthy option. Pair these bites with celery and carrot sticks for a crunchy side. You can serve them as an appetizer or with a hearty salad. Friends and family will love these flavorful bites. For the full recipe, check out the complete guide! To store leftover Buffalo Cauliflower Bites, let them cool first. Place them in an airtight container. You can keep them in the fridge for up to three days. If you want to keep them longer, consider freezing. For the best taste, reheat your Buffalo Cauliflower Bites in the oven. Preheat your oven to 350°F (175°C). Spread them on a baking sheet. Heat them for about 10 minutes. This helps keep them crispy. You can also use an air fryer for a quick option. To freeze Buffalo Cauliflower Bites, lay them flat on a baking sheet. Freeze them until solid, about one hour. Then, transfer them to a freezer-safe bag. Remove as much air as you can. They can stay in the freezer for up to three months. When you’re ready to eat, bake them directly from the freezer. Adjust cooking time as needed for best results. Check out the Full Recipe for more details! Buffalo Cauliflower Bites can last up to four days in the fridge. Store them in an airtight container. This keeps them fresh and tasty. If you wait too long, they may lose their crispiness. Yes, you can make Buffalo Cauliflower Bites ahead of time. You can prepare the batter and coat the florets. Store them in the fridge for a day before baking. This saves time when you want a quick snack or meal. The best way to reheat Buffalo Cauliflower Bites is in the oven. Preheat your oven to 375°F (190°C). Place the bites on a baking sheet for about 10 minutes. This keeps them crispy and delicious. You can also use an air fryer for a quicker option. Just heat them at 350°F (175°C) for about 5 minutes. Enjoy your bites hot and flavorful! You learned how to make tasty Buffalo Cauliflower Bites. We covered key ingredients, from fresh options to gluten-free and vegan alternatives. I gave you clear steps to cook them crispy and tips for better flavor. You explored fun sauce variations and how to store leftovers too. Remember, this dish is versatile and can fit your taste. Now, enjoy creating your own Buffalo Cauliflower Bites!

Savory Buffalo Cauliflower Bites Easy and Flavorful Dish

Are you ready to spice up your snack game? These Savory Buffalo Cauliflower Bites are easy to make, packed with

To make creamy garlic mashed potatoes, you need a few key ingredients. Here’s what you'll need: - 2 pounds russet potatoes, peeled and diced - 4 cloves garlic, peeled and minced - 1/2 cup unsalted butter - 1 cup heavy cream - 1/2 cup sour cream - Salt and pepper to taste These ingredients create the base for rich, creamy, and flavorful mashed potatoes. The russet potatoes give you that fluffy texture. Garlic adds a nice kick. Butter and cream make everything smooth and rich. To take your mashed potatoes to the next level, consider these garnishes: - 2 tablespoons fresh chives, finely chopped (for garnish) - 1/4 teaspoon smoked paprika (for added flavor) Chives bring a fresh taste and a pop of color. Smoked paprika adds depth and a hint of warmth. Having the right tools makes cooking easier. Here are some tools I recommend for this recipe: - A large pot for boiling the potatoes - A potato masher or electric mixer for mashing - A small saucepan for warming the butter and cream - A colander for draining the potatoes These tools help you create the perfect creamy consistency with ease. Using them will make your cooking process smooth and fun. If you want the full recipe, check out the details above! Start by peeling and dicing 2 pounds of russet potatoes. Cut them into even-sized chunks. This helps them cook evenly. Next, take 4 cloves of garlic, peel them, and mince them finely. The garlic adds a strong flavor to the potatoes. Now, set everything aside while you prepare to cook. Fill a large pot with water and add a pinch of salt. Bring the water to a boil over medium-high heat. Once boiling, carefully add the diced potatoes and minced garlic. Cook for about 15-20 minutes. You want the potatoes to be fork-tender. Test them by poking a piece with a fork. If it goes in easily, they are ready. Drain the potatoes and garlic well in a colander. Return the drained potatoes and garlic to the pot. Use a potato masher or an electric mixer to mash them together. Mash until the potatoes are smooth and creamy. This is where the magic happens! Slowly pour in the warm butter and cream mixture while mixing. Add 1/2 cup of sour cream for extra creaminess. Season with salt, pepper, and a touch of smoked paprika. Mix until everything is well combined. Now, your creamy garlic mashed potatoes are ready to serve! For the full recipe, check the earlier section. To get the creamiest mashed potatoes, use russet potatoes. They have a high starch content, which makes them fluffy. After cooking, be sure to drain the potatoes well. Any extra water can make them watery. When mashing, add warm butter and cream slowly. This helps achieve that velvety feel. Mixing in sour cream also adds a nice tang. One common mistake is overcooking the potatoes. If you cook them too long, they can become mushy. Always check for fork-tenderness around the 15-minute mark. Another mistake is not mashing fully. Make sure there are no lumps. Lastly, avoid cold ingredients. Cold butter or cream can cool down your mash, making it less creamy. You can easily boost the flavor of your mashed potatoes. Try adding roasted garlic for a deeper taste. Fresh herbs like thyme or rosemary can add brightness. For a smoky kick, use smoked paprika. If you want a cheesy twist, mix in shredded cheese like cheddar or parmesan. Experimenting with flavors makes this dish even more fun. For the full recipe, check the earlier section. {{image_2}} You can use other potatoes instead of russet. Yukon Gold potatoes add a buttery flavor. They are creamy and smooth. Red potatoes work too, but they give a chunkier texture. Each potato type changes the taste slightly. Try different kinds to find your favorite! To make your mashed potatoes special, consider adding flavors. A bit of cream cheese gives a rich taste. Roasted garlic can replace fresh garlic for a sweet flavor. You might also mix in some cheese. Parmesan or cheddar can add a cheesy kick. Herbs like rosemary or thyme can also brighten the dish. You can easily make this dish vegan. Use plant-based butter instead of regular butter. Swap heavy cream with coconut cream or almond milk. For sour cream, try cashew cream or a store-bought vegan option. These changes keep the creamy texture while making it plant-based. You won’t miss the dairy at all! Explore these ideas for your own spin on the creamy garlic mashed potatoes. For the full recipe, check out the details above. To store leftover creamy garlic mashed potatoes, wait for them to cool down. Place them in an airtight container. Make sure to cover the container tightly. This helps prevent air from getting in. You can store them in the fridge for up to three days. If you want to keep them longer, try freezing. For long-term storage, freezing is a great option. First, let the mashed potatoes cool completely. Then, scoop them into freezer-safe bags. Flatten the bags to remove air and seal tightly. Label the bags with the date. You can freeze them for up to two months. When you’re ready to eat, simply thaw in the fridge overnight. Reheating creamy garlic mashed potatoes can be simple. You have a few options. The microwave is quick and easy. Place the potatoes in a bowl and cover with a damp paper towel. Heat in short bursts, stirring in between. You can also reheat on the stovetop. Add a splash of cream or butter to keep them creamy. Stir over low heat until warm. Enjoy your creamy garlic mashed potatoes just like new! Yes, you can prepare these mashed potatoes ahead of time. Make the dish up to the point of mashing. Let them cool and store in the fridge. When ready to serve, reheat them gently on the stove or in the microwave. Stir in a little extra cream or butter to restore their creaminess. This way, you save time on busy days while still enjoying a tasty side dish. If you want to skip heavy cream, try using whole milk or half-and-half. You can also use Greek yogurt for a tangy twist. Coconut milk works as a dairy-free option. Just remember that these swaps may change the flavor a bit. Adjust the amount based on your desired creaminess. To avoid gluey mashed potatoes, be gentle when mashing. Over-mixing can cause the starch to release too much, making them sticky. Use a potato masher or a ricer for the best texture. Also, don’t skip drying the potatoes after boiling. This step helps remove extra moisture, leading to a fluffier end result. Keep these tips in mind for perfect creamy garlic mashed potatoes every time! Creamy garlic mashed potatoes are easy to make with the right ingredients and methods. We covered the essential components, from preparation to texture. You learned how to avoid common mistakes and enhance flavor. Remember, you can customize this dish with various potatoes or flavors. Proper storage and reheating keep your leftovers tasty. Enjoy making this dish, and share it with friends. With practice, your mashed potatoes will impress everyone at the table. Happy cooking!

Creamy Garlic Mashed Potatoes Velvety and Simple Dish

Are you ready to elevate your dinner game with a timeless classic? Creamy Garlic Mashed Potatoes are velvety, rich, and

Here’s what you need for crispy garlic Parmesan wings:

Crispy Garlic Parmesan Wings Tasty and Easy Recipe

If you crave a delicious snack, you’ve come to the right place! These Crispy Garlic Parmesan Wings are easy to

- 1 lb beef sirloin or tenderloin, thinly sliced - 2 tablespoons olive oil - 1 medium onion, thinly sliced - 3 cloves garlic, minced - 8 oz mushrooms, sliced (cremini or button) - 1 tablespoon Worcestershire sauce - 1 teaspoon paprika - 1 cup beef broth - 1 cup sour cream - 2 tablespoons all-purpose flour - Salt and pepper to taste - Fresh parsley for garnish - 8 oz egg noodles

Classic Beef Stroganoff Rich and Flavorful Comfort Dish

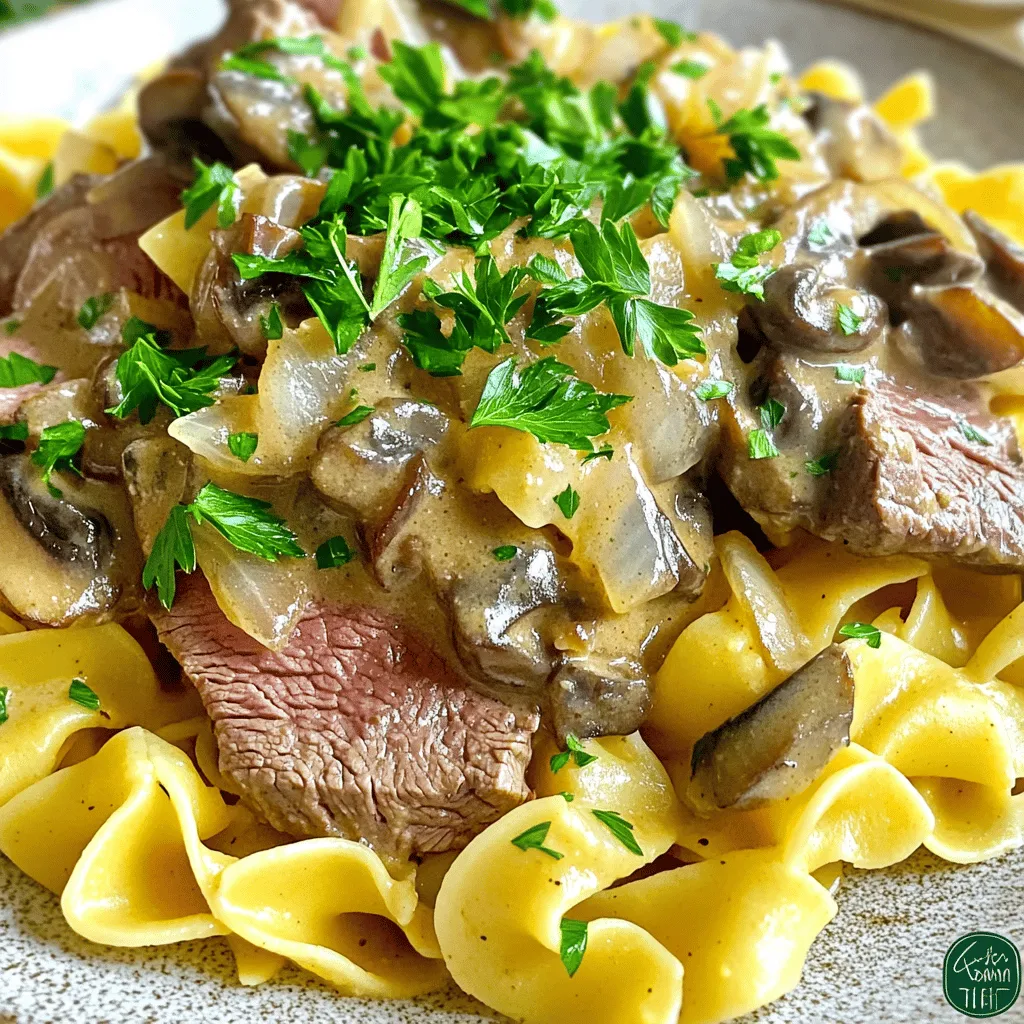
Welcome to the world of Classic Beef Stroganoff! This rich and flavorful dish warms hearts and fills bellies. With tender

- Quinoa and Liquid Components - 1 cup quinoa, rinsed - 2 cups vegetable broth or water

Grilled Vegetable and Quinoa Salad Fresh Delight

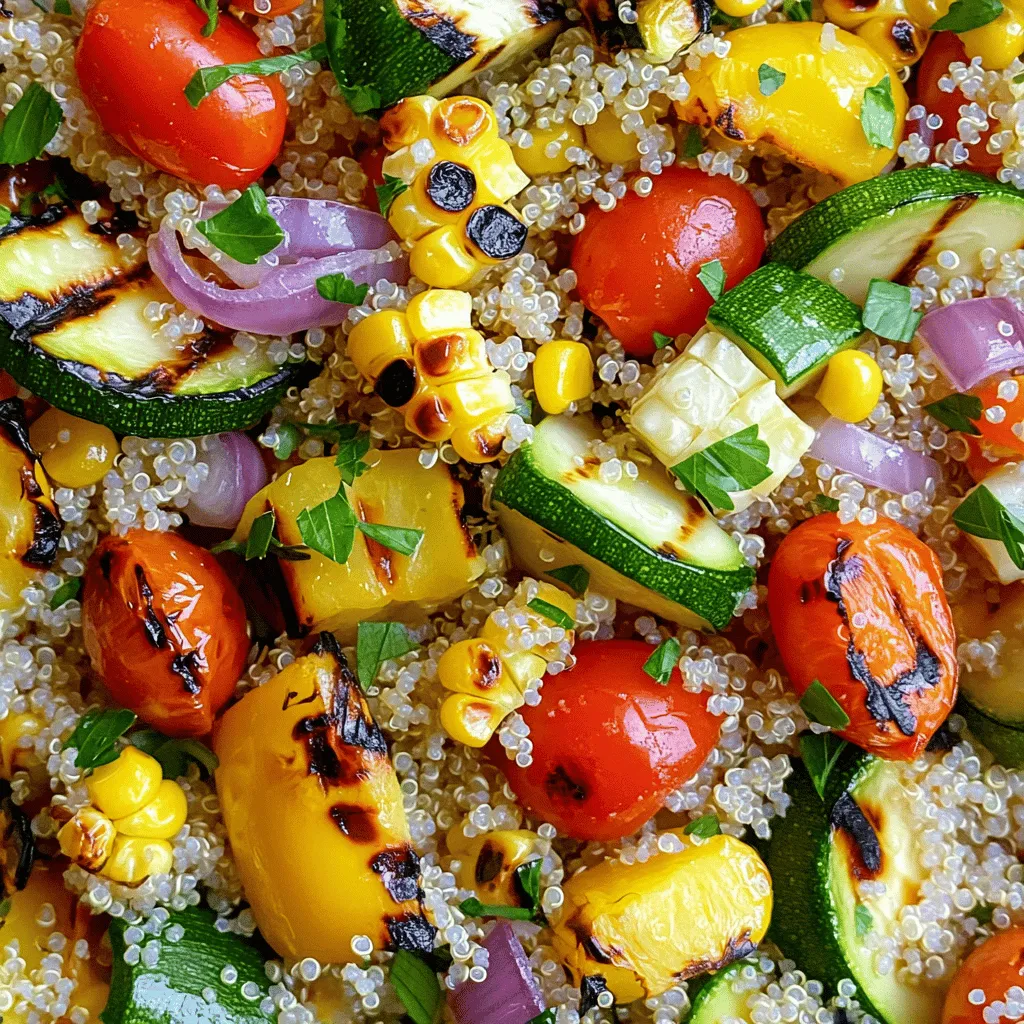
Welcome to a flavor-packed journey with my Grilled Vegetable and Quinoa Salad! This dish is not only fresh and healthy,

To make this creamy mushroom risotto, you need: - 1 ½ cups Arborio rice - 1 onion, finely chopped - 2 cloves garlic, minced - 1 ½ cups mushrooms (mixed varieties like cremini and shiitake), sliced - 4 cups low-sodium vegetable broth - 1 cup heavy cream or coconut cream for a vegan option - ½ cup grated Parmesan cheese or nutritional yeast for a vegan option - 2 tablespoons olive oil - 1 teaspoon dried thyme - Salt and pepper to taste - Fresh parsley, chopped for garnish

Instant Pot Creamy Mushroom Risotto Rich and Delicious

If you crave a warm, rich dish that’s easy to make, you’ve come to the right place. My Instant Pot

Older posts
Newer posts
← Previous Page1 … Page63 Page64 Page65 Page66 Next →

dsad

© 2025 My Saved Recipe • Built with GeneratePress

Our Policies

  • Copyright Policy
  • Cookie Policy
  • GDPR Policy
  • Privacy Policy
  • Disclaimer
  • Terms Of Use

More Information

  • Home
  • About
  • Contact
  • Appetizers
  • Dessert
  • Dinner
  • Drinks
©2025, My Saved Recipe About Back To Top