Skip to content
DisclaimerTerms Of UseGDPR PolicyCookie Policy

My Saved Recipe

  • Home
  • Drinks
  • Appetizers
  • Dinner
  • Dessert
  • About
  • Contact
  • Privacy Policy
DisclaimerTerms Of UseGDPR PolicyCookie Policy

Savannah

- Mixed Baby Greens: Use 4 cups of mixed baby greens, like arugula, spinach, and watercress. These greens offer a fresh base for the salad. They add texture and flavor, making each bite exciting. - Fresh Strawberries: Select 1 cup of fresh strawberries. Look for ripe, juicy berries. Hull and slice them before adding. The sweetness of strawberries pairs perfectly with the saltiness of prosciutto. - Burrata Cheese: Choose 1 ball of burrata cheese. This cheese should feel soft and creamy. Cut it into large pieces to showcase its rich inside. Handle it gently to keep its beautiful shape. - Prosciutto: Use 6 slices of high-quality prosciutto. Look for thinly sliced meat with a nice marbling. Tear it into bite-sized pieces for easy eating. The savory flavor complements the salad well. - Roasted Pistachios: Prepare 1/4 cup of roasted pistachios, roughly chopped. These nuts add a nice crunch. You can substitute them with almonds or walnuts if you prefer. - Dressing Ingredients: Use 2 tablespoons of balsamic glaze and 2 tablespoons of extra virgin olive oil. These dressings enhance the salad's flavor. Add salt and freshly cracked black pepper to taste for extra seasoning. For the full recipe, check out the details above. 1. In a large mixing bowl, take the mixed baby greens and sliced strawberries. Gently toss them together until they blend well. This step ensures every bite has a mix of flavors. 2. Next, drizzle the extra virgin olive oil over the salad mixture. Add some salt and freshly cracked black pepper. Toss lightly again to coat everything evenly. This adds a nice flavor boost. 3. For presentation, grab a large serving platter or individual plates. Artfully arrange the salad mixture on the platter. Create a little nest in the center for the burrata pieces. 4. Now, scatter the torn prosciutto pieces on top of the salad. This adds a savory touch that pairs perfectly with the sweetness of the strawberries. 5. Place the burrata pieces on the salad. Make sure they stand out, as they are the stars of the dish. 6. Drizzle balsamic glaze over the entire salad. This will add sweetness and depth, making every bite more delightful. 7. Finish off by sprinkling the roasted pistachios on top. They give a nice crunch. Add fresh basil leaves to garnish, giving the salad a vibrant look. - Serve the salad immediately to keep the greens fresh. The bright colors and flavors are best enjoyed right away. - You can plate the salad in elegant dishes for a special touch. Consider adding a drizzle of extra balsamic glaze around the platter. This enhances the visual appeal. - This salad works great as a light lunch or appetizer. You can pair it with crusty bread or a light white wine for a complete meal. For a detailed view of this recipe, check out the Full Recipe. To keep your greens fresh, wash them in cold water. Dry them well using a salad spinner or clean kitchen towel. Store them in a container with a paper towel inside to absorb moisture. This helps them stay crisp longer. For strawberries, it’s best to keep them in the fridge. Don't wash them until you're ready to eat. Store them in a breathable container, like a berry basket. This allows air to circulate and keeps them fresh. Burrata cheese needs careful handling. Keep it in its liquid until you are ready to use it. Store it in the fridge and consume it within a few days for the best taste and texture. To give your salad a gourmet look, use a large, shallow bowl. Arrange the greens and strawberries in a colorful pattern. Place burrata pieces in the center for a stunning focal point. You can impress guests by serving the salad on individual plates. Drizzle extra balsamic glaze around the plate for a fancy touch. Scatter the pistachios on top for added flair and crunch. Fresh basil leaves add a pop of color, making your dish even more appealing. {{image_2}} You can change the burrata cheese if you want. Try using fresh mozzarella or goat cheese. These swap outs still give you a creamy feel. They also add a nice twist to the flavor. When it comes to greens, you have options. Instead of mixed baby greens, use kale or romaine. Both add crunch and taste. You can even mix them for a more interesting salad. Spinach also works and is mild in flavor. Want to add some extra fruit? Peaches or figs work great. They add sweetness and a juicy bite. You can slice them thin and toss them in. If you want to switch up the dressing, try honey mustard or lemon vinaigrette. These dressings give a different flavor profile. They can brighten the dish without overpowering it. For more ideas, check out the Full Recipe. It offers tips and tricks to make this salad your own! To keep your Prosciutto Strawberry Burrata Salad fresh, store it properly. I recommend using an airtight container. This helps keep the flavors vibrant. Try to eat it within two days for the best taste. Store the salad without the dressing. Dressings can make greens soggy. If you have extra strawberries or burrata, keep them in separate containers. This way, they stay fresh longer. If your greens start to wilt, don't worry. You can refresh them! Rinse the greens gently in cold water. Pat them dry with a towel. This will help them regain some crunch. You can also reuse the salad components in other dishes. Toss leftover greens into a wrap or sandwich. Use the burrata as a topping for pasta or pizza. It’s all about being creative with your leftovers! To make a vegetarian version, simply leave out the prosciutto. You can replace it with a flavorful option like roasted chickpeas or marinated artichokes. Both add texture and taste. You can use the same ingredients and follow the recipe steps. This way, you keep the salad fresh and vibrant. Yes, you can prepare parts of the salad in advance. Wash and dry the greens, and store them in a sealed container. Slice the strawberries and keep them in the fridge. However, wait to add the burrata and prosciutto until serving. This keeps the salad fresh and tasty. Burrata cheese offers several health benefits. It is rich in calcium, which helps your bones. It also has protein, which is good for muscle growth. Moreover, burrata contains healthy fats, which can support heart health. Enjoy it in moderation for a tasty treat! For the full recipe, check out the detailed instructions above. This blog post covered how to make a delicious Prosciutto Strawberry Burrata Salad. You learned the best ingredients to use, their preparation, and tips for storage. I shared serving suggestions and variations to keep things fresh. Remember, using quality ingredients makes a big difference. Try different fruits or greens to find your perfect mix. Enjoy your salad and impress your guests with these easy steps.

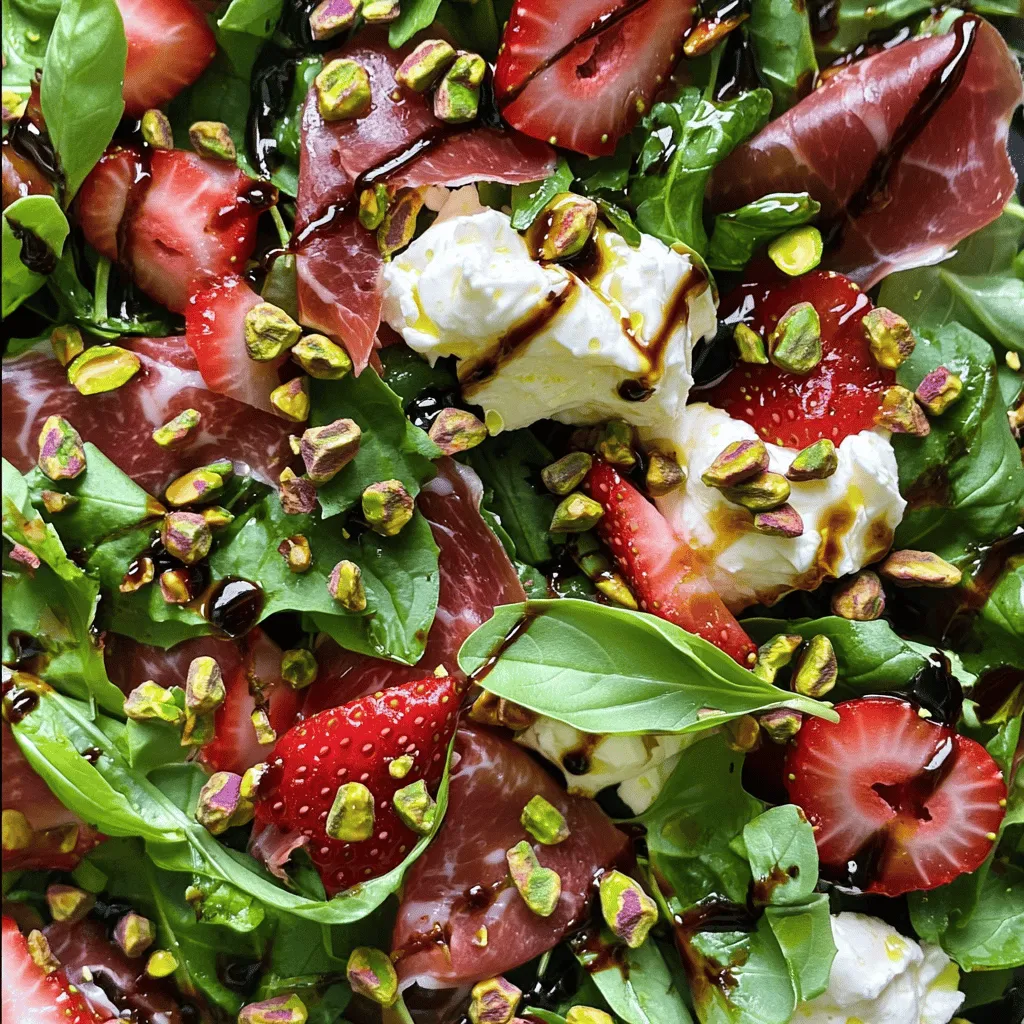
Prosciutto Strawberry Burrata Salad Fresh Delight

Are you ready to create a dish that dazzles the taste buds? My Prosciutto Strawberry Burrata Salad is a fresh

- 1 cup graham cracker crumbs - 1/4 cup unsalted butter, melted - 2 cups cream cheese, softened - 1/2 cup granulated sugar - 1/2 cup sour cream - 1 teaspoon vanilla extract - Zest of 1 lemon - 2 tablespoons lemon juice - 2 large eggs - 1 cup fresh blueberries The main ingredients create a rich and creamy base. The graham cracker crumbs form a buttery crust. Cream cheese gives the cheesecake its smooth texture. Granulated sugar adds sweetness, while sour cream contributes tang. Fresh lemon zest and juice bring a bright flavor. - 2 tablespoons blueberry jam - Fresh mint leaves For toppings, blueberry jam adds a fruity finish. Fresh mint leaves bring color and freshness. These toppings make the cheesecakes pop with flavor and look great. - Muffin tin - Mixing bowls - Electric mixer You will need a muffin tin to hold the mini cheesecakes. Mixing bowls help you combine the ingredients well. An electric mixer ensures a smooth batter without lumps. Having the right tools makes baking easier and more fun. For the full recipe, check out the detailed steps to create these delightful treats. 1. Preheat your oven to 325°F (160°C). This helps the cheesecakes bake evenly. 2. Line a muffin tin with paper liners. This makes it easy to remove the cheesecakes later. 3. In a medium bowl, mix 1 cup of graham cracker crumbs with 1/4 cup of melted unsalted butter. Stir until combined. 4. Press about a tablespoon of the crumb mixture into each muffin liner. Use the back of a spoon to pack it down firmly. 1. In a large mixing bowl, beat 2 cups of softened cream cheese until smooth using an electric mixer. 2. Add 1/2 cup of granulated sugar, 1/2 cup of sour cream, 1 teaspoon of vanilla extract, the zest of 1 lemon, and 2 tablespoons of lemon juice to the cream cheese. Mix until smooth. 3. Add 2 large eggs, one at a time. Mix on low speed until just combined. Do not overmix. 4. Gently fold in 1 cup of fresh blueberries into the cheesecake batter. Be careful to keep the blueberries intact for a lovely burst of flavor. 1. Evenly distribute the cheesecake batter over the prepared crusts in the muffin tin. Fill each liner about 3/4 full. 2. Bake in the preheated oven for 20-25 minutes. The centers should be set but still slightly jiggly. 3. Remove from the oven and let them cool at room temperature for about 10 minutes. 4. Refrigerate for at least 2 hours to set completely. For the complete recipe, check out the [Full Recipe](#). - Overmixing batter: This can make the texture tough. Mix just until smooth. - Not cooling properly: Let the cheesecakes cool before chilling. This helps set their shape. - Use room temperature ingredients: Cold cream cheese will not mix well. It needs to be soft. - Avoid overbaking: Bake until the centers are slightly jiggly. They will firm up as they cool. - Best served chilled: Chilling enhances the flavors and makes them refreshing. - Pair with homemade whipped cream: A dollop of whipped cream adds richness and a nice touch. Enjoy these tips to make the best mini lemon blueberry cheesecakes. Check out the Full Recipe for more details! {{image_2}} You can easily switch things up with your mini lemon blueberry cheesecakes. Instead of blueberries, try using raspberries or strawberries. These fruits add a nice twist to your dessert. You can also add chocolate chips or nuts. Dark chocolate adds richness, while nuts give a lovely crunch. Just fold them into the batter gently. If you need a gluten-free option, use gluten-free graham cracker crumbs. These work just like regular crumbs for the crust. For a dairy-free twist, substitute cream cheese with a dairy-free cream cheese. You can also use cashew cream for a smooth texture. These choices keep the flavor tasty for everyone. If you’re hosting a larger gathering, you can double the recipe. This will give you about 24 mini cheesecakes. To make one full cheesecake, use a 9-inch springform pan. Simply pour the batter into the pan after mixing. Bake it for 45-55 minutes instead of 20-25 minutes. This will create a lovely, creamy cheesecake that everyone will love. For more details, check the Full Recipe. To keep your mini lemon blueberry cheesecakes fresh, refrigerate them right away. Place them in an airtight container. This keeps moisture in and prevents them from drying out. They stay fresh for about 3 to 4 days. If you want to enjoy them longer, use plastic wrap before sealing. This adds an extra layer of protection. You can freeze mini cheesecakes for later enjoyment. First, let them cool completely. Then, wrap each cheesecake tightly in plastic wrap. After that, put them in a freezer-safe bag or container. This prevents freezer burn. They can last up to 2 months in the freezer. When you're ready to eat them, take them out and thaw in the fridge overnight. This keeps their texture smooth and creamy. Mini cheesecakes are best eaten within a week. After that, they may still be safe but lose quality. Look for changes in texture or smell to tell if they've gone bad. If they become watery or smell sour, it’s time to toss them. Enjoy these treats while they’re at their best! You can tell mini cheesecakes are done by looking for visual cues. The edges should be set, while the center may jiggle slightly. A toothpick test works well too; insert it into the center. If it comes out clean or with a few moist crumbs, they are ready. Keep an eye on the baking time. They usually bake for 20-25 minutes at 325°F (160°C). Yes, you can make the cheesecake batter in advance. Store it in the fridge for up to 24 hours. Just keep it in a sealed container. When you're ready to bake, give it a quick stir. This helps to mix any ingredients that may have settled. It's a great way to save time on busy days. If you need a substitute for sour cream, there are several options. Greek yogurt works well and gives a similar tang. You could also use cream cheese thinned with a bit of milk. Another option is buttermilk, which adds moisture and flavor. Choose what fits your taste or what you have on hand. This blog post shared how to make tasty mini cheesecakes. You learned about key ingredients, like graham cracker crumbs and cream cheese, and how fresh blueberries add flavor. I provided step-by-step instructions for perfecting your cheesecakes and offered tips to avoid common mistakes. Whether you're making variations for special diets or just for fun, you'll impress your friends. Remember to store them well for freshness. Enjoy your baking adventure and savor every bite of your delicious creation!

Mini Lemon Blueberry Cheesecakes Irresistible Treat

If you’re craving a sweet, zesty treat, you’re in the right place! Mini lemon blueberry cheesecakes are a perfect blend

To make these delightful Strawberry Lemonade Cookies, you will need: - 1 cup unsalted butter, softened - 1 cup granulated sugar - 1 egg - 2 tablespoons fresh lemon juice - 1 tablespoon lemon zest - 2 cups all-purpose flour - 1/2 teaspoon baking soda - 1/4 teaspoon salt - 1 cup finely chopped fresh strawberries - 1/2 cup powdered sugar (for dusting) You can swap unsalted butter for coconut oil for a dairy-free option. Granulated sugar can be replaced with brown sugar if you want a richer flavor. If you need a vegan version, use flaxseed meal mixed with water instead of the egg. For the lemons, bottled lemon juice works, but fresh juice is best for taste. Fresh strawberries and lemons bring bright flavors to these cookies. Strawberries add sweetness and moisture, making the cookies soft. They also provide a lovely red color. Fresh lemons give a zesty kick that balances the sweetness. The zest carries essential oils, enhancing the lemon flavor. Using fresh ingredients makes your cookies taste better and more vibrant. Start by preheating your oven to 350°F (175°C). This temperature is key for baking. Line a baking sheet with parchment paper. This helps the cookies not stick. You can use multiple sheets if you want to bake more at once. In a large mixing bowl, cream together 1 cup of softened butter and 1 cup of granulated sugar. Mix until it looks light and fluffy. Then, add in 1 egg, 2 tablespoons of fresh lemon juice, and 1 tablespoon of lemon zest. Stir well to combine. In a different bowl, whisk together 2 cups of all-purpose flour, 1/2 teaspoon of baking soda, and 1/4 teaspoon of salt. Gradually add this dry mix to the wet mix. Stir until just combined. Gently fold in 1 cup of finely chopped fresh strawberries. This step is fun and colorful. The strawberries will add a refreshing taste. Using a tablespoon or cookie scoop, drop rounded balls of dough onto your prepared baking sheet. Make sure to space them about 2 inches apart. Bake the cookies for 12-15 minutes. Look for edges that are lightly golden. This shows they are ready. Once done, remove them from the oven and let them cool on the sheet for 5 minutes. Then, transfer the cookies to a wire rack to cool completely. For an extra sweet touch, dust the cookies with powdered sugar. For the full recipe, check the earlier section. To get cookies that are soft and chewy, focus on your mixing. Cream the butter and sugar well. This step adds air and helps your cookies rise. Do not overmix after adding flour. Mix until just combined for the best texture. If your cookies spread too much while baking, try chilling the dough. Once you mix the dough, refrigerate it for 30 minutes. This helps the butter firm up. Also, ensure you measure your flour correctly. Too little flour can lead to flat cookies. Lemon zest gives a bright taste to your cookies. Use a microplane to get fine zest from fresh lemons. Just be careful not to get any white pith, as it can be bitter. Adding zest brightens the flavor and makes your cookies stand out. For a full flavor experience, don’t skip this step while making your Strawberry Lemonade Cookies. {{image_2}} You can add chocolate chips to your cookies for a rich twist. Mix in 1 cup of semi-sweet chocolate chips after folding in the strawberries. The chocolate adds depth to the sweet and tangy flavor. The cookies become even more delicious, blending fruity and chocolatey notes. Try adding herbs like basil or mint for a fresh flavor. Use 1 tablespoon of finely chopped herbs mixed into the dough. Basil pairs well with strawberries, giving a sweet and savory profile. Mint adds a cooling touch, making the cookies refreshing. For a gluten-free version, swap all-purpose flour with almond flour or a gluten-free blend. Ensure your baking soda is gluten-free too. For a vegan option, replace the egg with flaxseed meal. Mix 1 tablespoon of flaxseed with 2.5 tablespoons of water. Let it sit until it thickens. Use vegan butter instead of regular butter. These swaps keep the cookies tasty and inclusive. For more details, check the Full Recipe. To keep your strawberry lemonade cookies fresh, store them in an airtight container. This helps prevent moisture loss and keeps them soft. You can add a slice of bread in the container. This slice absorbs excess moisture, keeping the cookies from getting hard. Keep the container at room temperature, away from sunlight. You can freeze these cookies for later enjoyment. First, let them cool completely. Then, place them in a single layer on a baking sheet. Freeze them for about one hour. Once frozen, transfer the cookies to a freezer-safe bag. This helps keep them from sticking together. Make sure to label the bag with the date. You can freeze them for up to three months. When stored properly, these cookies last about one week at room temperature. If you freeze them, they last much longer. Just remember to thaw them at room temperature for a few hours before serving. They will taste just as good as fresh-baked cookies. Enjoy these sweet treats any time! You can make these cookies ahead of time by preparing the dough. After mixing, wrap the dough tightly in plastic wrap. Then, place it in the fridge for up to three days. When you are ready to bake, scoop and bake as instructed in the Full Recipe. This way, you enjoy fresh cookies anytime! If you don't have fresh strawberries, you can use frozen strawberries. Thaw them first and drain any excess juice. Chop them finely before adding to the dough. Dried strawberries also work but will change the cookie's texture. Keep in mind, fresh berries give the best flavor! Yes, you can add icing to these cookies. A simple lemon glaze works great. Just mix powdered sugar with lemon juice until smooth. Drizzle it over cooled cookies for a sweet touch. You can also use a cream cheese frosting for a richer flavor. In this blog post, we explored key ingredients for delicious strawberry lemonade cookies. We discussed how fresh strawberries and lemons enhance flavor. I shared step-by-step instructions to help you bake perfectly every time. Remember to use my tips for the right cookie texture and avoiding spreading. I also offered fun variations and smart storage info to keep your cookies fresh. Enjoy your baking adventure! These cookies will surely impress your friends and family.

Strawberry Lemonade Cookies Refreshing Sweet Treat

Craving a sweet and tangy treat? You’re in for a delight! My Strawberry Lemonade Cookies blend juicy strawberries and zesty

Let’s dive into the ingredients for the Mediterranean Salad Bowl. Each one adds flavor and nutrition. You can find all these items at your local grocery store. - Quinoa - Fresh vegetables (cherry tomatoes, cucumber, red bell pepper, red onion) - Canned chickpeas - Kalamata olives and feta cheese - Dressing components (olive oil, lemon juice, oregano, salt, and pepper) Quinoa is a great base for this salad. It is light, fluffy, and packed with protein. The fresh vegetables bring color and crunch. Cherry tomatoes offer sweetness, while cucumber cools the dish. Red bell pepper gives a hint of warmth, and red onion adds a bit of bite. Chickpeas are a must for heartiness. They are full of fiber and keep you full longer. Kalamata olives add a briny flavor that balances the sweetness of the veggies. Feta cheese gives a creamy, tangy kick to each bite. Now, let’s talk about the dressing. Olive oil adds richness. Lemon juice brightens up the flavors and adds zest. Oregano gives an earthy note, while salt and pepper round everything out. For the full recipe, check out the details above, and get ready to create a fresh and flavorful Mediterranean Salad Bowl that you will love! First, grab a medium pot. Bring 2 cups of vegetable broth or water to a boil. I always use broth for added flavor. This step is quick and easy. Once boiling, add 1 cup of rinsed quinoa. Lower the heat to a simmer. Cover the pot and cook for about 15 minutes. The quinoa will absorb the liquid and become fluffy. After cooking, remove it from heat and let it cool. While the quinoa cools, get a large mixing bowl. In this bowl, mix together the following ingredients: - 1 cup cherry tomatoes, halved - 1 cucumber, diced - 1 red bell pepper, diced - ½ red onion, finely chopped - 1 cup canned chickpeas, drained and rinsed - ½ cup Kalamata olives, pitted and halved - ¼ cup fresh parsley, chopped Now, for the dressing! In a small bowl, whisk together: - 3 tablespoons olive oil - 2 tablespoons lemon juice - 1 teaspoon dried oregano - Salt and pepper to taste Make sure to whisk until smooth. This dressing will tie all the flavors together. Once the quinoa has cooled, add it to the vegetable mixture. Pour the dressing over everything and toss gently. You want to mix well but avoid breaking the quinoa. Finally, sprinkle ½ cup of crumbled feta cheese on top. Give it one last light toss. This adds flavor and creaminess. Taste it and adjust seasoning with salt and pepper if needed. For the full recipe, check out the Mediterranean Bliss Bowl. Enjoy your fresh and colorful salad bowl! To make the best Mediterranean salad bowl, focus on the quinoa first. - Achieving the right quinoa texture: Rinse your quinoa well before cooking. This removes bitterness. Cook it in vegetable broth for flavor. It should be fluffy, not mushy. Once done, let it cool before mixing. - Balancing flavors in the dressing: Mix olive oil and lemon juice for a bright taste. Add dried oregano for a hint of earthiness. Taste it before pouring over the salad. Adjust salt and pepper to your liking. - Mixing techniques for even distribution: Start by combining your vegetables in a big bowl. Once mixed, gently fold in the quinoa. Use a spatula to avoid breaking the feta. This keeps everything well distributed and looking pretty. A beautiful salad bowl makes your meal more inviting. - Serving suggestions for a beautiful display: Use clear glass bowls to show off the colors. Layer the ingredients to create a visual feast. - Garnishing with herbs or lemon wedges: Fresh parsley adds a pop of green. A lemon wedge on the side brightens the dish. It also invites people to squeeze some juice over the salad. - Bowl alternatives for serving: Try using rustic wooden bowls for a homey feel. You can also use large lettuce leaves as edible bowls. They add flavor and fun to your meal. These tips will help you create a Mediterranean salad bowl that impresses everyone. For full details on making this dish, check out the Full Recipe. {{image_2}} You can make your Mediterranean salad unique. Start by adding proteins. Grilled chicken or shrimp brings great flavor and fills you up. You can also mix in different vegetables. Try creamy avocado or sweet roasted red peppers. They add a nice twist to the bowl. If you prefer vegan options, no problem! You can leave out feta cheese or swap it for vegan cheese. This way, everyone can enjoy the salad, no matter their diet. This salad fits many diets. If you're gluten-free, quinoa is a perfect base. It has no gluten and is very nutritious. You can also make low-carb versions. Just skip the chickpeas or reduce the amount of quinoa. Key ingredients in this salad offer many benefits. Quinoa is high in protein and fiber. Fresh vegetables add vitamins and minerals. Chickpeas boost your energy and are great for your heart. Every bite is not just tasty; it's good for you too! For the full recipe, check out the Mediterranean Bliss Bowl 🥗. To keep your Mediterranean salad fresh, store it in an airtight container. This helps prevent sogginess. I recommend using glass or BPA-free plastic containers. They keep the taste and texture better than other options. You can store the salad in the fridge for up to three days. If you add dressing, eat it within two days. The veggies stay crisp when stored without dressing. This makes it easier to enjoy later. Can you freeze the Mediterranean salad? I don’t recommend freezing it. Freezing can change the texture of veggies and chickpeas. They may become mushy when thawed. If you still want to freeze it, leave out the fresh ingredients like tomatoes, cucumber, and feta cheese. These items do not freeze well. To thaw, place the container in the fridge overnight. Refresh the salad by adding fresh veggies and a splash of lemon juice before serving. This adds life back to your dish. To make a Mediterranean salad from scratch, follow these simple steps: 1. Cook the quinoa: Start by boiling vegetable broth or water. Add 1 cup of rinsed quinoa. Lower the heat, cover it, and simmer for 15 minutes. This makes the quinoa fluffy. 2. Prepare the veggies: While the quinoa cooks, chop fresh vegetables like cherry tomatoes, cucumber, red bell pepper, and red onion. 3. Mix ingredients: In a large bowl, combine the chopped veggies with canned chickpeas and Kalamata olives. 4. Make the dressing: In a small bowl, whisk together olive oil, lemon juice, dried oregano, salt, and pepper. 5. Combine everything: Once the quinoa cools, add it to the veggie mix. Drizzle the dressing over and toss gently. 6. Add feta: Sprinkle crumbled feta cheese on top and mix lightly. This approach gives you a fresh and tasty salad, perfect for any meal. You can find the full details in the [Full Recipe]. A Mediterranean salad features classic ingredients that bring vibrant flavors. Here’s an overview of the essentials: - Quinoa: This grain provides a healthy base and nutty flavor. - Fresh vegetables: Cherry tomatoes add sweetness, while cucumber and red bell pepper offer crunch. - Red onion: It gives a sharp bite to balance the flavors. - Canned chickpeas: These are packed with protein and add a creamy texture. - Kalamata olives: They add a briny taste that enhances the salad. - Feta cheese: This crumbly cheese provides a rich flavor and creaminess. - Dressing: Olive oil, lemon juice, oregano, salt, and pepper create a zesty finish. These ingredients combine to create a colorful and healthy dish. Yes, you can use different grains instead of quinoa! Here are some great substitutes: - Couscous: It cooks quickly and has a light, fluffy texture. - Bulgur: This grain is hearty and has a slightly nutty taste. - Farro: It adds a chewy texture and rich flavor. - Brown rice: This is a gluten-free option that works well too. Feel free to experiment with these grains while keeping the rest of your salad the same! This Mediterranean salad is fresh, tasty, and easy to make. You learned how to cook quinoa and mix it with vibrant veggies and chickpeas. The dressing adds a zesty kick while feta cheese gives richness. You can customize it with proteins or different veggies for variety. Remember to store leftovers correctly and enjoy them later! This salad fits many diets and flavors. Using my tips will help you make the perfect bowl. Enjoy your healthy creation!

Mediterranean Salad Bowl Fresh and Flavorful Delight

Are you ready for a fresh, tasty adventure? My Mediterranean Salad Bowl is packed with vibrant veggies, hearty quinoa, and

- Japanese cucumbers and alternatives - Use 2 large Japanese cucumbers. They are crisp and sweet. You can use regular cucumbers if needed. Just slice them thinly. - Seasoning essentials - You need 1 teaspoon of salt. This draws out moisture and enhances flavor. - Add 1 tablespoon of rice vinegar. It gives a nice tang. - Include 1 tablespoon of sesame oil. This adds a rich, nutty flavor. - Additional flavor enhancers - Use 1 teaspoon of soy sauce for umami goodness. - Add 1 teaspoon of sugar. It balances the vinegar's tang. - Grate 1 teaspoon of ginger. It adds a fresh kick. - Optional garnishes - Toss in 1 tablespoon of toasted sesame seeds for crunch. - Add 2 green onions, finely chopped, for freshness. - Garnish with a few sprigs of fresh cilantro if you like. This simple ingredient list makes the Japanese cucumber salad both tasty and easy. Check out the Full Recipe for more details on how to bring these flavors together! Start by slicing your cucumbers thinly. I like to use Japanese cucumbers, but regular ones work too. Place the slices in a colander and sprinkle them with salt. This step helps pull out excess moisture. Let them drain for about 10 to 15 minutes. Removing moisture is key to keeping the salad crisp. If you skip this, the salad may become soggy. After draining, gently squeeze the cucumbers to get rid of more water. This makes a big difference in texture. Now, let’s make the dressing. In a small bowl, mix rice vinegar, sesame oil, soy sauce, sugar, and grated ginger. Whisk it well until everything is combined. The balance of flavors is important. The vinegar adds tang, while the sugar brings sweetness. Adjust the ingredients to your taste. If you like it sweeter, add more sugar. If you want more tang, add extra vinegar. Once your cucumbers are ready and the dressing is made, it’s time to assemble the salad. Place the drained cucumbers in a mixing bowl. Pour the dressing over the cucumbers and toss them gently. This ensures each slice is coated well. Next, add the toasted sesame seeds and chopped green onions. Toss again to mix everything together. It’s best to let the salad rest for about 10 minutes. This resting time helps the flavors develop. Just before serving, feel free to garnish with fresh cilantro if you like. Enjoy your crisp and tasty salad! To keep your salad crunchy, choose the right cucumbers. I recommend using firm, fresh Japanese cucumbers. They have thin skin and less water. If you can't find them, regular cucumbers work too. Just peel them if the skin is thick. Enhancing texture is key. After slicing the cucumbers, sprinkle them with salt. Let them sit in a colander for 10 to 15 minutes. This step draws out excess moisture and firms them up. After draining, gently squeeze the cucumbers to remove any remaining liquid. This keeps your salad from becoming soggy. Adding fresh herbs brightens your salad. I love using cilantro for its fresh taste. You can also try mint or basil if you prefer. Just chop them finely and sprinkle them in before serving. For more flavor, experiment with seasonings. Try adding a touch of chili oil for spice. You can also mix in a splash of lime juice for acidity. These options bring new life to the dish. Each addition can change the flavor profile, so have fun with it! {{image_2}} You can make this salad even better by adding other tasty things. Try slicing some carrots. Their sweetness adds a nice twist to the dish. You could also add radishes for a bit of crunch and spice. When it comes to dressings, feel free to experiment. You can try adding chili oil for heat. A splash of lemon juice can brighten the flavors. Japanese cucumber salad is just one of many great salads in Asia. You might enjoy Thai papaya salad, which has a spicy kick. Korean cucumber salad, known as (oi muchim), offers a different flavor with garlic and chili. The history of Japanese cucumber salad is rich. It showcases the Japanese love for fresh, crisp vegetables. This dish reflects the balance of flavors prized in Japanese cuisine. It’s a simple and healthy side that complements many meals. To store leftover salad, first let it cool. Place it in an airtight container. Make sure to squeeze out as much air as possible. This helps keep the salad fresh. If you have extra dressing, store it in a separate container. This prevents the salad from getting soggy. Always keep your salad in the fridge. How long does it last? The salad lasts about three days in the fridge. After that, the quality decreases. Signs that indicate spoilage include a slimy texture or an off smell. If you see any discoloration or wilting, it’s best to throw it away. Trust your senses; they often tell you if food is no longer good. Japanese cucumber salad is a fresh, light dish. It highlights the crispness of cucumbers. This salad has roots in Japanese cuisine, where it is often served as a side. The salad is simple and flavorful, making it a favorite for many. You can enjoy it with rice, fish, or grilled meats. The key ingredients are cucumbers, rice vinegar, and sesame oil. Together, they create a delightful taste that complements many meals. Yes, you can prepare this salad ahead of time. To do this, follow these tips: - Slice the cucumbers and salt them as directed. This helps them stay crisp. - Make the dressing and store it in a separate container. This keeps the flavors fresh. - Combine everything only when you are ready to serve. This way, the cucumbers stay crunchy. Aim to let the salad sit for about 10 minutes before serving. This enhances the flavors. Japanese cucumber salad has many health benefits. Here are some key insights: - Low in calories: This salad is light and perfect for those watching their weight. - High in water content: Cucumbers are about 95% water, helping you stay hydrated. - Rich in vitamins: Cucumbers provide vitamin K, which is great for bone health. - Ginger benefits: The ginger adds flavor and may aid digestion. This salad is not just tasty; it also supports a healthy lifestyle. This blog post covered how to make a tasty Japanese cucumber salad. We discussed key ingredients, from cucumbers to seasonings, and the step-by-step process for preparation and assembly. Crispiness and flavor tips ensure your salad stands out. You can mix in other ingredients for variety or explore regional twists for a fun twist. Remember to store your salad properly to keep it fresh. With these tips, you’re set to impress with a refreshing dish that’s both healthy and enjoyable!

Japanese Cucumber Salad Delicious and Simple Recipe

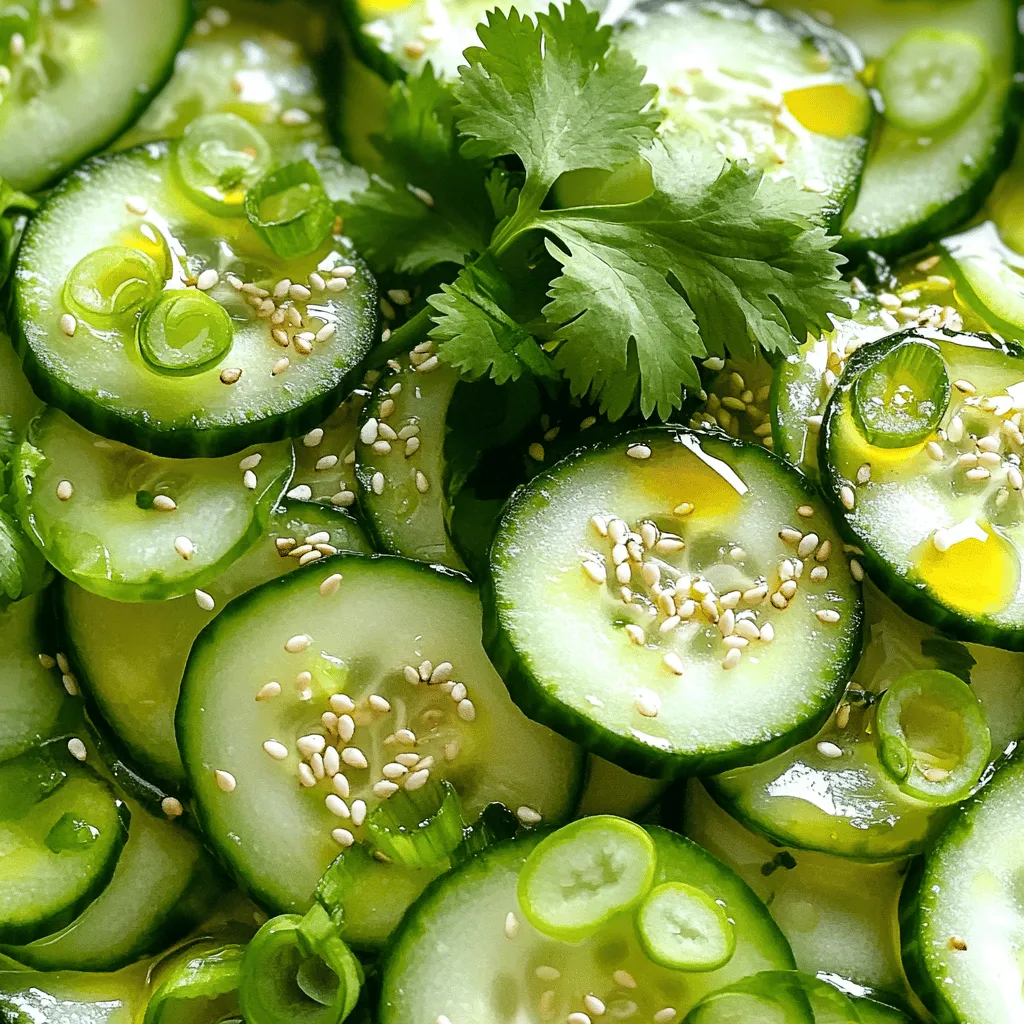
Japanese cucumber salad is simple, fresh, and bursting with flavor. With just a handful of ingredients like crisp cucumbers, rice

For this Lemon Basil Sorbet, fresh ingredients make all the difference. Here’s what you need: - 1 cup fresh lemon juice (about 4-6 lemons) - 1 cup sugar - 1 cup water - 1 cup fresh basil leaves, packed - Zest of 2 lemons - Pinch of salt - Optional garnish (1 tablespoon lemon zest) Using fresh lemon juice gives the sorbet a bright and zesty flavor. The sugar helps to balance the tartness and creates a sweet treat. Water is essential for creating the simple syrup that forms the base of the sorbet. Fresh basil adds an aromatic touch, while lemon zest enhances the citrus notes. A pinch of salt rounds out the flavors. If you want to make it extra special, add some lemon zest as a garnish when serving. If you're ready to make this delightful treat, check the Full Recipe for all the steps! To start, take a small saucepan. Add one cup of sugar and one cup of water. Place it over medium heat. Stir the mixture until the sugar dissolves completely. This creates your simple syrup. It is a key base for the sorbet. Next, remove the syrup from heat. Add one cup of fresh basil leaves into the warm syrup. Let the basil steep for about 30 minutes. This step is essential. It allows the basil to release its fresh flavor. After steeping, strain the syrup using a fine-mesh sieve. Press down with a spoon to extract every drop. Discard the basil leaves. Now, combine the basil-infused syrup with one cup of fresh lemon juice and the zest of two lemons. Add a pinch of salt to enhance the flavors. Mix well until everything blends smoothly. Pour the mixture into a shallow container and cover it. Place it in the freezer for about two hours until it starts to freeze. Check on it every 30 minutes. Use a fork to scrape the mixture. This keeps the sorbet fluffy and prevents ice crystals. Repeat this process for two to three hours. Once it has a light, fluffy texture, it’s ready to serve. Scoop it into dishes and enjoy your lemon basil sorbet! For the full recipe, refer to the ingredients and steps above. To get the best texture in your lemon basil sorbet, you need to scrape the mixture well. Scraping helps break up ice crystals and makes the sorbet light and fluffy. I recommend using a fork for this task. You should scrape the mixture every 30 minutes as it freezes. When it’s ready, the sorbet should look airy and soft, not hard and icy. Fresh lemon and basil make a big difference in flavor. Fresh lemons add bright zest, while fresh basil gives a lovely aroma. When choosing lemons, look for ones that feel heavy for their size. For basil, pick vibrant green leaves with no brown spots. These tips ensure you get the best taste from your sorbet. Garnishing your sorbet can make it even more special. A sprinkle of lemon zest on top adds a nice touch. You can also serve it in a chilled bowl for extra flair. This sorbet pairs well with light desserts or can be enjoyed alone. Consider adding a few fresh berries on the side for color and sweetness. {{image_2}} Lemon basil sorbet is fun to change. You can try different herbs, fruits, and sweeteners. Here are some tasty ideas. You can swap basil for mint or rosemary. Mint gives a cool taste. Rosemary adds a warm, earthy flavor. Both work well with lemon. You can also mix fruits with herbs. For example, try lemon with strawberries or peaches. These combos create new flavors that excite the taste buds. Want to make your sorbet pop? Add berries like raspberries or blueberries. They mix well with lemon and basil. You can also use different citruses like orange or lime for a zesty twist. Changing sweeteners can also change the taste. Use honey or agave syrup instead of sugar. Each sweetener brings its own flavor, making the sorbet unique. This lemon basil sorbet is already dairy-free and vegan. You can keep it that way easily. Just make sure to use plant-based sweeteners if you want. If you need substitutes, try maple syrup or coconut sugar. They add great flavor while keeping the recipe plant-based. Enjoy the fresh and flavorful delight of lemon basil sorbet with these variations! To keep your Lemon Basil Sorbet fresh, use an airtight container. A shallow dish works well too. This helps the sorbet freeze evenly. Avoid using plastic wrap alone. It doesn’t seal well and may lead to freezer burn. To prevent freezer burn, press a piece of parchment paper against the sorbet. Then, cover it with the lid. This extra layer protects against air. You can store Lemon Basil Sorbet for about two weeks in the freezer. After that, the flavor and texture may start to change. Signs that the sorbet has gone bad include ice crystals forming on top or a strange smell. If it looks or smells off, it’s best to toss it. If you have leftover sorbet, you can turn it into a fun sorbet cocktail. Just blend it with some sparkling water or use it as a topping on fresh fruit. If the sorbet has become too hard, let it sit at room temperature for a few minutes. Then, re-scoop it to serve. You can also refreeze sorbet after softening, but try to do this only once for the best texture. Sorbet is often made with fruit puree, water, and sugar. It is light and smooth. Sorbetto is the Italian version. It typically has more fruit and creaminess. Both are frozen desserts, but sorbetto is richer in flavor and texture. Yes, you can make Lemon Basil Sorbet without an ice cream maker. You just need a shallow container and a fork. After mixing the sorbet base, freeze it. Scrape it with a fork every 30 minutes. This breaks up ice crystals and makes it fluffy. To adjust sweetness, change the sugar amount. Start with less sugar and taste. You can add more later if needed. Another option is to use different sweeteners, like honey or agave. Remember to balance sweetness with the tartness of lemons. - What are the best ways to serve Lemon Basil Sorbet? Serve Lemon Basil Sorbet in small bowls or cups. You can garnish it with fresh basil or lemon zest. Pair it with shortbread cookies for added crunch. This makes a lovely presentation for guests. - Is it possible to use bottled lemon juice instead of fresh? You can use bottled lemon juice, but fresh juice is best. Fresh lemons have more flavor and brightness. If you use bottled juice, check for additives. Choose one with no extra ingredients for the best taste. In this article, we explored how to make Lemon Basil Sorbet from fresh ingredients. We covered everything from preparing the simple syrup to freezing and serving the sorbet. Remember, using fresh herbs and fruits enhances flavor and texture. Don’t shy away from trying variations, like mint or berry infusions. Store sorbet properly to keep it fresh longer. With these tips, you'll easily create a refreshing treat for any occasion. Enjoy experimenting with flavors, and savor every bite of your homemade sorbet!

Lemon Basil Sorbet Fresh and Flavorful Delight

Looking for a refreshing treat that’s both unique and delicious? Lemon Basil Sorbet is the perfect blend of zingy lemon

- 2 large heirloom tomatoes, sliced - 2 ripe peaches, pitted and sliced - 1 ball of fresh burrata cheese - 1/4 cup fresh basil leaves, torn - 2 tablespoons balsamic glaze - 2 tablespoons extra virgin olive oil - Salt and freshly cracked black pepper to taste If you can't find heirloom tomatoes, try using vine-ripened tomatoes. They have good flavor too. For cheese, you can use fresh mozzarella instead of burrata. It will still taste great! In different seasons, swap peaches for nectarines or even plums. Each fruit adds its own twist to the salad. To pick ripe peaches, look for ones that feel soft but not mushy. They should smell sweet. For burrata, choose cheese that feels soft and creamy. Fresh burrata should have a smooth surface. When selecting tomatoes, look for ones that are firm and have bright colors. Avoid any that feel too hard or have blemishes. First, wash the heirloom tomatoes and peaches under cold water. Make sure to remove any dirt. Pat them dry with a clean kitchen towel. This step helps keep your salad fresh and clean. Next, slice the heirloom tomatoes into thick rounds. For the peaches, cut them into wedges. This makes them easy to layer later. Now, let’s build the salad. On a large serving platter, alternate layering the sliced tomatoes and peaches. Create a circular pattern for a nice look. This makes for a beautiful presentation. Then, gently tear the burrata cheese into pieces. Place it right in the center of the platter. Let it ooze slightly for a creamy effect that everyone will love. To finish, drizzle balsamic glaze and extra virgin olive oil over the entire salad. This adds a rich flavor and shine. Don't forget to season it with salt and freshly cracked black pepper to taste. These final touches will enhance the taste and make it pop. For the full recipe, check out the complete guide to make this delightful dish. To impress your guests, focus on how you present the salad. Start with a large, white platter. This helps the colors pop. Arrange the tomato and peach slices in a circular pattern. Alternate colors for a striking look. Place the burrata cheese in the center. Let it ooze slightly for a creamy touch. Add torn basil leaves on top for a fresh green accent. Drizzle balsamic glaze and olive oil for a glossy finish. This not only looks good but adds flavor too! You can prep this salad ahead of time. Start by washing and slicing the tomatoes and peaches. Store them in separate containers in the fridge. This keeps them fresh and crisp. On the day you serve, layer the tomatoes and peaches on your platter. Add the burrata and basil last. Drizzle the oils and season just before serving. This keeps the salad looking fresh and vibrant. This salad pairs well with crusty bread or a light white wine. A chilled Sauvignon Blanc complements the sweetness of the peaches. You can serve it at summer picnics, family gatherings, or casual dinners. It’s a great dish for any occasion! Enjoy the bright flavors and fresh ingredients. The Tomato Peach Burrata Salad is sure to delight everyone at your table. For the complete recipe, check out [Full Recipe]. {{image_2}} You can change up the flavor of your salad easily. Adding nuts or seeds gives a nice crunch. I recommend using toasted pine nuts or sliced almonds. They add texture and flavor. You can also use sunflower seeds for a nut-free option. Herbs and spices can change the taste too. Try adding a sprinkle of chili flakes for heat. You can also use mint or arugula for a fresh twist. Each herb brings its own unique flavor to the dish. If you're vegan, you can swap the burrata cheese for tofu. Silken tofu works well for a creamy texture. Make sure to season it with some salt and lemon juice. This keeps the salad tasty and plant-based. For gluten-free options, this salad is naturally gluten-free! Just ensure your balsamic glaze does not contain any gluten. You can enjoy this dish without any worries. The best time to use summer produce is during peak season. Fresh peaches and tomatoes taste amazing when they are in season. You can also experiment with autumn fruits. Try pears or apples for a different flavor profile. Switching fruits based on the season keeps the salad fresh. Each season brings new tastes and colors. Use whatever is ripe and available for the best results. To keep your Tomato Peach Burrata Salad fresh, follow these steps: - Place any leftover salad in an airtight container. - Cover the salad tightly to keep out air. - Store in the fridge for best results. Avoid mixing the salad with the dressing if you want it to last longer. This salad lasts about 2 days in the fridge. Look for these signs to know if it has gone bad: - The tomatoes and peaches become mushy. - The burrata cheese smells sour. - The salad looks dry or discolored. You can repurpose leftover ingredients easily! Here are some fun ideas: - Mix leftover burrata into pasta for a creamy dish. - Use extra peaches in smoothies or desserts. - Toss leftover tomatoes into a quick omelette. These quick recipes make your leftovers shine! Burrata cheese is a fresh Italian cheese. It has a soft outer shell and a creamy inside. The flavor is rich and buttery, making it a perfect match for salads. When you slice it, the creamy center oozes out, adding a delightful texture. This cheese pairs well with fruits, like peaches and tomatoes, enhancing their sweetness. Yes, you can prepare the salad in advance. However, wait to add the burrata until right before serving. To keep the flavors fresh, store the tomatoes and peaches in a covered bowl. Add the dressing just before serving to avoid soggy fruit. This way, your salad stays crisp and tasty. For this salad, I love using a balsamic vinaigrette. It adds a sweet and tangy touch. You can also try a simple olive oil and lemon juice mix. Both options complement the flavors of the peaches and tomatoes. Feel free to experiment with herbs for extra flavor. When selecting peaches, look for a deep yellow or golden color. They should feel slightly soft when you gently press them. Avoid peaches with green spots, as they may not be ripe. A sweet aroma is also a good sign that they are ready to eat. This blog post covered the ingredients and steps for a fresh salad. You learned how to choose ripe peaches and fresh burrata, and we explored ingredient swaps. I shared tips for assembling and presenting the salad, plus variations to suit your taste. Consider trying different fruits or cheeses based on the season. Enjoy the flavors of summer with this bright dish. It’s easy to make and perfect for any gathering. Your kitchen can be a place of creativity and fun!

Tomato Peach Burrata Salad Fresh and Tasty Delight

Looking for a fresh and tasty salad that shines in summer? My Tomato Peach Burrata Salad combines ripe peaches, juicy

- 4 boneless chicken thighs - 1 cup pineapple juice - 2 tablespoons soy sauce - 2 tablespoons honey - 1 teaspoon grated ginger - 2 cloves garlic, minced - 1 teaspoon sesame oil - 1 bell pepper (red or yellow), sliced - 1 cup cherry tomatoes, halved - Fresh cilantro, for garnish - Salt and pepper to taste - 1 cup jasmine rice - 1 cup coconut milk - 1/2 cup water - Pinch of salt When I make Hawaiian chicken with coconut rice, I start with fresh, simple ingredients. Each one plays a big role in the dish. For the chicken, I use boneless thighs. They stay juicy and tender. Pineapple juice adds a sweet and tangy flavor. Soy sauce brings in some salty depth. Honey adds sweetness and helps caramelize the chicken. Grated ginger and minced garlic offer warmth and spice. Sesame oil gives a nutty taste. I love to add colorful bell peppers and cherry tomatoes for a fresh crunch. Finally, I always garnish with fresh cilantro for a burst of flavor. For the coconut rice, I choose jasmine rice. It has a lovely aroma and texture. The creamy coconut milk replaces water for cooking. A pinch of salt enhances the taste. This combination makes the rice rich and delicious. You can find the full recipe for Hawaiian chicken with coconut rice. I promise you will enjoy every bite! To start, gather your marinade ingredients. You will need pineapple juice, soy sauce, honey, grated ginger, minced garlic, and sesame oil. Mix these in a bowl. Once combined, add the boneless chicken thighs. Make sure the chicken is well-coated in the marinade. Cover the bowl and refrigerate it. Let it sit for at least 30 minutes. For more flavor, marinate for up to 2 hours. Now, it’s time to prepare the coconut rice. First, rinse the jasmine rice under cold water. Do this until the water runs clear. This step removes extra starch. Next, in a medium saucepan, combine coconut milk, water, and a pinch of salt. Bring this mixture to a gentle boil. After that, add the rinsed rice. Stir it once, then cover the pan. Reduce the heat to low and simmer for about 15-20 minutes. The rice should absorb all the liquid. When done, fluff the rice with a fork and let it sit. For the chicken, heat a grill pan or skillet over medium-high heat. Take the marinated chicken out of the fridge. Remove it from the marinade, but save that for later. Season the chicken with salt and pepper. Cook the chicken for about 5-7 minutes on each side. Use a meat thermometer to check that the internal temperature reaches 165°F (75°C). This ensures it is fully cooked. In the last few minutes of cooking, add sliced bell pepper and halved cherry tomatoes to the pan. Pour the reserved marinade over the chicken and veggies. This step boosts the flavor. Cook for another 2-3 minutes. The vegetables should soften slightly, and the sauce will thicken. To serve, take a plate and mound a portion of coconut rice in the center. Top it with the cooked chicken and colorful veggies. Drizzle any remaining sauce from the pan on top. Finally, garnish with fresh cilantro for a burst of flavor. Enjoy your Hawaiian Chicken with Coconut Rice! For the complete recipe, refer to the Full Recipe section. For the best flavor, marinate the chicken for at least 30 minutes. If you're in a hurry, 30 minutes works great. However, for the best taste, aim for up to 2 hours. This longer time allows the flavors to soak in deeply. You can use leftover marinade, but make sure to cook it well. Do not use it raw, as it touches raw chicken. You can grill or bake the chicken. Grilling gives it a smoky touch. Baking is a simple way too. If you grill, preheat the grill to medium-high heat. Cook the chicken for about 5-7 minutes on each side. For baking, set your oven to 375°F (190°C). Bake for 25-30 minutes. Always check the chicken's internal temperature. It should reach 165°F (75°C) for safety. To make your coconut rice light and fluffy, fluff it with a fork after cooking. This helps separate the grains. If you want creamier rice, add a bit more coconut milk. Adjust the coconut milk based on your taste. Start with 1 cup, and feel free to add a little more if you like. The balance of coconut milk and water is key to getting it just right. {{image_2}} If you want to mix things up, try different veggies. Instead of bell peppers, use zucchini or snap peas. They add great crunch and color. You can also swap cherry tomatoes for diced carrots or green beans. Seasonal veggies like asparagus or squash work well too. Just keep an eye on cooking times to ensure everything is tender. Feel free to change the protein! Tofu is a fantastic option for a vegetarian twist. Just press it to remove excess water, then cut it into cubes. Cook it for about 8-10 minutes until golden brown. Shrimp is another great choice. Add them to the pan for just 3-4 minutes until they turn pink. This keeps your meal fast and fresh! Want to add some flair? Consider spices like cumin or paprika for warmth. Fresh herbs like basil or mint can brighten the dish. For a sweet and savory twist, add mango or a drizzle of balsamic glaze. These changes can make your Hawaiian chicken with coconut rice even more exciting. Enjoy experimenting with flavors! For the full recipe, check [Full Recipe]. To keep your Hawaiian chicken and coconut rice fresh, store leftovers in the fridge. Place the chicken and rice in airtight containers. This helps keep out air and moisture. Aim to eat the leftovers within three days for the best taste. Use glass or plastic containers that seal well. If you want to save some portions for later, freezing is a great option. Divide the chicken and rice into single servings. Wrap each serving tightly with plastic wrap, then place them in freezer bags. Label each bag with the date. To thaw, move the portions to the fridge overnight. This method keeps the texture nice. When you're ready to eat, you can reheat chicken and rice easily. The best method is to use the stove. Heat a skillet over low heat and add a splash of water or broth to keep it moist. Stir the chicken and rice until warm. Avoid the microwave if you can, as it may dry out the food. Enjoy your delicious meal again! The cooking time for Hawaiian chicken is about 10 to 14 minutes. First, marinate the chicken for at least 30 minutes. After marinating, cook the chicken in a grill pan or skillet over medium-high heat for 5 to 7 minutes on each side. The chicken should reach an internal temperature of 165°F (75°C) for safety. This ensures the chicken stays juicy and flavorful. Yes, you can use brown rice instead of jasmine rice. However, brown rice takes longer to cook. You will need to increase the cooking time to about 40 to 45 minutes. Use a ratio of 1 cup of brown rice to 1 1/4 cups of coconut milk and 1/2 cup of water. This will help keep the rice moist and tasty. To make Hawaiian chicken gluten-free, substitute soy sauce with tamari or coconut aminos. Both options work well without the gluten. Check all other ingredients, like marinades and sauces, to ensure they are gluten-free. This way, you can enjoy your meal without worry. Canned coconut milk works great for this recipe. It adds rich flavor and creaminess. Just shake the can well before opening. Use it in the same amount as fresh coconut milk. For best results, choose a full-fat version for a creamier texture in your rice. For a complete meal, consider these sides: - Grilled vegetables like zucchini or asparagus - A fresh green salad with vinaigrette - Pineapple or mango salsa for a fruity kick - Steamed broccoli or green beans for color and crunch These sides complement the flavors of the Hawaiian chicken and coconut rice perfectly. For the full recipe, check out the earlier section! This blog post shares a simple and tasty Hawaiian Chicken with Coconut Rice recipe. You learned about essential ingredients, step-by-step instructions, and helpful tips for the best results. We also covered variations for flavors and how to store leftovers. By following these steps, you can create a meal that delights your taste buds. Enjoy cooking and experimenting with this dish! You’ll impress family and friends with your new skills.

Hawaiian Chicken with Coconut Rice Flavorful Delight

Are you ready to take your taste buds on a tropical trip? In this article, I’ll show you how to

Gathering the right ingredients makes cooking fun and easy. Here’s what you need for Pineapple Chicken Stir Fry: - 1 lb chicken breast, sliced into thin strips - 1 cup fresh pineapple, diced - 1 bell pepper (red or yellow), sliced - 1 cup snap peas - 1 small onion, sliced - 3 cloves garlic, minced - 1 tablespoon fresh ginger, grated - 1/4 cup soy sauce - 2 tablespoons honey - 1 tablespoon cornstarch mixed with 2 tablespoons water (slurry) - 2 tablespoons vegetable oil - 1 teaspoon sesame oil - Salt and pepper to taste - Cooked jasmine rice or quinoa (for serving) Each item brings a unique flavor. The chicken adds protein, while the pineapple gives sweetness. The bell pepper adds crunch, and the snap peas offer a fresh taste. Garlic and ginger give it a warm kick. The soy sauce and honey blend salty and sweet, creating a tasty sauce. You can find the full recipe [here](#). Enjoy gathering these ingredients, and let’s get cooking! First, take your chicken breast and slice it into thin strips. Toss the chicken with a pinch of salt and pepper. This helps to add flavor. Set the chicken aside for marination while you prepare the other ingredients. Next, heat a tablespoon of vegetable oil in a large skillet over medium-high heat. Once hot, add the marinated chicken. Stir-fry the chicken for about 5 to 7 minutes. You want it to be cooked through and golden brown. Remove the chicken and set it aside. In the same skillet, add the remaining tablespoon of vegetable oil. Toss in the sliced onion, minced garlic, and grated ginger. Sauté these for about 2 minutes until they smell great. Then, add the sliced bell pepper and snap peas. Stir-fry for 3 to 4 minutes. The veggies should be tender yet still crisp. Now, return the cooked chicken to the pan. Add the diced pineapple for a sweet touch. Pour in the soy sauce and honey, stirring everything together. Let the flavors mingle for a minute. To thicken the sauce, mix cornstarch with water to make a slurry. Stir this into the pan. Cook for about 2 minutes until the sauce coats the chicken and vegetables. This gives a nice glossy finish. Serve your delicious stir fry over cooked jasmine rice or quinoa for a hearty meal. Enjoy this quick and tasty dish! If you want to see the full recipe, check out the recipe section. Cooking at high heat is key for a great stir fry. It helps your chicken cook fast and stay juicy. When you use high heat, the veggies stay crisp and colorful. Always use fresh ingredients. Fresh chicken and vibrant vegetables boost the flavor and texture of your dish. To take your stir fry to the next level, think about spices. Add a pinch of red pepper flakes for heat. You could also use garlic powder or a splash of lime juice for a zesty kick. Don't forget to garnish! Chopped green onions and sesame seeds look pretty and add extra flavor. Stir-frying is quick and fun! Use a large skillet or wok to give the food room to move. Make sure to keep stirring so everything cooks evenly. If you want a smoky flavor, try grilling your chicken. It can add a lovely char that pairs well with the sweet pineapple. {{image_2}} You can change the protein in this dish. Instead of chicken, use tofu or shrimp. Tofu makes a great vegetarian choice. Shrimp adds a nice seafood twist. For vegetables, you can swap in broccoli or carrots. Broccoli gives a nice crunch. Carrots add sweetness and color. Mix and match to find your favorite combo! If you need a gluten-free option, choose gluten-free soy sauce. It has the same great taste without gluten. Looking for a lower-sugar dish? Use sugar-free alternatives for honey. You can try agave syrup or a sugar substitute. These keep your stir fry tasty without the extra sugar. Want to spice things up? Add chili flakes for a kick. Start with a little, then add more if you like heat. Incorporating tropical fruits can take your dish to the next level. Try adding diced mango for even more sweetness. It pairs nicely with the pineapple and gives a tropical vibe. For the full recipe, check out [Full Recipe]. When you finish your Pineapple Chicken Stir Fry, let it cool down. This step helps prevent condensation. Place it in an airtight container to keep it fresh. Glass or plastic containers work well. You can store it in the fridge for up to three days. To reheat your stir fry, use a skillet over medium heat. This method helps maintain the texture. You can add a splash of water or soy sauce to keep it moist. Stir it occasionally for even heating. If you prefer the microwave, use a microwave-safe dish. Heat it in short bursts and stir in between. You can freeze Pineapple Chicken Stir Fry for later. First, cool the dish completely. Then, pack it in a freezer-safe container or bag. Be sure to remove as much air as possible. This trick prevents freezer burn. It can last up to three months in the freezer. To enjoy it later, thaw it overnight in the fridge before reheating. This way, it stays tasty and fresh. Pineapple Chicken Stir Fry lasts about 3 to 4 days in the fridge. Store it in a sealed container. Look for signs of spoilage, like off-smells or changes in color. If it smells funny or looks strange, don't eat it. Yes, you can make Pineapple Chicken Stir Fry ahead of time. Cook it, let it cool, and store it in the fridge. When you're ready to eat, just reheat it on the stove or in the microwave. Make sure it’s hot all the way through. You can serve Pineapple Chicken Stir Fry with cooked jasmine rice or quinoa. Other good sides are steamed broccoli or fried rice. You can also add a simple salad for some crunch. Yes, Pineapple Chicken Stir Fry is healthy. It has lean chicken, fresh veggies, and pineapple. Chicken provides protein, while veggies add vitamins and minerals. Pineapple gives you fiber and natural sweetness, making this dish a balanced meal. To make it spicier, add chili flakes or sliced jalapeños. You can also use sriracha or another hot sauce in the mix. Start with a little, taste it, and add more if you like heat! Pineapple Chicken Stir Fry is simple and tasty. We covered ingredients and steps for cooking. Fresh veggies and fruits deliver great flavors. You can swap proteins or veggies based on taste. Remember to store leftovers properly for later. Meal prepping can save time too. Whether you enjoy spicy or sweet, this dish fits all. Happy cooking!

Pineapple Chicken Stir Fry Flavorful and Easy Dinner

Looking for a quick and tasty dinner? Pineapple Chicken Stir Fry is your answer! This dish combines tender chicken, vibrant

To make a fresh and tasty spring roll salad, gather these key ingredients: - 1 cup rice vermicelli noodles - 1 cup shredded cabbage (green or purple) - 1 cup shredded carrots - 1 cup cucumber, julienned - 1 red bell pepper, thinly sliced - 1/2 cup fresh mint leaves, chopped - 1/2 cup fresh cilantro, chopped - 1/2 cup green onions, sliced These ingredients offer a crisp texture and bright colors. They blend well, creating a salad that is fun to eat. For the creamy peanut sauce, you will need: - 1/3 cup creamy peanut butter - 2 tablespoons soy sauce - 1 tablespoon rice vinegar - 1 tablespoon lime juice - 1 tablespoon honey or maple syrup - 1 teaspoon sriracha or chili paste (adjust for heat) - 2-3 tablespoons warm water (to thin) This sauce packs a punch of flavor. Its smoothness pairs perfectly with the salad. You can enhance your dish with these garnishes: - 1/4 cup roasted peanuts, chopped (for garnish) - Lime wedges (for serving) These extras add crunch and a zesty finish to your meal. You can mix and match based on your taste. For the full recipe, check out the Spring Roll Salad Delight 🥗🥢. To start, bring a large pot of water to a boil. Add 1 cup of rice vermicelli noodles. Cook them for about 3 to 5 minutes. Stir gently to prevent sticking. When they are tender, drain the noodles. Rinse them under cold water to stop the cooking. This keeps them firm and perfect for your salad. While the noodles cook, wash and prepare your fresh vegetables. You need 1 cup of shredded cabbage, which can be green or purple. Shred 1 cup of carrots and julienne 1 cup of cucumber and 1 red bell pepper. Chop 1/2 cup of fresh mint and 1/2 cup of cilantro. Finally, slice 1/2 cup of green onions. This colorful mix adds great flavor and crunch. In a small bowl, whisk together your peanut sauce. Combine 1/3 cup of creamy peanut butter, 2 tablespoons of soy sauce, 1 tablespoon of rice vinegar, and 1 tablespoon of lime juice. Add 1 tablespoon of honey or maple syrup for sweetness. If you like heat, mix in 1 teaspoon of sriracha or chili paste. Gradually add 2 to 3 tablespoons of warm water to thin the sauce. Adjust the water until it reaches your desired thickness. In a large bowl, combine the cooled rice vermicelli noodles with the shredded cabbage, carrots, cucumber, red bell pepper, mint, cilantro, and green onions. Toss everything gently to mix the flavors together. You want a nice blend of colors and tastes in every bite. To serve, divide the salad mixture among plates or bowls. Drizzle the peanut sauce generously over the top. For a lovely finish, garnish with chopped roasted peanuts and serve lime wedges on the side. The lime adds a zesty kick that brightens the whole dish. Enjoy this fresh and tasty spring roll salad! When cooking rice vermicelli noodles, follow the package instructions closely. Boil water in a large pot and add the noodles. They usually need just 3-5 minutes. Watch them closely; you want them soft but not mushy. Drain the noodles and rinse them under cold water. This step stops the cooking and helps keep them from sticking. Prep your vegetables while the noodles cook. Shred the cabbage and carrots, julienne the cucumber, and slice the bell pepper. Chop the fresh herbs and green onions. By preparing these in advance, you save time and keep everything fresh. You can even store prepped veggies in the fridge for a day, keeping them crisp and ready to use. Fresh herbs are key to this salad. Mint and cilantro add bright flavors. They make the dish pop! Chop them finely to spread their taste evenly. If you want, try adding basil or parsley for a new twist. You can also mix different herbs to find your favorite combo. {{image_2}} You can boost the protein in your spring roll salad in tasty ways. If you want a plant-based option, try tofu. Use firm tofu, and press it to remove extra water. Cube it and pan-fry until golden. Shrimp adds a sweet, briny flavor. Cook shrimp until they turn pink and curl. Chicken is another great choice. Grill or poach chicken, then slice it thin. Each of these proteins works well with the fresh veggies and peanut sauce. For a vegetarian meal, use eggs as a protein source. Soft-boiled or poached eggs add richness. For vegan options, stick with tofu or add chickpeas for extra protein. Ensure your peanut sauce uses maple syrup instead of honey. This keeps the sauce sweet and vegan-friendly. You can also add more nuts or seeds for crunch and nutrition. If someone has a peanut allergy, swap peanut butter for sunflower seed butter. It gives a nice nutty taste. Use gluten-free soy sauce if you need a gluten-free option. For those allergic to soy, coconut aminos work well. If you're avoiding rice vermicelli, try quinoa or zucchini noodles. Both are great alternatives and add a new twist to the dish. Feel free to mix and match ingredients to fit your dietary needs. You can store leftover spring roll salad in an airtight container. Keep it in the fridge. It stays fresh for about two days. The noodles and veggies will lose some crunch, but the flavor remains great. If you plan to eat it later, store the peanut sauce separately. This keeps everything fresh and tasty. Freezing spring roll salad is tricky. The fresh veggies don’t freeze well. They become mushy when thawed. However, you can freeze cooked rice vermicelli noodles. Place them in a freezer bag, squeeze out the air, and seal it tight. They can last up to three months in the freezer. When you're ready to use them, thaw in the fridge overnight. Store peanut sauce in a jar or container with a tight lid. It can last in the fridge for about a week. If you want to keep it longer, freeze the sauce in ice cube trays. Once frozen, transfer the cubes to a freezer bag. This way, you can take out just what you need. When you want to use it, thaw the cubes in the fridge or microwave. For the full recipe, check out the delightful Spring Roll Salad Delight. Serve spring roll salad in bowls. This way, everyone can enjoy their own serving. Drizzle the peanut sauce on top and add lime wedges for extra flavor. You can also sprinkle chopped peanuts for a nice crunch. Yes, you can make the peanut sauce ahead of time. Store it in a sealed container in the fridge. It will stay fresh for about a week. Just give it a good stir before using, as it may thicken. Spring roll salad lasts about 2-3 days in the fridge. Keep it in an airtight container to maintain its freshness. The veggies may lose some crunch, but the flavors will still be tasty. Yes, this recipe is gluten-free. Just ensure that the soy sauce is gluten-free. Many brands offer gluten-free options, so read the label when shopping. You can use thin rice noodles or even zucchini noodles as a substitute. If you want a low-carb option, try spiralized veggies. They add a fresh twist while keeping the dish light and delightful. This blog post covered how to make a fresh spring roll salad. You learned about key ingredients, made a tasty peanut sauce, and mixed it all together. We shared helpful tips for cooking noodles and preparing ingredients. You also saw variations that suit many diets and storage tips for leftovers. Try this salad at home. It’s fresh, healthy, and easy to make. Enjoy tasty flavors and a fun cooking experience!

Spring Roll Salad with Peanut Sauce Fresh and Tasty

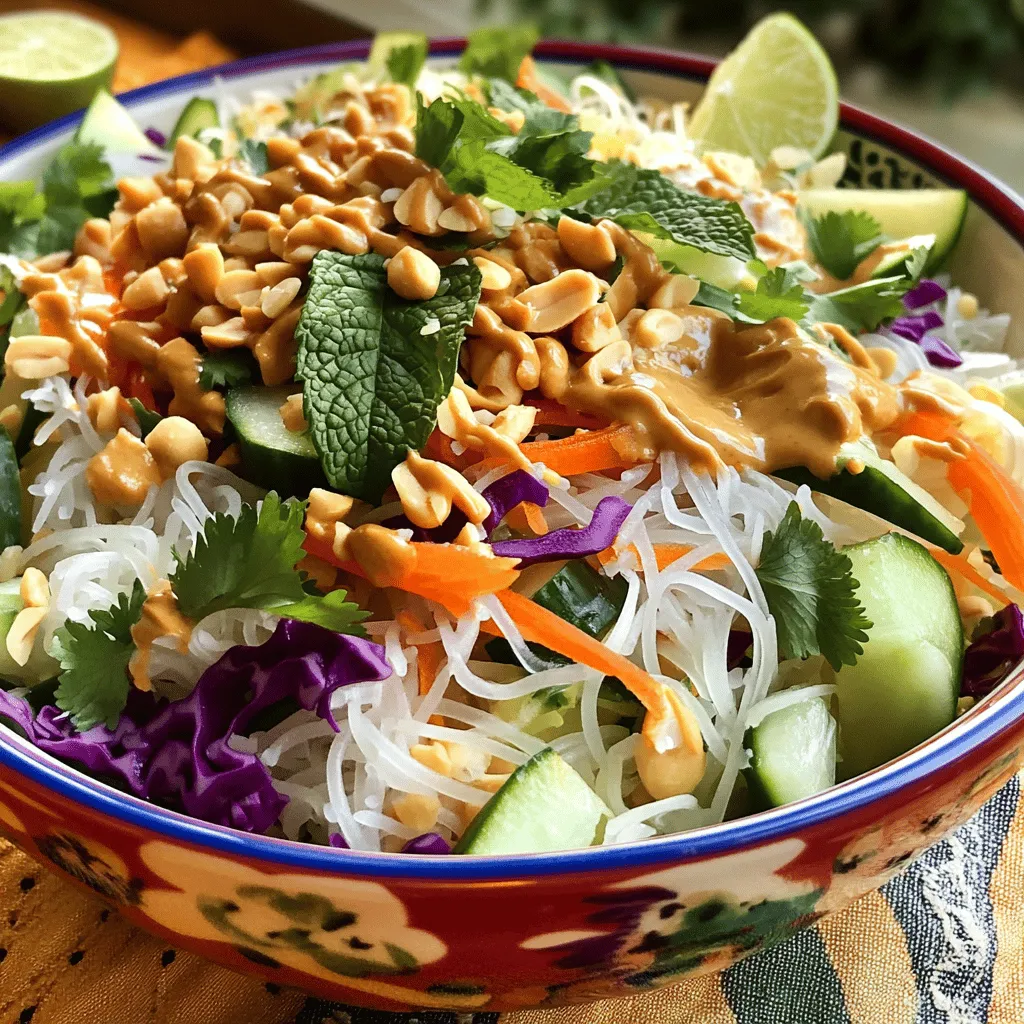
If you’re craving a fresh, vibrant dish, you’re in the right place! This Spring Roll Salad with Peanut Sauce is

Older posts
Newer posts
← Previous Page1 … Page8 Page9 Page10 … Page67 Next →

dsad

© 2025 My Saved Recipe • Built with GeneratePress

Our Policies

  • Copyright Policy
  • Cookie Policy
  • GDPR Policy
  • Privacy Policy
  • Disclaimer
  • Terms Of Use

More Information

  • Home
  • About
  • Contact
  • Appetizers
  • Dessert
  • Dinner
  • Drinks
©2025, My Saved Recipe About Back To Top