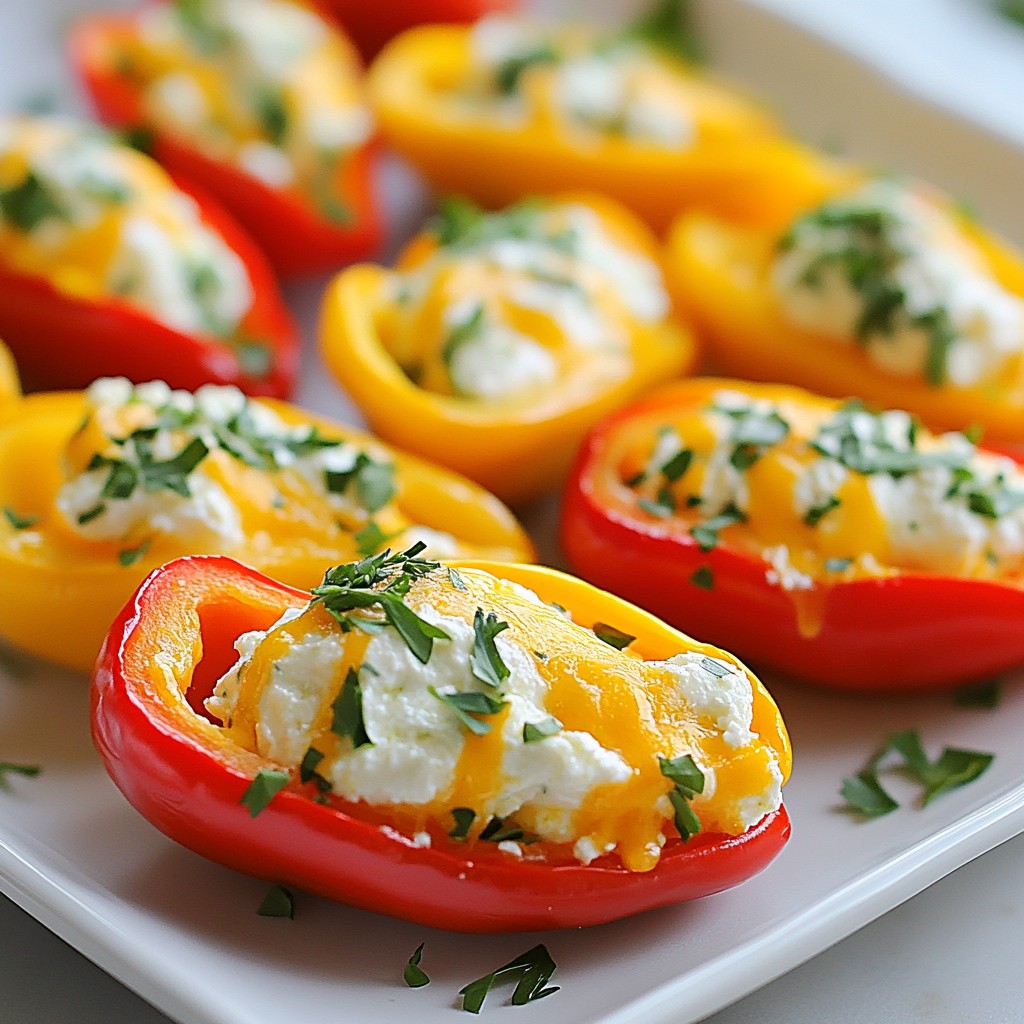
Looking for a quick and tasty snack? Cheese Stuffed Mini Peppers are your answer! These colorful bites are easy to make, packed with flavor, and perfect for any occasion. With just a few simple ingredients, you can create a dish that impresses everyone. Whether you’re hosting a party or need a healthy snack, these cheesy peppers are sure to satisfy. Let’s dive into this delicious recipe!
Why I Love This Recipe
- Vibrant Colors: The combination of red, yellow, and orange mini peppers makes for a visually stunning dish that brightens up any table.
- Rich and Creamy Filling: The blend of cream cheese, cheddar, and feta creates a deliciously creamy texture that melts in your mouth.
- Quick and Easy: This recipe is simple to prepare, making it a perfect option for both weeknight dinners and last-minute gatherings.
- Customizable: You can easily tweak the filling ingredients to suit your taste, such as adding bacon, herbs, or spices for extra flavor.
Ingredients
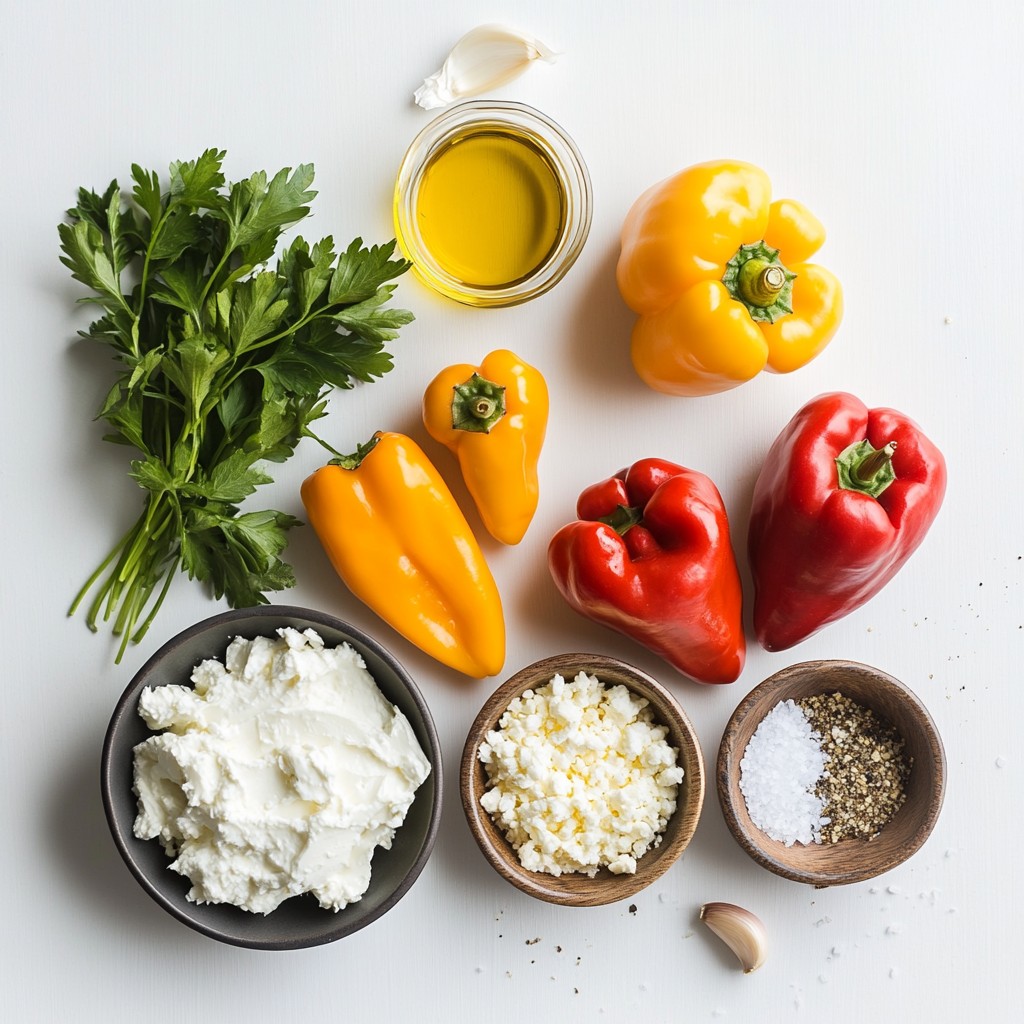
List of Ingredients
- 12 mini sweet peppers (red, yellow, and orange)
- 1 cup cream cheese, softened
- 1/2 cup shredded sharp cheddar cheese
- 1/4 cup crumbled feta cheese
- 1 garlic clove, minced
- 1 tablespoon fresh parsley, chopped
- 1 teaspoon Italian seasoning
- Salt and pepper to taste
- 1 tablespoon olive oil
When I create cheese stuffed mini peppers, I love to use a mix of sweet peppers. The colors make the dish pop. The cream cheese gives a rich and creamy base. Adding sharp cheddar cheese amps up the flavor. Feta cheese adds a nice tangy touch. Garlic brings in a warm aroma. Fresh parsley adds a lovely green color and freshness. Italian seasoning adds depth and a hint of herbiness. I always adjust salt and pepper to fit my taste. A drizzle of olive oil helps the peppers bake nicely.
Optional Ingredients for Added Flavor
- Different cheese options
- Spices and herbs variations
- Additional toppings like bacon or chives
You can mix things up with cheese options. Try goat cheese for a tangy twist. Add spices like paprika for some heat. Fresh herbs like basil or dill can add great flavor too. For an extra crunch, sprinkle crispy bacon bits or chives on top. These simple changes can turn a classic recipe into something new and exciting!
Step-by-Step Instructions
Preparation Steps
1. First, preheat your oven to 375°F (190°C). This step warms the oven for cooking.
2. Next, cut the mini peppers in half from top to bottom. Remove the seeds carefully. This keeps the peppers crisp.
3. In a mixing bowl, combine the softened cream cheese, shredded cheddar, and crumbled feta.
4. Add minced garlic, chopped parsley, and Italian seasoning. Mix well. Season with salt and pepper to taste. This creates a tasty filling.
Baking Instructions
1. Now, stuff each pepper half generously with the cheese mixture. Make sure to pack it in well. This helps to maximize the flavor.
2. Arrange the stuffed peppers on a baking sheet lined with parchment paper. Drizzle olive oil over them for added richness.
3. Bake the peppers in the preheated oven for about 20-25 minutes. The peppers should be tender, and the cheese should be bubbly and slightly golden.
Serving Instructions
1. After baking, let the peppers cool for a few minutes. This makes them easier to handle.
2. For a pretty touch, arrange the stuffed peppers on a colorful platter. Garnish with more chopped parsley. This adds color and freshness to your dish.
Tips & Tricks
Expert Tips for Perfecting the Recipe
To achieve the best texture with cheese, use cream cheese that is softened. This makes mixing easy and helps create a smooth filling. Blend in the other cheeses well. I like to use a mix of sharp cheddar and feta for a great taste. The sharpness of cheddar pairs nicely with the creamy feta.
Seasoning is key. Make sure to add salt, pepper, and Italian seasoning to your cheese mix. These will elevate the flavors. Don't skip the garlic; it adds a nice kick. Mix everything until it is fully combined. You want each bite to be packed with flavor.
Common Mistakes to Avoid
One common mistake is overstuffing the peppers. If you cram too much filling in, it can spill out while baking. Aim for a generous but controlled amount. Stuff them firmly, but not to the point of bursting.
Another mistake is underbaking or overbaking. You want the peppers to be tender and the cheese to be bubbly. Bake them for 20-25 minutes at 375°F (190°C). Keep an eye on them during the last few minutes. Remove them when they look slightly golden.
Suggestions for Serving
For dipping sauces, I recommend a tangy ranch or a cool yogurt sauce. They balance the richness of the cheese. A homemade garlic aioli also works well.
When it comes to beverages, pair these peppers with a crisp white wine or a light beer. If you prefer non-alcoholic options, try sparkling water with a splash of lemon. This adds a refreshing touch. Enjoy your cheese stuffed mini peppers with these options for a complete snack experience!
Pro Tips
- Choosing Peppers: Select mini sweet peppers that are firm and brightly colored for the best flavor and texture.
- Mixing Cheese: For a creamier filling, let the cream cheese soften at room temperature before mixing with other cheeses.
- Extra Flavor: Consider adding chopped jalapeños or red pepper flakes to the cheese mixture for a spicy kick.
- Serving Suggestions: Serve these stuffed peppers with a side of marinara sauce for dipping to enhance the flavor.
Variations
Flavor Variations
You can spice up these cheese stuffed mini peppers easily. Try adding jalapeños to the cheese mix. This adds heat and depth. For a Mediterranean twist, include sun-dried tomatoes. They bring a sweet, tangy flavor that pairs well with cheese. Mix and match to find your favorite blend!
Dietary Variations
These peppers work well for different diets. For a vegetarian option, use only plant-based cheeses. This keeps the flavors rich while being meat-free. If you need gluten-free options, check your cheese labels. Most cheese is gluten-free, so this dish fits many diets with small tweaks.
Presentation Variations
Presentation matters! Serve your cheese stuffed mini peppers on a colorful platter. Garnish with extra parsley for a pop of color. For themed events, use toppings like red sauce for a festive touch. You can even arrange the peppers to form a fun shape, like a heart or a star. Make it fun and creative!
Storage Information
Storing Leftovers
For storing leftover cheese stuffed mini peppers, use airtight containers. Glass or plastic containers work well. Make sure to let them cool before sealing. This helps keep them fresh. Place the container in the fridge. They can last up to three days.
Reheating Guidelines
You can reheat your leftovers in two ways: the microwave or the oven. The microwave is quick but may change the texture. Heat for about 30 seconds to 1 minute. If you want them crispy, use the oven. Preheat it to 350°F (175°C) and bake for about 10 minutes. This keeps the peppers firm and the cheese melty.
Freezing Instructions
To freeze stuffed peppers, first, let them cool completely. Place them in a single layer on a baking sheet. Freeze for 2-3 hours until solid. Then, transfer them to a freezer-safe bag. Make sure to squeeze out the air. They can stay frozen for up to three months. To thaw, move them to the fridge overnight. Reheat them in the oven as mentioned before. Enjoy your tasty snack later!
FAQs
How do you ensure cheese stuffed mini peppers don’t get soggy?
To keep cheese stuffed mini peppers from getting soggy, start by baking them at the right temperature. I use 375°F (190°C). This allows the peppers to cook evenly. Make sure to remove the seeds and membranes before stuffing. This step reduces moisture. When mixing your cheese filling, use softened cream cheese. This helps the filling bind well. Use just enough olive oil to coat the peppers lightly. Too much oil can make them soggy. Lastly, don’t overbake. Check them after 20 minutes. You want them tender but not mushy.
Can I make cheese stuffed mini peppers ahead of time?
Yes, you can make cheese stuffed mini peppers ahead of time. Prepare them up to the baking step. Once stuffed, cover them and keep them in the fridge. They will stay fresh for about 24 hours. When ready to bake, just add a few extra minutes to the cooking time. If you freeze them, they can last for about a month. Thaw in the fridge overnight before baking. This method saves time and makes hosting easy.
Are cheese stuffed mini peppers healthy?
Cheese stuffed mini peppers can be a healthy snack. They are low in calories and high in vitamins. Mini peppers are rich in vitamin C and fiber. The cheese adds flavor and protein. To keep them healthy, use lower-fat cheese options. You can also add more herbs and spices instead of salt. This way, you enjoy great taste while keeping it nutritious. Remember to balance them with other healthy foods for a full meal.
You now have a clear guide to make cheese stuffed mini peppers. We covered the key ingredients, step-by-step instructions, and handy tips. Try different flavors and presentations to make this dish your own. Remember to avoid common mistakes like overstuffing. With practice, your stuffed peppers will impress everyone at your table. Enjoy making this fun, tasty recipe anytime!