Craving a quick and tasty snack? Cheesy pizza bombs are your answer! With gooey cheese and pepperoni wrapped in soft dough, these bites deliver all the flavor you want. They’re easy to make and perfect for any gathering. In just a few simple steps, you can impress friends and family with this delicious treat. Let's dive in and make your snack game even better!
Why I Love This Recipe
- Easy to Make: This recipe requires minimal ingredients and simple steps, making it perfect for a quick snack or appetizer.
- Customizable: You can easily switch out the fillings with your favorite toppings, allowing everyone to tailor their pizza bombs to their taste.
- Fun to Eat: These cheesy bites are not only delicious but also fun to eat, perfect for parties or family gatherings.
- Perfectly Dippable: Serve them with pizza sauce for dipping, enhancing the flavor and adding a classic touch.
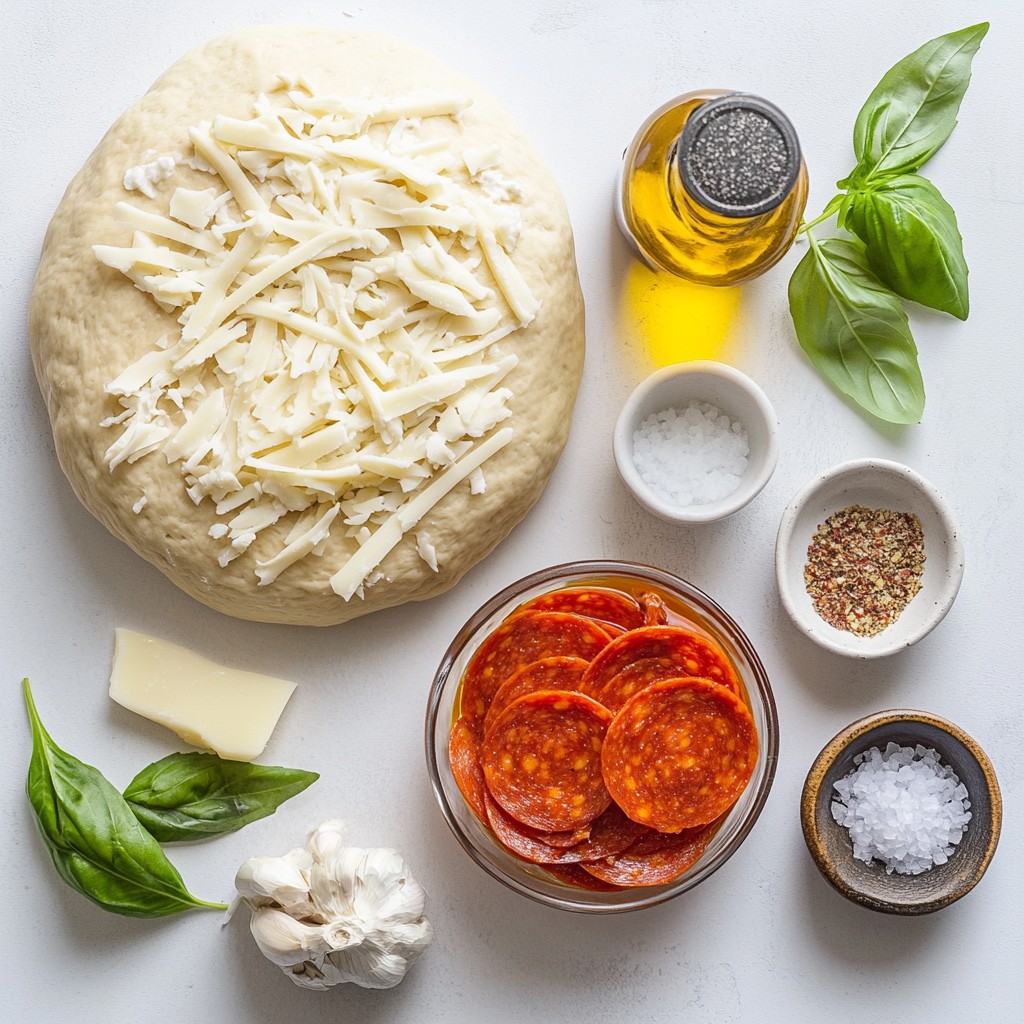
Ingredients
Required Ingredients
- 1 can of refrigerated pizza dough
- 1 cup shredded mozzarella cheese
- 1/2 cup pepperoni slices (or your favorite toppings)
- 1/4 cup pizza sauce (for dipping)
- 1 tablespoon Italian seasoning
- 2 tablespoons olive oil
- 1/4 teaspoon garlic powder
- Salt to taste
- Fresh basil leaves (optional for garnish)
To make cheesy pizza bombs, gather these simple ingredients. Start with the refrigerated pizza dough. This dough is easy to work with and saves time. You'll need shredded mozzarella cheese for that gooey, melty goodness inside. Pepperoni slices add a classic flavor, but feel free to switch it up with other toppings you love.
For the dipping sauce, pizza sauce is a must. It pairs perfectly with each bomb. Italian seasoning adds extra flavor, while olive oil brushes on a nice shine. Garlic powder brings a touch of zest, and salt enhances all the flavors. Finally, fresh basil leaves make a lovely garnish, adding a pop of color.
These ingredients come together to create a fun and tasty snack. You can whip these up in no time, perfect for parties or movie nights. Enjoy the process of creating your cheesy pizza bombs!
Step-by-Step Instructions
Preparation Steps
1. Preheat oven and prepare baking sheet
Start by setting your oven to 400°F (200°C). This heat makes the pizza bombs golden and fluffy. Line a baking sheet with parchment paper to prevent sticking.
2. Roll out pizza dough and cut into squares
Take the refrigerated pizza dough from the can. Roll it flat on a lightly floured surface until it’s about 1/4 inch thick. Cut the dough into 2-inch squares. This size is perfect for stuffing!
3. Assemble the filling
In the center of each square, place a spoonful of shredded mozzarella cheese. Top it with a few slices of pepperoni or your favorite toppings. This blend gives a tasty surprise inside each bomb.
Cooking Steps
1. Seal the dough squares
Fold each corner of the dough square toward the center. Press the seams tightly to seal in the cheese and toppings. This step keeps the gooey goodness from leaking out while baking.
2. Brush with flavored oil mixture
In a small bowl, mix olive oil, garlic powder, and Italian seasoning. Brush this flavorful mixture over each pizza bomb. This adds extra taste and a nice shine.
3. Bake and cool
Place the stuffed pizza bombs on the prepared baking sheet. Make sure they have space to rise. Bake them for 12-15 minutes. They should be golden brown and puffed up. Once done, let them cool for a few minutes before serving. Enjoy them warm with pizza sauce for dipping!
Tips & Tricks
Ensuring the Perfect Dough Texture
The thickness of your dough matters. Aim for about 1/4 inch thick. This thickness gives a nice balance of chewiness and crispness. If it’s too thin, your cheesy pizza bombs can burst in the oven.
To seal the dough effectively, fold each corner to the center. Pinch the seams tightly. This step keeps the cheese and toppings from leaking out while baking. A good seal means a gooey surprise inside!
Flavor Enhancements
Using different seasonings can amp up the taste. Besides Italian seasoning, try adding some crushed red pepper for heat. You can also mix in dried oregano or thyme for extra flavor.
Adding spices to the filling makes each bite special. A dash of garlic powder or even some onion powder can make a big difference. Experiment with your favorite herbs!
Serving Suggestions
To present the cheesy pizza bombs, place them on a rustic wooden board. This adds charm to your table. You can also use a colorful platter for a fun touch.
Serve warm with pizza sauce on the side for dipping. You can also try ranch dressing or marinara sauce. A sprinkle of fresh basil leaves on top adds color and freshness.
Pro Tips
- Use Fresh Ingredients: Whenever possible, opt for fresh toppings like vegetables or homemade sauce for a burst of flavor.
- Experiment with Cheese: Try mixing different types of cheese, like cheddar or provolone, for a unique cheesy experience.
- Don’t Overfill: Be careful not to overfill the dough, as this can cause the pizza bombs to burst open while baking.
- Serve Immediately: These pizza bombs are best enjoyed right out of the oven while they’re warm and gooey!
Variations
Vegetarian Options
You can make cheesy pizza bombs vegetarian by using fresh veggies. Try bell peppers, mushrooms, or spinach. These add flavor and color. You can also use a blend of cheeses, like mozzarella and feta. This mix gives you a tasty Mediterranean-style pizza bomb. Just add olives and sun-dried tomatoes for that authentic touch.
Alternative Proteins
If you want to switch up the protein, cooked chicken or sausage work great. Chop them small and mix them with cheese. This adds a hearty bite. For those who prefer vegan options, you can use dairy-free cheese. Look for brands that melt well. You can also use vegan pizza dough for a fully plant-based treat.
Fusion Flavors
Get creative with fusion flavors by adding international ingredients. Think of using kimchi for a spicy kick or BBQ sauce for a sweet twist. You can even try adding curry powder for an Indian flair. Play with unique topping combinations, such as pineapple and jalapeño. These twists make every bite exciting and new.
Storage Info
Storing Leftovers
To keep your cheesy pizza bombs fresh, place them in an airtight container. Make sure they are cool before sealing. This helps keep moisture out. Store them in the fridge. They stay good for about 3 to 4 days.
Freezing Tips
If you want to save some for later, freezing works well. First, let the pizza bombs cool completely. Then, wrap each one in plastic wrap. Place them in a freezer-safe bag. This keeps them safe from freezer burn.
To reheat, simply bake them at 350°F (175°C) for about 15-20 minutes. They will taste fresh and delicious! To maintain flavor and texture, don’t microwave them. Baking helps keep that nice, crispy outside.
FAQs
Common Preparation Questions
Can I make cheesy pizza bombs ahead of time? Yes, you can make pizza bombs ahead of time. Prepare them, but do not bake. Store them in the fridge for up to a day. When ready, just bake them as directed.
How do I reheat leftover pizza bombs? To reheat pizza bombs, place them on a baking sheet. Preheat your oven to 350°F (175°C). Bake for about 5-8 minutes, or until warm. This keeps them crispy.
Ingredient Questions
Can I use gluten-free pizza dough? Yes, gluten-free pizza dough works well. Just follow the same steps. Make sure to check the brand for best results.
What can I substitute for mozzarella cheese? You can use any cheese that melts well, like cheddar or provolone. For a vegan option, try a plant-based cheese that melts.
Cooking Questions
What temperature should I bake them at? Bake pizza bombs at 400°F (200°C). This gives them the right crispness and golden color.
How can I tell when they are done? Pizza bombs are done when they are puffed and golden brown. You can also check by looking for a bubbly cheese filling peeking out.
This blog post covered how to make delicious cheesy pizza bombs. We discussed key ingredients, step-by-step instructions, and tips for the best results. I shared ways to customize flavors, including vegetarian and fusion options. Proper storage techniques preserve freshness and taste.
Now it's time to gather your ingredients and get cooking. Enjoy your tasty pizza bombs with loved ones!