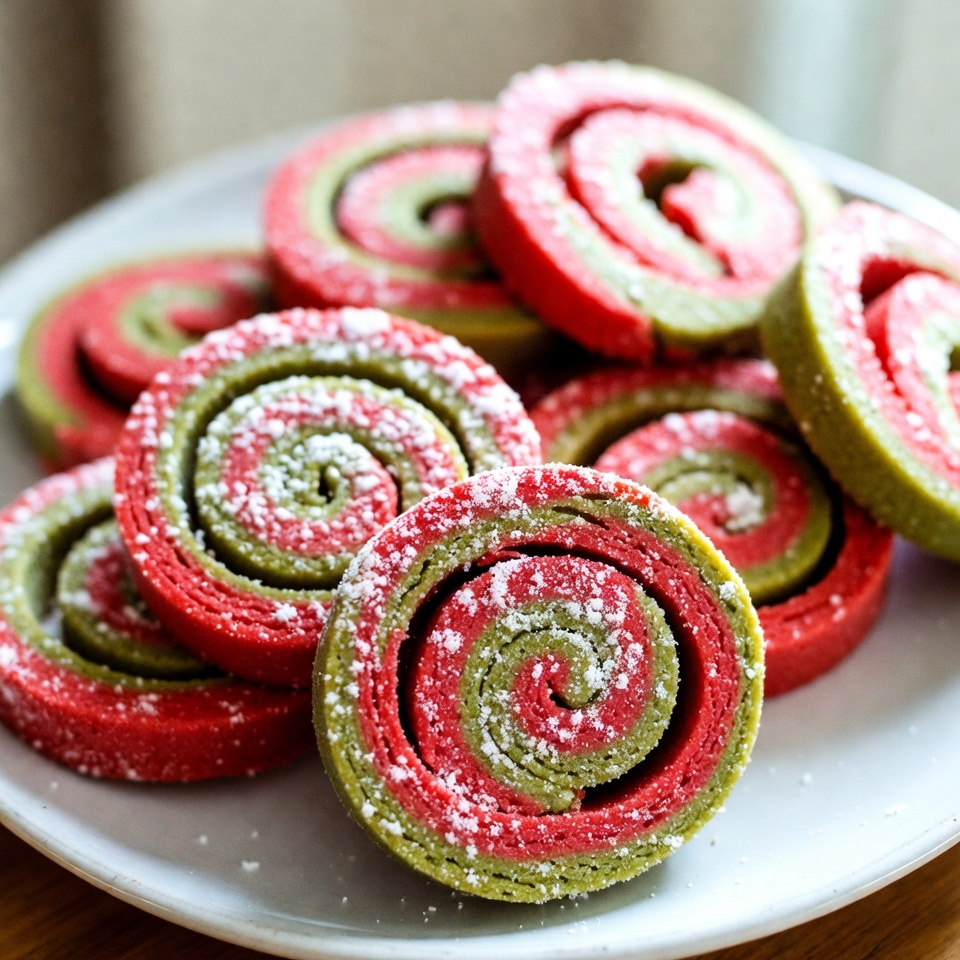
Craving a festive treat that's as fun to make as it is to eat? Look no further than Christmas Pinwheel Cookies! These vibrant, spiral cookies are a perfect blend of flavor and cheer, making them a holiday favorite. In this guide, I'll walk you through the simple steps of mixing, rolling, and decorating these delightful cookies. With quick tips and fun variations, you'll impress your friends and family with your baking skills this season!
Why I Love This Recipe
- Festive Appearance: These cookies are not only delicious but also visually stunning with their vibrant red and green colors, making them perfect for holiday gatherings.
- Fun to Make: Rolling and stacking the dough is a fun activity, especially with kids, bringing a sense of joy and creativity to your holiday baking.
- Delightful Flavor: The combination of vanilla and almond extracts gives these cookies a unique and delightful flavor that pairs perfectly with the sweetness of the sugar.
- Perfect for Gifting: These cookies make an excellent gift for friends and family during the holiday season, wrapped up in festive packaging for a personal touch.
Ingredients
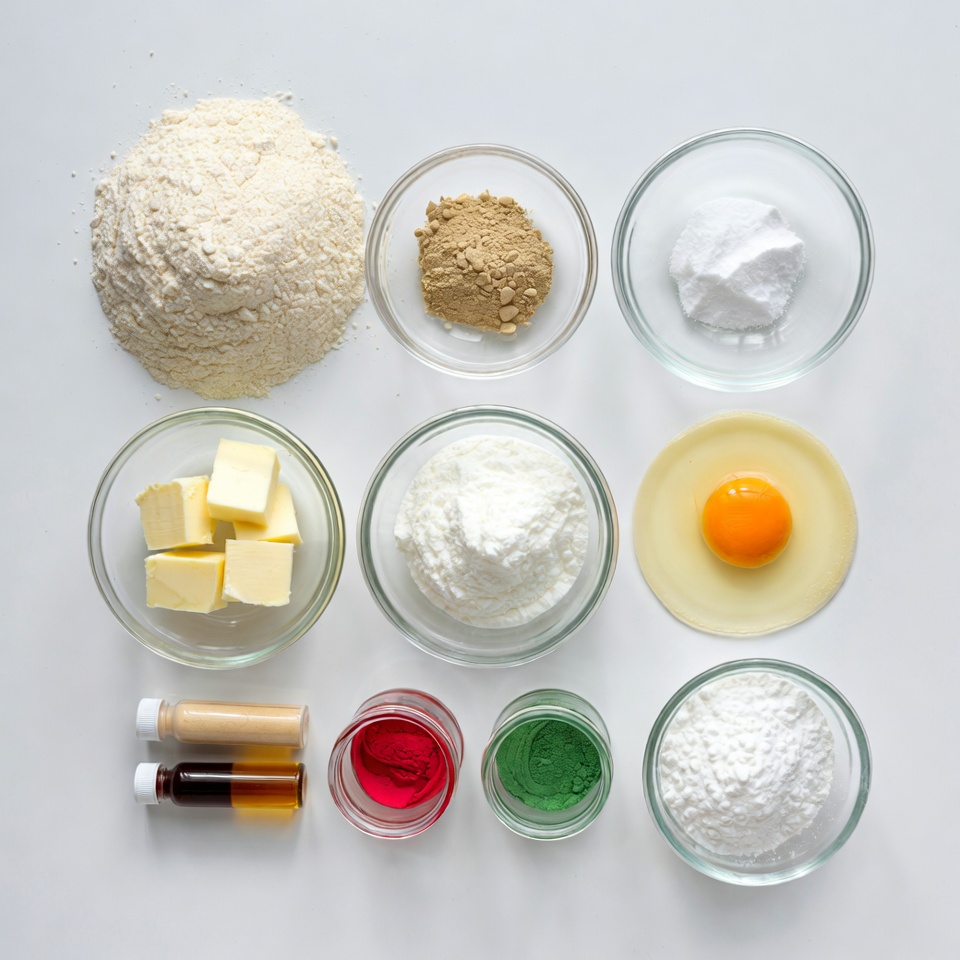
List of Ingredients
- 2 ¾ cups all-purpose flour
- 1 teaspoon baking powder
- ½ teaspoon salt
- 1 cup unsalted butter, softened
- 1 cup granulated sugar
- 1 egg
- 1 teaspoon vanilla extract
- 1 teaspoon almond extract
- ½ cup red food coloring
- ½ cup green food coloring
- ½ cup powdered sugar (for dusting)
These ingredients create a fun and colorful treat. The butter gives cookies a rich taste. The sugar makes them sweet and delightful. Food coloring adds a festive touch. The flour keeps the cookie structure strong. Baking powder helps them rise. Salt balances the flavors well. Vanilla and almond extracts add nice aromas. Using these ingredients, you will bake cookies everyone loves.
Step-by-Step Instructions
Mixing the Dry Ingredients
- In a medium bowl, whisk together 2 ¾ cups of flour, 1 teaspoon of baking powder, and ½ teaspoon of salt.
- Set this mix aside for later use.
Preparing the Butter Mixture
- In a large bowl, cream 1 cup of softened butter and 1 cup of sugar until fluffy.
- Add 1 egg, 1 teaspoon of vanilla extract, and 1 teaspoon of almond extract. Mix everything until combined.
Combining Ingredients
- Gradually add the dry mix to the wet mix. Stir until just combined.
- Divide the dough into two equal parts. Leave one part plain. Add ½ cup of red food coloring to the other half and mix well.
- Repeat this process, adding ½ cup of green food coloring to the plain half.
Rolling and Chilling Dough
- Place each color of dough on separate sheets of parchment paper. Roll each into a rectangle about ¼ inch thick.
- Remove the top parchment layer from one color. Carefully stack the other color on top.
- Using the parchment, roll the dough tightly into a log. Wrap in parchment paper and chill in the fridge for at least 2 hours.
Baking the Cookies
- Preheat your oven to 350°F (175°C). Line a baking sheet with parchment paper.
- Once chilled, slice the log into ¼-inch thick rounds.
- Place the cookies on the prepared baking sheet, leaving space between them.
- Bake for 8-10 minutes, until the edges are lightly golden. Cool on the baking sheet for a few minutes before moving to a wire rack.
- After cooling, dust the cookies with powdered sugar before serving.
Tips & Tricks
Achieving Perfect Cookies
Chilling the dough is a key step. It helps the cookies hold their shape. When the dough is cold, it bakes evenly. If you skip this step, your cookies may spread too much. I recommend chilling for at least two hours. For the best flavor, chill overnight.
To ensure even baking, keep cookie sizes uniform. Use a ruler or your eyes to measure. Place the cookies about two inches apart on the baking sheet. This space allows heat to circulate. Watch them closely while baking. They should turn golden at the edges but stay soft in the middle.
Decorating Ideas
For festive presentations, dust the cookies with powdered sugar. It gives them a snowy look. You can also use colorful sprinkles for a fun touch. Try white chocolate drizzle for a sweet contrast.
If you're looking for alternatives, consider using cocoa powder. It adds a nice richness. You can also use crushed candy canes for a minty twist. Each option brings a new look and flavor to your cookies.
Pro Tips
- Chill for Best Results: Chilling the dough not only makes it easier to slice but also enhances the flavors, allowing the ingredients to meld perfectly.
- Use Quality Food Coloring: For vibrant colors, opt for gel food coloring instead of liquid. Gel colors provide a richer hue without adding extra moisture to the dough.
- Don’t Overbake: Keep an eye on the cookies as they bake. They should be lightly golden around the edges but soft in the center to ensure they stay chewy.
- Serve with Style: Dust the cooled cookies with powdered sugar just before serving for a festive touch that adds both flavor and visual appeal.
Variations
Flavor Modifications
You can change the flavor of your Christmas pinwheel cookies easily. Instead of vanilla and almond, try peppermint extract for a fresh twist. The strong minty taste will make your cookies stand out. You can also mix extracts, like vanilla and orange, for a unique flavor.
Next, think about your colors. You can use blue and yellow food coloring for a fun look. Or, swap red and green for a monochrome style using shades of pink and white. Let your creativity shine through your colors!
Dietary Options
If you have dietary needs, you can still enjoy these cookies. For a gluten-free version, swap all-purpose flour with a gluten-free blend. Make sure the blend can substitute cup for cup. This way, you get the same great texture.
For vegan options, replace the butter with coconut oil or a vegan butter substitute. You can use flaxseed or applesauce instead of the egg. Mix one tablespoon of flaxseed with three tablespoons of water and let it sit for a few minutes. This mixture works well in most cookie recipes. Enjoy your tasty treats while meeting your dietary needs!
Storage Info
Proper Storage Guidelines
To keep your Christmas Pinwheel Cookies fresh, store them in an airtight container. This helps to maintain their soft texture and flavor. You can use a plastic or glass container with a tight lid. Place a layer of parchment paper between the cookies to avoid sticking. Keep them at room temperature for up to one week. If you want to keep them longer, consider freezing.
Freezing Cookies
You can freeze both uncooked dough and baked cookies. For uncooked dough, wrap it tightly in plastic wrap. Then, place it in a freezer bag. This way, you can bake fresh cookies later. Label the bag with the date for easy reference.
For baked cookies, let them cool completely. Then, layer them in a freezer-safe container with parchment paper between layers. They can last up to three months in the freezer. When you want to enjoy them, let them thaw at room temperature. Reheat in the oven for a warm treat!
FAQs
How long do Christmas Pinwheel Cookies last?
Christmas Pinwheel Cookies stay fresh for about one week. Store them in an airtight container. They taste best within the first few days.
Can I make these cookies ahead of time?
Yes, you can make these cookies ahead of time. You can prepare the dough and chill it. This way, you can bake them later when you need them.
What can I substitute for almond extract?
If you don't like almond extract, try using vanilla extract instead. You can also use hazelnut or coconut extract for a different flavor twist.
How do I prevent my cookies from spreading?
To keep cookies from spreading, chill the dough well before baking. Also, avoid over-creaming the butter and sugar mixture.
Can I use different colors for the pinwheels?
Absolutely! You can use any food coloring you like. Mix and match colors for fun designs. Just remember to keep the dough thickness consistent.
You now have a clear guide to making Christmas Pinwheel Cookies. We covered ingredients, step-by-step instructions, tips, variations, and storage info. Each section helps you create tasty and colorful cookies for any holiday. Use the tips to ensure perfect cookies every time. Remember, experimenting with flavors and colors adds fun. Store your cookies properly to keep them fresh longer. Enjoy the process, and share your sweet results with family and friends! Happy baking!