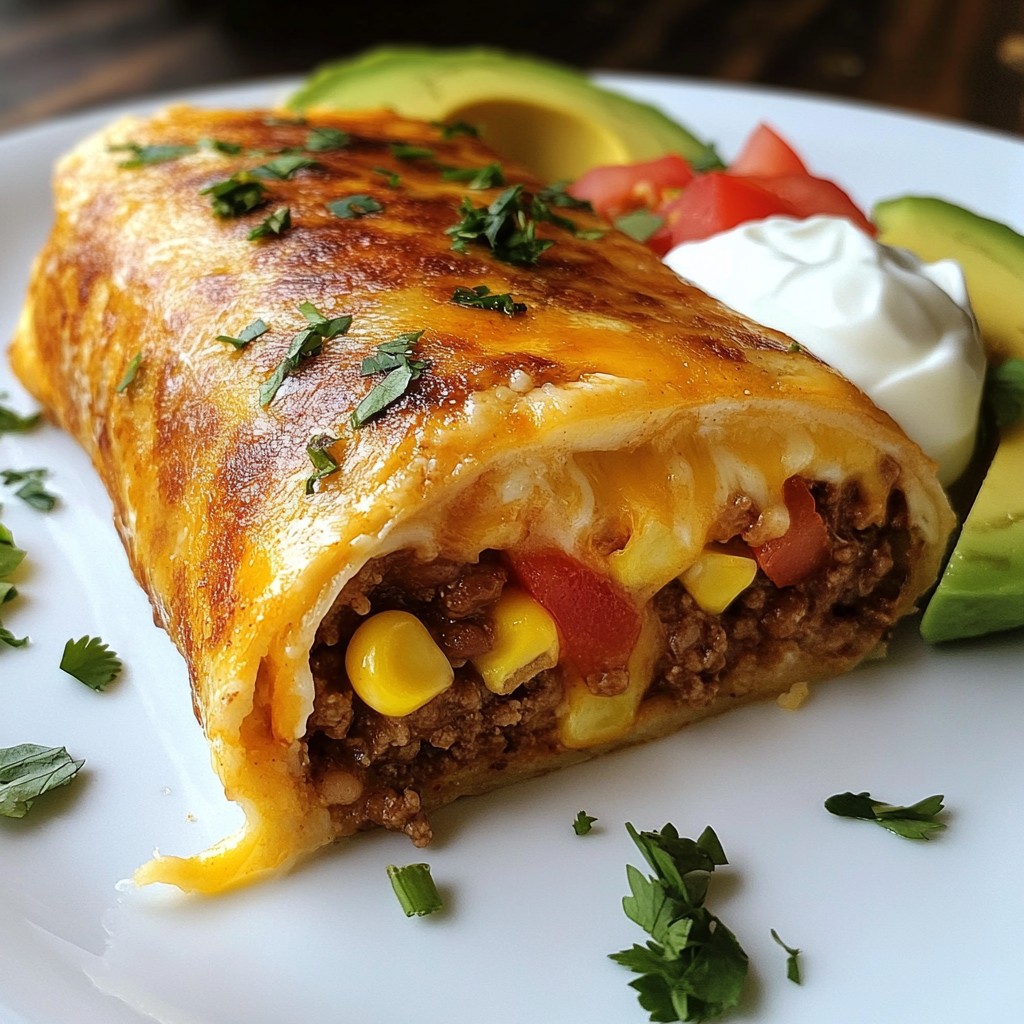
Craving a tasty twist on a classic dish? The Grilled Cheese Burrito is your answer! This fun recipe merges gooey cheese and savory fillings into a crispy wrap. It's easy to make and perfect for any meal. I’ll walk you through simple steps, essential ingredients, and creative twists that will make your taste buds dance. Let’s get grilling and turn this comfort food dream into a reality!
Why I Love This Recipe
- Comforting and Satisfying: This grilled cheese burrito combines the best of both worlds—grilled cheese and burrito—in one delicious dish, making it a perfect comfort food.
- Customizable Fillings: You can easily adjust the fillings to suit your taste, whether you prefer beef, chicken, or a vegetarian option packed with beans and veggies.
- Quick and Easy: With a prep time of just 15 minutes, this recipe is perfect for a quick weeknight dinner or a satisfying snack.
- Great for Sharing: This recipe makes 4 servings, making it a great option for sharing with family or friends for a fun meal together.
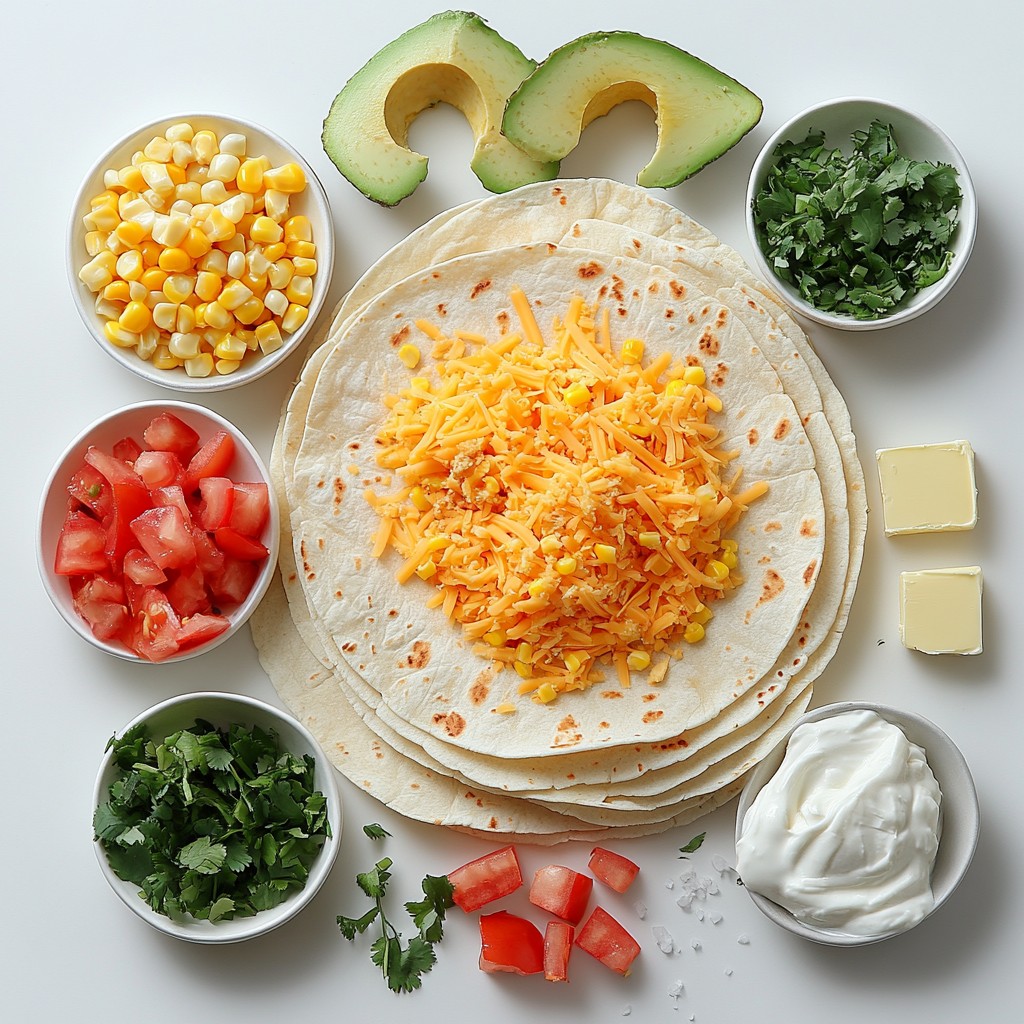
Ingredients
List of Essential Ingredients
- 4 large flour tortillas
- 1 cup shredded cheddar cheese
- 1 cup shredded mozzarella cheese
- 1 cup cooked and seasoned ground beef or shredded chicken (optional)
- 1/2 cup refried beans
- 1 medium tomato, diced
- 1/2 cup corn kernels (canned or fresh)
- 1/4 cup fresh cilantro, chopped
- 1 avocado, sliced
- 2 tablespoons sour cream (for serving)
- Salt and pepper to taste
- Butter for grilling
To make a great Grilled Cheese Burrito, you need simple, fresh ingredients. The flour tortillas are your base. They hold all the good stuff inside.
Cheddar and mozzarella are the star cheeses. They melt perfectly and blend well together. If you want meat, ground beef or shredded chicken adds flavor.
Refried beans make the burrito creamy and filling. Fresh diced tomatoes and corn add crunch and sweetness. Chopped cilantro brings a burst of freshness.
Don’t forget the avocado! It adds a creamy texture. Sour cream on the side makes it even better. Season with salt and pepper to enhance all the flavors.
Finally, use butter for grilling. It gives the burrito a nice golden crust. Each ingredient works together to create a tasty meal. You can mix and match to suit your taste!
Step-by-Step Instructions
Preparation Steps
1. Preheat skillet and prepare tortillas
Start by preheating a large skillet over medium heat. Lightly butter one side of a tortilla. This butter will help create a nice, crispy crust.
2. Layer fillings on the tortilla
Place the buttered side down on the skillet. On one half of the tortilla, add:
- A generous amount of shredded cheddar cheese
- A generous amount of shredded mozzarella cheese
- A spoonful of refried beans
- Ground beef or shredded chicken, if you want
- Diced tomatoes
- Corn kernels
- Chopped cilantro
Sprinkle some salt and pepper on top for extra flavor.
3. Cooking the burrito to perfection
Fold the tortilla in half over the fillings. Press down gently to help seal it. Cook for about 3-4 minutes. You want the bottom to be golden and the cheese to begin melting.
Cooking Time and Techniques
1. Timing for each side
Carefully flip the burrito over. If needed, add a little more butter to the skillet. Cook for another 3-4 minutes on the other side. You are aiming for a golden, crispy exterior.
2. Tips for achieving a crispy exterior
Make sure your skillet is not too hot. If it is, the outside might burn before the cheese melts. Keep an eye on the burrito. When both sides are golden, you are ready to enjoy!
Tips & Tricks
Perfecting Your Grilled Cheese Burrito
To make a great grilled cheese burrito, cheese is key. I recommend using a mix of cheddar and mozzarella. The cheddar adds sharpness, while mozzarella brings stretch. You can also try Monterey Jack for a different taste.
When filling your burrito, avoid overstuffing. Too many toppings can cause leaks. Use just enough filling to create a nice balance. Remember to layer your ingredients. Start with cheese, then add refried beans, meat, and veggies. This helps keep the burrito together.
Cooking Gear and Tools
For the best result, use a non-stick skillet. A heavy skillet works well too. It helps the burrito cook evenly. If you like grill marks, try a grill pan.
Make sure to have a spatula on hand. It helps flip your burrito without breaking it. If you want to cook multiple burritos, a flat griddle is great. It allows you to make several at once.
Pro Tips
- Use Fresh Ingredients: Always opt for fresh vegetables and quality cheeses to enhance the flavor of your burrito.
- Control the Heat: Cook on medium heat to ensure the cheese melts properly without burning the tortilla.
- Experiment with Fillings: Feel free to add other ingredients like jalapeños or bell peppers for an extra kick and variety.
- Let it Rest: Allow the burrito to sit for a minute after cooking; this helps the cheese set and makes for easier slicing.
Variations
Creative Twists on the Grilled Cheese Burrito
You can make the grilled cheese burrito your own with fun twists. For a vegetarian option, try using beans and veggies. Black beans or pinto beans are great choices. Mix in bell peppers, spinach, or zucchini for added flavor and nutrition.
If you like heat, add jalapeños or a splash of hot sauce. This spicy twist brings out the flavors of the cheese and meat, if you use it. The heat from the jalapeños adds a nice kick.
Seasonal Variations
Seasonal ingredients can change the taste of your burrito. In summer, add fresh corn and summer veggies like squash or tomatoes. This gives a bright flavor and adds texture.
In winter, use hearty ingredients like sweet potatoes. Roasted sweet potatoes add sweetness and depth. You can even toss in some kale or Brussels sprouts for extra health benefits. Each season brings its own flavor to the dish.
Storage Info
Refrigeration Guidelines
To store leftover burritos, wrap them in plastic wrap or foil. Place them in an airtight container. This keeps them fresh for 3 to 4 days in the fridge.
When reheating, use a skillet for the best texture. Heat it over medium heat. Place the burrito in the skillet and cover it with a lid. Cook for about 5 minutes on each side. This makes the outside crispy while warming the inside.
Freezing Tips
Freezing prepped burritos is great for future meals. Wrap each burrito tightly in plastic wrap. Then place them in a freezer bag. They can stay in the freezer for up to 3 months.
To thaw, move the burrito to the fridge overnight. For reheating, you can use the same skillet method. Alternatively, heat it in the microwave for 1-2 minutes on high. Just be careful, as the microwave can make the tortilla soft.
FAQs
Common Questions about Grilled Cheese Burritos
How long does it take to make a Grilled Cheese Burrito? It takes about 15 minutes to make a Grilled Cheese Burrito. This includes prep and cooking time. You can whip up this tasty dish in no time!
Can I customize the fillings? Yes, you can customize the fillings! Use your favorite meats, veggies, or cheeses. Try adding spicy peppers or different beans for a fun twist. The options are endless with this recipe!
Where can I find Grilled Cheese Burritos in restaurants? You can find Grilled Cheese Burritos at some fast-food places and food trucks. Many restaurants now offer fun twists on classic dishes. Check local spots for this delicious treat!
Nutritional Information
Overview of calories and macronutrients A serving of this Grilled Cheese Burrito has about 400-500 calories. It provides protein, carbs, and fats. The cheese and meat offer plenty of protein. The beans and veggies add fiber and nutrients.
Healthy alternatives and substitutes for lower calorie options You can make this burrito lighter. Use whole wheat tortillas for more fiber. Swap cheese for low-fat options. Substitute ground beef with grilled veggies or tofu for a healthy twist. These changes keep the flavor while cutting calories.
To wrap up, making a grilled cheese burrito is simple and fun. You learned about the key ingredients, like cheese and tortillas, and how to prepare them. The tips will help you achieve that perfect crispy bite. Remember, you can get creative with fillings and flavors. Storing leftovers is easy, so enjoy these burritos any day of the week. I hope you feel inspired to create your own tasty version. Happy cooking!