Looking for a warm, hearty meal that’s quick and easy? My Instant Pot Creamy Chicken Stew is just what you need! Packed with juicy chicken thighs and fresh veggies, this dish is creamy and comforting. With simple ingredients and straightforward steps, you'll have a tasty dinner ready in no time. Join me as I guide you through this simple recipe that will impress your family and friends!
Why I Love This Recipe
- Comforting and Hearty: This creamy chicken stew is the perfect dish to warm you up on a chilly day, providing both comfort and satisfaction.
- Easy One-Pot Meal: With everything cooked in the Instant Pot, cleanup is a breeze, making it ideal for busy weeknights.
- Customizable Ingredients: You can easily substitute vegetables or proteins based on what you have on hand, making it versatile for any occasion.
- Delicious Leftovers: This stew tastes even better the next day, making it a great option for meal prep or leftovers.
Ingredients
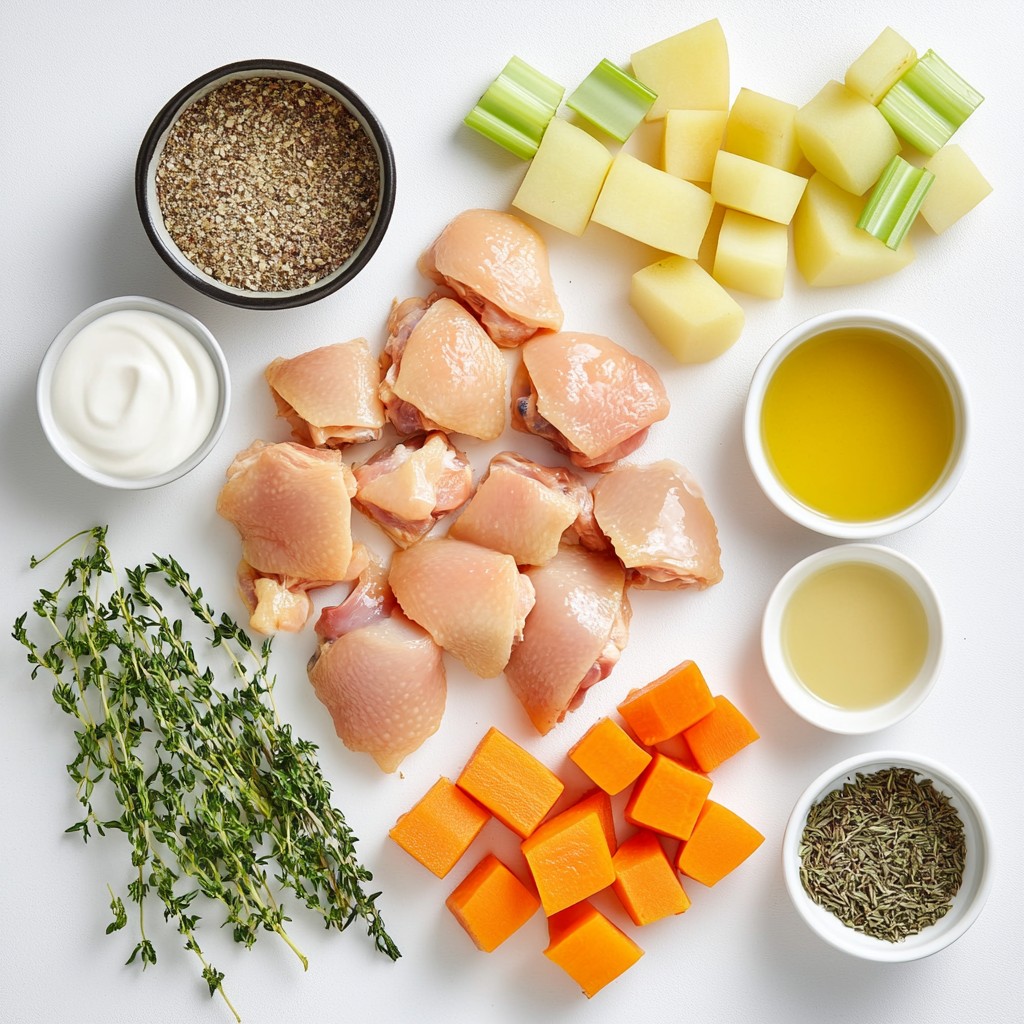
Main Ingredients
- 1.5 pounds boneless, skinless chicken thighs, cut into bite-sized pieces
- 2 tablespoons olive oil
- 1 medium onion, diced
- 3 cloves garlic, minced
- 3 carrots, sliced
- 2 stalks celery, sliced
- 2 medium potatoes, diced
- 1 teaspoon dried thyme
- 1 teaspoon dried rosemary
- 4 cups chicken broth
- 1 cup heavy cream or coconut cream
- Salt and pepper to taste
- Fresh parsley, chopped for garnish
These are the main ingredients for your creamy chicken stew. Chicken thighs work well because they stay juicy and tender. The mix of vegetables adds flavor and texture. The herbs bring a lovely aroma, while the cream makes it rich.
Optional Ingredients
- Dairy-free alternatives: Use coconut cream if you want a dairy-free option.
- Garnishes: Fresh parsley adds a nice touch when serving.
Using dairy-free options keeps the stew creamy without the dairy. Garnishes, like parsley, make the dish look fresh and inviting.
Cooking Equipment
- Instant Pot
- Cutting board and knife
The Instant Pot is key for this recipe. It cooks the stew quickly and evenly. A good cutting board and knife will help you prep the ingredients fast and easy.
Step-by-Step Instructions
Preparing the Chicken
To start, I turn my Instant Pot to the sauté setting. I let it heat up, then add two tablespoons of olive oil. Once the oil is hot, I add 1.5 pounds of boneless, skinless chicken thighs, cut into bite-sized pieces. I season the chicken with salt and pepper. I sauté the chicken for about five minutes until it turns brown. After that, I remove the chicken and set it aside. This step builds flavor for the stew.
Cooking the Vegetables
Next, I cook the vegetables right in the Instant Pot. I add the diced onion, minced garlic, sliced carrots, and sliced celery into the pot. I sauté these for three to four minutes. This timing helps the veggies soften and brings out their natural sweetness. It’s key to sauté the vegetables before adding the other ingredients. It makes the stew taste better.
Combining Ingredients and Pressure Cooking
Now, I return the chicken to the pot. I also add the diced potatoes, one teaspoon of dried thyme, and one teaspoon of dried rosemary. I pour in four cups of chicken broth and stir everything to combine. After mixing, I close the lid and set the valve to sealing. I cook on high pressure for 15 minutes. After cooking, I let it sit for ten minutes to release pressure naturally. Then, I switch to a quick release to let out any remaining steam.
Adding Cream and Final Steps
When the lid is off, I stir in one cup of heavy cream or coconut cream for a dairy-free option. I switch the Instant Pot back to sauté mode and let it simmer for five minutes. This step thickens the stew and makes it creamy. Lastly, I taste the stew and adjust the seasonings. If it needs more salt or pepper, I add it now.
Tips & Tricks
Perfecting the Stew
- Recommended cooking times: For tender chicken, pressure cook for 15 minutes.
- How to achieve the right consistency: Stir in cream after cooking to thicken the stew.
Cooking Method Advice
- Alternative sauté methods: If you don’t have an Instant Pot, use a large pot on the stove for sautéing.
- Using leftovers creatively: This stew is great for using leftover chicken or veggies.
Serving Suggestions
- Best sides to accompany the stew: Serve with crusty bread or a fresh salad.
- Presentation tips for serving: Use rustic bowls and top with parsley for a pop of color.
Pro Tips
- Choose the Right Chicken: For the most tender and flavorful stew, opt for boneless, skinless chicken thighs over breasts, as they remain juicier during cooking.
- Use Fresh Herbs: For a more vibrant flavor, consider using fresh thyme and rosemary instead of dried. Just remember to adjust the quantity, as fresh herbs are more potent.
- Thicken to Your Liking: If you prefer a thicker stew, feel free to mash some of the potatoes against the sides of the pot after cooking to create a creamier texture.
- Store Properly: Leftover stew can be refrigerated in an airtight container for up to 3 days or frozen for up to 3 months. Reheat gently on the stovetop to preserve the creaminess.
Variations
Ingredient Substitutions
You can change the chicken if you want. Use turkey or even tofu as a swap. Both options work well. If you want to add more veggies, try mushrooms, zucchini, or peas. These add color and nutrition.
Flavor Enhancements
Adding spices can take your stew to the next level. Try paprika or cayenne for some heat. Herbs like basil or oregano can give a fresh taste. You can also swap the heavy cream for sour cream or Greek yogurt. This adds a nice tang. Using vegetable broth instead of chicken broth can make it lighter and vegetarian-friendly.
Dietary Adjustments
If you need gluten-free options, check your broth. Many brands are gluten-free. For a low-carb version, skip the potatoes. Instead, use cauliflower for a similar texture. You can also add more vegetables to keep it hearty and satisfying.
Storage Info
Refrigeration Tips
To store leftovers, let the stew cool first. Place it in an airtight container. This keeps the stew fresh and tasty. I recommend using glass containers. They do not absorb odors and are easy to clean.
Freezing Instructions
For freezing, use freezer-safe bags or containers. Pour the cooled stew into these bags. Squeeze out the air before sealing. This prevents freezer burn. To thaw, move the stew to the fridge overnight. When ready to eat, reheat it on the stove or in the microwave.
Shelf Life
The stew lasts about 3 to 4 days in the fridge. Look for signs of spoilage like off smells or mold. If you see these signs, throw the stew away. For frozen stew, it keeps well for up to 3 months. Always check for freshness before eating.
FAQs
Can I use frozen chicken for this recipe?
Yes, you can use frozen chicken. Just add a bit more time to the cooking. The Instant Pot will cook the chicken well, even from frozen. This saves time if you forget to thaw it.
How can I thicken my chicken stew more?
To thicken your stew, you have a few options:
- Add more heavy cream or coconut cream.
- Mix a bit of cornstarch with water and stir it in.
- Add mashed potatoes for extra thickness.
These methods will create a rich and creamy stew.
What can I serve with creamy chicken stew?
Creamy chicken stew pairs well with:
- Crusty bread for dipping.
- Rice to soak up the sauce.
- A fresh green salad for crunch.
These sides add balance to the meal.
Can I make this recipe in advance?
Yes, you can make this stew in advance. It tastes even better the next day! Just store it in the fridge after cooking. Reheat it on the stove or in the microwave.
Is the stew freezer-friendly?
Yes, this stew is freezer-friendly. Let it cool completely before transferring to a freezer-safe container. It can last up to three months in the freezer. Thaw overnight in the fridge before reheating.
This chicken stew recipe combines simple ingredients and easy steps to create a warm dish. You learn to prepare chicken and sauté vegetables, ensuring great taste. Tips on cooking times and variations will help you tweak the stew to your liking. Store leftovers or freeze them for later. With these insights, you'll enjoy making this comforting meal anytime. Dive into the world of cooking and share your tasty creations with loved ones. Enjoy your cooking journey!