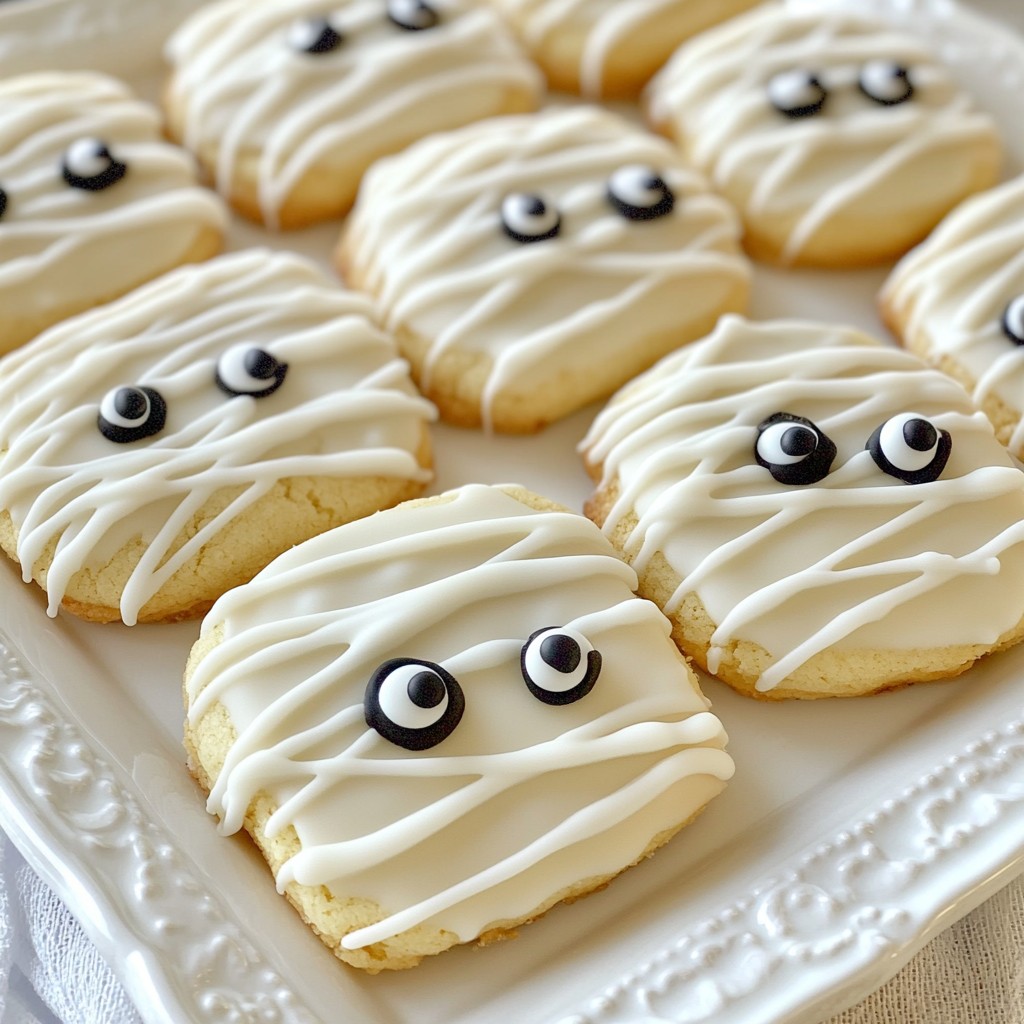
Get ready to impress your friends with Mummy Halloween Cookies! These spooky treats are easy to make and a blast to decorate. With simple ingredients and step-by-step instructions, you’ll see how fun baking can be. Plus, I’ll share tips for the perfect cookie texture and creative decorating ideas. Whether you’re a baking pro or a novice, these cookies will delight everyone at your Halloween party! Let’s dive in!
Why I Love This Recipe
- Fun and Festive: These mummy cookies are not just delicious, but they also bring a fun, spooky vibe to any Halloween celebration!
- Easy to Make: The recipe is simple and straightforward, making it a great activity for families or beginners in baking.
- Customizable Decor: You can get creative with the decorations, using different types of eyes or even adding more spooky elements!
- Deliciously Sweet: The combination of buttery cookies with white chocolate chips creates a treat that's irresistibly sweet and satisfying.
Ingredients
Here’s what you need to make Mummy Halloween Cookies:
- 2 cups all-purpose flour
- 1 teaspoon baking powder
- 1/2 teaspoon baking soda
- 1/2 teaspoon salt
- 3/4 cup unsalted butter, softened
- 1 cup granulated sugar
- 1 large egg
- 1 teaspoon vanilla extract
- 1 cup white chocolate chips
- 1/4 cup black decorating gel or chocolate (for eyes)
- Edible googly eyes (optional)
- Parchment paper (for baking)
Gathering these ingredients is the first step to making fun, spooky treats. Each item plays a vital role in the cookie's texture and taste. For example, the all-purpose flour gives the cookies structure, while the butter adds richness. The white chocolate chips offer sweet bursts in every bite, making these cookies a delight. If you want to make the cookies even more fun, consider using edible googly eyes. They add a playful look that kids and adults will love.

Step-by-Step Instructions
Preheat the Oven
First, set your oven to 350°F (175°C). This step is key for even baking. While it heats, line two baking sheets with parchment paper. This keeps cookies from sticking.
Prepare Dry Ingredients
Grab a bowl and whisk together 2 cups of all-purpose flour, 1 teaspoon of baking powder, 1/2 teaspoon of baking soda, and 1/2 teaspoon of salt. Mix well to ensure everything blends. Set this bowl aside for later.
Cream the Butter and Sugar
In a large mixing bowl, take 3/4 cup of softened unsalted butter and 1 cup of granulated sugar. Use an electric mixer to beat them together. Mix for about 2-3 minutes until it looks light and fluffy. This creates a great base for your cookies.
Add Egg and Vanilla
Now, add 1 large egg and 1 teaspoon of vanilla extract to the butter and sugar mix. Beat until everything is well combined. You want the mix to look smooth and creamy.
Combine Mixtures
Next, gradually add the dry mixture to the wet one. Stir until just combined. Be careful not to overmix, as this can make the cookies tough.
Fold in Chocolate Chips
Gently fold in 1 cup of white chocolate chips. Make sure the chips are evenly spread throughout the dough. This will give your cookies a sweet surprise in every bite.
Shape Cookies and Bake
Use a tablespoon or cookie scoop to portion out the dough onto the lined baking sheets. Space them about 2 inches apart. Slightly flatten the dough balls and shape them into ovals. Make one side thicker for the body and the other tapered for the head.
Bake
Place the cookies in the oven and bake for 10-12 minutes. Look for lightly golden edges. Once done, let them cool on the sheets for 5 minutes before moving them to a wire rack to cool fully.
Cool and Decorate
After cooling, melt more white chocolate chips in a microwave-safe bowl. Heat in 30-second bursts, stirring in between. Once smooth, drizzle the chocolate over the cookies to make mummy bands. While the chocolate is still soft, add edible googly eyes or use black decorating gel to create eyes. Let the chocolate set before serving.
Tips & Tricks
How to Achieve Perfect Cookie Texture
To get the best cookie texture, use softened butter. Soft butter blends well with sugar. Cream them until light and fluffy. This adds air to your dough. Don't overmix after adding dry ingredients. Mix just until combined for soft cookies. Shape the dough into oval forms. This helps them bake evenly. Bake until the edges are golden, but the centers remain soft.
Best Decorating Tools for Mummy Cookies
For decorating, use a piping bag for neat lines. If you don't have one, a zip-top bag works. Just cut a tiny corner to pipe the chocolate. A fork can also create fun drizzle patterns. For eyes, use edible googly eyes or black gel. Both options add a spooky touch. These tools make decorating fun and easy.
Storage Tips for Freshness
To keep your cookies fresh, store them in an airtight container. This helps retain their soft texture. For longer storage, freeze them in a single layer. Once frozen, place them in a freezer bag. They can last up to three months. Thaw them at room temperature before eating. Enjoy your delicious mummy cookies anytime!
Pro Tips
- Chill the Dough: For easier handling and to prevent spreading, chill the cookie dough for about 30 minutes before shaping and baking.
- Use Quality Chocolate: Opt for high-quality white chocolate chips for melting and drizzling, as they provide a smoother texture and better flavor.
- Experiment with Flavors: Add a touch of almond extract or a pinch of cinnamon to the dough for a unique flavor twist that complements the sweetness.
- Store Properly: Keep the cookies in an airtight container at room temperature to maintain freshness and softness for up to a week.
Variations
Flavor Variations (chocolate chip, peanut butter)
You can make Mummy Halloween Cookies in many fun flavors. Try adding chocolate chips for a classic twist. Simply fold in one cup of chocolate chips when mixing the dough. Another great option is peanut butter. Replace half of the butter with peanut butter for a nutty flavor. This adds richness and a unique taste that kids will love.
Alternative Decorating Techniques (different icing colors)
When it comes to decorating, get creative! Use different icing colors to make your mummies pop. You can use colored icing to make spooky designs or fun faces. Try using orange or green icing for an extra Halloween touch. You can also drizzle dark chocolate on the cookies for a spooky look. Mix and match colors to make each cookie unique!
Gluten-Free Options
If you need a gluten-free version, it's easy to swap the flour. Use a gluten-free all-purpose flour blend instead of regular flour. Make sure it has xanthan gum for good texture. This way, everyone can enjoy these fun treats. Just follow the same steps in the recipe for a delicious gluten-free cookie!
Storage Info
Best Storage Practices for Mummy Cookies
To keep your mummy cookies fresh, store them in an airtight container. This helps prevent them from getting hard or stale. Place parchment paper between layers of cookies to avoid sticking. Make sure to keep them at room temperature for best results.
Freezing Instructions
You can freeze these cookies for later enjoyment. First, let them cool completely. Then, wrap each cookie in plastic wrap. Place all wrapped cookies in a freezer bag. They can be stored in the freezer for up to three months. When ready to eat, thaw them at room temperature for a few hours.
Shelf Life Guidance
Mummy cookies stay fresh for about one week at room temperature. If you store them in the fridge, they can last up to two weeks. However, storing them in the fridge may change their texture. Always check for any signs of spoilage before enjoying your treats!
FAQs
How long does it take to make Mummy Halloween Cookies?
It takes about 40 minutes to make these cookies. You need 20 minutes to prepare and 20 minutes to bake. This makes it easy to whip up a batch quickly.
Can I use different types of chocolate?
Yes, you can use milk or dark chocolate. Just make sure the chocolate is good quality for the best taste. White chocolate gives a nice contrast for mummy wraps.
How do I make Halloween cookies without eggs?
You can use applesauce or a flaxseed mixture as an egg substitute. For flaxseed, mix one tablespoon of ground flaxseed with three tablespoons of water. Let it sit for a few minutes before adding it to the mix.
What can I use instead of edible googly eyes?
If you don’t have googly eyes, use chocolate chips or small candies. You can also use black decorating gel to draw eyes on the cookies.
Can Mummy Halloween Cookies be made in advance?
Yes, you can bake the cookies ahead of time. Store them in an airtight container. Decorate them just before serving for the best look.
Making Mummy Halloween Cookies is fun and simple with the right steps and ingredients. You learned about the key ingredients, detailed baking steps, and handy tips. You can customize your cookies too, like adding chocolate or using fun colors.
In the end, these cookies are a great treat for any Halloween party. They taste good and look spooky. Now you can impress your friends and family with these fun cookies!