Latest & Greatest

Blueberry Cheesecake Fillo Galette Delightful Recipe
Looking for a dessert that wows and delights? Meet the Blueberry Cheesecake Fillo Galette! This easy recipe combines crispy fillo
Read more…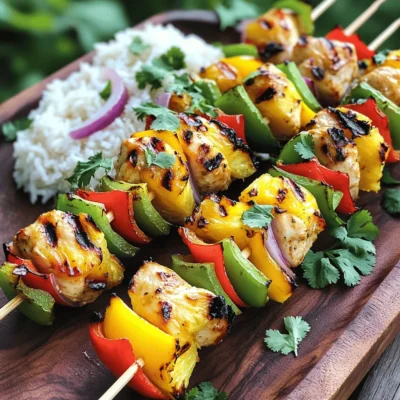
Pineapple Chicken Kabobs Tasty and Easy Recipe
Are you ready to impress your friends and family with a fun, tasty dish? Pineapple Chicken Kabobs are super easy
Read more…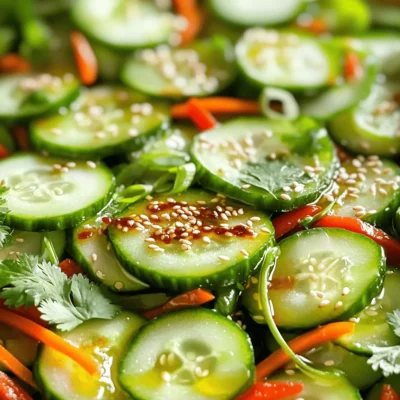
Spicy Asian Cucumber Salad Fresh and Flavorful Recipe
Get ready to spice up your meal with my delicious Spicy Asian Cucumber Salad! Crisp cucumbers mixed with vibrant veggies
Read more…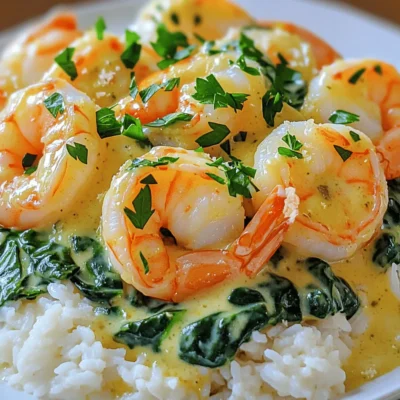
Creamy Garlic Shrimp Rich and Flavorful Recipe
Looking for a quick and delicious meal? My Creamy Garlic Shrimp recipe packs rich flavor in every bite. With just
Read more…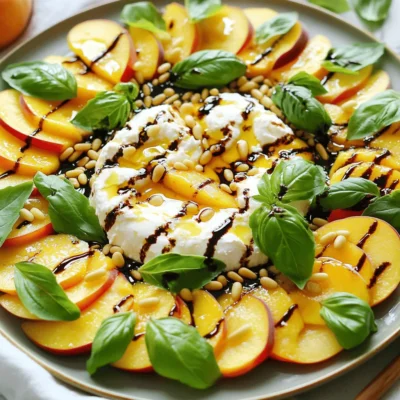
Peach Caprese Salad with Burrata Fresh and Flavorful
Summer is here, and it’s the perfect time for a Peach Caprese Salad with Burrata! This fresh dish combines juicy
Read more…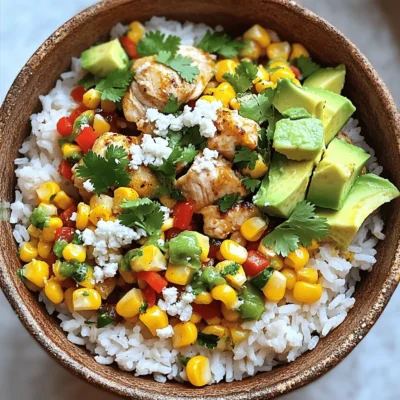
Street Corn Chicken Rice Bowl Flavorful Meal Idea
Are you craving a delicious and colorful meal? Look no further than the Street Corn Chicken Rice Bowl! Packed with
Read more…
Pineapple Coconut Mojito Mocktail Refreshing Delight
Looking for a refreshing drink to enjoy without the buzz? The Pineapple Coconut Mojito Mocktail is your answer! This delightful
Read more…
Butterfly Pea Flower Soda Refreshing and Fun Drink
Are you ready to sip on something unique? Butterfly pea flower soda is colorful, tasty, and fun! This drink mixes
Read more…browse recipes


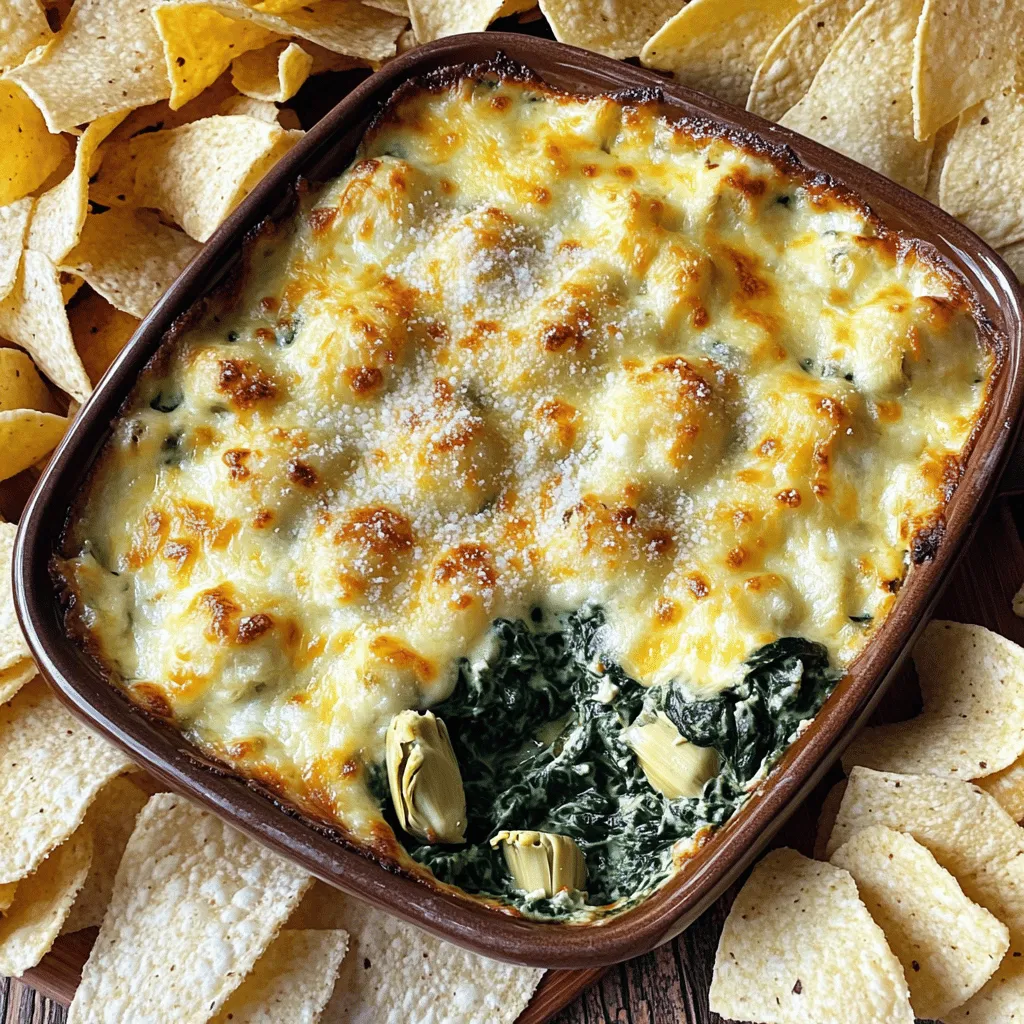
Creamy Spinach Artichoke Dip Irresistibly Cheesy Treat
If you crave something cheesy and delicious, you’ve come to the right place! My Creamy Spinach Artichoke Dip is everything you want in a…
My Latest Desserts

Apple Cider Donut Ice Cream Sandwiches Delightful Treat
Get ready to treat your taste buds! Apple Cider Donut Ice Cream Sandwiches blend fall flavors and sweet creaminess. These Read Full Recipe-
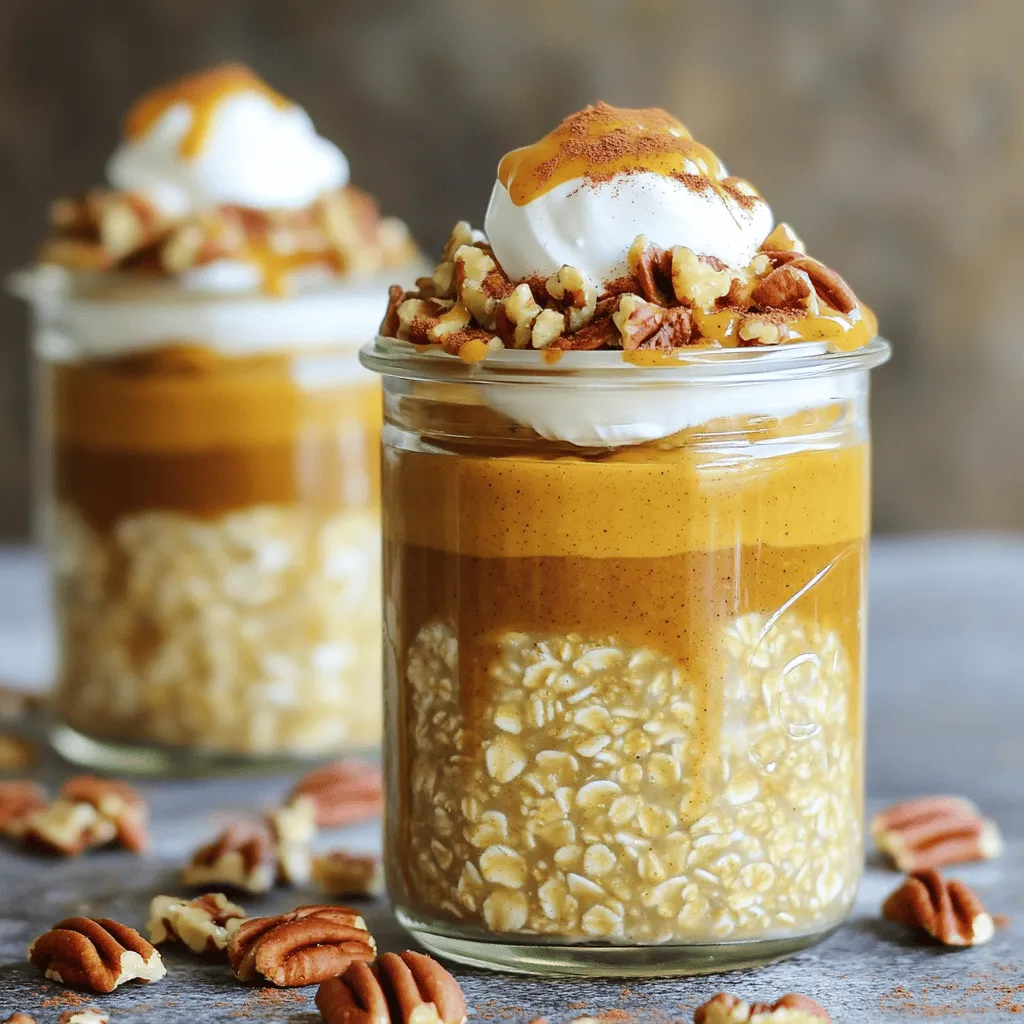
Brown Sugar Pumpkin Pie Overnight Oats Delight
Looking for a tasty breakfast that’s easy and fun? You’ll love my Brown Sugar Pumpkin Pie Overnight Oats Delight! This Read Full Recipe -
Cream Soda Donut Holes Delightful Dessert Recipe
Are you ready to enjoy a fun twist on a classic treat? Cream Soda Donut Holes are sweet, fluffy, and Read Full Recipe -
Cookie Dough Bars Delightful Recipe for a Sweet Treat
If you’ve ever craved the rich, sweet goodness of cookie dough, then you’re in for a treat! My recipe for Read Full Recipe -
Chocolate Covered Cherries with Pistachio Dust Delight
Get ready to treat your taste buds with my “Chocolate Covered Cherries with Pistachio Dust Delight.” This sweet snack combines Read Full Recipe -
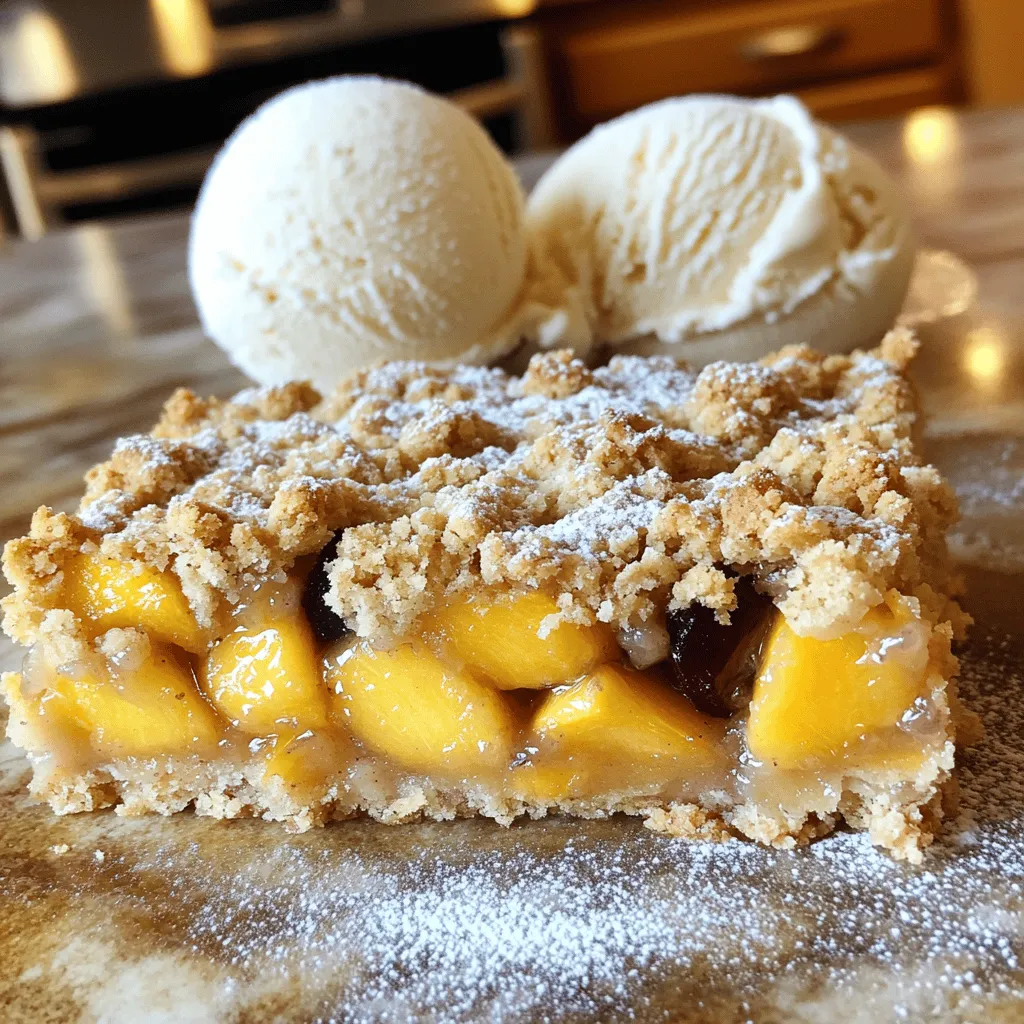
Peach Plum Crumble Bars Irresistible Sweet Treat
Are you ready for a dessert that combines the sweetness of peaches and plums? My Peach Plum Crumble Bars are Read Full Recipe -
Watercolor Buttercream Cupcakes Delightful Recipe Guide
Are you ready to bring some color to your baking? In this guide, I’ll show you how to make stunning Read Full Recipe -
No-Bake Peach Icebox Cake Simple and Refreshing Treat
If you’re seeking a sweet, cool treat that’s simple to make, it’s time to try my No-Bake Peach Icebox Cake. Read Full Recipe -
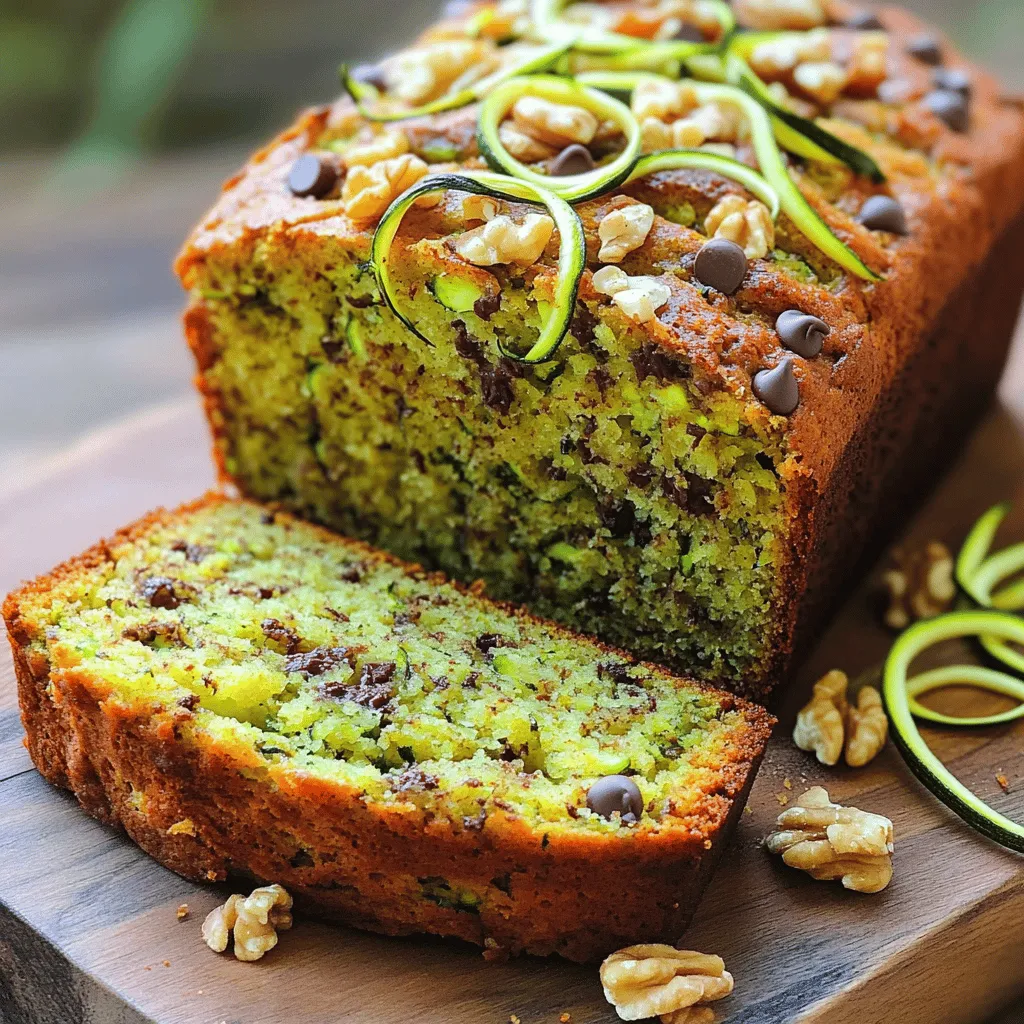
The Best Zucchini Bread Irresistible and Easy Recipe
Are you ready to bake the best zucchini bread that’s both irresistible and easy? This simple recipe combines fresh, grated Read Full Recipe -
Peach Cobbler Pancakes Delicious and Simple Recipe
Are you ready to bring a burst of flavor to your breakfast table? Peach Cobbler Pancakes are the perfect blend Read Full Recipe


My Latest Recipes

hey,
i’m !
I’m so happy you’re here!
Food is my passion, and perfecting each dish is my craft. I can’t wait for you to try them let’s dive into this delicious journey side by side.
![- 2 lbs chicken wings, separated at joints - 1/4 cup honey - 1/4 cup sriracha sauce - 2 tablespoons soy sauce (or tamari for gluten-free) - 1 tablespoon apple cider vinegar - 1 teaspoon garlic powder - 1 teaspoon ginger powder - 1/2 teaspoon smoked paprika - Salt and pepper to taste These main ingredients create a perfect balance of sweet and spicy flavors. The honey adds sweetness while the sriracha brings the heat. The soy sauce and apple cider vinegar deepen the taste, making every bite exciting. - Sesame seeds - Chopped green onions Adding sesame seeds and chopped green onions gives your wings extra flair. They not only look good but also add texture and flavor. It’s a simple touch that makes your dish pop. - Use tamari instead of soy sauce for gluten-free wings. - Try agave syrup or maple syrup if you want a low-sugar option. These swaps keep the recipe flexible. You can still enjoy sweet and spicy chicken wings, even with dietary needs. Just remember to keep the balance of flavors! For the complete recipe, check out the [Full Recipe]. Start by preparing the chicken wings. In a large bowl, season the wings with salt and pepper. This simple step brings out their flavor. Next, pat them dry with paper towels. Dry wings will crisp up better when cooked. This makes a big difference in texture. Now, let’s make the sweet and spicy sauce. In a separate bowl, combine the key ingredients. Whisk together the honey, sriracha sauce, soy sauce, apple cider vinegar, garlic powder, ginger powder, and smoked paprika. Mix until everything blends well. This sauce is where the magic happens. It adds both heat and sweetness to your wings. After making the sauce, it’s time to marinate. Pour half of the sweet and spicy sauce over the wings. Make sure each wing is well-coated. This step is crucial for flavor. Allow the wings to marinate for at least 30 minutes. If you have time, marinate them for up to 2 hours in the fridge. This extra time deepens the flavor. For the full recipe, check [Full Recipe]. Enjoy the process and get ready for a tasty meal! Oven baking is a great way to cook chicken wings. It gives you crispy wings without all the oil. Frying can make them greasy and hard to control. Baking helps keep the flavors in check while making them crisp. If you want less mess, go for the oven. Preheat your oven to 400°F before you start cooking. For crispy wings, drying them is key. Pat them dry with paper towels. This step helps remove moisture that can make them soggy. Flipping the wings halfway through baking is also important. It ensures that both sides get even heat, leading to great crunchiness. Don’t skip this step; it makes a big difference! To boost flavor, consider adding more spices. You might try cayenne for heat or smoked paprika for depth. Fresh herbs like cilantro can add a bright taste. You can also mix in some lime juice for a zesty kick. Feel free to experiment with the sauce. Making your wings unique is part of the fun! For the full recipe, check the details above. {{image_2}} You can change how spicy your wings are. To do this, adjust the amount of sriracha sauce in the recipe. If you want a milder taste, use less sriracha. You can also add more honey to balance the heat. For a fiery kick, add extra sriracha or even some cayenne pepper. Experiment to find the perfect heat level for you and your guests. Adding citrus or herbs can make your wings even more exciting. Try mixing in some fresh lime or orange juice for a zesty touch. You could also add lime zest for a punch of flavor. Fresh herbs like cilantro or parsley can brighten up the dish. Just sprinkle them on right before serving for a fresh finish. You don’t have to bake these wings if you prefer other methods. Grilling gives wings a smoky flavor. Just marinate them as usual, then grill over medium heat until cooked through. Air frying is another fun option. It makes wings crispy without much oil. Set your air fryer to 360°F and cook for about 25-30 minutes, flipping halfway. No matter how you cook them, your wings will taste great! To keep your sweet and spicy chicken wings fresh, use airtight containers. Glass or plastic containers with tight lids work best. Store the wings in the fridge for up to four days. If you have a lot of sauce, keep it in a separate container. This helps keep the wings crispy. To reheat your chicken wings and keep them crispy, use the oven. Preheat your oven to 350°F (175°C). Place the wings on a baking sheet. Bake for about 10-15 minutes, turning them halfway through. This helps to restore that wonderful crunch you love. You can freeze the chicken wings for later. First, let them cool completely. Then, place the wings in a freezer-safe bag. Squeeze out as much air as you can before sealing. They can last in the freezer for up to three months. To thaw, move them to the fridge overnight. For best results, reheat them in the oven to restore their crunch. Marinating chicken wings is key for great flavor. I suggest marinating them for at least 30 minutes. This time lets the wings soak up the sweet and spicy sauce. If you have time, marinate for up to 2 hours in the fridge. The longer they sit, the more flavor they get. Just make sure to cover them well. Yes, you can use frozen chicken wings. However, they will need a bit more time to cook. Thaw them first for even cooking. This keeps the wings from being tough. Cooking from frozen can change the texture, making them less crispy. Aim for about 10 extra minutes in the oven to ensure they are fully cooked. Sweet and spicy chicken wings pair well with many sides. Here are some tasty ideas: - Celery sticks for crunch - Carrot sticks for sweetness - Ranch or blue cheese dressing for dipping - Fresh salad to balance the heat - French fries for a classic touch For the full recipe, check out the Sweet and Spicy Chicken Wings section. In this guide, I covered how to make sweet and spicy chicken wings. I shared key ingredients and optional garnishes to enhance flavor. You learned the best cooking techniques and tips for crispy wings. I also provided ideas for variations and storage methods. Sweet and spicy wings are easy to make and fun to enjoy. I encourage you to try these recipes and find your favorite twist. Your kitchen adventures await!](https://mysavedrecipe.com/wp-content/uploads/2025/05/58382a51-f874-43af-b96b-12f0d458b549-300x300.webp)

![For sweet and spicy meatball subs, you will need: - 1 lb ground beef (or turkey) - 1/2 cup breadcrumbs - 1/4 cup grated Parmesan cheese - 1 large egg - 2 cloves garlic, minced - 1 teaspoon onion powder - 1 teaspoon smoked paprika - 1 teaspoon salt - 1/2 teaspoon black pepper - 1/4 cup fresh parsley, chopped - 1 cup sweet chili sauce - 1/4 cup sriracha sauce (adjust to taste) - 4 sub rolls - 1 cup shredded mozzarella cheese - Fresh basil leaves for garnish These ingredients create a rich flavor that makes every bite memorable. You can customize your meatballs. Consider adding: - 1/4 cup finely chopped onion - 1/2 teaspoon crushed red pepper flakes - 1 tablespoon Worcestershire sauce These add-ins can enhance the flavor. Experiment to find what you like best. The right toppings can elevate your subs. Try these: - Extra shredded mozzarella cheese - Sliced jalapeños for heat - Sliced avocado for creaminess - Pickled onions for a tangy crunch These toppings add texture and flavor to your dish. For the full recipe, check the steps to create these tasty meatball subs. First, preheat your oven to 400°F (200°C). This helps the meatballs cook evenly. In a large bowl, mix these ingredients: - 1 lb ground beef (or turkey) - 1/2 cup breadcrumbs - 1/4 cup grated Parmesan cheese - 1 large egg - 2 cloves garlic, minced - 1 teaspoon onion powder - 1 teaspoon smoked paprika - 1 teaspoon salt - 1/2 teaspoon black pepper - 1/4 cup fresh parsley, chopped Stir until everything blends together well. Now, shape the mixture into small meatballs, about 1 inch wide. Place them on a baking sheet lined with parchment paper. Bake the meatballs for 20-25 minutes. They should be brown and cooked through. While the meatballs bake, grab a small saucepan. Combine 1 cup of sweet chili sauce and 1/4 cup of sriracha sauce over medium heat. Mix until it warms up and blends nicely. When the meatballs are ready, take them out of the oven. Transfer them into the saucepan and gently toss them in the sweet and spicy sauce. Next, cut the sub rolls in half lengthwise, but don’t cut all the way through. Place the rolls on a baking sheet. Fill each roll with a good amount of the glazed meatballs. Top them with shredded mozzarella cheese. Put the loaded subs back in the oven for 5-7 minutes. Wait until the cheese melts and bubbles. Once done, take them out and garnish with fresh basil leaves. Enjoy your delicious Sweet and Spicy Meatball Subs! For the complete recipe, check out the [Full Recipe]. To make great meatballs, use fresh ingredients. Fresh parsley adds a bright taste. Mix the ground beef well with the egg, breadcrumbs, and spices. You want a smooth mixture. Form the meatballs into the same size. This helps them cook evenly. Bake them until they are nicely browned. A good tip is to use a meat thermometer. Aim for 160°F (71°C) for ground beef. Serve your meatball subs hot and fresh. Place the meatballs in the sub rolls right after baking. Top them with melted mozzarella cheese for a rich flavor. You can add fresh basil leaves for a nice touch. For extra heat, drizzle more sriracha on top. Pair your subs with a side of chips or a salad. This makes for a fun meal. You could also serve them on a platter for a party. One common mistake is overmixing the meatball mixture. This can lead to tough meatballs. Another mistake is undercooking them. Always check the temperature to ensure they are safe to eat. Avoid using stale breadcrumbs; they can make the meatballs dry. Lastly, don’t skimp on the sauce. The sweet and spicy mix really makes the dish shine. For the full recipe, refer to the Sweet and Spicy Meatball Subs above. {{image_2}} You can change up the meat in these subs. Ground beef is classic, but turkey works too. It gives a lighter taste. You can also use ground chicken for a different flavor. For a richer taste, try pork. Each meat brings its own spin to the dish. Switching sauces can make a big difference. If you want less heat, use barbecue sauce instead of sriracha. For a different sweet flavor, try honey garlic sauce. You can even mix in teriyaki sauce for an Asian twist. Each swap can change the whole vibe of the meal. For a meat-free option, use plant-based meat. There are many brands that mimic ground beef well. For a vegan sub, mix lentils with breadcrumbs. You can also mash chickpeas and add spices for great flavor. Use vegan cheese or skip it for a lighter bite. These swaps keep the subs tasty and fun. You can find the full recipe [here](#). To store leftover meatball subs, let them cool first. Place them in an airtight container. You can keep them in the fridge for up to three days. If you want to keep them longer, freezing is a better option. When you are ready to eat, take the subs out of the fridge. Preheat your oven to 350°F (175°C). Wrap each sub in foil to keep them moist. Heat them for about 15 minutes. If frozen, let them thaw in the fridge overnight before reheating. To freeze meatball subs, do not add the cheese yet. Once they cool, wrap each sub tightly in plastic wrap. Place the wrapped subs in a freezer bag. They can stay in the freezer for up to two months. When you're ready to enjoy, just follow the reheating instructions. For the best flavor, use the full recipe to make delicious meatball subs! Meatball subs started in the U.S., mainly in Italian-American communities. Italian immigrants brought their meatball recipes. They served meatballs in bread, creating a new dish. Over time, these subs gained popularity across the country. Now, they are a favorite at many diners and homes. Yes, you can prepare meatballs ahead of time. Making them a day before saves time on busy days. Just mix the ingredients and form the meatballs. Store them in the fridge. You can also freeze them for up to three months. When ready to cook, thaw them in the fridge overnight. Then, bake and enjoy! If you need a substitute for breadcrumbs, try crushed crackers or oats. Both options work well in meatballs. You can also use ground nuts for a gluten-free choice. Just adjust the amount to keep the meatball texture right. Each substitute adds a unique flavor to your meatballs. To adjust spice levels, change the amount of sriracha in your sauce. For milder subs, use less sriracha. You can also add sweet chili sauce for a hint of heat without overwhelming flavors. For spicier meatballs, mix in some red pepper flakes or jalapeños. Taste as you go to find the perfect balance! This blog post covered how to make tasty meatball subs. I shared key ingredients, step-by-step instructions, and useful tips for perfecting your dish. You learned about variations, storage, and even answered common questions. Now, you can create your own meatball sub masterpiece. Enjoy crafting your meal and impressing friends and family with your skills!](https://mysavedrecipe.com/wp-content/uploads/2025/04/43bfee7f-a6a6-46e3-88a1-d4ac2c477741-300x300.webp)

Strawberry Lemonade Cookies Refreshing Sweet Treat
Craving a sweet and tangy treat? You’re in for a delight! My Strawberry Lemonade Cookies blend juicy strawberries and zesty lemons into a refreshing…