


Latest & Greatest

Malibu Sunset Mocktail Refreshing and Flavorful Drink
Looking for a drink that shouts summer without the buzz? My Malibu Sunset Mocktail is the perfect choice! It’s a
Read more…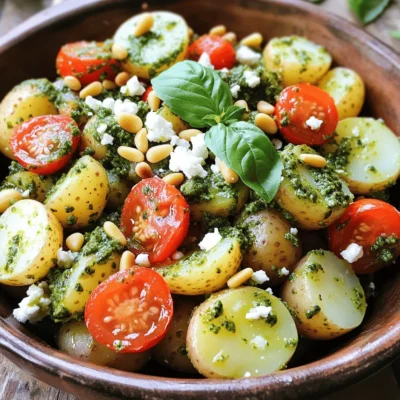
Pesto Potato Salad Refreshing and Flavorful Dish
Looking for a dish that’s both refreshing and flavorful? My Pesto Potato Salad is your answer! This dish combines tender
Read more…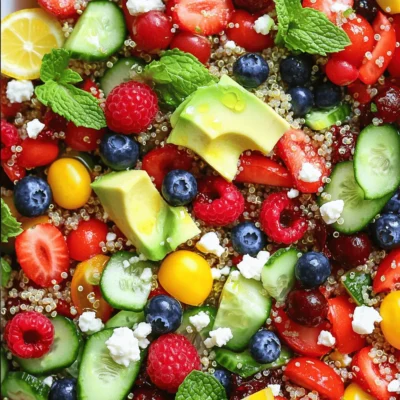
Healthy Summer Salad Bowls Fresh and Flavorful Meal
Looking for a tasty way to stay healthy this summer? You’re in the right place! In this article, I’ll guide
Read more…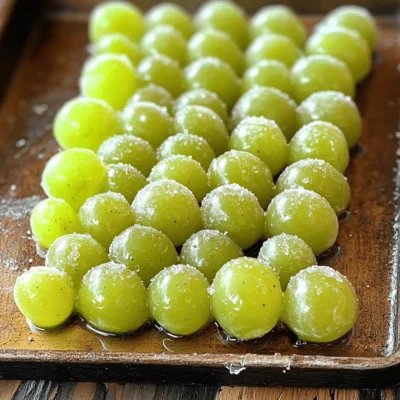
Vegan Sour Patch Grapes Tangy Treat for Everyone
Looking for a fun and tasty treat that everyone can enjoy? Try Vegan Sour Patch Grapes! With just a few
Read more…
Grilled Skirt Steak with Lemon Herb Couscous Delight
If you’re ready to elevate your grilling game, my Grilled Skirt Steak with Lemon Herb Couscous Delight is the perfect
Read more…
Kiwi Mint Mojito Mocktail Refreshing and Fun Drink
Looking for a refreshing drink that’s both fun and flavorful? Dive into the world of mocktails with my Kiwi Mint
Read more…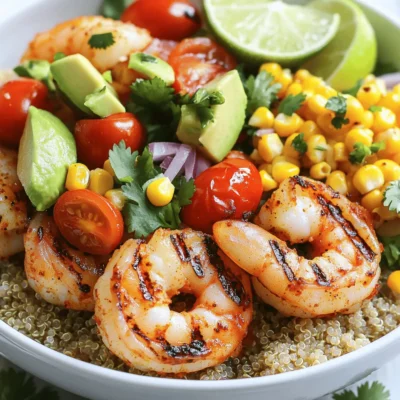
Grilled Shrimp Bowl with Avocado and Corn Salsa Delight
Looking for a fresh and tasty meal? Dive into my Grilled Shrimp Bowl with Avocado and Corn Salsa Delight! This
Read more…
Lemon Pizza Delight Fresh and Flavorful Slice
If you’re ready for a pizza that bursts with fresh flavor, then lemon pizza is for you! This unique dish
Read more…browse recipes


![To make honey garlic glazed salmon, you need a few key ingredients. Each one brings its own special flavor. Here is the list of ingredients: - Salmon fillets - Honey - Soy sauce - Garlic - Fresh ginger - Sesame oil - Olive oil - Lime juice - Salt and pepper - Green onions - Sesame seeds Using fresh ingredients makes a big difference. Fresh salmon fillets are the star of the dish. They provide a rich taste and firm texture. Honey adds sweetness, while soy sauce gives depth. Garlic and ginger bring warmth and zest. The sesame oil adds a nutty flavor that pairs well with the salmon. Olive oil helps to cook the fish evenly. Lime juice brightens the dish and cuts through the richness. Salt and pepper enhance all the flavors. For garnish, green onions and sesame seeds add color and crunch. These small touches make your meal look beautiful. You can check the [Full Recipe] for more details. With this list, you are ready to create a tasty and simple meal. Each ingredient works together to make honey garlic glazed salmon a favorite dish. To start, you need to make the marinade. In a small bowl, whisk together the honey, soy sauce, minced garlic, grated ginger, sesame oil, lime juice, salt, and pepper. Mix it well. This sauce is sweet and savory. It adds great flavor to the salmon. You can taste it to see if it needs more salt or honey. Next, take your salmon fillets and place them in a shallow dish or a resealable bag. Pour the marinade over the salmon. Make sure each piece is well-coated. This helps the flavors soak in. Cover the dish or seal the bag. Place it in the fridge for at least 30 minutes. You can marinate for up to 2 hours for a stronger flavor. Now it’s time to cook the salmon. Preheat your oven to 400°F (200°C). Heat olive oil in an oven-safe skillet on medium-high heat. Once hot, take the salmon out of the marinade. Let the excess marinade drip off. Place the salmon in the skillet, skin-side down. Sear the salmon for about 3-4 minutes. The skin should be crispy. Carefully flip the fillets and pour any leftover marinade over them. Transfer the skillet to the oven. Bake for 8-10 minutes. The salmon is ready when it flakes easily with a fork. For a caramelized glaze, broil it for 1-2 minutes. Just watch it closely so it doesn’t burn. After cooking, let it rest for a minute. Garnish with sliced green onions and sesame seeds before serving. Enjoy this delicious meal! For the full recipe, refer to the earlier section. When you pick salmon, look for bright colors. Fresh salmon should have a deep pink or red hue. The flesh must feel firm and moist. Avoid fish that smells too strong or looks dull. If possible, buy from a trusted local market or fishmonger. They often have the best quality. To get a great glaze, start with the right marinade. Mix honey, soy sauce, garlic, and ginger well. Let your salmon soak in this mix for at least 30 minutes. The longer it sits, the more flavor it gets. When cooking, sear the skin side first. This step helps the glaze stick and gives you that crispy texture. Tweak the taste based on your liking. If you want it sweeter, add more honey. For more saltiness, increase the soy sauce. Remember, balance is key. Taste the marinade before you add the salmon. You can always adjust it. These small tweaks can make a big difference in your meal. For the full recipe, check the detailed instructions. {{image_2}} You can use other fish for this dish. Options like trout or tilapia work well. Both fish have mild flavors and absorb the marinade nicely. The cooking time may change. Check for doneness often to avoid overcooking. Adding vegetables can make your meal more colorful and healthy. Try bell peppers, broccoli, or snap peas. Toss them in the marinade too. Bake them alongside your fish for a full meal. You can also stir-fry them separately with a bit of olive oil. You can change this dish to fit the season. In spring, use fresh asparagus or peas. In summer, add zucchini or tomatoes. For fall, try sweet potatoes or Brussels sprouts. In winter, root veggies like carrots or parsnips work great. These swaps keep the dish exciting and fresh. For the full recipe, visit the link above. Store leftover honey garlic glazed salmon in an airtight container. I recommend placing it in the fridge within two hours of cooking. It will stay fresh for 2 to 3 days. To keep the fish moist, add a splash of lime juice before sealing. You can freeze honey garlic glazed salmon for up to 3 months. Wrap each fillet tightly in plastic wrap. Then, place them in a freezer-safe bag. Remove as much air as possible to prevent freezer burn. Label the bag with the date before freezing. To reheat, take the salmon out of the fridge or freezer. If frozen, let it thaw overnight in the fridge. Once thawed, preheat your oven to 350°F (175°C). Place the salmon on a baking sheet and cover it with foil. Heat for about 10-15 minutes, or until warmed through. This method keeps the fish tender and juicy. You can also microwave it on a low setting for quick reheating, but it may dry out. For the full recipe, check out the complete details above. Yes, you can use other fish. Try trout, tilapia, or cod. Each fish has its own flavor. These options work well with honey and garlic. Just adjust cooking times as needed. Thinner fish may cook faster, while thicker ones may take longer. You can marinate the salmon for 30 minutes to 2 hours. Longer marinating gives more flavor. Just don’t marinate too long. The fish may become mushy. Always keep it in the fridge while marinating. Many sides pair nicely with honey garlic glazed salmon. Here are a few great options: - Steamed broccoli - Roasted asparagus - Garlic mashed potatoes - Rice or quinoa - Mixed green salad These sides bring balance to the meal. They add freshness and texture. You can mix and match based on what you like or have on hand. This post shared a simple recipe for honey garlic glazed salmon. We covered the ingredients, marinating steps, and cooking methods. I also provided tips to choose fresh salmon and create the perfect glaze. You learned about tasty variations and how to store leftovers properly. Experiment with this dish to make it your own. Enjoy the flavors, and share it with others!](https://mysavedrecipe.com/wp-content/uploads/2025/06/fd39c2ee-6413-4458-b1c2-c9cd7a8c8c56.webp)
Honey Garlic Glazed Salmon Delicious and Simple Meal
Are you ready to impress your taste buds with a simple yet delightful dish? Honey Garlic Glazed Salmon is just the recipe you need.…
My Latest Desserts

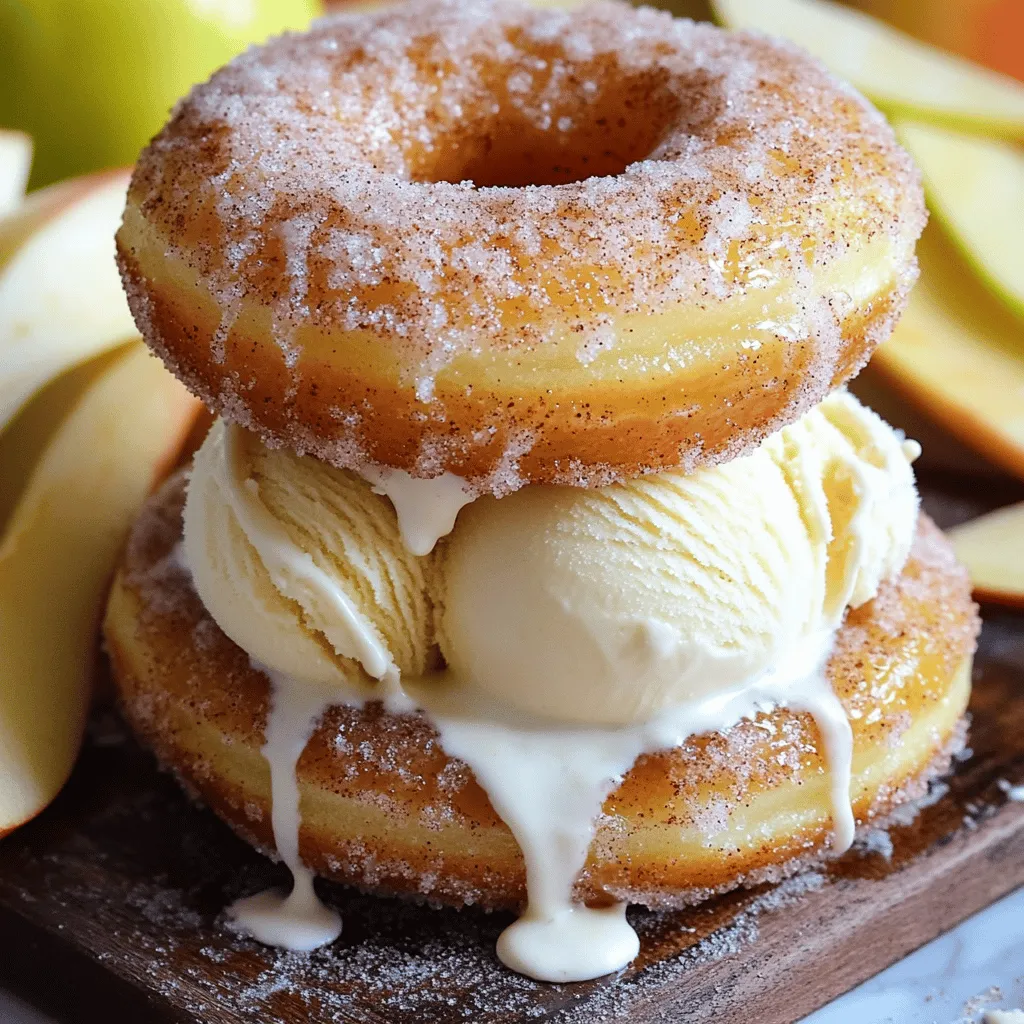
Apple Cider Donut Ice Cream Sandwiches Delightful Treat
Get ready to treat your taste buds! Apple Cider Donut Ice Cream Sandwiches blend fall flavors and sweet creaminess. These Read Full Recipe-
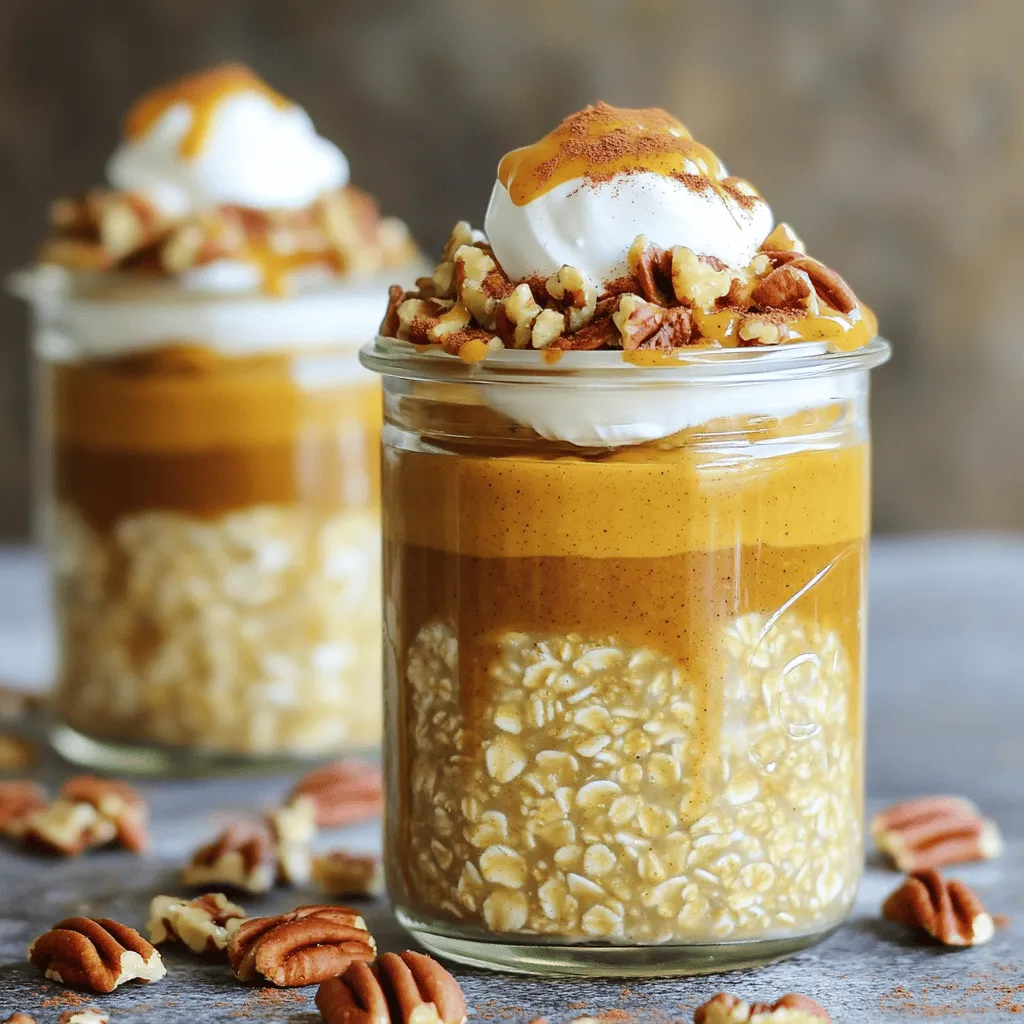
Brown Sugar Pumpkin Pie Overnight Oats Delight
Looking for a tasty breakfast that’s easy and fun? You’ll love my Brown Sugar Pumpkin Pie Overnight Oats Delight! This Read Full Recipe -
Cream Soda Donut Holes Delightful Dessert Recipe
Are you ready to enjoy a fun twist on a classic treat? Cream Soda Donut Holes are sweet, fluffy, and Read Full Recipe -
Cookie Dough Bars Delightful Recipe for a Sweet Treat
If you’ve ever craved the rich, sweet goodness of cookie dough, then you’re in for a treat! My recipe for Read Full Recipe -
Chocolate Covered Cherries with Pistachio Dust Delight
Get ready to treat your taste buds with my “Chocolate Covered Cherries with Pistachio Dust Delight.” This sweet snack combines Read Full Recipe -
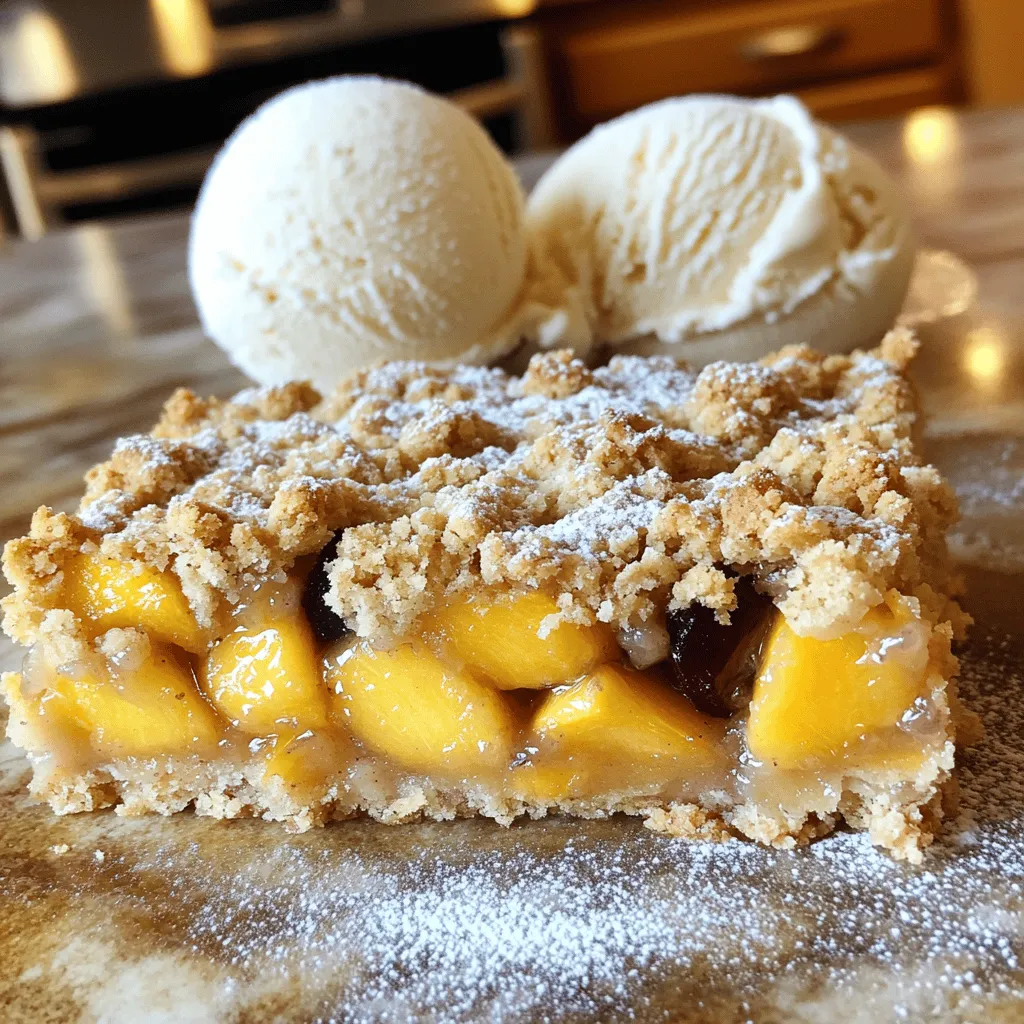
Peach Plum Crumble Bars Irresistible Sweet Treat
Are you ready for a dessert that combines the sweetness of peaches and plums? My Peach Plum Crumble Bars are Read Full Recipe -
Watercolor Buttercream Cupcakes Delightful Recipe Guide
Are you ready to bring some color to your baking? In this guide, I’ll show you how to make stunning Read Full Recipe -
No-Bake Peach Icebox Cake Simple and Refreshing Treat
If you’re seeking a sweet, cool treat that’s simple to make, it’s time to try my No-Bake Peach Icebox Cake. Read Full Recipe -
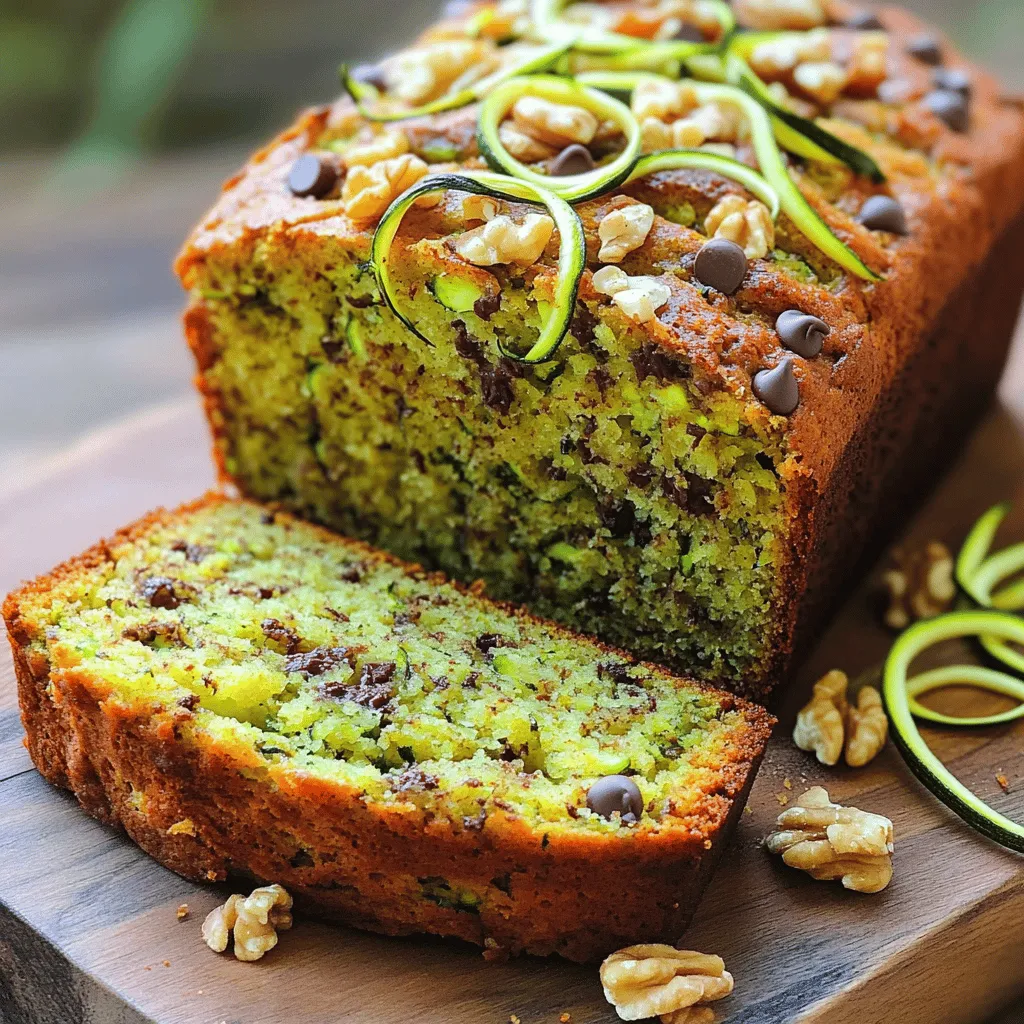
The Best Zucchini Bread Irresistible and Easy Recipe
Are you ready to bake the best zucchini bread that’s both irresistible and easy? This simple recipe combines fresh, grated Read Full Recipe -
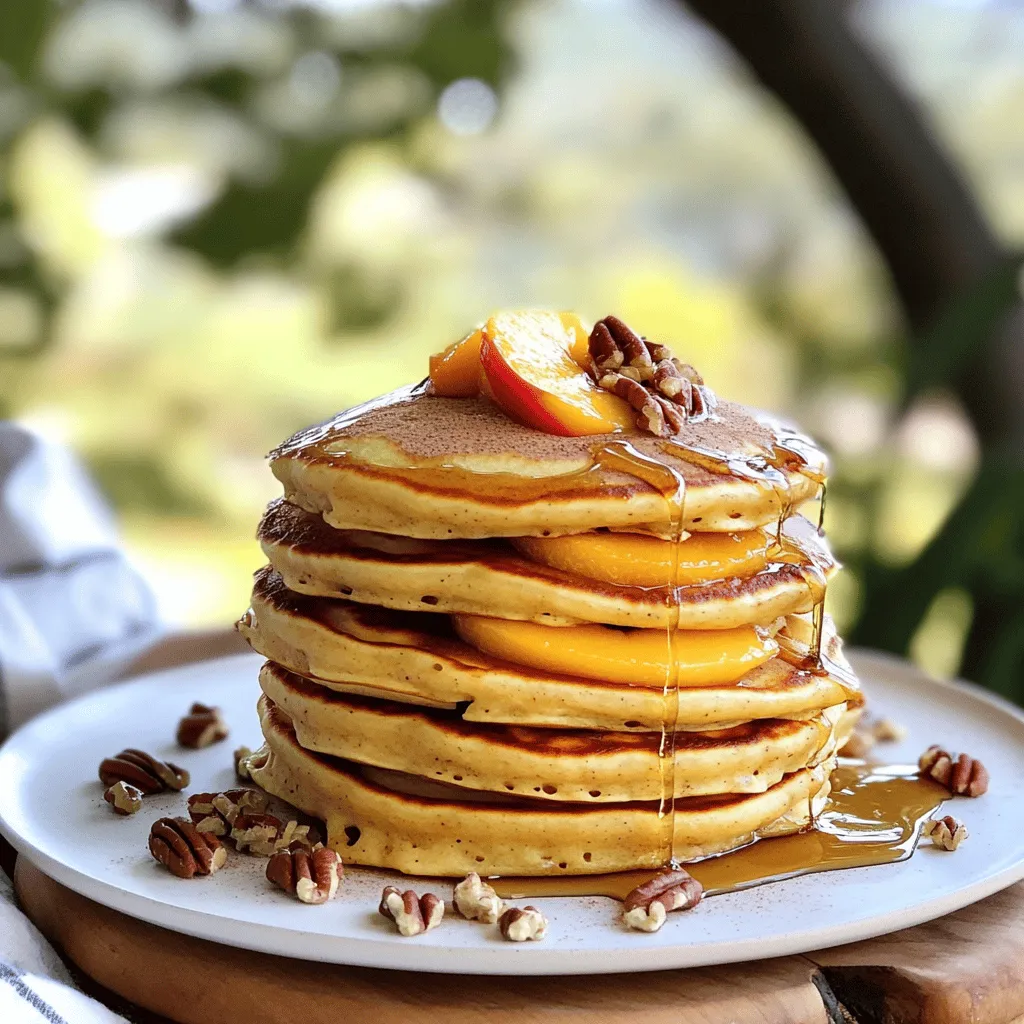
Peach Cobbler Pancakes Delicious and Simple Recipe
Are you ready to bring a burst of flavor to your breakfast table? Peach Cobbler Pancakes are the perfect blend Read Full Recipe


My Latest Recipes

hey,
i’m !
I’m so happy you’re here!
Food is my passion, and perfecting each dish is my craft. I can’t wait for you to try them let’s dive into this delicious journey side by side.


![- 2 ½ cups all-purpose flour - 1 cup warm milk (110°F) - 2 tablespoons sugar - 1 tablespoon instant yeast - 1 teaspoon salt - 2 tablespoons unsalted butter, melted - Cornmeal for dusting Best types of flour for English muffins For English muffins, all-purpose flour works great. It gives a nice balance of fluffiness and structure. You can also try bread flour for a chewier texture. Alternative milk options You can use dairy-free milk if you want. Almond milk or oat milk are good choices. Just make sure they are warm, like the recipe says. Conversions for different serving sizes If you want more muffins, double the ingredients. For fewer muffins, cut the amounts in half. Keep the ratios the same for best results. Gluten-free alternatives To make gluten-free muffins, use a gluten-free flour blend. Check that it has a binder like xanthan gum. This helps the muffins hold together while cooking. For the full recipe, refer to the sections above. Enjoy your baking! To start, you need to activate the instant yeast. Mix the warm milk, sugar, and yeast in a bowl. Let this sit for five minutes. You will see bubbles form on top. This shows the yeast is alive and ready to work. Next, mix the wet and dry ingredients. Add the melted butter and salt to the yeast mix. Gradually stir in the flour. Use a spoon or spatula to combine until a soft dough forms. Now, it’s time to knead the dough effectively. Place it on a floured surface. Use your hands to push and fold the dough. Knead for about five minutes. You want it to feel smooth and elastic. This step is key for fluffy muffins. After kneading, let the dough rise. Place it in a greased bowl. Cover it with a kitchen towel and set it in a warm spot. Let it rise for about one hour. It should double in size. This rise gives the muffins their light texture. For shaping, use a round cutter about three inches wide. Cut out circles from the dough. Place them on a baking sheet that has cornmeal dusted on it. This helps prevent sticking. Next, let the muffins rest for about thirty minutes. This gives them another chance to rise. To cook, preheat your griddle to medium heat. Cook each muffin for seven to eight minutes on each side. They should turn golden brown. Now you have fluffy, tasty English muffins ready to enjoy! Check the [Full Recipe] for more details. To make fluffy muffins, avoid common mistakes. One big mistake is using cold ingredients. Always use warm milk at 110°F. This helps the yeast work better. Another mistake is not kneading enough. Knead the dough for about 5 minutes until it's smooth. This builds gluten, which gives muffins their texture. The dough's temperature matters too. If it's too cold, the muffins won’t rise well. Keep the dough in a warm spot. Covering it with a towel helps keep it warm. You can add herbs or spices to your muffins for extra flavor. Try mixing in rosemary or garlic powder for a savory twist. For sweetness, consider adding cinnamon or nutmeg. Fillings also add fun flavors. You can stuff your muffins with fruits like blueberries or chocolate chips. For a savory option, try adding cheese or cooked bacon bits. When serving your muffins, think about toppings. Butter is a classic choice. You can also use jams or honey for a sweet touch. Pair your muffins with breakfast items like eggs or fruit. They also work great as snacks with coffee or tea. These tips will make your muffins shine! For more details, check the Full Recipe. {{image_2}} To make whole wheat English muffins, you need to switch the flour. Use 1 ½ cups of whole wheat flour and 1 cup of all-purpose flour. This mix gives a nice, hearty taste. Whole wheat flour absorbs more liquid, so add a bit more milk if the dough feels dry. When cooking, the time may change. Cook them for about 8-9 minutes on each side. Keep an eye on the muffins to prevent burning. The muffins should be golden brown and puffed up. You can add fun flavors to your muffins. Mix in fruits like blueberries or raisins. Nuts like walnuts or almonds also work well. Just add about ½ cup of your choice when mixing the dough. For a savory twist, try adding shredded cheese or fresh herbs. A tablespoon of dried oregano or thyme can add great flavor. Cheese like cheddar or feta can make the muffins even tastier. This way, you can enjoy muffins for breakfast or as a snack. If you want to make your muffins healthier, reduce the sugar. Use only 1 tablespoon of sugar or swap it for honey. You can also use natural sweeteners like maple syrup. They add sweetness without all the sugar. Using yogurt instead of butter can add moisture. Use 2 tablespoons of plain yogurt for a softer texture. It also gives a nice tang to the muffins. These changes keep your muffins fluffy while making them a bit healthier. For the Full Recipe, you can follow the steps above to create these tasty variations. To keep your English muffins fresh, store them in a zip-top bag. You can also use an airtight container. Place them at room temperature for up to three days. If you want longer storage, consider the freezer. To freeze the muffins, let them cool completely. Wrap each muffin in plastic wrap. Place the wrapped muffins in a freezer bag. They can stay frozen for up to three months. When you want to eat one, take it out and let it thaw at room temperature. For a warm muffin, you can also microwave it for about 20 seconds. Reheat your muffins for the best texture. You can use a toaster or oven. For the oven, set it to 350°F and heat for 5-10 minutes. This keeps the muffins from getting soggy. If you prefer the microwave, heat for 10-15 seconds. Enjoy them warm with butter or your favorite spread. Homemade English muffins stay fresh for about 3 to 5 days. Store them in an airtight bag or container at room temperature. If you want them to last longer, freeze them. They can stay good for up to three months in the freezer. Just remember to let them cool completely before you freeze them. Yes, you can use active dry yeast instead of instant yeast. Just remember, you need to activate it first. Mix the active dry yeast with warm milk and sugar. Let it sit for about 5 to 10 minutes until it bubbles. Then, you can follow the same steps as in the full recipe. If your muffins don’t rise, check a few things. First, make sure your yeast is fresh. Old yeast won’t work well. Second, check the dough temperature. If it’s too cold, it won’t rise. Give it a warm place to rise. Lastly, knead the dough enough. This helps develop gluten, which is key for rising. You can make English muffins without a griddle by using an oven. Preheat your oven to 350°F. Place the muffins on a baking sheet lined with parchment paper. Bake for about 20 minutes, flipping halfway through. This will give you a nice golden color and keep them fluffy inside. Making English muffins at home is tasty and fun. You need just a few simple ingredients and follow easy steps. From mixing dough to achieving that perfect rise, this guide has you covered. Remember to avoid common mistakes and try different flavors to enhance your muffins. Store them well for longer freshness and enjoy them anytime. With these tips, you can create delicious muffins that brighten your breakfast or snack time. Enjoy your baking journey and share the joy of homemade goodness!](https://mysavedrecipe.com/wp-content/uploads/2025/05/d7e2c81b-3811-44eb-bb87-f0c2d6151cc6-300x300.webp)
![To make delicious egg muffins with veggies, you need the following: - 6 large eggs - 1 cup spinach, chopped - 1/2 cup bell peppers (red, yellow, or green), diced - 1/2 cup cherry tomatoes, halved - 1/4 cup red onion, finely chopped - 1/2 cup shredded cheese (cheddar or mozzarella) - 1/4 teaspoon garlic powder - 1/4 teaspoon black pepper - Salt to taste This mix gives a great flavor and texture. Each ingredient plays a role. The eggs bind everything together, while the veggies add color and nutrients. You can try adding these for extra flavor: - Fresh herbs like parsley or basil for garnish - Alternative cheeses such as feta or goat cheese These options let you customize your muffins. Each ingredient can make your meal unique and tasty. Don't be afraid to experiment! First, you need to preheat your oven to 375°F (190°C). This step helps the muffins cook evenly. While the oven heats, grease your muffin tin with a bit of oil or cooking spray. This keeps the muffins from sticking. A well-greased tin is key for easy removal. Next, grab a large mixing bowl. Crack the eggs into the bowl and whisk them well. You want them to be nice and fluffy. After that, add the chopped spinach, diced bell peppers, halved cherry tomatoes, and finely chopped red onion to the eggs. Stir everything together gently. Now, sprinkle in the shredded cheese, garlic powder, black pepper, and salt. Mix until all the ingredients combine nicely. Make sure the veggies and cheese are spread evenly throughout the egg mixture. Now it’s time to fill the muffin tin. Pour the egg and veggie mix into each cup, filling them about 3/4 full. This gives them room to rise. Once filled, place the muffin tin in the preheated oven. Bake for 18-20 minutes. The muffins are done when the eggs are set and the tops look lightly golden. After baking, remove the muffins from the oven and let them cool for a few minutes. Then, gently lift them from the tin. If you want, add some fresh herbs on top for a nice touch. Enjoy your veggie-packed egg muffins! For the full recipe, see the earlier section. To make your egg muffins perfect, start with the eggs. Whisk them well until they are frothy. This helps to add air, making the muffins light and fluffy. Use a fork or a whisk for best results. When you pour the mixture into the muffin tin, do not overfill. Fill each cup about three-quarters full. This allows space for the muffins to rise without spilling over. One common mistake is not greasing the tin properly. Use oil or cooking spray to coat the tin. This step prevents sticking and makes cleanup easier. Another mistake is undercooking or overcooking the muffins. Keep an eye on the bake time. Check them at 18 minutes. The muffins should be set and slightly golden on top. To boost flavor, add herbs and spices. Fresh parsley, basil, or oregano work well. You can use about a tablespoon of chopped herbs for a great taste. If you want to change the cheese, try feta or goat cheese. They add a nice tang and work well with veggies. These options can give your muffins a tasty twist. For the full recipe, visit the [Full Recipe] section. {{image_2}} You can mix up the vegetables in your egg muffins for fun flavors. Zucchini adds moisture and a mild taste. Mushrooms bring a nice umami flavor and a chewy texture. Broccoli adds a bit of crunch and a pop of green. The great thing about these muffins is you can use what you have. Seasonal vegetables are also a good choice. In the summer, use fresh corn or diced tomatoes. In fall, consider sweet potatoes or squash for added sweetness. This way, you can enjoy different tastes each season. Adding protein to your egg muffins makes them heartier. You can use bacon, ham, or sausage for a savory touch. Cook these proteins first to get the best flavor. Chop them into small pieces before adding them to the mixture. If you're looking for plant-based options, tofu works great too. Crumble firm tofu and mix it in. You can also use chickpeas or black beans for added protein. These options keep your muffins tasty and filling while catering to various diets. For the full recipe, check out the details in the earlier section. Refrigeration Tips After you bake the egg muffins, let them cool completely. Then, place them in an airtight container. Store them in the fridge for up to five days. Always check for any signs of spoilage before eating. Freezing Instructions For longer storage, freeze the muffins. Wrap each muffin tightly in plastic wrap. Place them in a freezer bag or container. They can last for about three months in the freezer. When ready to eat, just thaw them in the fridge overnight. Best Methods for Reheating You can reheat egg muffins in the microwave or oven. For the microwave, heat on medium power for about 30-60 seconds. In the oven, preheat to 350°F (175°C) and bake for around 10 minutes. Maintaining Texture and Flavor To keep the muffins moist, cover them with a damp paper towel when microwaving. This helps to prevent them from drying out. If using the oven, you can add a splash of water to the baking dish to create steam. This keeps them soft and tasty. Yes, you can make these muffins ahead of time. - Meal Prep Suggestions: Prepare a batch on the weekend. Store them in the fridge for easy breakfasts. Allow the muffins to cool before placing them in an airtight container. They stay fresh for about five days. You can also freeze them for longer storage. Just reheat in the microwave or oven when ready to eat. You can easily modify the recipe to fit many dietary needs. - Gluten-Free and Dairy-Free Options: For gluten-free muffins, use gluten-free flour. Most veggies are safe for gluten-free diets. For a dairy-free option, skip the cheese or use a dairy-free cheese substitute. You can also add nutritional yeast for a cheesy flavor without dairy. These egg muffins last about five days in the fridge. - Storage Duration and Safety Tips: Store them in a sealed container to keep them fresh. If you notice any changes in smell or texture, it’s best to toss them. Always check before eating. In this blog post, I shared how to make tasty egg muffins. We covered the key ingredients, like eggs and fresh veggies, and added options for flavor, like herbs and alternative cheeses. I detailed step-by-step instructions, from preparing your oven to mixing and baking. Plus, I offered tips to ensure perfect muffins and variations to suit your taste. Remember, these muffins are easy to store and reheat. You can adapt them for any diet too. Enjoy your egg muffins and get creative with the flavors!](https://mysavedrecipe.com/wp-content/uploads/2025/04/1d4a3e34-6d6e-4af4-82c1-787e144f4de7-300x300.webp)
Quick Refrigerator Pickles Tangy and Flavorful Delight
Looking to add a burst of flavor to your meals? Quick refrigerator pickles are the answer! In this guide, I’ll share easy steps to…
![- Cucumbers and the ideal variety I love using small cucumbers for this recipe. Look for pickling cucumbers, like Kirby or Persian. They have a crisp texture and great flavor. Slice them into rounds. This helps them absorb the brine well. - Vinegar types and their flavor influences For this recipe, I use apple cider vinegar. It adds a nice tang. You can also try white vinegar or rice vinegar for a different taste. Each type of vinegar can change how the pickles taste, so feel free to experiment. - Additional seasonings and their roles Seasonings are key to great flavor. I add garlic for depth and mustard seeds for a little crunch. Dill seeds give a fresh taste, while crushed red pepper adds heat. You can adjust these to suit your taste, making them your own. For the full recipe, check [Full Recipe]. To make quick refrigerator pickles, start with the cucumbers. I like using small cucumbers for this recipe. Rinse them well and slice them into thin rounds. This helps the flavors soak in more. Next, make the vinegar brine. In a medium saucepan, combine 1 cup of water, 1 cup of apple cider vinegar, 2 tablespoons of sugar, and 1 tablespoon of salt. Heat this mixture on medium until the sugar and salt dissolve. Do not boil it. Once it’s dissolved, remove it from the heat and let it cool slightly. Now it's time to layer the ingredients in the jar. Take a clean jar and add the cucumber slices. Follow with 2 smashed garlic cloves, 1 teaspoon of mustard seeds, and 1 teaspoon of dill seeds. If you like some heat, add 1/2 teaspoon of crushed red pepper flakes here. This step adds a pop of flavor. Cooling the brine is very important. It helps keep the cucumbers crisp and fresh. Once the brine cools a bit, pour it over the cucumbers in the jar. Make sure they are fully submerged in the liquid. Seal the jar tightly and place it in the refrigerator. The pickles need time to develop flavor. For the best taste, let them sit for at least 24 hours. You can munch on them after a few hours, but they taste best when given time to soak. Enjoy your quick refrigerator pickles! You can make your pickles just how you like them. Want sweeter pickles? Add more sugar to the brine. If you like it spicy, throw in extra crushed red pepper flakes. You can also mix in herbs like thyme or oregano for a twist. Fresh dill sprigs can add a nice touch too. Feel free to experiment with flavors to find your perfect pickle. When making quick refrigerator pickles, keep a few things in mind. First, be careful with salt. Too much salt can spoil the taste, while too little can make them bland. Next, make sure you fully submerge the cucumbers in the brine. If they float above the liquid, they won’t pickle well. Using a weight or another jar can help keep them submerged. Avoid these mistakes for the best results with your pickles. {{image_2}} You can pick more than just cucumbers for your quick pickles. Carrots, radishes, and onions work great too. They offer unique flavors and colors. Slice your chosen veggies into thin pieces. This helps them soak up the brine better. You can create a mixed vegetable pickle jar. Just layer your favorite veggies and follow the same brining steps. This mix adds a fun twist to your meals. Want to change the flavor of your pickles? Try adding soy sauce for an Asian-inspired twist. It gives your brine a savory depth. You can also add citrus, like lime or lemon juice, for a fresh taste. This brightens the pickles and makes them even more refreshing. Feel free to experiment! Every new flavor can lead to a delightful surprise. Each batch can be unique, just like your taste! For your quick refrigerator pickles, the right container is key. I recommend using glass jars. They are easy to seal and let you see the pickles. Make sure they have tight-fitting lids. This helps keep the pickles fresh. Plastic containers can work too, but glass is better. To maximize shelf life, keep the pickles submerged in the brine. This helps prevent air from spoiling them. Always use clean utensils when taking pickles out. This keeps bacteria away and helps them last longer. How long will pickles last in the fridge? Quick refrigerator pickles can last about two to four weeks. The vinegar helps preserve them. As time goes on, they may lose some crunch but will still taste great. Watch for signs of spoilage. If you see mold or an off smell, it's time to toss them. If the brine turns cloudy, that can also mean they are past their prime. Always trust your senses. Enjoy your pickles while they are still fresh! Refrigerator pickles should sit for at least 24 hours. This time allows the flavors to blend well. If you’re in a hurry, you can taste them after a few hours. However, they will be better after a full day. Yes, you can reuse the brine. Just strain it to remove any bits. Store it in the refrigerator for up to a week. You can use it for another batch of pickles. Just keep in mind that the flavor may change with each use. No, refrigerator pickles are not meant for canning. Canning needs special methods to kill germs. Refrigerator pickles are quick and easy. They stay fresh in the fridge but do not last as long as canned pickles. If you want to try canning, look for recipes designed for that process. Making homemade pickles is a fun and tasty project. We covered the needed ingredients, including cucumbers and vinegars, and shared clear steps for preparation and cooling. Customizing your pickles is easy with seasonings and new flavors. We also explored variations with other vegetables and shared storage tips. Remember to watch for signs of spoilage to keep your pickles fresh. With this guide, you can create delicious pickles your way. Happy pickling!](https://mysavedrecipe.com/wp-content/uploads/2025/07/3685e86a-b74b-4d70-9b8f-0740dda85722.webp)
