


Latest & Greatest

Tangerine Mint Cooler Refreshing Summer Beverage Recipe
Looking for a refreshing drink to sip on during hot summer days? I’ve got just the thing! This Tangerine Mint
Read more…
Salted Pistachio Caramel Frappe Delightful and Easy Recipe
Craving a cool, sweet treat that’s also unique? Let’s whip up a Salted Pistachio Caramel Frappe! This delightful drink combines
Read more…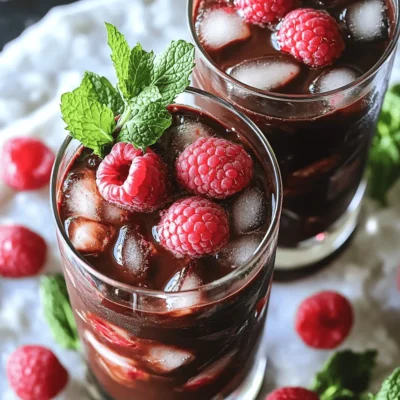
Dark Chocolate Raspberry Refresher Simple and Tasty Drink
Are you ready for a drink that’s both simple and delicious? The Dark Chocolate Raspberry Refresher combines rich dark chocolate
Read more…
Kiwi Passionfruit Agua Fresca Refreshing Summer Drink
Are you ready to beat the summer heat with a refreshing treat? Kiwi Passionfruit Agua Fresca is the perfect way
Read more…
Minted Melon Agua Fresca Refreshing Summer Drink
Looking for a cool drink to beat the summer heat? My Minted Melon Agua Fresca is the perfect choice! This
Read more…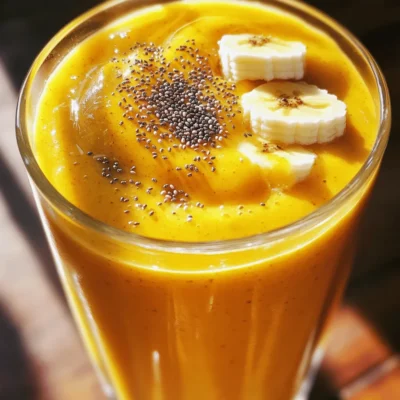
Turmeric Mango Sunrise Smoothie Energizing Drink Recipe
Looking for a refreshing drink that boosts your energy and health? Try my Turmeric Mango Sunrise Smoothie! This tasty blend
Read more…
Vanilla Bean Chai Freeze Refreshing Dessert Delight
Looking for a cool treat that’s bursting with flavor? The Vanilla Bean Chai Freeze is your answer! This delightful dessert
Read more…
Pomegranate Rosemary Cooler Refreshing Drink Recipe
Looking for a drink that’s both refreshing and unique? The Pomegranate Rosemary Cooler is just what you need! With its
Read more…browse recipes


Stuffed Bell Peppers with Quinoa Flavorful Meal Idea
Looking for a tasty and healthy meal idea? Stuffed bell peppers with quinoa are a crowd-pleaser! They are colorful, filling, and packed with nutrition.…
My Latest Desserts

Chewy Pumpkin Cookies Simple and Irresistible Treat
Craving a delicious fall treat? Look no further! My chewy pumpkin cookies are simple to make and completely irresistible. With Read Full Recipe-
Pumpkin Streusel Muffins Irresistible Fall Treat
Fall is here, and what better way to celebrate than with warm Pumpkin Streusel Muffins? These muffins are soft, spiced, Read Full Recipe -
Pumpkin Cheesecake Muffins Delightful Flavor Treat
Craving a sweet treat that screams fall? You’re in for a treat with Pumpkin Cheesecake Muffins! These muffins blend rich Read Full Recipe -
Pumpkin Spice Cookie Bites Irresistible Fall Treat
Are you ready to embrace the cozy flavors of fall? These Pumpkin Spice Cookie Bites are the perfect treat! They Read Full Recipe -
Vegan Pumpkin Spice Cookies Tasty Fall Delight
If you love fall flavors, you’ll adore these Vegan Pumpkin Spice Cookies! They are soft, spiced, and full of seasonal Read Full Recipe -
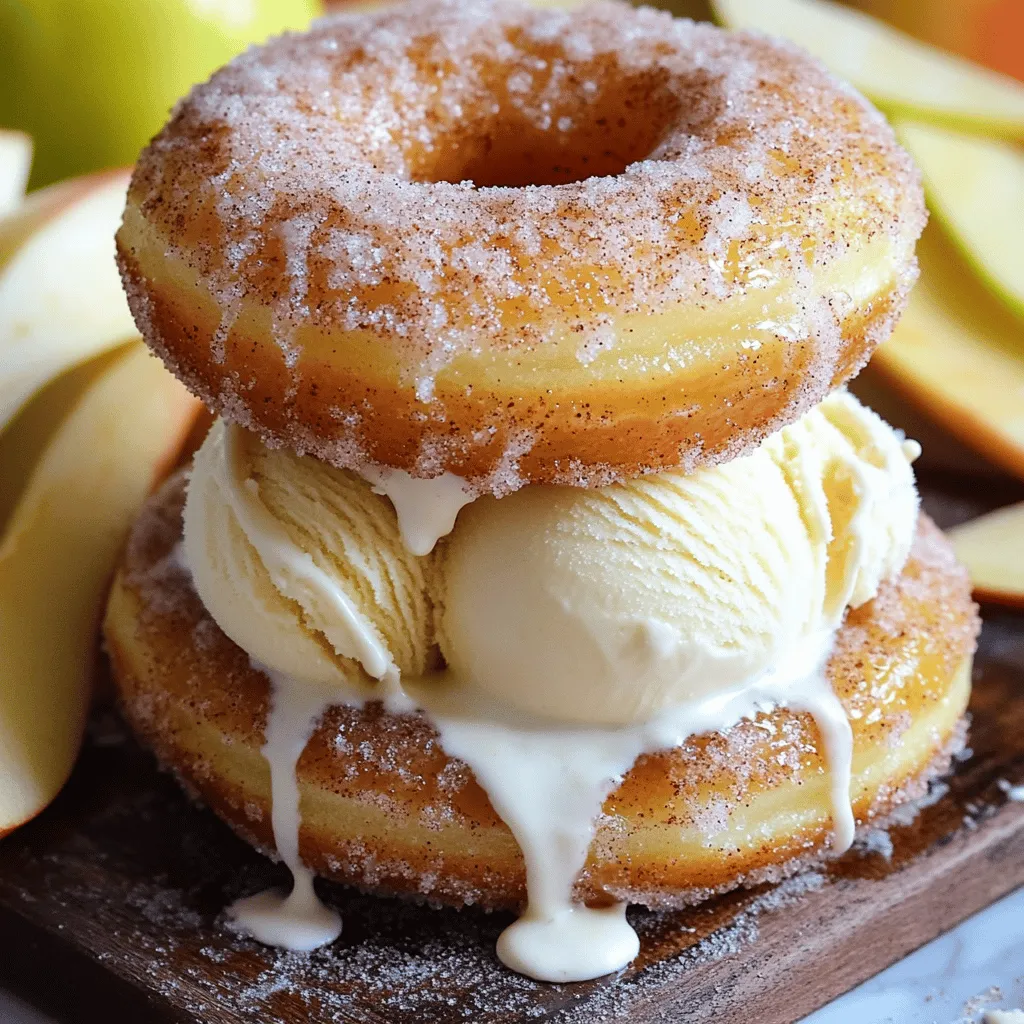
Apple Cider Donut Ice Cream Sandwiches Tasty Delight
Get ready for a sweet treat that combines two favorites: donuts and ice cream! Apple Cider Donut Ice Cream Sandwiches Read Full Recipe -
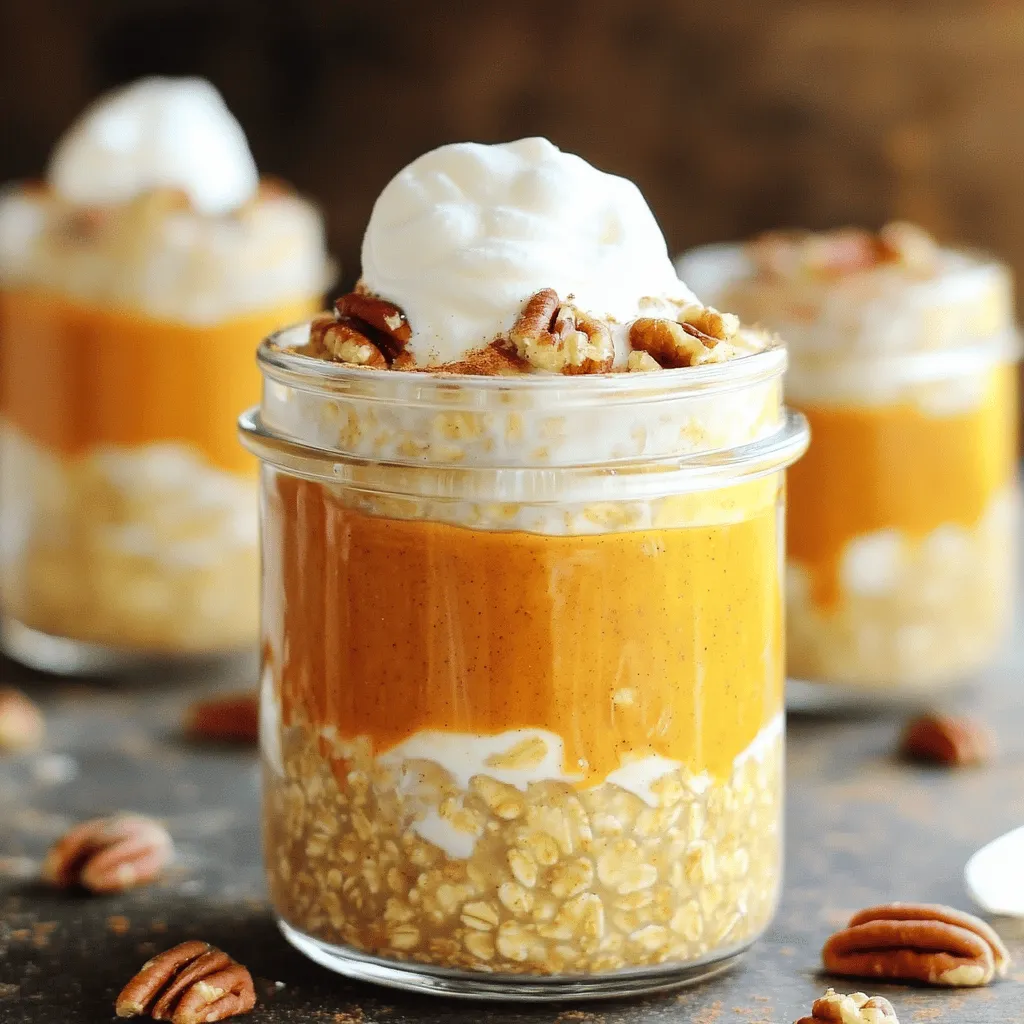
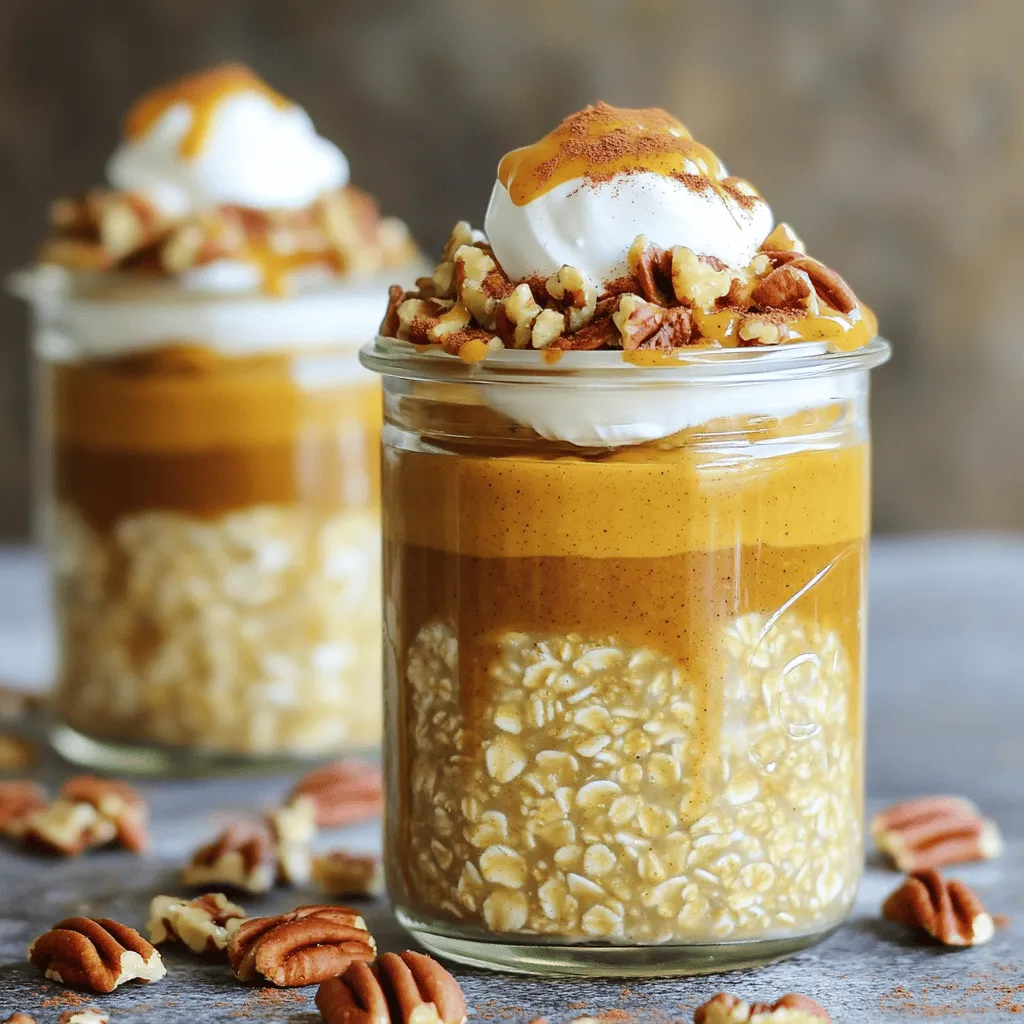
Brown Sugar Pumpkin Pie Overnight Oats Delight
Start your day with a warm slice of fall in a jar: Brown Sugar Pumpkin Pie Overnight Oats! This easy Read Full Recipe -
Apple Cider Donut Ice Cream Sandwiches Delightful Treat
Get ready to treat your taste buds! Apple Cider Donut Ice Cream Sandwiches blend fall flavors and sweet creaminess. These Read Full Recipe -
Brown Sugar Pumpkin Pie Overnight Oats Delight
Looking for a tasty breakfast that’s easy and fun? You’ll love my Brown Sugar Pumpkin Pie Overnight Oats Delight! This Read Full Recipe -
Cream Soda Donut Holes Delightful Dessert Recipe
Are you ready to enjoy a fun twist on a classic treat? Cream Soda Donut Holes are sweet, fluffy, and Read Full Recipe


My Latest Recipes

hey,
i’m !
I’m so happy you’re here!
Food is my passion, and perfecting each dish is my craft. I can’t wait for you to try them let’s dive into this delicious journey side by side.


![- 2 cups fresh figs, chopped - 1 tablespoon lemon juice - 1 teaspoon vanilla extract To make Quick Fig Jam, fresh ingredients matter. I love using ripe, sweet figs. They give the jam its rich flavor and color. When choosing figs, look for ones that are plump and slightly soft. They should smell sweet and fragrant. Lemon juice adds a nice tartness. It helps balance the sweetness of the figs. The vanilla extract brings warmth and depth to your jam. Don't skip it; it makes a big difference. - 1 cup granulated sugar - 1/2 teaspoon cinnamon (optional) For pantry staples, granulated sugar is key. It helps the figs break down and creates a thick jam. You can adjust the sugar amount based on your taste. If you like a bit of spice, add cinnamon. It pairs well with figs and gives the jam a cozy flavor. - How to measure figs accurately To measure figs, chop them first and then pack them into a cup. Do not press down too hard. You want them to be loosely packed for the best flavor. - Importance of ingredient quality Quality matters in cooking. Always use fresh figs and good sugar. The better the ingredients, the better your jam will taste. This is key to making your Quick Fig Jam shine. For the [Full Recipe], follow the steps outlined, and enjoy making this delightful spread! To start, wash your fresh figs under cool running water. Gently rub them to remove any dirt. Next, cut off the stems and chop the figs into small pieces. This helps them break down easily during cooking. Before you begin cooking, prepare your area. Gather all your ingredients and tools. This includes a medium saucepan, a wooden spoon, and a clean jar for storage. Keeping everything in reach makes the cooking process smooth and fun. In your medium saucepan, combine the chopped figs, granulated sugar, and lemon juice. Stir the mixture well to ensure the sugar coats the figs. Next, place the saucepan over medium heat. Bring the mixture to a gentle boil while stirring occasionally. Once it starts boiling, lower the heat. Allow the mixture to simmer for about 15 to 20 minutes. Stir frequently to prevent it from sticking to the bottom. You want it to thicken to a jam-like consistency. After the jam thickens, remove it from heat. Add the vanilla extract and cinnamon, if you like. These flavors enhance the jam's taste. Stir well to combine. Let the jam cool slightly before transferring it to a clean, sterilized jar. Allow it to cool completely at room temperature. Once cooled, seal the jar and store it in the fridge. Your quick fig jam will stay fresh for about two weeks. - Overcooking your fig jam: Cooking too long can turn your jam into a hard mass. Stay close to the stove as it simmers. Stir often and keep an eye on the time. Aim for a 15-20 minute cook time to achieve that perfect spreadable consistency. - Using unripe figs: Unripe figs lack the sweetness and flavor you want. Always choose ripe, soft figs. They will give your jam a rich taste and smooth texture. Check your figs carefully before using them. - Balancing sweetness with acidity: Figs are sweet, so adding a touch of lemon juice helps balance that sweetness. It makes the flavor pop and keeps it from being too sugary. Adjust the lemon juice to find your perfect balance. - Flavor variations with spices or herbs: You can spice things up by adding cinnamon, nutmeg, or even a hint of ginger. These spices add warmth and depth. Feel free to experiment. Just remember to start small and taste as you go. - Best cookware for making jam: Use a heavy-bottomed saucepan. It distributes heat evenly and helps prevent burning. A wide pan also allows moisture to escape, helping the jam thicken faster. - Recommended storage containers: Glass jars are best for storing your fig jam. They keep the jam fresh and let you see the beautiful color. Make sure to sterilize the jars to ensure safety and longevity. {{image_2}} You can enhance your quick fig jam by adding other fruits. Try chopping apples, pears, or peaches. These fruits pair well with figs. The sweetness and texture give your jam a new twist. Mix and match until you find your favorite blend. Adding spices can elevate your fig jam. Consider using ginger or nutmeg for a warm flavor. When you add spices, reduce the sugar a bit. This balance lets the spices shine without being too sweet. Experiment with different spices to discover your unique blend. You can also try using honey or maple syrup instead of sugar. These natural sweeteners can change the flavor profile. When using them, cook your jam a little longer. This helps to achieve the right thickness. Adjusting the cooking time is key for perfect consistency. Check out the Full Recipe for tips on making quick fig jam. How long does Quick Fig Jam last in the fridge? Quick Fig Jam lasts for up to two weeks in the fridge. Make sure to keep it in a sealed jar. This keeps it fresh and safe to eat. Best practices for sealing jars When sealing your jars, always use clean, sterilized jars. Fill them to about half an inch from the top. Wipe the rim with a clean cloth to remove any jam. Finally, screw the lid on tightly to keep air out. Guidelines for freezing your jam You can freeze Quick Fig Jam for up to six months. Use freezer-safe containers or jars. Leave some space at the top of the jar. The jam will expand as it freezes. Thawing tips for best texture To thaw frozen jam, place it in the fridge overnight. This helps keep the texture smooth. You can also thaw it in a bowl of warm water. Avoid microwaving, as it may change the jam's texture. How to recognize spoilage Look for changes in color or smell. If the jam has an off odor or looks cloudy, it may be spoiled. Mold on the surface is also a clear sign that it’s time to toss it. Proper disposal methods If your jam has spoiled, throw it away in the trash. Do not compost it, as this can attract pests. Always clean the jar before recycling to keep it safe. Making Quick Fig Jam takes about 30 minutes in total. You will spend 10 minutes preparing the figs and other ingredients. The cooking takes about 15-20 minutes. This quick process means you can enjoy your jam in no time. Yes, you can make fig jam without sugar. You can use honey, maple syrup, or agave nectar. These options add sweetness but may change the jam's thickness. Sugar helps create the right texture, so you may need to cook it longer. Always taste as you go to achieve the flavor you like best. If your jam doesn’t thicken, don’t worry! You can cook it longer over low heat. Keep stirring to avoid burning. If it still seems runny, mix in a bit of pectin. You can also let it cool to see if it firms up. If not, you can use it as a sauce instead. This article covered everything you need to make quick fig jam. We discussed fresh ingredients, pantry staples, and measurement tips to ensure you get it right. I shared step-by-step instructions on preparation and cooking, along with helpful tips to avoid common mistakes. We explored tasty variations and how to store your jam safely. Remember, quality ingredients make the best jam. With these tips, you can create a delicious treat that impresses anyone. Enjoy your cooking adventure with figs and have fun experimenting!](https://mysavedrecipe.com/wp-content/uploads/2025/06/22d9fddb-9fe7-4372-851a-d54a165ac2f5-300x300.webp)

Spicy Chickpea Tacos Flavorful and Easy Meal Idea
Craving a meal that’s both quick and full of flavor? Look no further! Spicy Chickpea Tacos combine tender chickpeas with bold spices for a…
![- 1 can (15 oz) chickpeas - 1 tablespoon olive oil - Spices: smoked paprika, ground cumin, chili powder, cayenne pepper - Toppings: shredded red cabbage, avocado, cilantro, feta cheese (optional) These ingredients create a tasty base for your spicy chickpea tacos. Chickpeas give you protein and fiber. Olive oil adds healthy fat and helps the spices stick. You can serve the tacos with various sauces and sides for extra flavor. Try adding hot sauce for heat. A side of rice or a simple salad works well too. To enhance nutrition, add more veggies. Chopped tomatoes or diced bell peppers add color. They also boost vitamins. You can mix and match to suit your taste. For the full recipe, check the complete details to create these delicious tacos. First, preheat your oven to 400°F (200°C). This step is key for crispy chickpeas. Next, you need to mix the chickpeas with olive oil and spices. In a large bowl, add the drained chickpeas. Pour in one tablespoon of olive oil. Then, add one teaspoon of smoked paprika, one teaspoon of ground cumin, and half a teaspoon of chili powder. If you like heat, add a quarter teaspoon of cayenne pepper. Finish with salt and pepper to taste. Toss everything well to coat the chickpeas evenly. Now, spread the chickpeas on a baking sheet in a single layer. This helps them roast evenly. Place the baking sheet in the oven and roast for about 20 to 25 minutes. Stir them halfway through to ensure they get crispy all around. You’ll know they are done when they turn golden and crunchy. While the chickpeas are roasting, it’s time to warm your tortillas. You can do this in a skillet over medium heat. Heat each tortilla for about 30 seconds on each side. This makes them soft and easy to fold. Keeping them warm means they won’t crack when you fill them. Once the chickpeas are crisp, take them out of the oven. Start building your taco by laying a generous amount of crispy chickpeas onto each tortilla. Next, top them with shredded red cabbage for crunch. Add sliced avocado for creaminess and sprinkle with fresh cilantro. For extra flavor, drizzle lime juice over the top. If you want it creamier, add crumbled feta cheese. Now your tacos are ready to enjoy! For the full recipe, check out the [Full Recipe]. To adjust the spice levels in your tacos, start by tasting the spices as you mix. If you like it hot, add more cayenne pepper. For milder tacos, use less. You can also add more lime juice to balance the heat. Remember, everyone has different preferences, so taste as you go. It’s fun to find the right mix for you! To keep your roasted chickpeas fresh, store them in an airtight container. They will stay crunchy for about three days. If they lose their crunch, try reheating them in the oven for a few minutes. For tacos, assemble only what you will eat. Store leftover toppings separately to keep them fresh. You can use leftovers for salads or wraps, too! To elevate the taste of your tacos, consider adding more toppings. Fresh mango or pineapple can give a sweet kick. You might sprinkle some jalapeños for extra heat. Try adding a dollop of yogurt or sour cream for creaminess. Mix in some spices like coriander or garlic powder to the chickpeas for added depth. There are endless ways to make your tacos unique! For the full recipe, refer to the [Full Recipe]. {{image_2}} For a plant-based twist, use lentils instead of chickpeas. Lentils cook fast and pack protein. You can also try black beans or pinto beans for a different flavor. If you want a meat-like texture, consider jackfruit. It soaks up spices well and has a fun, pulled texture. Add some sautéed mushrooms for a hearty bite. To change the taste, mix up the spices. Try adding garlic powder or onion powder for depth. A splash of soy sauce or tamari can add a savory kick. If you like citrus, replace lime with lemon or orange juice. For a smoky flavor, try adding chipotle powder. This gives your tacos a unique twist that excites the taste buds. When it comes to tortillas, you have options. Corn tortillas are gluten-free and add a nice texture. Flour tortillas are soft and chewy, making them a favorite for many. You can even use lettuce wraps for a low-carb version. Look for gluten-free tortillas made from almond or coconut flour for a new taste. Each tortilla type brings its own flair to your spicy chickpea tacos. Store leftover chickpeas in an airtight container. Keep them in the fridge for up to five days. For longer storage, freeze them in a freezer-safe bag. Make sure to remove as much air as possible. This method helps keep their flavor and texture. To keep tortillas fresh, store them in a sealed bag. Place them in the fridge for up to a week. For longer storage, you can freeze them. Just wrap each tortilla in plastic wrap before placing them in the freezer. This way, they won’t stick together. Reheat chickpeas in the oven or microwave. For the oven, set it to 350°F (175°C). Spread the chickpeas on a baking sheet and heat for about 10 minutes. If using a microwave, heat in short bursts of 30 seconds. Stir in between to avoid uneven heating. For tortillas, warm them in a skillet. Heat each side for about 20 to 30 seconds. This keeps them soft and pliable, perfect for making tacos. Enjoy your tasty Spicy Chickpea Tacos with all the right textures! Yes, you can prep the chickpeas and toppings in advance. - Cook the chickpeas and store them in a container. - Keep the tortillas wrapped in foil or a bag. - Prepare toppings like cabbage and avocado, but slice avocados just before serving. Chickpeas are very versatile. Here are some great additions: - Fresh tomatoes for a juicy bite. - Diced red onion for a sharp flavor. - Sliced jalapeños for added heat. - Corn for sweetness and crunch. If you love heat, try these tips: - Add more cayenne pepper to the chickpeas. - Drizzle hot sauce on top before serving. - Include fresh chopped jalapeños as a topping. - Use spicy salsa for extra kick. Yes, they can be gluten-free! - Use corn tortillas, which are naturally gluten-free. - Check labels on any packaged ingredients. - Swap out feta cheese for a dairy-free option if needed. For the full recipe, check out the details provided. In this blog post, we covered how to make tasty Spicy Chickpea Tacos. We went through the main ingredients, including chickpeas, olive oil, and spices. You learned step-by-step instructions for preparation and roasting, plus tips for perfect spice levels and leftovers. Remember, these tacos are versatile; feel free to swap ingredients to suit your taste. With their bold flavors and fun assembly, Spicy Chickpea Tacos are a dish you can enjoy any time. Try making them your own with different toppings or sauces. Enjoy!](https://mysavedrecipe.com/wp-content/uploads/2025/05/819b49e6-de89-4c88-9862-24012c8d226d.webp)
