Latest & Greatest

Quick Fig Jam Easy and Flavorful Homemade Delight
Make your mornings sweeter with my Quick Fig Jam! This easy and flavorful treat transforms fresh figs into a delicious
Read more…
Crunchy Pickled Okra Flavorful and Easy Recipe
If you love bold flavors and crave a crunchy snack, you’ll enjoy this crunchy pickled okra recipe. It’s easy to
Read more…
Moroccan Frittata Flavorful Dish for Easy Meals
Looking for a simple, tasty dish? Try a Moroccan frittata! This vibrant meal bursts with flavor and uses easy ingredients.
Read more…
Classic Fried Okra Crispy and Flavorful Delight
Are you ready to discover a crispy, flavorful delight that you can make at home? Classic fried okra is a
Read more…
Peach Cobbler with Fresh Peaches Easy Dessert Recipe
Craving a sweet treat? This Peach Cobbler with Fresh Peaches is your answer! It’s an easy dessert perfect for any
Read more…
Southern Peach Bread Irresistible and Moist Delight
If you’ve ever tasted Southern Peach Bread, you know it’s a treat you can’t resist. Imagine moist, fluffy slices loaded
Read more…
Savory Southern Okra Patties Easy and Tasty Recipe
Are you ready to dive into a tasty Southern treat? My Savory Southern Okra Patties recipe is easy to follow
Read more…
French Fig Jam Simple Recipe for Delicious Flavor
If you crave a simple yet delicious spread, this French Fig Jam recipe is for you. Made with fresh figs,
Read more…browse recipes


Creamy Mango Ice Cream Delightful and Easy Recipe
Craving a refreshing treat that bursts with flavor? You’re in for a delicious surprise! In this article, I’ll share my easy and delightful recipe…
My Latest Desserts

Chewy Pumpkin Cookies Simple and Irresistible Treat
Craving a delicious fall treat? Look no further! My chewy pumpkin cookies are simple to make and completely irresistible. With Read Full Recipe-
Pumpkin Streusel Muffins Irresistible Fall Treat
Fall is here, and what better way to celebrate than with warm Pumpkin Streusel Muffins? These muffins are soft, spiced, Read Full Recipe -
Pumpkin Cheesecake Muffins Delightful Flavor Treat
Craving a sweet treat that screams fall? You’re in for a treat with Pumpkin Cheesecake Muffins! These muffins blend rich Read Full Recipe -
Pumpkin Spice Cookie Bites Irresistible Fall Treat
Are you ready to embrace the cozy flavors of fall? These Pumpkin Spice Cookie Bites are the perfect treat! They Read Full Recipe -
Vegan Pumpkin Spice Cookies Tasty Fall Delight
If you love fall flavors, you’ll adore these Vegan Pumpkin Spice Cookies! They are soft, spiced, and full of seasonal Read Full Recipe -
Apple Cider Donut Ice Cream Sandwiches Tasty Delight
Get ready for a sweet treat that combines two favorites: donuts and ice cream! Apple Cider Donut Ice Cream Sandwiches Read Full Recipe -
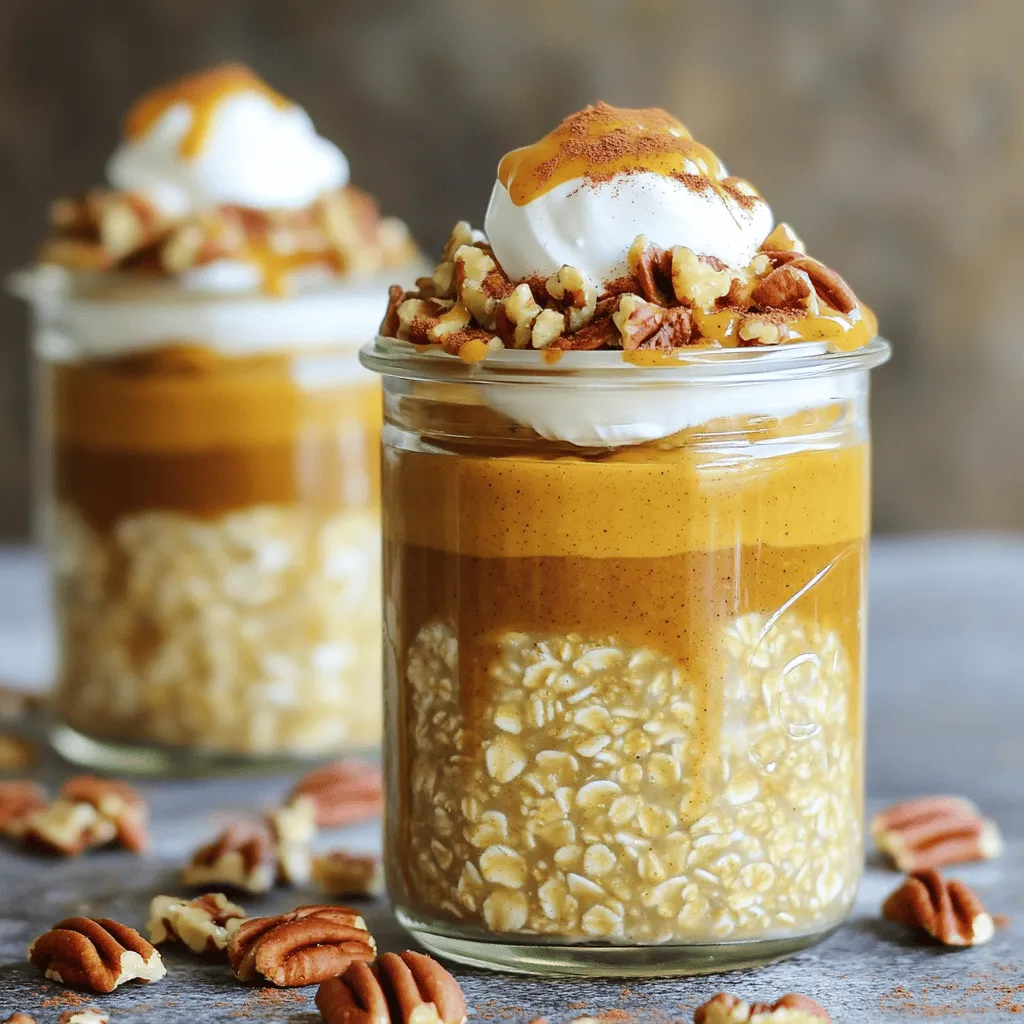
Brown Sugar Pumpkin Pie Overnight Oats Delight
Start your day with a warm slice of fall in a jar: Brown Sugar Pumpkin Pie Overnight Oats! This easy Read Full Recipe -
Apple Cider Donut Ice Cream Sandwiches Delightful Treat
Get ready to treat your taste buds! Apple Cider Donut Ice Cream Sandwiches blend fall flavors and sweet creaminess. These Read Full Recipe -
Brown Sugar Pumpkin Pie Overnight Oats Delight
Looking for a tasty breakfast that’s easy and fun? You’ll love my Brown Sugar Pumpkin Pie Overnight Oats Delight! This Read Full Recipe -
Cream Soda Donut Holes Delightful Dessert Recipe
Are you ready to enjoy a fun twist on a classic treat? Cream Soda Donut Holes are sweet, fluffy, and Read Full Recipe


My Latest Recipes

hey,
i’m !
I’m so happy you’re here!
Food is my passion, and perfecting each dish is my craft. I can’t wait for you to try them let’s dive into this delicious journey side by side.
![- 4 ripe tomatoes, sliced - 8 ounces fresh mozzarella cheese, sliced - 1 cup fresh basil leaves - 4 tablespoons extra-virgin olive oil - 2 tablespoons balsamic glaze - Salt and freshly ground black pepper to taste How to choose ripe tomatoes When you pick tomatoes, look for ones that feel firm. They should have smooth skin and vibrant color. A ripe tomato will smell sweet and fresh. Try to choose tomatoes that are slightly soft when you press them gently. This means they are ready to eat! Selecting high-quality mozzarella For the best flavor, choose fresh mozzarella. It should be soft and moist, not dry. Look for mozzarella packed in water or whey. This keeps it fresh. If you can, buy it from a local cheese shop or farmer's market for the best quality. Importance of fresh basil Fresh basil adds bright flavor to your salad. Look for basil with deep green leaves. Avoid any brown or wilted leaves. When you smell fresh basil, it should smell sweet and herbal. This smell means it is fresh and ready to use in your dish. For the full details on making this delightful salad, check out the Full Recipe. To make this salad, start with ripe tomatoes. Choose bright red tomatoes that feel slightly soft. Next, select fresh mozzarella. It should be creamy and firm. Slice the tomatoes and mozzarella into even pieces. Aim for about 1/4 inch thick. This helps each bite taste perfect. Use a sharp knife for clean cuts. Now it's time to layer the salad. Take a large platter. Start with a slice of tomato, then add mozzarella, and a basil leaf. Repeat this until all ingredients are used. Drizzle extra-virgin olive oil over the salad. This adds a rich flavor. Next, drizzle balsamic glaze for sweetness and tang. Season your salad with salt and freshly ground black pepper. This boosts the taste. For a spicy kick, you can add red pepper flakes. Allow the salad to rest for about 5 minutes. This helps the flavors blend nicely. Enjoy your Simple Caprese Salad Delight! You can find more details in the Full Recipe. Serve your Caprese salad cold for the best taste. A cool salad brings out fresh flavors. Pair it with crusty bread or a light white wine. This adds depth and makes the meal even better. To add a kick, sprinkle red pepper flakes on your salad. This small step makes a big difference. You can also try different oils, like infused olive oil. Each oil brings a new twist to the dish. For gatherings, serve your salad on a large, colorful platter. This makes the dish eye-catching. You can also use creative bowls or even rustic wooden boards. Add extra basil leaves on top for a pop of color. These small touches make your Caprese salad stand out. For the full recipe, check out the Caprese Delight Salad 🥗 section above. {{image_2}} For your Caprese salad, you can switch up the cheese. Try using burrata for a creamier texture. Goat cheese also works well for a tangy twist. If you have seasonal veggies, toss in sliced cucumbers or peppers. They add a nice crunch and fresh flavor. You can also use heirloom tomatoes for a colorful and tasty option. If you want a vegan version, replace mozzarella with plant-based cheese. There are many good options made from nuts or soy. For a nut-free salad, ensure you choose a cheese that does not contain nuts. This way, everyone can enjoy your dish without worry. Infusing your olive oil can elevate your salad. Try adding garlic or herbs to the oil for extra flavor. Different balsamic reductions can also change the taste. A sweeter version can add depth, while a more tangy one can brighten the dish. Experiment with these ideas to make your Caprese salad unique. For the complete recipe, check out the [Full Recipe]. Store your Caprese salad in a clean, airtight container. This keeps it fresh and tasty. Use a glass or plastic container with a tight lid. The salad stays good in the fridge for 1-2 days. After that, the ingredients may wilt or lose flavor. If you want to keep your salad fresh for longer, store the parts separately. Keep the tomatoes, mozzarella, and basil in their own containers. This way, they stay crisp and flavorful. Assemble your salad just before you plan to eat. If you have a ready-to-eat salad, eat it within one day for the best taste. Freezing Caprese salad is not ideal. The tomatoes and mozzarella can become mushy when thawed. If you must freeze, consider just the basil. Chop it and freeze it in a small bag. To thaw, place it in the fridge overnight. Use it in soups or sauces later. For best results, enjoy your salad fresh using the Full Recipe. Caprese salad stays fresh in the fridge for about two days. After that, the tomatoes and mozzarella may get soggy. To keep it fresh, store it in an airtight container. Yes, you can prepare Caprese salad ahead of time. However, it’s best to add the oil and glaze just before serving. This keeps the flavors vibrant and the texture fresh. You can add a few herbs to your Caprese salad. Fresh oregano or parsley works well. You can also try mint for a unique twist. Mix and match to find your favorite flavor. Balsamic vinegar is a raw, tangy liquid. Balsamic glaze is thicker and sweeter, made by cooking down the vinegar. The glaze adds a rich finish to dishes like Caprese salad. Yes, Caprese salad is gluten-free. It contains no wheat or gluten ingredients. You can enjoy this salad without worrying about gluten. This blog shared how to create a delicious Caprese salad. We covered fresh ingredients, easy steps, and great tips. Choosing ripe tomatoes and fresh mozzarella is key to flavor. Layer your salad carefully for the best look. Remember to season and let it rest for better taste. Feel free to experiment with variations and enjoy it fresh. Whether it’s for a meal or a gathering, your Caprese salad will impress. Keeping ingredients fresh ensures a delightful experience every time. Happy cooking!](https://mysavedrecipe.com/wp-content/uploads/2025/06/1b81fb84-be7d-4121-86ad-cb500c438595-300x300.webp)
![When making Instant Pot beef stew, you need some key ingredients. Gathering these will help you create a hearty meal. Here’s what you will need: - Beef and Vegetables - 2 pounds beef chuck, cut into 1-inch cubes - 1 medium onion, chopped - 3 cloves garlic, minced - 4 medium carrots, sliced - 3 medium potatoes, diced - 1 cup frozen peas (added at the end) - Seasonings and Broth - 3 cups beef broth - 2 tablespoons olive oil - 2 tablespoons tomato paste - 1 teaspoon dried thyme - 1 teaspoon smoked paprika - 1 bay leaf - Salt and pepper to taste - Optional Ingredients - You can add a splash of red wine for depth. - Fresh herbs like parsley can brighten the dish. Using fresh ingredients makes the stew taste better. Each part plays a role in the flavor. The beef adds richness, while the vegetables bring sweetness. The herbs and spices provide depth and warmth. For a full recipe, check [Full Recipe]. Cutting and Chopping Start by cutting the beef chuck into 1-inch cubes. This size helps the meat cook evenly. Next, chop one medium onion and mince three cloves of garlic. Slice four medium carrots and dice three medium potatoes. Having all your ingredients ready makes cooking easier and faster. Measuring and Organizing Measure out two tablespoons of olive oil for sautéing. You’ll need three cups of beef broth, two tablespoons of tomato paste, one teaspoon of dried thyme, and one teaspoon of smoked paprika. Don’t forget the bay leaf, salt, and pepper. Set everything out on your counter for easy access. Sautéing and Browning Press the Sauté button on the Instant Pot. Add the olive oil and let it heat up. Once hot, add the beef in batches. Make sure to brown the meat on all sides. This step adds great flavor. Remove the beef with a slotted spoon and set it aside. Pressure Cooking Settings In the same pot, add the chopped onion and minced garlic. Sauté for about 3-4 minutes until the onions are soft. Then, stir in the tomato paste for one more minute. Return the browned beef to the pot. Now, add the sliced carrots, diced potatoes, beef broth, thyme, smoked paprika, bay leaf, salt, and pepper. Stir everything well. Natural Release Method Close the lid of the Instant Pot and check that the valve is set to sealing. Cook on high pressure for 35 minutes. When the time is up, let the pressure release naturally for 10-15 minutes. This method keeps the stew tender and juicy. After that, switch the valve to venting to release any remaining pressure. Adding Frozen Peas Open the lid and stir in one cup of frozen peas. Let them warm through for about five minutes. This adds a pop of color and sweetness to the stew. Seasoning Adjustments Before serving, taste the stew. If it needs more flavor, adjust the seasoning with salt and pepper. You can also add a sprinkle of fresh herbs for brightness. Enjoy your savory Instant Pot beef stew! For the full recipe, check the details above. - Overcrowding the Pot: When you add too much beef at once, it will not brown well. This step adds flavor. Work in small batches to get a nice sear. This makes your stew taste rich and deep. - Ignoring Cooking Times: Each Instant Pot is different. Always follow the suggested cooking time. If you cook for too long, the beef can become tough. The right timing gives you tender meat that melts in your mouth. - Adding Herbs and Spices: Fresh or dried herbs can boost the taste of your stew. Try adding bay leaves, thyme, or rosemary for extra flavor. You can also sprinkle in some black pepper for a kick. - Using Bone Broth: Bone broth is richer than regular beef broth. It adds depth to your stew and makes it more nutritious. Replace beef broth with bone broth in your recipe for a tasty upgrade. - How to Thicken the Stew: If your stew is too thin, mix a tablespoon of cornstarch with cold water. Stir this mix into the stew and cook on sauté for a few minutes until it thickens. This will give you a nice, hearty stew. - Balancing Flavors: Taste your stew before serving. If it’s too salty, add a bit of sugar or a splash of vinegar to balance it out. This small tweak can enhance the overall flavor and make it perfect. {{image_2}} Alternatives for Beef If you want to switch things up, you can use chicken or turkey. Both meats cook well in the Instant Pot. For a plant-based option, try mushrooms or lentils. These options give great flavor and texture. Vegetable Variations Feel free to mix in your favorite vegetables. Turnips, parsnips, or sweet potatoes add a nice twist. You can also add bell peppers or green beans for a pop of color. Gluten-Free Options To keep this stew gluten-free, make sure your broth is certified gluten-free. Most beef broths are safe, but always check the label. Cornstarch can replace flour if you want to thicken your stew. Low-Carb Alternatives Want to cut carbs? Swap potatoes for cauliflower. Cauliflower gives a similar texture without the carbs. You can also add more leafy greens like spinach or kale for extra nutrients. Adding Asian Flavors Want to make it unique? Add soy sauce and ginger for an Asian twist. You can also toss in some bok choy or snow peas. These flavors will take your stew to a new level. Making it Spicy If you like heat, add chili flakes or diced jalapeños. This gives your stew a nice kick. You can also use spicy sausage instead of beef for a bold flavor. For the full recipe, check out the savory Instant Pot beef stew. Enjoy your cooking! - Proper Storage Containers: Use airtight containers for best results. Glass or plastic works well. - Shelf Life in the Fridge: Your beef stew lasts about 3 to 4 days. Make sure to store it right after cooling. - Freezing Tips: Let the stew cool before freezing. Divide it into portions. Use freezer-safe bags or containers. Leave some space for expansion. - Thawing and Reheating Instructions: Thaw overnight in the fridge. You can also use the microwave for faster thawing. Reheat on the stove or in the microwave. - Stovetop vs. Microwave: The stovetop is best for even heating. Stir often to avoid hot spots. The microwave is quick but may unevenly heat your stew. - Adjusting Consistency After Reheating: If your stew is too thick, add a bit of beef broth or water. Stir well to mix. If it's too thin, simmer it on the stove to thicken. Can I use frozen beef? Yes, you can use frozen beef. Just note that it may need more time to cook. If you choose to use frozen beef, add about 10 minutes to your cooking time. The Instant Pot can handle it, but ensure your beef is in cubes. What type of beef is best for stew? Beef chuck is the best choice for stew. It is tender and full of flavor. Chuck breaks down well during cooking, making it juicy and tasty. You can also use brisket or round, but chuck is my top pick. Why is my stew too watery? If your stew is watery, you can thicken it by making a slurry. Mix 1 tablespoon of cornstarch with 2 tablespoons of cold water. Stir it into the stew and cook for a few minutes on sauté mode until it thickens. How can I prevent the meat from being tough? To keep your meat tender, brown it first. This adds flavor and helps keep moisture in. Also, avoid overcooking. The Instant Pot cooks fast, so stick to the time. Letting the stew rest helps too. Calories and Macros Each serving of beef stew has about 350 calories. It has 20 grams of protein and 15 grams of fat. Carbs come from the veggies and potatoes, about 30 grams per serving. Allergens to Consider This recipe is generally safe, but check for allergens. It contains beef and may have gluten if you add bread. Always read labels on broth and any extra ingredients. This blog post covered making a delicious Instant Pot beef stew. We discussed the key ingredients, cooking steps, and helpful tips. I shared common mistakes to avoid and how to enhance flavor. You can also explore different variations to suit your taste or diet. Remember, practice makes perfect. Don’t rush, enjoy the process, and experiment with flavors. With these tips, you’ll create a stew that warms your heart and home. Happy cooking!](https://mysavedrecipe.com/wp-content/uploads/2025/06/e52b03c1-4e57-4892-bcf1-e62fc5fbd469-300x300.webp)


Creamy Spinach Artichoke Dip Irresistibly Cheesy Treat
If you crave something cheesy and delicious, you’ve come to the right place! My Creamy Spinach Artichoke Dip is everything you want in a…