Latest & Greatest
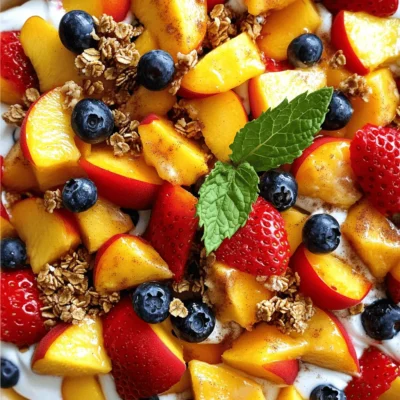
Peach Cobbler Cheesecake Fruit Salad Delightful Treat
Are you ready for a sweet twist on dessert? My Peach Cobbler Cheesecake Fruit Salad is a delightful treat that
Read more…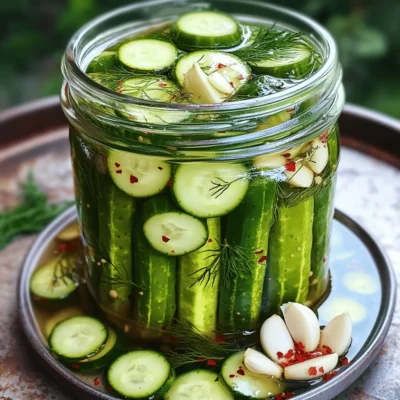
Garlic Dill Refrigerator Pickles Easy Flavor Burst
Are you ready to elevate your snacking game? Garlic Dill Refrigerator Pickles are the answer! With a burst of flavor
Read more…
Zucchini Brownies Simple and Delicious Recipe Guide
Are you ready to indulge in a sweet treat that’s packed with hidden veggies? My simple and delicious Zucchini Brownies
Read more…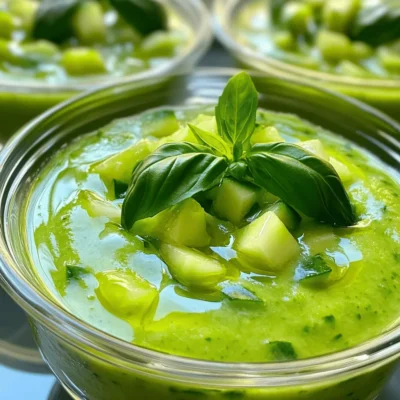
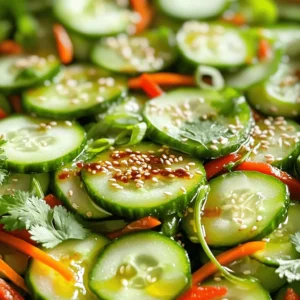
Quick Cucumber Gazpacho Fresh and Flavorful Recipe
Looking for a refreshing dish that’s quick to make? You’ll love this Quick Cucumber Gazpacho! It’s light, tasty, and perfect
Read more…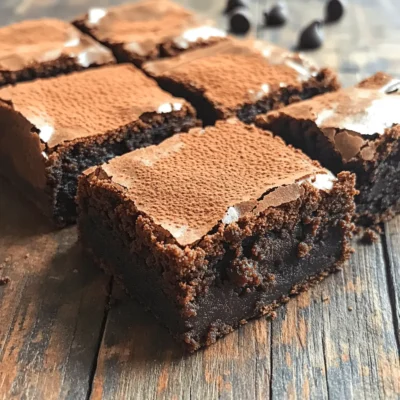
Healthy 87 Calorie Brownies Simple and Delicious Recipe
Craving chocolate without the guilt? You’re in luck! These Healthy 87 Calorie Brownies are not just simple to make, but
Read more…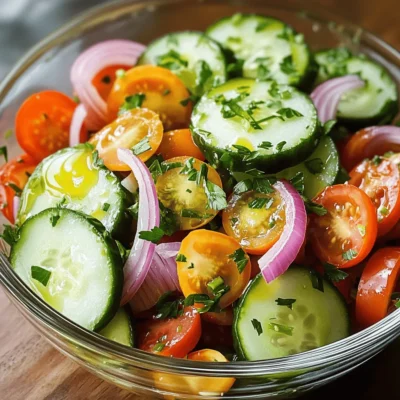
Marinated Cucumbers Onions and Tomatoes Flavor Boost
Looking for a quick way to add flavor to your meals? Marinated cucumbers, onions, and tomatoes are the answer! This
Read more…
Easy Peach Galette Simple and Delicious Dessert Recipe
Craving a dessert that’s both simple and delightful? Then you’ll love this Easy Peach Galette recipe! With fresh, juicy peaches
Read more…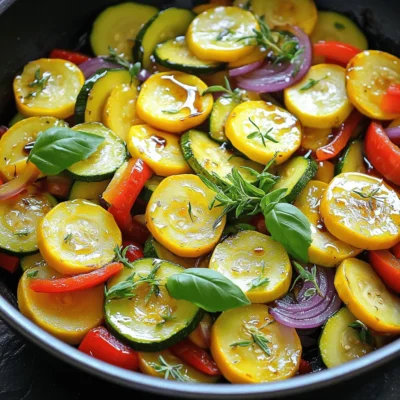
Summer Squash Sauté Flavorful and Simple Dish
Looking for a quick and tasty dish? My Summer Squash Sauté is perfect for you! This colorful, simple recipe highlights
Read more…browse recipes


Cheeseburger Game Day Sliders Irresistible Flavor Treat
Get ready to impress your friends with my Cheeseburger Game Day Sliders! These mini delights pack big flavors that everyone will love. Made with…
My Latest Desserts

Chocolate Chip Pumpkin Cream Cheese Muffins Delight
If you love the cozy flavors of fall, you’re in for a real treat! Chocolate Chip Pumpkin Cream Cheese Muffins Read Full Recipe-
Streusel Pumpkin Cream Cheese Muffins Delightful Treat
If you love pumpkin flavors, you will adore these Streusel Pumpkin Cream Cheese Muffins. They mix rich pumpkin with creamy Read Full Recipe -
Easy Pumpkin Cream Cheese Muffins Tasty Fall Treat
Fall is here, and that means it’s time for warm, cozy treats! You’ll love these Easy Pumpkin Cream Cheese Muffins. Read Full Recipe -
Pumpkin Cream Cheese Muffins Delightful and Simple Recipe
Get ready to enjoy a treat that combines the warmth of pumpkin with creamy cheese! This simple recipe for pumpkin Read Full Recipe -
Pumpkin Pie Crinkle Cookies Charming Autumn Treat
Get ready to embrace autumn with a delightful twist on a classic favorite! Pumpkin Pie Crinkle Cookies combine the warm Read Full Recipe -
Pumpkin Cheesecake Cookies Irresistible Fall Treat
Welcome to the season of cozy flavors and pumpkin delights! If you crave a treat that combines the rich taste Read Full Recipe -
Chocolate Chip Pumpkin Cookies Flavorful Fall Treat
Are you ready to bake something special this fall? Chocolate chip pumpkin cookies blend sweet chocolate with warm pumpkin spice Read Full Recipe -
Pumpkin Butter Snickerdoodles Irresistible Cookie Treat
Looking for a new fall favorite? These Pumpkin Butter Snickerdoodles are the perfect cookie treat! With soft centers and a Read Full Recipe -
Pumpkin & Oatmeal Cookies with Icing Delight
If you’re looking for a delightful treat that combines the warm flavors of fall, you’re in the right place! In Read Full Recipe -
Pumpkin Churro Bites Tasty and Easy Dessert Treat
Are you ready to take your dessert game to the next level? These Pumpkin Churro Bites are here to impress! Read Full Recipe


My Latest Recipes

hey,
i’m !
I’m so happy you’re here!
Food is my passion, and perfecting each dish is my craft. I can’t wait for you to try them let’s dive into this delicious journey side by side.

![For flavorful BBQ grilled chicken thighs, you need just a few key ingredients. Here’s what you’ll need: - Bone-in, skin-on chicken thighs - 1/4 cup olive oil - 1/4 cup apple cider vinegar - 1/4 cup honey - 2 tablespoons Dijon mustard - 4 cloves garlic, minced - 2 teaspoons smoked paprika - 1 teaspoon salt - 1 teaspoon black pepper - 1 teaspoon cayenne pepper (optional, for heat) These ingredients come together to create a tasty marinade that makes the chicken juicy and full of flavor. The key here is the chicken thighs. They have more fat than breasts, which keeps them moist. The skin adds crispness and flavor, especially when grilled. The marinade works its magic by tenderizing the meat and infusing it with taste. I love using olive oil for its rich flavor and health benefits. Apple cider vinegar adds a tangy kick, while honey balances it with sweetness. Dijon mustard brings depth and a slight tang. Garlic and smoked paprika add layers of flavor. The salt and black pepper enhance everything, and cayenne gives it a spicy edge if you like heat. You can find the full recipe above to make sure you get everything just right. Enjoy the process and the delicious results! To make the marinade, start by mixing the following ingredients in a medium bowl: - 1/4 cup olive oil - 1/4 cup apple cider vinegar - 1/4 cup honey - 2 tablespoons Dijon mustard - 4 cloves garlic, minced - 2 teaspoons smoked paprika - 1 teaspoon salt - 1 teaspoon black pepper - 1 teaspoon cayenne pepper (optional) Whisk these ingredients until they blend well. This marinade gives your chicken its rich flavor. Marinating time is key. I recommend marinating for at least 2 hours. If you can wait overnight, the taste improves even more. Next, preheat your grill to medium-high heat, around 375°F to 400°F. This heat gives the chicken a nice sear. After marinating, take the chicken thighs out. Let any excess marinade drip off. Discard the leftover marinade to keep things safe. Place the chicken thighs skin-side down on the grill. Cook for about 6-8 minutes. Look for crispy skin and nice grill marks. After that, flip the chicken thighs. Grill them for another 6-8 minutes. You want the internal temperature to reach 165°F. The juices should run clear. To check for doneness, use a meat thermometer. The safe internal temperature for chicken is 165°F. You can also tell the chicken is ready when the juices run clear. If the chicken is still pink, give it more time on the grill. Once done, let the chicken rest for about 5 minutes before serving. This helps keep it juicy. You can find the full recipe above for more details. Enjoy your flavorful and juicy BBQ grilled chicken thighs! To set up your grill, start with a clean grate. A clean grill helps prevent sticking. Preheat the grill to medium-high heat, around 375°F to 400°F. This heat level cooks chicken thighs evenly and creates a nice crust. To avoid sticking, oil the grill grates before placing the chicken on them. You can use a paper towel soaked in oil. Just hold it with tongs and wipe the grates. This small step makes a big difference. You can enhance the flavor of your BBQ grilled chicken thighs with a few optional ingredients. For a zesty kick, try adding lemon juice or zest to your marinade. Fresh herbs like thyme or rosemary can also add depth. A splash of soy sauce might give it a unique twist. Resting the meat is vital. After grilling, let the chicken thighs sit for about 5 minutes. This step allows the juices to redistribute. If you skip this, the juices will run out when you cut into the meat. The result? Dry chicken, and nobody wants that. For the full recipe, check out the detailed instructions provided earlier. {{image_2}} For BBQ grilled chicken thighs, marinades make all the difference. You can create many flavors to match your taste. Citrus-based marinade options: - Lemon and lime: Use juice from two lemons and two limes. Add a bit of zest for extra flavor. - Orange and ginger: Mix juice from two oranges with a teaspoon of minced ginger. It gives a sweet touch. Citrus marinades help tenderize the meat. They also add a bright flavor that pairs well with chicken. Spicy marinade variations: - Chipotle lime: Blend chipotle peppers in adobo sauce, lime juice, and olive oil. This adds a smoky and spicy kick. - Sriracha and honey: Mix Sriracha sauce with honey for sweet heat. A tablespoon of soy sauce can deepen the flavor. Spicy marinades bring excitement to your chicken. They work well if you enjoy bold flavors. When it comes to BBQ, sauces and rubs can elevate your grilled chicken. Popular BBQ sauces to use: - Kansas City style: This sauce is thick and sweet, made with molasses and brown sugar. - Carolina vinegar sauce: This sauce is tangy and thin, made with vinegar and spices. It adds a nice kick. BBQ sauces can be brushed on during the last few minutes of grilling. This helps create a sticky glaze. Dry rub combinations for extra flavor: - Classic BBQ rub: Combine brown sugar, smoked paprika, garlic powder, and black pepper. This mix brings a sweet and smoky flavor. - Herb blend: Use dried thyme, oregano, and rosemary for a fresh taste. This adds a nice depth to the chicken. Dry rubs can be applied before marinating or grilling. They create a flavorful crust on the chicken. Experiment with these options for your BBQ grilled chicken thighs. You’ll find a mix that suits your taste. For a full recipe, check out the detailed steps above. After enjoying your BBQ grilled chicken thighs, store any leftovers in the fridge. First, let the chicken cool to room temperature. Then, place it in an airtight container. This helps keep moisture in and prevents odors from mixing. Use a container with a tight lid or a resealable plastic bag. Remove as much air as possible. Store the chicken for up to four days. To freeze grilled chicken thighs, start by letting them cool fully. Wrap each piece tightly in plastic wrap. Then, place the wrapped chicken in a heavy-duty freezer bag. Write the date on the bag. This helps you keep track of how long it's been frozen. You can freeze the chicken for up to three months. When you’re ready to eat, thaw the chicken in the fridge overnight. To reheat, place the chicken in a preheated oven at 350°F (175°C). Heat it for about 20-25 minutes. This keeps it juicy. You can also use a microwave, but be careful. Microwaving can dry the chicken out if you’re not careful. Enjoy your flavorful and juicy meal again! For more details, check the full recipe. Marinate chicken thighs for at least 2 hours. For the best flavor, I suggest marinating overnight. This allows the chicken to soak up all the tasty goodness from the marinade. The longer you marinate, the more flavor you get in each bite. Just remember, you should not exceed 24 hours. Too long can make the meat mushy. Yes, you can cook BBQ chicken thighs in the oven. Preheat your oven to 400°F. Place the marinated chicken thighs on a baking sheet. Bake for about 35-40 minutes. Use a meat thermometer to check for 165°F internal temperature. You can also broil for the last few minutes to get crispy skin. It’s a great way to enjoy BBQ chicken when you can't grill outside. BBQ grilled chicken thighs pair well with many sides. Here are some popular choices: - Coleslaw - Corn on the cob - Baked beans - Grilled vegetables - Potato salad These dishes balance the rich flavors of the chicken. They also add color and variety to your meal. To reheat grilled chicken thighs, you can use the oven or microwave. For the oven, set it to 350°F. Place the chicken on a baking dish and cover it with foil. Heat for about 15-20 minutes. This keeps the chicken moist. If using a microwave, heat on medium power for about 2-3 minutes. Always check that the chicken is heated through to 165°F. This way, you can enjoy juicy chicken again. For more tips and the full recipe, check out the [Full Recipe]. Grilling bone-in chicken thighs can be simple and fun. You learned about the perfect marinade and cooking steps. I shared tips to enhance flavors and avoid sticking on the grill. Remember, marinating time makes a big difference. You can try different marinades and sauces to mix things up. Store leftovers properly to enjoy later. Whether you grill outside or cook inside, these tips will help you serve tasty chicken. Enjoy your cooking and happy grilling!](https://mysavedrecipe.com/wp-content/uploads/2025/06/3aaf060a-ae6b-4fb2-84b5-06eb056edd7e-300x300.webp)
![- 2 cups fresh figs, chopped - 1 tablespoon lemon juice - 1 teaspoon vanilla extract To make Quick Fig Jam, fresh ingredients matter. I love using ripe, sweet figs. They give the jam its rich flavor and color. When choosing figs, look for ones that are plump and slightly soft. They should smell sweet and fragrant. Lemon juice adds a nice tartness. It helps balance the sweetness of the figs. The vanilla extract brings warmth and depth to your jam. Don't skip it; it makes a big difference. - 1 cup granulated sugar - 1/2 teaspoon cinnamon (optional) For pantry staples, granulated sugar is key. It helps the figs break down and creates a thick jam. You can adjust the sugar amount based on your taste. If you like a bit of spice, add cinnamon. It pairs well with figs and gives the jam a cozy flavor. - How to measure figs accurately To measure figs, chop them first and then pack them into a cup. Do not press down too hard. You want them to be loosely packed for the best flavor. - Importance of ingredient quality Quality matters in cooking. Always use fresh figs and good sugar. The better the ingredients, the better your jam will taste. This is key to making your Quick Fig Jam shine. For the [Full Recipe], follow the steps outlined, and enjoy making this delightful spread! To start, wash your fresh figs under cool running water. Gently rub them to remove any dirt. Next, cut off the stems and chop the figs into small pieces. This helps them break down easily during cooking. Before you begin cooking, prepare your area. Gather all your ingredients and tools. This includes a medium saucepan, a wooden spoon, and a clean jar for storage. Keeping everything in reach makes the cooking process smooth and fun. In your medium saucepan, combine the chopped figs, granulated sugar, and lemon juice. Stir the mixture well to ensure the sugar coats the figs. Next, place the saucepan over medium heat. Bring the mixture to a gentle boil while stirring occasionally. Once it starts boiling, lower the heat. Allow the mixture to simmer for about 15 to 20 minutes. Stir frequently to prevent it from sticking to the bottom. You want it to thicken to a jam-like consistency. After the jam thickens, remove it from heat. Add the vanilla extract and cinnamon, if you like. These flavors enhance the jam's taste. Stir well to combine. Let the jam cool slightly before transferring it to a clean, sterilized jar. Allow it to cool completely at room temperature. Once cooled, seal the jar and store it in the fridge. Your quick fig jam will stay fresh for about two weeks. - Overcooking your fig jam: Cooking too long can turn your jam into a hard mass. Stay close to the stove as it simmers. Stir often and keep an eye on the time. Aim for a 15-20 minute cook time to achieve that perfect spreadable consistency. - Using unripe figs: Unripe figs lack the sweetness and flavor you want. Always choose ripe, soft figs. They will give your jam a rich taste and smooth texture. Check your figs carefully before using them. - Balancing sweetness with acidity: Figs are sweet, so adding a touch of lemon juice helps balance that sweetness. It makes the flavor pop and keeps it from being too sugary. Adjust the lemon juice to find your perfect balance. - Flavor variations with spices or herbs: You can spice things up by adding cinnamon, nutmeg, or even a hint of ginger. These spices add warmth and depth. Feel free to experiment. Just remember to start small and taste as you go. - Best cookware for making jam: Use a heavy-bottomed saucepan. It distributes heat evenly and helps prevent burning. A wide pan also allows moisture to escape, helping the jam thicken faster. - Recommended storage containers: Glass jars are best for storing your fig jam. They keep the jam fresh and let you see the beautiful color. Make sure to sterilize the jars to ensure safety and longevity. {{image_2}} You can enhance your quick fig jam by adding other fruits. Try chopping apples, pears, or peaches. These fruits pair well with figs. The sweetness and texture give your jam a new twist. Mix and match until you find your favorite blend. Adding spices can elevate your fig jam. Consider using ginger or nutmeg for a warm flavor. When you add spices, reduce the sugar a bit. This balance lets the spices shine without being too sweet. Experiment with different spices to discover your unique blend. You can also try using honey or maple syrup instead of sugar. These natural sweeteners can change the flavor profile. When using them, cook your jam a little longer. This helps to achieve the right thickness. Adjusting the cooking time is key for perfect consistency. Check out the Full Recipe for tips on making quick fig jam. How long does Quick Fig Jam last in the fridge? Quick Fig Jam lasts for up to two weeks in the fridge. Make sure to keep it in a sealed jar. This keeps it fresh and safe to eat. Best practices for sealing jars When sealing your jars, always use clean, sterilized jars. Fill them to about half an inch from the top. Wipe the rim with a clean cloth to remove any jam. Finally, screw the lid on tightly to keep air out. Guidelines for freezing your jam You can freeze Quick Fig Jam for up to six months. Use freezer-safe containers or jars. Leave some space at the top of the jar. The jam will expand as it freezes. Thawing tips for best texture To thaw frozen jam, place it in the fridge overnight. This helps keep the texture smooth. You can also thaw it in a bowl of warm water. Avoid microwaving, as it may change the jam's texture. How to recognize spoilage Look for changes in color or smell. If the jam has an off odor or looks cloudy, it may be spoiled. Mold on the surface is also a clear sign that it’s time to toss it. Proper disposal methods If your jam has spoiled, throw it away in the trash. Do not compost it, as this can attract pests. Always clean the jar before recycling to keep it safe. Making Quick Fig Jam takes about 30 minutes in total. You will spend 10 minutes preparing the figs and other ingredients. The cooking takes about 15-20 minutes. This quick process means you can enjoy your jam in no time. Yes, you can make fig jam without sugar. You can use honey, maple syrup, or agave nectar. These options add sweetness but may change the jam's thickness. Sugar helps create the right texture, so you may need to cook it longer. Always taste as you go to achieve the flavor you like best. If your jam doesn’t thicken, don’t worry! You can cook it longer over low heat. Keep stirring to avoid burning. If it still seems runny, mix in a bit of pectin. You can also let it cool to see if it firms up. If not, you can use it as a sauce instead. This article covered everything you need to make quick fig jam. We discussed fresh ingredients, pantry staples, and measurement tips to ensure you get it right. I shared step-by-step instructions on preparation and cooking, along with helpful tips to avoid common mistakes. We explored tasty variations and how to store your jam safely. Remember, quality ingredients make the best jam. With these tips, you can create a delicious treat that impresses anyone. Enjoy your cooking adventure with figs and have fun experimenting!](https://mysavedrecipe.com/wp-content/uploads/2025/06/22d9fddb-9fe7-4372-851a-d54a165ac2f5-300x300.webp)
Spiralized Sweet Potato Carbonara Creamy and Delicious
Are you ready to elevate your dinner game? My Spiralized Sweet Potato Carbonara is not just creamy and delicious; it’s also a healthy twist…