Latest & Greatest

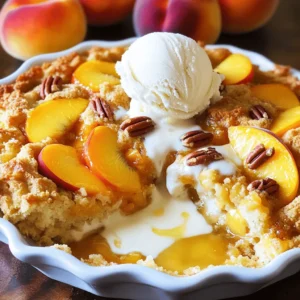
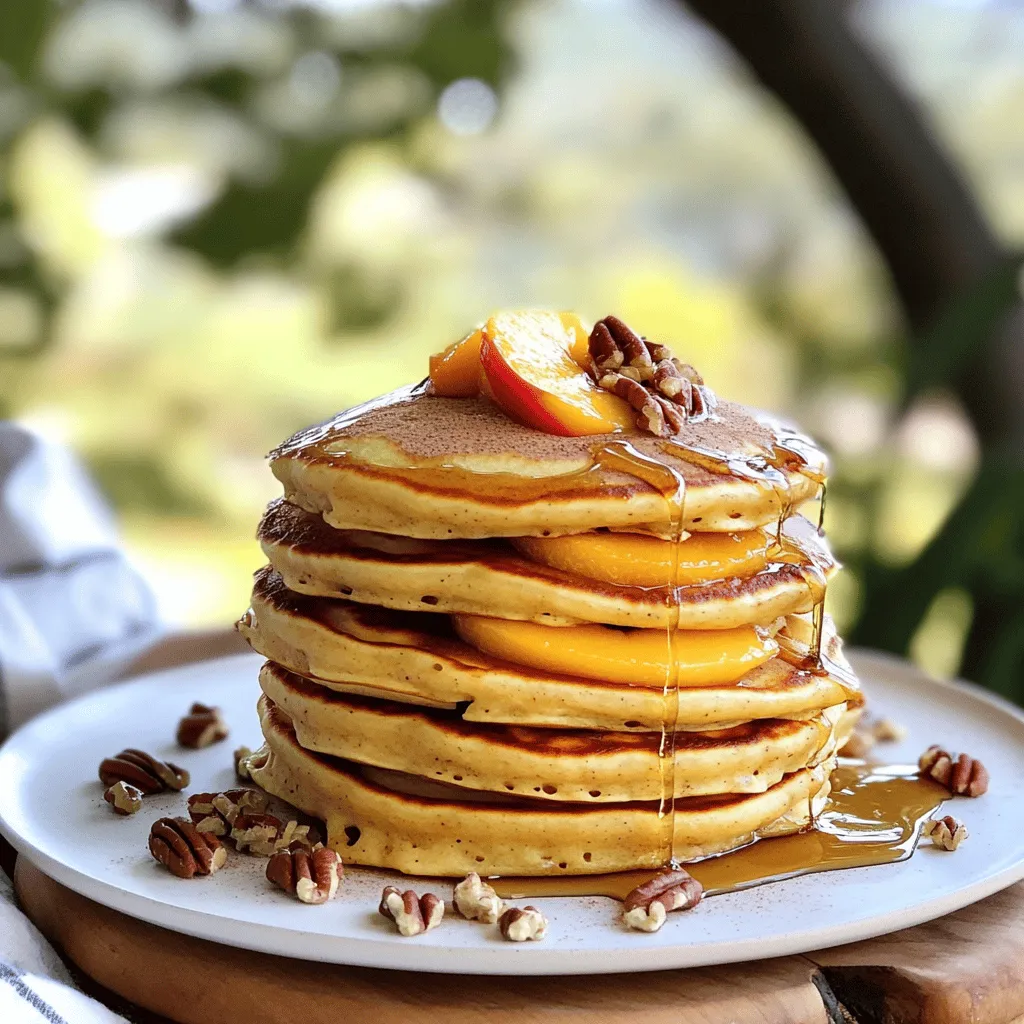
Peach Cobbler Pancakes Delicious and Simple Recipe
Are you ready to bring a burst of flavor to your breakfast table? Peach Cobbler Pancakes are the perfect blend
Read more…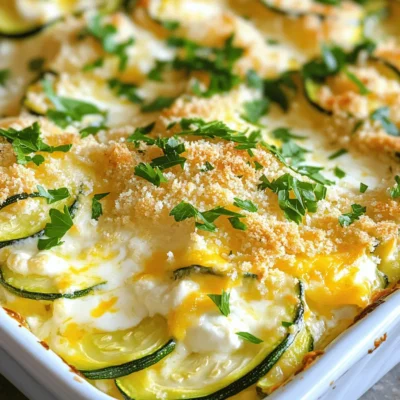
Creamy Cheesy Zucchini Casserole Simple and Delicious
Are you ready for a dish that combines creamy goodness with cheesy delight? My Creamy Cheesy Zucchini Casserole is here
Read more…
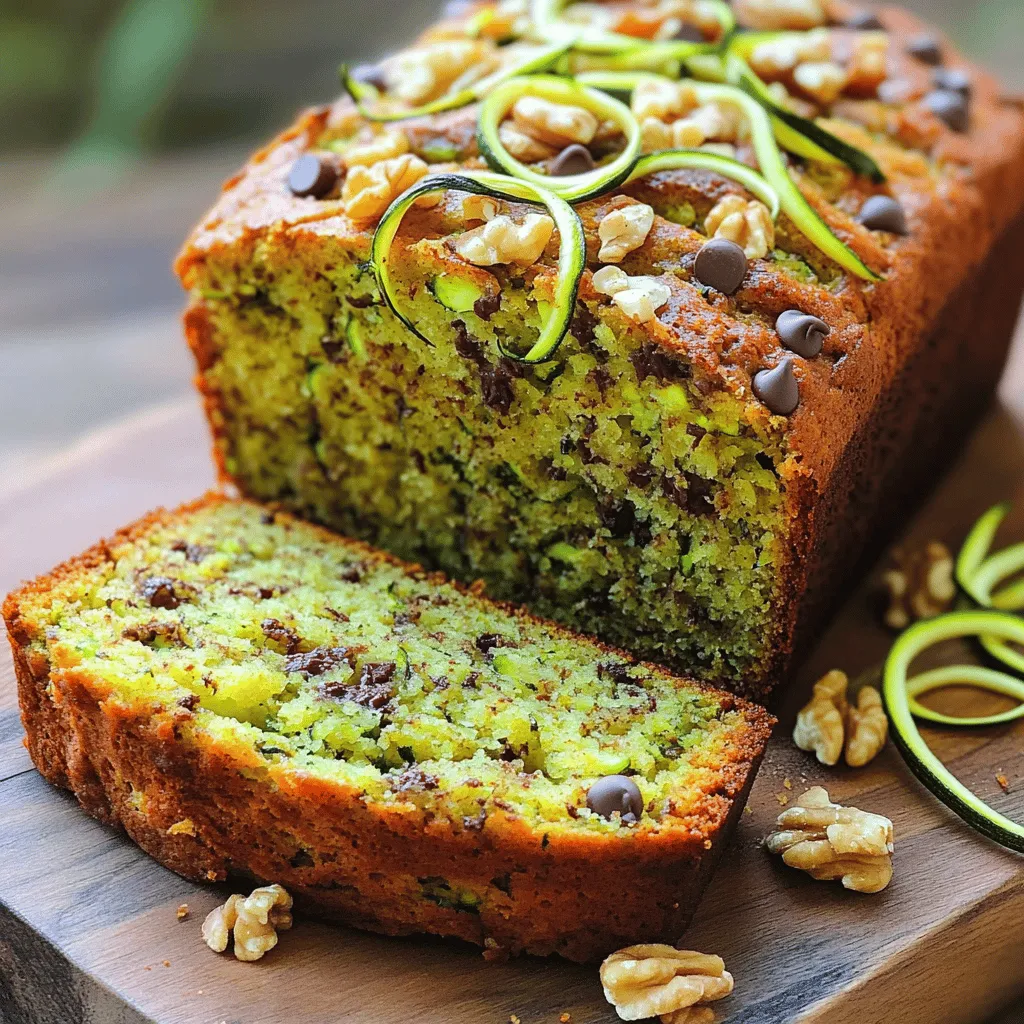
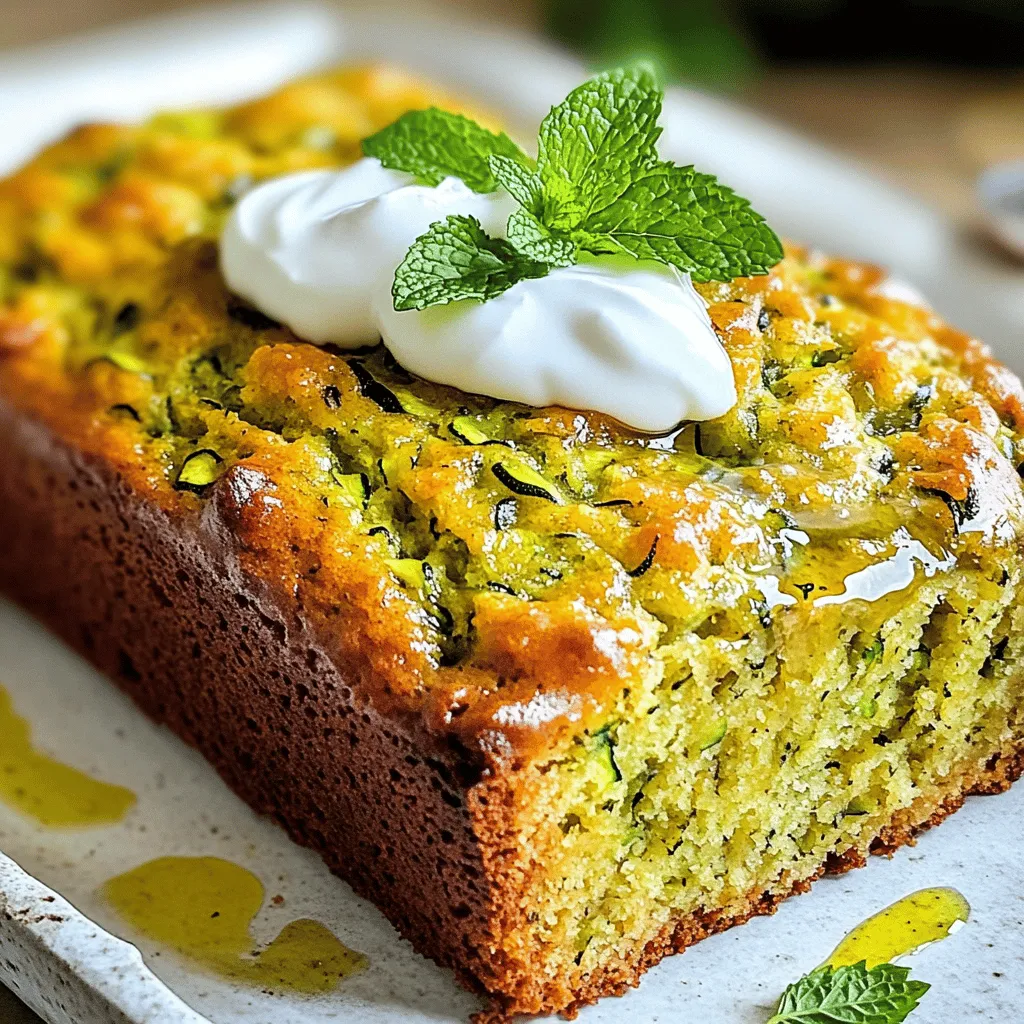
Olive Oil Zucchini Bread Moist and Flavorful Recipe
Welcome to your new favorite treat: Olive Oil Zucchini Bread! This recipe gives you a moist, flavorful loaf that’s perfect
Read more…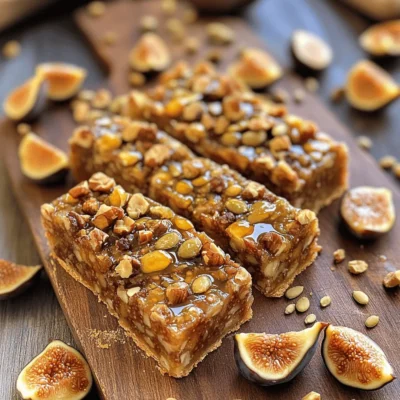
Fig and Walnut Bars Healthy and Flavorful Snack
If you’re searching for a tasty yet healthy snack, Fig and Walnut Bars are a perfect choice! Packed with nutritious
Read more…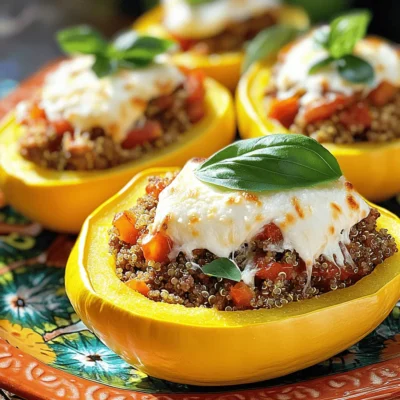
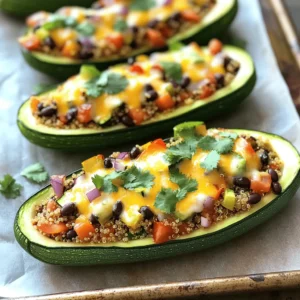
Stuffed Yellow Squash with Beef Flavorful Recipe
Are you ready to spice up your dinner routine? This delicious Stuffed Yellow Squash with Beef recipe is simple, tasty,
Read more…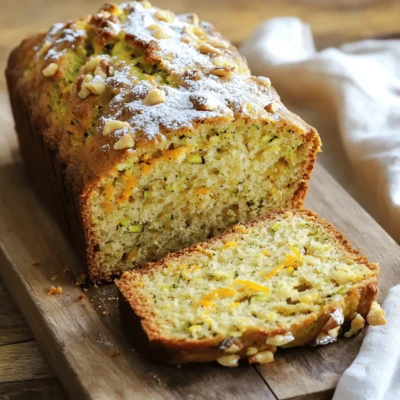
Zucchini Orange Bread Delightful and Easy to Bake
Are you ready to bake something truly delightful? This Zucchini Orange Bread combines fresh zucchini and bright orange zest for
Read more…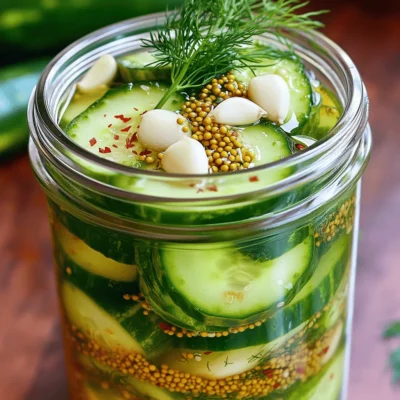
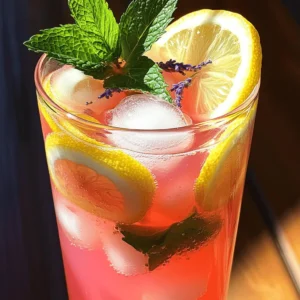
Quick Refrigerator Pickles Tangy and Flavorful Delight
Looking to add a burst of flavor to your meals? Quick refrigerator pickles are the answer! In this guide, I’ll
Read more…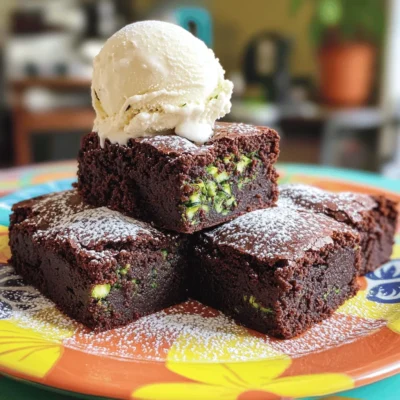
Zucchini Brownies for Kids Healthy and Tasty Delight
Are you looking for a new treat that kids will love while sneaking in some veggies? Look no further! These
Read more…browse recipes
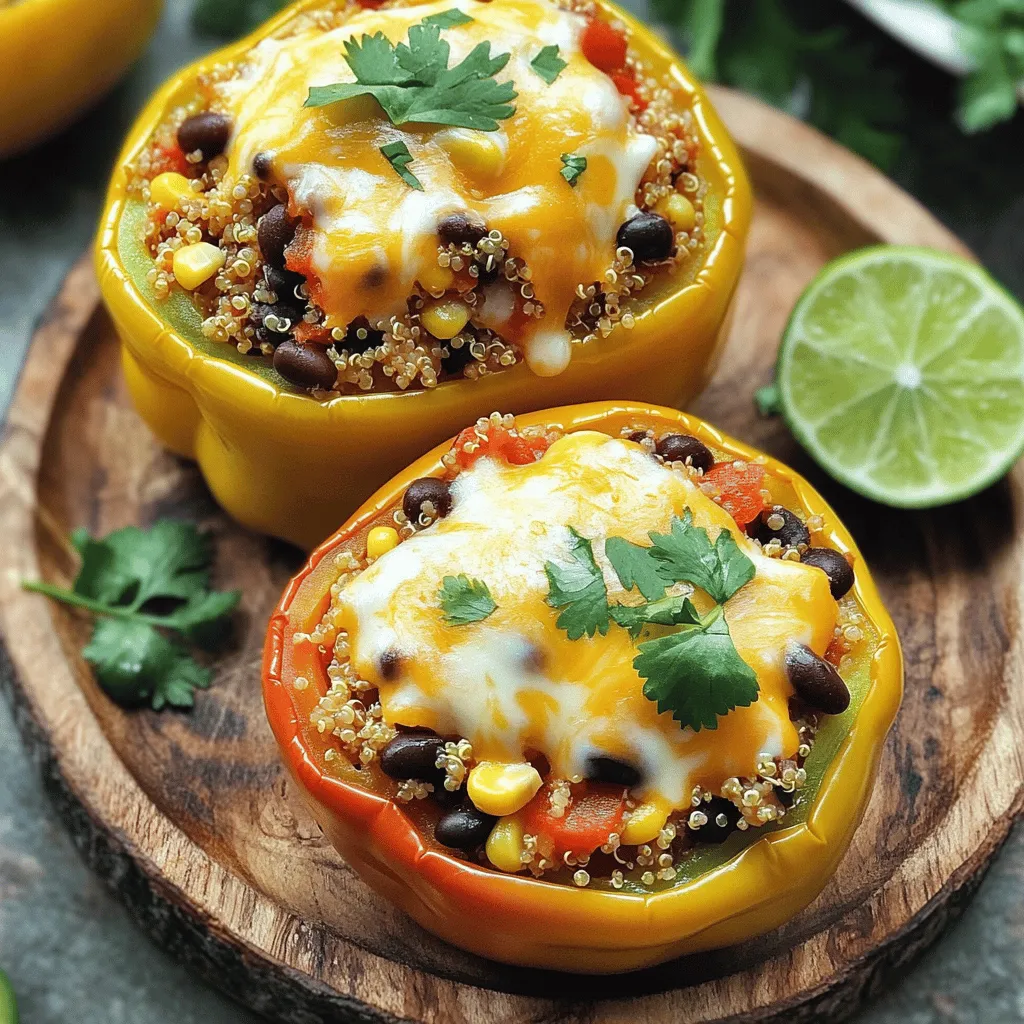
Cheesy Stuffed Bell Peppers Tasty and Satisfying Meal
Cheesy stuffed bell peppers are the perfect meal for anyone craving comfort and flavor. This dish combines colorful veggies, protein-packed quinoa, and gooey cheese,…
My Latest Desserts

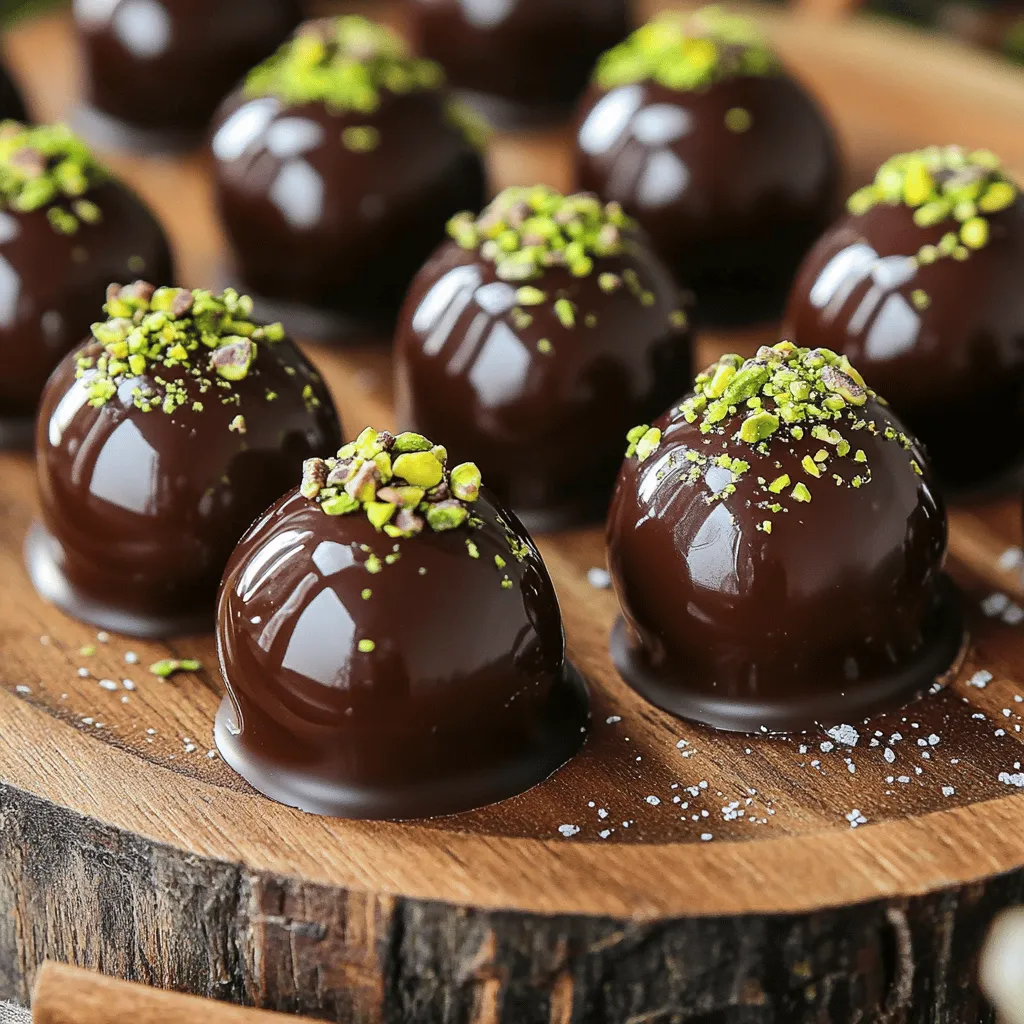
Chocolate Covered Cherries with Pistachio Dust Delight
Get ready to treat your taste buds with my “Chocolate Covered Cherries with Pistachio Dust Delight.” This sweet snack combines Read Full Recipe-
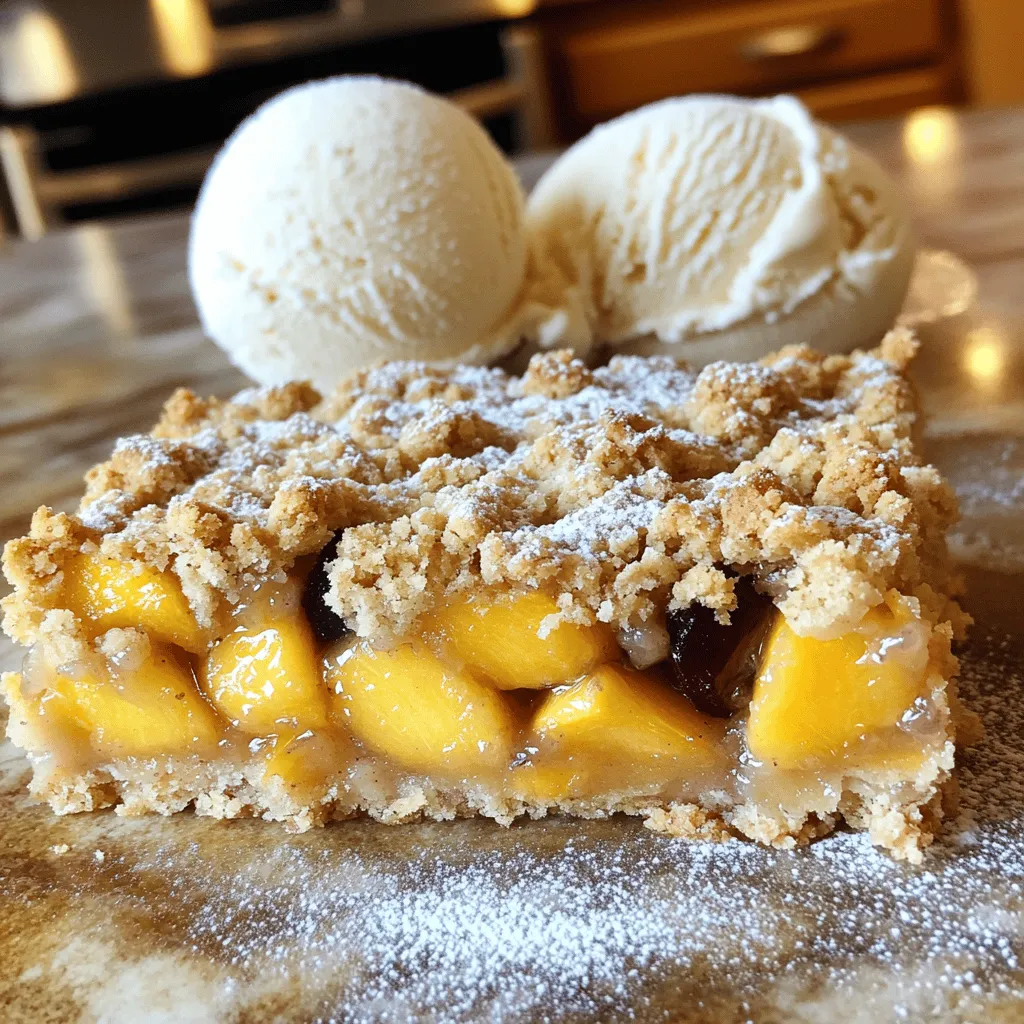
Peach Plum Crumble Bars Irresistible Sweet Treat
Are you ready for a dessert that combines the sweetness of peaches and plums? My Peach Plum Crumble Bars are Read Full Recipe -
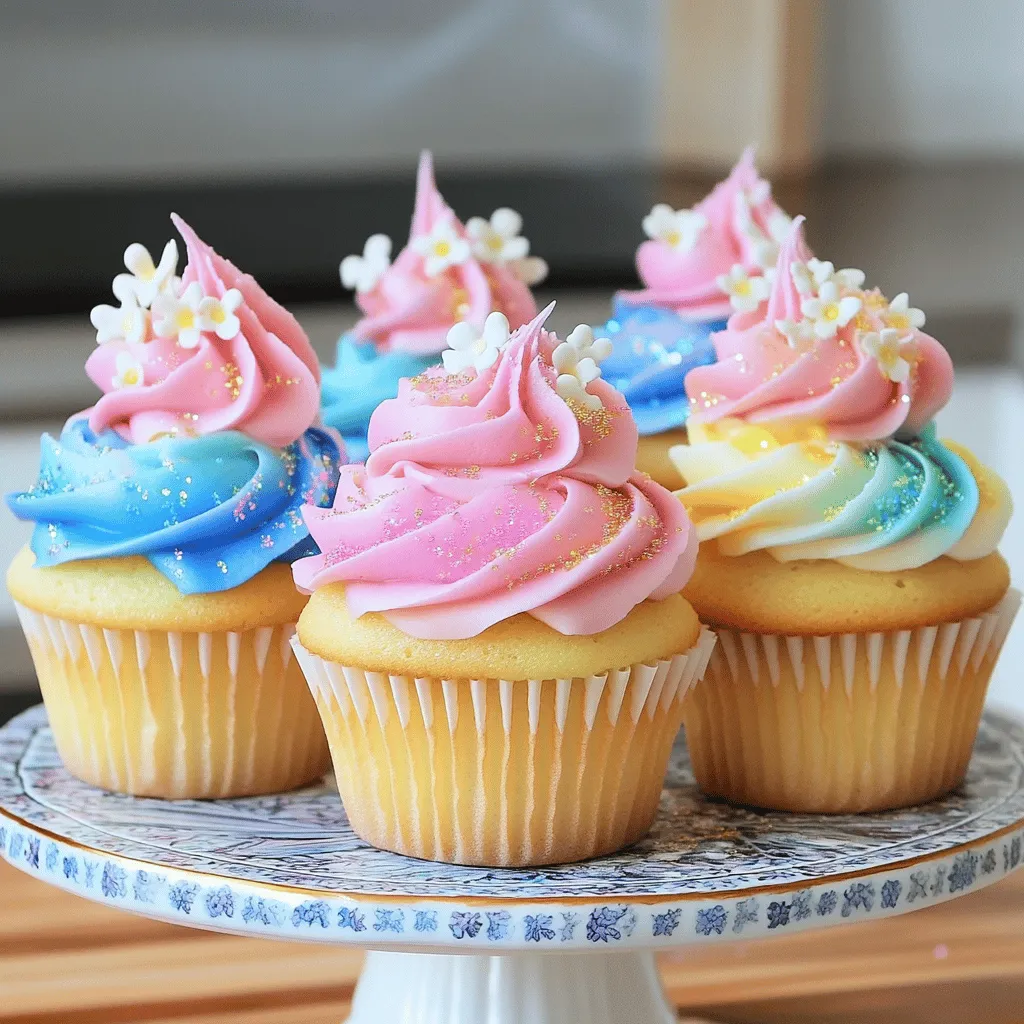
Watercolor Buttercream Cupcakes Delightful Recipe Guide
Are you ready to bring some color to your baking? In this guide, I’ll show you how to make stunning Read Full Recipe -
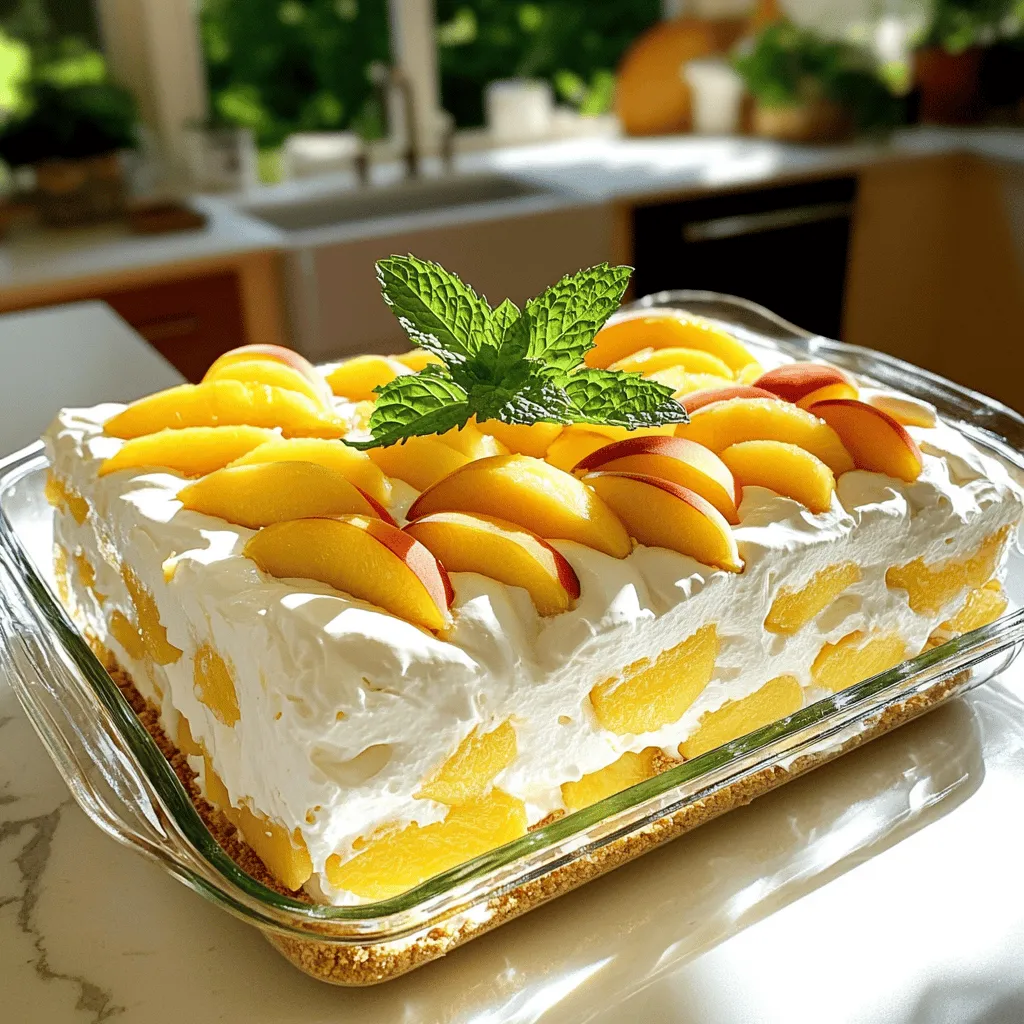
No-Bake Peach Icebox Cake Simple and Refreshing Treat
If you’re seeking a sweet, cool treat that’s simple to make, it’s time to try my No-Bake Peach Icebox Cake. Read Full Recipe -
The Best Zucchini Bread Irresistible and Easy Recipe
Are you ready to bake the best zucchini bread that’s both irresistible and easy? This simple recipe combines fresh, grated Read Full Recipe -
Peach Cobbler Pancakes Delicious and Simple Recipe
Are you ready to bring a burst of flavor to your breakfast table? Peach Cobbler Pancakes are the perfect blend Read Full Recipe -
Olive Oil Zucchini Bread Moist and Flavorful Recipe
Welcome to your new favorite treat: Olive Oil Zucchini Bread! This recipe gives you a moist, flavorful loaf that’s perfect Read Full Recipe -
Fig and Walnut Bars Healthy and Flavorful Snack
If you’re searching for a tasty yet healthy snack, Fig and Walnut Bars are a perfect choice! Packed with nutritious Read Full Recipe -
Zucchini Orange Bread Delightful and Easy to Bake
Are you ready to bake something truly delightful? This Zucchini Orange Bread combines fresh zucchini and bright orange zest for Read Full Recipe -
Zucchini Brownies for Kids Healthy and Tasty Delight
Are you looking for a new treat that kids will love while sneaking in some veggies? Look no further! These Read Full Recipe


My Latest Recipes

hey,
i’m !
I’m so happy you’re here!
Food is my passion, and perfecting each dish is my craft. I can’t wait for you to try them let’s dive into this delicious journey side by side.
![To make garlic butter baked scallops, you need the following items: - 12 large sea scallops, cleaned - 4 tablespoons unsalted butter, melted - 4 cloves garlic, minced - 1 tablespoon fresh parsley, chopped - 1 tablespoon lemon juice - Zest of 1 lemon - 1/2 teaspoon red pepper flakes (optional) - Salt and black pepper to taste - Breadcrumbs for topping (optional) These ingredients create a rich and flavorful dish that tastes gourmet. When choosing scallops, freshness is key. Here’s how to select the best: - Look for scallops that are firm and slightly moist. - They should have a sweet, briny smell, not a fishy one. - If possible, buy scallops on the same day you plan to cook them. - Store scallops in the fridge and use them within a day or two. Keeping scallops fresh helps ensure the best taste and texture. You can customize your garlic butter baked scallops with these extras: - A dash of white wine for added depth. - Parmesan cheese for a rich, cheesy topping. - Fresh herbs like thyme or basil for extra flavor. - A squeeze of orange juice for a citrus twist. These optional ingredients can elevate your dish and suit your tastes. For the full recipe, check out the detailed cooking steps. First, preheat your oven to 375°F (190°C). This step warms up the oven for even cooking. Next, take your scallops and pat them dry with a paper towel. Removing moisture helps them sear nicely. Arrange the scallops in a single layer in a baking dish. Make sure they have space around them. This allows for even cooking and great flavor absorption. Now it’s time to make the garlic butter sauce. In a small bowl, combine 4 tablespoons of melted butter with 4 cloves of minced garlic. Add in 1 tablespoon of fresh chopped parsley and 1 tablespoon of lemon juice. For extra flavor, include the zest of one lemon. If you like a bit of heat, mix in 1/2 teaspoon of red pepper flakes. Season with a pinch of salt and black pepper. Stir everything together until it looks like a tasty sauce. With your scallops arranged and sauce ready, pour the garlic butter mixture over them. Ensure each scallop gets a nice coating. If you want a crunchy topping, sprinkle breadcrumbs on top. Place the baking dish in the preheated oven. Bake for 12 to 15 minutes. The scallops should turn opaque and tender. For a golden crust, switch to broil for the last 2 to 3 minutes. Keep an eye on them to avoid burning. Once done, let them cool slightly before serving. You can garnish with more parsley and lemon wedges for a bright touch. This step adds a nice presentation to your dish. For the full recipe, see above. When cooking scallops, I focus on a few key points. Always start with dry scallops. Wet scallops do not sear well. Pat them dry using a paper towel before cooking. This helps achieve a nice, golden crust. Cook them on high heat for a short time. This keeps them tender and flavorful. Choose scallops that are fresh and firm. Look for a sweet smell, not a fishy odor. Fresh scallops should have a glossy look. If you’re at a market, ask for "dry" scallops. These scallops are not treated with preservatives. They taste better and cook more evenly. To boost flavor, consider adding fresh herbs. Basil, thyme, or dill work well with scallops. A pinch of paprika or cayenne pepper can add a kick. You might like to use a splash of white wine for depth. Mix these in your garlic butter sauce for added taste. For the full recipe, check out the details above. {{image_2}} You can cook scallops in many ways. Grilling adds a smoky flavor. Just brush them with garlic butter and grill for about 2-3 minutes on each side. Sautéing is also easy. Heat some butter in a pan, add scallops, and cook for 2-4 minutes. Both methods keep the scallops tender and flavorful. You can change some ingredients to fit dietary needs. Use olive oil instead of butter for a dairy-free option. If you want less salt, try using low-sodium butter. You can swap out parsley for fresh basil or cilantro for a different taste. These swaps keep the dish tasty while meeting your needs. Garlic butter baked scallops pair well with many sides. Try serving them with a fresh salad or steamed veggies. A light pasta dish also complements the scallops nicely. For drinks, a crisp white wine enhances the flavors. You can check the Full Recipe for more ideas on how to enjoy this meal. After cooking, let the scallops cool down. Place them in an airtight container. This keeps them fresh. Store the container in the fridge. Use the leftovers within two days for best taste. If you want to keep them longer, consider freezing. To reheat, use the oven for the best results. Preheat your oven to 350°F (175°C). Place the scallops in a baking dish. Add a little butter or olive oil to keep them moist. Cover with foil to retain heat. Bake for about 10 minutes. Check to make sure they are warmed through. If you want to freeze scallops, do it right after cooking. Let them cool first. Then, wrap each scallop in plastic wrap. Place them in a freezer bag. Try to remove as much air as possible. This helps prevent freezer burn. Use frozen scallops within three months for the best flavor. Scallops are fully cooked when they turn opaque and firm. You can check by cutting one in half. If it looks white and not translucent, it’s ready. Cooking time is about 12-15 minutes at 375°F (190°C). If you want a nice crust, broil them for the last few minutes. This gives them a lovely golden top. Yes, you can use frozen scallops! Just be sure to thaw them first. Place them in the fridge overnight or run them under cold water. Pat them dry before cooking. This step helps the garlic butter stick better and keeps them from getting watery. Thawed scallops work very well in this dish. Garlic butter baked scallops pair well with many sides. I recommend serving them with a fresh green salad or roasted vegetables. You can also serve them over a bed of creamy risotto or pasta. A slice of crusty bread is great for dipping in the tasty garlic butter. For a refreshing touch, add a glass of white wine or lemon water. For the full recipe and more details, check the [Full Recipe]. In this article, we discussed how to make garlic butter baked scallops. We covered the main ingredients, giving tips for maximum freshness. I shared step-by-step baking instructions, along with best practices for cooking scallops. We explored variations, storage tips, and common questions. Remember, cooking scallops can be simple and tasty. Use fresh seafood and follow these tips. Enjoy your meal and impress your guests with this dish!](https://mysavedrecipe.com/wp-content/uploads/2025/06/2584ee2d-ac61-4066-9ff8-95936299039c-300x300.webp)
![- 1 pound baby carrots - 2 tablespoons unsalted butter - 1/4 cup pure maple syrup - 1 teaspoon ground cinnamon - 1/2 teaspoon nutmeg - 1/4 teaspoon salt - 1 tablespoon fresh lemon juice - 2 tablespoons chopped fresh parsley (for garnish) - Skillet - Measuring cups and spoons - Vegetable peeler (optional) - Cooking spoon or spatula Gathering the right ingredients is key to making maple glazed carrots. I choose baby carrots because they are sweet and tender. You can use larger carrots, but cut them into even sticks. The unsalted butter adds rich flavor. Pure maple syrup is a must for that sweet glaze. Ground cinnamon and nutmeg bring warmth. A little salt enhances all the flavors. Fresh lemon juice gives a bright touch at the end. Finally, fresh parsley adds a nice pop of color when you serve the dish. For tools, a skillet is essential for cooking. Measuring cups and spoons help you get the right amounts. If you want, a vegetable peeler makes prep easier. A cooking spoon or spatula is great for stirring the carrots. With these ingredients and tools ready, you are set to create a delicious side dish. Check out the [Full Recipe] for more details on how to prepare this sweet and simple dish. Start by washing the baby carrots under cold water. You can peel them if you want, but it's not necessary. If you have larger carrots, cut them into sticks. Make sure they are all about the same size. This helps them cook evenly. Next, heat a large skillet over medium heat. Add the butter and let it melt. Once the butter is melted, toss in the carrots. Stir them well to coat with the butter. Now, pour the maple syrup over the carrots. Sprinkle in the ground cinnamon, nutmeg, and salt. Stir everything together until it is mixed well. Increase the heat a bit and let the mixture come to a simmer. Cover the skillet and let the carrots cook for about ten minutes. Stir them occasionally. You want them to be fork-tender. Once the carrots are tender, uncover the skillet. Let the glaze reduce for about five minutes. Stir occasionally until the sauce thickens. After that, remove the skillet from the heat. Stir in the fresh lemon juice to add brightness. Transfer the glazed carrots to a serving dish. Finally, garnish with freshly chopped parsley for a pop of color. Now you have a lovely side dish! For the complete recipe, check out the Full Recipe. To make your maple glazed carrots shine, start with high-quality maple syrup. Look for pure syrup, not flavored or imitation versions. Pure maple syrup has a rich taste that enhances the dish. Fresh spices also boost flavor. Use ground cinnamon and nutmeg, but consider grating fresh nutmeg for a brighter taste. Fresh herbs like thyme or rosemary can add depth too. To achieve fork-tender carrots, choose baby carrots for quick cooking. If you use larger ones, cut them into even sticks. This helps them cook evenly. Start with medium heat when melting butter, then add the carrots. Keep the glaze on low to avoid burning. Stir often to coat the carrots well. As they cook, the natural sugars caramelize, enhancing sweetness. Maple glazed carrots pair well with many proteins. Try them alongside roasted chicken or grilled salmon for a balanced meal. They also work great with grains like rice or quinoa. For a stunning presentation, arrange the glazed carrots on a platter. Sprinkle fresh parsley on top before serving. This adds a lovely touch of color and freshness. For the full recipe, check the complete guide above. {{image_2}} You can change the flavor of maple glazed carrots by using different sweeteners. For a change, try honey instead of maple syrup. Honey gives a mild sweetness that works well. You can also experiment with herbs for garnish. Fresh thyme or dill can add a new twist to your dish. These herbs bring a fresh taste that balances the sweet glaze. Adding more veggies can make this dish even better. You might try parsnips or sweet potatoes. These root vegetables add depth and a new texture. You can also blend flavors with onions or shallots. Cooking them with the carrots adds a sweet, savory note. This creates a more complex and delicious side dish. If you want to make this dish vegan, simply swap the butter for a plant-based option. Coconut oil or olive oil works great. This keeps the flavor rich while meeting dietary needs. The dish can also be made gluten-free. All the ingredients in this recipe are gluten-free, so you can enjoy them without worry. For the full recipe, check out the detailed steps and ingredients listed above. To keep your maple glazed carrots fresh, store them in an airtight container. Refrigerate them within two hours of cooking. This helps maintain their sweet flavor and soft texture. If you want to freeze the glazed carrots, wait until they cool. Then, place them in a freezer-safe bag. Squeeze out as much air as you can before sealing. This prevents freezer burn and keeps them tasty. When you’re ready to enjoy the leftovers, choose a gentle reheating method. The microwave works well but can make them soft. Instead, heat them in a skillet over low heat. Add a splash of water to help steam them. This keeps the carrots moist. To refresh the glaze, drizzle a little maple syrup while reheating. Stir gently to coat the carrots again. You can safely eat the leftovers for about four days when stored correctly. If you notice any off smells or a slimy texture, throw them away. These signs mean the carrots have spoiled. Always trust your senses! Enjoy your delicious, sweet treat while it lasts. For the full recipe, check out the recipe section above. You can replace butter with olive oil or coconut oil. Both options give great flavor. Use the same amount as in the recipe. Olive oil adds a nice richness, while coconut oil brings a hint of sweetness. This keeps the dish dairy-free and tasty. Yes, frozen carrots work well! However, they need a bit more cooking time. Start by adding them to the skillet and cooking for 5 minutes before adding the maple syrup and spices. Check for tenderness with a fork to ensure they cook evenly. Maple glazed carrots pair well with many dishes. Try serving them with roasted chicken or grilled salmon. They also taste great with rice or quinoa. For a complete meal, add a simple salad or some crusty bread on the side. Store leftover carrots in an airtight container in the fridge. They can last up to 3 days. When reheating, warm them in a skillet over low heat. Add a splash of water or more maple syrup to refresh the glaze. This keeps them moist and flavorful. Maple glazed carrots are simple yet delicious. We covered the ingredients and cooking tools you need. You learned how to prepare and cook the carrots to perfection. Tips for flavor and presentation help you elevate the dish. Variations and storage guidelines give you more options. These carrots make a great side dish or main event in your meals. Enjoy experimenting with flavors and sharing them with friends and family. Happy cooking!](https://mysavedrecipe.com/wp-content/uploads/2025/04/1cc45279-8e0f-4e4c-8764-19e9f6fe406b-300x300.webp)
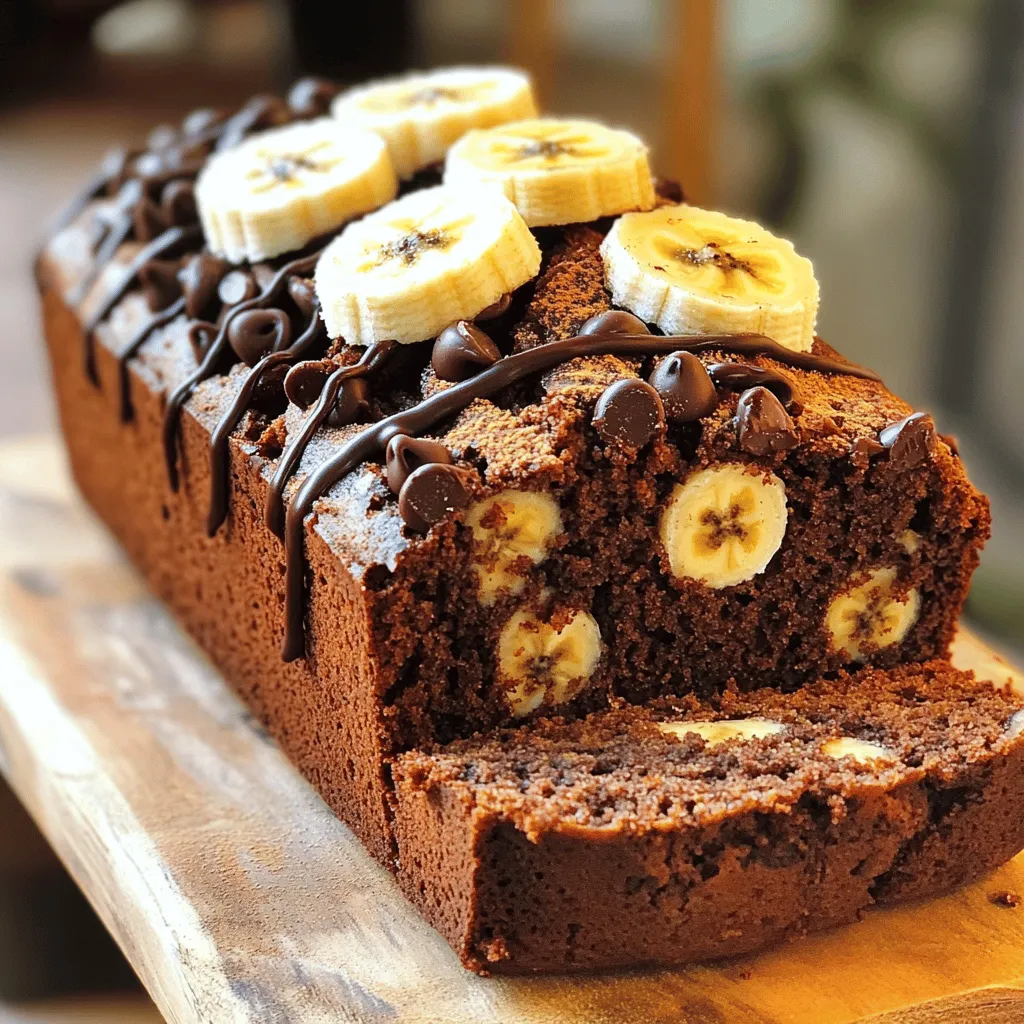
Chocolate Chip Banana Bread Simple and Tasty Recipe
If you love sweet treats that are easy to make, you’ll adore this Chocolate Chip Banana Bread recipe. With just a few simple ingredients,…