


Latest & Greatest

Cheesy Zucchini Casserole Delightful and Easy Recipe
Are you looking for a simple and delicious way to enjoy zucchini? Then this Cheesy Zucchini Casserole is perfect for
Read more…
Peach Cobbler Pancakes Delicious and Simple Recipe
Are you ready to bring a burst of flavor to your breakfast table? Peach Cobbler Pancakes are the perfect blend
Read more…
Creamy Cheesy Zucchini Casserole Simple and Delicious
Are you ready for a dish that combines creamy goodness with cheesy delight? My Creamy Cheesy Zucchini Casserole is here
Read more…
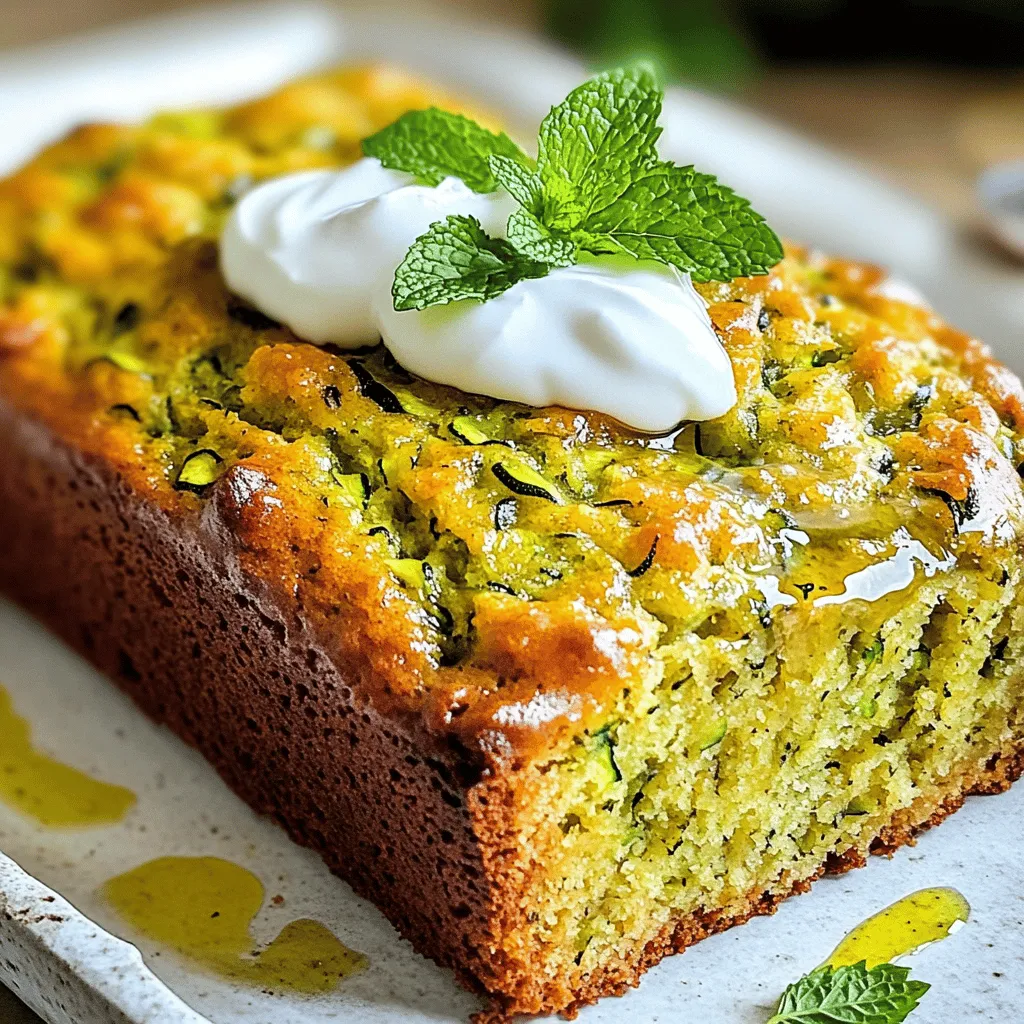
Olive Oil Zucchini Bread Moist and Flavorful Recipe
Welcome to your new favorite treat: Olive Oil Zucchini Bread! This recipe gives you a moist, flavorful loaf that’s perfect
Read more…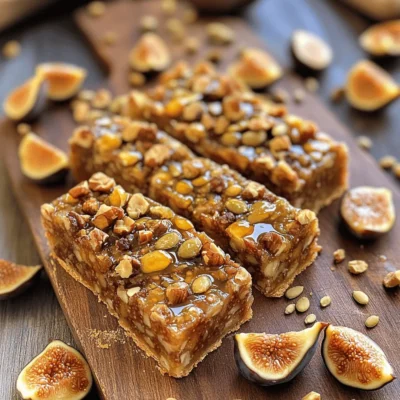
Fig and Walnut Bars Healthy and Flavorful Snack
If you’re searching for a tasty yet healthy snack, Fig and Walnut Bars are a perfect choice! Packed with nutritious
Read more…
Stuffed Yellow Squash with Beef Flavorful Recipe
Are you ready to spice up your dinner routine? This delicious Stuffed Yellow Squash with Beef recipe is simple, tasty,
Read more…
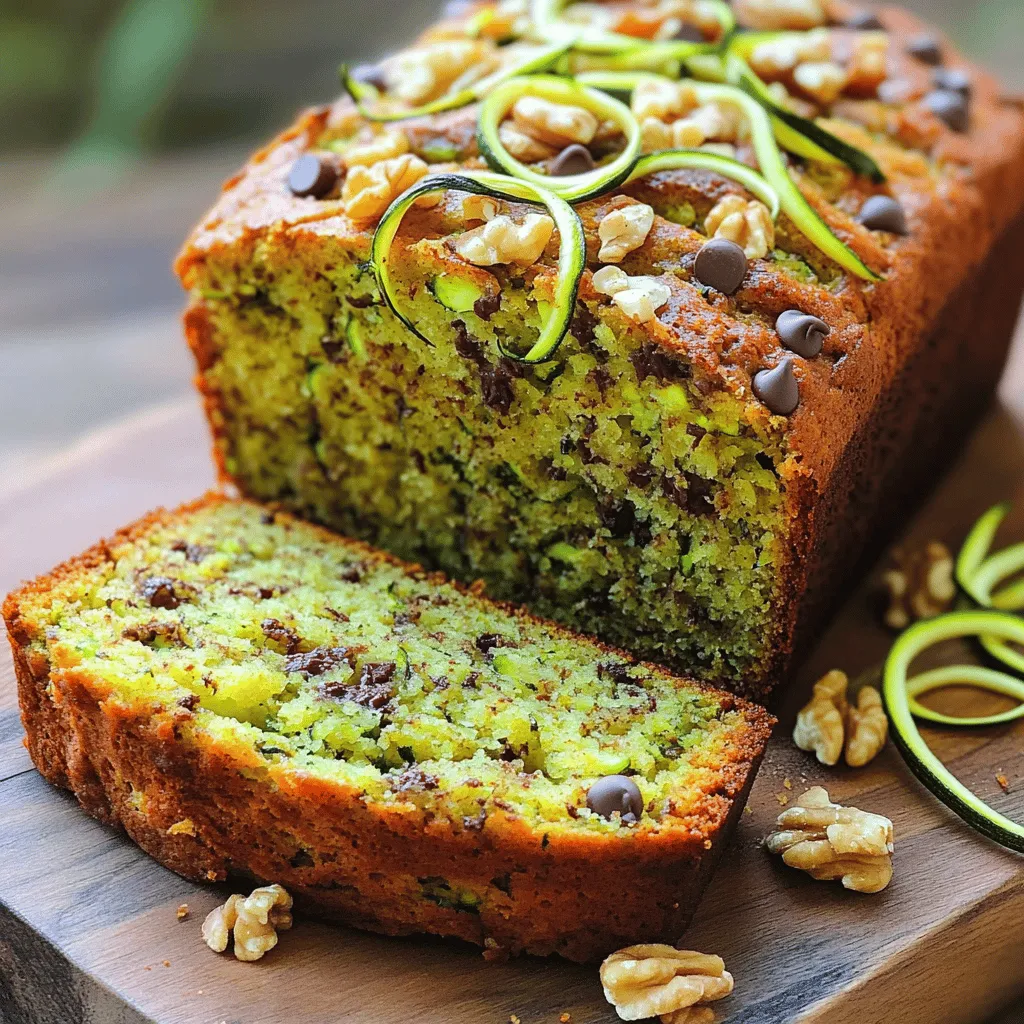
Zucchini Orange Bread Delightful and Easy to Bake
Are you ready to bake something truly delightful? This Zucchini Orange Bread combines fresh zucchini and bright orange zest for
Read more…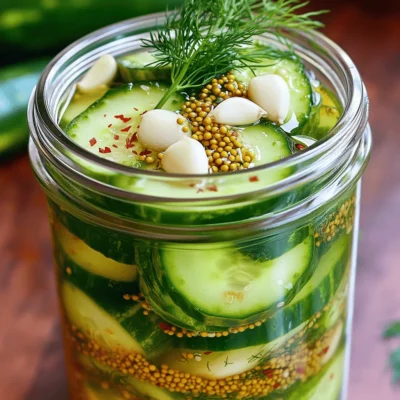
Quick Refrigerator Pickles Tangy and Flavorful Delight
Looking to add a burst of flavor to your meals? Quick refrigerator pickles are the answer! In this guide, I’ll
Read more…browse recipes


Watercolor Buttercream Cupcakes Delightful Recipe Guide
Are you ready to bring some color to your baking? In this guide, I’ll show you how to make stunning Watercolor Buttercream Cupcakes that…
My Latest Desserts

Cream Soda Donut Holes Delightful Dessert Recipe
Are you ready to enjoy a fun twist on a classic treat? Cream Soda Donut Holes are sweet, fluffy, and Read Full Recipe-
Cookie Dough Bars Delightful Recipe for a Sweet Treat
If you’ve ever craved the rich, sweet goodness of cookie dough, then you’re in for a treat! My recipe for Read Full Recipe -
Chocolate Covered Cherries with Pistachio Dust Delight
Get ready to treat your taste buds with my “Chocolate Covered Cherries with Pistachio Dust Delight.” This sweet snack combines Read Full Recipe -
Peach Plum Crumble Bars Irresistible Sweet Treat
Are you ready for a dessert that combines the sweetness of peaches and plums? My Peach Plum Crumble Bars are Read Full Recipe -
Watercolor Buttercream Cupcakes Delightful Recipe Guide
Are you ready to bring some color to your baking? In this guide, I’ll show you how to make stunning Read Full Recipe -
No-Bake Peach Icebox Cake Simple and Refreshing Treat
If you’re seeking a sweet, cool treat that’s simple to make, it’s time to try my No-Bake Peach Icebox Cake. Read Full Recipe -
The Best Zucchini Bread Irresistible and Easy Recipe
Are you ready to bake the best zucchini bread that’s both irresistible and easy? This simple recipe combines fresh, grated Read Full Recipe -
Peach Cobbler Pancakes Delicious and Simple Recipe
Are you ready to bring a burst of flavor to your breakfast table? Peach Cobbler Pancakes are the perfect blend Read Full Recipe -
Olive Oil Zucchini Bread Moist and Flavorful Recipe
Welcome to your new favorite treat: Olive Oil Zucchini Bread! This recipe gives you a moist, flavorful loaf that’s perfect Read Full Recipe -
Fig and Walnut Bars Healthy and Flavorful Snack
If you’re searching for a tasty yet healthy snack, Fig and Walnut Bars are a perfect choice! Packed with nutritious Read Full Recipe


My Latest Recipes

hey,
i’m !
I’m so happy you’re here!
Food is my passion, and perfecting each dish is my craft. I can’t wait for you to try them let’s dive into this delicious journey side by side.

![- 1 pound sirloin steak, cut into bite-sized pieces - 2 cups cooked jasmine rice - 1 tablespoon vegetable oil - 2 cloves garlic, minced - 1 teaspoon fresh ginger, grated - 1 cup broccoli florets - 1 carrot, julienned - 1 zucchini, sliced - 2 tablespoons soy sauce - 1 tablespoon teriyaki sauce - 1 teaspoon sesame oil - 2 green onions, sliced (for garnish) - Sesame seeds (for garnish) Gather these ingredients before you start cooking. The sirloin steak gives a rich flavor. It’s tender and juicy, perfect for hibachi bowls. Jasmine rice adds a nice touch with its fragrance. I like to use fresh veggies like broccoli, carrots, and zucchini. They not only taste great but also add color and nutrients. The sauces are key for flavor. Soy sauce brings saltiness, while teriyaki sauce adds sweetness. Sesame oil rounds out the dish with a nutty taste. Green onions and sesame seeds are the perfect finishing touches, giving texture and crunch. Ready to dive into the cooking? Check out the Full Recipe to see how to bring these ingredients together for a delicious meal. - Combine steak with soy sauce, teriyaki sauce, and sesame oil. - Allow to marinate for at least 15 minutes. Marinating the steak adds rich flavor. The soy sauce gives it saltiness, while teriyaki adds a sweet kick. Sesame oil brings a nutty taste. Make sure to coat every piece well. Letting it sit for 15 minutes helps the flavors sink in. You can marinate it longer if you have time. - Heat vegetable oil in a skillet or hibachi grill. - Sauté garlic and ginger until fragrant. Heat your skillet on medium-high. Add the vegetable oil. Once hot, toss in the minced garlic and grated ginger. Stir for about 30 seconds. You want them fragrant, not burnt. This step builds a great base for your veggies. - Stir-fry broccoli, carrot, and zucchini. - Cook marinated steak until browned. - Combine steak and vegetables. Add the broccoli, carrots, and zucchini to your skillet. Stir-fry for about 4 to 5 minutes. You want them tender but still crunchy. Next, add the marinated steak. Cook for about 4 to 6 minutes until browned. Once done, mix the veggies back in. This melds all the flavors together. - Add jasmine rice to serving bowls. - Top with steak and vegetable mixture. - Garnish with green onions and sesame seeds. Scoop some jasmine rice into each bowl. Then, load it up with the steak and veggie mix. Finally, sprinkle sliced green onions and sesame seeds on top. This adds color and crunch. For the full recipe, check out the [Full Recipe]. For the best hibachi steak, I recommend sirloin or ribeye. These cuts are tender and flavorful. When choosing your steak, look for good marbling. This means small white lines of fat in the meat. They make the steak juicy and tasty. To ensure perfect tenderness, let your steak sit at room temperature for about 30 minutes before cooking. This helps it cook evenly and stay soft. Preparing your veggies right makes a big difference. For carrots, peel them first. Then, slice them into thin strips, called julienne. This helps them cook quickly. For zucchini, cut off the ends, then slice it into rounds. Aim for thin slices for even cooking. Cook broccoli florets for about 4-5 minutes. Carrots and zucchini should cook for the same time. This way, they stay crunchy and vibrant. Marinating your steak boosts flavor. To make it even better, add some garlic or a splash of lime juice. Let your steak marinate for at least 15 minutes. You can go longer if time allows. This helps the flavors soak in. Just remember, don’t marinate too long, or it may become mushy. Your steak deserves that perfect balance of taste and texture. For the full recipe, check out the Hibachi Steak Bowls section above. {{image_2}} You can swap out steak for chicken or tofu. Chicken is lighter and cooks faster. Tofu is great for a plant-based meal. If you use chicken, cut it into small pieces. Cook it for about 5-7 minutes until it's no longer pink. For tofu, press it to remove water, then cut and cook for about 3-5 minutes. This way, you can enjoy a tasty bowl with your favorite protein. Feel free to use seasonal vegetables. This adds freshness and flavor to your dish. Try using bell peppers, snap peas, or asparagus. They cook quickly and add color. You can also mix in mushrooms or corn for extra texture. Just chop them into bite-size pieces, so they cook evenly. Experiment with different sauces to change the flavor. You might try spicy marinades if you like heat. Garlic sauce can add a nice kick too. You can make your own sauces or use store-bought ones for convenience. Just remember, a good sauce brings the whole dish together. Check out the Full Recipe for more details on ingredients and flavors. To keep your hibachi steak bowls fresh, store leftovers in the fridge. Use airtight containers to prevent moisture loss. Glass or BPA-free plastic works best. Make sure to let the dish cool before sealing. This helps maintain the flavor and texture. Consume leftovers within three days for the best taste. For reheating, the stovetop is the best option. It keeps the steak tender and the veggies crisp. Place the bowl in a skillet over medium heat. Stir occasionally until heated through. If using the microwave, remove the lid and cover with a damp paper towel. Heat in short bursts. Check often to avoid overcooking. To freeze hibachi steak bowls, pack them tightly in airtight containers. Leave some space for expansion. You can freeze them for up to three months. When ready to eat, thaw in the fridge overnight. To reheat, use the stovetop for the best results, or microwave if short on time. A hibachi steak bowl is a delicious dish with tender steak and fresh veggies. It often includes jasmine rice as the base. You can add a mix of flavors from soy sauce and teriyaki sauce. The dish is quick to make, so it’s great for busy nights. It's colorful and filling, perfect for any meal. To make hibachi steak bowls healthier, use lean cuts of steak. Substitute brown rice for jasmine rice for more fiber. You can also add more veggies like bell peppers or snap peas. Keep portion sizes small to avoid eating too much. Use less oil when cooking and try to grill instead. Yes, you can make hibachi steak bowls in advance! Cook the steak and veggies, then store them in the fridge. Keep the rice separate to avoid sogginess. You can prep up to three days ahead. Just reheat everything in a skillet or microwave when ready to eat. Many Japanese restaurants offer hibachi steak bowls. Look for places that specialize in hibachi or teppanyaki. Popular chains like Benihana serve similar dishes. You can also find them at food trucks or local eateries. Check online reviews to find the best spots near you. You've learned how to make tasty hibachi steak bowls from scratch. We covered key ingredients, step-by-step cooking, and tips to enhance your meal. Remember, you can switch proteins or veggies to suit your taste. Store leftovers properly, and you can enjoy this dish later. Try experimenting with the flavors based on what you like. Making hibachi steak bowls can be fun and rewarding. Enjoy your cooking!](https://mysavedrecipe.com/wp-content/uploads/2025/07/27751393-57de-4f36-8ce6-5aae3cf82e72-300x300.webp)

Easy Cucumber Tomato Onion Salad Fresh and Zesty Dish
Looking for a simple and refreshing dish? This Easy Cucumber Tomato Onion Salad is your answer! Bursting with fresh flavors, it’s perfect for any…
. First, take a large mixing bowl. Combine the diced cucumbers, tomatoes, sliced red onion, and diced bell pepper in the bowl. This mix gives a great crunch and color. Next, add fresh parsley to the bowl. It adds a nice touch of green and fresh flavor to your salad. In a small bowl, whisk together the lemon juice, olive oil, and optional honey. This dressing will brighten up your salad. Make sure it is well combined, so every bite is tasty. Now, pour the dressing over the salad mixture. Gently toss everything together. You want to coat all the veggies without mashing them. Season with salt and pepper to taste. Toss again to spread the seasoning evenly. Let the salad sit for about 10 minutes. This allows the flavors to blend nicely. For the full recipe, check out the complete instructions. To make the best Easy Cucumber Tomato Onion Salad, start with fresh produce. - Tomatoes: Look for tomatoes that are firm but slightly soft. They should have a bright color and a sweet scent. - Cucumbers: Choose cucumbers that are dark green and firm. Avoid ones with wrinkles or soft spots. - Fresh Herbs: Use fresh parsley or any herb you love. Fresh herbs add bright flavors and color. Enhancing the flavor of your salad is simple and fun. - Spices and Herbs: You can add dill or basil for a twist. These herbs pair well with the salad's fresh taste. - Dressing Consistency: If your dressing is too thick, add a bit of water or extra lemon juice. This will help it coat the salad better. Serving your salad can make a big difference in enjoyment. - Temperature: This salad is best served chilled or at room temperature. It keeps the flavors fresh and vibrant. - Pairing Options: Serve it alongside grilled chicken or fish for a complete meal. It also works well with sandwiches or wraps. For more ideas, check out the Full Recipe. {{image_2}} You can easily change this salad to suit your taste. For a Mediterranean twist, add olives and feta cheese. This combination brings saltiness and creaminess. You can also try a Southwest flair. Adding black beans and corn will give it a hearty feel. Both options will make your salad exciting. Using seasonal veggies makes this dish even better. In summer, add zucchini or bell peppers for extra crunch. In winter, use diced celery or radish for a refreshing bite. Think about your meal setting too. For summer BBQs, serve it cold. In winter, you can enjoy it at room temperature. The dressing can change the entire salad. Try a vinegar-based dressing for a tangy kick. Balsamic or red wine vinegar works well. If you prefer something creamy, use a yogurt-based dressing. This will add a rich flavor while keeping it light. For the full recipe, check out the detailed instructions above. To keep your cucumber tomato onion salad fresh, store it in the fridge. Use an airtight container to prevent air from spoiling it. Glass or plastic containers work well. Avoid using metal containers, as they can react with the salad's ingredients. This salad stays fresh for about 2 to 3 days in the fridge. To prevent sogginess, keep the dressing separate until you're ready to eat. Add the dressing just before serving for the best taste and texture. You should not freeze this salad. The cucumbers and tomatoes lose their crispness when frozen. If you want to save it, consider freezing the dressing separately. When ready to use, thaw it in the fridge and mix it fresh with the salad ingredients. This will help maintain the salad's taste and texture. Yes, you can prep this salad ahead of time. To keep it fresh, store the ingredients separately. Cut the cucumbers, tomatoes, and bell pepper, but don’t mix them yet. Keep the dressing in a small jar. This way, you avoid soggy veggies. When ready to eat, combine everything and add the dressing. If you want a different sweetener, try maple syrup or agave nectar. Both add a nice touch. Maple syrup has a rich flavor, while agave is milder. You can also use stevia for a low-calorie option. Adjust the amount to taste, as some sweeteners are stronger than honey. To make this salad vegan, simply omit the honey. You can replace it with a touch of maple syrup or leave it out entirely. The salad will still taste great. All other ingredients are naturally vegan-friendly, so you're good to go! This salad pairs well with grilled chicken or fish. You could also serve it with pita bread and hummus for a light meal. For a heartier option, try it alongside quinoa or brown rice. The fresh flavors complement many main dishes. Yes, this salad is gluten-free! All the ingredients are safe for those avoiding gluten. You can enjoy it without worry. Just make sure any dressings or add-ins are also gluten-free. This salad is simple and packed with fresh flavors. We covered key ingredients, easy steps, and clever tips. You can personalize it with add-ins for different styles. Remember to use fresh produce for the best taste. Store leftovers properly to enjoy later. In the end, this salad fits any meal and is a healthy choice. Make it your own, and enjoy every bite!](https://mysavedrecipe.com/wp-content/uploads/2025/07/0a88af83-360d-424e-995f-6ea0959c5481.webp)
