


Latest & Greatest

Buffalo Cauliflower Bites Crispy and Flavorful Snack
If you’re craving a crispy and flavorful snack, look no further than Buffalo Cauliflower Bites! These bites are easy to
Read more…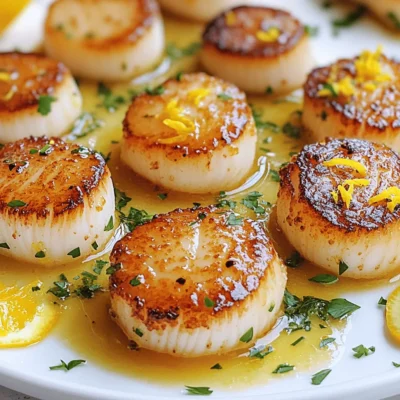
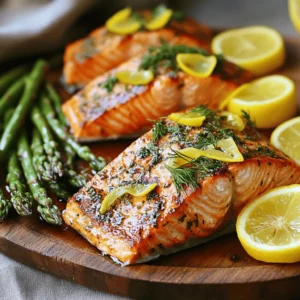
Pan-Seared Scallops Simple and Flavorful Recipe
If you’ve ever wished to impress family and friends with a fancy dish, this pan-seared scallops recipe is for you.
Read more…
One-Pan Honey Pineapple Chicken Flavorful Delight
Looking for a simple yet tasty dinner idea? One-Pan Honey Pineapple Chicken brings sweet and savory together in one dish!
Read more…
Mini Cheesecake Desserts Delightful and Easy Recipe
If you love cheesecakes but want a bite-sized treat, you’re in the right place! I’ll show you how to make
Read more…
Savory Louisiana Gumbo with Sausage & Shrimp Recipe
Welcome to a taste of Louisiana! In this blog post, you’ll discover how to make a spicy and savory gumbo
Read more…
Easy Dinner Recipe Zesty Lemon Herb Quinoa Bowl
Tired of the same old dinner routine? I have a fresh and vibrant solution for you: the Zesty Lemon Herb
Read more…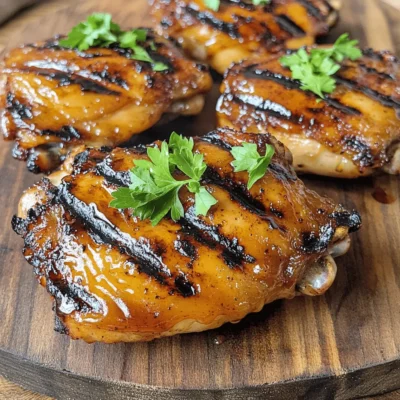
BBQ Grilled Chicken Thighs Flavorful and Juicy Meal
If you want a meal that bursts with flavor, BBQ grilled chicken thighs are the way to go! With their
Read more…
Quick Curry Noodles Tasty and Easy Weeknight Meal
Craving a fast and tasty dinner? My Quick Curry Noodles are here to save your weeknight! You’ll whip up this
Read more…browse recipes


Chipotle Honey Chicken Flavorful Grilled Delight
Welcome to your new favorite dish: Chipotle Honey Chicken. If you want a meal that’s both tasty and simple to make, you’re in the…
My Latest Desserts

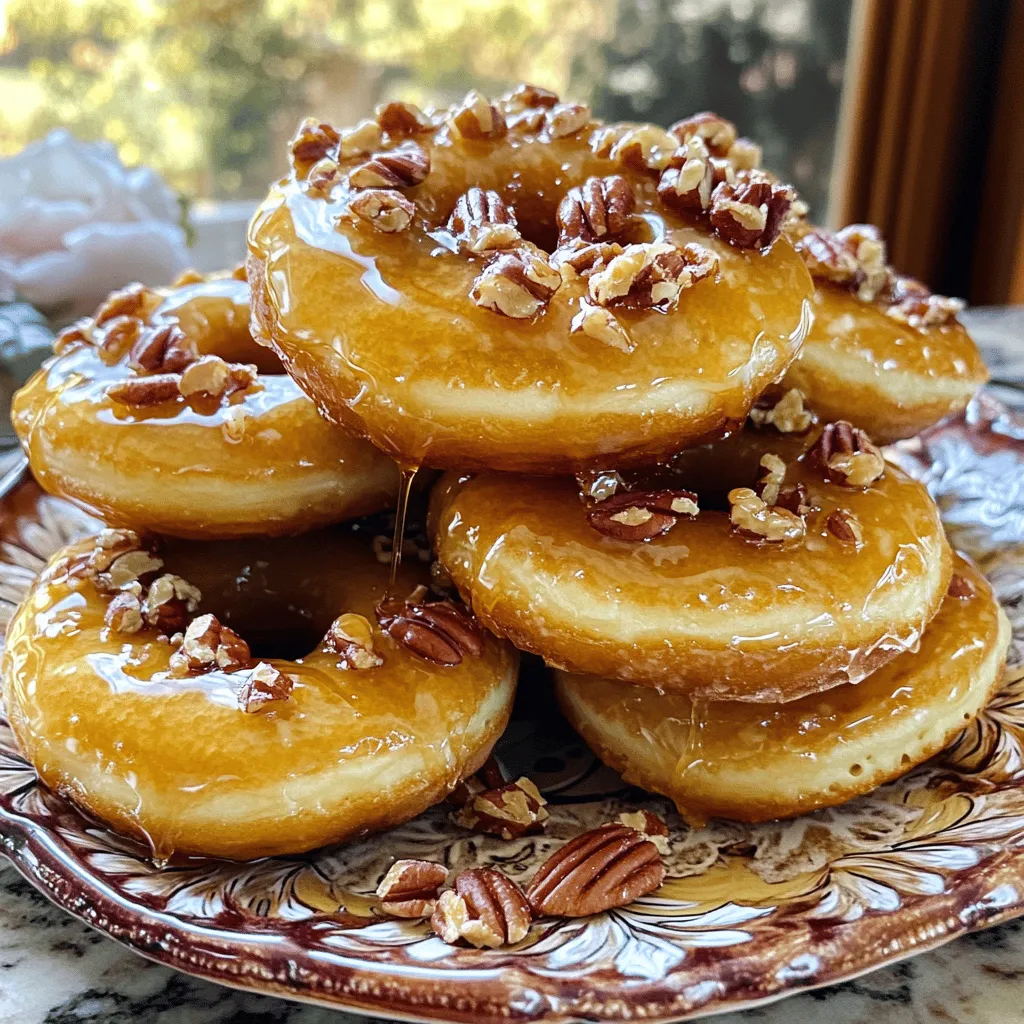
Pancake Donuts with Maple Glaze Simple and Delicious
Do you love pancakes and donuts? With my pancake donuts topped with maple glaze, you can enjoy both! This simple Read Full Recipe-
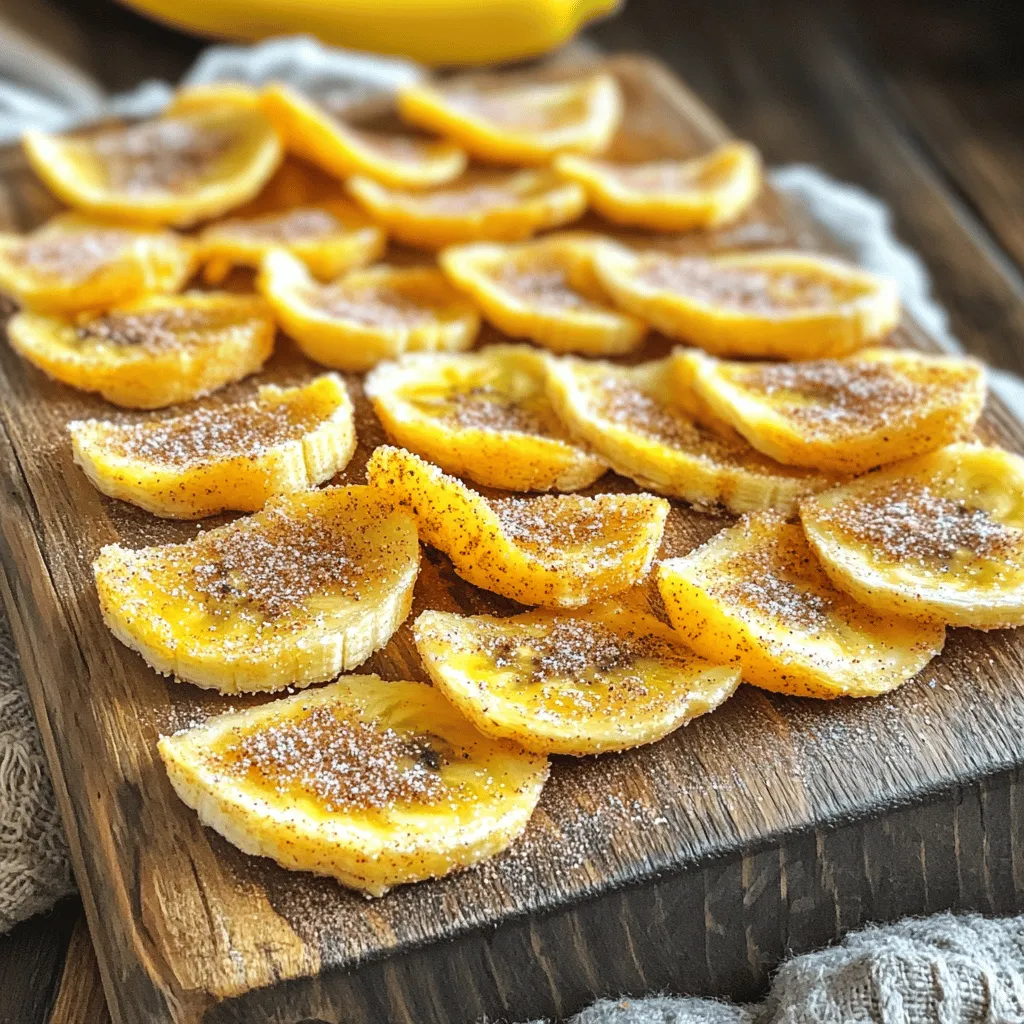
Crispy Cinnamon Sugar Air Fryer Banana Chips Delight
Are you ready for a snack that’s both crunchy and sweet? I’m excited to share my Crispy Cinnamon Sugar Air Read Full Recipe -
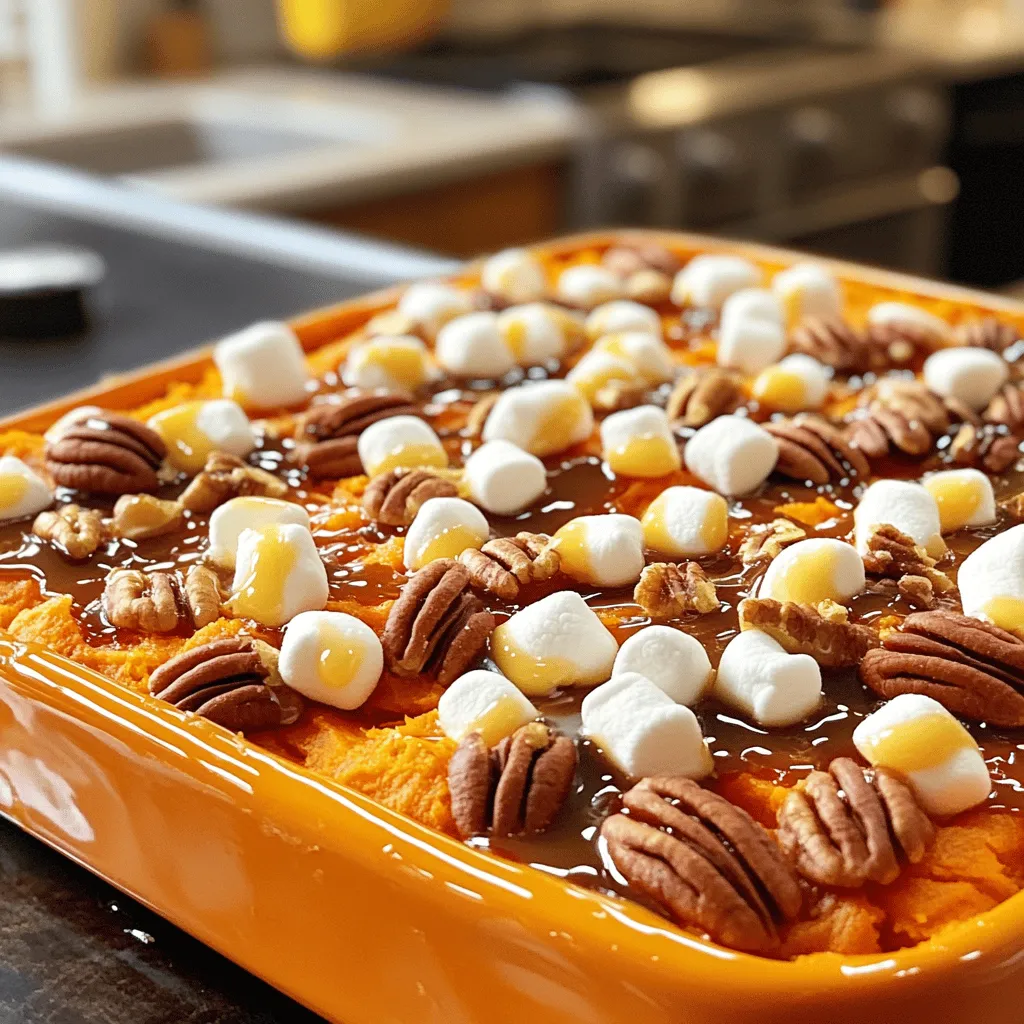
Easy Sweet Potato Casserole Simple and Tasty Recipe
Looking for a sweet, easy dish that steals the show? My Easy Sweet Potato Casserole is just what you need! Read Full Recipe -
Peppermint Chocolate Chip Cookies Festive and Delightful
Get ready to celebrate the season with my Peppermint Chocolate Chip Cookies! These festive treats combine the rich taste of Read Full Recipe -
Chocolate Thumbprint Cookies Irresistible Treat Recipe
If you’re craving a sweet treat, you’ll love chocolate thumbprint cookies! These soft, chewy cookies are easy to make and Read Full Recipe -
Easy Stained Glass Cookies Simple and Fun Recipe
Get ready to create some beautiful treats with my Easy Stained Glass Cookies! This simple recipe is perfect for kids Read Full Recipe -
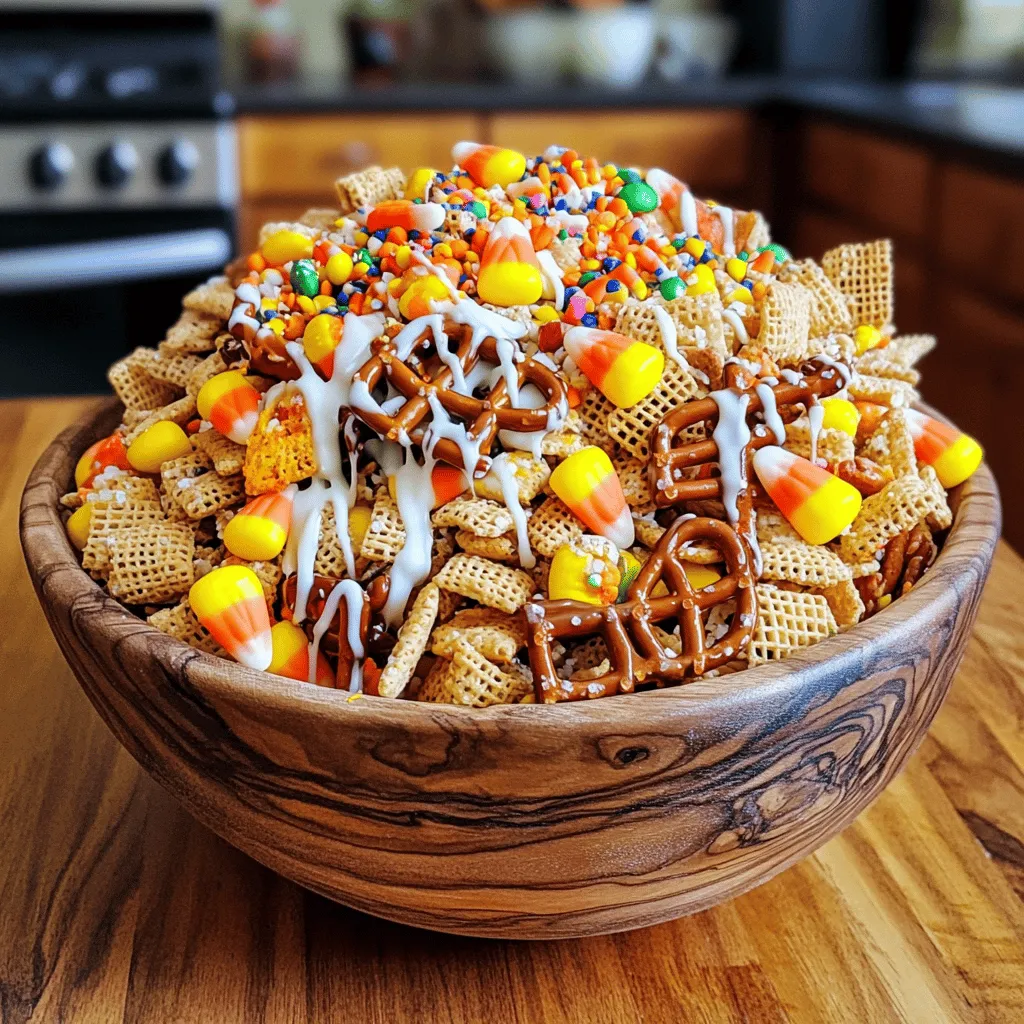
Halloween Chex Mix Fun and Festive Snack Idea
Get ready for a sweet and spooky delight with my Halloween Chex Mix! This fun snack combines crispy Chex cereal, Read Full Recipe -
Pumpkin Cheesecake Dip Delightful and Easy Recipe
Fall is here, and nothing screams comfort like my Pumpkin Cheesecake Dip! This delightful treat is easy to make, packed Read Full Recipe -
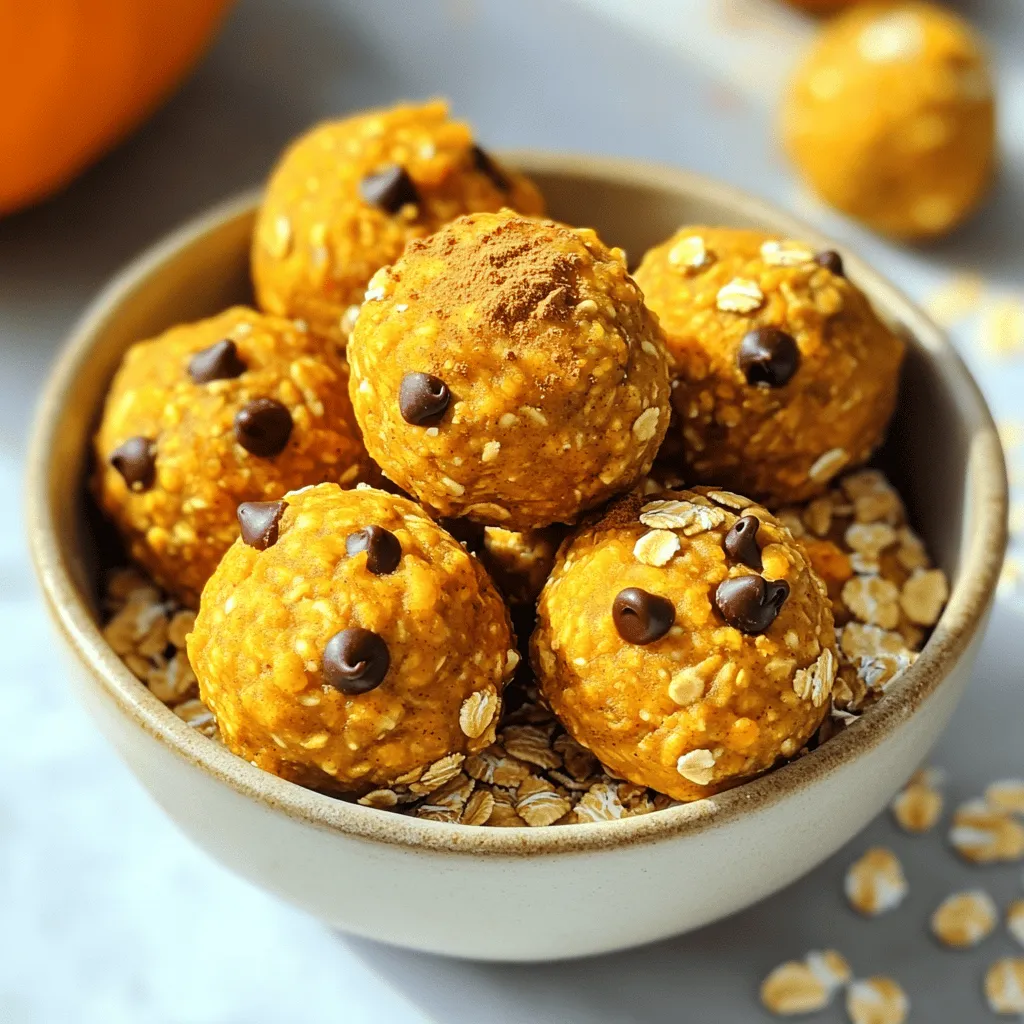
Pumpkin Spice Energy Bites Healthy Power Snack
Looking for a delicious and healthy snack? Pumpkin Spice Energy Bites are the answer! These tasty treats blend fiber-rich oats, Read Full Recipe -
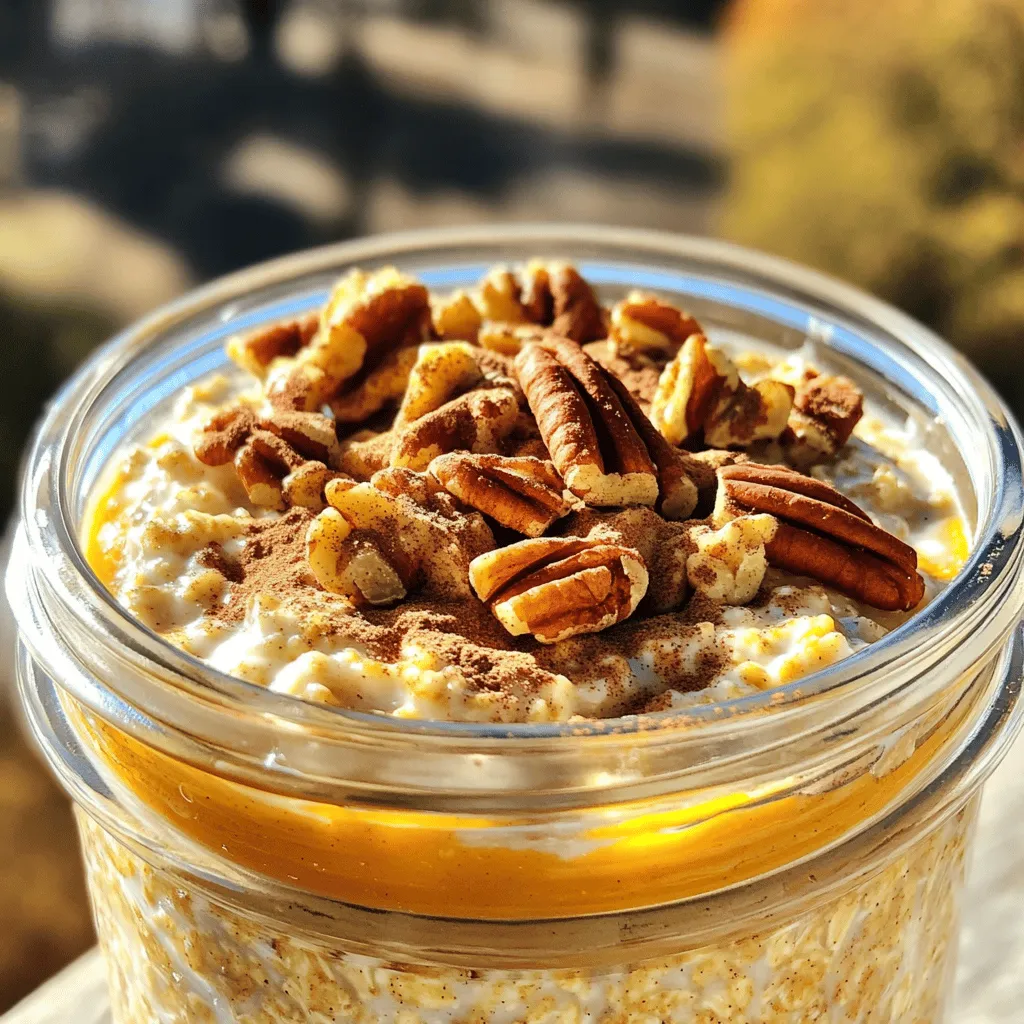
Pumpkin Pie Overnight Oats Flavorful and Nutritious Meal
Looking for a healthy yet tasty breakfast? Pumpkin Pie Overnight Oats combine rich pumpkin flavor with creamy oats. Packed with Read Full Recipe


My Latest Recipes

hey,
i’m !
I’m so happy you’re here!
Food is my passion, and perfecting each dish is my craft. I can’t wait for you to try them let’s dive into this delicious journey side by side.

![- 1 cup pumpkin puree - 1/2 cup cream cheese, softened - 1/2 cup granulated sugar - 1/2 cup brown sugar, packed - 2 large eggs - 1 teaspoon vanilla extract - 1/2 cup vegetable oil - 1 1/2 cups all-purpose flour - 1 teaspoon baking powder - 1 teaspoon baking soda - 1 teaspoon ground cinnamon - 1/2 teaspoon nutmeg - 1/2 teaspoon salt - 1 cup semi-sweet chocolate chips - Optional: Pumpkin seeds for topping These ingredients blend to create a tasty muffin. Pumpkin puree gives moisture and flavor. Cream cheese adds a rich, smooth texture. The sugars sweeten the mix and help it rise. Eggs bind everything together while adding fluffiness. Vegetable oil keeps the muffins moist. Flour forms the base and gives structure. Baking powder and baking soda help them rise. Cinnamon and nutmeg bring warmth and spice. Salt enhances all the flavors. Finally, chocolate chips provide a sweet surprise in every bite. You can even sprinkle pumpkin seeds on top for added crunch. For the full recipe, check out [Full Recipe]. - Muffin tin - Mixing bowls - Whisk and spatula - Measuring cups and spoons Having the right tools makes baking easier. A muffin tin shapes the muffins perfectly. Mixing bowls help you blend wet and dry ingredients separately. A whisk and spatula are essential for a smooth batter. Measuring cups and spoons ensure you use the right amounts. With these ingredients and tools, you’re ready to create delicious chocolate chip pumpkin cream cheese muffins. - Preheat oven to 350°F (175°C). - Prepare your muffin tin with liners. - In a large bowl, combine the wet ingredients: - 1 cup pumpkin puree - 1/2 cup cream cheese, softened - 1/2 cup granulated sugar - 1/2 cup brown sugar, packed - 2 large eggs - 1 teaspoon vanilla extract - 1/2 cup vegetable oil Mix until smooth and creamy. - In another bowl, whisk together the dry ingredients: - 1 1/2 cups all-purpose flour - 1 teaspoon baking powder - 1 teaspoon baking soda - 1 teaspoon ground cinnamon - 1/2 teaspoon nutmeg - 1/2 teaspoon salt - Fold the dry ingredients into the wet mixture. - Add in 1 cup semi-sweet chocolate chips. Mix gently until combined. - Scoop the batter into the prepared muffin tin, filling each cup about two-thirds full. - Bake for 18-20 minutes. Check with a toothpick for doneness. - Cool in the pan for 5 minutes before moving them to a wire rack. You can follow this method for the full recipe. Enjoy the rich blend of flavors as you bake! To make the best chocolate chip pumpkin cream cheese muffins, avoid overmixing the batter. When you mix too much, the muffins can turn tough. Stir just until you see no dry flour. This keeps the muffins light and fluffy. To test for doneness, use a toothpick. Insert it into the center of a muffin. If it comes out clean, the muffins are ready. If there’s batter on it, bake for a couple more minutes. There are many options for flavor variations. You can add nuts like walnuts or pecans for extra crunch. You can also throw in dried fruits like cranberries. They pair well with pumpkin and chocolate. Using fresh spices makes a big difference, too. Freshly grated nutmeg or cinnamon gives a stronger flavor than pre-ground spices. Try to use them for a richer taste. Serve your muffins warm with a light dusting of powdered sugar. A dollop of whipped cream on the side makes them extra special. For gatherings, get creative! You can arrange them on a pretty plate. Consider pairing them with a warm drink like apple cider or hot chocolate. These ideas make your muffins a hit! {{image_2}} You can make this recipe fit your needs. For a dairy-free option, use vegan cream cheese. This swap keeps the muffins creamy without the dairy. If you want less sugar, try using honey or maple syrup. These natural sweeteners add flavor and moisture, making the muffins just as tasty. Want to boost the taste? Add chopped nuts or seeds for a nice crunch. Walnuts or pecans work great. You can also mix in seasonal spices like ginger or cloves. These spices bring out the pumpkin flavor and add warmth to each bite. If you need gluten-free muffins, use a gluten-free flour blend. This swap keeps the texture light and fluffy. For a vegan version, replace eggs with flax eggs. Mix one tablespoon of ground flaxseed with three tablespoons of water, and let it sit for a few minutes. This mixture works well to bind the ingredients together. Explore these variations to make the muffins your own. For the full recipe, check out the above section. To keep your chocolate chip pumpkin cream cheese muffins fresh, store them in an airtight container. This will prevent them from drying out. Place a piece of wax paper between layers to keep the muffins fluffy. If you want to keep them longer, you can freeze them. Just wrap each muffin in plastic wrap, then place them in a freezer bag. They will stay good for up to three months. When you are ready to enjoy your muffins again, reheating is easy. You can use a microwave for quick warming. Heat each muffin for about 15-20 seconds. If you want a crispier texture, use an oven. Preheat the oven to 350°F (175°C) and bake the muffins for about 5-10 minutes. This will help maintain their soft, moist texture. Enjoy them warm for the best taste! Can I use fresh pumpkin instead of canned? Yes, you can use fresh pumpkin. Cook and puree the pumpkin first. This gives a fresh taste. Make sure it’s not too watery, or it can change the muffin texture. How do I know when the muffins are done baking? Check the muffins with a toothpick. Insert it into the center. If it comes out clean, your muffins are done. They should also look puffed and golden brown. What is the best way to frost or glaze these muffins? For a simple glaze, mix powdered sugar with a little milk. Drizzle it over cooled muffins. You can also use cream cheese frosting for extra richness. Why are my muffins dense or dry? Dense muffins may come from overmixing the batter or too much flour. Always measure flour correctly. Dry muffins can result from overbaking or not enough moisture. How can I achieve a dome shape in muffins? To get that dome shape, fill each muffin cup more than usual. Use an ice cream scoop for even portions. A hot oven also helps create that rise. What goes well with pumpkin muffins? Pair these muffins with a warm drink. Think coffee, tea, or apple cider. They also taste great with butter or cream cheese spread. Can these be served as breakfast or dessert? Yes, these muffins are perfect for both! Enjoy them for breakfast with fruit or as a dessert with ice cream. They fit any time of day. You’ve learned how to make tasty chocolate chip pumpkin muffins with easy steps. From gathering ingredients to baking, following these directions will help you succeed. Remember, not overmixing is key for great texture. Feel free to explore ingredient variations to match your taste. This simple recipe is perfect for any gathering or a cozy treat at home. Enjoy your muffins warm or share them with friends! Happy baking!](https://mysavedrecipe.com/wp-content/uploads/2025/07/4efbcf9e-024b-49a5-a6e9-98dcc95b0ed3-300x300.webp)
![To make Buffalo Cauliflower Bites, you need: - 1 medium head of cauliflower, cut into bite-sized florets - 1 cup all-purpose flour - 1 cup water - 1 teaspoon garlic powder - 1 teaspoon onion powder - 1 teaspoon smoked paprika - 1/2 teaspoon salt - 1/4 teaspoon black pepper - 1 cup buffalo sauce - 2 tablespoons olive oil - 1 tablespoon fresh parsley, chopped (for garnish) These ingredients work together to create a crispy, flavorful snack that packs a punch. If you don’t have some ingredients, here are good substitutes: - Cauliflower: You can replace it with broccoli for a similar crunch. - All-purpose flour: Use chickpea flour or gluten-free flour for a different twist. - Buffalo sauce: Try hot sauce mixed with melted butter for a quick fix. - Olive oil: Any neutral oil, like canola or vegetable oil, will work well. These alternatives maintain the taste and texture of the bites, so you won't miss a thing. Buffalo Cauliflower Bites are healthy and flavorful. Here’s a quick look at their nutritional value per serving (about 4 bites): - Calories: 150 - Protein: 4g - Fat: 7g - Carbohydrates: 20g - Fiber: 3g - Sodium: 400mg These bites are not just delicious; they offer a mix of nutrients and a good amount of fiber. Enjoy these tasty treats without guilt! For the full recipe, check out the [Full Recipe]. Start with a fresh head of cauliflower. Remove the leaves and stem. Cut it into bite-sized florets. Make sure they are all similar in size. This helps them cook evenly. Rinse the florets under cold water. Pat them dry with a clean towel. A dry surface helps the batter stick better. In a large mixing bowl, combine flour, garlic powder, onion powder, smoked paprika, salt, and black pepper. Whisk them together. Gradually add the water while mixing. You want a smooth batter. If it feels too thick, add a bit more water. The batter should coat the cauliflower without dripping too much. Preheat your oven to 450°F (232°C). Line a baking sheet with parchment paper. Dip each cauliflower floret into the batter. Let any extra batter drip off. Place the florets on the baking sheet in a single layer. Bake for 25-30 minutes. Flip them halfway for even cooking. They should be golden and crispy. While the cauliflower is baking, mix buffalo sauce and olive oil in a large bowl. Once the florets are done, remove them from the oven. Toss them in the buffalo sauce mixture until well coated. Return the bites to the baking sheet. Bake for another 10 minutes for extra crispiness. Finally, garnish with fresh parsley before serving. Enjoy your Buffalo Cauliflower Bites! For the complete recipe, check the [Full Recipe]. To get your Buffalo cauliflower bites extra crispy, focus on the batter. The mix of flour and water works best when it is smooth. You want the batter to coat the florets well. Dip each piece and let the excess drip off. This step helps avoid soggy bites. Bake them at 450°F to lock in the crunch. Flip them halfway through cooking to ensure even crispiness. For even better results, bake them a bit longer for that golden finish. Enhancing flavor is key to making these bites truly special. Add spices like garlic powder and smoked paprika to the batter. This gives the cauliflower a rich taste before you even add the buffalo sauce. After baking, toss the florets in a mix of buffalo sauce and olive oil. This adds depth and moisture, making each bite juicy. You can also experiment with different hot sauces or spices to find your perfect mix. When it comes to serving, think about fun and flavor. Pair your bites with a cool dip like ranch or blue cheese. Fresh veggies like carrot sticks or celery add a nice crunch. You can also serve them on a platter with fresh parsley for a nice touch. For a fun twist, use them as a topping on a salad or in a wrap. The options are endless! If you want the full recipe, check out the [Full Recipe]. {{image_2}} You can easily make Buffalo Cauliflower Bites vegan. Just swap the all-purpose flour with chickpea flour. This change adds protein and a nice flavor. Use water to make the batter, just like in the original recipe. Chickpea flour gives the bites a great texture. You will love how well they hold the sauce. If you want to mix things up, try different flavors. Add honey or maple syrup for sweetness. This creates a sweet and spicy balance. You can also use different sauces. Try teriyaki or barbecue sauce for a fun twist. Mix and match spices like cayenne for heat or curry powder for a warm taste. Your Buffalo Cauliflower Bites can become a whole new dish! You don’t have to bake your bites. An air fryer works great! It cooks them fast and makes them super crispy. Set the air fryer to 400°F (204°C) and cook for about 15 minutes. Shake the basket halfway to ensure even cooking. Grilling is another fun method. Toss the cauliflower on the grill for a smoky flavor. Just be sure to use a grill basket or foil. This keeps small pieces from falling through. Both methods give you tasty results. You can find the full recipe to explore more ways to make these bites delicious! Store your Buffalo Cauliflower Bites in an airtight container. Make sure they cool down first. This keeps them fresh for up to three days. If you have a lot left, you can separate them into smaller portions. This way, you can grab a quick snack later. Reheat your cauliflower bites in the oven for the best crispiness. Set your oven to 350°F (175°C). Place the bites on a baking sheet and warm them for about 10-15 minutes. You can also use an air fryer if you have one. Just cook them for around 5-7 minutes for that crunchy texture. You can freeze these bites for up to three months. First, bake them as usual. Let them cool completely, then place them in a single layer on a baking sheet. Freeze them for a couple of hours until solid. After that, transfer the bites to a freezer bag. When you're ready to eat, bake them straight from frozen. This makes for an easy snack anytime you want. For the full recipe, check out the earlier section. Yes, you can prepare Buffalo Cauliflower Bites ahead of time. First, make the batter and coat the cauliflower. Place them on the baking sheet but don’t bake them yet. Cover the sheet with plastic wrap and keep it in the fridge. You can store them this way for up to 24 hours. When you're ready to eat, just bake them right from the fridge. This saves time and lets the flavors blend well. Buffalo Cauliflower Bites are perfect for many sides. Here are some ideas: - Celery sticks - Carrot sticks - Ranch dressing for dipping - Blue cheese dressing - A fresh salad - Chips and salsa These options add crunch and flavor. They also balance the spicy taste of the bites. The heat level of Buffalo Cauliflower Bites comes from the buffalo sauce. It can be spicy, but you can adjust it. If you want less heat, mix the buffalo sauce with some olive oil or butter. This will tone down the spice. You can also try a milder sauce or use a homemade version. Just keep tasting as you mix until you find the right level for you. In this blog post, we explored making delicious Buffalo Cauliflower Bites. We discussed the important ingredients, including substitutes, and shared key nutritional details. I outlined step-by-step instructions for preparing, battering, and baking the bites. We also talked about tips for crispiness and serving. You can create variations, like vegan options or different flavor profiles. Finally, we covered storage tips for leftovers. Remember, you can adjust spice levels to fit your taste. Enjoy making this tasty dish!](https://mysavedrecipe.com/wp-content/uploads/2025/06/1f95edf8-102b-4d3f-90ee-1a521df22ad8-300x300.webp)
Summer Squash Sauté Flavorful and Simple Dish
Looking for a quick and tasty dish? My Summer Squash Sauté is perfect for you! This colorful, simple recipe highlights fresh zucchini and yellow…
![- Zucchini: I use two medium zucchinis for this dish. Look for firm, shiny skin. Slice them into half-moons for even cooking. This shape helps them cook quickly and keeps their crunch. - Yellow Squash: Choose two medium yellow squashes. They should feel heavy and firm. Like zucchini, slice them into half-moons. This keeps the cooking time the same for both squashes. - Essential Seasonings: - Olive Oil: I use one tablespoon to sauté the veggies. It adds a nice flavor and helps prevent sticking. - Thyme: I love using fresh thyme leaves. One teaspoon adds a great earthy note. - Balsamic Vinegar: One tablespoon of balsamic vinegar gives a sweet and tangy finish to the dish. Don’t skip this; it brightens the flavors. - Salt and Pepper: Season to taste; these are key for enhancing all the flavors. - Fresh Basil Leaves: Use these for garnish. They add a fresh touch and look lovely on the plate. - Additional Vegetables: You can add carrots or corn for more color and flavor. Just slice the carrots thinly so they cook at the same rate. - Proteins to Include: Want a heartier meal? Add chickpeas for protein. If you prefer meat, cooked chicken works well too. Just toss it in when you add the squash. For the complete recipe, check the [Full Recipe]. How to Slice the Squash Properly To slice the squash, start by washing it. Place the zucchini and yellow squash on a cutting board. Cut off both ends first. Then, slice the squash into half-moons. Aim for about a half-inch thick. This size cooks evenly and keeps some crunch. Preparing Vegetables for Sautéing Next, chop the red bell pepper and slice the red onion. Mince the garlic cloves. Make sure all veggies are ready before cooking. This way, you can add them in quick order. It helps keep the cooking process smooth and easy. Heating the Pan: Best Practices Heat a large skillet over medium heat. Add one tablespoon of olive oil. Let it warm up for a minute. You want the oil to shimmer but not smoke. This shows it’s ready for the veggies. Sautéing Techniques for Perfect Texture Start with the sliced onion. Cook it for 2 to 3 minutes until it looks slightly translucent. Then, add the minced garlic. Cook it for one minute until fragrant. Now, toss in the sliced zucchini and yellow squash. Sauté for 5 to 6 minutes, stirring often. The squash should be tender but still have a slight crunch. Finally, add the red bell pepper and thyme leaves. Cook for 2 to 3 more minutes. Drizzle with balsamic vinegar, then season with salt and pepper. This step brings out all the flavors. For a stunning finish, use the Full Recipe to help guide you. Achieving the Right Level of Doneness To get the best texture, cook your squash just right. Aim for a tender bite, not mushy. I suggest sautéing the zucchini and yellow squash for about 5 to 6 minutes. Stir them often to cook evenly. You want them to stay bright and vibrant, which shows they are not overcooked. How to Make it Extra Flavorful Adding layers of flavor is key. Start with a good base of olive oil. This oil not only helps in cooking but also adds depth. Use fresh garlic and thyme for a punchy taste. Balsamic vinegar gives a tangy kick at the end. This mix makes your dish shine. If you want more, try adding a splash of lemon juice or a pinch of red pepper flakes for heat. Garnishing Ideas with Fresh Herbs Presentation matters! Fresh basil leaves are your best friend here. Sprinkle them on top right before serving. You can also use parsley or chives for a pop of color. These herbs not only look good; they also add fresh flavor. Serving Suggestions: What Pairs Well This sauté pairs well with many dishes. Serve it alongside grilled chicken or fish for a complete meal. It also works great on a bed of rice or quinoa. If you're feeling creative, try it on a pizza or in a pasta dish. The options are endless! For the full recipe, check out the vibrant Summer Squash Sauté. {{image_2}} You can change up your Summer Squash Sauté by using fresh herbs. Basil and oregano are both great options. Basil gives a sweet and fragrant taste. Oregano adds a warm, earthy flavor. Try using these herbs based on what you like and what is in season. You can also explore different squash types. Zucchini and yellow squash are common, but you can use pattypan or crookneck squash too. Each type brings its own taste and texture. Mixing different squashes makes your dish even more colorful and fun. If you're looking for vegan options, consider using dairy-free cheese. It melts well and adds creaminess without dairy. Many brands offer great choices, so pick one that suits your taste. For gluten-free substitutes, you don't need to worry. This dish is already gluten-free! Just make sure any added ingredients, like sauces or grains, are also gluten-free. This way, everyone can enjoy your flavorful meal. For the Full Recipe, be sure to check the detailed steps and ratios. Enjoy experimenting with these variations and modifications! To keep your Summer Squash Sauté fresh, place it in an airtight container. Refrigerate it within two hours of cooking. This helps prevent bad bacteria. Your sauté will stay good for up to three days. If you want to keep it longer, freezing is a great option. - Best Practices for Refrigeration: - Use a clean, dry container. - Label the container with the date. - Store in the main part of the fridge, not the door. - Freezing Tips for Extended Shelf Life: - Let the sauté cool completely before freezing. - Place it in a freezer-safe bag or container. - Squeeze out as much air as possible. This helps avoid freezer burn. - It can last for up to three months in the freezer. When it’s time to enjoy your leftovers, you can either microwave or use the stovetop. Each method has its own perks. - Microwave vs. Stovetop: Which is Better? - Microwave: Quick and easy. Place the sauté in a microwave-safe dish. Cover it and heat in short bursts. Stir in between to ensure even heating. - Stovetop: Better for keeping flavor. Heat a skillet over medium-low heat. Add a splash of olive oil to help with sticking. Stir gently until warmed through. - Maintaining Flavor and Texture: - Add a little salt or fresh herbs when reheating. This boosts the taste. - Avoid high heat, which can make the veggies mushy. Keep them slightly crisp for the best texture. Can I use other vegetables for this recipe? Yes, you can! This dish is very flexible. You can add in carrots or corn. Bell peppers and onions work well too. Feel free to mix and match based on what you have. Just remember to cut them in similar sizes for even cooking. How long does Summer Squash Sauté last in the fridge? Summer Squash Sauté can last about 3 to 5 days in the fridge. Make sure to store it in an airtight container. This keeps it fresh and tasty. When ready to eat, just reheat and enjoy. What is the best way to cut squash for sautéing? The best way to cut squash is into half-moons. Start by slicing the squash lengthwise. Then, cut each half into thin slices. This helps them cook evenly. Aim for about a quarter-inch thickness. How can I prevent squash from becoming mushy? To keep squash from getting mushy, do not overcook it. Sauté just until tender, about 5-6 minutes. Stir occasionally to avoid sticking. Also, using a hot skillet helps. This way, the squash cooks quickly while keeping some crunch. This blog post covered how to make a great summer squash sauté. You learned about key ingredients like zucchini and yellow squash, along with vital seasonings. I shared step-by-step cooking tips and ideas for presentation. Variations and dietary options ensure everyone can enjoy this dish. Proper storage and reheating advice help you savor leftovers. Now, you have all the tools needed to create a delicious sauté. Get cooking and enjoy every tasty bite!](https://mysavedrecipe.com/wp-content/uploads/2025/06/d590bc31-5938-40fc-a343-f0a923147ed9.webp)
