


Latest & Greatest

Lemon Garlic Roasted Cauliflower Flavorful Side Dish
Are you ready to elevate your side dish game? Lemon Garlic Roasted Cauliflower is the perfect blend of tangy lemon
Read more…
Creamy Tomato Basil Pasta Delight in Every Bite
Are you ready to indulge in a rich and creamy tomato basil pasta that dances on your taste buds? This
Read more…
Savory Herb Roasted Chicken Flavorful and Easy Recipe
Are you ready to master a dish that wows everyone? My Savory Herb Roasted Chicken recipe combines fresh herbs and
Read more…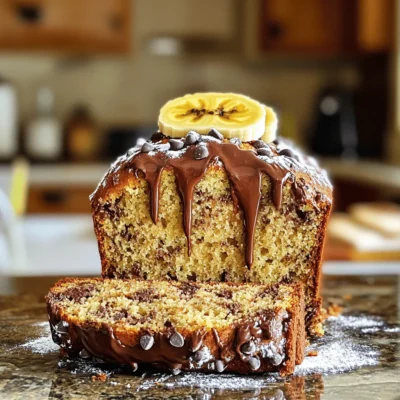
Chocolate Chip Banana Bread Easy and Delicious Treat
Looking for a quick, tasty treat? This Chocolate Chip Banana Bread is your answer! It’s easy to make and filled
Read more…
Vegan Stuffed Bell Peppers Savory and Nutritious Meal
Looking for a meal that’s both savory and healthy? Try my Vegan Stuffed Bell Peppers! They’re colorful, easy to make,
Read more…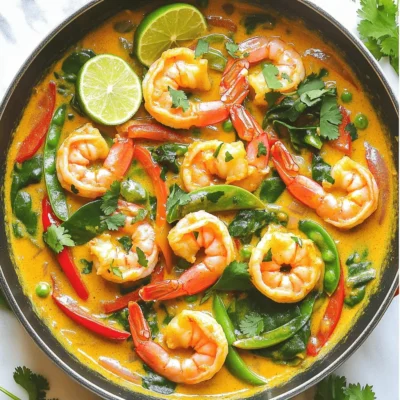
Coconut Curry Shrimp Flavorful and Easy Recipe Guide
Are you ready to dive into a dish that’s bursting with flavor? In this Coconut Curry Shrimp recipe guide, I’ll
Read more…
Oven-Baked Chicken Fajitas Flavorful and Simple Recipe
If you’re craving a flavorful meal that’s easy to make, try these Oven-Baked Chicken Fajitas. This recipe brings together juicy
Read more…
Lemon Blueberry Shortbread Mousse Cake Delight
Are you ready to indulge in a delightful dessert? Lemon Blueberry Shortbread Mousse Cake is a treat that combines creamy
Read more…browse recipes


![For this dish, I always choose sweet corn. It has a nice flavor that shines when grilled. Use four ears of corn, husked and cleaned. Fresh corn is best, but frozen corn works too. If you go for frozen, make sure it’s thawed first. Grilling fresh corn brings out its natural sweetness. The magic of flavor comes from the spices. You will need: - 2 tablespoons olive oil - 1 teaspoon chili powder - 1/2 teaspoon garlic powder - 1/2 teaspoon smoked paprika - 1 lime, juiced and zested - Salt and pepper to taste These spices give the corn a zesty kick. The chili powder adds heat, while the smoked paprika brings depth. Lime juice and zest brighten the flavors, making every bite refreshing. Toppings make this dish pop! I recommend: - 1/4 cup cotija cheese, crumbled (or feta as a substitute) - Fresh cilantro, chopped, for garnish Cotija cheese adds a creamy texture and a salty bite. The cilantro gives a burst of freshness. Together, they elevate the corn to gourmet status. For the full recipe, check out the complete guide to Chili Lime Corn on the Cob. Start by husking the corn. Remove all the green leaves and silk. Rinse the ears under cold water. This helps clean off any dirt. I love using fresh, sweet corn for this recipe. It makes the dish taste amazing. You can use frozen corn too, but fresh corn adds the best flavor. In a small bowl, combine olive oil, chili powder, garlic powder, and smoked paprika. Squeeze in the juice of one lime and add the zest. Add salt and pepper to taste. Mix well until it looks smooth. This dressing gives the corn a spicy and zesty kick. You can adjust the spice level based on your taste. Preheat your grill to medium-high heat. If you use a stovetop grill pan, set it to medium heat. Brush the corn with half of the chili lime dressing. Make sure every kernel gets some flavor. Place the corn on the grill. Cook for 10 to 12 minutes, turning often. You want it to be tender with nice char marks. After grilling, brush the corn with the rest of the dressing. Top with crumbled cotija cheese and fresh cilantro. Enjoy this tasty treat on a summer day! For the full recipe, see the details above. To perfect those grill marks, start with clean grates. This helps the corn not stick. Heat your grill to medium-high. When it's hot, place the corn at a 45-degree angle. This angle gives you nice, deep marks. Turn the corn every few minutes to get even charring. Aim for about 10-12 minutes of grilling. You want a balance of char and tenderness. The magic of chili lime corn comes from the marinade. Use olive oil, chili powder, and lime juice. This mix adds depth and zing. Brush half on the corn before grilling. Save the rest for after grilling. The lime juice will brighten the corn’s natural sweetness. If you want more heat, add cayenne or extra chili powder. Serve the corn hot off the grill. Sprinkle it with cotija cheese right away. This helps the cheese stick to the warm corn. Finish with fresh cilantro for color and flavor. You can also squeeze more lime juice over the top. Serve with lime wedges on the side. This dish pairs well with grilled meats or as a side for tacos. For the full recipe, check out Chili Lime Zesty Corn on the Cob. {{image_2}} To make a vegan version of chili lime corn, skip the cotija cheese. Instead, use nutritional yeast for a cheesy flavor. It adds a nice umami taste without dairy. You can also drizzle a little extra lime juice for brightness. The chili lime dressing keeps it tasty and fresh. If you love heat, add some diced jalapeños to the dressing. You can also sprinkle cayenne pepper on top after grilling. This spicy twist gives your corn a kick. You can adjust the spice level to fit your taste. Just start with a little and add more if you like it hot. You can switch up the cheese based on your preference. Feta works great as a substitute for cotija. You might also try queso fresco for a lighter taste. If you want a creamier touch, use goat cheese. Each cheese brings its own unique flavor, so feel free to experiment! For the full recipe, check out the [Full Recipe]. After grilling, let the corn cool down. Wrap the corn in foil or plastic wrap. Store it in the fridge for up to three days. This method keeps the corn fresh and juicy. If you keep it in an airtight container, it will last even longer. Just make sure it is tightly sealed. This way, you can enjoy the flavors of chili lime corn later. If you want to save corn for later, freezing is a great option. Start by husking the corn and removing the silk. Blanch the corn in boiling water for 4-5 minutes. Then, plunge it into ice water to stop the cooking. Once cooled, wrap each ear in plastic wrap. Place the wrapped corn in a freezer bag. Squeeze out as much air as you can. Frozen corn will stay good for up to six months. When it’s time to enjoy your corn again, there are easy ways to reheat it. You can grill it again for a smoky flavor. Heat your grill to medium and cook for about 5 minutes, turning often. Another option is to use the microwave. Wrap the corn in a damp paper towel and heat for 1-2 minutes. This keeps the corn moist. You can also reheat it in a skillet with a little butter for extra flavor. No matter how you heat it, your chili lime corn will taste great! To pick the best corn, look for bright green husks. The kernels should be plump and firm. Press the kernels with your thumb; they should feel full and juicy. Avoid corn with dry or brown husks. Fresh corn tastes sweeter and grills better. Yes, you can prepare the corn in advance. Husk the corn and mix the chili lime dressing. Store both in the fridge for a few hours or overnight. When ready to grill, brush the corn with the dressing. This saves time and keeps the flavor fresh. You can play with different spices to change the flavor. Try cumin for warmth or cayenne for heat. You can also use lemon zest instead of lime for a different twist. Experiment with fresh herbs like parsley or basil for extra flavor. Enjoy making this dish your own! We explored how to create the best Chili Lime Corn on the Cob. First, we reviewed key ingredients like fresh corn and spices. Then, I shared step-by-step instructions for preparing, dressing, and grilling the corn. We discussed tips for great grill marks and flavor boosts. You can try fun variations, like vegan options or spicy twists. Finally, I covered storage tips for your leftovers. Enjoy making this dish that’s bright, tasty, and sure to impress!](https://mysavedrecipe.com/wp-content/uploads/2025/05/ac01c555-c982-4368-a567-f9b80a908f7d.webp)
Chili Lime Corn on the Cob Perfect for Summer Grilling
Summer grilling calls for vibrant, tasty dishes, and there’s nothing better than Chili Lime Corn on the Cob. This recipe bursts with flavor and…
My Latest Desserts

Pancake Donuts with Maple Glaze Simple and Delicious
Do you love pancakes and donuts? With my pancake donuts topped with maple glaze, you can enjoy both! This simple Read Full Recipe-
Crispy Cinnamon Sugar Air Fryer Banana Chips Delight
Are you ready for a snack that’s both crunchy and sweet? I’m excited to share my Crispy Cinnamon Sugar Air Read Full Recipe -
Easy Sweet Potato Casserole Simple and Tasty Recipe
Looking for a sweet, easy dish that steals the show? My Easy Sweet Potato Casserole is just what you need! Read Full Recipe -
Peppermint Chocolate Chip Cookies Festive and Delightful
Get ready to celebrate the season with my Peppermint Chocolate Chip Cookies! These festive treats combine the rich taste of Read Full Recipe -
Chocolate Thumbprint Cookies Irresistible Treat Recipe
If you’re craving a sweet treat, you’ll love chocolate thumbprint cookies! These soft, chewy cookies are easy to make and Read Full Recipe -
Easy Stained Glass Cookies Simple and Fun Recipe
Get ready to create some beautiful treats with my Easy Stained Glass Cookies! This simple recipe is perfect for kids Read Full Recipe -
Halloween Chex Mix Fun and Festive Snack Idea
Get ready for a sweet and spooky delight with my Halloween Chex Mix! This fun snack combines crispy Chex cereal, Read Full Recipe -
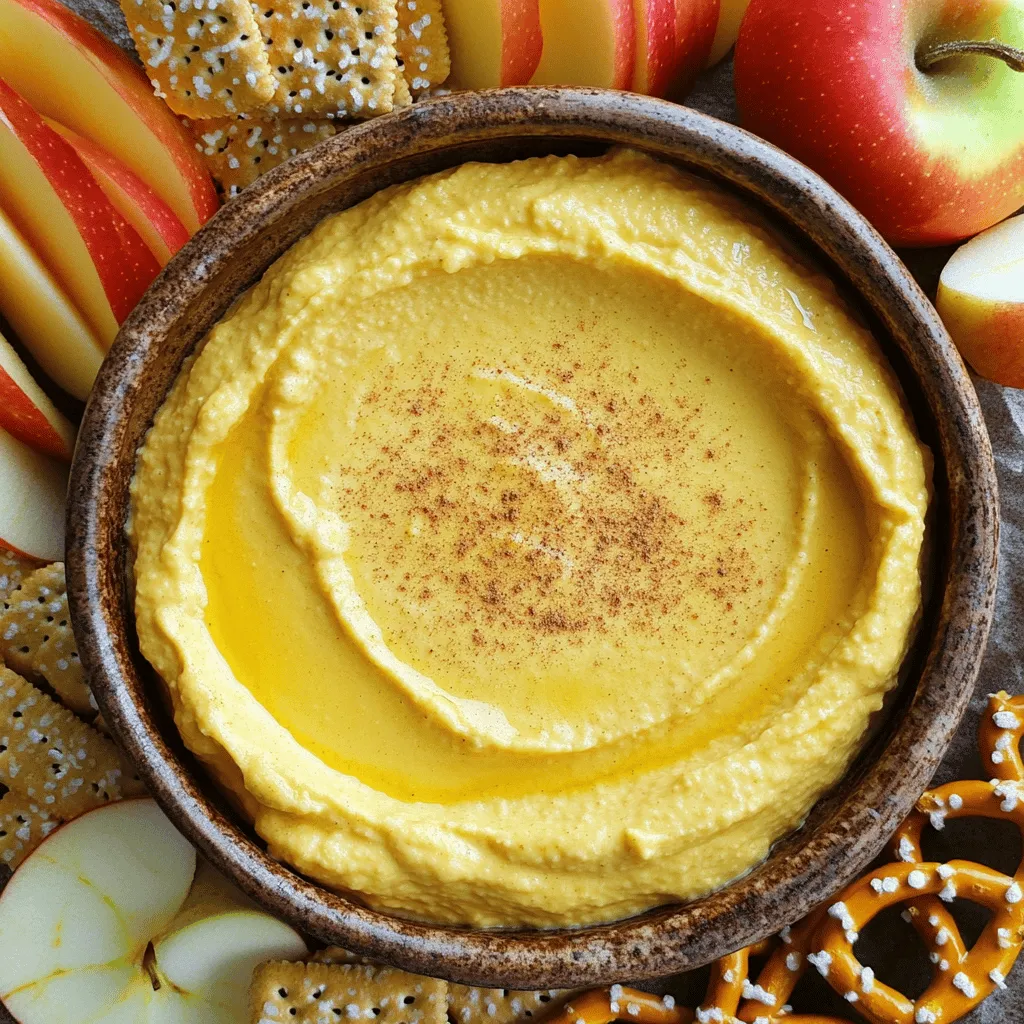
Pumpkin Cheesecake Dip Delightful and Easy Recipe
Fall is here, and nothing screams comfort like my Pumpkin Cheesecake Dip! This delightful treat is easy to make, packed Read Full Recipe -
Pumpkin Spice Energy Bites Healthy Power Snack
Looking for a delicious and healthy snack? Pumpkin Spice Energy Bites are the answer! These tasty treats blend fiber-rich oats, Read Full Recipe -
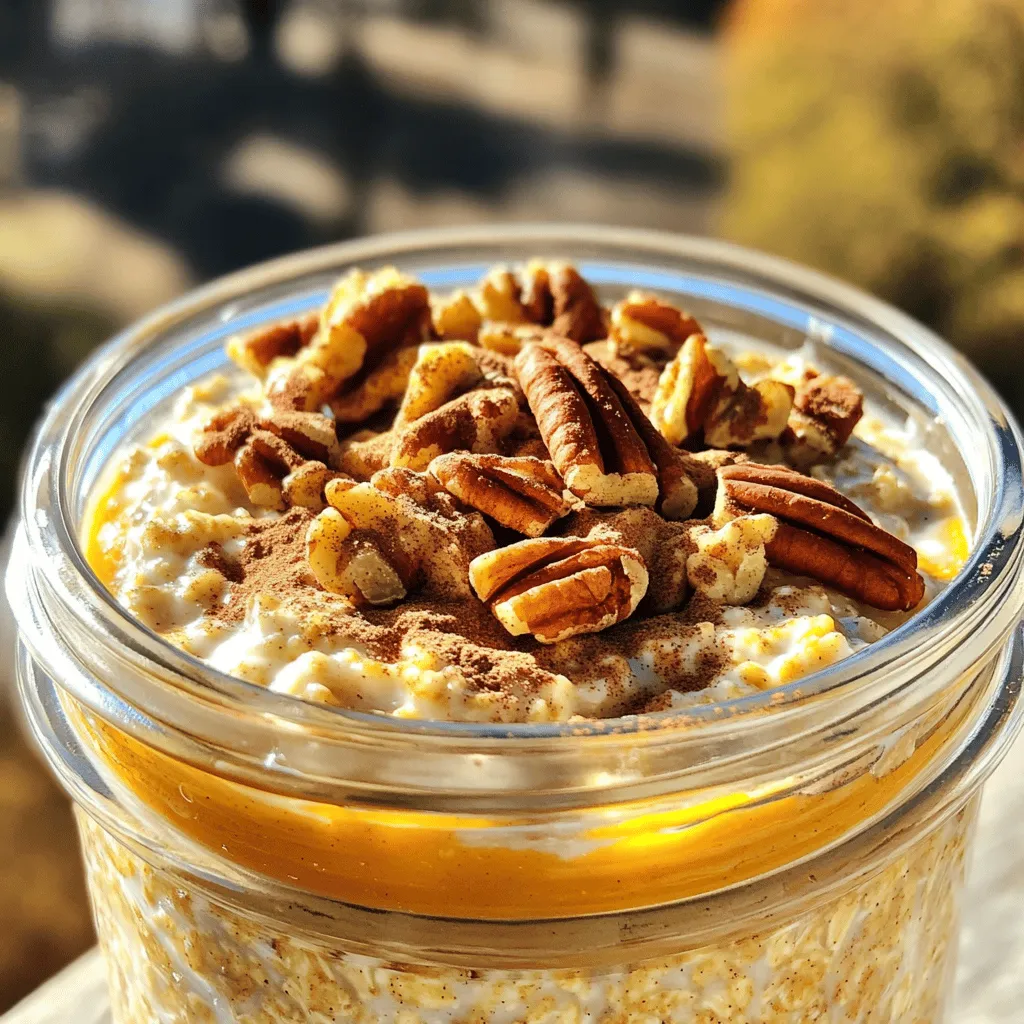
Pumpkin Pie Overnight Oats Flavorful and Nutritious Meal
Looking for a healthy yet tasty breakfast? Pumpkin Pie Overnight Oats combine rich pumpkin flavor with creamy oats. Packed with Read Full Recipe


My Latest Recipes

hey,
i’m !
I’m so happy you’re here!
Food is my passion, and perfecting each dish is my craft. I can’t wait for you to try them let’s dive into this delicious journey side by side.
![- 2 cups strong brewed chai tea - 1 cup coconut milk - Sweeteners: Honey or maple syrup The main part of this frozen treat is the chai tea. I love using strong brewed chai for the best flavor. You can cool it down before mixing in other ingredients. The coconut milk adds creaminess and a nice tropical twist. Sweeteners like honey or maple syrup let you adjust the level of sweetness to your liking. - Pure vanilla bean paste or vanilla bean seeds - Ground spices: cinnamon, ginger, nutmeg Vanilla bean paste or seeds brings a rich flavor. It blends perfectly with the chai. Ground spices like cinnamon, ginger, and nutmeg add warmth and depth. These spices boost the flavor, making each bite exciting. You can mix and match to find what you enjoy most. - Whipped cream (optional) - Garnishes: Cinnamon stick, additional spices Toppings can enhance your Vanilla Bean Chai Freeze. Whipped cream adds a fluffy texture. You can sprinkle extra spices on top for a pretty finish. A cinnamon stick as a garnish not only looks nice but also adds more flavor. The choice is yours! For the full recipe, check out the complete guide. Enjoy making this refreshing dessert! - In a large mixing bowl, combine 2 cups of cooled chai tea, 1 cup of coconut milk, and 1/4 cup of honey or maple syrup. - Add 2 teaspoons of pure vanilla bean paste, 1/2 teaspoon of ground cinnamon, 1/4 teaspoon of ground ginger, and a pinch of ground nutmeg. - Whisk until all ingredients are blended. Make sure the mixture is smooth and creamy. You can adjust the sweetness by adding more honey or syrup if you want it sweeter. - Pour the mixture into a freezer-safe container. Spread it evenly to ensure it freezes well. - Cover the container with a lid or plastic wrap, and freeze for about 4 hours, or until solid but not rock hard. - Every hour, take a fork and scrape the mixture. This helps break up icy layers and makes the texture light and fluffy. Keep doing this until it is fully frozen and fluffy. - Once your Vanilla Bean Chai Freeze is ready, scoop it into bowls or glasses. - If you like, top with whipped cream and a sprinkle of cinnamon or nutmeg for extra flair. You can also add a cinnamon stick for a fun touch. This Vanilla Bean Chai Freeze is a refreshing dessert delight that everyone will love. To get the best texture, scrape the mixture often. This helps break up icy bits. Use a fork to scrape every hour while it freezes. This step makes your freeze fluffier. If the freeze is too hard, adjust your freezing time. You want it firm but easy to scoop. Taste your mix to see if it needs more sweetness. This is key for a great dessert. You can add more honey or syrup as needed. For a healthier twist, try natural sweeteners like agave or stevia. These give you control over the final taste. Serve your Vanilla Bean Chai Freeze in clear bowls. This shows off its lovely texture and color. For garnish, sprinkle cinnamon on top. A cinnamon stick adds a nice touch. This simple trick makes your dessert look fancy and fun. Check out the Full Recipe for more details on this delightful treat! {{image_2}} You can easily make the Vanilla Bean Chai Freeze dairy-free. Just switch the coconut milk for almond milk or oat milk. Both options keep the creamy texture. Almond milk lends a nutty flavor, while oat milk brings a smooth sweetness. Choose the one you like best for your taste buds. Want to get creative? Try adding chocolate or coffee to the mix. Both flavors pair well with chai spices. If you crave something spicier, think about cardamom, allspice, or even a hint of black pepper. A touch of these spices can give your freeze a fun twist. Experiment and find what you love! You can also make this dessert into popsicles or ice cream. Just pour the mixture into popsicle molds instead of a container. You can even mix in fruits like berries or banana slices. Chopped nuts add a nice crunch, too. This way, you can enjoy a variety of frozen treats, all with that lovely chai flavor. For the complete recipe, check the [Full Recipe]. To keep your Vanilla Bean Chai Freeze fresh, store leftovers in airtight containers. This prevents freezer burn and keeps flavors strong. I recommend using glass or plastic containers with tight lids. After filling, smooth the surface to remove air. It helps to label and date each container. This way, you can track how long it has been in the freezer. If you want to re-freeze, do it with care. Always let the dessert thaw in the fridge first. This helps maintain its taste and texture. After thawing, avoid refreezing more than once. The texture may change, becoming icy or grainy. You want your freeze to stay smooth and creamy. For the best taste and texture, enjoy your Vanilla Bean Chai Freeze within two months. After that, it may still be safe, but the flavors can fade. Look for signs of spoilage, like ice crystals or a strange odor. If it smells off or looks discolored, it's best to toss it. Keep your freeze delicious and fresh! Yes, you can use store-bought chai tea. It saves time and effort. However, it may not match the flavor of freshly brewed chai. Pre-made options can be too sweet or weak. Always check the label for spices and sweetness levels. If you use it, adjust the sweetener in the recipe. Freshly brewed chai gives a richer taste. It’s worth the extra step if you have time. Coconut milk adds creaminess and a subtle flavor. If you need a substitute, try almond milk. Almond milk offers a light taste but less creaminess. Oat milk is another option, giving a smooth texture. Soy milk works well too, adding protein but a different taste. Each milk alters the final flavor, so choose based on your preference. For the best results, freeze for about four hours. This time allows the mixture to become solid but not rock hard. I recommend scraping the mixture every hour. This helps break up icy layers. It creates a fluffier texture that makes it delightful to eat. Adjust freezing time if your freezer runs colder or warmer. You can add alcohol for an adult twist. Rum or bourbon pairs nicely with chai flavors. Use about a tablespoon per serving for a light touch. Add it to the mixture before freezing. This will keep it from freezing too hard. Just be cautious; too much can change the texture. Enjoy experimenting with flavors! The Vanilla Bean Chai Freeze combines the rich flavors of chai tea, coconut milk, and sweeteners. You can enhance it with vanilla, spices, and toppings like whipped cream. Remember to scrape the mixture often and adjust sweetness to your taste. Feel free to experiment with dairy-free options or unique flavors. Store your freeze correctly to keep it fresh. Enjoy this treat as a delightful summer dessert or a cozy winter pick-me-up. It's a fun recipe that you can make your own!](https://mysavedrecipe.com/wp-content/uploads/2025/06/38fc46f4-8a84-4e2d-9a26-d8dbb11a4085-300x300.webp)
![- Tomatoes: Fresh tomatoes are the star of this soup. They bring vibrant flavor and natural sweetness. You can also use canned tomatoes if fresh ones aren’t available. - Basil: Fresh basil adds a fragrant touch. It brightens the soup and gives it a classic taste. Always chop it just before adding to keep its flavor strong. - Garlic and Onion: These two are essential. They build the soup's base flavor. Sautéing onion and garlic unlocks their sweetness, making the soup even more delicious. - Vegetable Broth: This adds depth to the soup. Choose low-sodium broth for better control over salt levels. It provides a great savory background. - Heavy Cream: This gives the soup its creamy texture. You can swap it for coconut cream for a dairy-free option. Both choices create a rich mouthfeel. - Olive Oil: Use extra virgin olive oil for the best flavor. It enhances the richness of the soup and helps sauté the onion and garlic. - Sugar for Taste: If your tomatoes are too acidic, a teaspoon of sugar can balance the flavors. It’s an easy fix to enhance the taste. - Salt and Pepper: These are key for seasoning. Adjust them to your liking after blending the soup. A pinch can elevate all the other flavors. For the complete recipe, check out [Full Recipe]. - Sautéing Onion and Garlic Start by heating two tablespoons of olive oil in a large pot over medium heat. Once hot, add one diced medium onion. Cook it until it becomes soft and clear, about five minutes. Next, stir in three minced garlic cloves. Cook for another minute until you smell that delicious aroma. - Adding Tomatoes and Broth Now it’s time for the star of the show. Add four cups of chopped fresh tomatoes or two cans of peeled whole tomatoes. If using canned tomatoes, crush them gently with a spoon. Pour in two cups of low-sodium vegetable broth. Bring this mixture to a simmer. Let it cook for about twenty minutes. This allows the flavors to mix and deepen. - Using an Immersion Blender After simmering, take the pot off the heat. Use an immersion blender to puree the soup until smooth. If you like a chunkier texture, blend just half of the soup. This gives you a nice mix of smooth and chunky bites. - Achieving Desired Texture Taste the soup as you blend. Adjust the texture to your liking. You want it creamy and rich, perfect for dipping or sipping. - Incorporating Cream and Basil Place the pot back on low heat. Stir in one cup of heavy cream or coconut cream for a dairy-free version. Add a quarter cup of fresh chopped basil. Let it warm through for about five minutes. The cream and basil make the soup even richer and fresher. - Seasoning the Soup to Taste Finally, taste the soup again. Add salt, pepper, and a teaspoon of sugar if needed. These small tweaks make a big difference in flavor. You want every bowl to be just right. Now you have a warm, creamy tomato basil soup ready to enjoy. For the full recipe, check the link. Using coconut cream makes this soup rich and tasty. It gives a slight sweetness and a smooth texture. Just swap it for heavy cream in the recipe. This choice is great for those who avoid dairy. When adding cream, heat it slowly. This helps prevent curdling. Pour it in after blending the soup. Stir gently until warm. This keeps the cream silky and delicious. To boost the soup's flavor, try adding spices. A pinch of red pepper flakes adds heat. A dash of smoked paprika gives it depth. These spices can transform your soup into something special. Fresh herbs make a big difference too. Besides basil, add a bit of parsley or oregano. These herbs brighten the soup and enhance its taste. Always chop them finely for the best results. Serve your creamy tomato basil soup with crusty bread. A grilled cheese sandwich pairs perfectly. The warm, gooey cheese complements the soup's richness. For garnishing, drizzle a little olive oil on top. It adds a nice shine and flavor. Fresh basil leaves also make a great garnish. They look pretty and taste fresh. For the full recipe, check out the complete instructions. Enjoy making this comforting dish! {{image_2}} For a vegetarian or vegan version of creamy tomato basil soup, start with dairy-free alternatives. Replace heavy cream with coconut cream or cashew cream. Both options add richness without dairy. You can also use almond milk for a lighter soup. Adding more vegetables can enhance the flavor and nutrition. Consider including carrots, bell peppers, or zucchini. These veggies blend well and add a pop of color. If you want a spicy tomato basil soup, add red pepper flakes or a dash of hot sauce. This extra kick can elevate the dish. You can also mix in smoked paprika for a smoky depth. Adding protein sources boosts the meal’s heartiness. Try mixing in cooked lentils, chickpeas, or diced tofu. These ingredients add texture and make the soup more filling. Incorporating seasonal ingredients can keep your soup fresh and exciting. In summer, use ripe heirloom tomatoes for a sweeter flavor. In winter, opt for roasted tomatoes for a deeper taste. Adjusting for fresh versus canned tomatoes is key. Fresh tomatoes offer brighter flavors, while canned tomatoes provide convenience and consistency. When using fresh tomatoes, let them simmer a bit longer to break down fully. These variations ensure your creamy tomato basil bliss remains delightful, no matter the season. For the full recipe, check out the section above. To store your creamy tomato basil soup, let it cool first. Pour the soup into an airtight container. This keeps out air and moisture. You can store it in the fridge for up to 4 days. Always check for signs of spoilage before eating. If it looks or smells off, toss it out. If you want to keep the soup longer, freezing is a great option. Use freezer-safe containers to prevent freezer burn. Leave space at the top for expansion. The soup can last in the freezer for about 3 months. When you're ready to eat, thaw it overnight in the fridge. Reheat it gently on the stove over low heat, stirring often to keep it smooth. You can be creative with leftover soup. Try using it as a pasta sauce. It also works well in a casserole. Pair it with grilled cheese for a comforting meal. You can also use it as a base for a tomato risotto. The options are endless! Yes, you can use canned tomatoes. Canned tomatoes are often picked at peak ripeness. This means they can be just as tasty as fresh ones. They save time and reduce prep work. When using canned tomatoes, choose whole or diced ones for the best results. To spice up your soup, add red pepper flakes or cayenne pepper. Start with a small amount, then taste. You can also add a dash of hot sauce while cooking. For extra flavor, sauté some chopped jalapeños with your onions. This will give your soup a nice kick! Grilled cheese is a classic choice. The gooey cheese complements the soup's creaminess. Crusty bread like a baguette or ciabatta is also great. It adds texture and is perfect for dipping. For a lighter option, try a fresh baguette with a dash of olive oil. For the full recipe, check out the Creamy Tomato Basil Bliss. In this post, we covered how to make a delicious tomato basil soup. We explored fresh ingredients, helpful pantry staples, and tasty optional add-ins. I shared step-by-step instructions to guide you through cooking, blending, and adjusting flavors. Plus, I offered tips for creaminess and serving ideas. Remember, you can mix in your favorite flavors or switch up ingredients. This soup is easy to make and enjoyable to share. Try it out, and make it your own!](https://mysavedrecipe.com/wp-content/uploads/2025/05/781fd6a9-c78f-4fbf-85b3-51b14a23c16c-300x300.webp)
Egg Muffins with Veggies Tasty and Simple Recipe
Are you looking for a quick, healthy breakfast? Look no further! My Egg Muffins with Veggies are easy to make and packed with flavor.…
![To make delicious egg muffins with veggies, you need the following: - 6 large eggs - 1 cup spinach, chopped - 1/2 cup bell peppers (red, yellow, or green), diced - 1/2 cup cherry tomatoes, halved - 1/4 cup red onion, finely chopped - 1/2 cup shredded cheese (cheddar or mozzarella) - 1/4 teaspoon garlic powder - 1/4 teaspoon black pepper - Salt to taste This mix gives a great flavor and texture. Each ingredient plays a role. The eggs bind everything together, while the veggies add color and nutrients. You can try adding these for extra flavor: - Fresh herbs like parsley or basil for garnish - Alternative cheeses such as feta or goat cheese These options let you customize your muffins. Each ingredient can make your meal unique and tasty. Don't be afraid to experiment! First, you need to preheat your oven to 375°F (190°C). This step helps the muffins cook evenly. While the oven heats, grease your muffin tin with a bit of oil or cooking spray. This keeps the muffins from sticking. A well-greased tin is key for easy removal. Next, grab a large mixing bowl. Crack the eggs into the bowl and whisk them well. You want them to be nice and fluffy. After that, add the chopped spinach, diced bell peppers, halved cherry tomatoes, and finely chopped red onion to the eggs. Stir everything together gently. Now, sprinkle in the shredded cheese, garlic powder, black pepper, and salt. Mix until all the ingredients combine nicely. Make sure the veggies and cheese are spread evenly throughout the egg mixture. Now it’s time to fill the muffin tin. Pour the egg and veggie mix into each cup, filling them about 3/4 full. This gives them room to rise. Once filled, place the muffin tin in the preheated oven. Bake for 18-20 minutes. The muffins are done when the eggs are set and the tops look lightly golden. After baking, remove the muffins from the oven and let them cool for a few minutes. Then, gently lift them from the tin. If you want, add some fresh herbs on top for a nice touch. Enjoy your veggie-packed egg muffins! For the full recipe, see the earlier section. To make your egg muffins perfect, start with the eggs. Whisk them well until they are frothy. This helps to add air, making the muffins light and fluffy. Use a fork or a whisk for best results. When you pour the mixture into the muffin tin, do not overfill. Fill each cup about three-quarters full. This allows space for the muffins to rise without spilling over. One common mistake is not greasing the tin properly. Use oil or cooking spray to coat the tin. This step prevents sticking and makes cleanup easier. Another mistake is undercooking or overcooking the muffins. Keep an eye on the bake time. Check them at 18 minutes. The muffins should be set and slightly golden on top. To boost flavor, add herbs and spices. Fresh parsley, basil, or oregano work well. You can use about a tablespoon of chopped herbs for a great taste. If you want to change the cheese, try feta or goat cheese. They add a nice tang and work well with veggies. These options can give your muffins a tasty twist. For the full recipe, visit the [Full Recipe] section. {{image_2}} You can mix up the vegetables in your egg muffins for fun flavors. Zucchini adds moisture and a mild taste. Mushrooms bring a nice umami flavor and a chewy texture. Broccoli adds a bit of crunch and a pop of green. The great thing about these muffins is you can use what you have. Seasonal vegetables are also a good choice. In the summer, use fresh corn or diced tomatoes. In fall, consider sweet potatoes or squash for added sweetness. This way, you can enjoy different tastes each season. Adding protein to your egg muffins makes them heartier. You can use bacon, ham, or sausage for a savory touch. Cook these proteins first to get the best flavor. Chop them into small pieces before adding them to the mixture. If you're looking for plant-based options, tofu works great too. Crumble firm tofu and mix it in. You can also use chickpeas or black beans for added protein. These options keep your muffins tasty and filling while catering to various diets. For the full recipe, check out the details in the earlier section. Refrigeration Tips After you bake the egg muffins, let them cool completely. Then, place them in an airtight container. Store them in the fridge for up to five days. Always check for any signs of spoilage before eating. Freezing Instructions For longer storage, freeze the muffins. Wrap each muffin tightly in plastic wrap. Place them in a freezer bag or container. They can last for about three months in the freezer. When ready to eat, just thaw them in the fridge overnight. Best Methods for Reheating You can reheat egg muffins in the microwave or oven. For the microwave, heat on medium power for about 30-60 seconds. In the oven, preheat to 350°F (175°C) and bake for around 10 minutes. Maintaining Texture and Flavor To keep the muffins moist, cover them with a damp paper towel when microwaving. This helps to prevent them from drying out. If using the oven, you can add a splash of water to the baking dish to create steam. This keeps them soft and tasty. Yes, you can make these muffins ahead of time. - Meal Prep Suggestions: Prepare a batch on the weekend. Store them in the fridge for easy breakfasts. Allow the muffins to cool before placing them in an airtight container. They stay fresh for about five days. You can also freeze them for longer storage. Just reheat in the microwave or oven when ready to eat. You can easily modify the recipe to fit many dietary needs. - Gluten-Free and Dairy-Free Options: For gluten-free muffins, use gluten-free flour. Most veggies are safe for gluten-free diets. For a dairy-free option, skip the cheese or use a dairy-free cheese substitute. You can also add nutritional yeast for a cheesy flavor without dairy. These egg muffins last about five days in the fridge. - Storage Duration and Safety Tips: Store them in a sealed container to keep them fresh. If you notice any changes in smell or texture, it’s best to toss them. Always check before eating. In this blog post, I shared how to make tasty egg muffins. We covered the key ingredients, like eggs and fresh veggies, and added options for flavor, like herbs and alternative cheeses. I detailed step-by-step instructions, from preparing your oven to mixing and baking. Plus, I offered tips to ensure perfect muffins and variations to suit your taste. Remember, these muffins are easy to store and reheat. You can adapt them for any diet too. Enjoy your egg muffins and get creative with the flavors!](https://mysavedrecipe.com/wp-content/uploads/2025/04/1d4a3e34-6d6e-4af4-82c1-787e144f4de7.webp)
